
Ever had to make a video call right on your browser with Google Meet, Zoom, or any other video chat app? Well, here’s what you might have never thought to ask—how does it work?
Well, there are a number of things that make a real-time video chat application fully functional on the web. In this article, we’ll explore how you can access media content through your device’s camera. And we'll build a camera app in the course of our exploration.
Let’s face it, using the MediaStream API to build a camera application does not tell the whole story. But here’s what I can promise you: we are taking the first step in the right direction.
Before we begin, have a peek at what you should be able to create by the end of this article here. Now that you are all geared up, let’s get to work!
Prerequisites
Before we dive in, let's be sure of a few things. This article is designed to be for beginners, but having the right resources will ensure a seamless experience. Here's what you'll need:
- A very basic understanding of HTML, CSS, and JavaScript — beginner level knowledge is absolutely fine.
- A basic understanding of the Document Object Model in JavaScript.
- Last but not the least, some good background music — I’ll let you choose this one yourself, but there's always freeCodeCamp radio.
Ok, now we're all set.
What is the MediaStream API?
The MediaStream Recording API helps the browser capture audio-visual data streams. It's important for our use case, because any image we capture has to be stored in a MediaStream object.
The MediaStream API does more than capture photos and videos. It also helps process and analyze the MediaStream data right on the browser. As complex as all of this might seem, it’ll interest you to know that the MediaStream API is surprisingly easy to work with.
Our camera app makes it even easier.
Components of Our Camera App
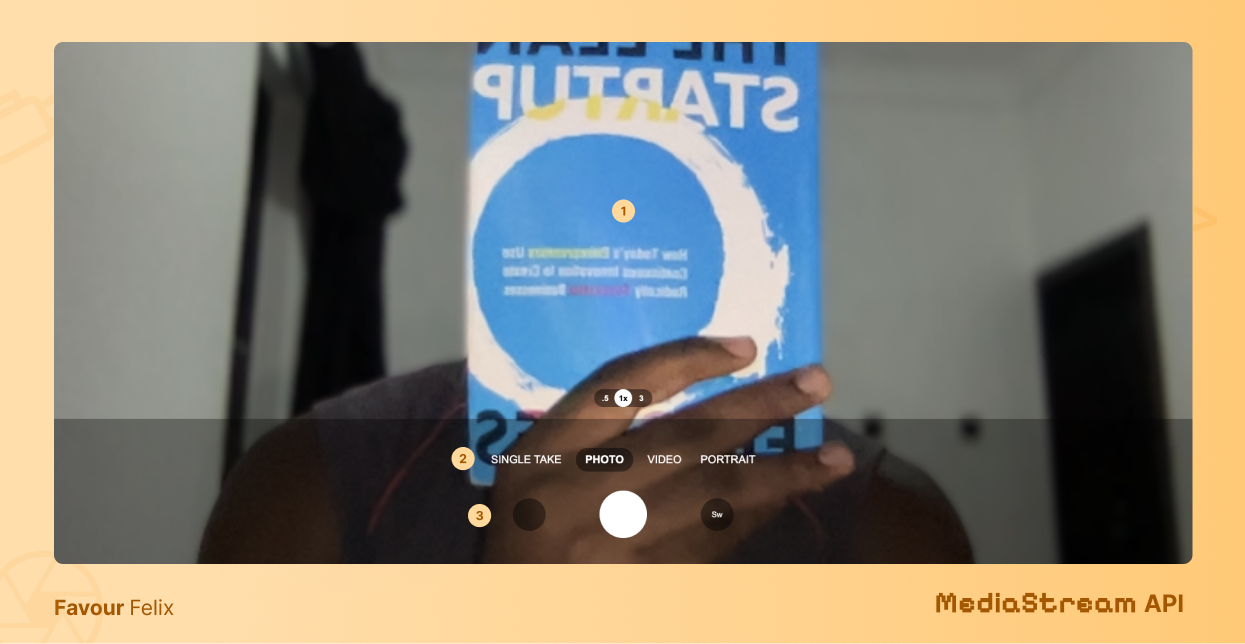
Our camera app has a very simple user interface — heavily inspired by the Samsung Camera UI. Some notable components/features of the camera are:
- Camera Preview
- Camera mode options
- Photo Gallery
For the sake of this tutorial, only a few actions on the browser are enabled — the “photo” camera mode, the camera shutter button, and the photo gallery button just to the right of the shutter button.
Step 1: Simple HTML for Our Camera app
To begin, we'll lay the foundation for our camera application with some simple markup. Understanding the structure of our camera app is crucial as it comprises four major sections, each playing a vital role in its overall functionality:
<video>section- Snapshot
<button>section <canvas>section- Snapshot
<img>section
1. <video> section
Our camera app must include a <video> tag for streaming the visual media from our webcam to our browser’s display. Let’s give it an id of camera-stream.
<video id="camera-stream" autoplay loop muted>
  <source src="" >
</video>
2. Snapshot <button> section
We'll also need a button to trigger the capture of the visual media when it is clicked. This will act as the shutter button. Let’s give it an id of shutter.
<div class="shutter-ctn">
  ...
  <button id="shutter" class="shutter">
  </button>
  ...
</div>
3. <canvas> section
A canvas tag helps us capture the image data from the video stream, while being able to export the data as an image that can be saved. The <canvas> element does not need to be visible to the user, but it must be accessible by the DOM. Let’s give it an id of canvas.
<canvas id="canvas"> </canvas>
4. Snapshot <img> section
For the final HTML section, we need a view to see all images that have been captured. Let’s identify this with an id of gallery-view.
<div id="gallery-view">
  <button id="prev">
    PREV
  </button>
  <img data-index="0" src="" alt="current viewed image">
  <button id="next">
    NEXT
  </button>
  ...
</div>
Step 2: Beautiful CSS Styles to Make Our App Pop
Adding styles to the HTML of our camera app greatly improves its user-friendliness. Don't hesitate to get creative while adding these styles, and feel free to skip this section to Step 3 if you would rather add your own styles.
First, lets add some global styles to ensure that each component fits perfectly when they are layered.
body {
  margin: 0;
  max-height: 100vh;
  overflow: hidden;
}
canvas {
  display: none;
}
button {
  border: 0;
  outline: none;
  background: #00000070;
  color: #FFFFFF;
  padding: 4px 8px;
  height: 30px;
  min-width: 30px;
  border-radius: 24px;
  display: grid;
  place-items: center;
  cursor: pointer;
}
Afterwards, we'll apply styling to the <video> element, which displays a preview of the shot to be captured.
.camera-ctn {
  position: relative;
  background: #000000;
}
.camera-view video {
  height: 100vh;
  width: 100vw;
  object-fit: cover;
  transform: scaleX(-1);
}
Lastly, the styling task left for us involves customizing the bottom section of our camera interface — the section typically housing the shutter button.
/* CAMERA BOTTOM */
.camera-bottom {
  height: 250px;
  background: #00000050;
  position: absolute;
  inset: 0;
  top: auto;
  padding: 0 5%;
  display: grid;
  place-items: center;
}
.camera-bottom > .inner {
  display: grid;
  place-items: center;
  max-width: 500px;
}

/* SHUTTER CONTAINER */
.shutter-ctn {
  display: flex;
  align-items: center;
  justify-content: space-around;
  width: 100%;
}
.shutter {
  height: 80px;
  width: 80px;
  background: #FFFFFF;
  border-radius: 50%;
}
.shutter:active {
  transform: scale(0.8);
}
.switch-device {
  height: 55px;
  width: 55px;
  border-radius: 50%;
}
To have a full view of the CSS styles originally used on this project, have a look at them here.
Step 3: JavaScript Code to Make Our App Fully Functional
Finally, after laying a solid foundation with our HTML structure and improving the usability of our camera app with some CSS styles, our focus now shifts to ensuring our camera app does what it’s supposed to do — take pictures.
We do this by heavily relying on the MediaStream API in JavaScript while following these three steps:
- Linking our HTML elements to JS.
- Connecting the webcam to JS code.
- Capturing and saving media from the webcam.
1. Linking HTML elements to JS
As we proceed with adding functionality to our HTML, we must link these elements to our JavaScript code via the DOM. Recall that we assigned IDs to the primary elements we defined in the HTML step.
const cameraVideoStream = document.getElementById('camera-stream')
const shutterButton = document.getElementById('shutter')
const canvas = document.getElementById('canvas')
...
2. Connecting the webcam to JavaScript code
Upon linking our HTML elements to our JS code, we can now establish the connection to our webcam. This involves initially verifying whether the user’s browser supports this operation using the navigator.mediaDevices boolean expression.
If the expression returns a truthy value, we can invoke getUserMedia() and specify the video option by passing {video: true} as a function argument like below:
if (navigator.mediaDevices && navigator.mediaDevices.getUserMedia({ video: true })) {
  navigator.mediaDevices
    .getUserMedia({ video: true })
    .then ((stream) => {
            cameraVideoStream.srcObject = stream
            cameraVideoStream.play()
    })
}
The getUserMedia() function invokes an asynchronous operation, which means it doesn't return a response immediately. Also, it might encounter failures — this could happen if the user denies permission for us to access their webcam or if their device lacks a webcam altogether.
If the operation is successful, the video stream is collected and transferred to the video element that was earlier created.
But the video does not start playing immediately. A brief delay occurs to allow for a buffer — this delay is often unnoticed. We have to create a streaming variable in conjunction with the canplay event of the <video> element to know when a portion of the video is buffered and ready to play. We can do that like below:
let width = window.innerWidth
let height = 0
let streaming = false

cameraVideoStream.addEventListener(
  "canplay",
  (ev) => {
    if (!streaming) {
      height = cameraVideoStream.videoHeight / (cameraVideoStream.videoWidth / width);

      canvas.setAttribute("width", width);
      canvas.setAttribute("height", height);
      cameraVideoStream.setAttribute("width", width);
      cameraVideoStream.setAttribute("height", height);
      streaming = true;
    }
  },
  false
);
Notice that before streaming is set to true, the <video> element and the <canvas> height are set to match the height value (which might be a fraction of the width based on the desired dimensions). This adjustment helps prevent any glitches, particularly when capturing the image.
3. Capture and save media from the webcam
Now, the hardest work is complete. All that is left is to capture snapshots from the video stream and store them in an array as images.
To accomplish this, we use the context of the <canvas> element defined earlier, accessed through canvas.getContext('2d'). Afterwards, we transfer the current frame of data from the video stream to compose an image using the canvasContext.drawImage() function just like below.
// Capture snapshots using HTML Canvas
function captureImage () {
  const canvasContext = canvas.getContext('2d')
  canvas.width = width
  canvas.height = height
  canvasContext.drawImage(cameraVideoStream, 0, 0, width, height)

  // Convert captured data to image (base64)
  const data = canvas.toDataURL('image/png')
  currentImageElement.src = data
}

// Add click listener to shutter button to capture image
shutterButton.addEventListener('click', () => captureImage())
With the data now captured as an image, the absolute final step is to convert the image to a transferable format suitable for the <img> tag or any other image viewing resource. One of the many transferable formats is base64, and fortunately, the <canvas> element enables us to achieve this effortlessly with canvas.toDataURL('image/png').
And voilà! You've successfully constructed your own camera app. Well done, genius!
As soon as we are done implementing these three steps, all that’s left is to say “cheese” and take some nice pictures.
If you mixed up a few instructions, feel free to take a look at the complete JS code here. If that does not help much, I’m always happy to assist personally when you send a message.
The Fun Doesn't Stop Here
Wanna have fun building more features for the camera app? You can pick up where I left off on GitHub. Whether it’s your own gallery, or a quick photo editing tool in the gallery view, or a timer feature, or even if you wish to extend this to a video recorder – go for it!
If you found this article helpful, feel free to connect on favourfelix.com to see what else I'm up to.