
By Yazdun Fadali
Next.js can seem intimidating at first, with so many new concepts to grasp. But don't worry – in this step-by-step tutorial, I will provide you with all the essential information you need to create your first modern full-stack application with Next.js.
In this tutorial, I will take you through the basics of Next.js and guide you in creating your very first full-stack application. By the end of this tutorial, you'll have the confidence to start building your own full-stack applications with Next.js.
So let's jump right in and unlock the power of Next.js together.
Here's what we'll cover:
- What Are We Going to Build?
- Getting Started
- How to create a shared layout in Next.js
- How to create a custom navigation bar in Next.js
- How to create an API route in Next.js
- How to build the homepage
- What is the App Router in Next.js?
- How to enhance the modularity and maintainability of your Next.js codebase
- How to create a dynamic character's page
- How to create dynamic API routes in Next.js
- How to create dynamic UI routes in Next.js
- What is
generateStaticParamsin Next.js? - What's the purpose of
dynamicParamswhen generating static pages in Next.js? - How to generate static pages with
generateStaticParams - How to build the quiz section
- How to create a client-side component in Next.js
- Conclusion
Alright, let's dive in!
What Are We Going To Build?
In this tutorial, we will create an engaging app that showcases information about Family Guy characters. Additionally, we will include a quiz section where users can test their knowledge of the show.
To keep things simple and familiar for you, we will avoid using a database and instead utilize local JSON data. By removing the complexity of database integration, we can focus on mastering the fundamental concepts of Next.js.
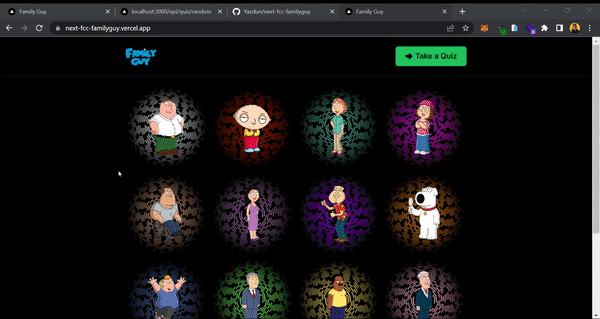 Application Preview
Getting Started
To get started with this tutorial, I highly recommend using the provided starter boilerplate that I specifically created for this tutorial. It saves your valuable time by already including the necessary dependencies and folder structure, eliminating the need to set up your project from scratch.
Simply clone the starter boilerplate from the GitHub repository and then follow along with the tutorial. This way, you can focus on learning and implementing the concepts without getting caught up in setup details.
- Starter Boilerplate: View on GitHub
- Final Version: View on GitHub
Once you have set up the starter boilerplate and successfully run it on your local machine, you should be able to see the initial page. This page marks the beginning of our tutorial and will serve as the starting point for our journey.
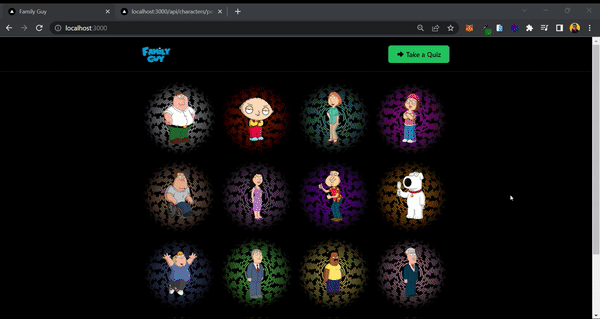
 Boilerplate's initial page
From here, we will gradually build upon the existing code and implement some cool features into our application. Let's dive in and get started right away!
How to Create a Shared Layout in Next.js
Often in your applications, you have elements that are shared across multiple pages, such as a navigation bar or a footer. Manually adding these elements to each page can be tedious and error-prone. Fortunately, Next.js provides a convenient way to create shared layouts that can be reused across our entire application.
The first type of layout is called the Root Layout. As the name suggests, this layout is shared across all pages in our application. It serves as the top-most layout and provides a consistent structure for our entire app. The Root Layout is required and we need to ensure that it includes the necessary HTML and body tags.
Next, let's consider individual route segments within your application. Each segment has the option to define its own layout. These layouts, similar to the Root Layout, will be shared across all pages within that segment. This allows you to have specific layouts for different sections of your app, while still maintaining a consistent structure within each segment.
Now, open up app/layout.js and add the following code to it:
// 📁 app/layout.js

const inter = Inter({ subsets: ['latin'] })

export const metadata = {
  title: 'Family Guy',
  description: 'Come here and learn more about Family Guy!',
}

export default function RootLayout({ children }) {
  return (
    <html lang="en">
      <body className={inter.className}>
        <Navigation />
        {children}
      </body>
    </html>
  )
}
The component you see here is the Root Layout component, which plays a crucial role in creating a shared layout for your entire application. Let's take a closer look at its structure and functionality.
In the component, you define the metadata object, which contains default metadata tags for your application. The title property specifies the title of your application, while the description property provides a brief description. These metadata tags are important for search engine optimization (SEO) and can be overridden for specific routes if needed.
Inside the RootLayout function, you structure the HTML document by using the html and body tags. You set the lang attribute of the html tag to "en" to indicate that the content is in English.
Within the body tag, you include the Navigation component, which is imported from the components directory. This component represents your navigation bar and will be shared across all pages of your application. By including it here, you ensure that it is displayed consistently throughout your app.
The children prop is a special prop that represents the content rendered within the RootLayout component. This allows you to nest other components and content within the shared layout.
Finally, you export the RootLayout component, making it available for use throughout your application.
How to Create a Custom Navigation Bar in Next.js
In this section, you will create a simple navigation bar component for your application. The navigation bar will include a logo and a link that takes users to the quiz section. Open up components/Navigation.jsx and add the following code:
// 📁 components/Navigation.jsx

export const Navigation = () => {
  return (
    <div className="sticky top-0 backdrop-blur-xl bg-[rgba(0,0,0,0.8)] border-b border-slate-800 z-50">
      <Container className="flex justify-between py-5">
        <Link href="/">
          <Image src="/logo.png" alt="Family Guy" width={70} height={50} />
        </Link>
        <Link
          href="/quiz"
          className="flex items-center justify-center gap-1 px-5 font-semibold text-black transition-colors bg-green-500 rounded-md duration-600 hover:bg-green-600"
        >
          <TbArrowBigRightFilled className="text-lg" />
          Take a Quiz
        </Link>
      </Container>
    </div>
  )
}
Now you have sticky Navigation component which is shared across the whole app. If you open up your local server, you should be able to see the following result:
 Preview of the sticky navigation bar
Congratulations on your progress so far! You have successfully created a shared layout with a navigation bar for your Next.js app. This shared layout ensures consistency across all pages, making it easier to manage elements like the navigation bar throughout your application.
Now, it's time to focus on building the homepage to display the characters. In order to display the characters on the Homepage, you need to create an API route that retrieves all the characters from your local JSON file, allowing you to dynamically populate the homepage with the relevant information.
How to Create an API Route in Next.js
Routing in Next.js is a fundamental concept that determines how different parts of your application are accessed. When you create a folder inside the app directory in Next.js, it automatically becomes a route. But you have the flexibility to define whether it should be a UI route or an API route.
Naming the file inside the route folder page.jsx transforms it into a UI route. This means that it will serve as a regular page with UI components. On the other hand, if you name the file as route.js, it becomes an API route. This signifies that it will handle API requests and responses.
It's important to keep in mind that within a single directory, you can have either a UI route or an API route, but not both. This clear separation allows for a clean and organized structure while building your Next.js application.
In the next section, you're going to create your first API route in Next.js. API routes in Next.js provide a simple and convenient way to create server-side endpoints within your application.
With API routes, you can define custom routes that handle HTTP requests and responses, allowing you to fetch or modify data, perform server-side computations, or integrate with external services.
These routes are written as JavaScript functions that are automatically deployed as serverless functions in the cloud. API routes provide a backend-like functionality within your frontend Next.js app, enabling you to build dynamic and interactive web applications without the need for a separate server.
How to Build the Homepage
In this section, you will be creating an API route that will enable you to retrieve all the available characters stored in the local JSON file. By implementing this API route, you will be able to fetch and display the characters on the homepage of your application.
How to create the characters API route
In order to ensure a clean separation between your API code and UI code, you will be housing all your API routes within the app/api directory.
By adopting this approach, you can effectively isolate your API-related functionality from your user interface, promoting better organization and maintainability.
This section will guide you through the process of creating the Characters API route. Simply open up the app/api/characters/route.js file and add the following code:
// 📁 app/api/characters/route.js

export async function GET() {
  return NextResponse.json({ characters: characters.data })
}
In this code snippet, you are importing a JSON file called characters.json. This file contains data about characters that you want to use in your application.
Next, you are importing the NextResponse object from the next/server module. This object provides functions for handling server responses in a Next.js application.
After that, you define an asynchronous function called GET(). This function is associated with the HTTP GET request method, which is commonly used to retrieve data from a server.
Inside the GET() function, you use the NextResponse.json() function to construct the server response. You pass an object with a property called characters, which holds the data from the characters.json file. This response is then returned from the function.
In simpler terms, this code is creating an API route that responds to GET requests. When a GET request is made to this route, it returns a JSON response containing the data from the characters.json file. This allows you to fetch the character data from your application and use it in other parts of our code.
Now, it's time to test your API route and ensure that everything is functioning correctly. To make this process simpler, you will use the browser itself to make the API request. Open your browser and enter the following URL: http://localhost:3000/api/characters.
Upon doing so, you will be directed to a page where you can observe the results of the API request. This step allows us to verify that the API route is working as expected and that it's successfully fetching the character data:
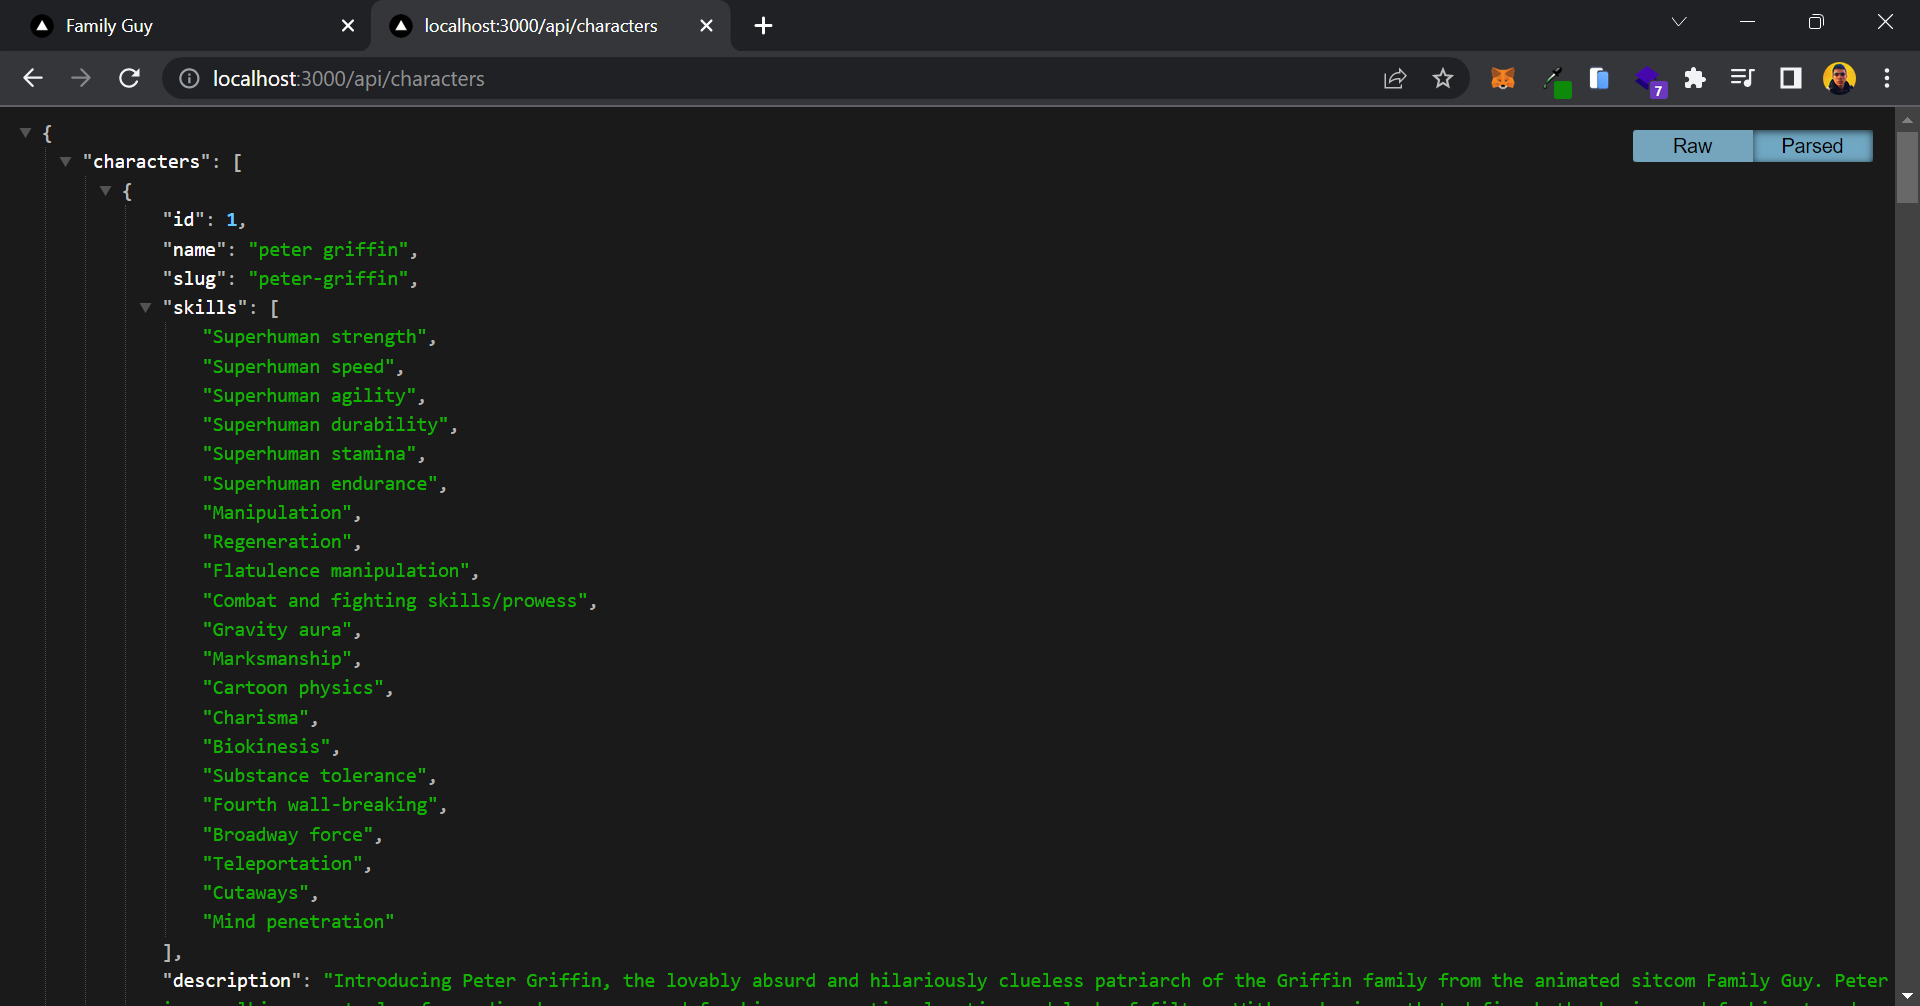 JSON data in the browser
Here's the JSON data which contains the list of characters. If the JSON data looks weird in your browser, make sure to install a JSON Formatter extension on your browser. I'm using Google Chrome so I'm using this JSON Formatter on my browser.
How to display characters on the homepage
Now that you have your API set up, let's create the UI for our homepage and display the characters. To do this, open the app/page.jsx file and add the following code snippet:
// 📁 app/page.jsx

async function getAllCharacters() {
  const data = await fetch(`${endpoint}/characters`)

  if (!data.ok) {
    throw new Error('Failed to fetch data')
  }

  return data.json()
}

export default async function Page() {
  const data = await getAllCharacters()

  return (
    <main>
      <Container className="grid grid-cols-2 gap-1 py-5 md:grid-cols-3 lg:grid-cols-4">
        {data?.characters?.map(item => {
          return (
            <Link
              href={`/characters/${item.slug}`}
              key={item.name}
              className="overflow-hidden rounded-md"
            >
              <Image
                src={item.avatar}
                alt=""
                className="transition-all duration-500 hover:scale-110 hover:-rotate-2"
                width={500}
                height={500}
              />
            </Link>
          )
        })}
      </Container>
    </main>
  )
}
In the above code snippet, you have a React component called Page that is defined as an asynchronous function. This component is responsible for rendering the homepage UI.
First, you have an asynchronous function called getAllCharacters which uses the "fetch" function to make an asynchronous HTTP request to the API endpoint. The response from this request is stored in the data variable.
Next, you have an error handling check. If the HTTP response returned an error (status code other than 200), we throw an error indicating that the data fetch has failed.
Moving on to the Page component, it awaits the result of calling the getAllCharacters function. The resulting data is stored in the data variable.
The return statement renders the UI of the homepage. It uses a main tag as the top-level container and a Container component to hold a grid layout with multiple columns.
Inside the Container, you map over the characters array in the data object and generate a list of items. For each character, we create a "Link" component that serves as a clickable link to a specific character's page. The link's URL is generated based on the character's slug property.
Within the Link, you have an Image component that displays the character's avatar image.
Overall, this code fetches data from an API endpoint, specifically character data. It then uses this data to dynamically render a grid layout of character avatars with clickable links to individual character pages.
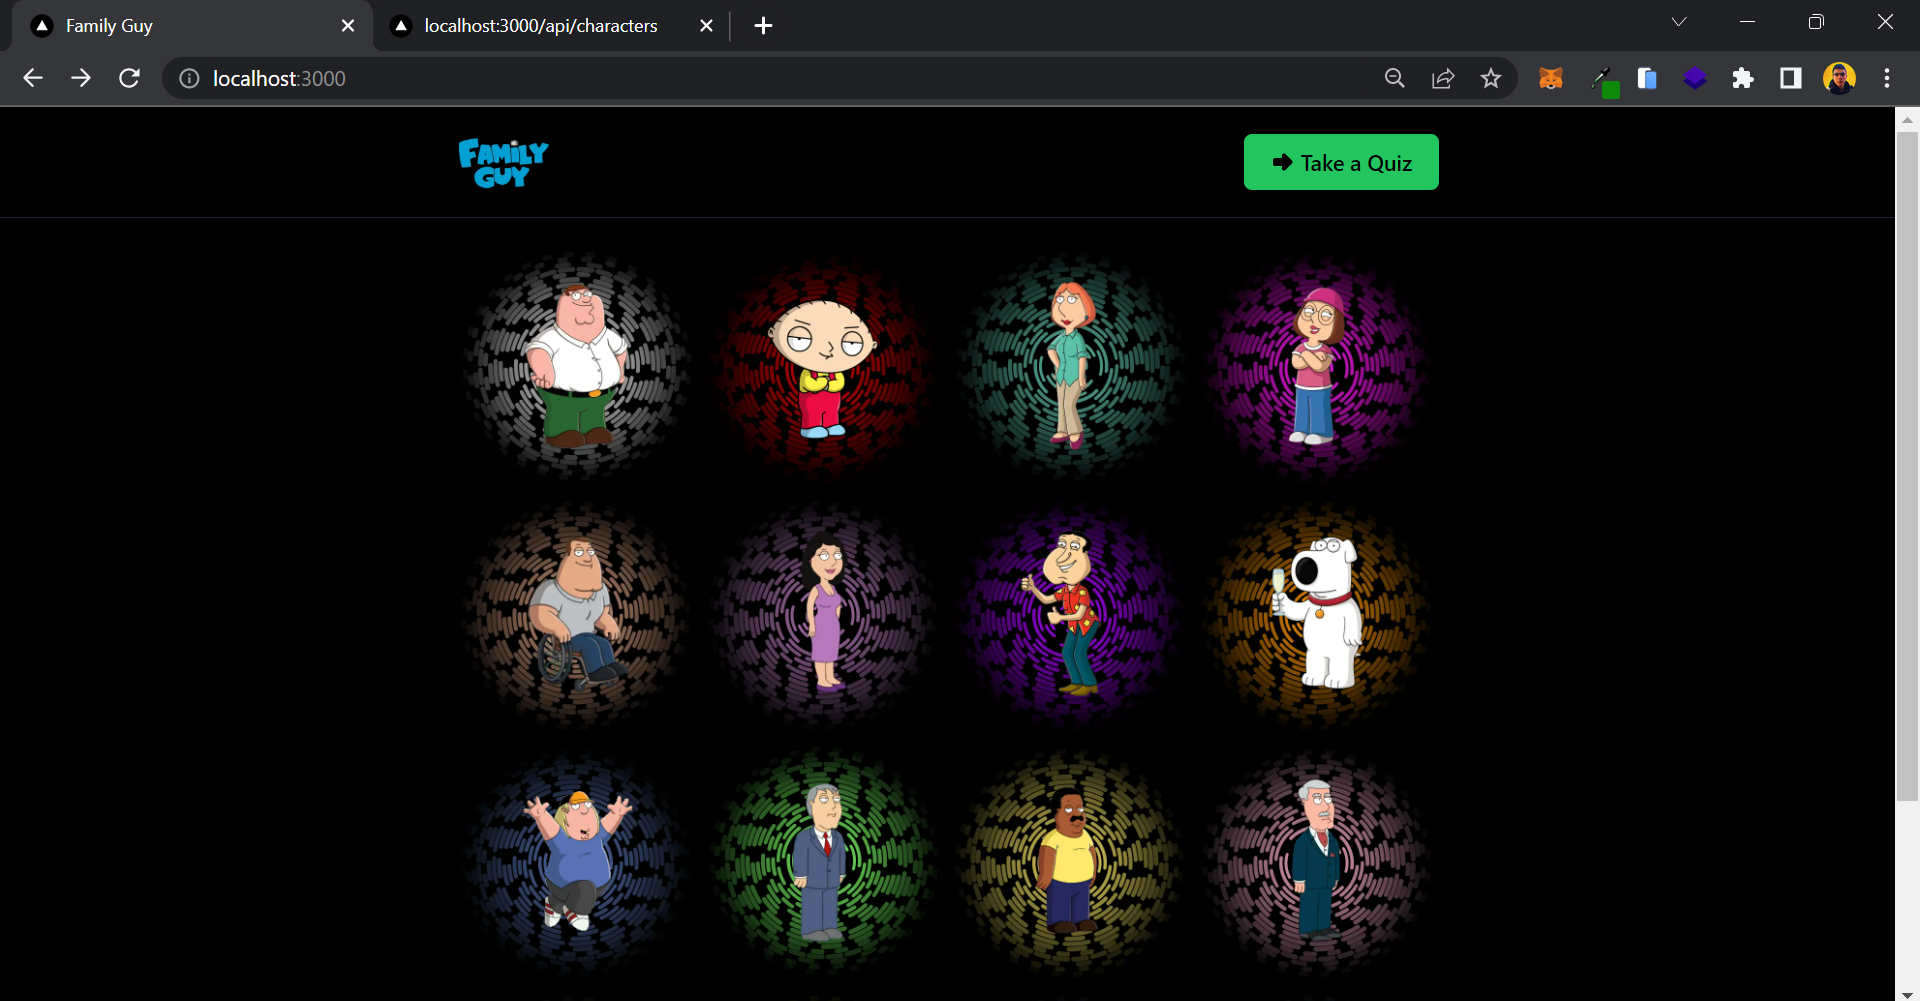 Homepage
Your homepage is now looking fantastic, but you may have noticed something unusual about the way we fetched the data. Typically, you might be familiar with using the useEffect hook to fetch data from an API. But in this case, you didn't use any hooks – yet your code is functioning perfectly.
In the next section, we will take a closer look at what exactly happened within this component. By examining the code and its execution, you will gain a deeper understanding of the Next.js mechanisms.
What is The App Router in Next.js?
The App Router in Next.js introduces a new paradigm for developing applications by leveraging the latest features of React. If you are already familiar with Next.js, you will discover that the App Router represents a natural evolution of the existing Pages Router, which is based on the file system.
The App Router basically enables you to run React code on the server by default, so you are fetching data on the server and only returning the static HTML to the client. This means that we have a Server Component that retrieves data from the server and renders its content on the server side.
There is a caveat to consider: you won't have access to client-side features like React state and React Hooks inside Server Components, since they are only running on the server.
If you want to use client-side features, you have to specify that in your component file by adding "use client" at the top of the file.
What is the point of server side rendering in Next.js?
In Next.js, SSR allows the server to generate the HTML content of a webpage and send it to the browser. This means that when you visit a Next.js website, you don't have to wait for the JavaScript code to load and execute on the browser before seeing any content. Instead, the server sends a pre-rendered HTML page, which can be displayed almost instantly.
The advantage of SSR is that it improves the initial load time of a webpage, providing a faster and more seamless user experience. It also helps with search engine optimization (SEO) because search engines can easily crawl and index the server-rendered HTML content.
Server-side rendering methods in Next.js
Next.js provides several methods for rendering pages. Each of these methods serves a specific purpose and can be used in different scenarios:
- Static Site Generation (SSG): Static Generation is a server-side rendering method where Next.js generates HTML at build time. During the build process, Next.js fetches data from APIs or other data sources and pre-renders the HTML pages. These pre-rendered pages can then be served to the client upon request. SSG is suitable for websites with content that doesn't frequently change.
- Server-Side Rendering (SSR): Server-Side Rendering is another method where Next.js generates HTML on each request. When a user visits a page, Next.js fetches the data and renders the HTML on the server before sending it to the client. SSR is useful for websites with frequently updated content or personalized user experiences.
- Incremental Static Regeneration (ISR): ISR is a feature in Next.js that allows you to statically generate pages on-demand, rather than at build time. This means that your site can be both statically generated and dynamic at the same time.
Now that we have a better understanding of server side rendering in Next.js, we can move on to the next section.
How to Enhance the Modularity and Maintainability of Your Next.js Codebase
In order to avoid code repetition and enhance code reusability, you can adopt a modular approach in your Next.js project. By isolating commonly used functions like getAllCharacters in a separate module, you can conveniently access and reuse them in multiple parts of your codebase.
You can make a quick adjustment in your project. First, navigate to the app/page.jsx file and locate the getAllCharacters function at the top. Cut out this function from the file.
Next, open the lib/characters.js file and export the getAllCharacters function from there. By moving the function to a separate module, you can easily import and use it in different parts of your codebase:
// 📁 lib/characters.js

import { endpoint } from '@/utils/endpoint'

export async function getAllCharacters() {
  const data = await fetch(`${endpoint}/characters`)

  if (!data.ok) {
    throw new Error('Failed to fetch data')
  }

  return data.json()
}
Now let's import the getAllCharacters function from lib/characters.js and use it inside app/page.jsx:
// 📁 app/page.jsx

import { getAllCharacters } from '@/lib/characters'

export default async function Page() {
  const data = await getAllCharacters()

  return (
    <main>
       //content went here ...
    </main>
  )
}
This way, you are going to have access to this fetch function throughout your whole codebase.
How to Create a Dynamic Character's Page
Congratulations on reaching this point in the tutorial! By now, you have gained a solid understanding of the fundamentals of Next.js.
In this section, you will be creating a dynamic API route. This route will enable you to fetch data for each character individually and subsequently build a user interface (UI) to showcase these characters to your users.
How to create dynamic API routes in Next.js
By creating a dynamic API route in Next.js, you can fetch character data based on the character's slug. To achieve this, you need to use brackets to name your folders, indicating to Next.js that it is a dynamic route. By naming the folders accordingly, you can access this dynamic value within your code, allowing you to retrieve and display the desired character's data.
Open up api/characters/[slug]/route.js and add the following snippet:
// 📁 api/characters/[slug]/route.js

export async function GET(req, { params }) {
  try {
    const character = characters.data.find(item => item.slug === params.slug)

    if (!character) {
      return new NextResponse('not found', { status: 404 })
    }

    const character_qoutes = qoutes.data.filter(
      item => item.character_id === character.id,
    )

    return NextResponse.json({
      character,
      character_qoutes: character_qoutes.length > 0 ? character_qoutes : null,
    })
  } catch (error) {
    return new NextResponse('Internal Server Error', { status: 500 })
  }
}
In the above code snippet, you have an asynchronous function named GET that handles a GET request in a Next.js API route. Let's break it down step by step:
- You import the
charactersandquotesdata from their respective JSON files using the Next.js file system (@/data/characters.jsonand@/data/quotes.json). - The function receives two parameters:
req(representing the incoming request) and an object calledparamswhich contains the dynamic parameters extracted from the request URL. - Inside a try-catch block, the code attempts to find a character in the
charactersdata by comparing theslugparameter fromparamswith theslugproperty of each character object. - If no character is found, the code returns a "not found" response with a status code of 404 using the
NextResponseclass from thenext/serverpackage. - If a character is found, the code proceeds to filter the
quotesdata array based on thecharacter_idproperty matching the found character'sid. - The filtered character quotes are assigned to the
character_quotesvariable. - Finally, the code returns a JSON response using
NextResponse.json(), including thecharacterobject and thecharacter_quotesarray (ornullif no quotes are found).
Next.js automatically extracts dynamic parameters from the URL and makes them available in the params object. In this code, you access the slug parameter using params.slug. This allows you to retrieve the specific character's slug from the URL and use it to find the corresponding character in the characters data.
Now you can test this endpoint to see the result, open up http://localhost:3000/api/characters/peter-griffin in your browser and you should be able to see the following JSON data:
 JSON data in the browser
How to create dynamic UI routes in Next.js
Now that your API is set up and capable of fetching character data, it's time to create a dynamic UI page to showcase this data.
The process of creating a dynamic UI page is quite similar to what you did when setting up the dynamic API route. But this time, you will be using page.jsx instead of route.js to generate a UI route.
Open up app/characters/[slug]/page.jsx and add the following snippet:
// 📁 app/characters/[slug]/page.jsx

import { getAllCharacters } from '@/lib/characters'

export const dynamicParams = false

export async function generateStaticParams() {
  const { characters } = await getAllCharacters()
  return characters.map(character => ({ slug: character.slug }))
}

export async function getCharacterBySlug(slug) {
  const data = await fetch(`${endpoint}/characters/${slug}`)

  if (!data.ok) {
    throw new Error('Failed to fetch data')
  }

  return data.json()
}

export default async function Page({ params }) {
  const { character, character_qoutes } = await getCharacterBySlug(params.slug)

  return (
    <Container className="flex flex-col gap-5 py-5" as="main">
      <div className="flex flex-col gap-2">
        <h1 className="text-2xl font-semibold capitalize">{character.name}</h1>
        <ul className="flex gap-1 text-sm">
          {character.occupations.map(item => {
            return (
              <li
                key={item}
                className="p-2 text-gray-300 bg-gray-800 rounded-md"
              >
                {item}
              </li>
            )
          })}
        </ul>
      </div>
      <p className="text-sm leading-6">{character.description}</p>
      <ul className="grid gap-2 sm:grid-cols-2">
        {character.images.map(image => {
          return (
            <li
              key={image}
              className="relative flex overflow-hidden bg-gray-900 rounded-xl"
            >
              <Image
                className="transition-all duration-500 hover:scale-110 hover:rotate-2"
                src={image}
                alt=""
                width={760}
                height={435}
              />
            </li>
          )
        })}
      </ul>
      {character.skills && (
        <>
          <h2 className="text-xl font-bold">Power and Skills</h2>
          <ul className="flex flex-wrap gap-1">
            {character.skills.map(item => {
              return (
                <li
                  className="flex justify-center flex-grow px-2 py-1 text-orange-400 rounded-full bg-orange-950"
                  key={item}
                >
                  {item}
                </li>
              )
            })}
          </ul>
        </>
      )}
      {character_qoutes && (
        <>
          <h2 className="text-xl font-bold">Famous Qoutes</h2>
          <ul className="grid gap-5">
            {character_qoutes.map((item, idx) => {
              return (
                <li
                  className="p-2 italic text-gray-400 border-l-4 border-green-400 rounded-md"
                  key={item.idx}
                >
                  {item.qoute}
                </li>
              )
            })}
          </ul>
        </>
      )}
    </Container>
  )
}
Don't be intimidated by the length of the code you see here! It may seem overwhelming at first, but it's actually quite straightforward. Let's take a deeper look at what we did in this code:
What is generateStaticParams in Next.js?
In Next.js, the generateStaticParams function is used to specify the dynamic routes that should be pre-rendered at build time.
To explain it in simpler terms, let's imagine you have a website with multiple blog posts, and each blog post has a unique URL. With generateStaticParams, you can tell Next.js which blog post URLs should be generated and pre-rendered during the build process.
When you implement generateStaticParams, you provide it with a function that returns an array of objects representing the dynamic paths you want to pre-render.
Each object typically contains a parameter that corresponds to the dynamic portion of the URL. For example, if your blog posts have URLs like /blog/post-1, /blog/post-2, and so on, you would return an array with objects like { params: { slug: 'post-1' } }, { params: { slug: 'post-2' } }, and so on.
In our case, we are retrieving a list of characters using the getAllCharacters() function. Then we map over the characters and return an array of objects, each containing a slug property with the character's slug value.
Next.js will then use this information to generate the static HTML files for these paths during the build process. This allows the pages to be served as static files, improving performance and SEO.
What's the purpose of dynamicParams when generating static pages in Next.js?
In Next.js, the behavior of dynamic segments that were not generated using generateStaticParams is controlled by the dynamicParams.
When dynamicParams is set to true, Next.js will attempt to fetch the corresponding page dynamically when a dynamic segment is visited.
On the other hand, if dynamicParams is set to false, Next.js will return a 404 page if it fails to find the requested page.
This setting allows you to define how Next.js handles dynamic segments that were not pre-generated, providing flexibility in handling dynamic routes in your applications.
How to generate static pages with generateStaticParams
Now that you've successfully generated a static path for each character, let's see how you can fetch data for each character.
The getCharacterBySlug function is an asynchronous function that takes the slug parameter, fetches data from the specified API endpoint using fetch, and returns the response data in JSON format. If the response is not successful (!data.ok), an error is thrown.
The Page component receives the params object as a prop, which contains the dynamic parameter values extracted from the URL. It calls the getCharacterBySlug function, passing the character's slug extracted from params to fetch the specific character's data.
The returned data is then used to populate the UI, which includes displaying the character's name, occupations, description, images, power and skills (if available), and famous quotes (if available).
Ideally, you can put getCharacterBySlug inside lib/characters.js and export it from there, but that's up to you to decide!
 Our application so far
How to Build the Quiz Section
Congratulations on reaching this point in the tutorial! You've accomplished a lot by creating dynamic API routes and UI pages, and understanding the different rendering methods in Next.js.
Now, let's add a touch of interactivity to this application. In this section, you will be building an engaging quiz section where users can put their Family Guy knowledge to the test.
How to create an API route to retrieve random questions
To ensure an exciting and unique experience for each user, it's important to avoid repeating the same question in the quiz every time. We want to keep things fresh and engaging.
In order to achieve this, we'll implement a mechanism that presents users with different questions each time they start the quiz.
Open up app/api/quiz/random/route.js and add the following snippet:
// 📁 app/api/quiz/random/route.js

export async function GET() {
  try {
    const random = Math.floor(Math.random() * questions.data.length)
    return NextResponse.json({
      randomQuestion: questions.data[random].id,
    })
  } catch (error) {
    return new NextResponse('Internal Server Error', { status: 500 })
  }
}
In this Next.js API route, you are implementing the logic to fetch a random question from a set of questions stored in a JSON file called quiz.json. First, we import the questions data from the JSON file and the NextResponse object from the Next.js server package.
Inside the GET function, we generate a random number using the Math.random() and Math.floor() functions. This number is used to select a random question from the questions.data array. We retrieve the question using its index, and specifically the id property of the randomly selected question.
Now let's create a UI to make use of this random question.
How to create an intro page for the Quiz
You will now create an user interface (UI) for the quiz introduction section. This UI will serve as the initial screen users see before starting the quiz.
You will leverage the API route you just created to dynamically redirect users to a new question each time they start the quiz.
Let's open up app/quiz/page.jsx and add the following code:
// 📁 app/quiz/page.jsx
export async function getRandomQuizQuestion() {
const data = await fetch(`${endpoint}/quiz/random`, { cache: 'no-store' })
if (!data.ok) {
throw new Error('Failed to fetch data')
}
return data.json()
}
export default async function Page() {
const data = await getRandomQuizQuestion()
return (
<Container
as="main"
className="flex flex-col gap-5 py-5 md:flex-row-reverse md:justify-between"
>
<div className="relative overflow-hidden rounded-2xl">
<div className="md:w-[24rem]">
<Image src="/wallpaper.jpg" alt="" width={700} height={700} />
</div>
<div className="absolute top-0 bottom-0 left-0 right-0 bg-gradient-to-t from-black to-transparent md:bg-gradient-to-r"></div>
</div>
<div className="md:w-[50%] flex flex-col gap-5">
<h1 className="text-2xl font-semibold">Family Guy Quiz</h1>
<p className="text-sm leading-6 text-gray-300">
Take this quiz to find out how much you know about the hit animated
sitcom Family Guy. Test your knowledge of the characters, the
episodes, and the show's many pop culture references.
</p>
<Link
href={`/quiz/${data.randomQuestion}`}
className="flex items-center justify-center gap-1 px-5 py-4 font-semibold text-orange-500 transition-colors rounded-md outline duration-600 hover:bg-orange-950"
>
<TbArrowBigRightFilled className="text-lg" />
Take a Quiz Now!
</Link>
</div>
</Container>
)
}
This code sets up the UI for the quiz introduction section, fetches a random question from the API, and provides a button for users to start the quiz.
In the this code, you might have noticed a change where we pass a parameter to the fetch method: { cache: 'no-store' }.
This change is significant because it ensures that the page we are working on will not be generated statically using the Static Site Generation (SSG) method. Instead, it will make an API request to the provided endpoint and fetch fresh data each time users visit the page.
By using { cache: 'no-store' }, we disable caching for this specific request. This guarantees that every time a user accesses this page, a new question will be fetched.
This approach adds a dynamic and interactive element to the quiz experience, ensuring that users always encounter a different question each time they visit the page.
 Quiz introduction page
How to create dynamic API route for quiz questions
To provide dynamic quiz questions, you need to create a new API route that will fetch and return the quiz questions. This way, you can retrieve the questions dynamically and present them to the users.
Open up app/api/quiz/[id] and add the following code:
// 📁 app/api/quiz/[id]

export async function GET(req, { params }) {
  try {
    const question = questions.data.find(item => item.id === params.id)

    if (!question) {
      return new NextResponse('not found', { status: 404 })
    }

    const { correct_answer, ...rest } = question

    return NextResponse.json({
      question: rest,
    })
  } catch (error) {
    return new NextResponse('Internal Server Error', { status: 500 })
  }
}
In this Next.js route, you handle a GET request to retrieve a specific question from a quiz. You import the questions data from a JSON file. Using the provided ID in the request parameters, you search for a matching question. If the question is not found, you return a "Not Found" response with a status code of 404.
If the question is found, you extract the correct answer and store the remaining question details in the rest variable.
Finally, you return a JSON response containing the question details (excluding the correct answer). If any errors occur during the process, you return an "Internal Server Error" response with a status code of 500.
Now you can test this API route in your browser by opening up your local server http://localhost:3000/api/quiz/CfQnf3lH56:
 http://localhost:3000/api/quiz/CfQnf3lH56
How to create a dynamic API route to fetch answers
Before implementing the UI, let's create an API route where you can fetch the correct answer for each question.
Open up app/api/quiz/answer/[id]/route.js and add the following code to it:
// 📁 app/api/quiz/answer/[id]/route.js

export async function GET(req, { params }) {
  try {
    const question = questions.data.find(item => item.id === params.id)

    if (!question) {
      return new NextResponse('not found', { status: 404 })
    }

    const { correct_answer } = question

    const filteredQuestions = questions.data.filter(
      item => item.id !== params.id,
    )
    const random = Math.floor(Math.random() * filteredQuestions.length)

    return NextResponse.json({
      correct: correct_answer,
      random: filteredQuestions[random].id,
    })
  } catch (error) {
    return new NextResponse('Internal Server Error', { status: 500 })
  }
}
The purpose of this API route is to retrieve a specific question from a quiz based on the provided ID. The code searches for the question by comparing the given ID with the IDs of questions stored in the questions data. If the requested question is found, its correct answer is extracted.
To suggest the next question, the code removes the current question from the available pool of questions by filtering it out. It then generates a random index within the range of the remaining questions. Using this random index, a new question is selected as a suggestion for the next question.
The code constructs and returns a JSON response containing the correct answer for the requested question and the ID of the randomly chosen next question. This functionality allows users to retrieve specific quiz questions and receive suggestions for the following question, improving the interactive experience of the quiz.
How to create dynamic UI routes for the Quiz questions
Now that you have successfully built all the necessary API endpoints, it's time to take the next step and create a user interface (UI) that allows users to interact with the APIs you've developed. This UI will serve as the gateway for users to access and utilize the functionalities offered by your APIs.
In this section, you'll learn about dynamic server-side rendering (SSR) in Next.js. We've already covered static pages (SSG), and now you'll explore SSR. Also SSR is much easier to implement.
Open up app/quiz/[id]/page.jsx and add the following code:
// 📁 app/quiz/[id]/page.jsx

async function getQuizQuestion(id) {
  const data = await fetch(`${endpoint}/quiz/${id}`)

  if (!data.ok) {
    throw new Error('Failed to fetch data')
  }

  return data.json()
}


export default async function Page({ params }) {
  const { question } = await getQuizQuestion(params.id)

  return (
    <Container as="main" className="flex flex-col gap-5 py-5">
      <h1 className="text-lg font-semibold">{question.title}</h1>
      <Answer answers={question.answers} questionId={params.id} />
    </Container>
  )
}
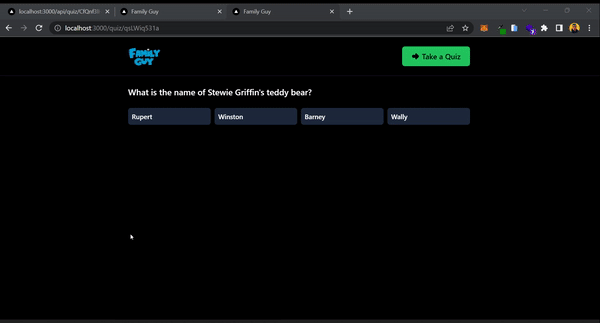
This Next.js page component fetches question data from an API endpoint using the getQuizQuestion function. It then renders the question's title and the corresponding answers using JSX components.
 Question UI route
That's all you needed to do to render a Next.js page server side!
In the next section, you're going to create a client side component to handle user's interaction with the answers.
How to create a client-side component in Next.js
In the final section of this tutorial, you'll create a client-side component to handle a user's interactions with the answers.
Open up components/Answer.jsx and add the following code:
// 📁 components/Answer.jsx

'use client'

import { useEffect, useState } from 'react'
import cn from 'classnames'
import Link from 'next/link'
import { FiRepeat } from 'react-icons/fi'
import { MdNearbyError } from 'react-icons/md'
import { FaCheck } from 'react-icons/fa'

export const Answer = ({ answers, questionId }) => {
  const [selected, setSeleceted] = useState(null)
  const [data, setData] = useState(null)
  const [loading, setLoading] = useState(false)

  useEffect(() => {
    let subscribed = true
    if (selected) {
      setLoading(true)
      fetch(`/api/quiz/answer/${questionId}`)
        .then(res => res.json())
        .then(data => {
          setLoading(false)
          if (subscribed) {
            setData(data)
          }
        })
    }

    return () => {
      console.log('cancelled!')
      subscribed = false
    }
  }, [questionId, selected])

  return (
    <>
      <ul className="grid grid-cols-2 gap-2 md:grid-cols-4">
        {answers.map(item => {
          const isLoading = selected === item && loading
          const isWrong =
            selected === item && data && data?.correct !== selected
          const isCorrect = data?.correct === item

          return (
            <li key={item}>
              <button
                disabled={data || loading}
                onClick={() => setSeleceted(item)}
                className={cn(
                  'p-2 rounded-md  items-center justify-between w-full flex text-sm font-semibold disabled:cursor-not-allowed transition-all',
                  isLoading && 'animate-pulse',
                  isWrong ? 'bg-red-700' : 'bg-slate-800',
                  isCorrect && 'outline text-green-500',
                )}
              >
                {item}
                {isCorrect && <FaCheck />}
                {isWrong && <MdNearbyError />}
              </button>
            </li>
          )
        })}
      </ul>
      {data?.random && (
        <Link
          href={`/quiz/${data.random}`}
          className="flex items-center gap-1 text-blue-400"
        >
          <FiRepeat className="mt-1" />
          Do it again
        </Link>
      )}
    </>
  )
}
This is a React component that takes two props: answers and questionId. It sets up state using the useState hook to keep track of the selected answer, the fetched data, and the loading status.
Inside the component, there's a useEffect hook that runs whenever the questionId or selected value changes. If a selected answer exists, it makes an API request to fetch the corresponding data using fetch and updates the state accordingly.
The component renders a list of answer options using a map function. Each answer option is represented as a button. The button's appearance is modified based on the selected answer, loading status, and correctness of the answer. It also displays different icons, such as a checkmark or an error icon, based on the correctness of the selected answer.
Additionally, if the fetched data includes a random property, a link is rendered to repeat the quiz with a new random question.
Here is how the final version of our quiz looks like:
 Quiz final version
Conclusion
Here is the end! You've successfully built your first full-stack application using Next.js. Throughout this step-by-step tutorial, you learned the basics of Next.js, exploring its powerful features and gaining the necessary knowledge to create modern web applications.
Through this tutorial, you not only built a functional app, but you also gained the confidence to start creating our own full-stack applications with Next.js. You learned about routing, server-side rendering, API integration, and more.
Now that you have a solid foundation in Next.js, the possibilities are endless. You can continue exploring advanced topics, such as database integration, authentication, and deployment, to take your applications to the next level.
You can follow me on Twitter where I share more useful tips on web development. Happy coding!