
A Hackintosh is a non-Mac computer system, made with PC parts, that runs the macOS operating system. In this tutorial, you will learn how to create a Hackintosh.
You will learn how to install macOS Big Sur (or any other version of macOS) using OpenCore.
The main benefit of a Hackintosh compared to an official Macintosh computer, is that it is WAY cheaper. I created a Hackintosh computer that matches the Mac Pro specs for about 1/3rd the price of a Mac Pro. Some people have been able to create a Hackintosh for under $100.
This tutorial will focus mainly on how to install macOS on your hardware. I also created a video version that shows how to build a complete machine and then install macOS on it.
The video shows how to use a computer with macOS to create a macOS installer for your Hackintosh. In this written tutorial, you will learn how to create the macOS installer using macOS or Windows.
You can watch the video here:
It is not illegal to create a Hackintosh for personal use but it does go against Apple's End User License Agreement. So don't plan on taking this into an Apple store for repair. And in many places it is illegal to sell a Hackintosh.
The Hardware
Many computer parts work for Hackintoshes. But some do not. Check this website to see what hardware is compatible with a Hackintosh.
In the video above I demonstrate step-by-step how to build a computer that will work as a Hackintosh. In the video description is a list of the specific parts I used.
If you want to be safe, you can use exact parts I used in my build but it is possible to install macOS on a wide variety of hardware.
Downloading MacOS and Creating a Bootable USB Installer
For this step, you will need a USB drive that is at least 16GB. The process is different depending on if you are setting up the bootable USB installer using macOS or Windows. The process is much simpler to do on macOS, but it still possible on Windows.
If you can, find a Mac machine to use to create the bootable USB installer. But I'll cover the steps for macOS and Windows.
Using MacOS to Create the MacOS Installer
There are a few programs you'll need during this process so start by downloading them. Here are links for what you will need followed by the download instructions.
- ProperTree - Click the "Code" button, then "Download Zip"
- MountEFI - Click the "Code" button, then "Download Zip"
- OC_GEN-X - Download the zip file for the most recent release.
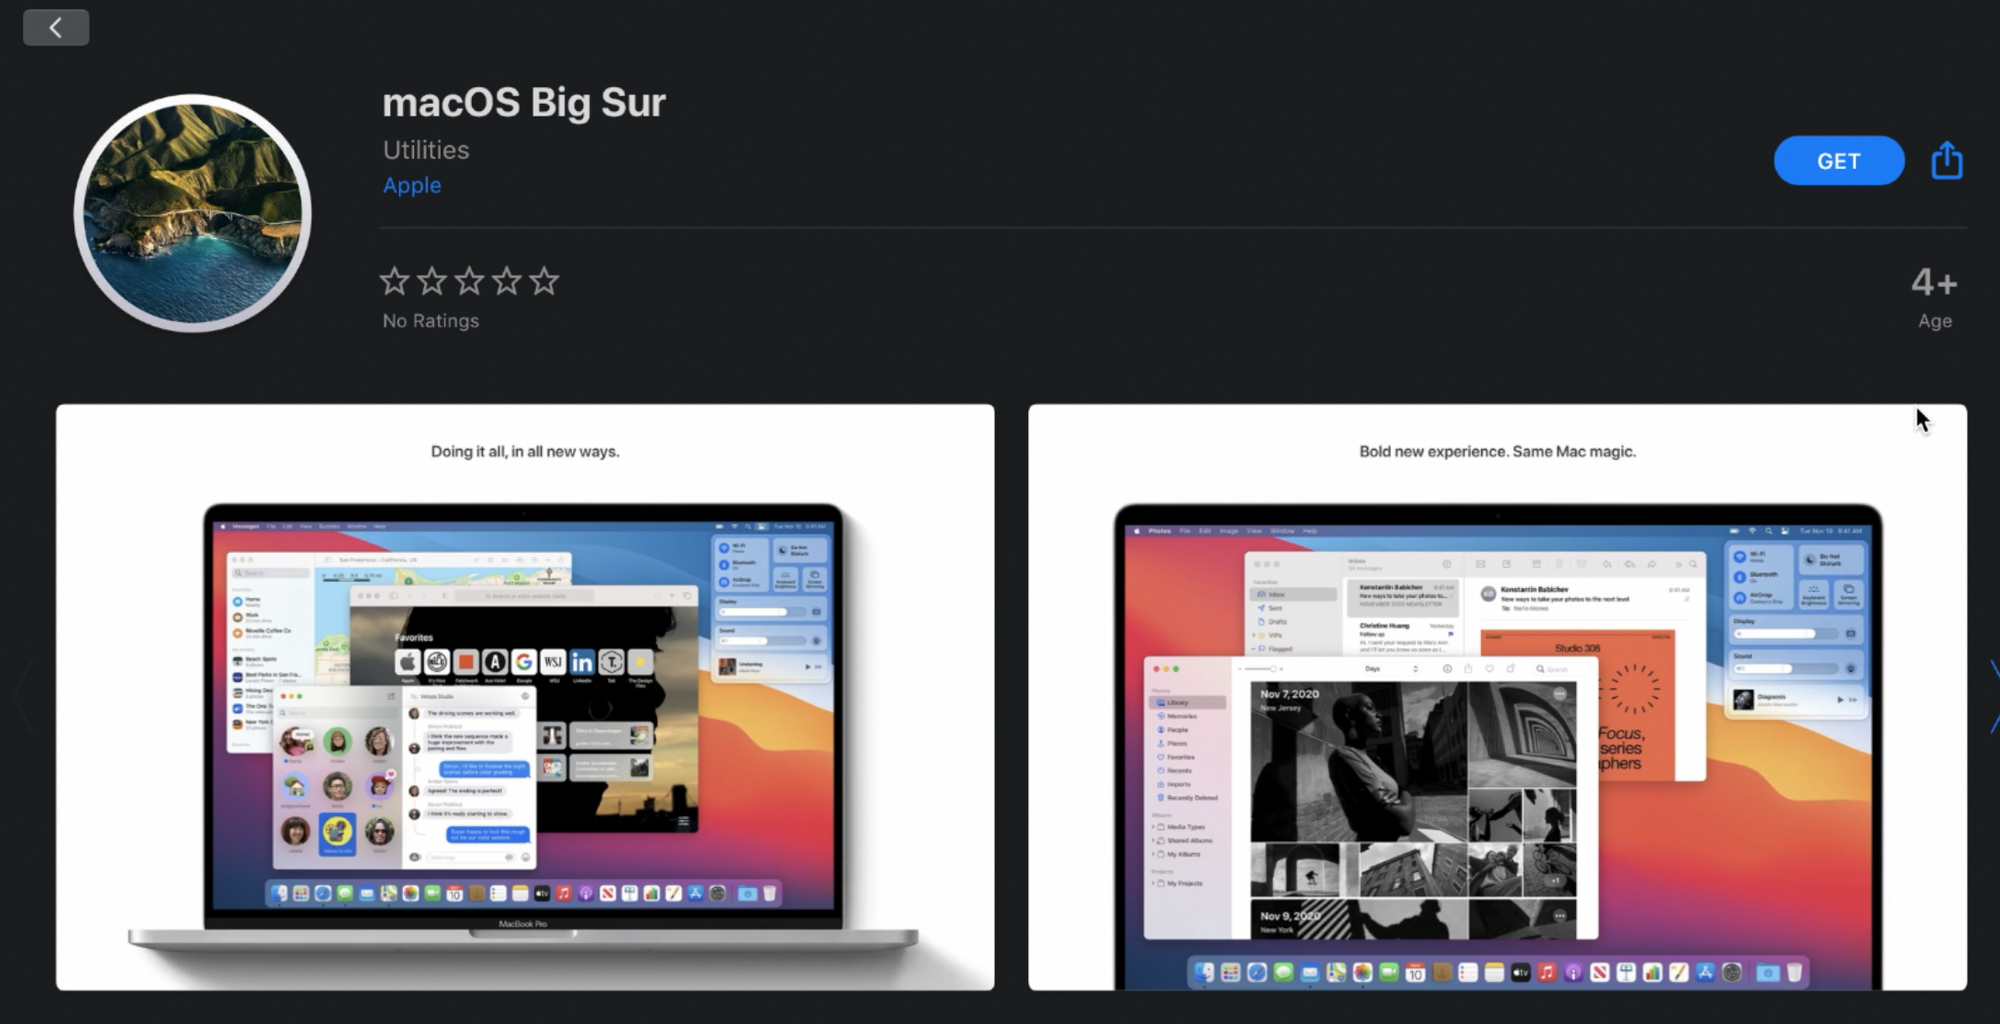
Open up the App store on macOS. Search for "Big Sur". Click "Get", and then "Download".
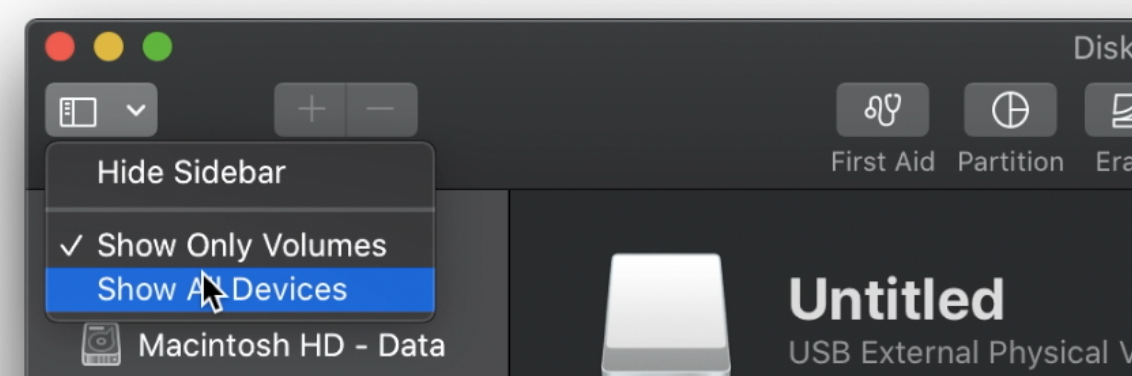
Format your USB drive using Disk Utility. To get into Disk Utility, just click the magnifying glass and type "Disk Utility.
Once Disk Utility is open, make sure that the view is set to show all devices.
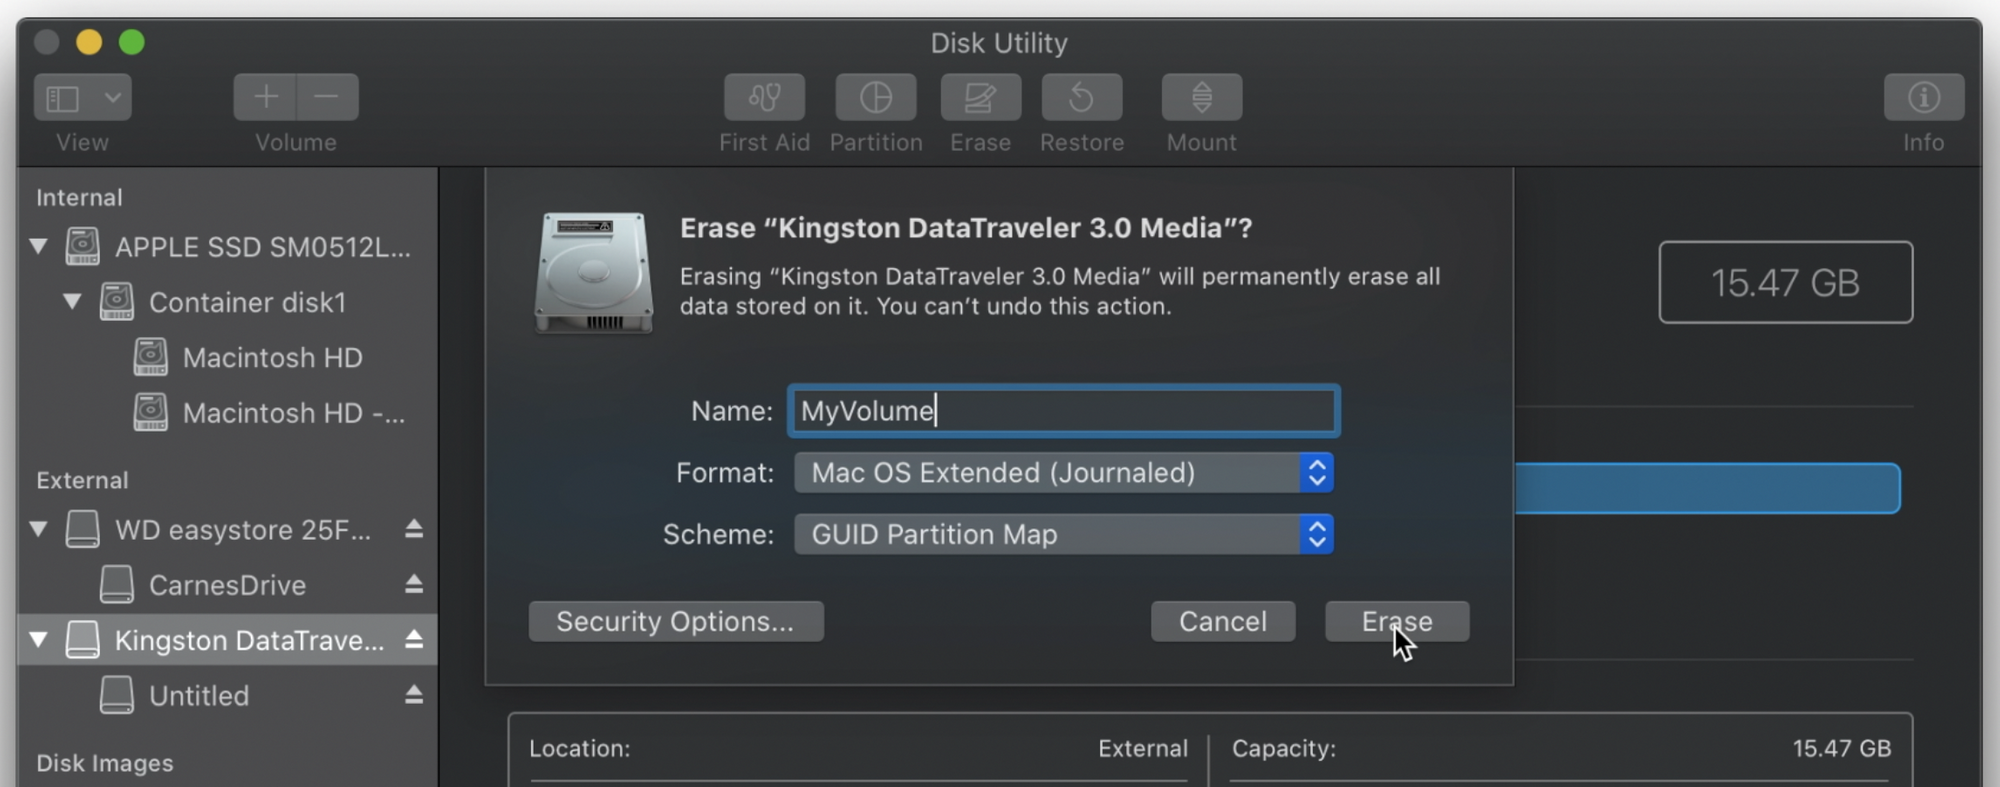
Click the USB drive, then click "Erase" in the top menu.
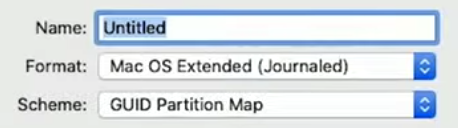
Name the drive "MyVolume". Make sure the format is Mac OS Extended (Journaled) and that the scheme is GUID Partition Map. Then click the "Erase" button.
After the USB drive is prepared, open the Terminal in MacOS. You will use a command in the terminal to make the USB drive into a bootable installer for macOS.
If you are installing macOS Big Sur, type the following command:
sudo /Applications/Install\ macOS\ Big\ Sur.app/Contents/Resources/createinstallmedia --volume /Volumes/MyVolume
If you are installing a different version of macOS, you can find the command for the version you are installing here.
You'll have to wait a bit for this to install. After this is done, open the OC_Gen-X program you downloaded earlier.
To open the program, you will have to right-click the icon, select "open", then select "open" again.
This is a software wizard that helps us easily prepare what we need to install MacOS on our particular hardware setup. It will go out and get everything we need except the SSDTs and put them in a folder for you.
You can also do this is a more manual method by following the OpenCore Install Guide. But this program simplifies things for us quite a bit and it is not available for Windows.
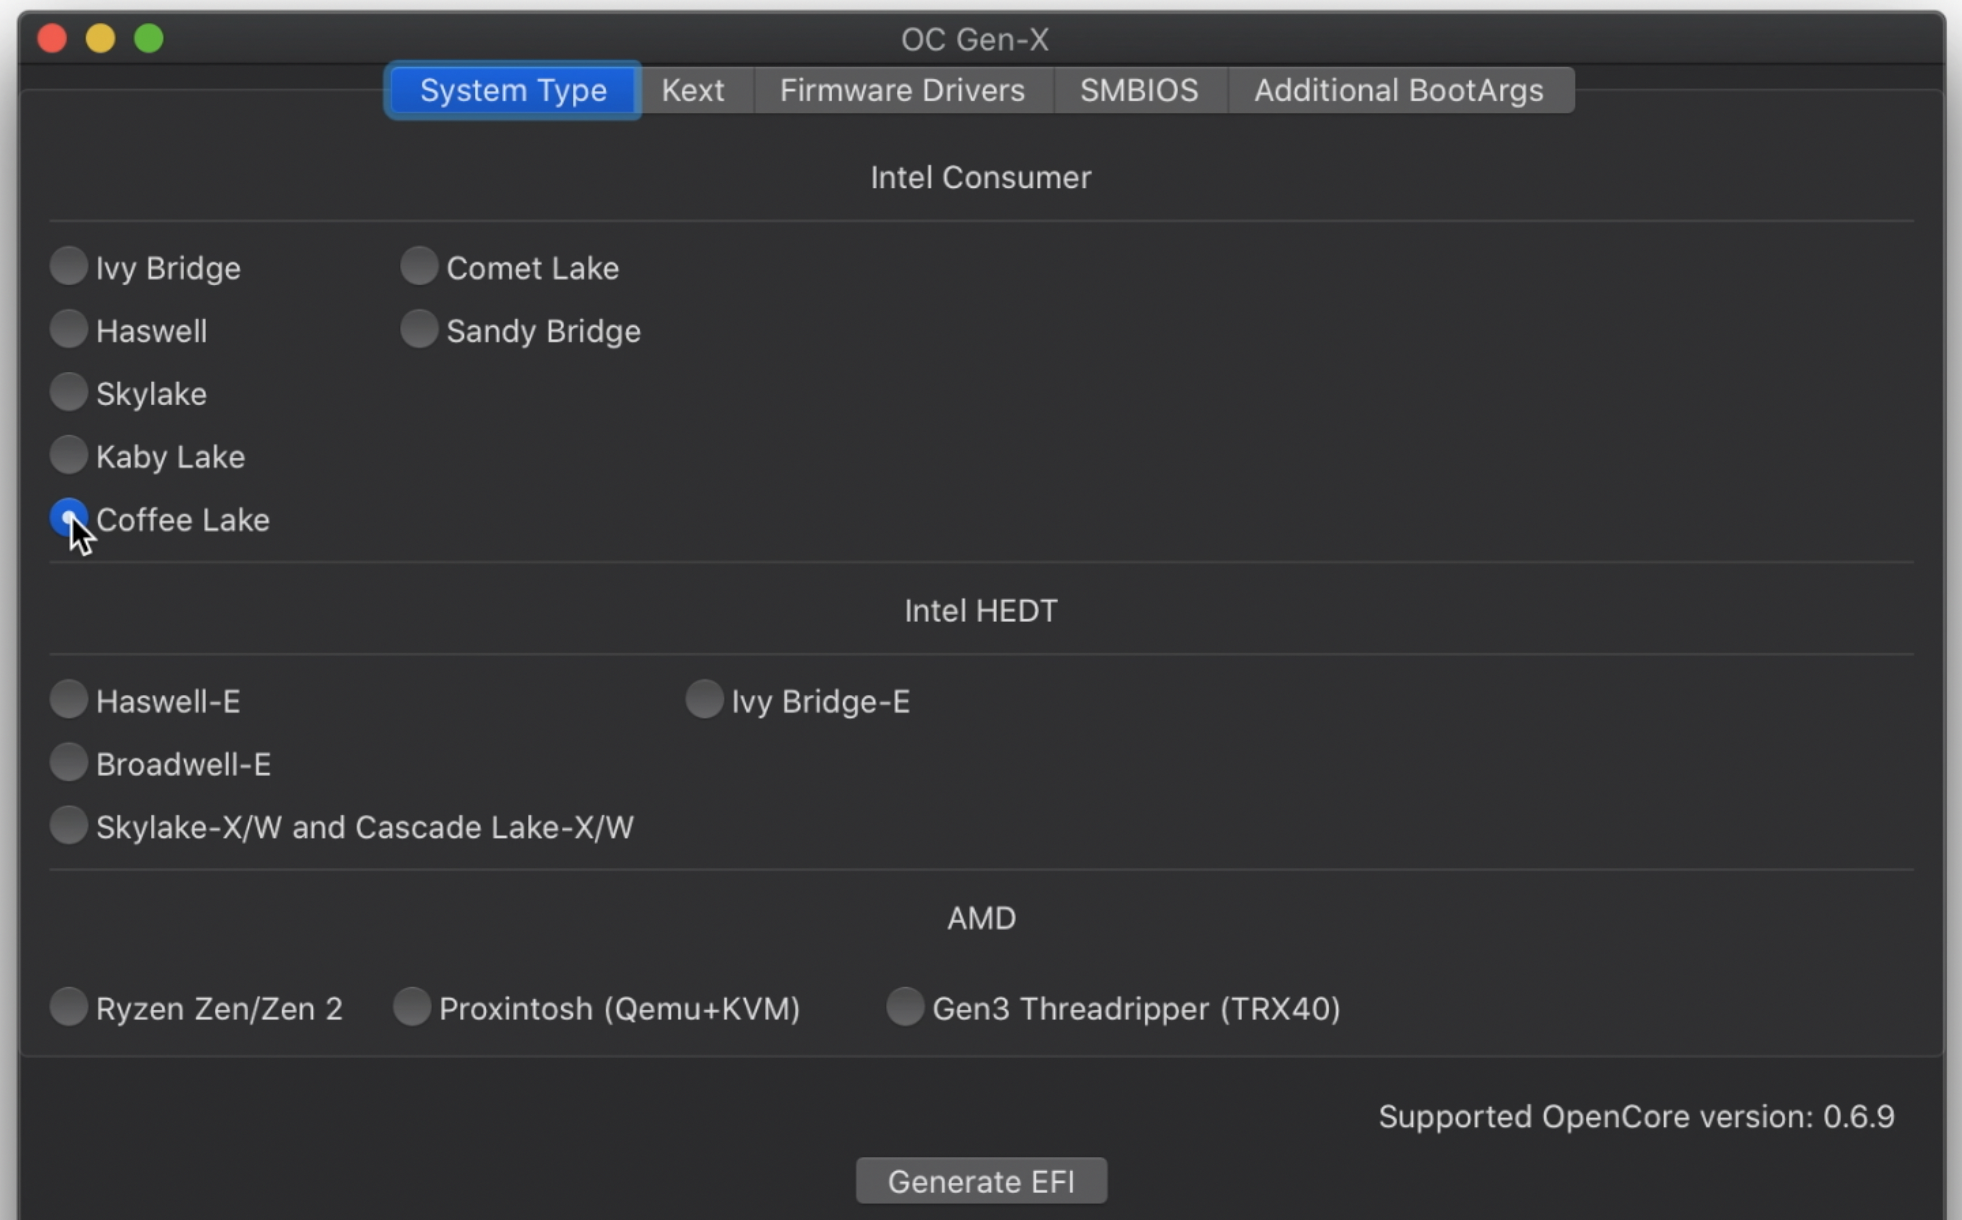
On this first screen under "System Type" choose the type of processor you have. Look in your processor's documentation to determine the name of the microarchitecture it uses. Getting this right is very important.
The type of processor I used is "Coffee Lake".
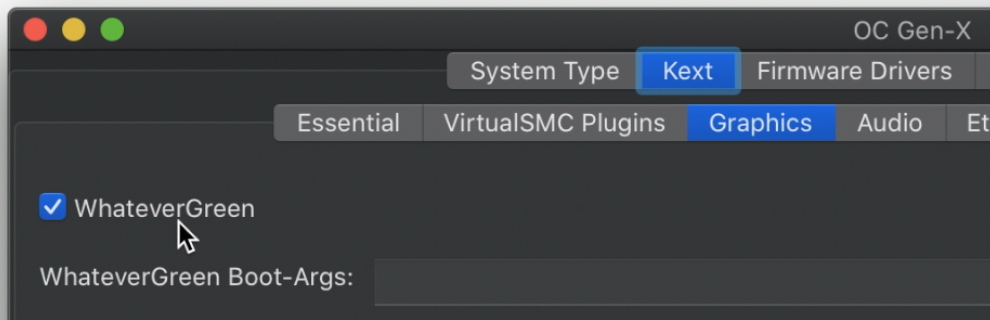
For most of the tabs in this program you can keep the default settings.
Under "Graphics" select "WhateverGreen" and under "Audio" select "AppleALC". Under "Ethernet" select "IntelMausi". These are very commonly used options but there is a small chance your settings will be different depending on your hardware and specific use case.
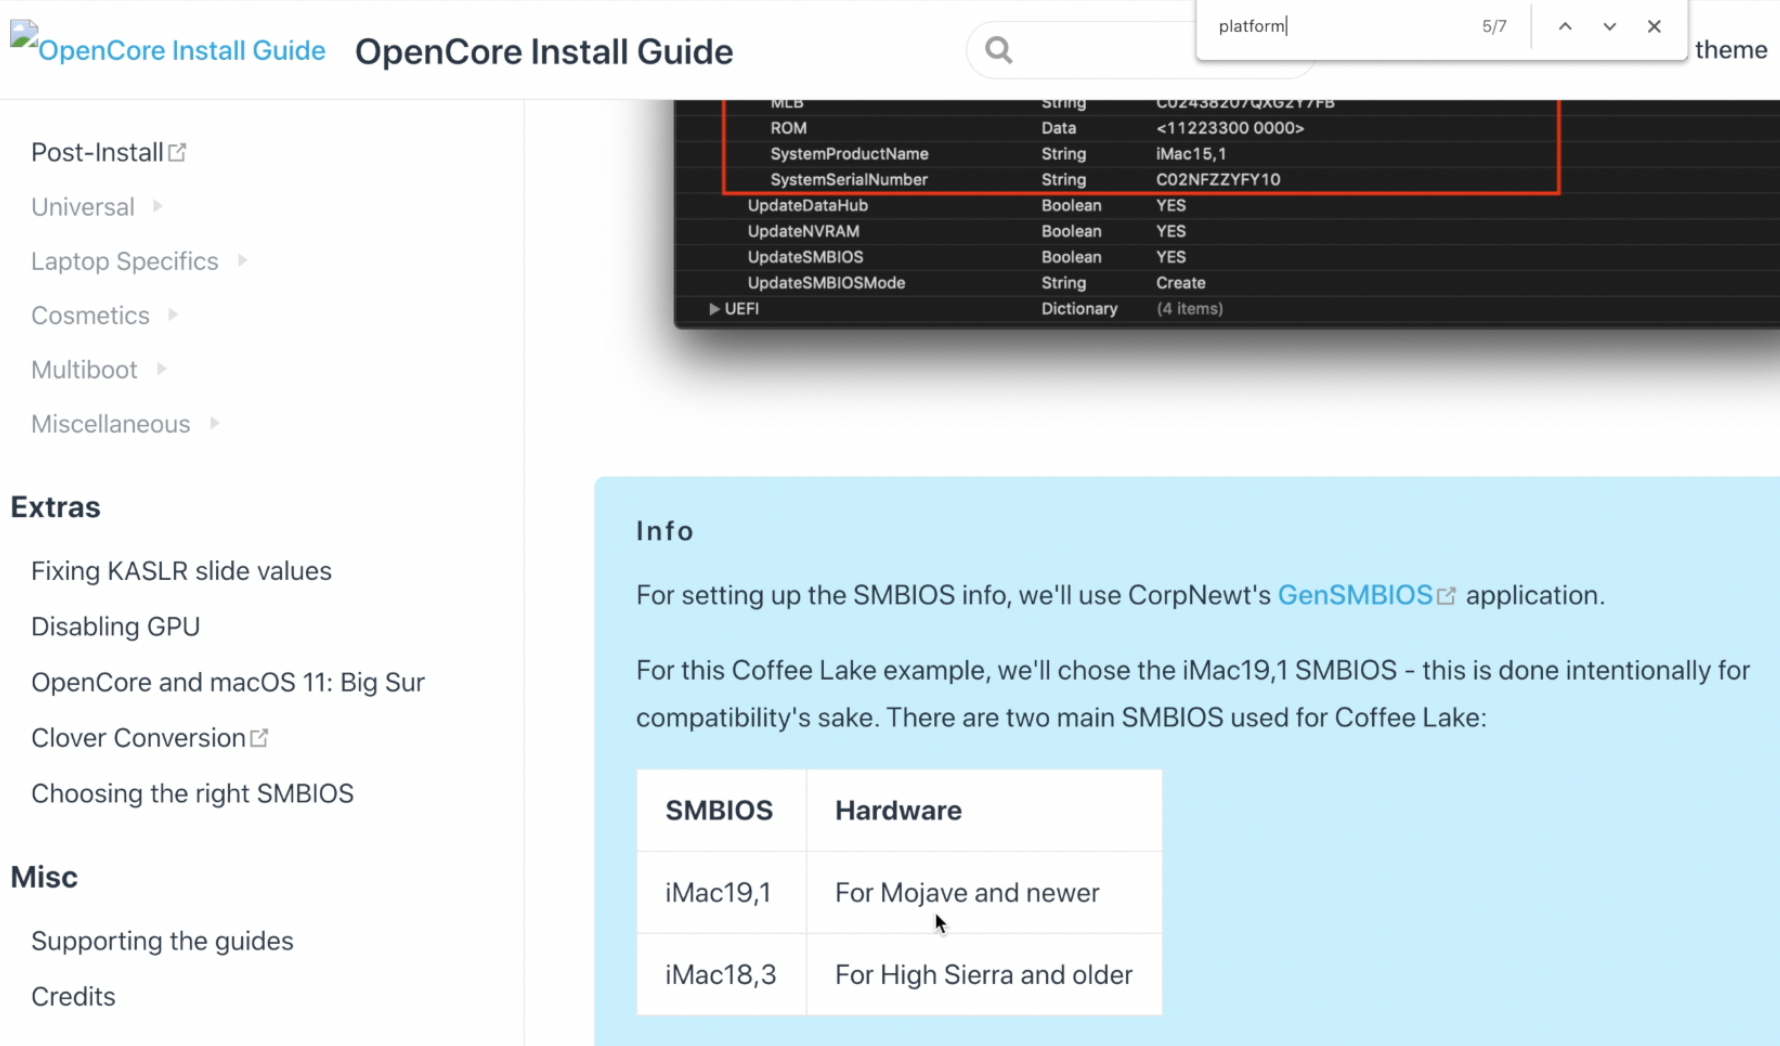
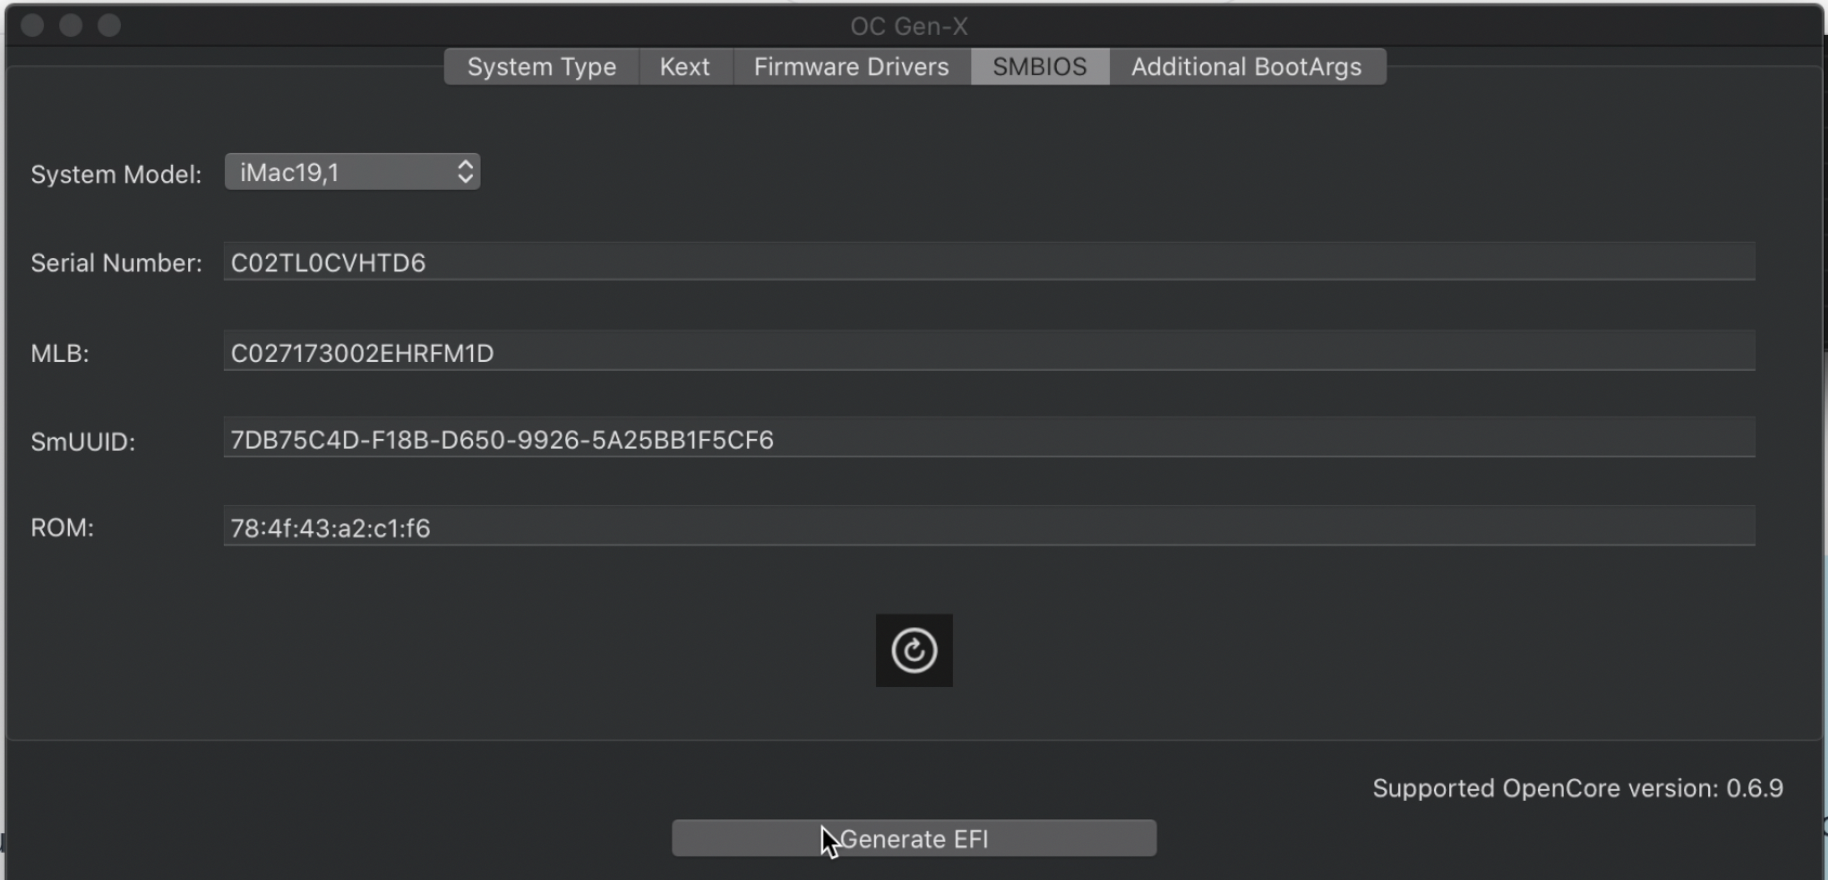
The SMBIOS is important and you will have to specify the correct System Model on that tab. For my setup I used "iMac19,1" but it could be different for you if you are using a different processor of a different operating system version.
To figure out what System Model to use, go to the Open Core Install Guide.
Select the section on the left side for your processor type (in my case it is "Coffee Lake"). Then find the heading "PlatformInfo". Scroll down a bit and you will see a table with the SMBIOS to use.
After selecting the appropriate System Model, click the "Generate EFI" button at the bottom.
An EFI folder has now been created on your desktop. We will now make some modifications to the contents.
You'll need to get the SSDT files. This is different depending on your processor.
You can find the list of the exact SSDT's you need at this link. Just select your processor type and download each of the required SSDTs.
Here are the links for the SSDTs needed for my Coffee Lake system.
Once all of those files are downloaded, move them into your EFI folder. They should be moved to this subfolder: EFI/ACPI/OC
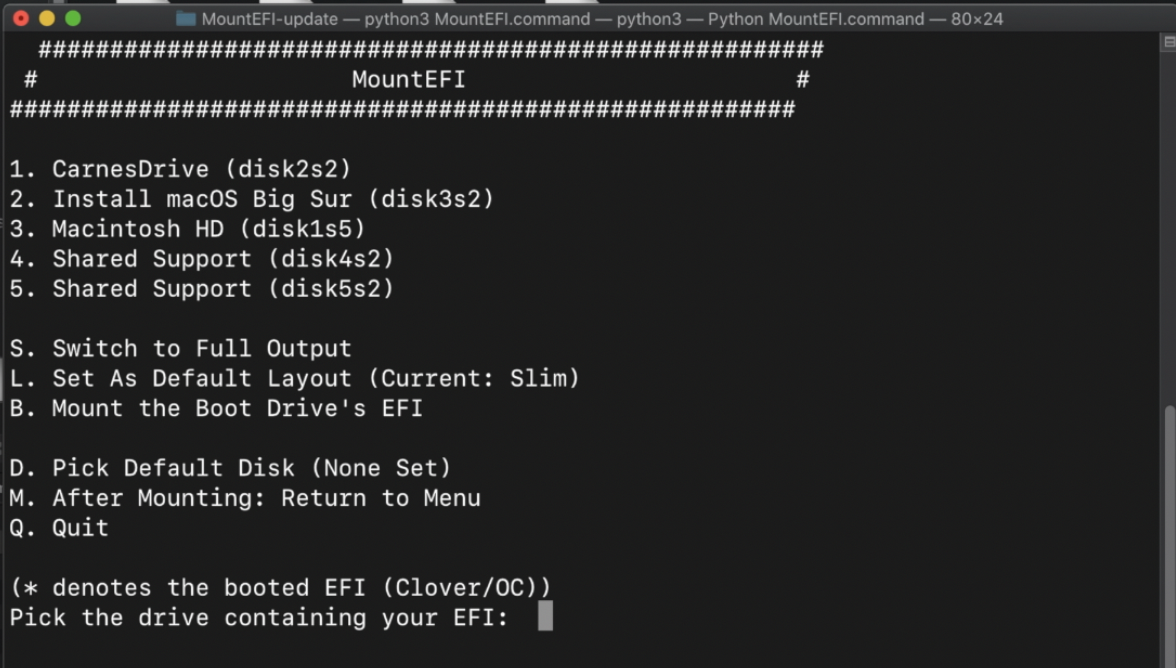
Now you will will use the MountEFI program downloaded earlier to mount the hidden EFI partition on the USB drive.
Right-click on MountEFI.command and click "open", then "open" again.
Select your USB drive. It should have a name like "Install macOS Big Sur" since we made it into a bootable installer for MacOS. In the screenshot below, it is option 2.
You now have a mounted EFI partition and an EFI folder from OC Gen-X. Drag the EFI folder into the EFI partition.
Open ProperTree.command which you downloaded earlier. Like before you can open it by right-clicking and selecting "open".
Once ProperTree is running, go to "File -> Open". Select the EFI partition, then the "OC" folder, then open the "config.plist" file.
The first thing we need to do is to inject all of the files in the EFI folder into the "config.plist" file.
So go to "File", then select "OC Snapshot". Make sure you're on the EFI partition. Go to the "EFI" folder, then the "OC" folder. And click the "Choose" button.
A dialog box could pop up here about what version to use. If this happens, click "Yes".
Now go back to "File", then select "OC Clean Snapshot" and select "Choose".
The OC Gen-X program helped simplify all the required setup. At this point you should verify that everything is setup correctly according the the official install guide.
Here is the guide for Coffee Lake. If you are using a different type of processor, just select your type in the left menu.
You can verify the quirks are set correctly in the config.plist file. They should all be correct.
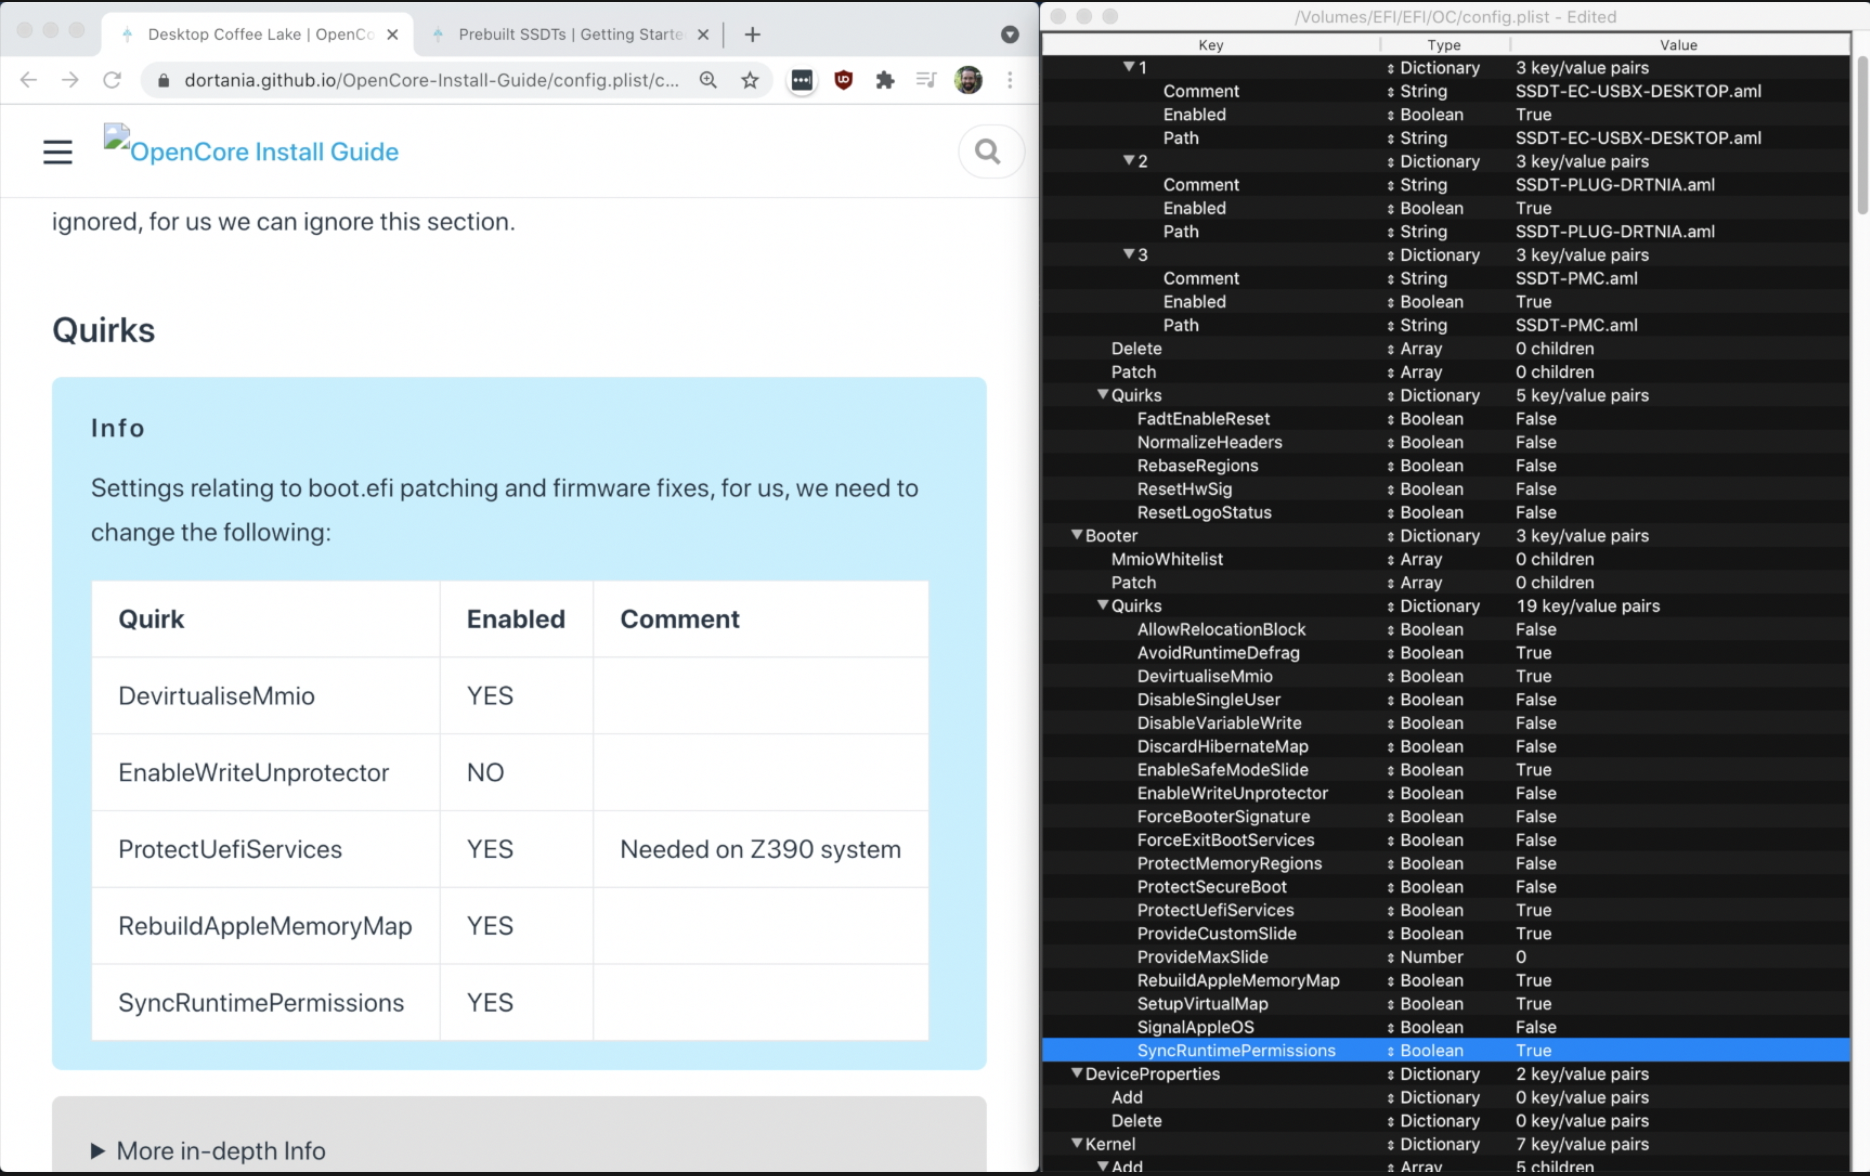
You need to do additional setup in the config.plist file to make sure the onboard graphics work. Find the "DeviceProperties" section, and then copy the following characters to add.
PciRoot(0x0)/Pci(0x2,0x0)
Note that this if you processor is not Coffee Lake, the exact thing you need to add under "DeviceProperties" could be different. Search for "Device Properties" in the OpenCore guide for your processor type to confirm what to add under "DeviceProperties" in the config.plist file.
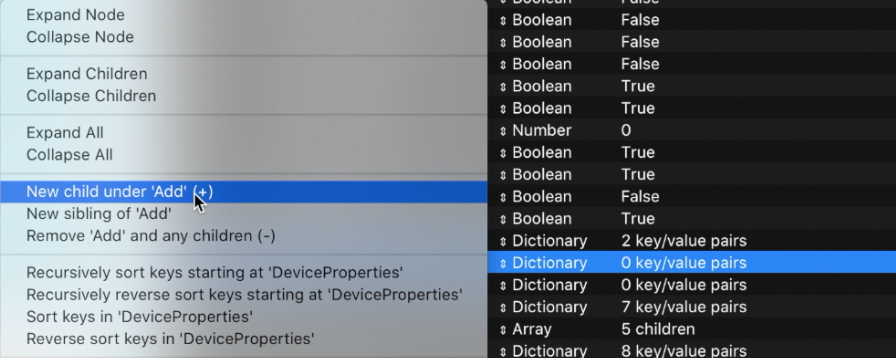
Under "DeviceProperties", click on "Add". Then right click and choose "New child under 'Add' (+)".
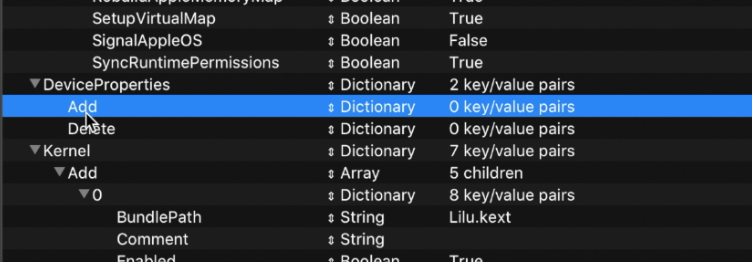
Double-click where it says "New String" and just paste the text into the field and hit enter. Then select in the next column where it says "String" and make sure that it is set to "Dictionary".
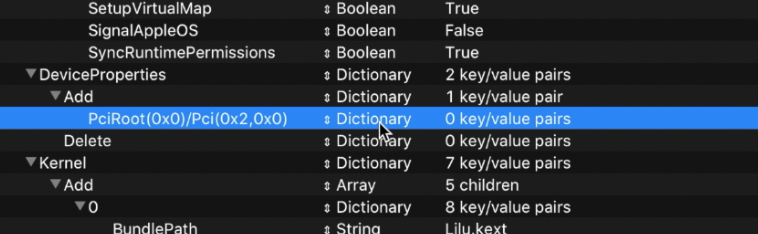
Next, we need to add more children under it and it should eventually look like this:
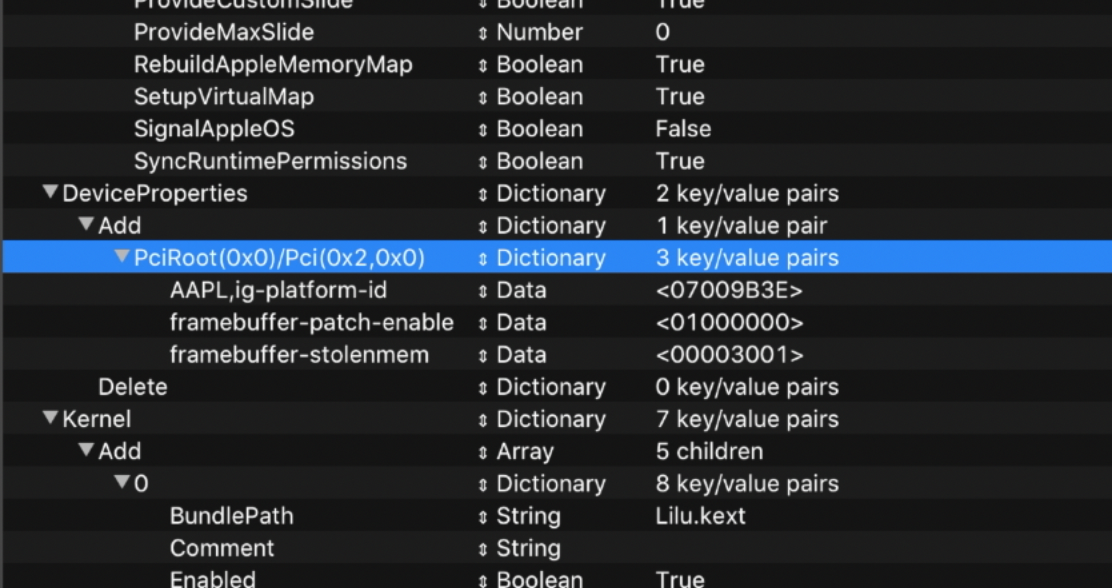
Below is the text from the image above that you need to add (if you system is Cofee Lake).
| Name | Type | Value |
| AAPL,ig-platform-id | Data | 07009B3E |
| framebuffer-patch-enable | Data | 01000000 |
| framebuffer-stolenmem | Data | 00003001 |
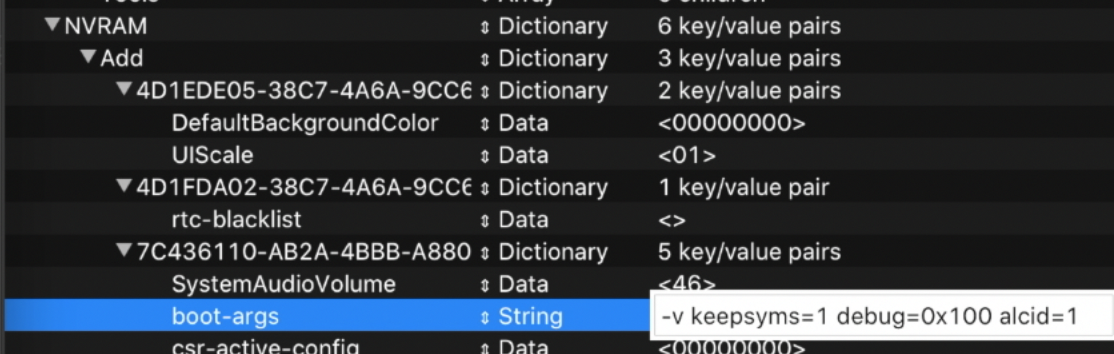
Now in the config.plist file, find the NVRAM section.
Update the "boot-args" so the text is "-v keepsyms=1 debug=0x100 alcid=1".
Now we'll change the language to English. So next to where it says "prev-lang:kbd", change "data" to "String" and set the value to "en-US:0" and hit enter.

If you want a different language just go to this link to find what language code to use.
The config.plist file is now done. So go to "file", then "save". You are now completely done setting up the bootable drive. So just eject the drive, and then you can plug it in to your Hackintosh.
Skip the next Windows section and go to the heading "BIOS Setup".
Using Windows to create the macOS Installer
The first step to creating a macOS installer on Windows is to download OpenCore. Make sure to download the zip file for the most recent release.
Unzip OpenCore and then go to /Utilities/macrecovery/. Next copy the folder path for the macrecovery folder:
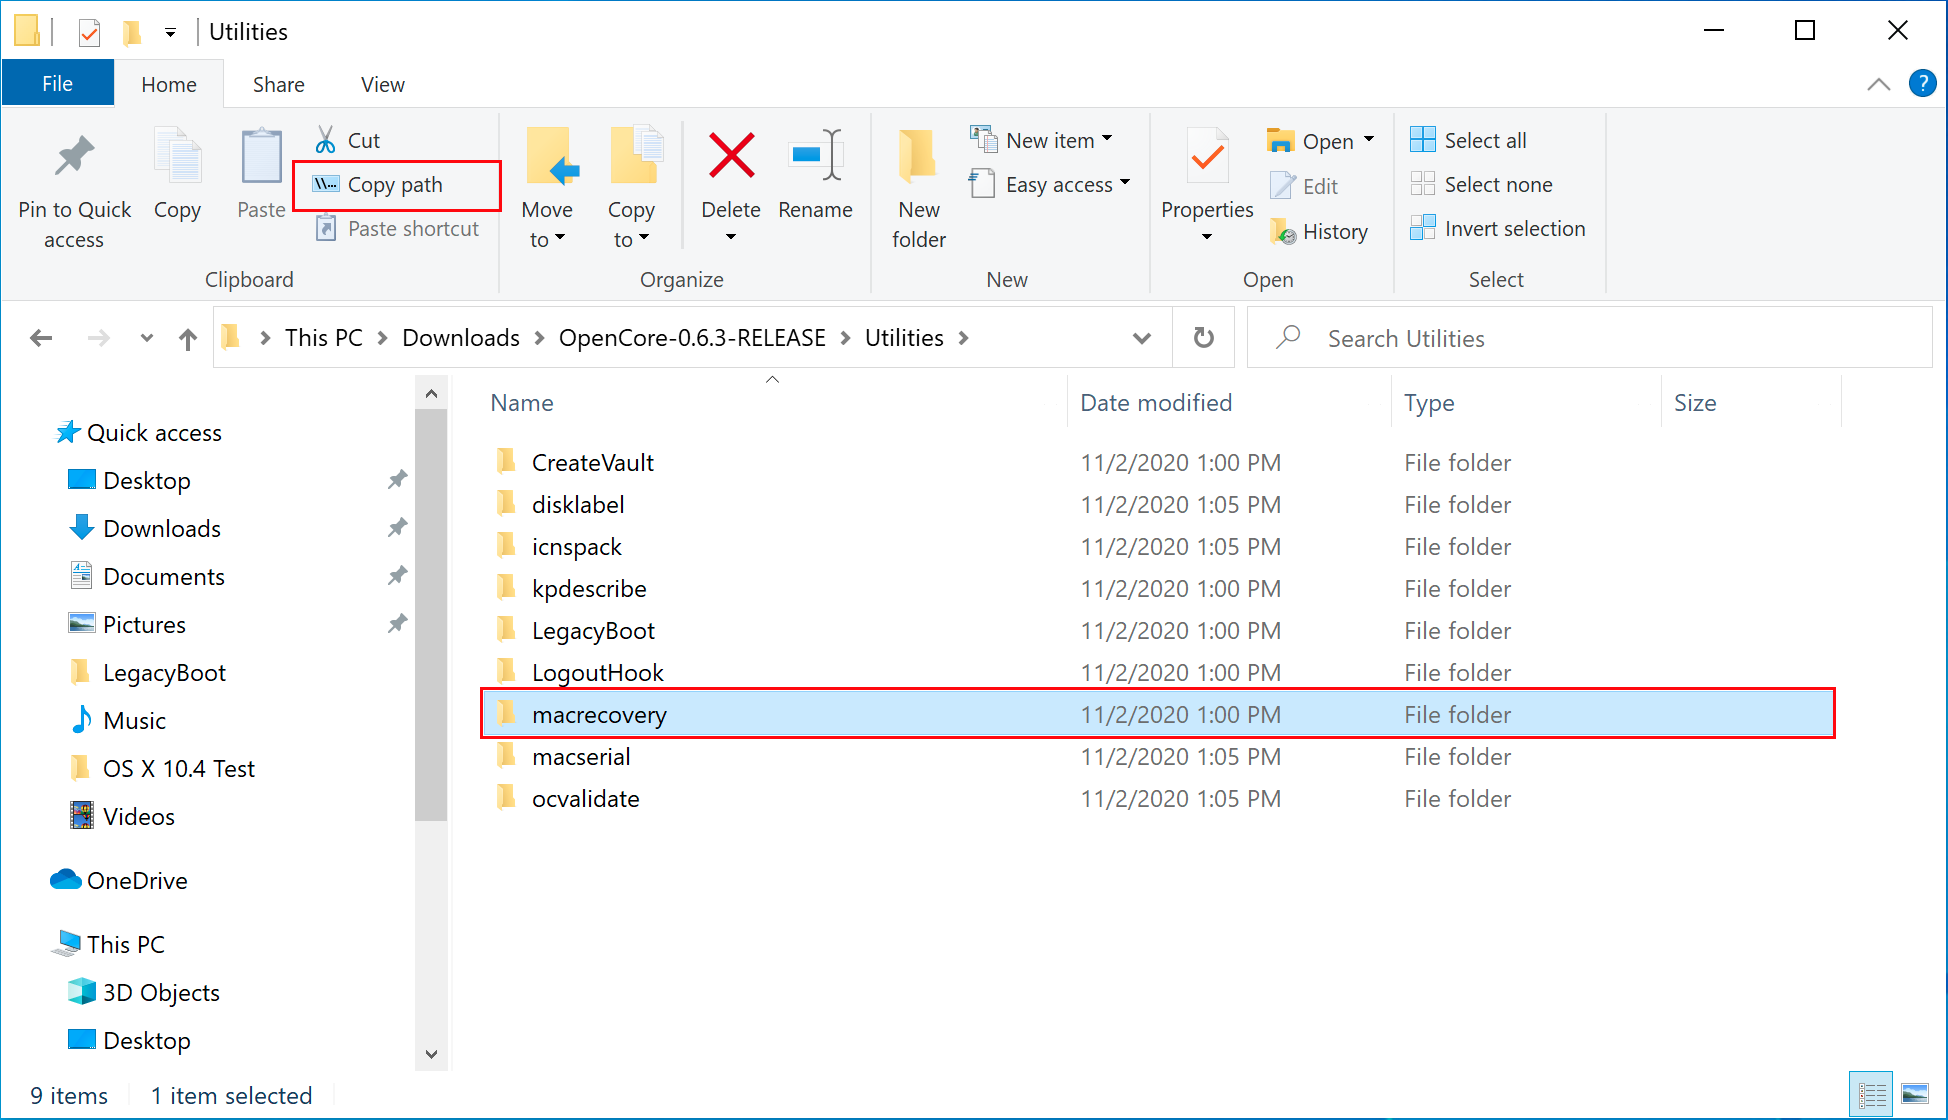 Source: OpenCore Docs
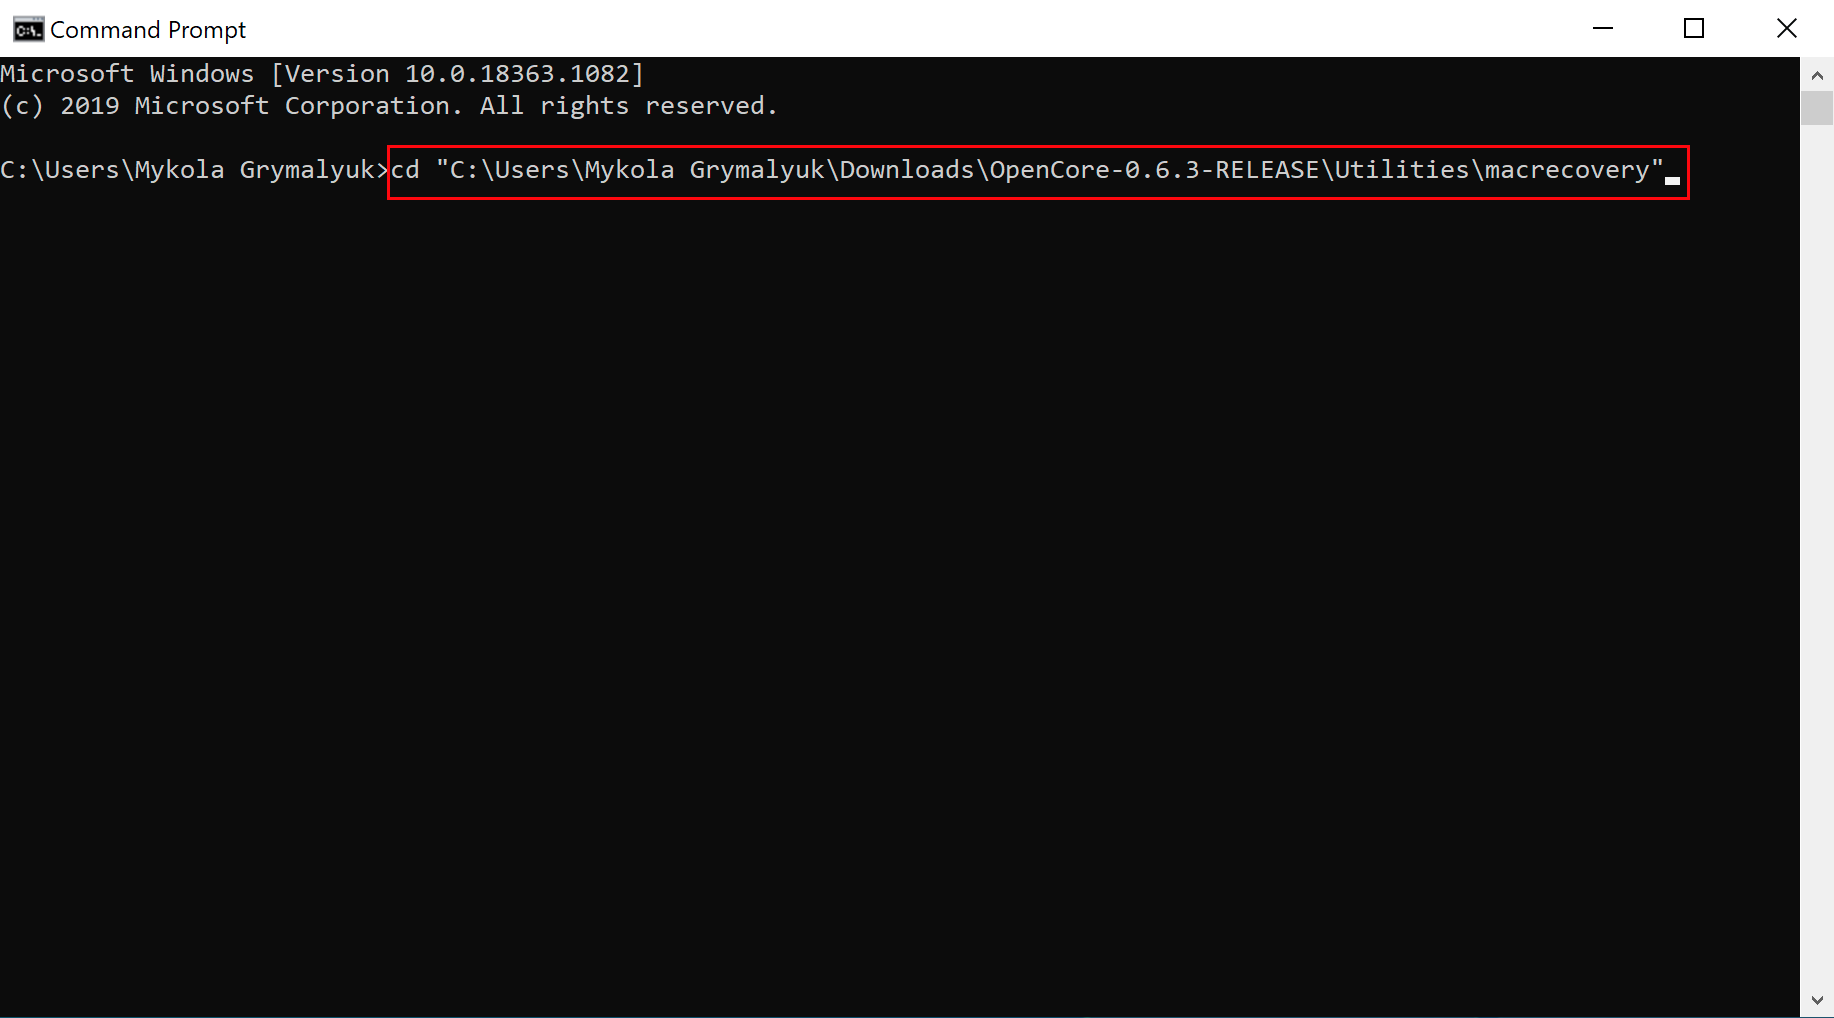
Open a Command Prompt and change directories into the macrecovery folder that you just copied using the command cd [PASTE_FOLDER_NAME].
It should look something like this:
 Source: OpenCore Docs
Now in the Command Prompt, run one of the following commands depending on what version of macOS you want. If you don't already have Python, you will have to install it first.
# Mojave(10.14)
python macrecovery.py -b Mac-7BA5B2DFE22DDD8C -m 00000000000KXPG00 download

# Catalina(10.15)
python macrecovery.py -b Mac-00BE6ED71E35EB86 -m 00000000000000000 download

# Big Sur(11)
python macrecovery.py -b Mac-E43C1C25D4880AD6 -m 00000000000000000 download
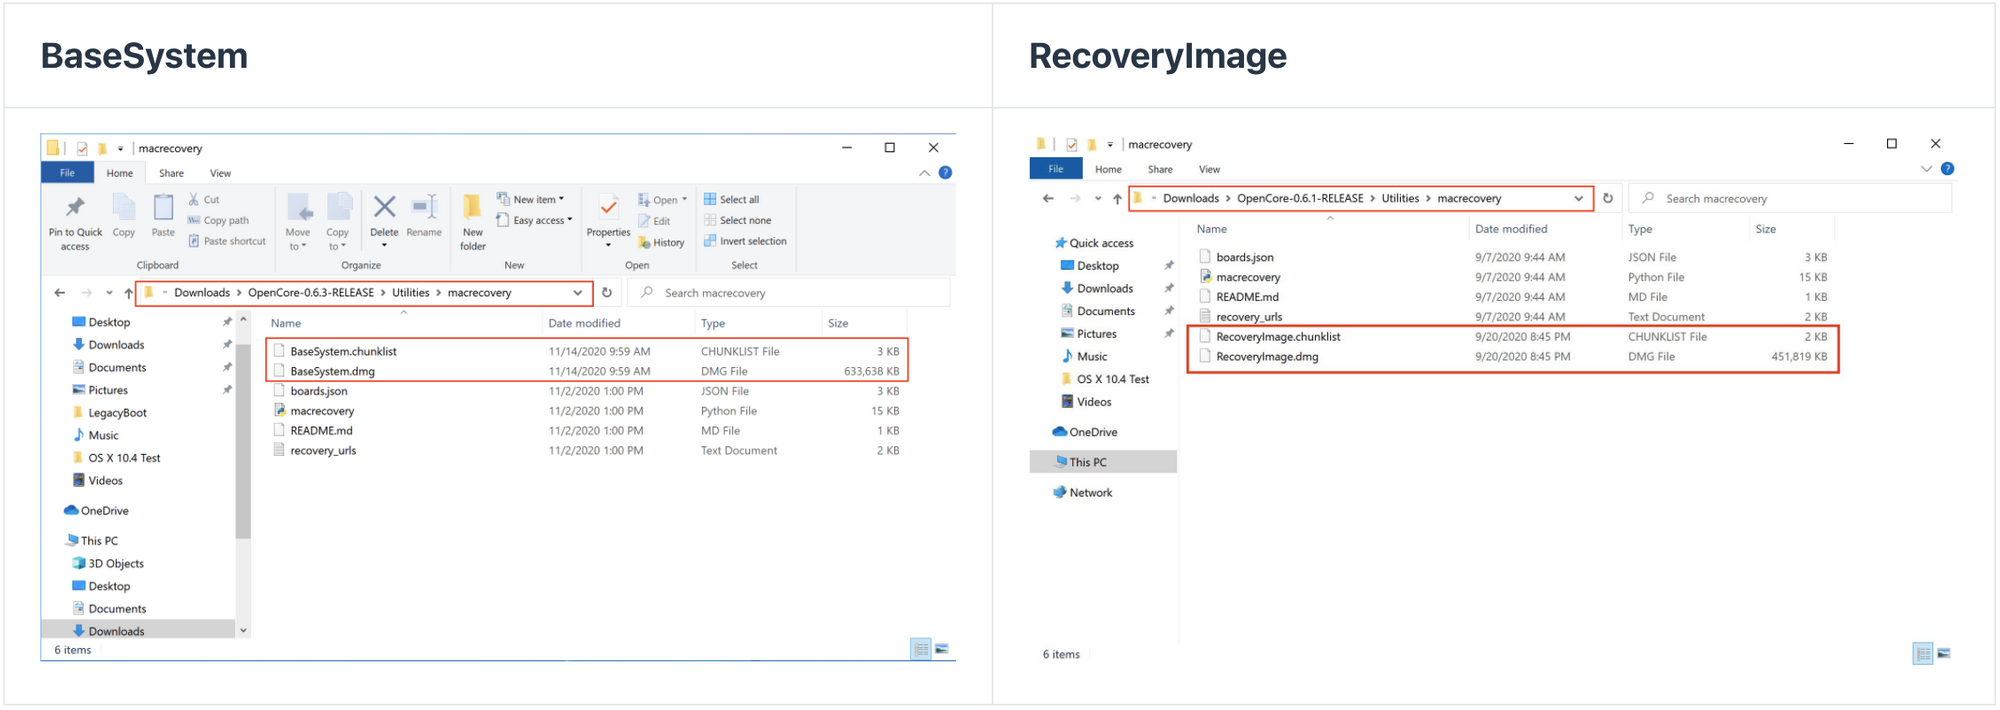
This will take some time, however once you're finished you should get either BaseSystem or RecoveryImage files:
 Source: OpenCore Docs
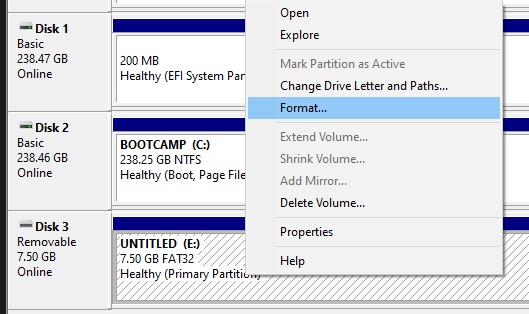
Now open up Disk Management and format the USB drive as FAT32. Follow these steps from the OpenCore Docs:
- Right click the Start Button on your task bar and select Disk Management.
- You should see all of your partitions and disks. On the bottom half, you'll see your devices. Find your USB.
- You'll want to format the USB to have a FAT32 partition.
- If you have multiple partitions on the USB, right click each partition and click Delete Volume for your USB.
- Right click the unallocated space and create a new simple volume. Make sure it is FAT32 and at least a gigabyte or two big. Name it "EFI".
- Otherwise, right click the partition on the USB and click Format and set it to FAT32.
 Source: OpenCore Docs
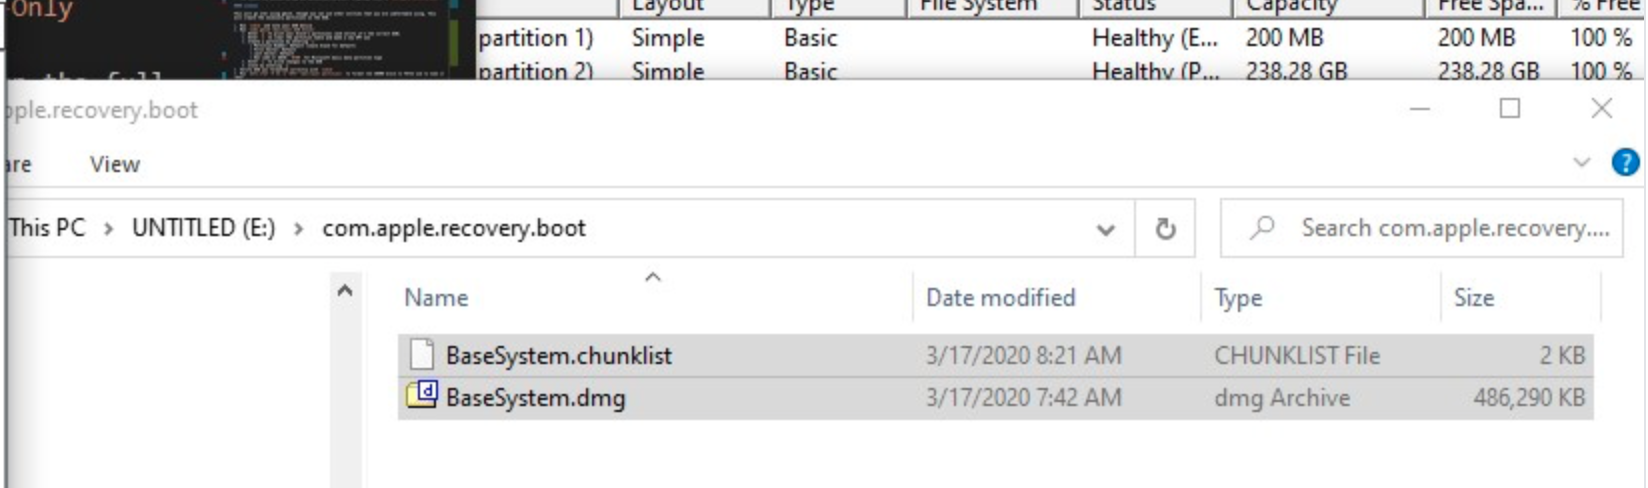
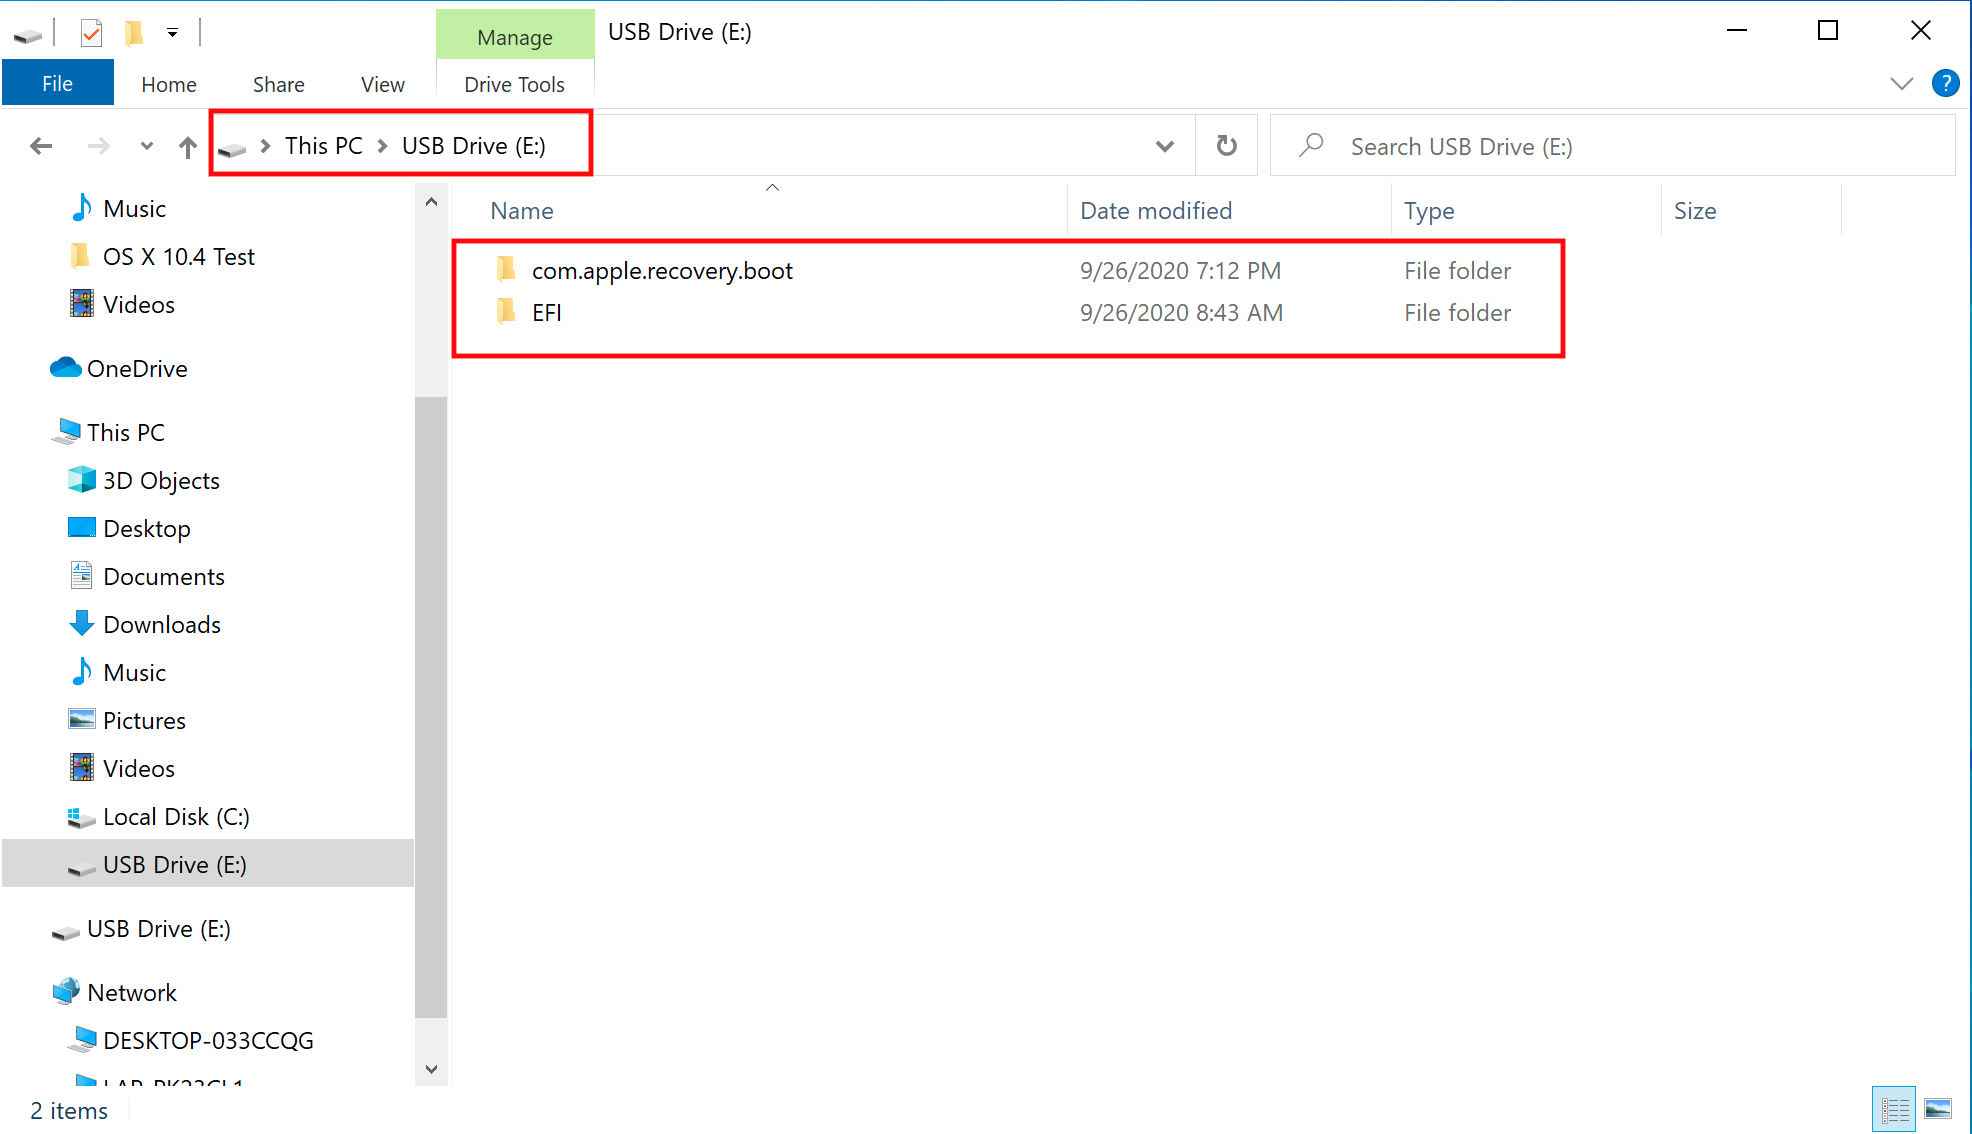
Next, go to the root of this USB drive and create a folder called com.apple.recovery.boot. Then move the downloaded BaseSystem or RecoveryImage files. Please ensure you copy over both the .dmg and .chunklist files to this folder:
 Source: OpenCore Docs
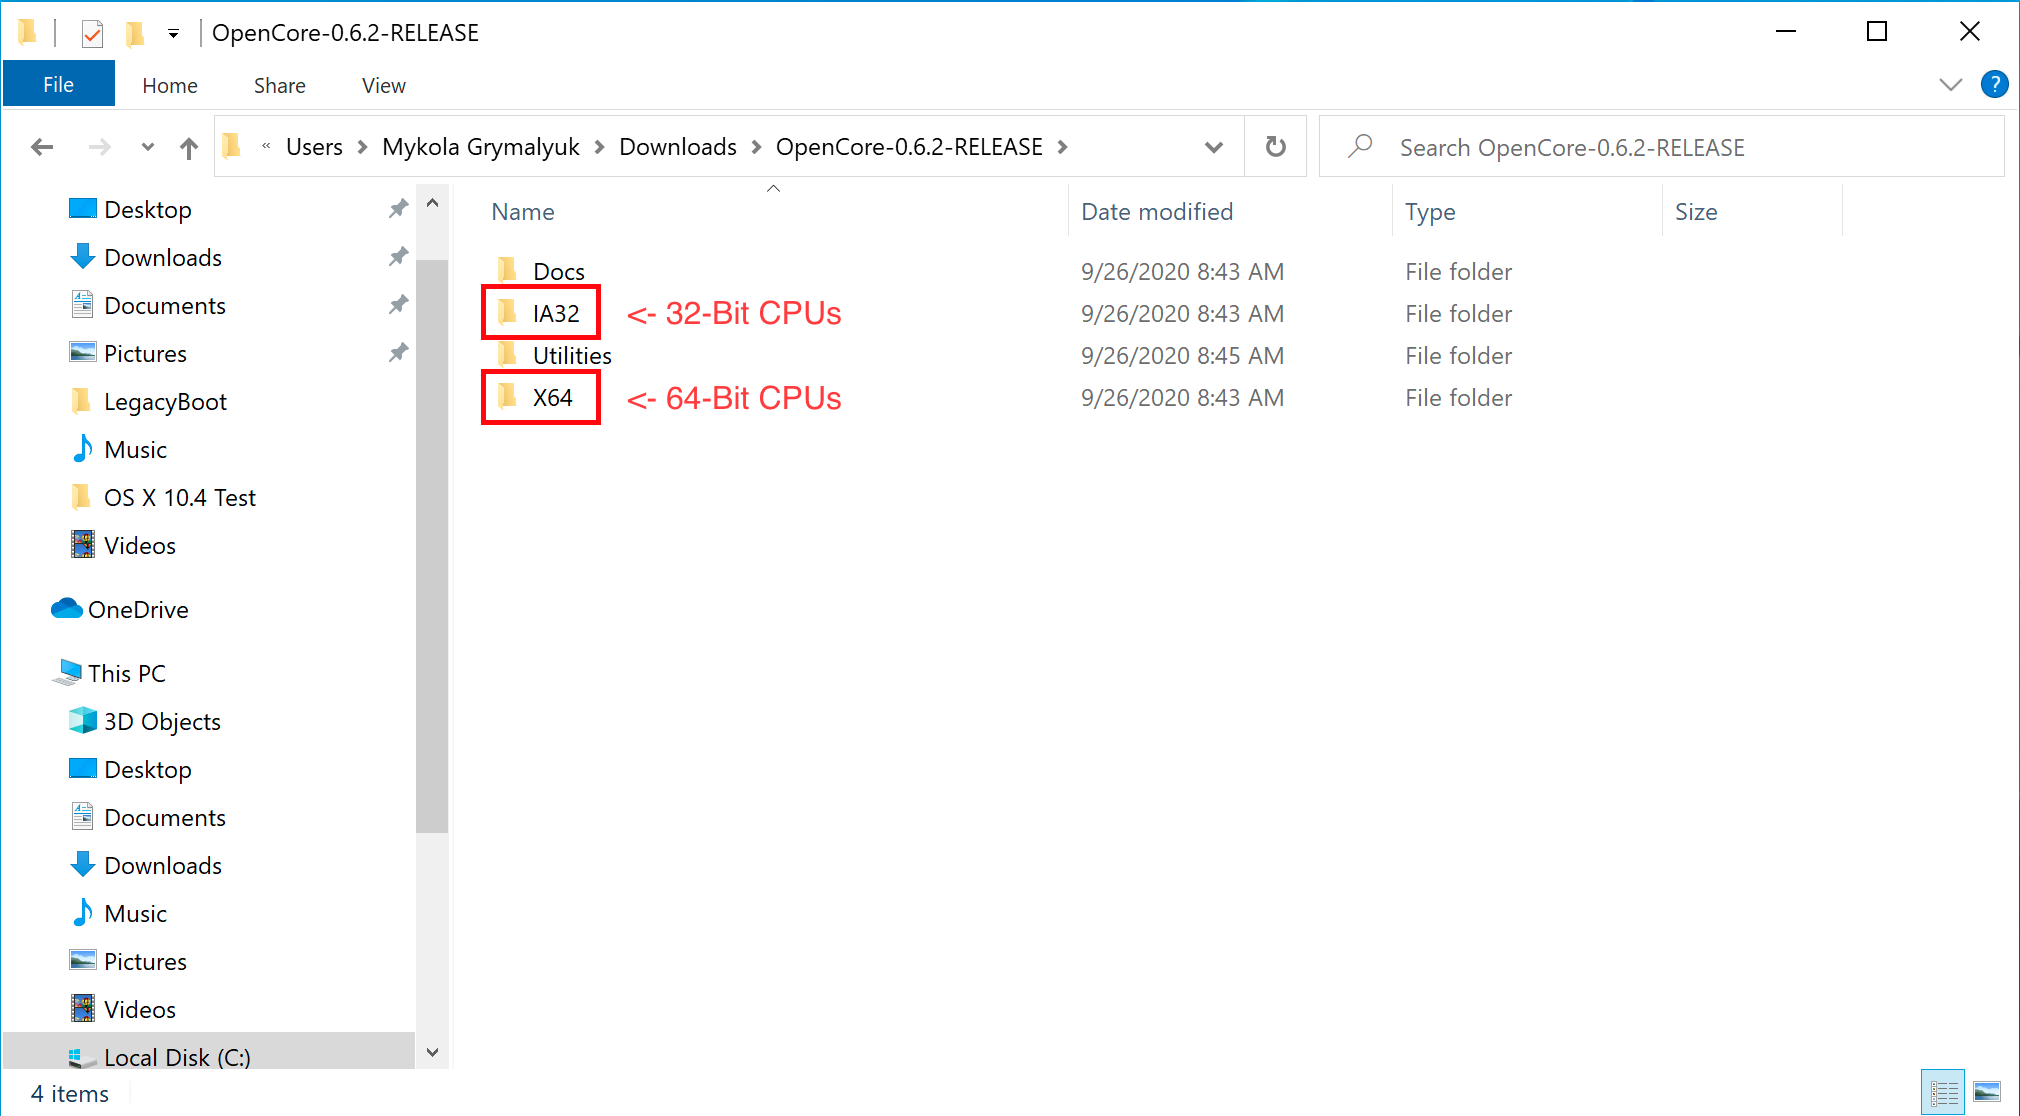
Now grab OpenCorePkg you downloaded earlier and open it:
 Source: OpenCore Docs
Here we see both IA32(32 Bit CPUs) and X64(64 Bit CPUs) folders, choose the one that's most appropriate to your hardware and open it. Next grab the EFI folder inside and place this on the root of the USB drive along side com.apple.recovery.boot. Once done it should look like this:
 Source: OpenCore Docs
At this point you will have to continue setting up your EFI folder. Because of the complexity of this step and all the different possible options depending on your setup, you should follow along with the official documentation for the next few steps.
Here are the links to the instructions for the next steps when using Windows to create the bootable USB installer. Note that the screenshots in the documentation show a mac but the steps apply to Windows as well. For setup using a mac, you don't have to go through these steps because there is a wizard that does all of them automatically.
Adding The Base OpenCore Files
BIOS Setup
I'll show you how I setup my BIOS for my Hackintosh. The BIOS software is specific to my motherboard and yours may look a little different. If yours looks different, do you best to find equivalent setting in you software, if yours looks different. Note that BIOS setting are easy to experiment with and you don't have to have all the same settings as me to get everything working.
Boot the computer up and then hit the "Delete" key to get into the BIOS.
Most setting can be left as the default. Here are the settings that should be updated:
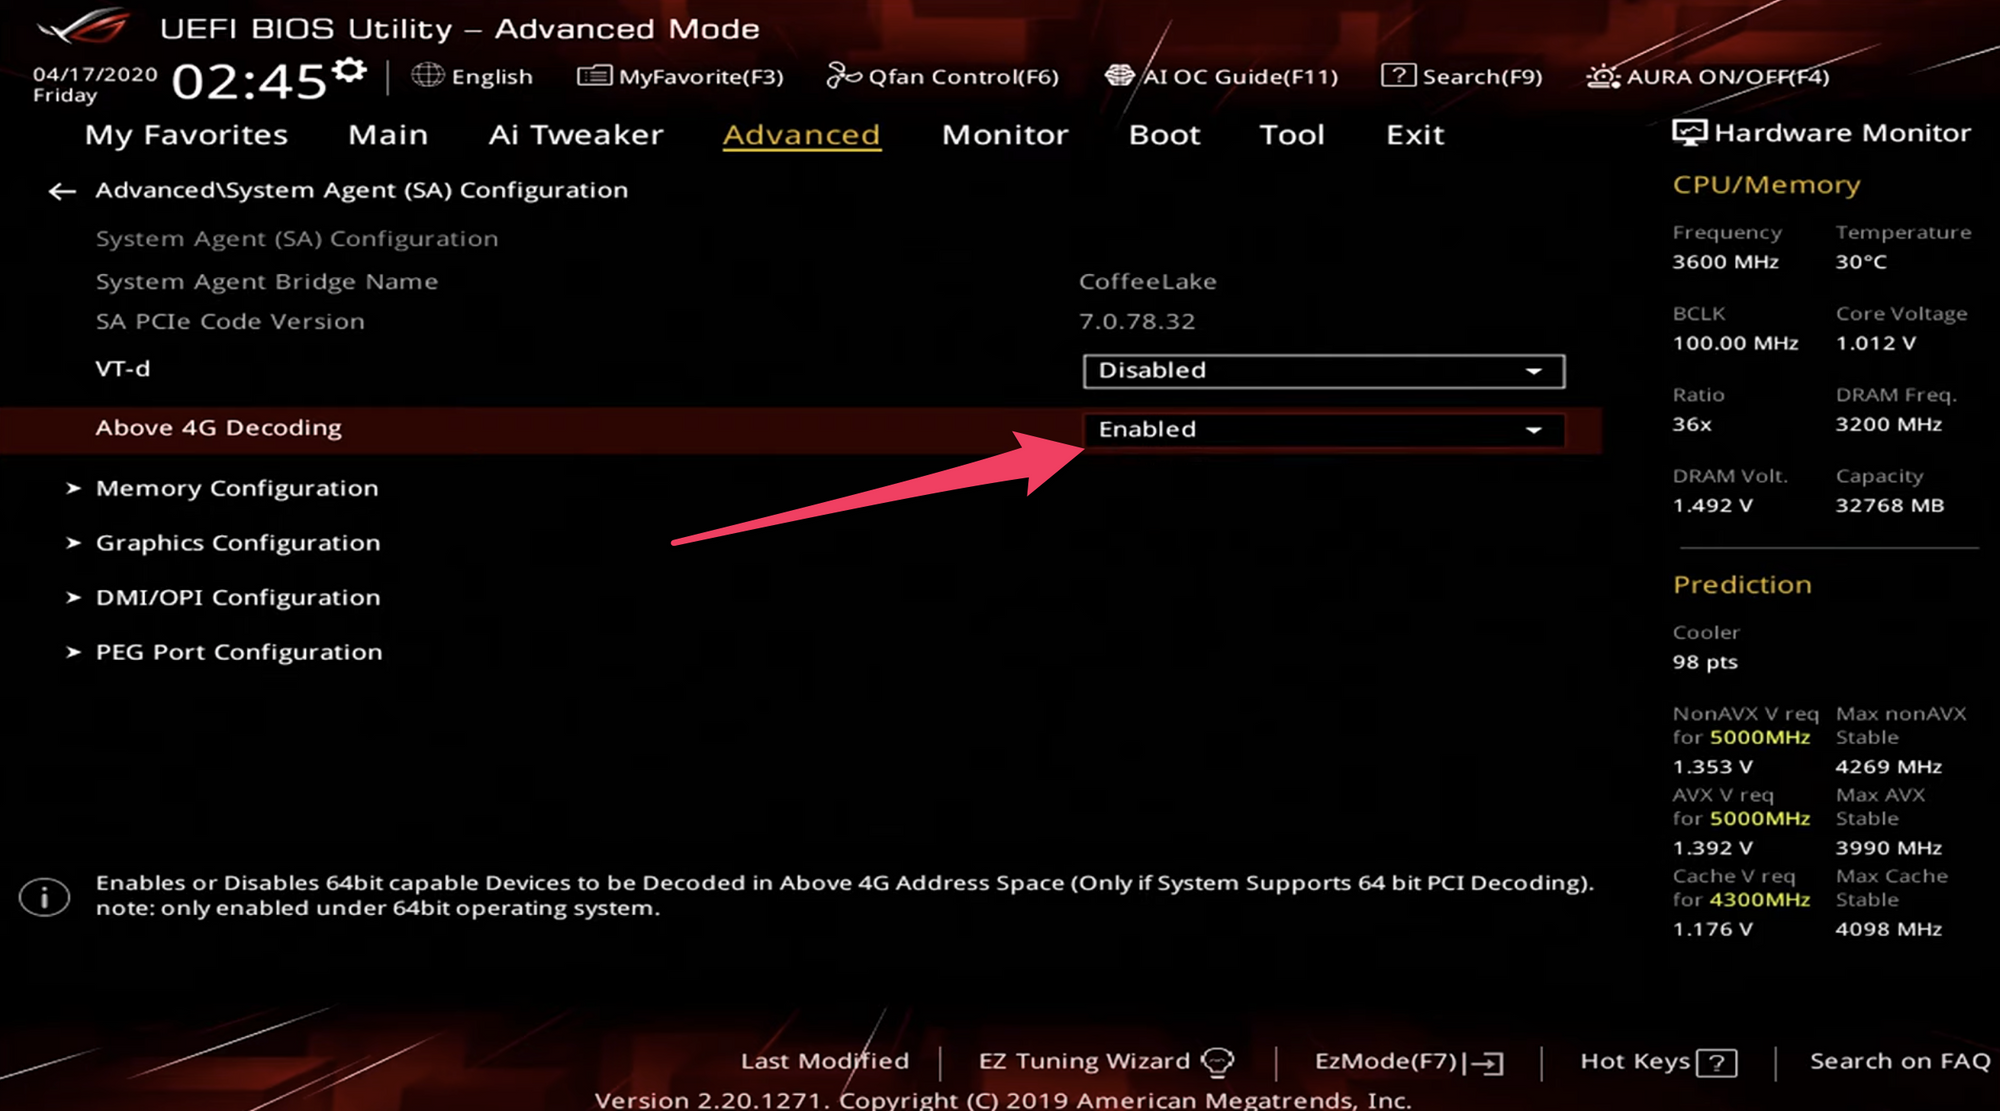
Under Advanced, "Above 4G Decoding" should be Enabled.
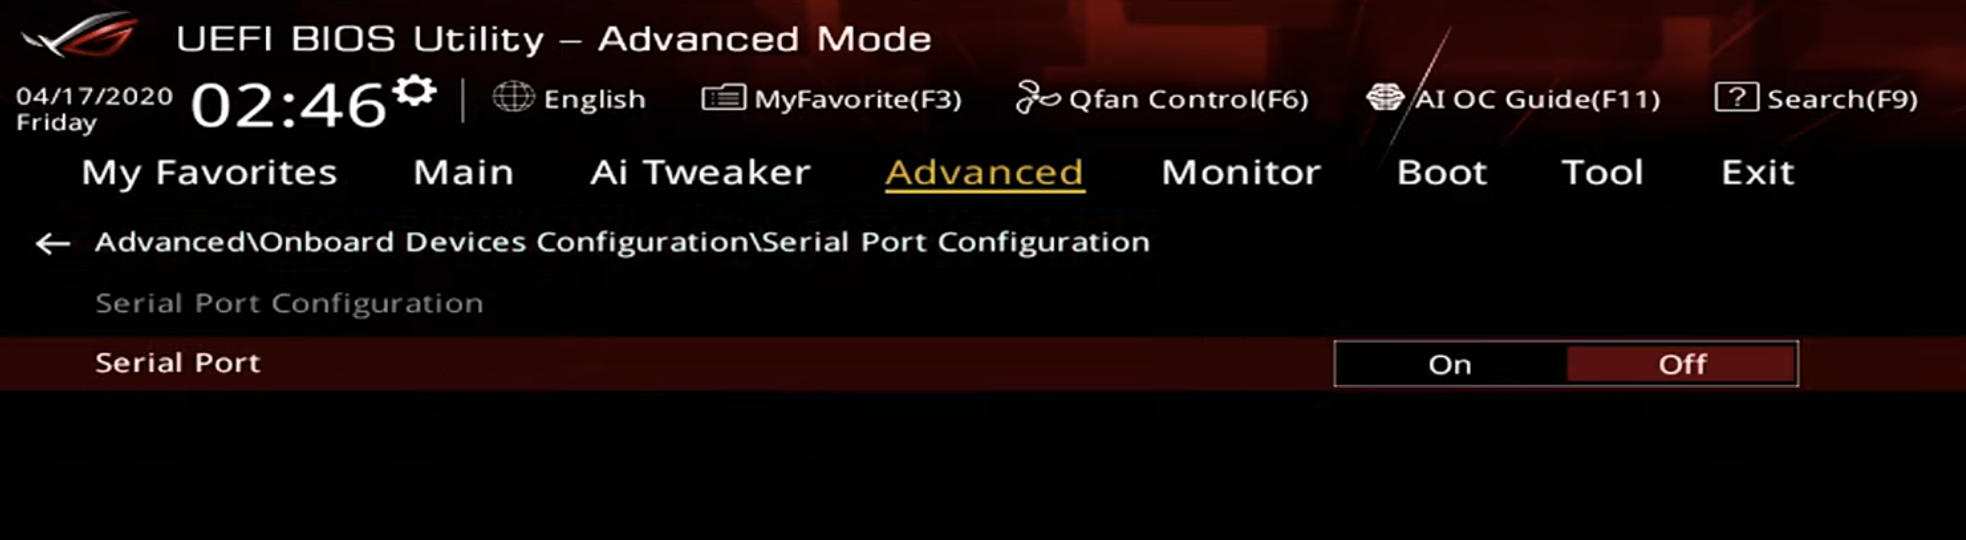
Under Advanced, and then under Serial Port Configuration, turn "Serial Port" to Off.
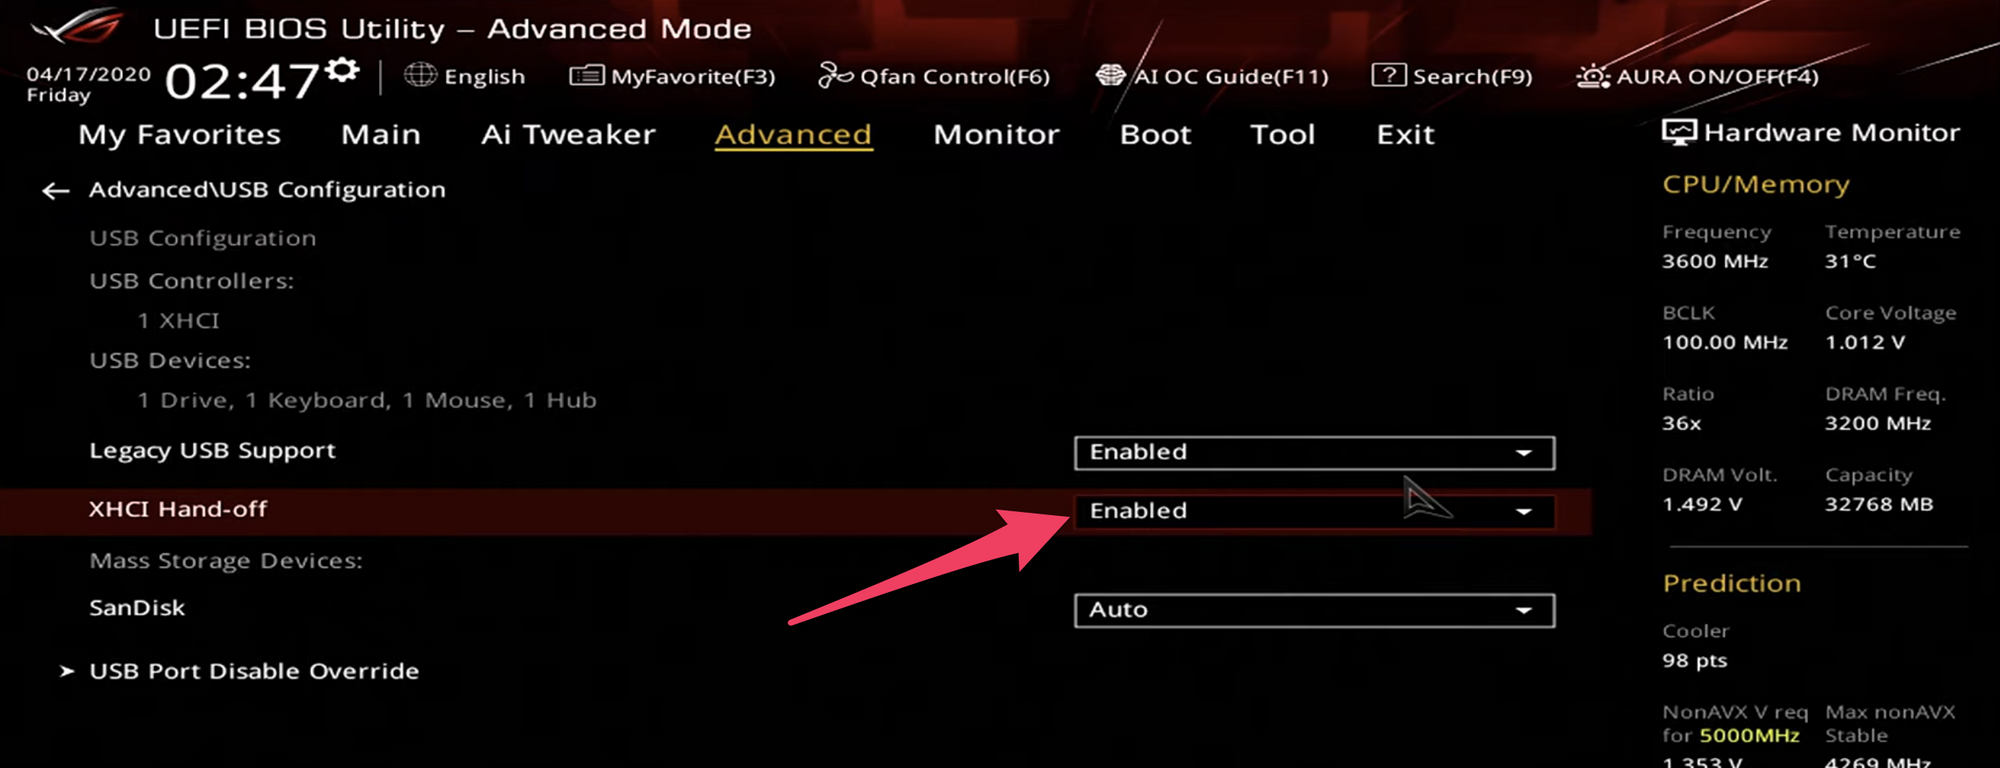
Under Advanced, and then under USB Configuration, set "XHCI Hand-off" to Enabled.

Under Boot, and then under Boot Configuration, set "Fast Boot" to Disabled

Under Boot, and then under Secure Boot, set "OS Type" to Windows UEFI mode.
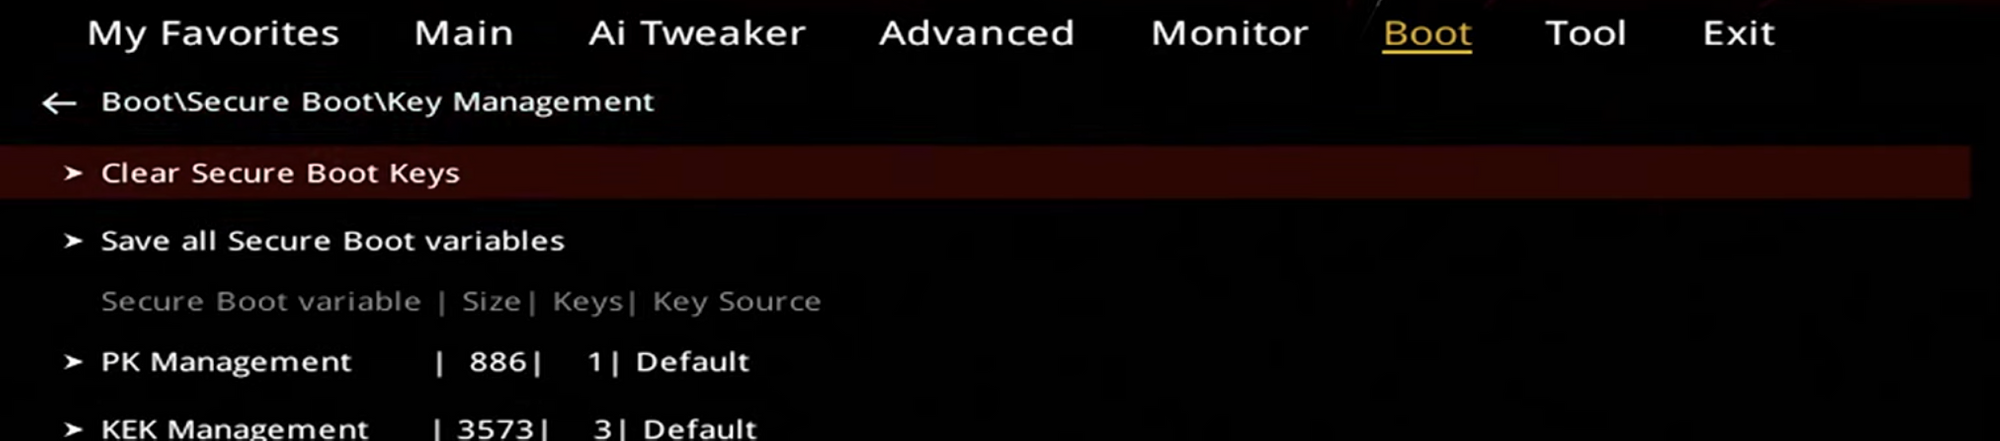
The final thing you need to do is to go under Boot > Secure Boot > Key Management. Then select "Clear Secure Boot Keys".
Now go to Exit and select "Save Changes & Reset".
MacOS Setup
After the computer restarts, hit F12 to get into the boot menu. Choose "Install MacOS Big Sur (External).
The next few screenshots are a little blurry since I was videotaping my monitor and did not focus correctly. Sorry about that.
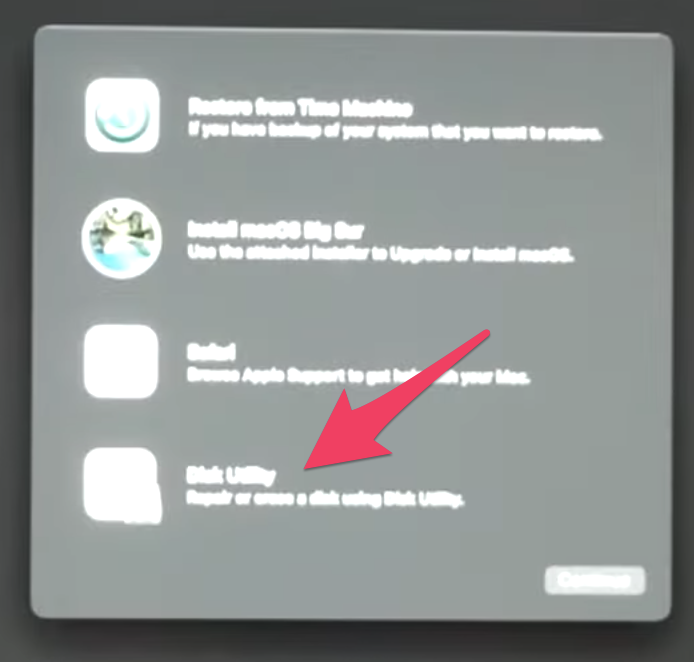
After it loads, the macOS Utilities screen should appear. Select "Disk Utility".
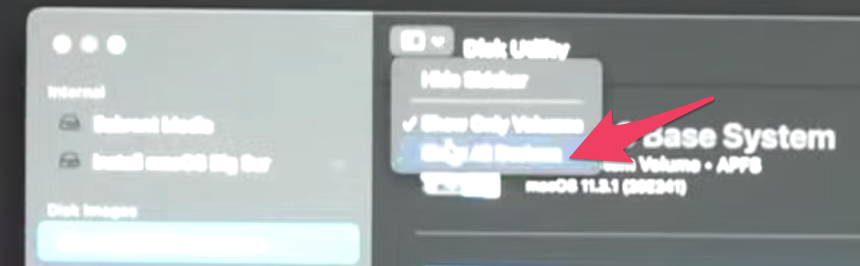
Click the dropdown menu toward the top and click "Show All Devices". Then select your hard drive and click "Erase" at the top.
You can name the drive anything you like. For Format, make sure to choose "Mac OS Extended (Journaled) and for Scheme choose "GUID Partition Map"
After the drive is erased, close Disk Utility and select "Install MacOS Big Sur". You will have to choose the hard drive you just formatted. And then you will have to wait as macOS is installed.
The computer should restart back into the boot menu. Select "MacOS Installer".
At this point you will set up the computer just like you would a brand new Mac computer. After the setup, macOS Big Sur will load.
There is one more thing left to do. You have to copy the EFI folder from the hidden EFI partition on the USB stick to the EFI partition on the hard drive you installed macOS on.
On the new Hackintosh, go to the web browser and download MountEFI. This is the same program you used before, if you created the installer on a mac. After clicking the link, click the "Code" button, then "Download ZIP".
Go to the downloads folder and and right click on MountEFI.command and open it.
Use the program to mount the EFI partitions from both the hard drive on your Hackintosh and the USB drive called "Install MacOS Big Sur". First select one, then the other.
After both partitions are mounted, you will need to copy the EFI folder from the USB EFI partition over to the hard drive EFI partition.

At this point you can restart the computer and take out the USB drive. The Hackintosh is complete!