

In this article, we will build an amazing Multi Step Registration form with smooth animated transitions using the MERN stack (MongoDB, Express, React, and Node.js).
By building this App, you will learn a lot of concepts in React and Node.js including:
- How to manage data for multiple forms with validation for each field
- How to retain values of forms data across routes
- How to update progress indications for each registration step
- How to load country-specific state and city from the API
- How to create smooth sliding animations using a very popular framer-motion library
- How to create Rest APIs using Express.js
- How to implement login and registration functionality with MongoDB
- How to store and validate passwords stored in encrypted form in MongoDB
And much more.
We will be using React Hooks syntax for building this application in React. So if you're new to React Hooks, check out my Introduction to React Hooks article to learn the basics of Hooks.
We will also be using a MongoDB database to store the registered user data, so make sure you install MongoDB locally by following instructions from this article.
Alright, let’s get started.
Initial Project Setup
Create a new project using create-react-app:
npx create-react-app multi-step-form-using-mern
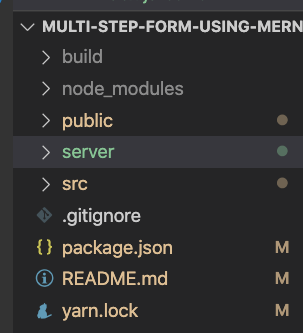
Once you've created the project, delete all files from the src folder and create an index.js file and a styles.scss file inside the src folder. Also create components, router, and utils folders inside the src folder.
Install the necessary dependencies like this:
yarn add axios@0.21.1 bootstrap@4.6.0 react-bootstrap@1.5.0 country-state-city@2.0.0 framer-motion@3.7.0 node-sass@4.14.1 react-hook-form@6.15.4 react-router-dom@5.2.0 sweetalert2@10.15.5
Open your styles.scss file and add the contents from here inside it.
We'll use SCSS syntax to write CSS. So if you're new to SCSS, check out my article here for an introduction to it.
How to Create the Initial Pages
Create a new file Header.js inside the components folder with the following content:
import React from 'react';

const Header = () => (
  <div>
    <h1>Multi Step Registration</h1>
  </div>
);

export default Header;
Create a new file FirstStep.js inside the components folder with the following content:
import React from 'react';

const FirstStep = () => {
  return (
    <div>
      First Step Form
    </div>
  )
};

export default FirstStep;
Create a new file AppRouter.js inside the router folder with the following content:
import React from 'react';
import { BrowserRouter, Route, Switch } from 'react-router-dom';
import FirstStep from '../components/FirstStep';
import Header from '../components/Header';

const AppRouter = () => (
  <BrowserRouter>
    <div className="container">
      <Header />
      <Switch>
        <Route component={FirstStep} path="/" exact={true} />
      </Switch>
    </div>
  </BrowserRouter>
);

export default AppRouter;
In this file, initially, we have added a single route for the first step.
If you're new to React Router, check out my free Introduction to React Router course.
Now, open the src/index.js file and add the following content inside it:
import React from 'react';
import ReactDOM from 'react-dom';
import AppRouter from './router/AppRouter';
import 'bootstrap/dist/css/bootstrap.min.css';
import './styles.scss';

ReactDOM.render(<AppRouter />, document.getElementById('root'));
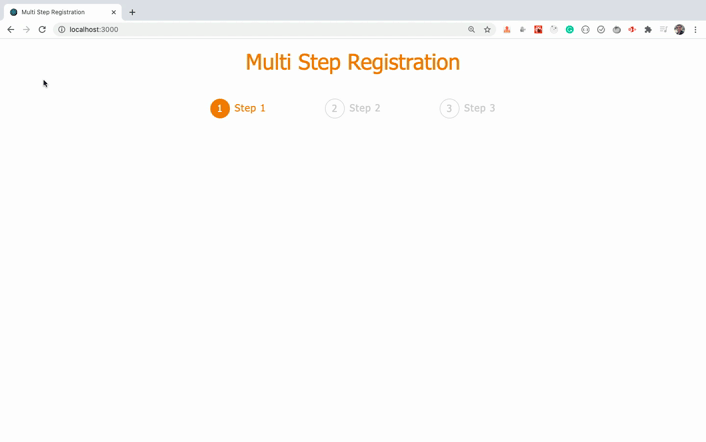
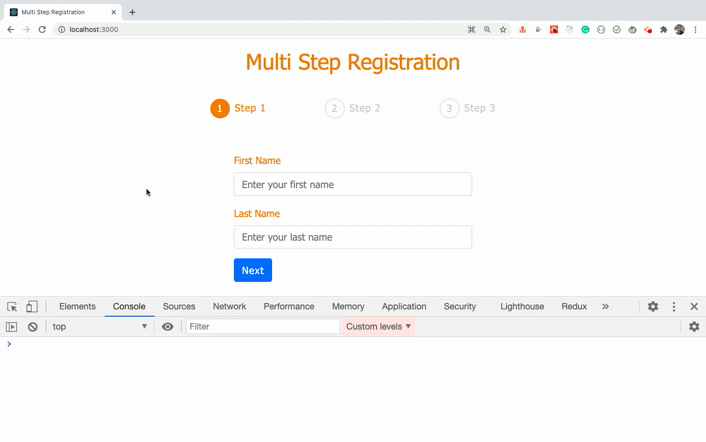
Start the application by running the yarn start command and you will see the following screen:
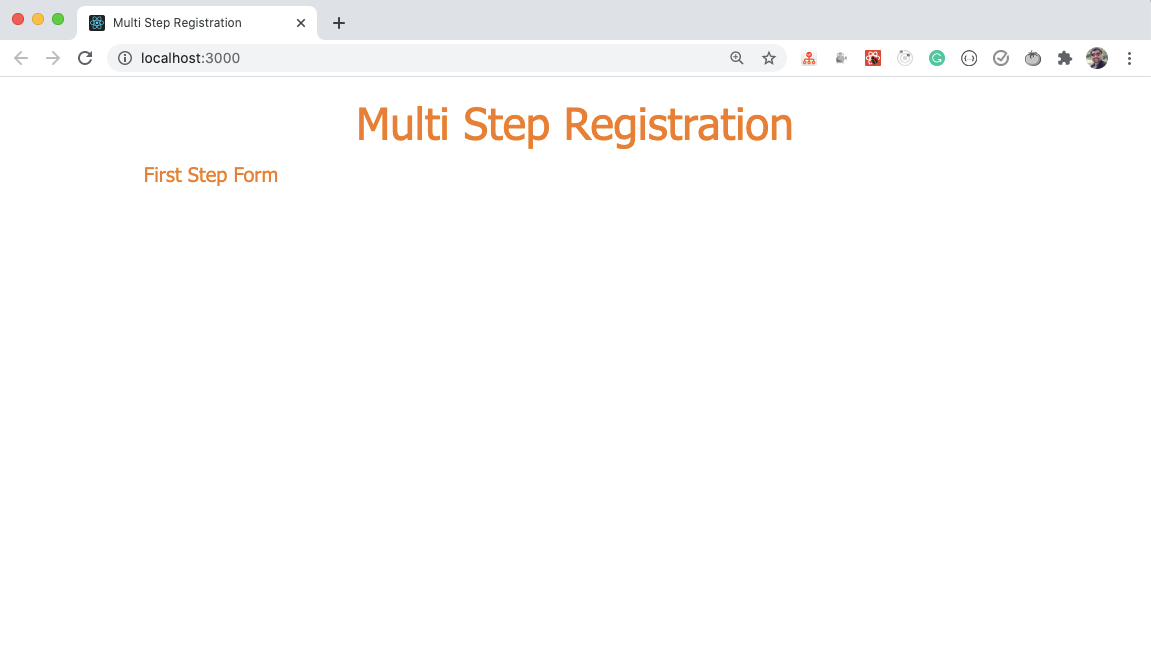
How to Add Progress Steps in the Header
Create a new file called Progress.js inside the components folder with the following content:
import React from 'react';

const Progress = () => {
  return (
    <React.Fragment>
      <div className="steps">
        <div className="step">
          <div>1</div>
          <div>Step 1</div>
        </div>
        <div className="step">
          <div>2</div>
          <div>Step 2</div>
        </div>
        <div className="step">
          <div>3</div>
          <div>Step 3</div>
        </div>
      </div>
    </React.Fragment>
  );
};

export default Progress;
and use it inside the Header.js file as shown below:
import React from 'react';
import Progress from './Progress';

const Header = () => (
  <div>
    <h1>Multi Step Registration</h1>
    <Progress />
  </div>
);

export default Header;
Now, if you check the application, you will see the following screen:
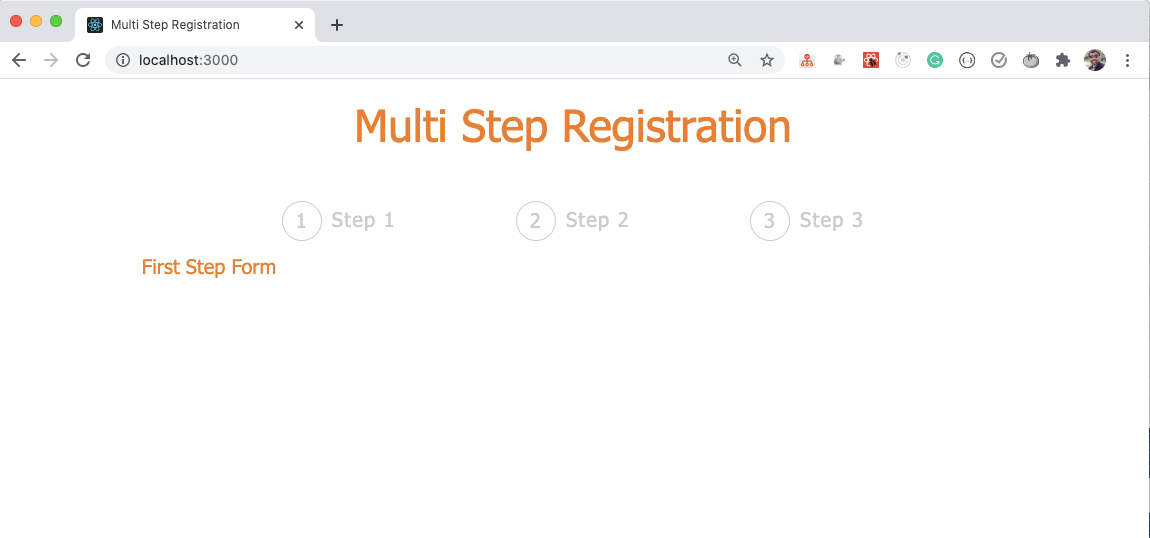
How to Create the First Step Form
Open the components/FirstStep.js file and replace what's in there with the following contents:
import React from 'react';
import { useForm } from 'react-hook-form';
import { Form, Button } from 'react-bootstrap';

const FirstStep = (props) => {
  const { register, handleSubmit, errors } = useForm();

  const onSubmit = (data) => {
    console.log(data);
  };

  return (
    <Form className="input-form" onSubmit={handleSubmit(onSubmit)}>
      <div className="col-md-6 offset-md-3">
        <Form.Group controlId="first_name">
          <Form.Label>First Name</Form.Label>
          <Form.Control
            type="text"
            name="first_name"
            placeholder="Enter your first name"
            autoComplete="off"
            ref={register({
              required: 'First name is required.',
              pattern: {
                value: /^[a-zA-Z]+$/,
                message: 'First name should contain only characters.'
              }
            })}
            className={`${errors.first_name ? 'input-error' : ''}`}
          />
          {errors.first_name && (
            <p className="errorMsg">{errors.first_name.message}</p>
          )}
        </Form.Group>

        <Form.Group controlId="last_name">
          <Form.Label>Last Name</Form.Label>
          <Form.Control
            type="text"
            name="last_name"
            placeholder="Enter your last name"
            autoComplete="off"
            ref={register({
              required: 'Last name is required.',
              pattern: {
                value: /^[a-zA-Z]+$/,
                message: 'Last name should contain only characters.'
              }
            })}
            className={`${errors.last_name ? 'input-error' : ''}`}
          />
          {errors.last_name && (
            <p className="errorMsg">{errors.last_name.message}</p>
          )}
        </Form.Group>

        <Button variant="primary" type="submit">
          Next
        </Button>
      </div>
    </Form>
  );
};

export default FirstStep;
Here, we're using a very popular react-hook-form library to easily manage forms with validations.
React-hook-form makes it really easy to work with simple as well as complex forms, as we don't need to manage the state of each input field and its onChange handler ourselves. This makes the code cleaner and easier to understand.
Check out my article here to learn about react-hook-form in detail.
As you can see in the above code, to use the react-hook-form library we need to first import and use the useForm hook.
const { register, handleSubmit, errors } = useForm();
Here,
registeris a function that we'll use as arefprovided by theuseFormhook. We can assign it to each input field so that thereact-hook-formcan track the changes for the input field valuehandleSubmitis the function we can call when the form is submittederrorswill contain the validation errors, if any
In the above code, we have given a ref to each input field that we got from the useForm hook like this:
ref={register({
  required: 'First name is required.',
  pattern: {
    value: /^[a-zA-Z]+$/,
    message: 'First name should contain only characters.'
  }
})}
Also, we added the onSubmit function which is passed to the handleSubmit function.
<Form className="input-form" onSubmit={handleSubmit(onSubmit)}>
Note that for each input field, we have given a unique name which is mandatory so react-hook-form can track the changing data.
When we submit the form, the handleSubmit function will handle the form submission. It will send the user entered data to the onSubmit function which we’re logging to the console.
const onSubmit = (data) => {
 console.log(data);
};
If there are any errors, we'll display them like this:
{errors.first_name && (
  <p className="errorMsg">{errors.first_name.message}</p>
)}
The errors object will be automatically populated with the property name denoted by the name given to each input field (if there are any errors). first_name in the above case is the name given to the first input field.
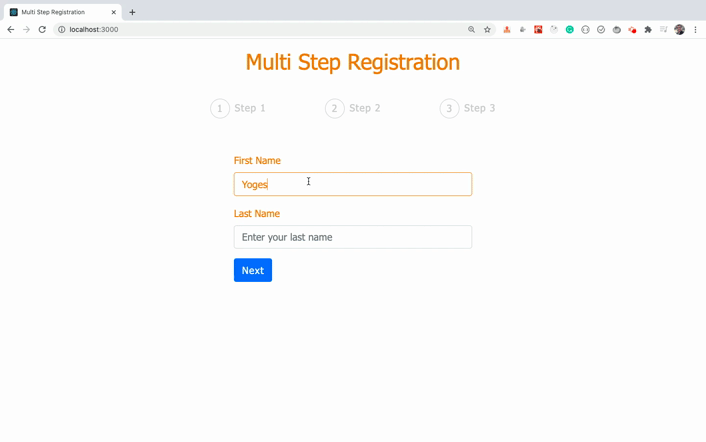
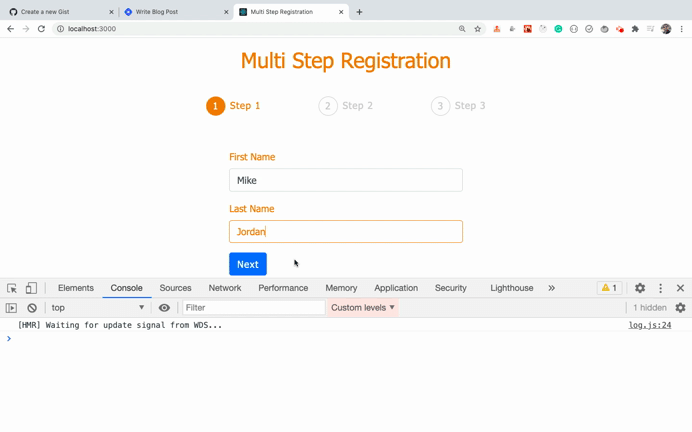
Now, let's check the application's functionality:

As you can see, with very little code, we've added a responsive validation functionality to the form.
How to Create the Second Step Form
Now, create a new file SecondStep.js inside the components folder with the following content:
import React from 'react';
import { useForm } from 'react-hook-form';
import { Form, Button } from 'react-bootstrap';

const SecondStep = (props) => {
  const { register, handleSubmit, errors } = useForm();

  const onSubmit = (data) => {
    console.log(data);
  };

  return (
    <Form className="input-form" onSubmit={handleSubmit(onSubmit)}>
      <div className="col-md-6 offset-md-3">
        <Form.Group controlId="first_name">
          <Form.Label>Email</Form.Label>
          <Form.Control
            type="email"
            name="user_email"
            placeholder="Enter your email address"
            autoComplete="off"
            ref={register({
              required: 'Email is required.',
              pattern: {
                value: /^[^@ ]+@[^@ ]+\.[^@ .]{2,}$/,
                message: 'Email is not valid.'
              }
            })}
            className={`${errors.user_email ? 'input-error' : ''}`}
          />
          {errors.user_email && (
            <p className="errorMsg">{errors.user_email.message}</p>
          )}
        </Form.Group>

        <Form.Group controlId="password">
          <Form.Label>Password</Form.Label>
          <Form.Control
            type="password"
            name="user_password"
            placeholder="Choose a password"
            autoComplete="off"
            ref={register({
              required: 'Password is required.',
              minLength: {
                value: 6,
                message: 'Password should have at-least 6 characters.'
              }
            })}
            className={`${errors.user_password ? 'input-error' : ''}`}
          />
          {errors.user_password && (
            <p className="errorMsg">{errors.user_password.message}</p>
          )}
        </Form.Group>

        <Button variant="primary" type="submit">
          Next
        </Button>
      </div>
    </Form>
  );
};

export default SecondStep;
Now, let's add another route in the AppRouter.js file for the SecondStep component.
import React from 'react';
import { BrowserRouter, Route, Switch } from 'react-router-dom';
import FirstStep from '../components/FirstStep';
import Header from '../components/Header';
import SecondStep from '../components/SecondStep';

const AppRouter = () => (
  <BrowserRouter>
    <div className="container">
      <Header />
      <Switch>
        <Route component={FirstStep} path="/" exact={true} />
        <Route component={SecondStep} path="/second" />
      </Switch>
    </div>
  </BrowserRouter>
);

export default AppRouter;
Also, import the SecondStep component at the top of the file as shown above.
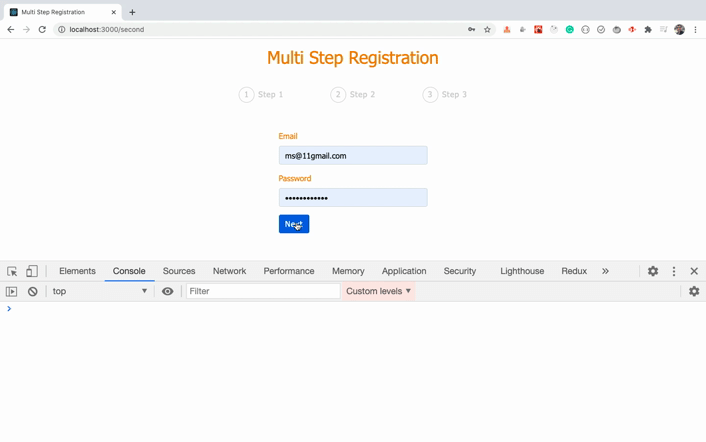
Now, we've added a route for the second step, let's check the application by accessing the URL http://localhost:3000/second.
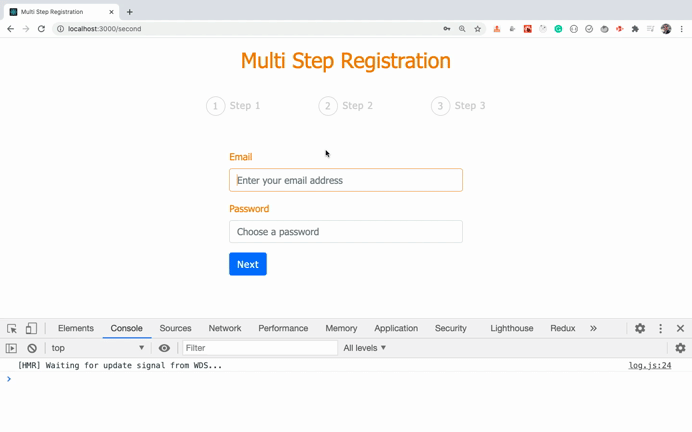
As you can see, the functionality is working fine, but we're directly accessing the /second route. Instead, let's add the code to programmatically redirect from step 1 to step 2.
When we provide any component for the Route inside the BrowserRouter, React Router automatically passes 3 props to that component, which are:
- history
- location
- match
Out of these, the history object contains a push method that we can use to redirect from one component to another.
So open the FirstStep.js file and replace the onSubmit function with the following code:
const onSubmit = (data) => {
  console.log(data);
  props.history.push('/second');
};
Here, for the push method, we've provided the route to which we need to redirect.
As you can see, when we click on the Next button in the first step we're redirected to the second step.
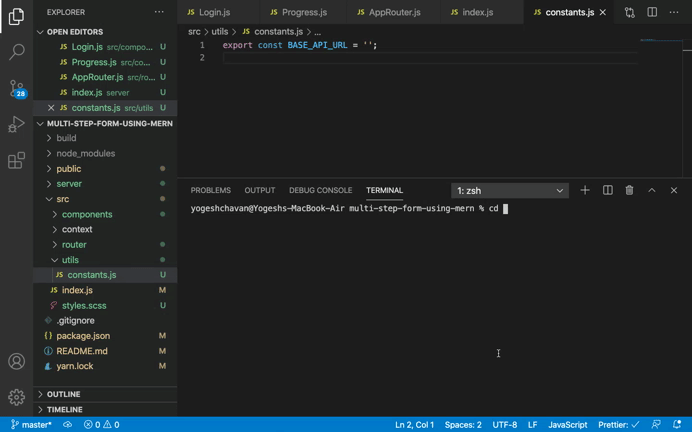
Now, create a new file constants.js inside the utils folder with the following content:
export const BASE_API_URL = 'http://localhost:3030';
Here, we're specifying our backend API's URL so we don't need to specify it in every API call. We just need to use this constant when we need to make an API call.
Now, let's add another route in our AppRouter.js file for the ThirdStep component.
...
<Switch>
  <Route component={FirstStep} path="/" exact={true} />
  <Route component={SecondStep} path="/second" />
  <Route component={ThirdStep} path="/third" />
</Switch>
...
How to Get a List of All Countries from the API
Create a new file ThirdStep.js inside the components folder with the following content:
import React, { useState, useEffect } from 'react';
import { Form, Button } from 'react-bootstrap';
import csc from 'country-state-city';
import axios from 'axios';
import { BASE_API_URL } from '../utils/constants';

const ThirdStep = (props) => {
  const [countries, setCountries] = useState([]);
  const [states, setStates] = useState([]);
  const [cities, setCities] = useState([]);
  const [isLoading, setIsLoading] = useState(false);

  const [selectedCountry, setSelectedCountry] = useState('');
  const [selectedState, setSelectedState] = useState('');
  const [selectedCity, setSelectedCity] = useState('');

  useEffect(() => {
   const getCountries = async () => {
     try {
       const result = await csc.getAllCountries();
       console.log(result);
     } catch (error) {}
    };

    getCountries();
  }, []);

  const handleSubmit = async (event) => {
    event.preventDefault();
  };

  return (
    <Form className="input-form" onSubmit={handleSubmit}>
      <div className="col-md-6 offset-md-3"></div>
    </Form>
  );
};

export default ThirdStep;
In this file, we're using a country-state-city npm library to get a list of available countries, cities, and states like this:
import csc from 'country-state-city';
Then in the component, we've defined some states:
const [countries, setCountries] = useState([]);
const [states, setStates] = useState([]);
const [cities, setCities] = useState([]);
const [isLoading, setIsLoading] = useState(false);

const [selectedCountry, setSelectedCountry] = useState('');
const [selectedState, setSelectedState] = useState('');
const [selectedCity, setSelectedCity] = useState('');
Here, countries, states and cities are declared in the state that will store the list of countries, states and cities, respectively, coming from the API.
We add another isLoading state to keep track of when the data is loading. selectedCountry, selectedState and selectedCity will contain the selected value when the user selects a particular dropdown value.
Then we've added a useEffect hook to make an API call to get the list of countries as shown below:
useEffect(() => {
  ...
  const result = await csc.getAllCountries();
  ...
}, []);
Here, we're calling the getAllCountries method of the country-state-city library to get a list of available countries.
Note that we've passed an empty array [] as the second argument to the useEffect hook so the hook will be called only once when the component is mounted.
Now, open the SecondStep.js file and replace the onSubmit function with the following code:
const onSubmit = (data) => {
  console.log(data);
  props.history.push('/third');
};
Using this code, we can easily navigate to the ThirdStep component.
Now, let's check the application.
As you can see, on the component load, we're getting a list of available countries in an array of objects.
Each object contains an isoCode and name property that we can use in our code to display it on the screen.
So change the useEffect hook to the below code:
useEffect(() => {
  const getCountries = async () => {
    try {
      setIsLoading(true);
      const result = await csc.getAllCountries();
      let allCountries = [];
      allCountries = result?.map(({ isoCode, name }) => ({
        isoCode,
        name
      }));
      const [{ isoCode: firstCountry } = {}] = allCountries;
      setCountries(allCountries);
      setSelectedCountry(firstCountry);
      setIsLoading(false);
    } catch (error) {
      setCountries([]);
      setIsLoading(false);
    }
  };

  getCountries();
}, []);
Here, we're first setting the isLoading flag to true to indicate that data is loading, which we will use soon.
Each object of the array contains many other properties like phonecode, flag, currency and so on, but we only want isoCode and name. So we're using the array map method to filter out only those properties, as shown below:
allCountries = result?.map(({ isoCode, name }) => ({
  isoCode,
  name
}));
Here, we're using the ES11 optional chaining operator which is denoted by the ?. The code after the ? will be executed only if the previous reference is not undefined or null. And as we're destructuring isoCode and name, we need the optional chaining operator.
The optional chaining operator is very useful in many scenarios. You can learn more about it in my Mastering Modern JavaScript book.
Now we have the following code:
const [{ isoCode: firstCountry } = {}] = allCountries;
setCountries(allCountries);
setSelectedCountry(firstCountry);
setIsLoading(false);
Let's understand what we're doing here.
Here, we've used object destructuring renaming with assignment syntax. We're destructuring the isoCode property from the first object of the allCountries array of objects and renaming the isoCode property to firstCountry just to identify that it's the first country from the list.
We're also assigning a default empty object so that if the allCountries array is empty we won't get an error.
In short, we are saying to take the isoCode property from the first object from the allCountries array of objects and rename it to firstCountry .
If the firstCountry property does not exist in the first object from the allCountries array, then assign a default value of empty object {} to the firstCountry variable.
Then we're updating the selectedCountry state value to the firstCountry value and isLoading state value to false using the below code:
setSelectedCountry(firstCountry);
setIsLoading(false);
Now, in the ThirdStep.js file, change the following code:
return (
  <Form className="input-form" onSubmit={handleSubmit}>
    <div className="col-md-6 offset-md-3"></div>
  </Form>
);
to this code:
return (
    <Form className="input-form" onSubmit={handleSubmit}>
      <div className="col-md-6 offset-md-3">
        <Form.Group controlId="country">
          {isLoading && (
            <p className="loading">Loading countries. Please wait...</p>
          )}
          <Form.Label>Country</Form.Label>
          <Form.Control
            as="select"
            name="country"
            value={selectedCountry}
            onChange={(event) => setSelectedCountry(event.target.value)}
          >
            {countries.map(({ isoCode, name }) => (
              <option value={isoCode} key={isoCode}>
                {name}
              </option>
            ))}
          </Form.Control>
        </Form.Group>
      </div>
    </Form>
  );
We can see the list of countries populated in the dropdown.
Now, if you navigate to step 3, you will see the following screen:
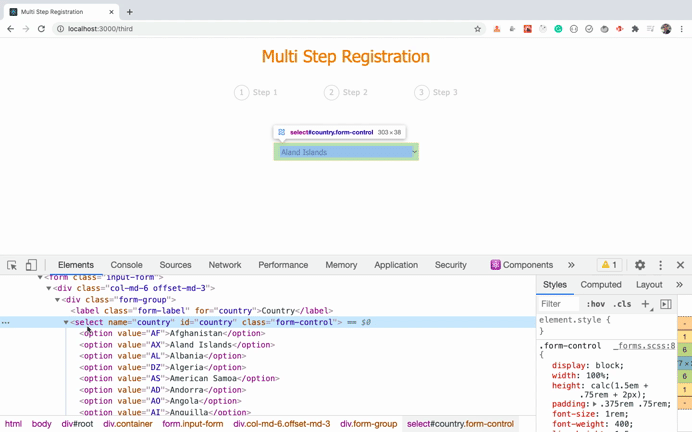
As you can see, the country dropdown is correctly populated with all countries. On change of the dropdown value, the selectedCountry state also changes to the country code (isoCode) as you can see in the React dev tools.
How to Get a List of States from the API
Now, let's add the code for getting a list of states based on the selected country.
Add the following code after the first useEffect hook in the ThirdStep.js file.
useEffect(() => {
    const getStates = async () => {
      try {
        const result = await csc.getStatesOfCountry(selectedCountry);
        let allStates = [];
        allStates = result?.map(({ isoCode, name }) => ({
          isoCode,
          name
        }));
        console.log({ allStates });
        const [{ isoCode: firstState = '' } = {}] = allStates;
        setCities([]);
        setSelectedCity('');
        setStates(allStates);
        setSelectedState(firstState);
      } catch (error) {
        setStates([]);
        setCities([]);
        setSelectedCity('');
      }
    };

    getStates();
  }, [selectedCountry]);
Here, we're calling the getStatesOfCountry method from the country-state-city library by passing the selectedCountry as the parameter. Then based on the result of the API, we're updating the respective states as shown below:
setCities([]);
setSelectedCity('');
setStates(allStates);
setSelectedState(firstState);
All the country, state and city dropdowns are inter-related. If we're changing the country, we should update the state also, which we're doing in the above code.
Also, note that we've passed the selectedCountry as a second parameter to the useEffect hook in the dependencies array:
useEffect(() => {
 ...
}, [selectedCountry]);
So this effect will only run when the selectedCountry state changes. This means that once we change the country dropdown, we're making an API call to get the states related to only that country and then populating the state's dropdown values.
Now, add the following code after the first Form.Group closing tag that's after the country dropdown:
<Form.Group controlId="state">
  <Form.Label>State</Form.Label>
  <Form.Control
    as="select"
    name="state"
    value={selectedState}
    onChange={(event) => setSelectedState(event.target.value)}
  >
    {states.length > 0 ? (
      states.map(({ isoCode, name }) => (
        <option value={isoCode} key={isoCode}>
          {name}
        </option>
      ))
    ) : (
      <option value="" key="">
        No state found
      </option>
    )}
  </Form.Control>
</Form.Group>
Here, we're displaying the state dropdown on the screen. If there are no states for the selected country, we show a No state found message because there are some countries that don't have any states.
Now, if you check the application, you will see the following screen:
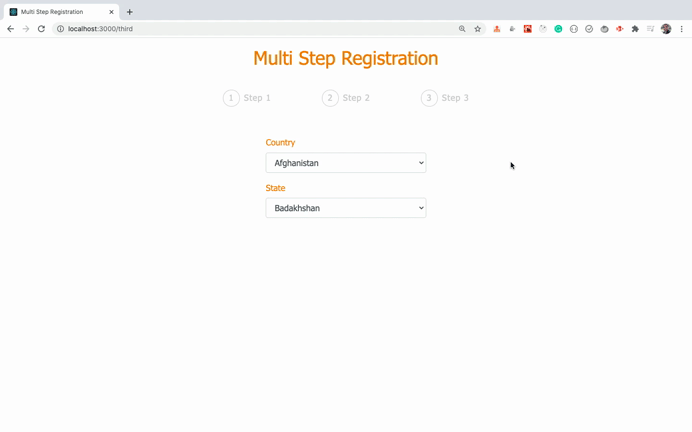
As you can see above, when we change the country dropdown value, the state dropdown list is also updated based on the selected country.
How to Get a List of Cities from the API
Now, let's populate the cities based on the country and state values.
Add another useEffect hook after the second hook as shown below:
useEffect(() => {
  const getCities = async () => {
    try {
      const result = await csc.getCitiesOfState(
        selectedCountry,
        selectedState
      );
      let allCities = [];
      allCities = result?.map(({ name }) => ({
        name
      }));
      const [{ name: firstCity = '' } = {}] = allCities;
      setCities(allCities);
      setSelectedCity(firstCity);
    } catch (error) {
      setCities([]);
    }
  };

  getCities();
}, [selectedState]);
Here, we're calling the getCitiesOfState method from the country-state-city library by passing the selectedCountry and selectedState as parameters. Based on the result of the API, we update the cities dropdown.
Now, add the following code after the second Form.Group closing tag that's after the state dropdown:
<Form.Group controlId="city">
  <Form.Label>City</Form.Label>
  <Form.Control
    as="select"
    name="city"
    value={selectedCity}
    onChange={(event) => setSelectedCity(event.target.value)}
  >
    {cities.length > 0 ? (
      cities.map(({ name }) => (
        <option value={name} key={name}>
          {name}
        </option>
      ))
    ) : (
      <option value="">No cities found</option>
    )}
  </Form.Control>
</Form.Group>
Here, we're displaying the cities dropdown on the screen. If there are no cities for the selected state, we show a No cities found message because there are some states that don't have any cities.
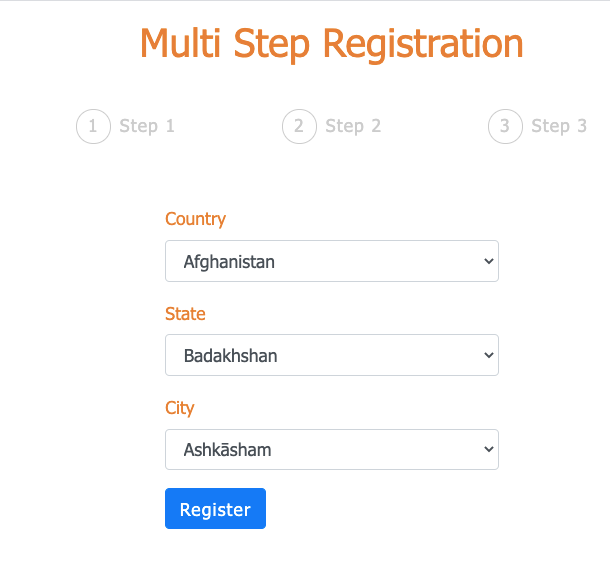
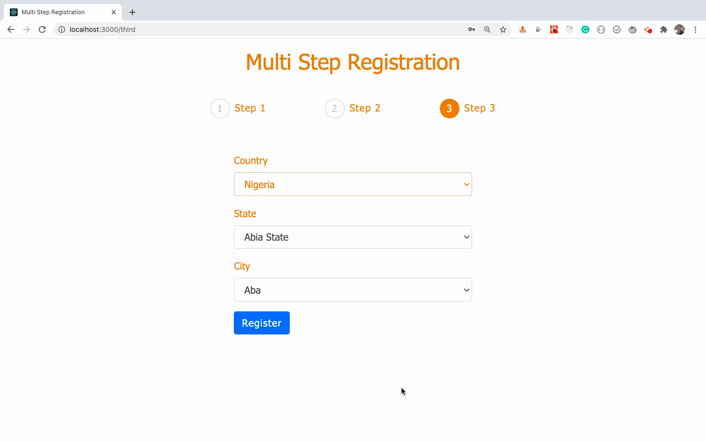
Now, if you check the application, you will see the following screen:
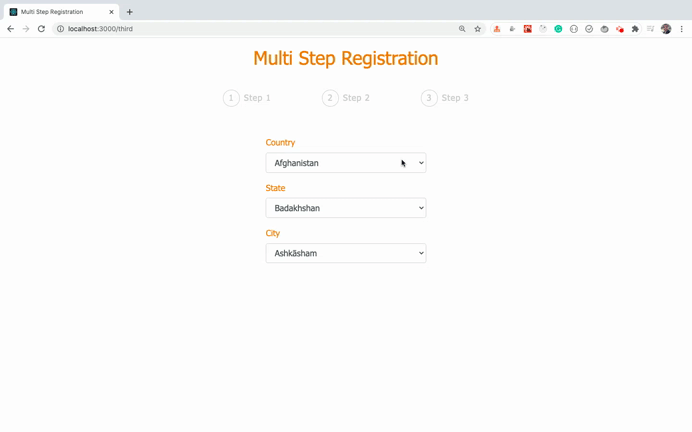
As you can see above, on change of country and state, the corresponding list of cities is populated in the cities dropdown.
Also, add the Register button after the last Form.Group closing tag that's after the city dropdown:
<Button variant="primary" type="submit">
  Register
</Button>
Now, your screen will look like this:
We're done creating screens for all the steps. Now let's get the step progress in the header working so it's clear which step we're currently on.
How to Add a Progress Indicator in the Header
We're showing the Progress component inside the Header component, but the Progress component is not mentioned in any of the Routes in the AppRouter.js file. Also, Header isn't mentioned in the Route.
So by default, we don't have access to the history, location and match props in both the Header and Progress components to identify which route we're on.
But there is an easy way to fix this. React Router provides a withRouter component which we can use in the Progress component so we will get access to the history, location and match props.
Open the Progress.js file and add import the withRouter component at the top of the file:
import { withRouter } from 'react-router-dom';
and change the export statement from this code:
export default Progress;
to this code:
export default withRouter(Progress);
So when we pass the Progress component to the withRouter component we'll get access to the history, location and match props inside the Progress component.
Now, replace the Progress component with the following code:
const Progress = ({ location: { pathname } }) => {
  const isFirstStep = pathname === '/';
  const isSecondStep = pathname === '/second';
  const isThirdStep = pathname === '/third';

  return (
    <React.Fragment>
      <div className="steps">
        <div className={`${isFirstStep ? 'step active' : 'step'}`}>
          <div>1</div>
          <div>
            {isSecondStep || isThirdStep ? (
              <Link to="/">Step 1</Link>
            ) : (
              'Step 1'
            )}
          </div>
        </div>
        <div className={`${isSecondStep ? 'step active' : 'step'}`}>
          <div>2</div>
          <div>{isThirdStep ? <Link to="/second">Step 2</Link> : 'Step 2'}</div>
        </div>
        <div className={`${pathname === '/third' ? 'step active' : 'step'}`}>
          <div>3</div>
          <div>Step 3</div>
        </div>
      </div>
    </React.Fragment>
  );
};
Here, in the first line, we're destructuring the location property from the props object and then the pathname property from the location property in a single line like this:
const Progress = ({ location: { pathname } }) => {
And based on which route we're on, we're adding the active class to each step div.
Also, import the Link component at the top of the file:
import { Link, withRouter } from 'react-router-dom';
Now, if you check the application, you will see the following screen:

As you can see, when we're on a particular step, that step number is shown as active in the progress bar with highlighted text. Then, as we navigate through the steps, the text of the previous steps is shown as a link so we can navigate back to any step to change any data.
How to Retain Entered Data Across Routes
But you will notice that, when we go to step 1 by clicking the link from step 3, the data entered in step 1 is lost.
This is because when we go from one route to another route, React Router completely unmounts the previous route component and mounts the next route component connected to that route. This causes all state values to be lost.
So let's add a way to preserve the data that's been entered when navigating to the previous step.
As you know, only the components connected to the routes mentioned in the AppRouter.js file are mounted and unmounted on the route change. But the AppRouter component in our case is not unmounted even when the routes change.
This means that the best place to store the data entered by the user is in the AppRouter component.
Let's add the user state, updateUser, and resetUser functions inside the AppRouter.js file.
const [user, setUser] = useState({});

const updateUser = (data) => {
  setUser((prevUser) => ({ ...prevUser, ...data }));
};

const resetUser = () => {
  setUser({});
};
So we will store the user-entered data in each step in the user state that's an object.
In the updateUser function, we're passing data to update the user state. In the updateUser function, we're first spreading out the user object values using the prevUser variable and then spreading out the data object so the resulting object will be the merging of two objects.
To update the state, we use the updater syntax of state with implicit return syntax for the object.
So this code:
setUser((prevUser) => ({ ...prevUser, ...data }));
is the same as the below code:
setUser((prevUser) => {
  return {
    ...prevUser,
    ...data
  };
});
As you can see above, if we want to implicitly return an object from an arrow function, we can skip the return keyword and enclose the object in round brackets.
This will make the code shorter and will also help you avoid typing mistakes in your code. Because of this, you will find that most React code is written using implicit return syntax.
So if we're in step 1 then we will pass the {first_name: 'Mike', last_name: 'Jordan' } as data and add it to the user state.
Then in step 2, if we pass {user_email: 'test@example.com', user_password: 'test@123'} as the data, then the updateUser function will update the user as shown below:
const prevUser = { first_name: 'Mike', last_name: 'Jordan' };
const data = { user_email: 'test@example.com', user_password: 'test@123' };

const result = { ...prevUser, ...data };
console.log(result); // { first_name: 'Mike', last_name: 'Jordan', user_email: 'test@example.com', user_password: 'test@123' }
Now, we have created the user state and updateUser function. So we need to pass it to each route that is connected to the step so we can save the user-entered data by calling the updateUser function.
Our current routes in the AppRouter.js file look like this:
<Switch>
  <Route component={FirstStep} path="/" exact={true} />
  <Route component={SecondStep} path="/second" />
  <Route component={ThirdStep} path="/third" />
</Switch>
So to pass the user and updateUser as props to the components connected to the route, we can't pass it like this:
<Route component={FirstStep} path="/" exact={true} user={user} updateUser={updateUser} />
Because this way props will be passed to the Route and not to the FirstStep component. So we need to use the following syntax:
<Route
  render={(props) => (
    <FirstStep {...props} user={user} updateUser={updateUser} />
  )}
  path="/"
  exact={true}
/>
Here, we're using the render props pattern for passing props. This will correctly pass the props and will also not re-create the FirstStep component on every re-render.
You can check out my Introduction to React Router course to learn more about why we need to use render instead of the component prop.
Now, after making this change for all the step-related routes, your routes will look like this:
<BrowserRouter>
  <div className="container">
    <Header />
    <Switch>
      <Route
        render={(props) => (
          <FirstStep {...props} user={user} updateUser={updateUser} />
        )}
        path="/"
        exact={true}
      />
      <Route
        render={(props) => (
          <SecondStep {...props} user={user} updateUser={updateUser} />
        )}
        path="/second"
      />
      <Route
        render={(props) => (
          <ThirdStep {...props} user={user}  />
        )}
        path="/third"
      />
    </Switch>
  </div>
</BrowserRouter>
Note that we're not passing the updateUser prop to the ThirdStep component route, because when we submit the form from step 3, we will be saving all the data directly into the database.
If you want you can pass the updateUser function to the ThirdStep component and save it to the state by calling the updateUser function (but it's not necessary).
Now, let's use the updateUser function inside these components to save the data.
So open the FirstStep.js and SecondStep.js files and inside the onSubmit handler function, and add props.updateUser(data) as the first statement.
// FirstStep.js
const onSubmit = (data) => {
  props.updateUser(data);
  props.history.push('/second');
};

// SecondStep.js
const onSubmit = (data) => {
  props.updateUser(data);
  props.history.push('/third');
};
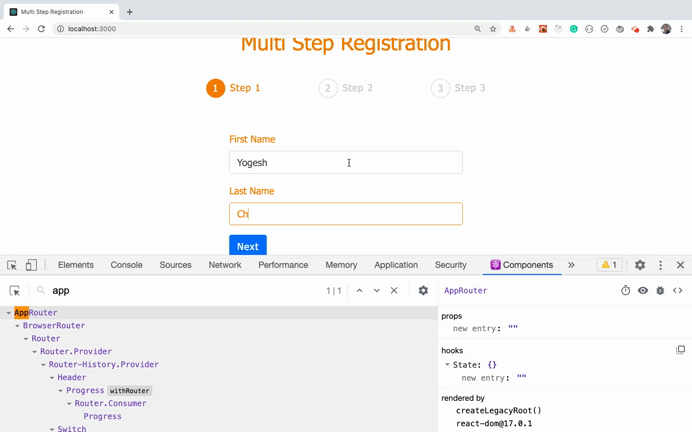
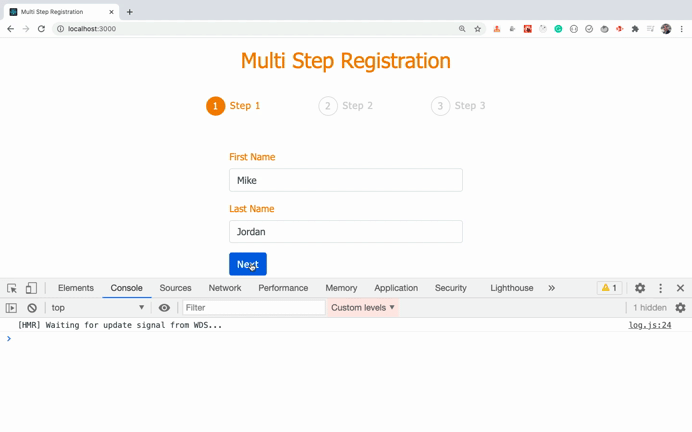
Now, if you check the application, you will see the following screen:
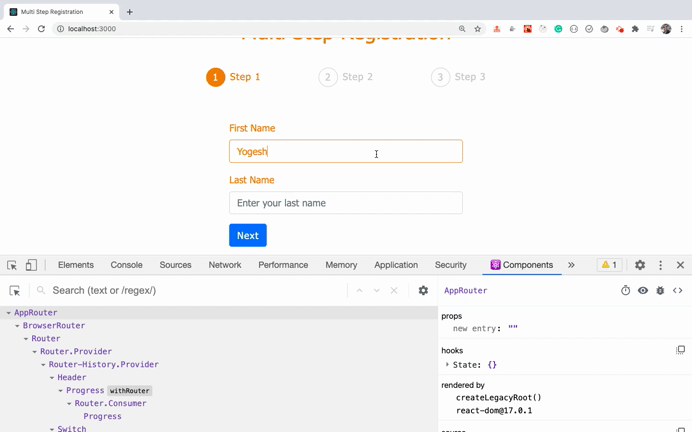
As you can see, initially the AppRouter component state is an empty object. But when we submit the form in each step, the state object gets updated with the user-entered data.
Now, let's use that data saved in the state and populate it in the respective input fields when we come back to the previous step from the next step.
As you know, we're using react-hook-form to manage the changing data of our forms in the FirstStep and SecondStep component using the useForm hook.
But the useForm hook also takes an optional parameter which we can use to persist the values across route changes.
So change the below code from the FirstStep.js file:
const { register, handleSubmit, errors } = useForm();
to this code:
const { user } = props;
const { register, handleSubmit, errors } = useForm({
  defaultValues: {
    first_name: user.first_name,
    last_name: user.last_name
  }
});
Here, we're destructuring the user prop from the props object which we're passing in the route of the AppRouter.js file. Then we're using the defaultValues property to set the value for each input field.
Just to remind you, first_name and last_name are the names given to the input fields in FirstStep component which react-hook-form uses to track changing data.
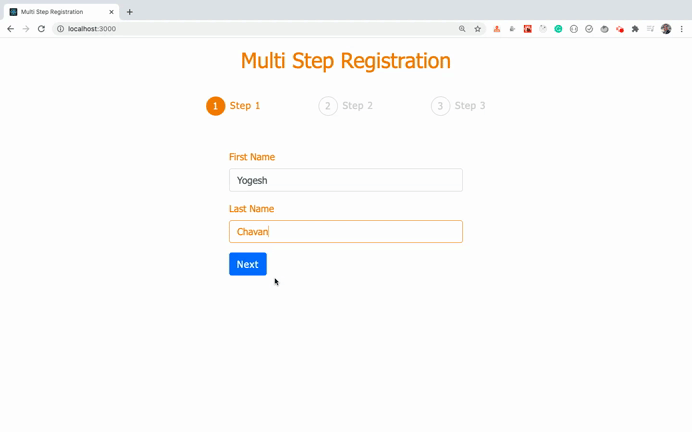
Now, if you check the application, you will see the following screen:
As you can see, when we come back from step 2 to step 1, the data entered in step 1 is not lost. This is because we're re-setting it with the data from the user state when the component is mounted again on route change.
Now, let's add some similar code in the SecondStep.js file also:
const { user } = props;
const { register, handleSubmit, errors } = useForm({
  defaultValues: {
    user_email: user.user_email,
    user_password: user.user_password
  }
});
If you check the application, you will see the following screen:
As you can see, when we come back from step 3 to step 2 or step 1, the data entered in step 1 and step 2 is not lost. So we have successfully preserved the data across steps.
How to Add Animated Transitions to the App
Now, let's add a smooth sliding animation functionality to the app.
To add animation, we're using the very popular framer motion library.
Framer motion makes it easy to add animation using a declarative approach in the same way that React does things.
So let's add animation in the FirstStep component.
Open the FirstStep.js file and add the import statement for the framer motion library at the top of the file:
import { motion } from 'framer-motion';
To animate any element on the page, we need to prefix it with motion like this:
<div>Click here to animate it</div>

// the above code will need to be converted to

<motion.div>Click here to animate it</motion.div>
Using motion as a prefix will return a React component that has specific animating capabilities added so that we can pass props to that element.
So inside the FirstStep.js file, after adding the motion prefix to the following div:
<div className="col-md-6 offset-md-3">
...
</div>
it will look like this:
<motion.div className="col-md-6 offset-md-3">
...
</motion.div>
Once we add a motion prefix to it, we can provide extra props to that element like this:
<motion.div
  className="col-md-6 offset-md-3"
  initial={{ x: '-100vw' }}
  animate={{ x: 0 }}
>
...
</motion.div>
Here, we've provided an initial prop to specify the location from where the animation will begin. We want the entire form to be slid in from the left side so we provided the x value as -100vw. This means 100% viewport width from the left side. So the initial position of the form will be far left but not visible on the screen.
Then we provided the animate prop with an x value of 0 so the form will slide in from left and will come back to its original position on the page. If we provide a value of 10 for x then it will move to 10px on the right side from its original position.
Now, your entire JSX code in the FirstStep.js file will look like this:
return (
  <Form className="input-form" onSubmit={handleSubmit(onSubmit)}>
    <motion.div
      className="col-md-6 offset-md-3"
      initial={{ x: '-100vw' }}
      animate={{ x: 0 }}
    >
      <Form.Group controlId="first_name">
        <Form.Label>First Name</Form.Label>
        <Form.Control
          type="text"
          name="first_name"
          placeholder="Enter your first name"
          autoComplete="off"
          ref={register({
            required: 'First name is required.',
            pattern: {
              value: /^[a-zA-Z]+$/,
              message: 'First name should contain only characters.'
            }
          })}
          className={`${errors.first_name ? 'input-error' : ''}`}
        />
        {errors.first_name && (
          <p className="errorMsg">{errors.first_name.message}</p>
        )}
      </Form.Group>

      <Form.Group controlId="last_name">
        <Form.Label>Last Name</Form.Label>
        <Form.Control
          type="text"
          name="last_name"
          placeholder="Enter your last name"
          autoComplete="off"
          ref={register({
            required: 'Last name is required.',
            pattern: {
              value: /^[a-zA-Z]+$/,
              message: 'Last name should contain only characters.'
            }
          })}
          className={`${errors.last_name ? 'input-error' : ''}`}
        />
        {errors.last_name && (
          <p className="errorMsg">{errors.last_name.message}</p>
        )}
      </Form.Group>

      <Button variant="primary" type="submit">
        Next
      </Button>
    </motion.div>
  </Form>
);
Now, if you check the application, you will see the sliding animation on page load:

As you can see, the form slides in from the left side of the page but it does not yet look very smooth.
To make it a smooth animation, we can provide another transition prop in addition to the initial and animate props.
<motion.div
  className="col-md-6 offset-md-3"
  initial={{ x: '-100vw' }}
  animate={{ x: 0 }}
  transition={{ stiffness: 150 }}
>
...
</motion.div>
Here, we've added a transition prop with value of 150 for stiffness. You can try changing the value from 150 to something else and check which one looks best to you. I will use 150 here.
Now, if you check the application, you will see a smooth sliding animation on page load:
Let's make the same animation changes in the SecondStep.js and ThirdStep.js files:
import { motion } from 'framer-motion';
...
<motion.div
  className="col-md-6 offset-md-3"
  initial={{ x: '-100vw' }}
  animate={{ x: 0 }}
  transition={{ stiffness: 150 }}
>
...
</motion.div>
Now if you check the application, you will see a smooth sliding animation on page load for all 3 steps:

How to Setup the Backend with Node.js
We're done with all the basic functionality for the front-end. Now let's setup the backend server code so we can save the data entered in the form to MongoDB.
Create a new folder with the name server outside the src folder. Then create models and routers folders inside the server folder.
Now, execute the following command from the server folder from the terminal:
yarn init -y
This will create a package.json file inside the server folder so we can manage the dependencies.
Now, install the required dependencies by executing the following command from the server folder from terminal:
yarn add bcryptjs@2.4.3 cors@2.8.5 express@4.17.1 mongoose@5.11.18 nodemon@2.0.7
Next, create a new file with the name .gitignore inside the server folder and add the following line inside it so the node_modules folder will not be pushed to GitHub (if you decide to push your code to GitHub):
node_modules
Create a new file db.js inside the server folder with the following content:
const mongoose = require('mongoose');

mongoose.connect('mongodb://127.0.0.1:27017/form-user', {
  useNewUrlParser: true,
  useCreateIndex: true,
  useUnifiedTopology: true
});
Here, we're using the mongoose library to work with MongoDB. For the mongoose.connect method, we've provided a connection string with the form-user database as the name of the database.
You can give whatever name you want instead of form-user.
Now, create a new file with the name index.js inside the server folder and add the following contents inside it:
const express = require('express');
require('./db');

const app = express();
const PORT = process.env.PORT || 3030;

app.get('/', (req, res) => {
  res.send('<h2>This is from index.js file</h2>');
});

app.listen(PORT, () => {
  console.log(`server started on port ${PORT}`);
});
Now, open the server/package.json file and add the scripts section inside it:
"scripts": {
  "start": "nodemon index.js"
},
Here we're using the nodemon npm package that will restart the Express server if we make any changes in index.js or the files included in the index.js file. This way we don't have to manually restart the server on every change.
So your entire package.json file will look like this:
{
  "name": "server",
  "version": "1.0.0",
  "main": "index.js",
  "license": "MIT",
  "scripts": {
    "start": "nodemon index.js"
  },
  "dependencies": {
    "bcryptjs": "2.4.3",
    "cors": "2.8.5",
    "express": "4.17.1",
    "mongoose": "5.11.18",
    "nodemon": "2.0.7"
  }
}
Now, open another terminal and execute the yarn start command from inside the server folder.
If you access http://localhost:3030/, you will see the following screen:
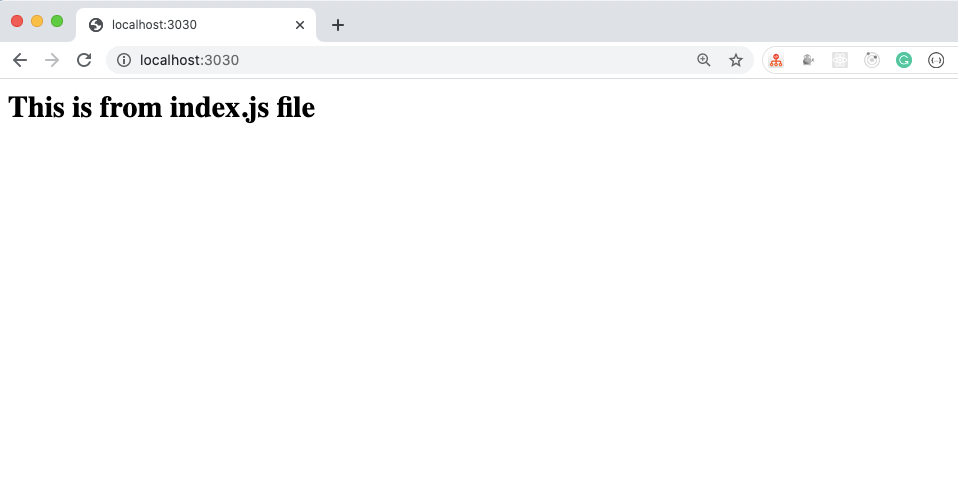
This shows that our Express server is correctly set up. Let's write Rest APIs to store the user registration data.
Create a new file called user.js inside the server/models folder with the following content:
const mongoose = require('mongoose');

const userSchema = mongoose.Schema(
  {
    first_name: {
      type: String,
      required: true,
      trim: true
    },
    last_name: {
      type: String,
      required: true,
      trim: true
    },
    user_email: {
      type: String,
      required: true,
      trim: true,
      validate(value) {
        if (!value.match(/^[^@ ]+@[^@ ]+\.[^@ .]{2,}$/)) {
          throw new Error('Email is not valid.');
        }
      }
    },
    user_password: {
      type: String,
      required: true,
      trim: true,
      minlength: 6
    },
    country: {
      type: String,
      required: true,
      trim: true
    },
    state: {
      type: String,
      trim: true
    },
    city: {
      type: String,
      trim: true
    }
  },
  {
    timestamps: true
  }
);

const User = mongoose.model('User', userSchema);

module.exports = User;
Here, we've created a User schema to define the structure of the data stored in the User collection.
If you have never worked with the mongoose library then check out this article for an introduction.
How to Create the REST APIs
Create a new file called user.js inside the routers folder with the following content:
const express = require('express');
const User = require('../models/user');
const bcrypt = require('bcryptjs');
const router = express.Router();

router.post('/register', async (req, res) => {
 const { user_email, user_password } = req.body;

 console.log('req.body', req.body);

 let user = await User.findOne({ user_email });
 if (user) {
   return res.status(400).send('User with the provided email already exist.');
 }

 try {
   user = new User(req.body);
   user.user_password = await bcrypt.hash(user_password, 8);

   await user.save();
   res.status(201).send();
 } catch (e) {
   res.status(500).send('Something went wrong. Try again later.');
 }
});

module.exports = router;
Here, we've created a post API for the /register route. We will be passing the data to this API in JSON format. The Express server makes it available inside the req.body object so we're destructuring the email and password value from it:
const { user_email, user_password } = req.body;
Then using the findOne method of the User model, we're first checking if there is any user with the provided email address.
let user = await User.findOne({ user_email });
If such a user exists, then we're returning an error back to the client (which is our React app).
return res.status(400).send('User with the provided email already exist.');
It's always good to specify the HTTP response code of the error while sending back the response.
You can find all HTTP status codes and their meanings on this website.
Then we pass all the user data (like first_name, last_name, user_email, users_password, country, state and city) which is present in the req.body to the User constructor .
But we don't want to store the user-entered data into the database as it is. So we'll use the popular bcryptjs npm library to hash the password before saving it to the database.
user.user_password = await bcrypt.hash(user_password, 8);
Check out my article here to learn about bcryptjs in detail.
And once the password is hashed, we call the save method of the User model to save all the details along with hashed password into the MongoDB database.
await user.save();
Once we're done, we're sending back the response with the status code of 201 which describes that something has been created.
res.status(201).send();
Note that here we're not sending back any data – just a response saying that the request was successful and a new record was created.
Then at the end, we're exporting the express router so we can use it in the index.js file.
Now, open the server/index.js file and import the user router at the top of the file:
const userRouter = require('./routers/user');
As we're sending the data to register from React app to Node.js server in JSON format, we need to add the following code for the middleware:
app.use(express.json());
Also, after the PORT constant, add the following line of code:
app.use(userRouter);
So your entire server/index.js file will look like this:
const express = require('express');
const userRouter = require('./routers/user');
require('./db');

const app = express();
const PORT = process.env.PORT || 3030;

app.use(express.json());
app.use(userRouter);

app.get('/', (req, res) => {
  res.send('<h2>This is from index.js file</h2>');
});

app.listen(PORT, () => {
  console.log(`server started on port ${PORT}`);
});
Here, we've provided userRouter as a middleware for the Express app so that we can make API requests to it.
It's always good to separate out each router in its own file and include it using the app.use method. This avoids making the code larger by writing it in a single file.
Now, start your local MongoDB database server by running ./mongod --dbpath=<path_to_mongodb-data_folder> as explained in this article and keep it running.
And then restart the Express server by running yarn start from the server folder and keep it running.
Open another terminal and start the react app by running yarn start if you haven't already done it.
So now you will two separate terminals open – one for running the Express server app and another one running the React app as shown below:
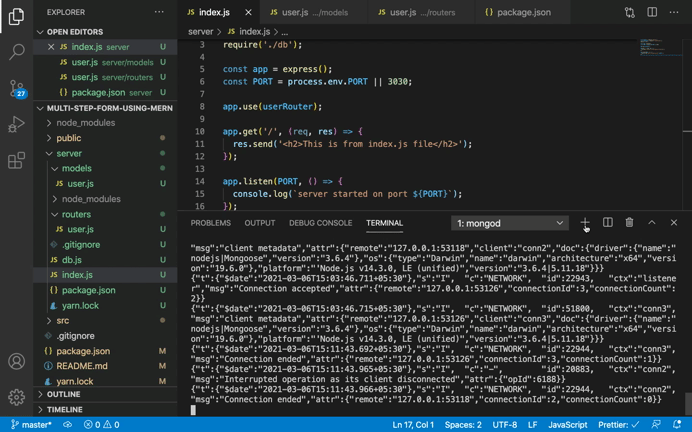
Here, we're opening terminals inside VSCode. You can open the first terminal by going to the Terminal -> New Terminal menu in VS Code. Then just click the + icon to open additional terminals.
How to Call REST APIs from a React App
Now, let's make the code changes in our React app to make the API call to our /register API.
Open the ThirdStep.js file and replace the handleSubmit method with the following code:
const handleSubmit = async (event) => {
    event.preventDefault();

    try {
      const { user } = props;
      const updatedData = {
        country: countries.find(
          (country) => country.isoCode === selectedCountry
        )?.name,
        state:
          states.find((state) => state.isoCode === selectedState)?.name || '',
        city: selectedCity
      };

      await axios.post(`${BASE_API_URL}/register`, {
        ...user,
        ...updatedData
      });
    } catch (error) {
      if (error.response) {
        console.log('error', error.response.data);
      }
    }
  };
Here, once we submit the form in step 2, we call the handleSubmit method where we make an API call to our /register API:
await axios.post(`${BASE_API_URL}/register`, {
  ...user,
  ...updatedData
});
Here, we're passing the data to the /register API in the JSON format.
We store the country code in selectedCountry and the state code in selectedState state variables. These are denoted by isoCode, and we first use the array find method to find out the actual names related to that country and state code as shown below:
const updatedData = {
  country: countries.find(
    (country) => country.isoCode === selectedCountry
  )?.name,
  state:
    states.find((state) => state.isoCode === selectedState)?.name || '',
  city: selectedCity
};
Inside the selectedCity state variable we store the name so we don't need to use the filter method there.
If you want a quick refresher on the most widely used array methods (including array find method) check out my article here.
While using the find method for state, we've added the || condition. This is because if there is no available state for any selected country, then while accessing ?.name, it might come as undefined. To avoid storing undefined in the database, we use the || operator to store an empty string '' instead or undefined.
How to Test REST APIs
Now, let's check the application's functionality.
As you can see, when we try to submit the form in the step 3, we're getting a CORS (Cross-Origin Resource Sharing) error in the browser console.
This is because the browser does not allow us to access the data of an application running on another port – because we're running our React application on port 3000 and our Node.js application on port 3030.
This is for security reasons and violates cross-domain policies.
To fix this, we need to install the cors npm package and use it in our server/index.js file so that the Node.js server will allow any application to access its APIs.
Don’t worry, we will see how we can use the Node.js APIs without using cors later in this article. We'll also avoid needing to run two separate terminals to start our React and Node.js server.
For now, open the server/index.js file and add the import for cors as shown below:
const cors = require('cors');
Note that we've already installed the cors npm package while creating the Express server earlier.
And add it as an Express middleware before the app.use(userRouter) statement like this:
app.use(express.json());
app.use(cors());
app.use(userRouter);
Now your index.js file will look like this:
const express = require('express');
const cors = require('cors');
const userRouter = require('./routers/user');
require('./db');

const app = express();
const PORT = process.env.PORT || 3030;

app.use(express.json());
app.use(cors());
app.use(userRouter);

app.get('/', (req, res) => {
  res.send('<h2>This is from index.js file</h2>');
});

app.listen(PORT, () => {
  console.log(`server started on port ${PORT}`);
});
If you submit the form, you will see that the data has been correctly logged into the console:
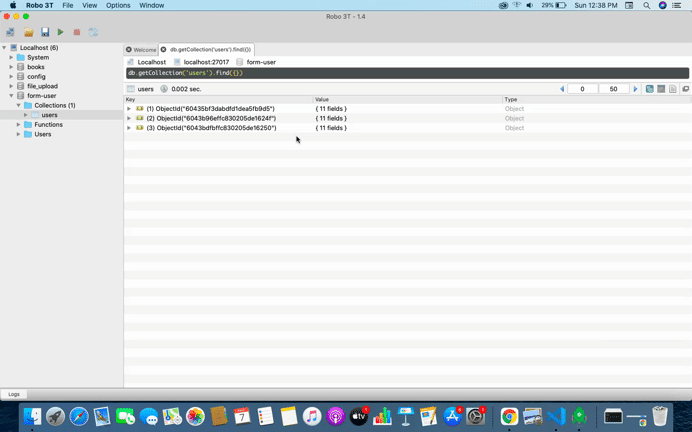
And the data also gets saved into the database as shown below:
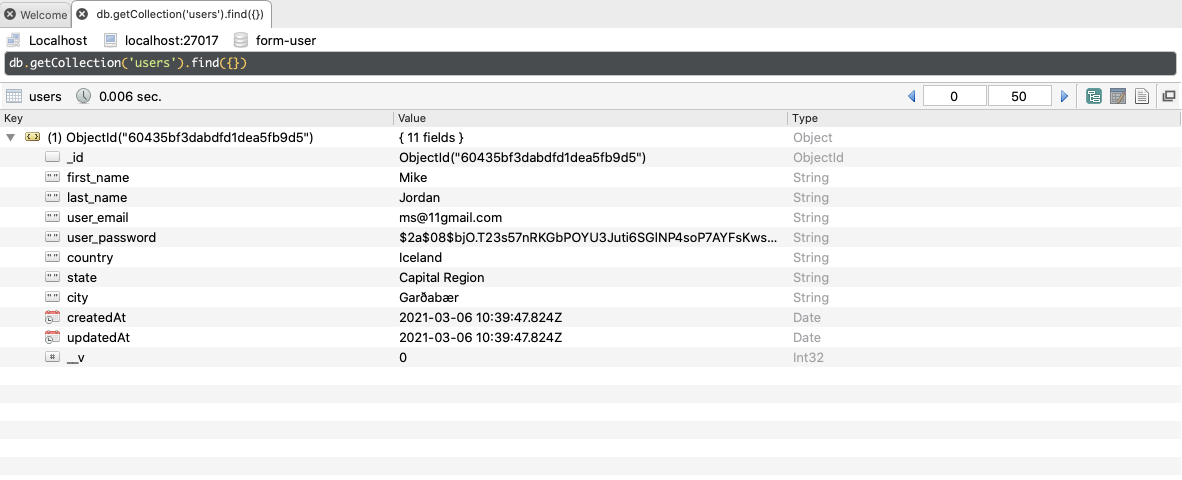
So now, we've successfully connected our front-end React app to the back-end Node.js app and saved the data to the database.
How to Show the Registration Feedback Popup
You might have noticed that we're not showing any indication that the data has been successfully saved to the database once we register the user. So let's do that now.
To show the success message, we'll use sweetalert2 which is a popular and customizable popup modal library.
Import it in the ThirdStep.js file as shown below:
import Swal from 'sweetalert2';
Inside the handleSubmit function, after the axios.post call, add the following code in the try block:
Swal.fire('Awesome!', "You're successfully registered!", 'success').then(
(result) => {
  if (result.isConfirmed || result.isDismissed) {
    props.history.push('/');
  }
}
);
and in the catch block add the following code:
if (error.response) {
  Swal.fire({
    icon: 'error',
    title: 'Oops...',
    text: error.response.data
  });
}
So your handleSubmit function will look like this now:
const handleSubmit = async (event) => {
    event.preventDefault();

    try {
      const { user } = props;
      const updatedData = {
        country: countries.find(
          (country) => country.isoCode === selectedCountry
        )?.name,
        state:
          states.find((state) => state.isoCode === selectedState)?.name || '', // or condition added because selectedState might come as undefined
        city: selectedCity
      };

      await axios.post(`${BASE_API_URL}/register`, {
        ...user,
        ...updatedData
      });
      Swal.fire('Awesome!', "You're successfully registered!", 'success').then(
        (result) => {
          if (result.isConfirmed || result.isDismissed) {
            props.history.push('/');
          }
        }
      );
    } catch (error) {
      if (error.response) {
        Swal.fire({
          icon: 'error',
          title: 'Oops...',
          text: error.response.data
        });
        console.log('error', error.response.data);
      }
    }
  };
If you check the application, you will see the following screen:

As you can see, if the user with the email address already exists in the database then we show an error message from the catch block.
And if the user email does not exist in the database, then we see the success popup as you can see below:
If you check the code of the popup for success, it looks like this:
Swal.fire('Awesome!', "You're successfully registered!", 'success').then(
  (result) => {
    if (result.isConfirmed || result.isDismissed) {
      props.history.push('/');
    }
  }
);
So if the user clicks on the OK button or clicks outside the popup modal, we redirect the user to step 1 using props.history.push('/');. But we also should clear the user-entered data from the input fields once the registration is successful. Let's do that now.
If you remember, we added a resetUser function inside the AppRouter component to clear the user state data.
Let's pass this function as a prop to the ThirdStep component. So your ThirdStep route will look like this:
<Route
  render={(props) => (
    <ThirdStep
      {...props}
      user={user}
      updateUser={updateUser}
      resetUser={resetUser}
    />
  )}
  path="/third"
/>
And inside the handleSubmit function of the ThirdStep.js file, before calling props.history.push('/'); call the resetUser function like this:
Swal.fire('Awesome!', "You're successfully registered!", 'success').then(
  (result) => {
    if (result.isConfirmed || result.isDismissed) {
      props.resetUser();
      props.history.push('/');
    }
  }
);
Now, if you register a new user, you will see that after registration, you will be redirected to step 1 and all the input fields will also be cleared.
How to Add Login Functionality to the App
We have added the entire registration functionality for the front-end and back-end. Let's add login functionality so we can check if a user with a provided email and password already exists and then retrieve the details of that user.
Open the routers/user.js file and add the following code inside it before the module.exports statement:
router.post('/login', async (req, res) => {
  try {
    const user = await User.findOne({ user_email: req.body.user_email });
    if (!user) {
      return res.status(400).send('User with provided email does not exist.');
    }

    const isMatch = await bcrypt.compare(
      req.body.user_password,
      user.user_password
    );

    if (!isMatch) {
      return res.status(400).send('Invalid credentials.');
    }
    const { user_password, ...rest } = user.toObject();

    return res.send(rest);
  } catch (error) {
    return res.status(500).send('Something went wrong. Try again later.');
  }
});
Here, we're first checking to see if the user with the provided email already exists using the findOne method. If no such user exists, then we return an error with a status code of 400.
If there is a user with the provided email address then we use the bcrypt.compare method to compare the original non-hashed password with the hashed password. If the hashed password does not match with the password from the user object, then we return an error saying Invalid credentials.
But if the password matches, then we create a new rest object with all the user properties except the hashed password using the ES9 rest operator for objects:
const { user_password, ...rest } = user.toObject();
This is because we don't want to return back the hashed password for security reasons.
Then we will send back the rest object with the password removed back to the client (our React app).
Now that we've created the back-end API, let's integrate the front-end part for our login functionality.
Create a new file called Login.js inside the components folder with the following code:
import React, { useState } from 'react';
import { useForm } from 'react-hook-form';
import { Form, Button } from 'react-bootstrap';
import axios from 'axios';
import { BASE_API_URL } from '../utils/constants';

const Login = () => {
  const { register, handleSubmit, errors } = useForm();
  const [successMessage, setSuccessMessage] = useState('');
  const [errorMessage, setErrorMessage] = useState('');
  const [userDetails, setUserDetails] = useState('');

  const onSubmit = async (data) => {
    console.log(data);

    try {
      const response = await axios.post(`${BASE_API_URL}/login`, data);
      setSuccessMessage('User with the provided credentials found.');
      setErrorMessage('');
      setUserDetails(response.data);
    } catch (error) {
      console.log(error);
      if (error.response) {
        console.log('error', error.response.data);
        setErrorMessage(error.response.data);
      }
    }
  };

  return (
    <Form className="input-form" onSubmit={handleSubmit(onSubmit)}>
      <div className="col-md-6 offset-md-3">
        {errorMessage ? (
          <p className="errorMsg login-error">{errorMessage}</p>
        ) : (
          <div>
            <p className="successMsg">{successMessage}</p>

            {userDetails && (
              <div className="user-details">
                <p>Following are the user details:</p>
                <div>First name: {userDetails.first_name}</div>
                <div>Last name: {userDetails.last_name}</div>
                <div>Email: {userDetails.user_email}</div>
                <div>Country: {userDetails.country}</div>
                <div>State: {userDetails.state}</div>
                <div>City: {userDetails.city}</div>
              </div>
            )}
          </div>
        )}
        <Form.Group controlId="first_name">
          <Form.Label>Email</Form.Label>
          <Form.Control
            type="email"
            name="user_email"
            placeholder="Enter your email address"
            ref={register({
              required: 'Email is required.',
              pattern: {
                value: /^[^@ ]+@[^@ ]+\.[^@ .]{2,}$/,
                message: 'Email is not valid.'
              }
            })}
            className={`${errors.user_email ? 'input-error' : ''}`}
          />
          {errors.user_email && (
            <p className="errorMsg">{errors.user_email.message}</p>
          )}
        </Form.Group>

        <Form.Group controlId="password">
          <Form.Label>Password</Form.Label>
          <Form.Control
            type="password"
            name="user_password"
            placeholder="Choose a password"
            ref={register({
              required: 'Password is required.',
              minLength: {
                value: 6,
                message: 'Password should have at-least 6 characters.'
              }
            })}
            className={`${errors.user_password ? 'input-error' : ''}`}
          />
          {errors.user_password && (
            <p className="errorMsg">{errors.user_password.message}</p>
          )}
        </Form.Group>

        <Button variant="primary" type="submit">
          Check Login
        </Button>
      </div>
    </Form>
  );
};

export default Login;
Now, open the AppRouter.js file and add a route for Login at the end of all routes before the ending Switch tag like this:
<BrowserRouter>
     ...
    <Route component={Login} path="/login" />
    </Switch>
  </div>
</BrowserRouter>
Also, include the Login component at the top:
import Login from '../components/Login';
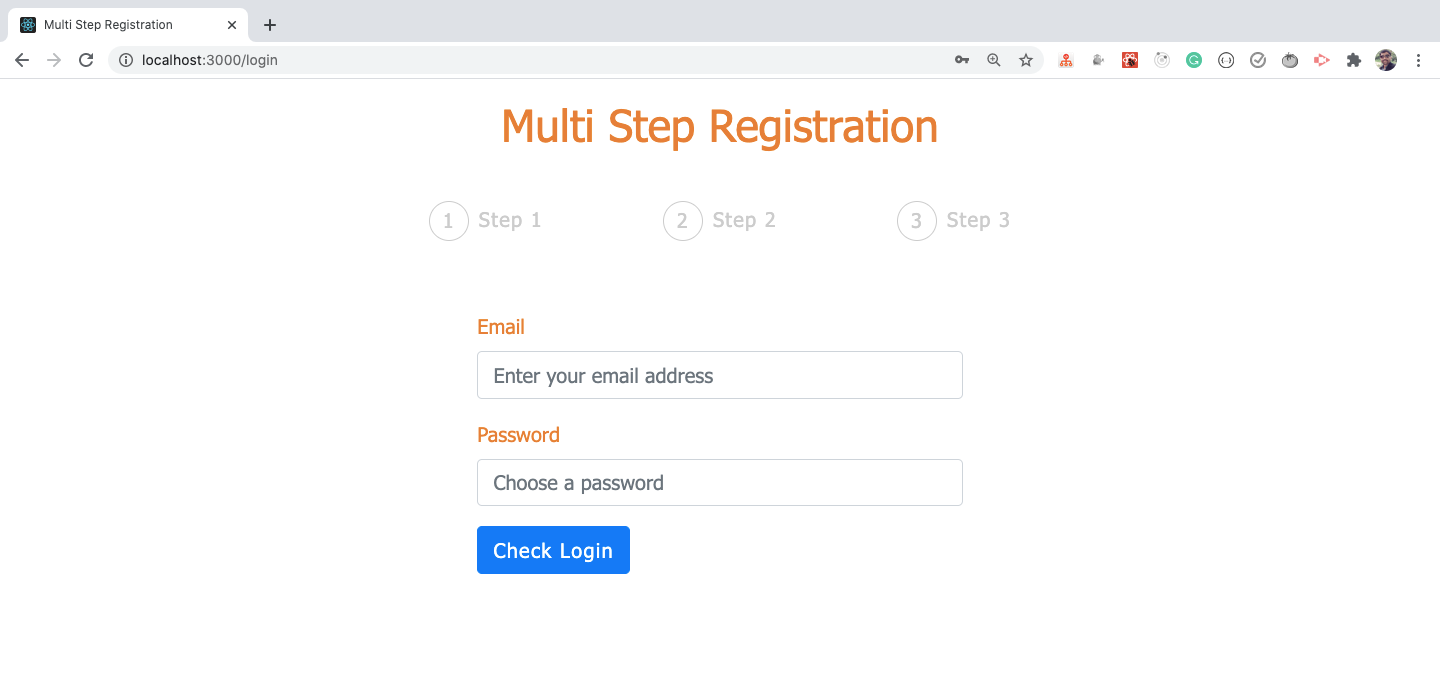
Now, if you access http://localhost:3000/login, you will see the following screen:
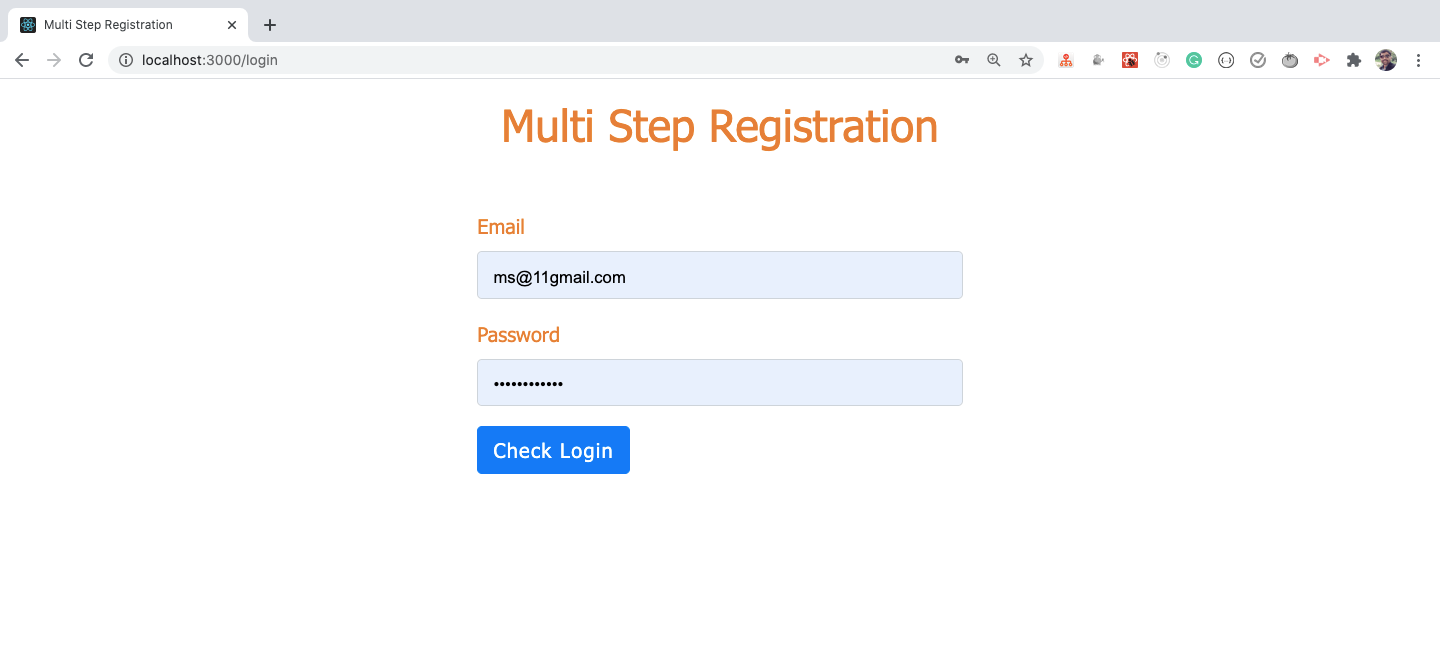
Here, we actually don't need to show the steps in the header, so let's add a condition to hide them on the login page.
Open the Progress.js file and add another const variable like this:
const isLoginPage = pathname === '/login';
Then add a ternary operator condition before the start of the div with class steps:
<React.Fragment>
  {!isLoginPage ? (
    <div className="steps">
     ...
    </div>
  ) : (
    <div></div>
  )}
</React.Fragment>
If the page is not a login page, then we'll display the steps – otherwise we will display an empty div.
Note that we need to render an empty div if we don't have anything to render, because React will throw an error if we don't return any JSX from the component.
Your entire Progress.js file will look like this now:
import React from 'react';
import { Link, withRouter } from 'react-router-dom';

const Progress = ({ location: { pathname } }) => {
  const isFirstStep = pathname === '/';
  const isSecondStep = pathname === '/second';
  const isThirdStep = pathname === '/third';
  const isLoginPage = pathname === '/login';

  return (
    <React.Fragment>
      {!isLoginPage ? (
        <div className="steps">
          <div className={`${isFirstStep ? 'step active' : 'step'}`}>
            <div>1</div>
            <div>
              {isSecondStep || isThirdStep ? (
                <Link to="/">Step 1</Link>
              ) : (
                'Step 1'
              )}
            </div>
          </div>
          <div className={`${isSecondStep ? 'step active' : 'step'}`}>
            <div>2</div>
            <div>
              {isThirdStep ? <Link to="/second">Step 2</Link> : 'Step 2'}
            </div>
          </div>
          <div className={`${pathname === '/third' ? 'step active' : 'step'}`}>
            <div>3</div>
            <div>Step 3</div>
          </div>
        </div>
      ) : (
        <div></div>
      )}
    </React.Fragment>
  );
};

export default withRouter(Progress);
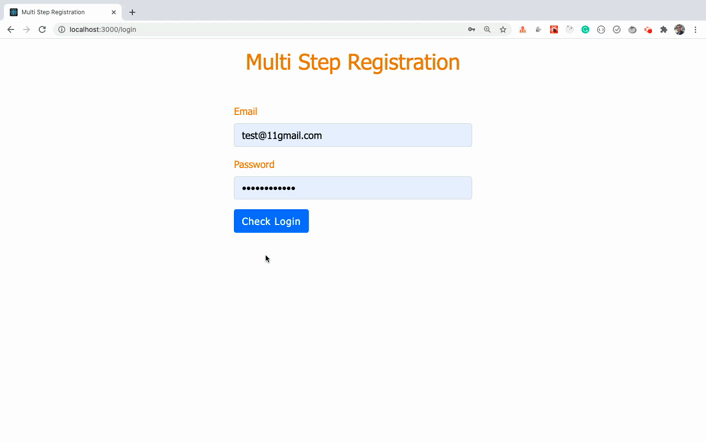
How to Test the Login Functionality
Now, if you check the login page, you will see the page without steps in the header. But the steps are still displayed for the other pages.
And if you enter the correct login credentials then you will get the details related to that user as shown below:

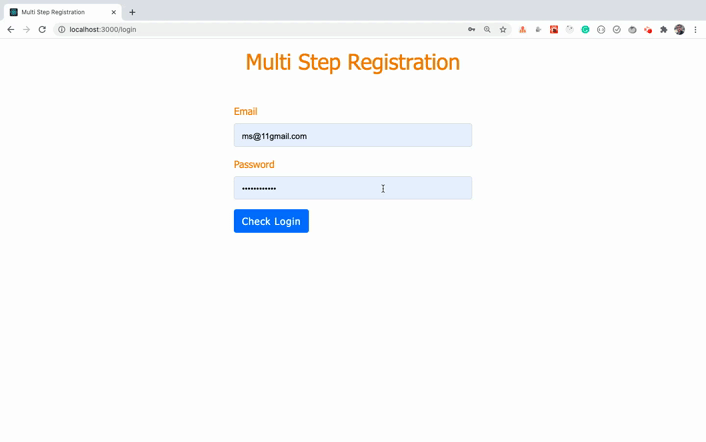
If the login credentials are invalid, you will see the error message as shown below:
If the email exists but the password does not match, then you will see the error message as shown below:
Now, let's understand the code from the Login.js file:
const onSubmit = async (data) => {
  console.log(data);

  try {
    const response = await axios.post(`${BASE_API_URL}/login`, data);
    setSuccessMessage('User with the provided credentials found.');
    setErrorMessage('');
    setUserDetails(response.data);
  } catch (error) {
    console.log(error);
    if (error.response) {
      console.log('error', error.response.data);
      setErrorMessage(error.response.data);
    }
  }
};
In the onSubmit function, we're making an API call to the /login endpoint by passing the data entered in the login form.
If there is no error in the API response, we will set the successMessage state and set the userDetails state with the response from the API. Otherwise we will set the errorMessage state.
And in the JSX, if the errorMessage state is not empty, we'll display the error message otherwise display successMessage state value with the userDetails data:
{errorMessage ? (
  <p className="errorMsg login-error">{errorMessage}</p>
) : (
  <div>
    <p className="successMsg">{successMessage}</p>

    {userDetails && (
      <div className="user-details">
        <p>Following are the user details:</p>
        <div>First name: {userDetails.first_name}</div>
        <div>Last name: {userDetails.last_name}</div>
        <div>Email: {userDetails.user_email}</div>
        <div>Country: {userDetails.country}</div>
        <div>State: {userDetails.state}</div>
        <div>City: {userDetails.city}</div>
      </div>
    )}
  </div>
)}
Note that we have not provided a link for the login page on the screen because the application is meant to display multi-step form functionality. I have included the login page so you can get an idea of how to validate user login.
If you want, you can include the login page link in the header or directly access it using http://localhost:3000/login.
How to Setup an Invalid Route Page
Now, we're done with the entire functionality of the App. Let's add some code so that if we enter any invalid route in the browser URL, the user will be redirected back to the home page.
Currently, if you access any invalid route like http://localhost:3000/contact, you will see a blank page. But there is also no error in the console because there is no matching route in the list of routes inside the AppRouter.js file.
Open the AppRouter.js file, and after the login route enter another route as shown below:
  ...
  <Route component={Login} path="/login" />
  <Route render={() => <Redirect to="/" />} />
</Switch>
Here, we haven't provided any path to the Route component for the last Route. This means that if any of the above routes do not match, this last Route will be executed. This will redirect the user to the / Route which is the FirstPage component route.
Also, import the Redirect component from the react-router-dom at the top of the file:
import { BrowserRouter, Redirect, Route, Switch } from 'react-router-dom';
Note that you need to enter it as the last route only. This way if any of the above routes do not match, the last route will be executed and it will redirect to the home page.
Let's verify it now.

As you can see, for all invalid routes we're redirected to the home page which is the first step page.
How to Get Rid of the CORS Library
As you know, to run this application, we need to start our React app using the yarn start command in one terminal. We also need to execute the yarn start command from the server folder for the backend server. And finally, we also need to keep our MongoDB server running in the third terminal.
So let's remove the need to run two separate yarn start commands. This will also allow you to deploy your app on a single hosting provider.
If you remember, in the server/index.js file, we added the following code:
app.use(cors());
Adding this code allows any application to access our APIs – which is fine when working in a local environment. But it's not safe to allow everyone to access our APIs. So let's fix that.
Open the server/index.js file and add the below code just above the app.use(express.json()); line:
app.use(express.static(path.join(__dirname, '..', 'build')));
Here, we're configuring our Express app to use the contents of the build folder as a starting point of our app.
The build folder will be created when we run the yarn build command for our React app.
As the build folder will be created outside the server folder, we're using .. to come out of the server folder to access it.
Also, import the path Node package at the top of the file:
const path = require('path');
We don't need to install the path npm package, as it's added by default when we install Node.js on our system.
Now, you can remove the cors import and its use from the server/index.js file.
Your final server/index.js file will look like this:
const path = require('path');
const express = require('express');
const userRouter = require('./routers/user');
require('./db');

const app = express();
const PORT = process.env.PORT || 3030;

app.use(express.static(path.join(__dirname, '..', 'build')));
app.use(express.json());
app.use(userRouter);

app.get('/', (req, res) => {
 res.send('<h2>This is from index.js file</h2>');
});

app.listen(PORT, () => {
 console.log(`server started on port ${PORT}`);
});
Now stop both the yarn start commands from both the terminals. Then, only in one terminal execute the yarn build command from inside the multi-step-form-using-mern folder which is our project folder.
The yarn build command will take some time to complete as it performs some optimizations. It should only be executed when we're done with all the app functionality and when we're ready to deploy the app to production.

Once the command completes successfully, you will see a build folder created as shown below:
The build folder contains our entire React app so you can use this build folder to deploy your app to production.
Now, open the src/utils/constants.js file and replace this code:
export const BASE_API_URL = 'http://localhost:3030';
with the below code:
export const BASE_API_URL = '';
Now, as we've created the build folder, navigate to server folder from the terminal and execute the yarn start command:
As you can see, the server has started on port 3030.
So let's access our application at http://localhost:3030/.
As you can see, we only need to run one yarn start command to start the Node.js Express server. The Node.js server renders our React app on port 3030 from the build folder.
So all our APIs are available now on http://localhost:3030 such as http://localhost:3030/register and http://localhost:3030/login.
Therefore we have changed the BASE_API_URL value to just an empty string:
export const BASE_API_URL = '';
When we're already on http://localhost:3030 we can make all our POST request APIs using just /login and /register.
So we only need one terminal to run the yarn start command and another terminal for starting the MongoDB service. This means that we can deploy our app on single hosting provider like heroku instead of deploying the React app on one hosting provider and the Node.js app on another hosting provider.
Note that if you make any changes to the React app's code, you will need to re-run the yarn build command from the project folder and then yarn start command from the server folder.
But there is one issue with this setup. If you directly go to any route apart from the / route like /first, /second, /login and so on, you will get an error as you'll see below:

This is because we’re starting the server from Express.js so the request will always go to the Express server (our Node server was created using Express) and there is no /second route for handling that on the Node side. So it gives us an error.
To fix this, open the server/index.js file and add the following code before the app.listen statement and after all other routes:
app.use((req, res, next) => {
  res.sendFile(path.join(__dirname, '..', 'build', 'index.html'));
});
This code will act as a default route. If any of the previous routes do not match, this code will send back the index.html file from the build folder which is our React app.
And because the /second route is present in our React app, you will see the correct step 2 page.
If the entered route is not present on the Node.js app as well as in our React app, then the user will be redirected to the step 1 page (our home page) because of our last route in the AppRouter.js file.
<Route render={() => <Redirect to="/" />} />
At this point, your complete server/index.js file will look like this:
const path = require('path');
const express = require('express');
const userRouter = require('./routers/user');
require('./db');

const app = express();
const PORT = process.env.PORT || 3030;

app.use(express.static(path.join(__dirname, '..', 'build')));
app.use(express.json());
app.use(userRouter);

app.get('/', (req, res) => {
  res.send('<h2>This is from index.js file</h2>');
});

app.use((req, res, next) => {
  res.sendFile(path.join(__dirname, '..', 'build', 'index.html'));
});

app.listen(PORT, () => {
  console.log(`server started on port ${PORT}`);
});
And you will not get an error now:

If you want to learn in-depth about rendering React apps using Node.js, check out this article.
Now we're done with both the front-end and back-end functionality as you can see below:

Closing points
We're done building out the functionality of the App.
You can find the complete GitHub source code for this application in this repository.
To take your skills further, you can improve the application by adding an extra validation at step 3 to check if the user has entered all the details in the form. This is important because you can directly visit the second step page of the form by using http://localhost:3030/second and proceed from there.
Thanks for reading!
Want to learn all ES6+ features in detail including let and const, promises, various promise methods, array and object destructuring, arrow functions, async/await, import and export and a whole lot more from scratch?
Check out my Mastering Modern JavaScript book. This book covers all the pre-requisites for learning React and helps you to become better at JavaScript and React.
Also, you can check out my free Introduction to React Router course to learn React Router from scratch.
Want to stay up to date with regular content regarding JavaScript, React, and Node.js? Follow me on LinkedIn.