

In this digital age, data flows freely across networks and devices. So protecting sensitive information from unauthorized access is crucial. That's where encryption comes in.
Encryption involves converting plain, readable data into an incomprehensible form. It's also essential to have a way to convert the data back into a readable form – otherwise the whole process makes no sense and isn't useful.
There are various popular encryption algorithms, each with its strengths and weaknesses. Understanding how these algorithms work is essential for programmers, as they need to choose the most appropriate one for their applications.
In this article, we will be build an application where users can encrypt images, and also revert the process using HTML, CSS, and JavaScript.
You will learn about working with images and how to encrypt them. The approach we will be using involves hiding one image inside another one, which is called Steganography. You will also practice some basic web development skills. It will be fun for sure!
Here's what we'll cover:
- How images are represented on your computer
- How to create the encryption algorithm
- How to create the decryption algorithm
- Photo encryption app code
How Images Are Represented on Your Computer
Understanding the way images are stored is critical before diving into encrypting them.
Images are represented on computers using a combination of pixels. A pixel is the smallest unit of an image and serves as the building block for displaying visuals on digital screens.
In memory, an image is an array of pixels. But now you're probably wondering, what is a pixel?
A pixel is assigned a specific color value which determines its appearance. The color values are typically represented using a combination of three primary colors: red, green, and blue – commonly known as RGB.
Each color channel is represented by a number value, ranging from 0 to 255, which determines the intensity of that color in the pixel.
For example:
- (0, 0, 0) represents black (absence of all colors)
- (255, 255, 255) represents white (maximum intensity of all colors)
- (255, 0, 0) represents pure red (maximum intensity of red, absence of green and blue)
- (0, 255, 0) represents pure green (maximum intensity of green, absence of red and blue)
- (0, 0, 255) represents pure blue (maximum intensity of blue, absence of red and green)
By combining different intensities of red, green, and blue, we can represent a wide range of colors. This color information for each pixel is stored in memory, forming a digital image. For example to get yellow, we can combine red and green – (255, 255, 0) represents a yellow pixel.
How to Use the Encryption Algorithm
The key idea behind the algorithm we're going to use is that it uses 2 images: the image we want to encrypt and an image that will play the role of mask used to hide the image we want to encrypt. So we're going to combine these two images in a way that hides our main image and allows its extraction.
Since an image is made of pixels, what works for a single pixel works for an entire image. We will discuss how we will be combining 2 pixels in a way that hides one and allows reverting the process.
Now for the interesting part: if we look at numbers from 0 to 255, they all can be written as follows: a 16 + b. For example 241 can be written as 15 16 + 1. But why we are doing this?
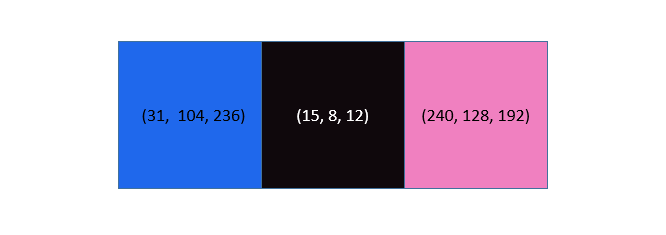
We will be using this to divide each pixel into two parts: first the a * 16 part and second b. The first part holds way more information than the second, since when a color degree goes up its intensity goes up. For example a (245, 137, 200) pixel can be split into (240, 128, 192) and (5, 9, 8).
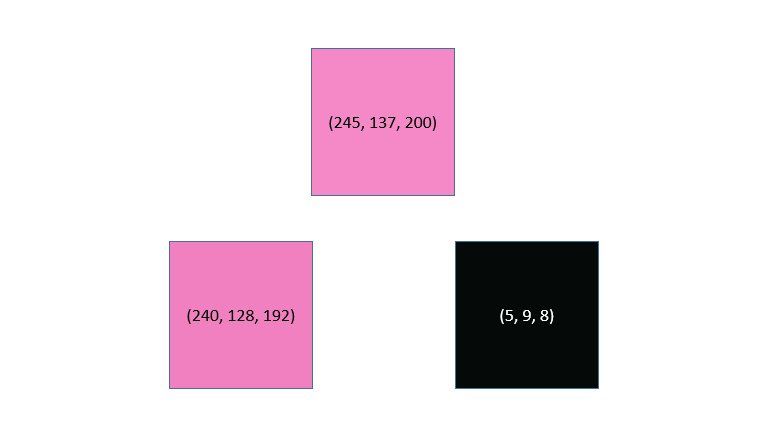 Image splitting
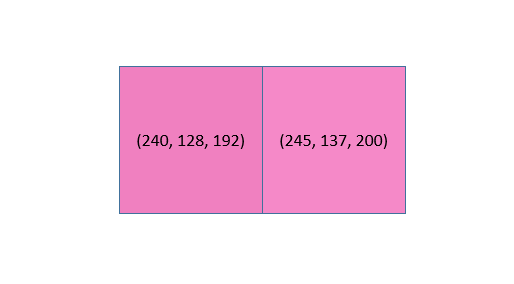
Now by comparing the high value pixel and the original one, you can see clearly that using the higher value pixel instead of the original one isn't going to change much of the information the original pixel holds.
 Comparing a higher value pixel and an original pixel's values
Now we will be using two pixels – one we're going to encrypt (the target pixel), and one we're going to hide the target pixel within (the encryption pixel), which can be random as we will see later.
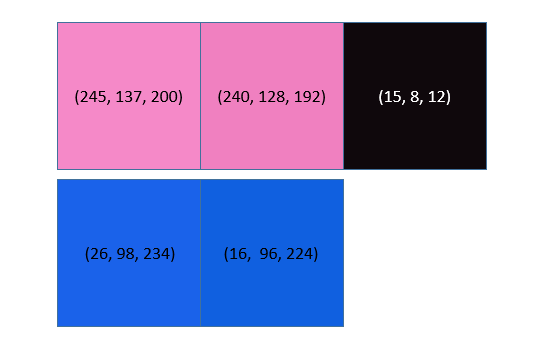
First we will get the high value pixel from our target and encryption pixels. Then for the pixel we're trying to encrypt, we'll divide each number degree by 16.
For example if the original target pixel was (245, 137, 200) then the high value pixel will be (240, 128, 192) which will become (15, 8, 12) after applying a division by 16.
 Getting initial values and applying division
Now we have two new pixels: the high value pixel of the encryption pixel, and our target pixel high value pixel that got divided by 16.
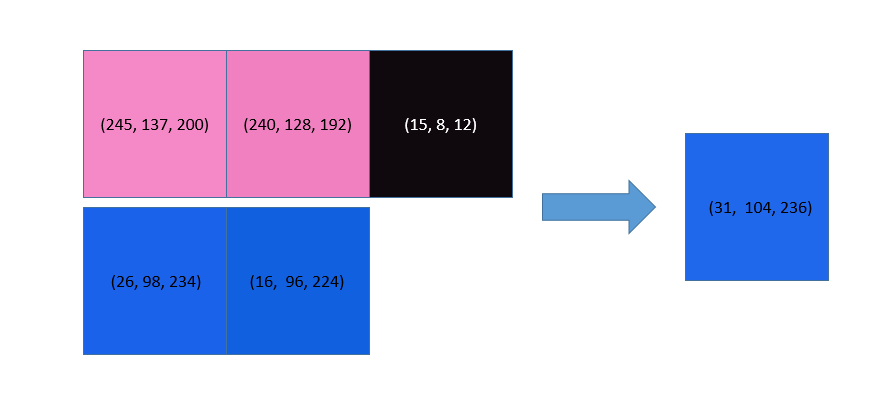
Finally, to get an encrypted pixel, we'll sum up the values of these two pixels to get what we're looking for.
Take, for example, (26, 98, 234) and (245, 137, 200) as our encryption and target pixels, respectively. Let's first get the high value pixels. We will have (16, 96, 224) and (240, 128, 192), respectively.
Now divide the target pixel high value pixel by 16 and you'll have (15, 8, 12). Now add these two up and you'll be left with (31, 104, 236). And that's our encrypted pixel.
 Encrypted image
Now you know how to encrypt a pixel. By applying this to all the pixels of an image we will get an encrypted image.
To make this clearer, we will be hiding an image of Quincy Larson playing guitar within the freeCodeCamp logo 😂.
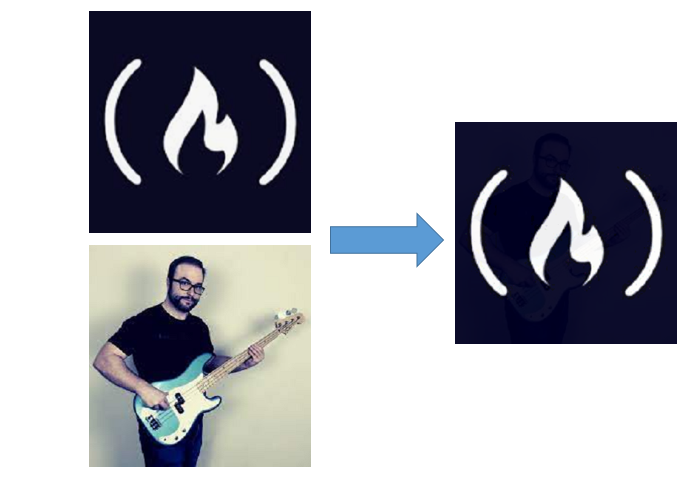 Image showing how we were able to hide Quincy Larson image in the freeCodeCamp logo
So to make this work we need two images: the one we need to encrypt and a random image to use as the encryption image. Also the two images should have the same dimensions to get the same number of pixels.
The reason we're using a random image to hide our image is to make it look like a very random image that will make no one suspicious.
How to Use the Decryption Algorithm
Now we need a way to revert the process, so to extract the target pixel from an encrypted pixel. Then we will have accomplished our goal.
Like we did earlier by combining 2 pixels to get an encrypted pixel, we will split back the encrypted pixel to get our target.
Every pixel can be split into two parts – the high value part (a * 16) and the low value part (b). Now we care about the b part since it comes from our target pixel. So we need to extract the b part from an encrypted pixel.
We can do this easily by mapping each number with its corresponding remainder of division by 16. We can do this using the modulo operator % which is a mathematical operator to get the remainder of the division of a number by another. For example 241 % 16 is 1 since since 241 is equal to 15 * 16 + 1.
By taking (31, 104, 236) and applying the modulo, we will be left with (15, 8, 12). As discussed earlier an encrypted pixel is the sum of the high value pixel of our encryption pixel or the mask pixel and the high value pixel of our target divided by 16. After the modulo is applied, the left value is the high value pixel of our target divided by 16.
Now multiply each number by 16 and you'll get exactly (240, 128, 192) which is the high value pixel of our target pixel.
 Decryption
Now as you can see, Steganography involves a small loss of each target pixel's information – but it's ok as you can see that it doesn't matter much in how the final image looks.
Photo Encryption App Code
And now since our toolkit is ready, let's code this image encryption application. All the code is available in this GitHub repo. The code itself is very straightforward.
First, create three files: an HTML file, a CSS file, and a JavaScript file.
For the HTML file we just need a canvas where we can see the resulting image. We also need two inputs of type file so we can upload our target and encryption images. And finally we need a button to save our encrypted image.
Also we will be using a small library to manage images created by Duke University, so we will have to include a script tag in the end of the body for this.
<!DOCTYPE html>
<html lang="en">
<head>
    <meta charset="UTF-8">
    <meta name="viewport" content="width=device-width, initial-scale=1.0">
    <title>Image encryption app</title>
    <link rel="stylesheet" href="index.css">
</head>
<body>
    <div class="container">
       <canvas></canvas>
    </div>
    <div class="input-container">
        <label for="Target">Upload target image</label>
        <input type="file" id="target" mltiple='false' accept='image/*'>
    </div>
    <div class="input-container">
        <label for="Encryption">Upload encryption image</label>
        <input type="file" id="encryption" multiple='false' accept='image/*'>
    </div>
    <button>Save image</button>
    <script src='https://www.dukelearntoprogram.com/course1/common/js/image/SimpleImage.js'></script>
    <script src="index.js" type="text/javascript"></script>
</body>
</html>
The CSS is simple too. We will give the div wrapping the canvas a width and height of 300px, the canvas a width and height of 100%, and it'll have a black border. Now the div tags wrapping our inputs will get a slight margin of 10px on the top, and that's it.
.container{
  width:300px;
  height: 300px;
}

canvas{
  width:100%;
  height:100%;
  border:1px solid black;
}

.input-container{
    margin-top: 10px;
}
Now for the JavaScript file. We will first select the two inputs, the canvas and the save button, and store them in four different variables. Then we will set the canvas width and height to 300px with JavaScript to avoid any future problems. And finally we'll set two variables, target and encryption, to store our encryption and target images.
const canvas = document.querySelector("canvas");
const targetInput = document.querySelector("#target");
const encryptionInput = document.querySelector("#encryption");
const saveButton = document.querySelector("button");
let target;
let encryption;

canvas.width = 300;
canvas.height = 300;
Now we need to store the encryption and target images on user upload in the two variables we created earlier. Also set the onClick event of our save button to a function called save that we will create next. Finally, we'll create a function that takes a number as an argument and returns its high value as discussed in the encryption algorithm section.
targetInput.onchange = (e) => {
  const img = new SimpleImage(targetInput);
  img.setSize(300, 300);
  target = img;
};

encryptionInput.onchange = (e) => {
  const img = new SimpleImage(encryptionInput);
  img.setSize(300, 300);
  encryption = img;
};

saveButton.onclick = save;

function getValue(x) {
  return x - (x % 16);
}
All that's left is to create the save function. First we will create a new image object with dimensions of 300 * 300. An image with these dimensions will have 90000 pixels. All of them have x and y coordinates from 0-299, since indexing starts from 0 in arrays. Looping from 0 to 300 twice will allow us to get all possible coordinates which means all pixels.
Now for each coordinate we will use the corresponding pixel of our encryption, target, and newly created image. Now we can set each pixel of our newly created image to the sum of the high value pixel of the encryption pixel and the high value pixel of our target divided by 16.
Now we will draw the newly created pixel on the canvas. And we'll need to get the URL of the image drawn into the canvas. We will be applying a small modification to the URL otherwise it will not work because we will get blocked by the browser for security reasons.
Finally, navigate to this URL by setting the window location to that URL. Then the encrypted image will be downloaded.
function save() {
  const img = new SimpleImage(300, 300);
  for (let i = 0; i < 300; i++) {
    for (let j = 0; j < 300; j++) {
      const targetPixel = target.getPixel(i, j);
      const encryptionPixel = encryption.getPixel(i, j);
      const pixel = img.getPixel(i, j);
      pixel.setRed(
        getValue(targetPixel.getRed()) / 16 + getValue(encryptionPixel.getRed())
      );
      pixel.setGreen(
        getValue(targetPixel.getGreen()) / 16 +
          getValue(encryptionPixel.getGreen())
      );
      pixel.setBlue(
        getValue(targetPixel.getBlue()) / 16 +
          getValue(encryptionPixel.getBlue())
      );
    }
  }
  img.drawTo(canvas);
  let url = canvas
    .toDataURL("image/png")
    .replace("image/png", "image/octet-stream");
  window.location.href = url;
}
And that's it for the code 😇.
Conclusion
In this article, we've learned a simple algorithm for image encryption. Modern algorithms are way more robust, as they use techniques like matrix multiplication to get solid hashing algorithms but they are very complex and require way more time and math knowledge than this one.
If you find this content enjoyable, follow me on LinkedIn as I post great content there 😉.