
By Peter Gleeson
The JSON API specification is a powerful way for enabling communication between client and server. It specifies the structure of the requests and responses sent between the two, using the JSON format.
As a data format, JSON has the advantages of being lightweight and readable. This makes it very easy to work with quickly and productively. The specification is designed to minimise the number of requests and the amount of data that needs sending between client and server.
Here, you can learn how to create a basic JSON API using Python and Flask. Then, the rest of the article will show you how to try out some of the features the JSON API specification has to offer.
Flask is a Python library that provides a 'micro-framework' for web development. It is great for rapid development as it comes with a simple-yet-extensible core functionality.
A really basic example of how to send a JSON-like response using Flask is shown below:
from flask import Flask

app = Flask(__name__)

@app.route('/')
def example():
   return '{"name":"Bob"}'

if __name__ == '__main__':
    app.run()
This article will use two add-ons for Flask:
- Flask-REST-JSONAPI will help develop an API that closely follows the JSON API specification.
- Flask-SQLAlchemy will use SQLAlchemy to make creating and interacting with a simple database very straightforward.
The big picture
The end goal is to create an API that allows client-side interaction with an underlying database. There will be a couple of layers between the database and the client - a data abstraction layer and a resource manager layer.
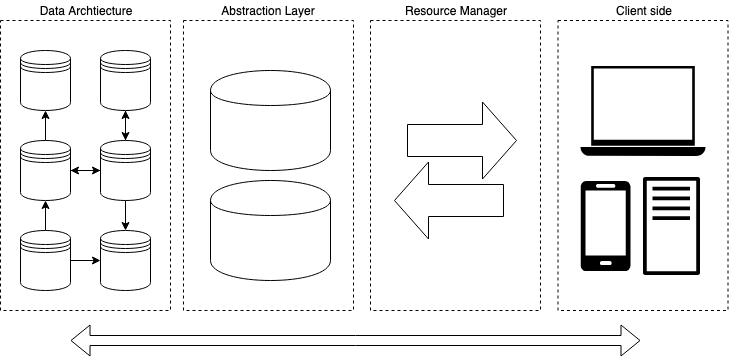
Here's an overview of the steps involved:
- Define a database using Flask-SQLAlchemy
- Create a data abstraction with Marshmallow-JSONAPI
- Create resource managers with Flask-REST-JSONAPI
- Create URL endpoints and start the server with Flask
This example will use a simple schema describing modern artists and their relationships to different artworks.
Install everything
Before getting started, you'll need to set up the project. This involves creating a workspace and virtual environment, installing the modules required, and creating the main Python and database files for the project.
From the command line create a new directory and navigate inside.
$ mkdir flask-jsonapi-demo
$ cd flask-jsonapi-demo/
It is good practice to create virtual environments for each of your Python projects. You can skip this step, but it is strongly recommended.
$ python -m venv .venv
$ source .venv/bin/activate
Once your virtual environment has been created and activated, you can install the modules needed for this project.
$ pip install flask-rest-jsonapi flask-sqlalchemy
Everything you'll need will be installed as the requirements for these two extensions. This includes Flask itself, and SQLAlchemy.
The next step is to create a Python file and database for the project.
$ touch application.py artists.db
Create the database schema
Here, you will start modifying application.py to define and create the database schema for the project.
Open application.py in your preferred text editor. Begin by importing some modules. For clarity, modules will be imported as you go.
Next, create an object called app as an instance of the Flask class.
After that, use SQLAlchemy to connect to the database file you created. The final step is to define and create a table called artists.
from flask import Flask
from flask_sqlalchemy import SQLAlchemy

# Create a new Flask application
app = Flask(__name__)

# Set up SQLAlchemy
app.config['SQLALCHEMY_DATABASE_URI'] = 'sqlite:////artists.db'
db = SQLAlchemy(app)

# Define a class for the Artist table
class Artist(db.Model):
    id = db.Column(db.Integer, primary_key=True)
    name = db.Column(db.String)
    birth_year = db.Column(db.Integer)
    genre = db.Column(db.String)

# Create the table
db.create_all()
Creating an abstraction layer
The next step uses the Marshmallow-JSONAPI module to create a logical data abstraction over the tables just defined.
The reason to create this abstraction layer is simple. It gives you more control over how your underlying data is exposed via the API. Think of this layer as a lens through which the API client can view the underlying data clearly, and only the bits they need to see.
In the code below, the data abstraction layer is defined as a class which inherits from Marshmallow-JSONAPI's Schema class. It will provide access via the API to both single records and multiple records from the artists table.
Inside this block, the Meta class defines some metadata. Specifically, the name of the URL endpoint for interacting with single records will be artist_one, where each artist will be identified by a URL parameter <id>. The name of the endpoint for interacting with many records will be artist_many.
The remaining attributes defined relate to the columns in the artists table. Here, you can control further how each is exposed via the API.
For example, when making POST requests to add new artists to the database, you can make sure the name field is mandatory by setting required=True.
And if for any reason you didn't want the birth_year field to be returned when making GET requests, you can specify so by setting load_only=True.
from marshmallow_jsonapi.flask import Schema
from marshmallow_jsonapi import fields

# Create data abstraction layer
class ArtistSchema(Schema):
    class Meta:
        type_ = 'artist'
        self_view = 'artist_one'
        self_view_kwargs = {'id': '<id>'}
        self_view_many = 'artist_many'

    id = fields.Integer()
    name = fields.Str(required=True)
    birth_year = fields.Integer(load_only=True)
    genre = fields.Str()
Create resource managers and URL endpoints
The final piece of the puzzle is to create a resource manager and corresponding endpoint for each of the routes /artists and /artists/id.
Each resource manager is defined as a class that inherits from the Flask-REST-JSONAPI classes ResourceList and ResourceDetail.
Here they take two attributes. schema is used to indicate the data abstraction layer the resource manager uses, and data_layer indicates the session and data model that will be used for the data layer.
Next, define api as an instance of Flask-REST-JSONAPI's Api class, and create the routes for the API with api.route(). This method takes three arguments - the data abstraction layer class, the endpoint name, and the URL path.
The last step is to write a main loop to launch the app in debug mode when the script is run directly. Debug mode is great for development, but it is not suitable for running in production.
# Create resource managers and endpoints

from flask_rest_jsonapi import Api, ResourceDetail, ResourceList

class ArtistMany(ResourceList):
    schema = ArtistSchema
    data_layer = {'session': db.session,
                  'model': Artist}

class ArtistOne(ResourceDetail):
    schema = ArtistSchema
    data_layer = {'session': db.session,
                  'model': Artist}

api = Api(app)
api.route(ArtistMany, 'artist_many', '/artists')
api.route(ArtistOne, 'artist_one', '/artists/<int:id>')

# main loop to run app in debug mode
if __name__ == '__main__':
    app.run(debug=True)
Make GET and POST requests
Now you can start using the API to make HTTP requests. This could be from a web browser, or from a command line tool like curl, or from within another program (e.g., a Python script using the Requests library).
To launch the server, run the application.py script with:
$ python application.py
In your browser, navigate to http://localhost:5000/artists. You will see a JSON output of all the records in the database so far. Except, there are none.
To start adding records to the database, you can make a POST request. One way of doing this is from the command line using curl. Alternatively, you could use a tool like Insomnia, or perhaps code up a simple HTML user interface that posts data using a form.
With curl, from the command line:
curl -i -X POST -H 'Content-Type: application/json' -d '{"data":{"type":"artist", "attributes":{"name":"Salvador Dali", "birth_year":1904, "genre":"Surrealism"}}}' http://localhost:5000/artists
Now if you navigate to http://localhost:5000/artists, you will see the record you just added. If you were to add more records, they would all show here as well, as this URL path calls the artists_many endpoint.
To view just a single artist by their id number, you can navigate to the relevant URL. For example, to see the first artist, try http://localhost:5000/artists/1.
Filtering and sorting
One of the neat features of the JSON API specification is the ability to return the response in more useful ways by defining some parameters in the URL. For instance, you can sort the results according to a chosen field, or filter based on some criteria.
Flask-REST-JSONAPI comes with this built in.
To sort artists in order of birth year, just navigate to http://localhost:5000/artists?sort=birth_year. In a web application, this would save you from needing to sort results on the client side, which could be costly in terms of performance and therefore impact the user experience.
Filtering is also easy. You append to the URL the criteria you wish to filter on, contained in square brackets. There are three pieces of information to include:
- "name" - the field you are filtering by (e.g.,
birth_year) - "op" - the filter operation ("equal to", "greater than", "less than" etc.)
- "val" - the value to filter against (e.g., 1900)
For example, the URL below retrieves artists whose birth year is greater than 1900:
http://localhost:5000/artists?filter=[{"name":"birth_year","op":"gt","val":1900}]
This functionality makes it much easier to retrieve only relevant information when calling the API. This is valuable for improving performance, especially when retrieving potentially large volumes of data over a slow connection.
Pagination
Another feature of the JSON API specification that aids performance is pagination. This is when large responses are sent over several "pages", rather than all in one go. You can control the page size and the number of the page you request in the URL.
So, for example, you could receive 100 results over 10 pages instead of loading all 100 in one go. The first page would contain results 1-10, the second page would contain results 11-20, and so on.
To specify the number of results you want to receive per page, you can add the parameter ?page[size]=X to the URL, where X is the number of results. Flask-REST-JSONAPI uses 30 as the default page size.
To request a given page number, you can add the parameter ?page[number]=X, where is the page number. You can combine both parameters as shown below:
http://localhost:5000/artists?page[size]=2&page[number]=2
This URL sets the page size to two results per page, and asks for the second page of results. This would return the third and fourth results from the overall response.
Relationships
Almost always, data in one table will be related to data stored in another. For instance, if you have a table of artists, chances are you might also want a table of artworks. Each artwork is related to the artist who created it.
The JSON API specification allows you to work with relational data easily, and the Flask-REST-JSONAPI lets you take advantage of this. Here, this will be demonstrated by adding an artworks table to the database, and including relationships between artist and artwork.
To implement the artworks example, it will be necessary to make a few changes to the code in application.py.
First, make a couple of extra imports, then create a new table which relates each artwork to an artist:
from marshmallow_jsonapi.flask import Relationship
from flask_rest_jsonapi import ResourceRelationship


# Define the Artwork table
class Artwork(db.Model):
    id = db.Column(db.Integer, primary_key=True)
    title = db.Column(db.String)
    artist_id = db.Column(db.Integer,
        db.ForeignKey('artist.id'))
    artist = db.relationship('Artist',
        backref=db.backref('artworks'))
Next, rewrite the abstraction layer:
# Create data abstraction
class ArtistSchema(Schema):
    class Meta:
        type_ = 'artist'
        self_view = 'artist_one'
        self_view_kwargs = {'id': '<id>'}
        self_view_many = 'artist_many'

    id = fields.Integer()
    name = fields.Str(required=True)
    birth_year = fields.Integer(load_only=True)
    genre = fields.Str()
    artworks = Relationship(self_view = 'artist_artworks',
        self_view_kwargs = {'id': '<id>'},
        related_view = 'artwork_many',
        many = True,
        schema = 'ArtworkSchema',
        type_ = 'artwork')

class ArtworkSchema(Schema):
    class Meta:
        type_ = 'artwork'
        self_view = 'artwork_one'
        self_view_kwargs = {'id': '<id>'}
        self_view_many = 'artwork_many'

    id = fields.Integer()
    title = fields.Str(required=True)
    artist_id = fields.Integer(required=True)
This defines an abstraction layer for the artwork table, and adds a relationship between artist and artwork to the ArtistSchema class.
Next, define new resource managers for accessing artworks many at once and one at a time, and also for accessing the relationships between artist and artwork.
class ArtworkMany(ResourceList):
    schema = ArtworkSchema
    data_layer = {'session': db.session,
                  'model': Artwork}

class ArtworkOne(ResourceDetail):
    schema = ArtworkSchema
    data_layer = {'session': db.session,
                  'model': Artwork}

class ArtistArtwork(ResourceRelationship):
    schema = ArtistSchema
    data_layer = {'session': db.session,
                  'model': Artist}
Finally, add some new endpoints:
api.route(ArtworkOne, 'artwork_one', '/artworks/<int:id>')
api.route(ArtworkMany, 'artwork_many', '/artworks')
api.route(ArtistArtwork, 'artist_artworks',
    '/artists/<int:id>/relationships/artworks')
Run application.py and trying posting some data from the command line via curl:
curl -i -X POST -H 'Content-Type: application/json' -d '{"data":{"type":"artwork", "attributes":{"title":"The Persistance of Memory", "artist_id":1}}}' http://localhost:5000/artworks
This will create an artwork related to the artist with id=1.
In the browser, navigate to http://localhost:5000/artists/1/relationships/artworks. This should show the artworks related to the artist with id=1. This saves you from writing a more complex URL with parameters to filter artworks by their artist_id field. You can quickly list all the relationships between a given artist and their artworks.
Another feature is the ability to include related results in the response to calling the artists_one endpoint:
http://localhost:5000/artists/1?include=artworks
This will return the usual response for the artists endpoint, and also results for each of that artist's artworks.
Sparse Fields
One last feature worth mentioning - sparse fields. When working with large data resources with many complex relationships, the response sizes can blow up real fast. It is helpful to only retrieve the fields you are interested in.
The JSON API specification lets you do this by adding a fields parameter to the URL. For example URL below gets the response for a given artist and their related artworks. However, instead of returning all the fields for the given artwork, it returns only the title.
http://localhost:5000/artists/1?include=artworks&fields[artwork]=title
This is again very helpful for improving performance, especially over slow connections. As a general rule, you should only make requests to and from the server with the minimal amount of data required.
Final remarks
The JSON API specification is a very useful framework for sending data between server and client in a clean, flexible format. This article has provided an overview of what you can do with it, with a worked example in Python using the Flask-REST-JSONAPI library.
So what will you do next? There are many possibilities. The example in this article has been a simple proof-of-concept, with just two tables and a single relationship between them. You can develop an application as sophisticated as you like, and create a powerful API to interact with it using all the tools provided here.
Thanks for reading, and keep coding in Python!