

In this article, I am going to walk you through creating a snake game using a React application. It is a simple 2d game built using TypeScript, and we won't need to use any third-party graphics libraries to build it.
This is what we'll make in this tutorial:

Snake is a fun game which you might have played on older feature phones like on Nokia 3310 models.
The concept behind it is simple: the snake roams around inside a box, and once it captures the fruit/object your points increase and the snake grows. If the snake hits the boundaries of the box or collides with itself then the game is over.
This article will provide you with all the necessary skills/steps to create your own Snake game from scratch. We'll first look at the code structures and their logic. Then I'll explain how they work when all of them are connected.
Without further ado, let’s get started.
Table of contents
- Prerequisites
- What is a snake game? What are we going to use in it?
- What is redux? Why are we using this?
- What is redux-saga? Why are we using this?
- Use case description
- The application and data layer set up
- Understanding UI Layer
- Canvas Board
- Drawing the objects
- Moving the snake across the board
- Drawing the fruit at a random position
- Score calculator
- Instruction component
- Final Game
- Summary
Prerequisites
Before you start reading this article, you should have a basic understanding of the following topics:
- Class Diagrams: We are going to use them to showcase our example. Here are a couple of resources you can use to learn more about them:
- Context Diagram and Container Diagrams
- React
- Generators:
What is a snake game? What are we going to use in it?
A snake game is an arcade game that involves a snake moving inside a box. Your score increases based on how many objects/fruit the snake eats. This will also increase the size of the snake. If it collides with itself or to the boundary of the box then the game is over.
You can read more about the history or the origins of the game in the Wiki link.
We are going to use the following tools to build our game:
- Redux: To create and manage the global state for the application.
- Redux-saga: A redux middleware we'll use to manage async tasks.
- Canvas HTML tag: We'll use this to draw an object like a snake and the fruit.
- React: UI library.
- Chakra-UI: Component library.
What is redux? Why are we using it?
Redux is a state container that helps you create and manage global state for your application. Redux consists of some basic parts like:
- Global State
- Redux store
- Actions and action creators
- Reducers
You can learn all about the above topics and how Redux works internally from the Redux doc’s getting started section.
We are using the state management library Redux because it will help us manage our global state in a simpler way. It will allow us to avoid prop drilling. It will also allow us to perform complex async actions via middleware.
You can learn more about middleware here.
What is redux-saga? Why are we using it?
Redux-saga is a middleware that helps us tap in between the dispatched action and the reducer of the redux store. This allows us to perform certain side-effects between the dispatched action and the reducer such as data fetching, listening to particular actions or setting up subscriptions, spawning actions, and more.
Redux saga uses generators and generator functions. A typical saga would look like this:
function* performAction() {
    yield put({
        type: COPY_DATA,
        payload: "Hello"
    });
}
performAction is a generator function. This generator function will execute the put function. It creates an object and returns it to the saga, telling what type of action needs to be executed with what payload. Then the put call returns an object descriptor saying which saga can take it up later and execute the particular action.
NOTE: You can read more about generators and generator functions by referring to the prerequisite section.
Now the question arises Why are we using redux-saga middleware? The answer is simple:
- It provides a better way to write unit test cases, which will help us test the generator functions in a simpler way.
- It can help you perform a lot of side effects and provide better control over the changes. One example is whenever you want to watch if a particular action X is executed then perform the action Y. Functions like
takeEvery,all, and so on make it simple to perform these operations. We will discuss more of this in a later section.
If you are not familiar with redux-saga, then I highly recommend going through the documentation here.
Use case description
NOTE: Context, Container, and Class diagrams drawn in this blog post don't accurately follow the exact conventions of these diagrams. I've approximated them here so you can understand the basic concepts.
Before we start, I would suggest reading up on c4models, container diagrams, and context diagrams. You can find resources about them in the prerequisites section.
In this article we are going to consider the following use case: Create a snake game.
The use case is pretty self-explanatory, and we have discussed what the snake game entails above. Below is the context diagram for our use case:
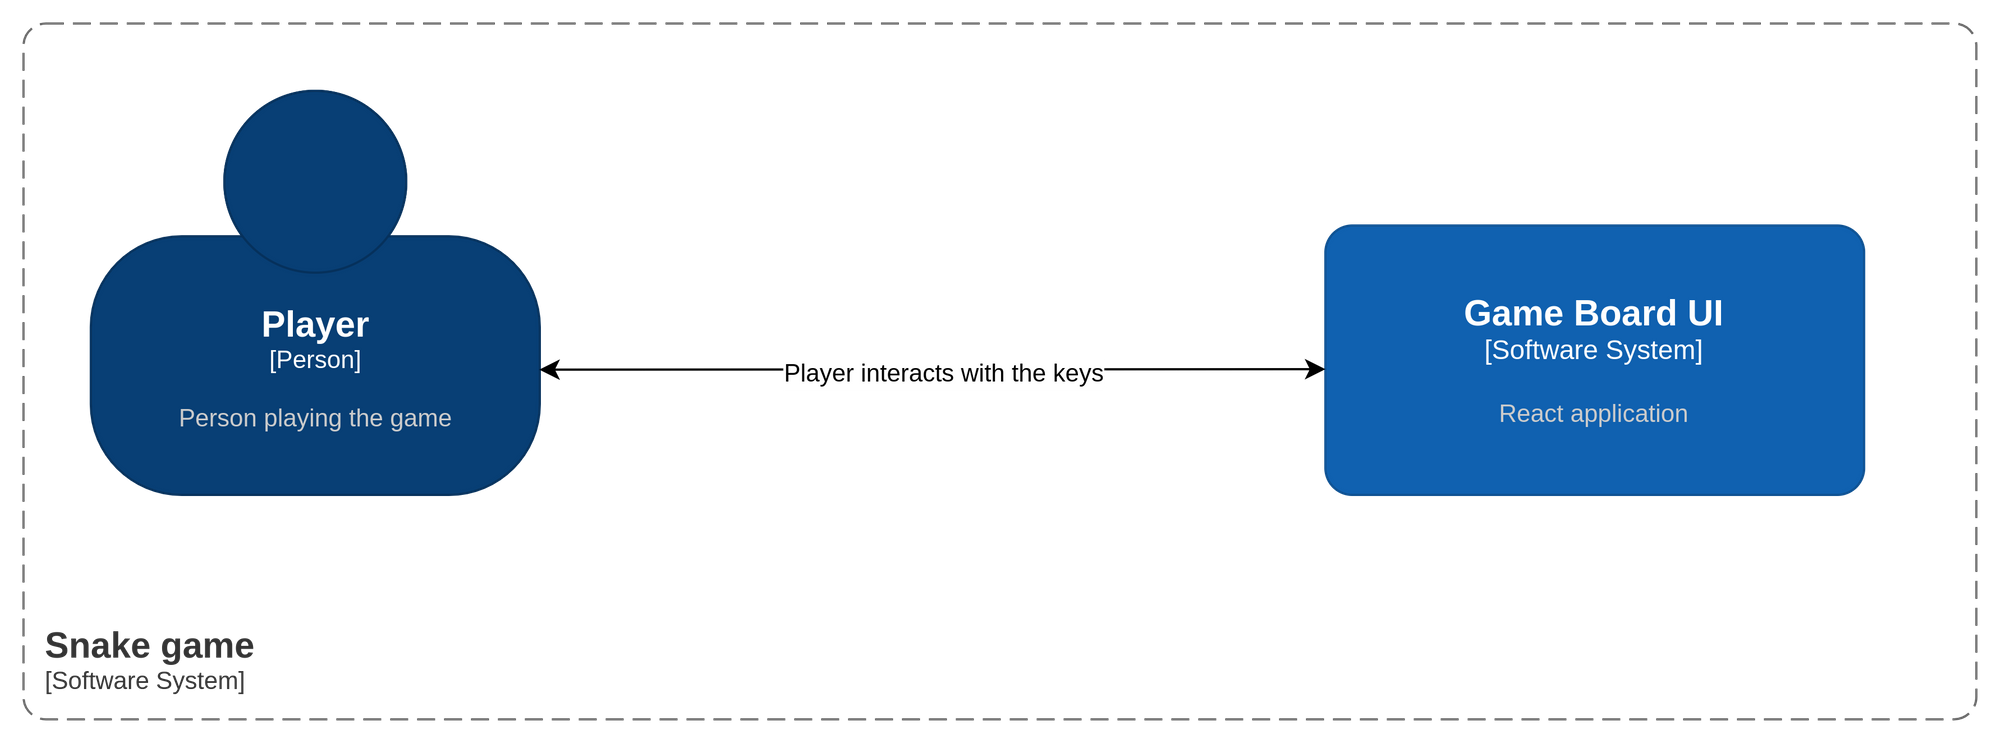 Snake game context diagram
Our context diagram is pretty straightforward. The player interacts with the UI. Let's dive deeper into the container game board UI and explore what other systems are present inside it.
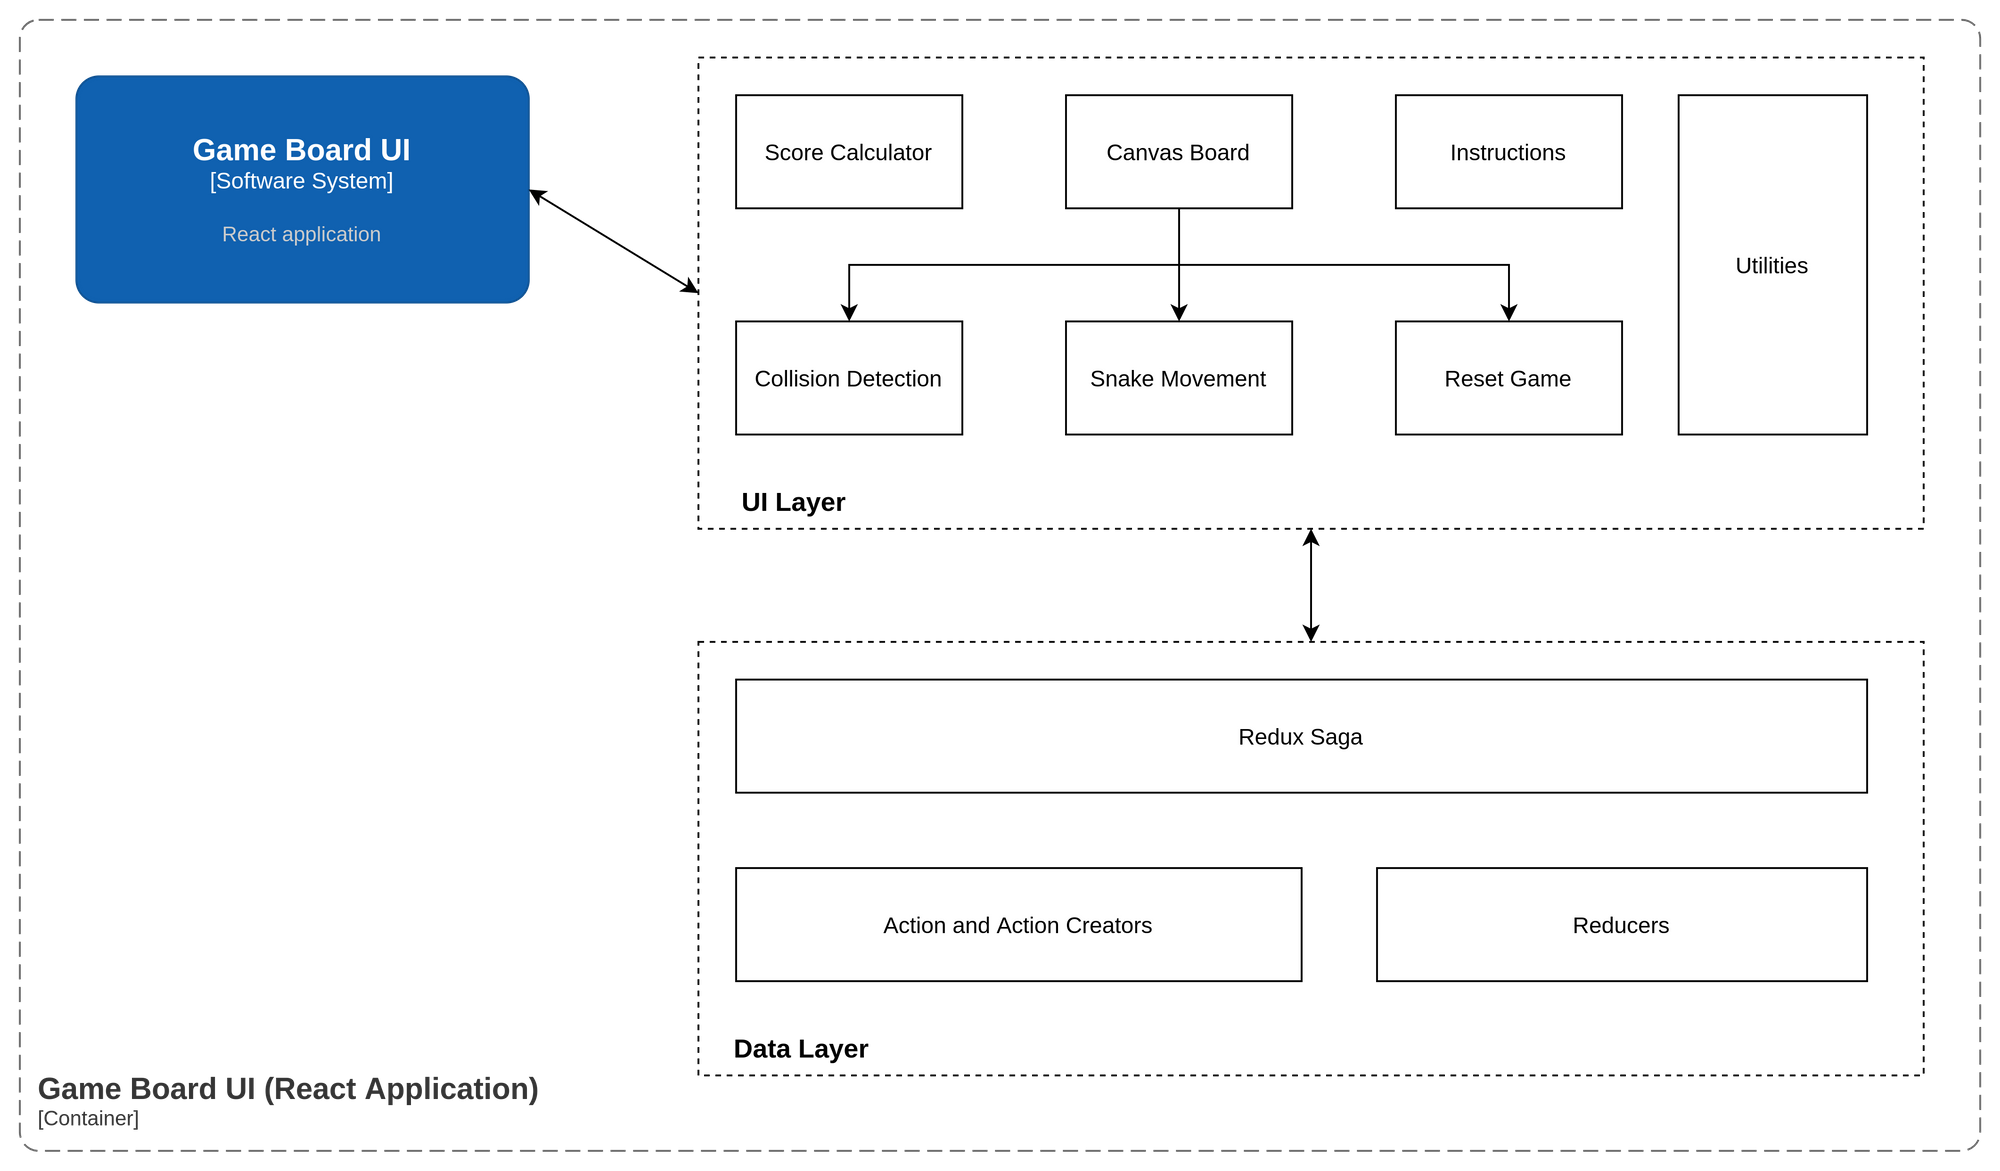 Container diagram for the snake game
As you can see from the above diagram, our Game Board UI is divided into two Layers:
- UI Layer
- Data Layer
The UI Layer consists of the following components:
- Score Calculator: This is a component that will display the score whenever the snake eats the fruit.
- Canvas Board: This is a component that handles the major UI part of our game. Its basic functionality is to draw the snake on the canvas and clear the canvas. It also handles the following responsibilities:
- It detects if the snake has collided with itself or with the boundary walls (Collision detection).
- Helps in moving the snake along the board with keyboard events.
- Resets the game when the game is over.
- Instructions: It provides the instructions for playing the game, along with the reset button.
- Utilities: These are the utility functions that we'll use throughout the application wherever needed.
Let's now talk about the Data Layer. It consists of the following components:
- Redux-saga: Set of generator functions that will perform certain actions.
- Actions and Action Creators: These are the set of constants and functions which will help in dispatching appropriate actions.
- Reducers: This will help us respond to the various actions dispatched by action creators and the sagas.
We will deep dive into all of these components and see how they work collectively in the later sections. First, let's initialize our project and set up our Data layer – that is, the Redux store.
The application and data layer set up
Before we start understanding our game components, let's first set up our React application and the data layer.
The game is built with React. I highly recommend using the create-react-app template to install all the necessary things to start your React application.
To create a CRA (create-react-app) project, first we need to install it. Type the below command into your terminal:
npm install -g create-react-app
Note: Before running this command make sure you have installed Node.js in your system. Follow this link to install it.
Next, we will start by creating our project. Let's call it snake-game. Type the below command into your terminal to create the project:
npx create-react-app snake-game
This may take few minutes to complete. Once this is completed, traverse to your newly created project using the below command:
cd snake-game
Once inside the project, type the below command to start the project:
npm run start
This command will open a new tab in your browser with the React logo spinning on the page like below:
 create-react-app initial page
Now our initial project setup is complete. Let's configure our data layer (the Redux store). Our data layer requires that we install the following packages:
- Redux
- Redux-saga
First, let's start off by installing these packages. Before we start, make sure you are in the project directory. Type the below command in the terminal:
npm install redux react-redux redux-saga
Once these packages are installed then we will first configure our Redux store. To start off, let's first create a folder named store:
mkdir store
This store folder will consist of all the files related to Redux. We will organize our store folder in the following manner:
store/
├── actions
│   └── index.ts
├── reducers
│   └── index.ts
└── sagas
    └── index.ts
├── index.ts
Let's discuss what each of the files does:
action/index.tsx: This file consists of constants that represents actions that our application can perform and dispatch to the Redux store. An example of such an action constant looks like this:
export const MOVE_RIGHT = "MOVE_RIGHT"
We will use the same action constant to create a function which will return an object with the following properties:
type: Action type, that is action constantpayload: additional data that acts as a payload.
These functions which return an object with the type property are called action creators. We use these functions to dispatch actions to our Redux store.
The payload attribute signifies that along with the action we can also pass additional data which can be used to store or update the value inside the global state.
NOTE: It is mandatory to have type property returned from the action creator. The payload property is optional. Also, the name of the payload property can be anything.
Let's see an example of an action creator:
//Without payload
export const moveRight = () => ({
    type: MOVE_RIGHT
});

//With payload
export const moveRight = (data: string) => ({
    type: MOVE_RIGHT,
    payload: data
});
Now that we know what actions and action creators are, we can move on to configuring our next artifact which is a reducer.
Reducers are functions that return a new global state every time an action is dispatched. They take in the current global state and return the new state based on the action that is dispatched/called. This new state is calculated based on the previous state.
We should be careful here that we do not perform any side-effects inside this function. We should not alter the global state – rather we should return the updated state as a new object itself. Therefore, the reducer function should be a pure function.
Now enough talking about reducers. Let's have a look at our sample reducers:
const GlobalState = {
    data: ""
};

const gameReducer = (state = GlobalState, action) => {
    switch (action.type) {
        case "MOVE_RIGHT":
            /**
             * Perform a certain set of operations
             */
            return {
                ...state, data: action.payload
            };

        default:
            return state;
    }
}
In this example, we have created a reducer function which is called a gameReducer. It takes in the state (default parameter as a global state) and an action. Whenever we have action.type that matches the switch case, then it performs a particular action, like returning a new state based on the action.
The sagas/index.ts file will consist of all the sagas that we will use in our application. We do have some basic understanding of the sagas which we briefly explained in the above sections. We will dive deeper into this section when we actually start our implementation of the snake game.
Now we have a basic understanding of the artifacts involved in making our Redux store. Let's go ahead and create store/index.ts like below:
import {
    createStore,
    applyMiddleware
} from "redux";
import createSagaMiddleware from "redux-saga";
import gameReducer from "./reducers";
import watcherSagas from "./sagas";
const sagaMiddleware = createSagaMiddleware();

const store = createStore(gameReducer, applyMiddleware(sagaMiddleware));

sagaMiddleware.run(watcherSagas);
export default store;
We will first import our reducer and the saga. Next we will use the createSagaMiddleware() function to create a saga middleware.
Next, we will connect it to our store by passing it as an argument to the applyMiddleware function inside createStore which you use to create a store. We will also pass gameReducer to this function so that a reducer is mapped to our store.
Finally, we will run our sagaMiddleware using this code:
sagaMiddleware.run(watcherSagas);
Our final step is to inject this store at the top level of our React app using the Provider component provided by react-redux. You can do this as follows:
import { Provider } from "react-redux";
import store from "./store";

const App = () => {
  return (
    <Provider store={store}>
    //   Child components...
    </Provider>
  );
};

export default App;
I have also installed chakra-UI as a UI component library for our project. To install chakra-UI, type the below command:
npm install @chakra-ui/react @emotion/react@^11 @emotion/styled@^11 framer-motion@^5
We also need to setup the ChakraProvider that will go in our App.tsx file. Our updated App.tsx file will look like this:
import { ChakraProvider, Container, Heading } from "@chakra-ui/react";
import { Provider } from "react-redux";
import store from "./store";

const App = () => {
  return (
    <Provider store={store}>
      <ChakraProvider>
        <Container maxW="container.lg" centerContent>
          <Heading as="h1" size="xl">SNAKE GAME</Heading>
    //Children components
        </Container>
      </ChakraProvider>
    </Provider>
  );
};

export default App;
Understanding UI layer
Let's first understand the dynamics of our Snake game from the UI perspective. Before we get started, our final Snake game will look like below:
The UI Layer consists of 3 layers: Score Calculator, Canvas Board, and Instructions. The below diagram showcases these sections:

Let's dive deeper into each of these sections to understand how our Snake game works.
Canvas Board
We'll start off by understanding the Canvas Board:
- Our canvas board is going to be of dimensions
height: 600, width: 1000 - This entire board is divided into blocks of
20x20size. That is, every object that is drawn on this board hasheight 20andwidth 20. - We are using the
<canvas>HTML element to draw the shapes in the canvas board component.
In our project, we are writing the canvas board component inside the file components/CanvasBoard.tsx. Now that our basic understanding is clear about the CanvasBoard component, let's start building this component.
Create a simple component that returns a canvas element as below:
export interface ICanvasBoard {
  height: number;
  width: number;
}

const CanvasBoard = ({ height, width }: ICanvasBoard) => {
  return (
    <canvas
      style={{
        border: "3px solid black",
      }}
      height={height}
      width={width}
    />
  );
};
Call this component in our App.tsx file with width and height of 1000 and 600 as a prop like below:
import { ChakraProvider, Container, Heading } from "@chakra-ui/react";
import { Provider } from "react-redux";
import CanvasBoard from "./components/CanvasBoard";
import ScoreCard from "./components/ScoreCard";
import store from "./store";

const App = () => {
  return (
    <Provider store={store}>
      <ChakraProvider>
        <Container maxW="container.lg" centerContent>
          <Heading as="h1" size="xl">SNAKE GAME</Heading>
          <CanvasBoard height={600} width={1000} /> //Canvasboard component added
        </Container>
      </ChakraProvider>
    </Provider>
  );
};

export default App;
This will create a simple box of height=600 and width=1000 with a black border like below:
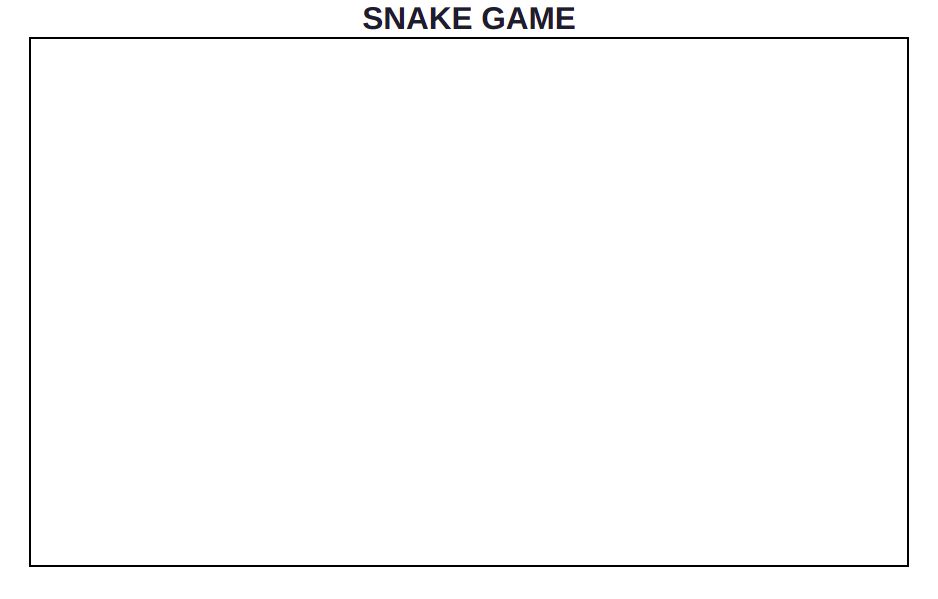 A blank canvas element with width=1000 and height=600
Now let's draw a snake at the center of this canvas. But before we can start drawing, we need to get the context of this canvas element.
The context of a canvas element provides you with all the information you need related to the canvas element. It gives you the dimensions of the canvas and also helps you draw on the canvas.
To get the context of our canvas element we need to call the getCanvas('2d') function which returns the 2d context of the canvas. The return type of this function is CanvasRenderingContext2D interface.
To do this in pure JS we would do something like below:
const canvas = document.querySelector('canvas');
const canvasCtx = canvas.getContext('2d');
But to do so in React we need to create a ref and pass it to the canvas element so that we can address it later in different hooks. To do so in our application, create one ref using the useRef hook:
const canvasRef = useRef<HTMLCanvasElement | null>(null);
Pass the ref into our canvas element:
<canvas
  ref={canvasRef}
  style={{
    border: "3px solid black",
  }}
  height={height}
  width={width}
/>;
Once the canvasRef is passed into the canvas element, we can use it inside a useEffect hook and store the context in a state variable.
export interface ICanvasBoard {
  height: number;
  width: number;
}

const CanvasBoard = ({ height, width }: ICanvasBoard) => {
  const canvasRef = (useRef < HTMLCanvasElement) | (null > null);
  const [context, setContext] =
    (useState < CanvasRenderingContext2D) | (null > null);

  useEffect(() => {
    //Draw on canvas each time
    setContext(canvasRef.current && canvasRef.current.getContext("2d")); //store in state variable
  }, [context]);

  return (
    <canvas
      ref={canvasRef}
      style={{
        border: "3px solid black",
      }}
      height={height}
      width={width}
    />
  );
};
Drawing the objects
After getting the context we need to do the following tasks each time a component updates:
- Clear the canvas
- Draw the snake with the current position
- Draw a fruit at a random position inside the box
We are going to clear the canvas multiple times, so we will make this a utility function. So for that, let's create a folder called utilities:
mkdir utilities
cd utilities
touch index.tsx
The above command will also create an index.tsx file inside the utilities folder. Add the below code in the utilities/index.tsx file:
export const clearBoard = (context: CanvasRenderingContext2D | null) => {
  if (context) {
    context.clearRect(0, 0, 1000, 600);
  }
};
The clearBoard function is pretty straightforward. It does the following actions:
- It accepts the 2d canvas context objects as an argument.
- It checks that the context is not null or undefined.
- The
clearRectfunction will clear all the pixels or objects present inside the rectangle. This function will take width and height as an argument for the rectangle to be cleared.
We will use this clearBoard function inside our CanvasBoard useEffect to clear the canvas every time the component is updated. For differentiating between different useEffects, we will name the above useEffect as useEffect1.
Now let's start by drawing the snake and the fruit at a random position. Since we are going to draw the objects multiple times, we'll create a utility function called drawObject for it. Add the below code in the utilities/index.tsx file:
export interface IObjectBody {
  x: number;
  y: number;
}

export const drawObject = (
  context: CanvasRenderingContext2D | null,
  objectBody: IObjectBody[],
  fillColor: string,
  strokeStyle = "#146356"
) => {
  if (context) {
    objectBody.forEach((object: IObjectBody) => {
      context.fillStyle = fillColor;
      context.strokeStyle = strokeStyle;
      context?.fillRect(object.x, object.y, 20, 20);
      context?.strokeRect(object.x, object.y, 20, 20);
    });
  }
};
The drawObject function accepts the following arguments:
context– A 2D canvas context object for drawing the object on the canvas.objectBody– This is an array of objects with each object havingxandyproperties, like theIObjectBodyinterface.fillColor– Color to be filled inside the object.strokeStyle– Color to be filled in the outline of the object. Defaults to#146356.
This function will check if the context is undefined or null. Then it iterates over the objectBody via forEach. For each object it performs the following operations:
- It will assign the
fillStyleandstrokeStyleinside the context. - It will use
fillReactto create a filled rectangle with coordinatesobject.xandobject.ywith size20x20 - Finally, it will use
strokeRectto create an outlined rectangle with coordinatesobject.xandobject.ywith size20x20
For drawing the snake we need to maintain the position of the snake. For that, we can use our global state management tool redux.
We need to update our reducers/index.ts file. Since we want to track the position of the snake, we will add it into our global state as follows:
interface ISnakeCoord {
  x: number;
  y: number;
}

export interface IGlobalState {
  snake: ISnakeCoord[] | [];
}

const globalState: IGlobalState = {
  //Postion of the entire snake
  snake: [
    { x: 580, y: 300 },
    { x: 560, y: 300 },
    { x: 540, y: 300 },
    { x: 520, y: 300 },
    { x: 500, y: 300 },
  ],
};
Let's call this state in our CanvasBoard component. We will use the useSelector hook of react-redux to get the required state from the store. The following will give us the snake's global state:
const snake1 = useSelector((state: IGlobalState) => state.snake);
Let's embed this in our CanvasBoard component and pass it to our drawObject function and see the output:
//Importing necessary modules
import { useSelector } from "react-redux";
import { clearBoard, drawObject, generateRandomPosition } from "../utils";

export interface ICanvasBoard {
  height: number;
  width: number;
}

const CanvasBoard = ({ height, width }: ICanvasBoard) => {
    const canvasRef = useRef<HTMLCanvasElement | null>(null);
    const [context, setContext] = useState<CanvasRenderingContext2D | null>(null);
    const snake1 = useSelector((state: IGlobalState) => state.snake);
    const [pos, setPos] = useState<IObjectBody>(
        generateRandomPosition(width - 20, height - 20)
      );

    useEffect(() => {
      //Draw on canvas each time
     setContext(canvasRef.current && canvasRef.current.getContext("2d")); //store in state variable
        drawObject(context, snake1, "#91C483"); //Draws snake at the required position
        drawObject(context, [pos], "#676FA3"); //Draws fruit randomly
    }, [context])

  return (
    <canvas
      style={{
        border: "3px solid black",
      }}
      height={height}
      width={width}
    />
  );
};
Let's see what the output will look like when the snake is drawn:
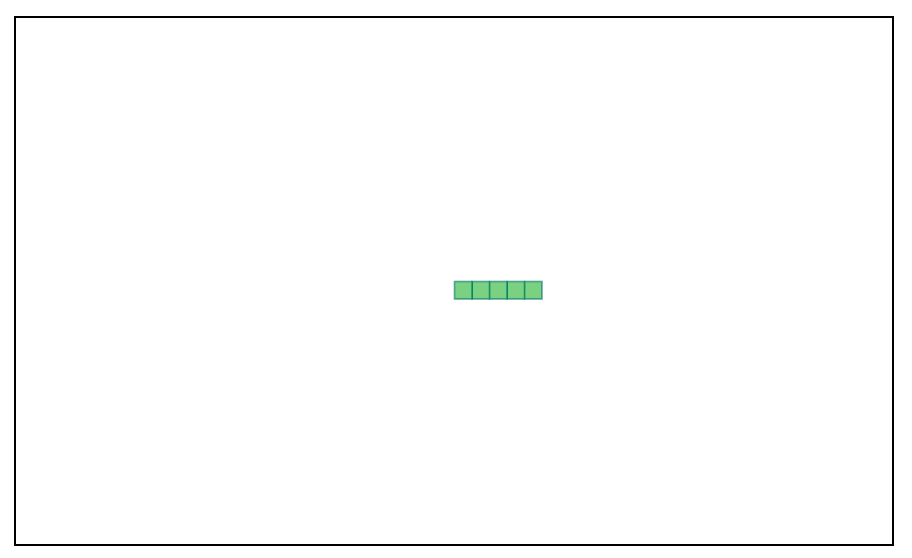 Drawing snake
Moving the snake across the board
Now that we have our snake drawn onto the canvas, let's learn how to move the snake across the board.
The movement of the snake is simple. It should always follow the below points:
- If the snake is moving horizontally, then it can only move up, down, and in the direction it is currently moving. For example, if the snake is moving to the right then it can move up or down or continue moving to the right.
- If the snake is moving vertically, then it can only move to the right, left or continue in the direction it's currently moving. For example, if the snake is moving up then it can move right or left (or continue up).
- The snake cannot move in the direction opposite to that of the current direction. That is, if the snake is moving to the left then it cannot move to the right straight away. Likewise, if it's going up it cannot move down.
For the smooth movement of our snake, the snake should always move in a rectangular fashion. And it needs to meet the above points to have that movement.
The below diagram helps summarise how the movement of the snake works in the entire application:
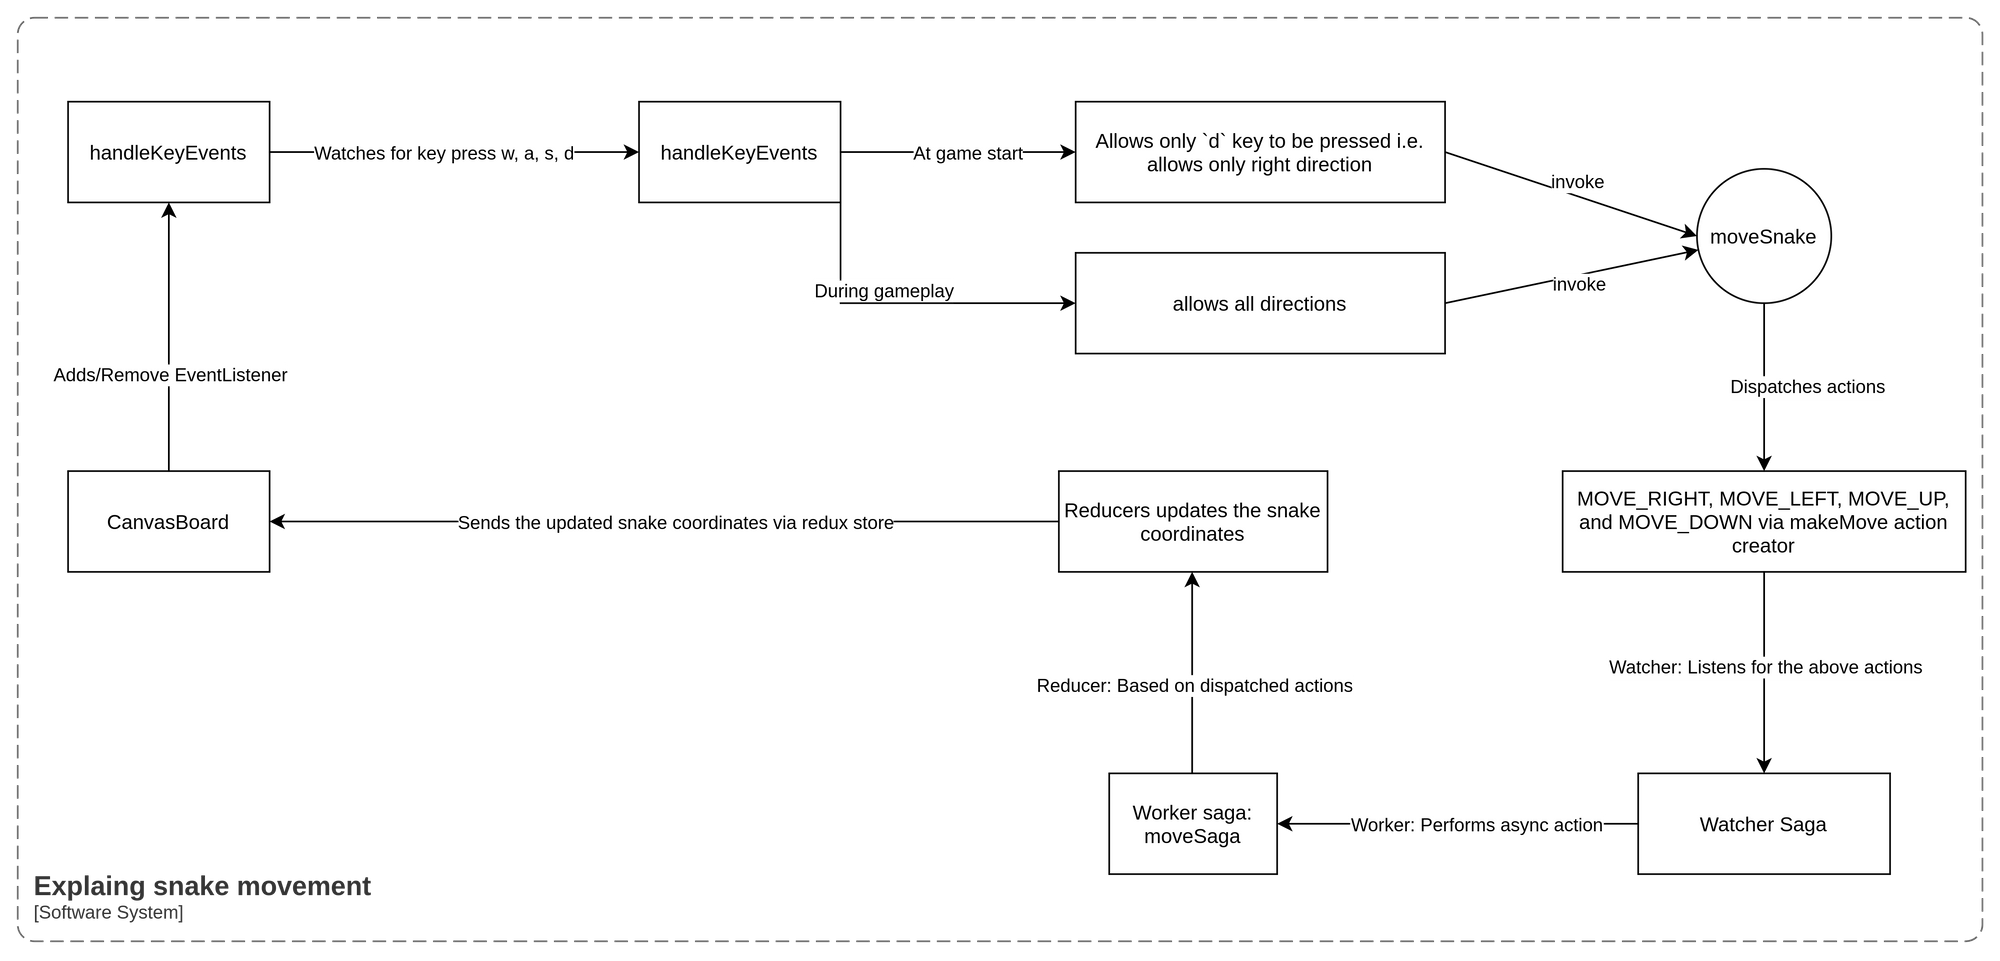 Snake movement explanation
NOTE: In the above diagram, the entire movement of the snake starts with the CanvasBoard component.
HINT: Don't worry if you cannot follow the above diagram. Just read the later sections to get more clarity.
To maintain the movement of the snake, we will introduce another state variable to our global state called disallowedDirection. The purpose of this variable is to keep track of the opposite direction of the snake's movement.
For example if the snake is moving left then the disallowedDirection will be set to right. So to summarise, we are tracking this direction so that we can avoid the snake moving in its opposite direction.
Let's create this variable in our global state:
interface ISnakeCoord {
  x: number;
  y: number;
}

export interface IGlobalState {
  snake: ISnakeCoord[] | [];
  disallowedDirection: string;
}

const globalState: IGlobalState = {
    //Postion of the entire snake
  snake: [
    { x: 580, y: 300 },
    { x: 560, y: 300 },
    { x: 540, y: 300 },
    { x: 520, y: 300 },
    { x: 500, y: 300 },
  ],
    disallowedDirection: ""
};
Now let's create some actions and action creators that will help us move the snake.
We will have two types of actions for this case:
- Actions for sagas
- These are the actions that will be dispatched from the
CanvasBoardcomponent. These actions will be:- MOVE_RIGHT
- MOVE_LEFT
- MOVE_UP
- MOVE_DOWN
- These are the actions that will be dispatched from the
- Actions for reducers
- These are the actions that will be yielded by the saga to propagate the calls to the reducers. These actions will be:
- RIGHT
- LEFT
- UP
- DOWN
- These are the actions that will be yielded by the saga to propagate the calls to the reducers. These actions will be:
We will take a closer look at these actions in the coming sections.
We will be creating one more action called SET_DIS_DIRECTION to set the disallowedDirection state.
Let's create some action creators for the movement of the snake:
setDisDirection– This action creator will be used to set thedisallowedDirectionvia theSET_DIS_DIRECTIONaction. Below is the code for this action creator:
export const setDisDirection = (direction: string) => ({
  type: SET_DIS_DIRECTION,
  payload: direction
});
makeMove– This will be used to set/update the new coordinates of the snake by updating thesnakestate variable. Below is the code for this action creator:
export const makeMove = (dx: number, dy: number, move: string) => ({
  type: move,
  payload: [dx, dy]
});
The parameters dx and dy are the deltas. They tell the Redux store by how much we should increase/decrease the coordinates of each snake block to move the snake in the given direction.
The move parameter is used to specify in which direction will the snake be moving. We will have a look at these actions creators soon in the coming sections.
Finally, our updated actions/index.ts file will look something like this:
export const MOVE_RIGHT = "MOVE_RIGHT";
export const MOVE_LEFT = "MOVE_LEFT";
export const MOVE_UP = "MOVE_UP";
export const MOVE_DOWN = "MOVE_DOWN";

export const RIGHT = "RIGHT";
export const LEFT = "LEFT";
export const UP = "UP";
export const DOWN = "DOWN";

export const SET_DIS_DIRECTION = "SET_DIS_DIRECTION";

export interface ISnakeCoord {
  x: number;
  y: number;
}
export const makeMove = (dx: number, dy: number, move: string) => ({
  type: move,
  payload: [dx, dy]
});

export const setDisDirection = (direction: string) => ({
  type: SET_DIS_DIRECTION,
  payload: direction
});
Now, let's have a look at the logic we are using to move the snake based on the above actions. All the snake movement will be tracked by the following actions:
- RIGHT
- LEFT
- UP
- DOWN
All these actions are the building blocks of the snake's movement. These actions, when dispatched, will always update the snake's global state based on the logic we are describing below. And they will calculate new coordinates of the snake on each movement.
To calculate the new coordinates of the snake after each movement, we will use the following logic:
- Copy the coordinates into a new variable called
newSnake - Add at the start of the
newSnakethe new x and y coordinates. These x and y attributes of these coordinates are updated by adding the x and y values from the action's payload. - Finally, remove the last entry from the
newSnakearray.
Now that we have some understanding of how the snake is moving, let's add the following cases in our gameReducer:
    case RIGHT:
    case LEFT:
    case UP:
    case DOWN: {
      let newSnake = [...state.snake];
      newSnake = [{
        //New x and y coordinates
        x: state.snake[0].x + action.payload[0],
        y: state.snake[0].y + action.payload[1],
      }, ...newSnake];
      newSnake.pop();

      return {
        ...state,
        snake: newSnake,
      };
    }
For every movement of the snake, we update the new x and y coordinates which are increased by payloads action.payload[0] and action.payload[1]. We successfully completed setting up the actions, actions creators, and the reducer logic.
We are good to go and can now use all of this in our CanvasBoard component.
First, let's add a useEffect hook in our CanvasBoard component. We will use this hook to attach/add an event handler. This event handler will be attached to the event keypress. We are using this event because whenever we press the w a s d keys we should be able to control the movement of the snake.
Our useEffect will look something like below:
useEffect(() => {
    window.addEventListener("keypress", handleKeyEvents);

    return () => {
      window.removeEventListener("keypress", handleKeyEvents);
    };
  }, [disallowedDirection, handleKeyEvents]);
It works in the following manner:
- On the mounting of the component, the event listener with callback function
handleKeyEventsis attached to the window object. - On the unmounting of the component, the event listener is removed from the window object.
- If there is any change in the direction or
handleKeyEventsfunction, we will re-run this useEffect. Therefore, we have addeddisallowedDirectionandhandleKeyEventsinto the dependency array.
Let's have a look at how the handleKeyEvents callback is created. Below is the code for the same:
const handleKeyEvents = useCallback(
    (event: KeyboardEvent) => {
      if (disallowedDirection) {
        switch (event.key) {
          case "w":
            moveSnake(0, -20, disallowedDirection);
            break;
          case "s":
            moveSnake(0, 20, disallowedDirection);
            break;
          case "a":
            moveSnake(-20, 0, disallowedDirection);
            break;
          case "d":
            event.preventDefault();
            moveSnake(20, 0, disallowedDirection);
            break;
        }
      } else {
        if (
          disallowedDirection !== "LEFT" &&
          disallowedDirection !== "UP" &&
          disallowedDirection !== "DOWN" &&
          event.key === "d"
        )
          moveSnake(20, 0, disallowedDirection); //Move RIGHT at start
      }
    },
    [disallowedDirection, moveSnake]
  );
We have wrapped this function with a useCallback hook. This is because we want the memoized version of this function which is called on every state change (that is, on the change of disallowedDirection and moveSnake). This function is called on every key pressed on the keyboard.
This event handler callback function serves the following purpose:
- If the
disallowedDirectionis empty then we make sure that the game will start only when the user presses thedkey. This means that the game starts only when the snake moves to the right.
NOTE: Initially the global state variable disallowedDirection value is an empty string. In this way, we know that if its value is empty then it's the start of the game.
Once the game starts, the disallowedDirection won’t be empty and then it listens to all the keyboard presses such as w s and a.
Finally, on every keypress, we are calling the function called moveSnake. We will take a closer look into it in the next section.
The moveSnake function is a function that dispatches an action passed to the makeMove action creator. This function accepts three arguments:
- dx - Delta for x-axis. This tells by how much the snake should move along the x-axis. If
dxis positive then it moves to the right, if it's negative it moves to the left. - dy - Delta for the y-axis. This tells by how much the snake should move along the y-axis. If
dyis positive then it moves down, if it's negative it moves up. - disallowedDirection - This value tells that the snake should not move in the opposite direction. This is an action that is captured by our middleware saga.
The code for the moveSnake function will look like this:
const moveSnake = useCallback(
    (dx = 0, dy = 0, ds: string) => {
      if (dx > 0 && dy === 0 && ds !== "RIGHT") {
        dispatch(makeMove(dx, dy, MOVE_RIGHT));
      }

      if (dx < 0 && dy === 0 && ds !== "LEFT") {
        dispatch(makeMove(dx, dy, MOVE_LEFT));
      }

      if (dx === 0 && dy < 0 && ds !== "UP") {
        dispatch(makeMove(dx, dy, MOVE_UP));
      }

      if (dx === 0 && dy > 0 && ds !== "DOWN") {
        dispatch(makeMove(dx, dy, MOVE_DOWN));
      }
    },
    [dispatch]
  );
The moveSnake is a simple function that checks for the conditions:
- If dx > 0, and the
disallowedDirectionis notRIGHT, then it can move in the RIGHT direction. - If dx < 0, and the
disallowedDirectionis notLEFT, then it can move in the LEFT direction. - If dy > 0, and the
disallowedDirectionis notDOWN, then it can move in the DOWN direction. - If dy < 0, and the
disallowedDirectionis notUP, then it can move in the UP direction.
This disallowedDirection value is set in our sagas which we'll talk about more in the later sections of this article. If we revisit the handleKeyEvents function now it makes much more sense. Let's walk through an example over here:
- Suppose you want to move the snake to the RIGHT. Then this function will detect that the
dkey is pressed. - Once this key is pressed it calls the
makeMovefunction (Game start condition) withdxas 20 (+ve),dyas 0, and the previously setdisallowedDirectionpreviously is called over here.
In this way, we make the movement of the snake in a particular direction. Now let's have a look at the sagas that we have used, and how they handle the movement of the snake.
Let's create a file called saga/index.ts. This file will consist of all our sagas. This is not a rule, but in general, we create two sagas.
The first one is the saga which dispatches the actual actions to the store – let's call this worker saga. The second is the watcher saga which watches for any action that is being dispatched – let's call this watcher saga.
Now we need to create a watcher saga that will look out for the following actions: MOVE_RIGHT, MOVE_LEFT, MOVE_UP, MOVE_DOWN.
function* watcherSaga() {
    yield takeLatest(
      [MOVE_RIGHT, MOVE_LEFT, MOVE_UP, MOVE_DOWN],
      moveSaga
    );
}
This watcher saga will watch for the actions above and execute the moveSaga function which is a worker saga.
You will notice that we have used a new function named takeLatest. This function will call the worker saga and cancel any previous saga calls if any of the actions mentioned in the first argument are dispatched.
From the words of the redux-saga docs:
takeLatest(pattern, saga, ...args)Forks a
sagaon each action dispatched to the Store that matchespattern. And automatically cancels any previoussagatask started previously if it's still running.
- Each time an action is dispatched to the store. And if this action matches
pattern,takeLateststarts a newsagatask in the background. If asagatask was started previously (on the last action dispatched before the actual action), and if this task is still running, the task will be cancelled.pattern: String | Array | Function- for more information see docs for[take(pattern)](https://redux-saga.js.org/docs/api/#takepattern)saga: Function- a Generator functionargs: Array<any>- arguments to be passed to the started task.takeLatestwill add the incoming action to the argument list (i.e. the action will be the last argument provided tosaga)
Now let's create a worker saga called moveSaga which will actually dispatch the actions to the Redux store:
export function* moveSaga(params: {
    type: string;
    payload: ISnakeCoord;
  }): Generator<
    | PutEffect<{ type: string; payload: ISnakeCoord }>
    | PutEffect<{ type: string; payload: string }>
    | CallEffect<true>
  > {
    while (true) {
    //dispatches movement actions
     yield put({
           type: params.type.split("_")[1],
           payload: params.payload,
      });

      //Dispatches SET_DIS_DIRECTION action
      switch (params.type.split("_")[1]) {
        case RIGHT:
          yield put(setDisDirection(LEFT));
          break;

        case LEFT:
          yield put(setDisDirection(RIGHT));
          break;

        case UP:
          yield put(setDisDirection(DOWN));
          break;

        case DOWN:
          yield put(setDisDirection(UP));
          break;
      }
      yield delay(100);
    }
  }
The moveSaga worker saga performs the following functions:
- It executes inside an infinite loop.
- So once a direction is given – that is if the
dkey is pressed andMOVE_RIGHTaction is dispatched – then it starts dispatching the same action until a new action (that is, direction) is given. This is handled by the below snippet:
yield put({
    type: params.type.split("_")[1],
    payload: params.payload,
});
- Once the above action is dispatched we set the disallowed direction to the opposite direction which is taken care of by the action creator
setDisDirection.
Now let's stitch these sagas into our sagas/index.ts file:
import {
    CallEffect,
    delay,
    put,
    PutEffect,
    takeLatest
} from "redux-saga/effects";
import {
    DOWN,
    ISnakeCoord,
    LEFT,
    MOVE_DOWN,
    MOVE_LEFT,
    MOVE_RIGHT,
    MOVE_UP, RIGHT,
    setDisDirection, UP
} from "../actions";

  export function* moveSaga(params: {
    type: string;
    payload: ISnakeCoord;
  }): Generator<
    | PutEffect<{ type: string; payload: ISnakeCoord }>
    | PutEffect<{ type: string; payload: string }>
    | CallEffect<true>
  > {
    while (true) {
      yield put({
        type: params.type.split("_")[1],
        payload: params.payload,
      });
      switch (params.type.split("_")[1]) {
        case RIGHT:
          yield put(setDisDirection(LEFT));
          break;

        case LEFT:
          yield put(setDisDirection(RIGHT));
          break;

        case UP:
          yield put(setDisDirection(DOWN));
          break;

        case DOWN:
          yield put(setDisDirection(UP));
          break;
      }
      yield delay(100);
    }
  }

  function* watcherSagas() {
    yield takeLatest(
      [MOVE_RIGHT, MOVE_LEFT, MOVE_UP, MOVE_DOWN],
      moveSaga
    );
  }

  export default watcherSagas;
Now let's update our CanvasBoard component to incorporate these changes.
//Importing necessary modules
import { useSelector } from "react-redux";
import { drawObject, generateRandomPosition } from "../utils";

export interface ICanvasBoard {
    height: number;
    width: number;
}

const CanvasBoard = ({ height, width }: ICanvasBoard) => {
    const canvasRef = useRef < HTMLCanvasElement | null > (null);
    const [context, setContext] = useState < CanvasRenderingContext2D | null > (null);
    const snake1 = useSelector((state: IGlobalState) => state.snake);
    const [pos, setPos] = useState < IObjectBody > (
        generateRandomPosition(width - 20, height - 20)
    );

    const moveSnake = useCallback(
        (dx = 0, dy = 0, ds: string) => {
            if (dx > 0 && dy === 0 && ds !== "RIGHT") {
                dispatch(makeMove(dx, dy, MOVE_RIGHT));
            }

            if (dx < 0 && dy === 0 && ds !== "LEFT") {
                dispatch(makeMove(dx, dy, MOVE_LEFT));
            }

            if (dx === 0 && dy < 0 && ds !== "UP") {
                dispatch(makeMove(dx, dy, MOVE_UP));
            }

            if (dx === 0 && dy > 0 && ds !== "DOWN") {
                dispatch(makeMove(dx, dy, MOVE_DOWN));
            }
        },
        [dispatch]
    );

    const handleKeyEvents = useCallback(
        (event: KeyboardEvent) => {
            if (disallowedDirection) {
                switch (event.key) {
                    case "w":
                        moveSnake(0, -20, disallowedDirection);
                        break;
                    case "s":
                        moveSnake(0, 20, disallowedDirection);
                        break;
                    case "a":
                        moveSnake(-20, 0, disallowedDirection);
                        break;
                    case "d":
                        event.preventDefault();
                        moveSnake(20, 0, disallowedDirection);
                        break;
                }
            } else {
                if (
                    disallowedDirection !== "LEFT" &&
                    disallowedDirection !== "UP" &&
                    disallowedDirection !== "DOWN" &&
                    event.key === "d"
                )
                    moveSnake(20, 0, disallowedDirection); //Move RIGHT at start
            }
        },
        [disallowedDirection, moveSnake]
    );
    useEffect(() => {
        //Draw on canvas each time
        setContext(canvasRef.current && canvasRef.current.getContext("2d")); //store in state variable
                    clearBoard(context);
        drawObject(context, snake1, "#91C483"); //Draws snake at the required position
    }, [context]);

    useEffect(() => {
        window.addEventListener("keypress", handleKeyEvents);

        return () => {
            window.removeEventListener("keypress", handleKeyEvents);
        };
    }, [disallowedDirection, handleKeyEvents]);

    return (
        <canvas
            style={{
                border: "3px solid black",
            }}
            height={height}
            width={width}
        />
    );
};
Once you've made these changes you can try moving the snake. And voilà! You will see the following output:
 Moving snake across the board
Drawing the fruit at a random position
To draw a fruit at a random position on the board we will use the generateRandomPosition utility function. Let's have a look at this function:
function randomNumber(min: number, max: number) {
  let random = Math.random() * max;
  return random - (random % 20);
}
export const generateRandomPosition = (width: number, height: number) => {
  return {
    x: randomNumber(0, width),
    y: randomNumber(0, height),
  };
};
This is a function that will generate random x and y coordinates in multiples of 20. These coordinates will always be less than the width and height of the board. It accepts width and height as arguments.
Once we have this function we can use it to draw the fruit at a random position inside the board.
First, let's create a state variable pos that will initially consist of some random position.
const [pos, setPos] = useState<IObjectBody>(generateRandomPosition(width - 20, height - 20));
Then, we will draw the fruit via our drawObject function. After this we will slightly update our useEffect hook:
 useEffect(() => {
        //Draw on canvas each time
        setContext(canvasRef.current &&   canvasRef.current.getContext("2d")); //store in state variable

        clearBoard(context);

        drawObject(context, snake1, "#91C483"); //Draws snake at the required position

        drawObject(context, [pos], "#676FA3"); //Draws object randomly
    }, [context]);
Once we have made the changes our board will look like below:
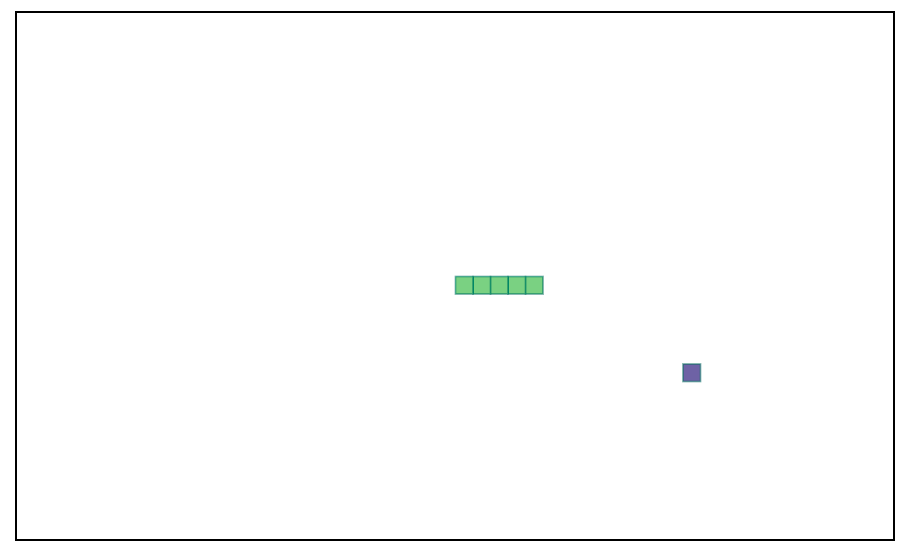 Snake and fruit drawn on the board
Score calculator
The game score is calculated based on how many fruits the snake has consumed without colliding with itself or with the boundary of the box. If the snake consumes the fruit then the size of the snake increases. If it collides with the edge of the box, then the game is over.
Now that we know what our criteria are for calculating the score, let's have a look on how we calculate the reward.
Calculating the reward
The reward after the snake consumes the fruit is as follows:
- Increase the size of the snake.
- Increase the score.
- Place the new fruit at a different random location.
If the snake consumes the fruit, then we must increase the size of the snake. This is a really simple task, we can just append the new x and y coordinates which are less than 20 from the last element of the snake global state array. For example, if the snake has the following coordinates:
{
snake: [
    { x: 580, y: 300 },
    { x: 560, y: 300 },
    { x: 540, y: 300 },
    { x: 520, y: 300 },
    { x: 500, y: 300 },
  ],
}
We should simply append the following object into the snake array: { x: 480, y: 280 }
In this way, we increase the size of the snake as well as add the new part/block at the end of it. For this to be implemented via Redux and redux-saga, we will need the following action and action creator:
export const INCREMENT_SCORE = "INCREMENT_SCORE"; //action

export const increaseSnake = () => ({  //action creator
    type: INCREASE_SNAKE
  });
We will also update our gameReducer to accommodate these changes. We will add the following case:
case INCREASE_SNAKE:
      const snakeLen = state.snake.length;
      return {
        ...state,
        snake: [
          ...state.snake,
          {
            x: state.snake[snakeLen - 1].x - 20,
            y: state.snake[snakeLen - 1].y - 20,
          },
        ],
      };
In our CanvasBoard component, we will first introduce a state variable called isConsumed. This variable will check if the fruit is consumed or not.
const [isConsumed, setIsConsumed] = useState<boolean>(false);
In our useEffect hook where we are drawing our snake and the fruit just below that, we will add the following condition:
//When the object is consumed
    if (snake1[0].x === pos?.x && snake1[0].y === pos?.y) {
      setIsConsumed(true);
    }
The above condition will check if the head of the snake snake[0] is equal to the pos, or the position of the fruit. If it is true, then it will set the isConsumed state variable to true.
Once the fruit is consumed, we need to increase the size of the snake. We can do this easily via another useEffect. Let's create another useEffect and call the action creator increaseSnake:
//useEffect2
useEffect(() => {
    if (isConsumed) {
      //Increase snake size when object is consumed successfully
      dispatch(increaseSnake());
    }
  }, [isConsumed]);
Now that we have increased the size of the snake, let's take a look at how we can update the score and generate a new fruit at another random position.
To generate a new fruit at another random position, we update the pos state variable which will re-run the useEffect1 and draw the object at pos. We should update our useEffect1 with a new dependency of pos and update useEffect2 as follows:
useEffect(() => {
    //Generate new object
    if (isConsumed) {
      const posi = generateRandomPosition(width - 20, height - 20);
      setPos(posi);
      setIsConsumed(false);

      //Increase snake size when object is consumed successfully
      dispatch(increaseSnake());
    }
  }, [isConsumed, pos, height, width, dispatch]);
One last thing left to do in this reward system is to update the score each time the snake eats the fruit. To do this follow the below steps:
- Introduce a new global state variable called
score. Update our global state as below in thereducers/index.tsfile:
export interface IGlobalState {
  snake: ISnakeCoord[] | [];
  disallowedDirection: string;
  score: number;
}

const globalState: IGlobalState = {
  snake: [
    { x: 580, y: 300 },
    { x: 560, y: 300 },
    { x: 540, y: 300 },
    { x: 520, y: 300 },
    { x: 500, y: 300 },
  ],
  disallowedDirection: "",
  score: 0,
};
- Create the following action and action creator in our
actions/index.tsfile:
export const INCREMENT_SCORE = "INCREMENT_SCORE"; //action

//action creator:
export const scoreUpdates = (type: string) => ({
  type
});
- Next, update our reducer to handle the
INCREMENT_SCOREaction. This will simply increment the global statescoreby one.
case INCREMENT_SCORE:
      return {
        ...state,
        score: state.score + 1,
      };
- Then we update our score state, dispatching the
INCREMENT_SCOREaction each time snake catches the fruit. For this we can update our useEffect2 as follows:
useEffect(() => {
    //Generate new object
    if (isConsumed) {
      const posi = generateRandomPosition(width - 20, height - 20);
      setPos(posi);
      setIsConsumed(false);

      //Increase snake size when object is consumed successfully
      dispatch(increaseSnake());

      //Increment the score
      dispatch(scoreUpdates(INCREMENT_SCORE));
    }
  }, [isConsumed, pos, height, width, dispatch]);
- Finally, we create a component called
ScoreCard. This will display the player’s current score. We will store this in the filecomponents/ScoreCard.tsx.
import { Heading } from "@chakra-ui/react";
import { useSelector } from "react-redux";
import { IGlobalState } from "../store/reducers";

const ScoreCard = () => {
    const score = useSelector((state: IGlobalState) => state.score);
    return (
        <Heading as="h2" size="md" mt={5} mb={5}>Current Score: {score}</Heading>
    );
}

export default ScoreCard;
After this we should also add the ScoreCard component into the App.tsx file to display it on our page.
import { ChakraProvider, Container, Heading } from "@chakra-ui/react";
import { Provider } from "react-redux";
import CanvasBoard from "./components/CanvasBoard";
import ScoreCard from "./components/ScoreCard";
import store from "./store";

const App = () => {
  return (
    <Provider store={store}>
      <ChakraProvider>
        <Container maxW="container.lg" centerContent>
          <Heading as="h1" size="xl">SNAKE GAME</Heading>
          <ScoreCard />
          <CanvasBoard height={600} width={1000} />
        </Container>
      </ChakraProvider>
    </Provider>
  );
};

export default App;
Once everything is in place, our snake will have a complete reward system that increases the size of the snake to update the score.
 Player playing snake with updating score and snake length.
Collision detection
In this section, we are going to take a look at how we implement collision detection for our Snake game.
In our Snake game, if a collision is detected, then the game is over – that is, the game stops. There are two conditions for collisions to happen:
- Snake collides with the boundaries of the box, or
- Snake collides with itself.
Let's take a look at the first condition. Suppose the head of the snake touches the boundaries of the box. In that case we will immediately stop the game.
For this to be incorporated into our game we will need to do as follows:
- Create an action and an action creator as below:
export const STOP_GAME = "STOP_GAME"; //action

//action creator
export const stopGame = () => ({
  type: STOP_GAME
});
- We need to update our
sagas/index.tsfile as well. We are going to make sure that saga stops dispatching actions once theSTOP_GAMEaction is encountered.
export function* moveSaga(params: {
  type: string;
  payload: ISnakeCoord;
}): Generator<
  | PutEffect<{ type: string; payload: ISnakeCoord }>
  | PutEffect<{ type: string; payload: string }>
  | CallEffect<true>
> {
  while (params.type !== STOP_GAME) {
    yield put({
      type: params.type.split("_")[1],
      payload: params.payload,
    });
    switch (params.type.split("_")[1]) {
      case RIGHT:
        yield put(setDisDirection(LEFT));
        break;

      case LEFT:
        yield put(setDisDirection(RIGHT));
        break;

      case UP:
        yield put(setDisDirection(DOWN));
        break;

      case DOWN:
        yield put(setDisDirection(UP));
        break;
    }
    yield delay(100);
  }
}

function* watcherSagas() {
  yield takeLatest(
    [MOVE_RIGHT, MOVE_LEFT, MOVE_UP, MOVE_DOWN, STOP_GAME],
    moveSaga
  );
}
- Finally we need to update our useEffect1 by adding the following condition:
if ( //Checks if the snake head is out of the boundries of the obox
      snake1[0].x >= width ||
      snake1[0].x <= 0 ||
      snake1[0].y <= 0 ||
      snake1[0].y >= height
    ) {
      setGameEnded(true);
      dispatch(stopGame());
      window.removeEventListener("keypress", handleKeyEvents);
    }
We are also removing the event listener handleKeyEvents. This will make sure that once the game is over the player cannot move the snake.
Finally, let's have a look at how we can detect the self-collision of the snake. We are going to use a utility function called hasSnakeCollided. It accepts two parameters: the first is the snake array, and the second is the head of the snake. If the head of the snake touches any parts of itself then it returns true or else it returns false.
The hasSnakeCollided function will look like below:
export const hasSnakeCollided = (
  snake: IObjectBody[],
  currentHeadPos: IObjectBody
) => {
  let flag = false;
  snake.forEach((pos: IObjectBody, index: number) => {
    if (
      pos.x === currentHeadPos.x &&
      pos.y === currentHeadPos.y &&
      index !== 0
    ) {
      flag = true;
    }
  });

  return flag;
};
We might slightly need to update our useEffect1 by updating the collision detection condition like this:
if (
      //Checks if the snake has collided with itself
      hasSnakeCollided(snake1, snake1[0]) ||

      //Checks if the snake head is out of the boundries of the obox
      snake1[0].x >= width ||
      snake1[0].x <= 0 ||
      snake1[0].y <= 0 ||
      snake1[0].y >= height
    ) {
      setGameEnded(true);
      dispatch(stopGame());
      window.removeEventListener("keypress", handleKeyEvents);
    }
Our useEffect1 will finally look like below:
//useEffect1
useEffect(() => {
    //Draw on canvas each time
    setContext(canvasRef.current && canvasRef.current.getContext("2d"));
    clearBoard(context);
    drawObject(context, snake1, "#91C483");
    drawObject(context, [pos], "#676FA3"); //Draws object randomly

    //When the object is consumed
    if (snake1[0].x === pos?.x && snake1[0].y === pos?.y) {
      setIsConsumed(true);
    }

    if (
      hasSnakeCollided(snake1, snake1[0]) ||
      snake1[0].x >= width ||
      snake1[0].x <= 0 ||
      snake1[0].y <= 0 ||
      snake1[0].y >= height
    ) {
      setGameEnded(true);
      dispatch(stopGame());
      window.removeEventListener("keypress", handleKeyEvents);
    } else setGameEnded(false);
  }, [context, pos, snake1, height, width, dispatch, handleKeyEvents]);
Our game will look like below once we add the collision detection system:
 Collision detection
Instruction component
We are in the end game now! Our final component will be the Instruction component. It will consist of instructions about the game like initial game condition, keys to use, and a reset button.
Let's start by creating a file called components/Instructions.tsx. Place the below code in this file:
import { Box, Button, Flex, Heading, Kbd } from "@chakra-ui/react";

export interface IInstructionProps {
  resetBoard: () => void;
}
const Instruction = ({ resetBoard }: IInstructionProps) => (
  <Box mt={3}>
    <Heading as="h6" size="lg">
      How to Play
    </Heading>
    <Heading as="h5" size="sm" mt={1}>
    NOTE: Start the game by pressing <Kbd>d</Kbd>
    </Heading>
    <Flex flexDirection="row" mt={3}>
      <Flex flexDirection={"column"}>
        <span>
          <Kbd>w</Kbd> Move Up
        </span>
        <span>
          <Kbd>a</Kbd> Move Left
        </span>
        <span>
          <Kbd>s</Kbd> Move Down
        </span>
        <span>
          <Kbd>d</Kbd> Move Right
        </span>
      </Flex>
      <Flex flexDirection="column">
        <Button onClick={() => resetBoard()}>Reset game</Button>
      </Flex>
    </Flex>
  </Box>
);

export default Instruction;
The Instruction component will accept resetBoard as a prop which is a function that will help the user when the game is over or when they want to reset the game.
Before we dive into the resetBoard function we need to make the following updates in our Redux store and saga:
- Add the following action and action creator in the
actions/index.tsfile:
export const RESET_SCORE = "RESET_SCORE"; //action
export const RESET = "RESET"; //action

//Action creator:
export const resetGame = () => ({
  type: RESET
});
- Then add the following condition into our
sagas/index.ts. We are going to make sure that saga discontinues to dispatch actions once theRESETand theSTOP_GAMEactions are encountered.
export function* moveSaga(params: {
  type: string;
  payload: ISnakeCoord;
}): Generator<
  | PutEffect<{ type: string; payload: ISnakeCoord }>
  | PutEffect<{ type: string; payload: string }>
  | CallEffect<true>
> {
  while (params.type !== RESET && params.type !== STOP_GAME) {
    yield put({
      type: params.type.split("_")[1],
      payload: params.payload,
    });
    switch (params.type.split("_")[1]) {
      case RIGHT:
        yield put(setDisDirection(LEFT));
        break;

      case LEFT:
        yield put(setDisDirection(RIGHT));
        break;

      case UP:
        yield put(setDisDirection(DOWN));
        break;

      case DOWN:
        yield put(setDisDirection(UP));
        break;
    }
    yield delay(100);
  }
}

function* watcherSagas() {
  yield takeLatest(
    [MOVE_RIGHT, MOVE_LEFT, MOVE_UP, MOVE_DOWN, RESET, STOP_GAME],
    moveSaga
  );
}
- Finally, we update our
reducers/index.tsfile for theRESET_SCOREcase as follows:
case RESET_SCORE:
      return { ...state, score: 0 };
Once our sagas and reducers are updated we can take a look at what operations the resetBoard callback will perform.
The resetBoard function performs the following operations:
- Removes the event listener
handleKeyEvents - dispatches the actions necessary for resetting the game.
- Dispatches the action to reset the score.
- Clears the canvas.
- Draws the snake again at its initial position
- Draws the fruit at a new random position.
- Finally, adds the event listener
handleKeyEventsfor thekeypressevent.
Below is how our resetBoard function will look:
const resetBoard = useCallback(() => {
    window.removeEventListener("keypress", handleKeyEvents);
    dispatch(resetGame());
    dispatch(scoreUpdates(RESET_SCORE));
    clearBoard(context);
    drawObject(context, snake1, "#91C483");
    drawObject(
      context,
      [generateRandomPosition(width - 20, height - 20)],
      "#676FA3"
    ); //Draws object randomly
    window.addEventListener("keypress", handleKeyEvents);
  }, [context, dispatch, handleKeyEvents, height, snake1, width]);
You should place this function inside the CanvasBoard component and pass the resetBoard function as a prop to the Instruction function as below:
<>
      <canvas
        ref={canvasRef}
        style={{
          border: `3px solid ${gameEnded ? "red" : "black"}`,
        }}
        width={width}
        height={height}
      />
      <Instruction resetBoard={resetBoard} />
    </>
Once this is placed we will have the Instruction component set up like below:
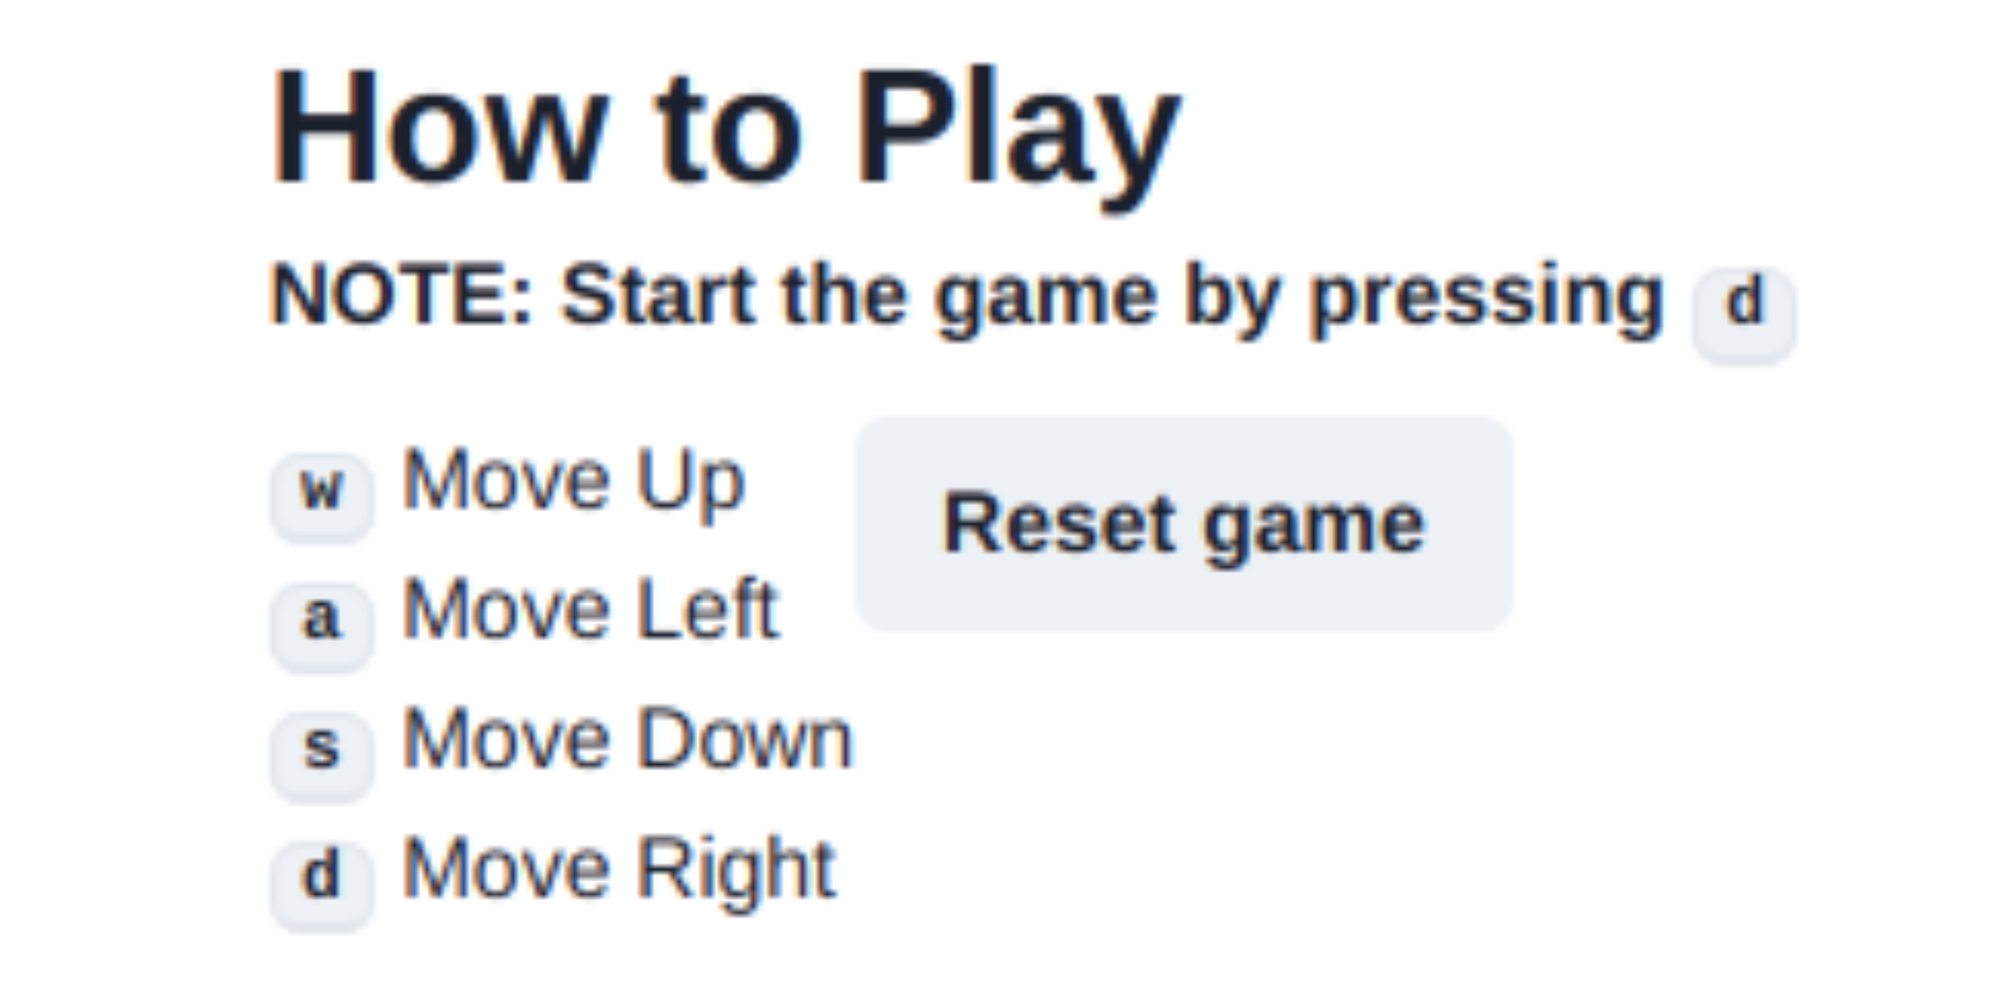 Instructions with reset button
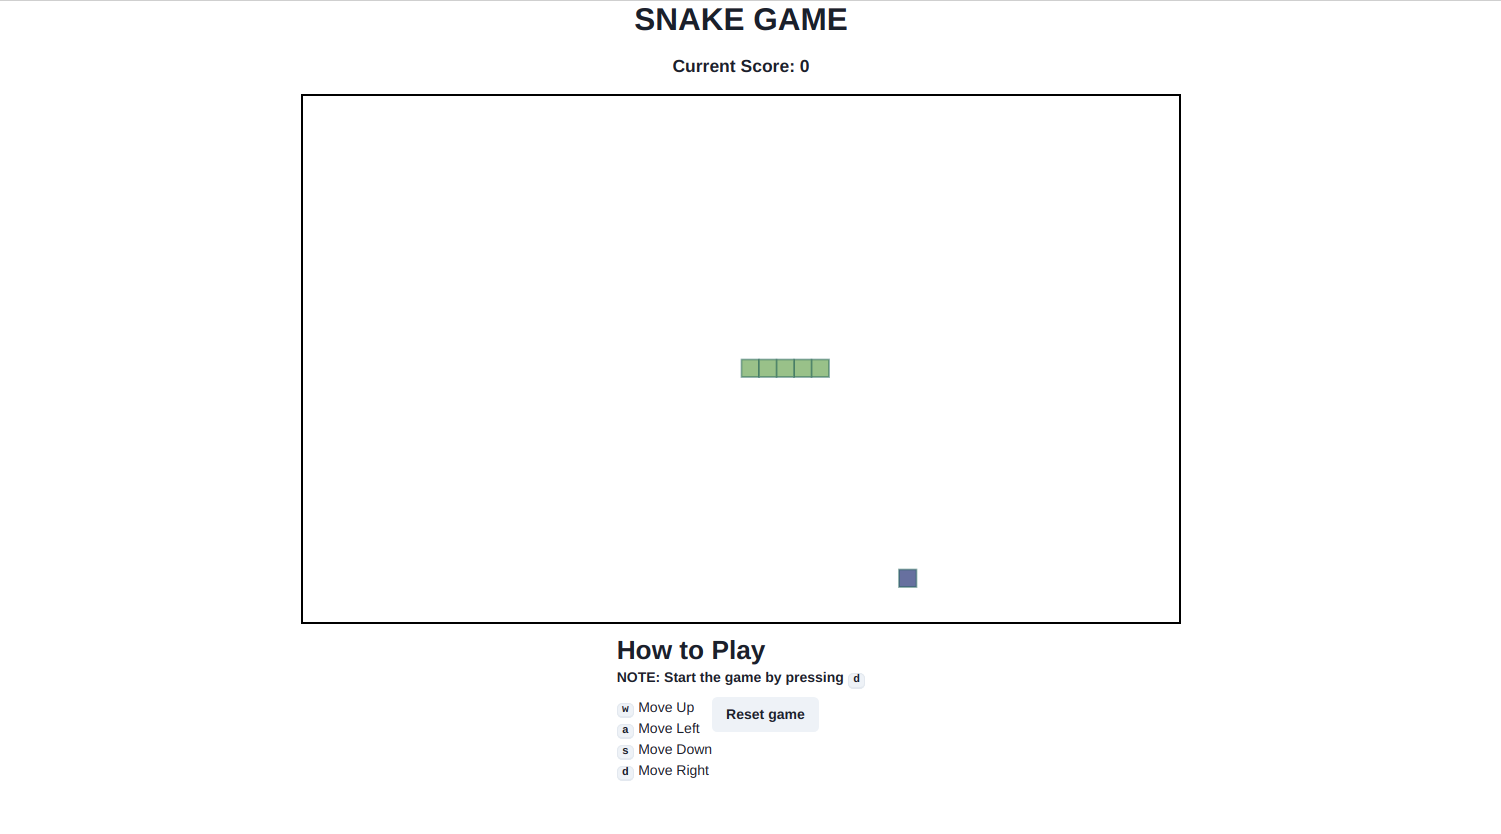
Final Game
If you have followed along up to this point, then congrats! You have successfully created a fun Snake game with React, Redux and redux-sagas. Once all of these things are connected your game will look like below:
 The complete snake game
Summary
So this is how you can build a Snake game from scratch. You can find the entire source code for the game in the below repository:
https://github.com/keyurparalkar/snake-game
If you liked the idea of building your own Snake game from scratch then you can take it up a notch by building these enhancements:
- Build the snake game with three.js
- Add an online score board
Thank you for reading!