

With the current state of the job market, there are a lot of people grinding out LeetCode as a way to prepare for technical interviews.
But sometimes it would be nice if there were a visualization showing the algorithms behind these problems.
In this tutorial, we will build out a visualization showing a couple of approaches to a popular LeetCode problem called Two Sum. We will use vanilla HTML, CSS, and JavaScript to build this project out.
Table of Contents
- Prerequisites
- Project Setup
- How to Solve LeetCode's Two Sum Problem
- Overview for the Two Sum Visualization
- Adding the Brute Force Visualization
- How to Disable the bruteForceSolutionBtn When the Animation is in Progress
- Adding the Map Solution Visualization
- How to Reset the Table Output for the Map Solution
- Final Solution Code and Live Example
- Conclusion
Prerequisites
This tutorial assumes that you have basic knowledge of HTML, CSS and JavaScript. If you haven't gone through a beginner course in any of those languages, then I would suggest starting with these resources:
- freeCodeCamp's Responsive Web Design Certification
- freeCodeCamp's JavaScript Algorithms and Data Structures Certification
This tutorial also assumes that you have some basic knowledge of how to work with a code editor or IDE. If not, then I would suggest looking into these resources:
Project Setup
You are free to build out this project in either your local code editor of choice, or through an online IDE or editor like CodePen, CodeSandbox, or Replit.
This project will consist of three files: index.html, index.js, and styles.css. Since this project is going to mainly focus on JavaScript, I have supplied all of the HTML and CSS in this GitHub repo here.
You are free to fork and clone the repository, or you can copy the code found in the HTML and CSS files and add it to your project.
Once you get your project environment setup, then you should start the local server and see this result on the screen:
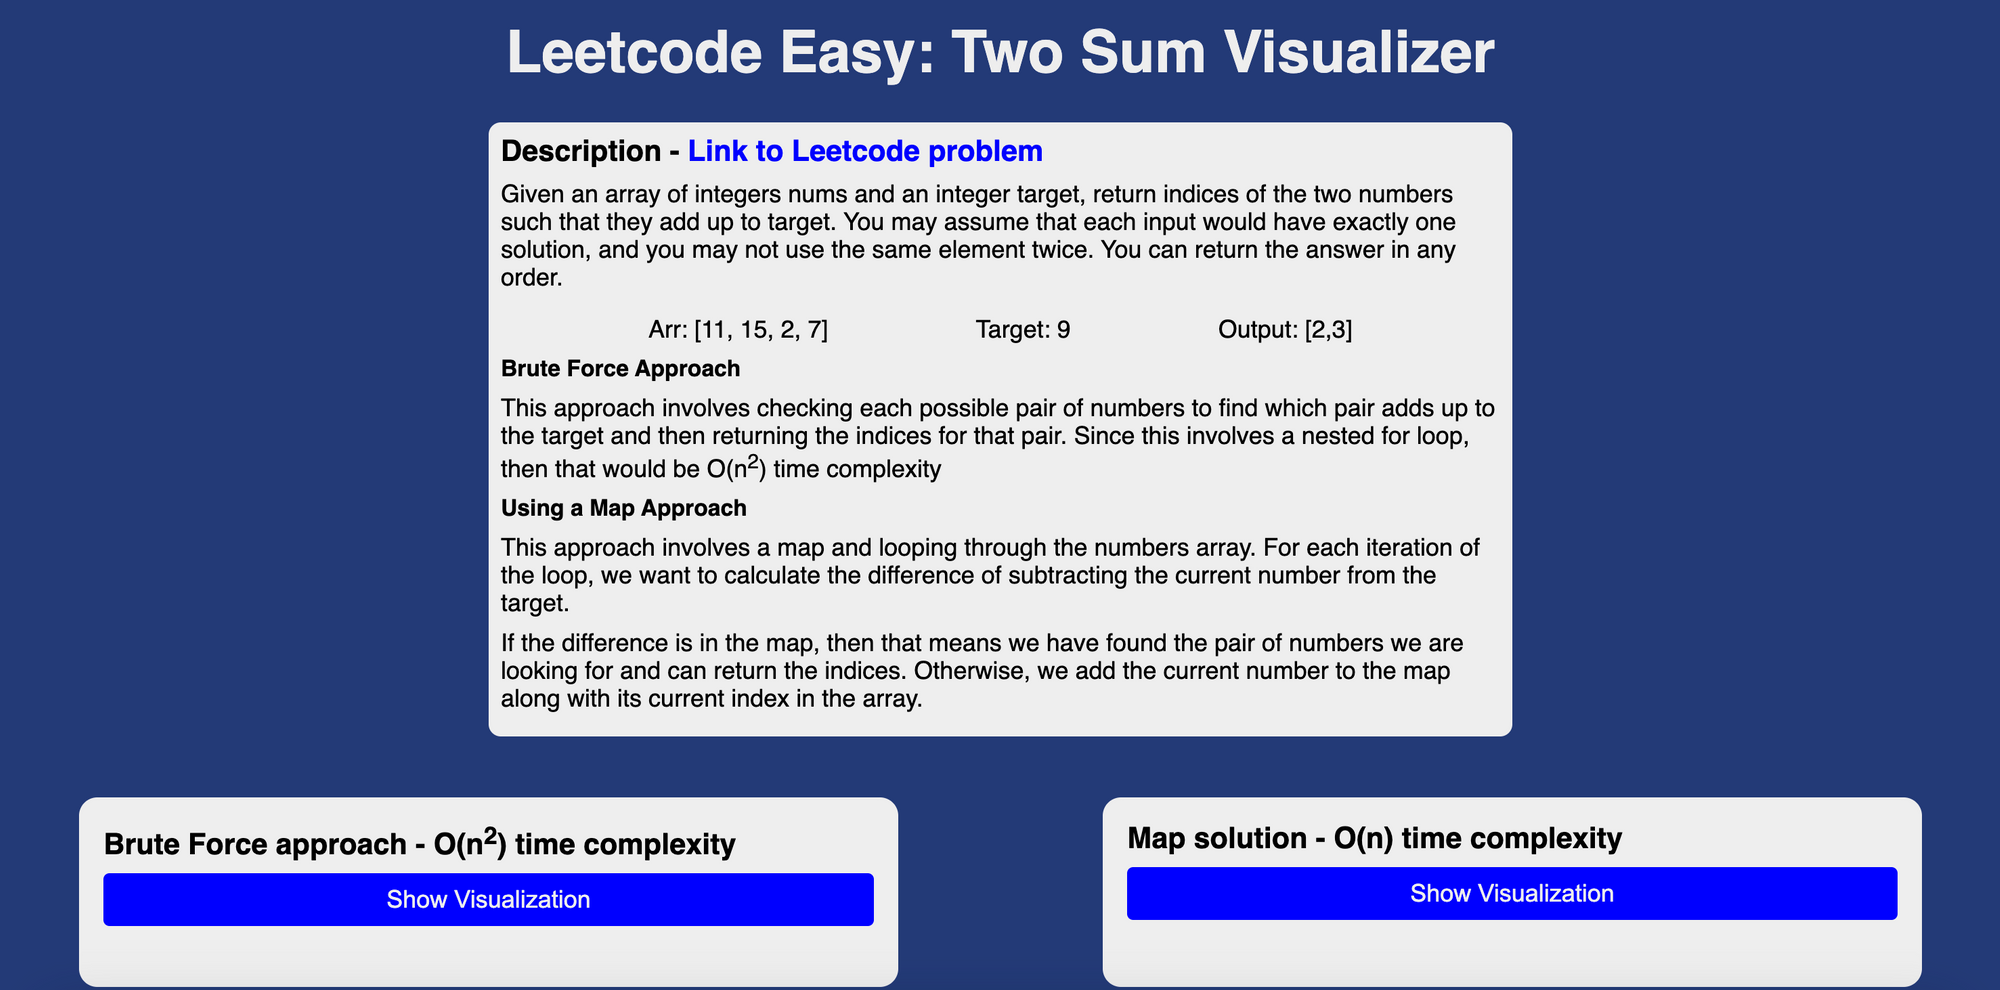 Visualization styles for Leetcode's Two Sum problem
How to Solve LeetCode's Two Sum problem
Before we can build out the visualization for this problem, we need to first understand and solve the problem.
Description
For this problem, you will be given a list of numbers in any order and a target number. The goal is to find the pair of numbers that adds up to the target and return an array of indices for that pair of numbers.
In this example, we have the following list and target number:
[2,7,11,15]
target: 9
The numbers 2 and 7 equal 9 so we would return [0,1] because that represents the indices for where the pair of numbers can be found in the array.
For this problem, you can assume there will be at least two numbers or more in the array and there will only be one possible solution.
So for example you can not have this input here which produces no solution because there are no two numbers in that list that add up to the target.
[1,2,3,4,5]
target: 55
You will also not get an input with multiple solutions. The following input has two answers of [0,1] and [1,2] which goes against the rules of this problem.
[3,3,3]
target: 6
Brute Force Approach
The more intuitive approach would be to start at the beginning of the list of numbers and compare each possible pair of numbers until we find the pair that adds up to the target.
Let's take a look at this example here:
[11, 15, 2, 7]
target:9
We can start with the first number in the list (11) and check each possible pair and see if it adds up to the target number (9).
11 + 15 = 9? NO
11 + 2 = 9? NO
11 + 7 = 9? NO
Since none of those pairs equal the target (9), then we move to the second number in the list (15) and check all possible pairs. There is no need to check 11+15 because we already checked that earlier.
15 + 2 = 9? NO
15 + 7 = 9? NO
Since none of those pairs equal the target (9), then we move to the third number in the list (2) and check all possible pairs.
2 + 7 = 9? YES!!!
Now, we have found the pair that adds up to the target we would return [2,3] because that represents the indices for where the pair of numbers can be found in the array.
Brute Force JavaScript Solution and Time Complexity
This solution uses a nested for loop which would be an O(n²) time complexity. The outer loop is used to get the current number in the list and the inner loop is used to check if the sum of the current number and other numbers in the list add up to the target.
/**
 * @param {number[]} nums
 * @param {number} target
 * @return {number[]}
 */

var twoSum = function (nums, target) {
  if (nums.length === 2) return [0, 1];

  for (let i = 0; i < nums.length; i++) {
    const currentNum = nums[i];
    for (let j = i + 1; j < nums.length; j++) {
      if (currentNum + nums[j] === target) return [i, j];
    }
  }
};
Note: I have added an additional check in my solution to check if the input array has only two numbers. In that case, we immediately return [0,1] because those are the only possible indices for that test case.
if (nums.length === 2) return [0, 1];
So far, our input arrays have been very small. But if we had an input array of 100, 500, or 1000+ numbers, then it could take a while to find the pair that adds up to the target.
In the next section, we are going to take a look at a solution that utilizes JavaScript's Map object and runs in linear time O(n).
Map Approach and Solution
In the brute force approach, we started at the beginning of the array and compared all possible pairs of numbers until we found the pair that added up to the target. But in this approach we can use JavaScript's Map object and one for loop to find that pair.
JavaScript's Map object is a collection of key-value pairs that allows for quick lookups and has built in methods like set(), get() and has().
Let's work with the same example from earlier:
[11, 15, 2, 7]
target:9
We can start looping through the array and look at the current number in the list which would be nums[i]. We also want to create a new map object which will be empty to start.
const map = new Map();

for(let i=0; i<nums.length; i++){

}
Inside our loop, we need to calculate the difference which will be the target minus the current number.
    const map = new Map();

    for(let i=0; i<nums.length; i++){
        const difference = target - nums[i]
    }
Since we know there can only be two numbers that add up to the target, we can check if the difference is in the map. If so, we have found the pair and can return the indices. Otherwise, we can add that current number to the map along with its index.
    const map = new Map();

    for(let i=0; i < nums.length; i++) {
        const difference = target - nums[i]

        if(map.has(difference)) {
            return [map.get(difference), i]
        } else {
            map.set(nums[i], i)
        }
    }
In the following code, the has() method is used to check if the following key is in the map object. This method will return a boolean of true or false.
map.has(difference)
The get() method is used to return that element from the map.
 if(map.has(difference)) {
   return [map.get(difference), i]
 }
The set() method will add or update an entry in the map with a key and value.
else {
  map.set(nums[i], i)
}
Here is the complete code for this approach:
/**
 * @param {number[]} nums
 * @param {number} target
 * @return {number[]}
 */
var twoSum = function(nums, target) {
    if(nums.length === 2) return [0,1]

    const map = new Map();

    for (let i = 0; i < nums.length; i++) {
        const difference = target - nums[i]

        if (map.has(difference)) {
            return [map.get(difference), i]
        } else {
            map.set(nums[i], i)
        }
    }

};
Time Complexity for the Map Solution
This solution would be a linear time complexity O(n). Since we are only using one loop instead of two, we have improved on the time complexity and no longer running in quadratic time O(n²) like we were earlier.
In the next few sections, we are going to start to build out the visualizations for each of these approaches.
Overview for the Two Sum Visualization
The goal of this project is to create visualizations for both the map and brute force solutions.
For the brute force solution, we will show what is it like to walk through each pair of numbers until we find the pair that adds up to the target.
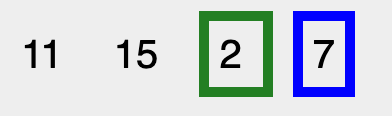
 Brute Force approach visualization
For the map solution, we will show the map being built out and checking for the pair that adds up to the target.
 Map solution visualization
Adding the Brute Force Visualization
Creating the const and let Variables
We first need to create const variables and assign them the result of accessing the HTML elements responsible for displaying the brute force solution button and output.
const bruteForceSolutionBtn = document.getElementById("brute-force-visual-btn");
const bruteForceNumbersOutput = document.querySelector(
  "#brute-force-output > .numbers-array"
);
const bruteForceTextOutput = document.querySelector(
  "#brute-force-output > .result-text"
);
The next step is to create const variables for the test case array and target that will be used for both visualizations.
const testCaseArray = [11, 15, 2, 7];
const target = 9;
Then, we need to create the let variables that will represent the current number we are looking at in the outer loop and the compliment number we are looking at in the inner loop.
let currentNum;
let currentCompliment;
Creating the getClassName Function
In our visualization we want to show the user the current pair of numbers we are checking by applying different colored borders around them. The current number will have a green border around it and the current compliment number will have a blue border around it.
In order to dynamically update these styles over time, we need to create a function that will be responsible for adding the appropriate classes to the current number and it compliment.
First, start by creating a new getClassName function that takes in a num parameter.
const getClassName = (num) => {

};
Inside that function, create a switch statement that has the num for the expression we are checking for.
const getClassName = (num) => {
  switch (num) {

  }
};
The first case should check for currentNum and return a string for the current-num class.
const getClassName = (num) => {
  switch (num) {
    case currentNum:
      return "class='current-num'";
  }
};
The second case should check for the currentCompliment and return a string for the compliment-num class.
const getClassName = (num) => {
  switch (num) {
    case currentNum:
      return "class='current-num'";
    case currentCompliment:
      return "class='compliment-num'";
  }
};
For the default case, it should return an empty string because we are not going to apply any classes for that element.
const getClassName = (num) => {
  switch (num) {
    case currentNum:
      return "class='current-num'";
    case currentCompliment:
      return "class='compliment-num'";
    default:
      return "";
  }
};
Creating the bruteForceApproach Function
This function will be responsible for executing the brute force solution and displaying the visualization on the page.
We first need to create the bruteForceApproach function which will be an async function.
const bruteForceApproach = async () => {

};
Then, we need to add the outer loop for our test case array.
const bruteForceApproach = async () => {
  for (let i = 0; i < testCaseArray.length; ++i) {

  }
};
Inside the for loop, update the currentNum to assign it the value of the current number we are looking at in the test case array.
const bruteForceApproach = async () => {
  for (let i = 0; i < testCaseArray.length; ++i) {
    currentNum = testCaseArray[i];
  }
};
Next, create the inner for loop.
const bruteForceApproach = async () => {
  for (let i = 0; i < testCaseArray.length; ++i) {
    currentNum = testCaseArray[i];
    for (let j = i + 1; j < testCaseArray.length; ++j) {

    }
  }
};
Inside the inner for loop, update the currentCompliment number and assign it the value of testCaseArray[j]. This is meant to represent each number to the right of the current number.
const bruteForceApproach = async () => {
  for (let i = 0; i < testCaseArray.length; ++i) {
    currentNum = testCaseArray[i];
    for (let j = i + 1; j < testCaseArray.length; ++j) {
      currentCompliment = testCaseArray[j];
    }
  }
};
Next, we need to add a setTimeout which will delay the visual changes made to the markup by one second. This is what is going to help create the animated effect of showing the different pairs of numbers.
const bruteForceApproach = async () => {
  for (let i = 0; i < testCaseArray.length; ++i) {
    currentNum = testCaseArray[i];
    for (let j = i + 1; j < testCaseArray.length; ++j) {
      currentCompliment = testCaseArray[j];
      await new Promise((resolve) => setTimeout(resolve, 1000));
    }
  }
};
Then we need to update the HTML for the output. Start by assigning the test case array to bruteForceNumbersOutput.innerHTML.
const bruteForceApproach = async () => {
  for (let i = 0; i < testCaseArray.length; ++i) {
    currentNum = testCaseArray[i];
    for (let j = i + 1; j < testCaseArray.length; ++j) {
      currentCompliment = testCaseArray[j];
      await new Promise((resolve) => setTimeout(resolve, 1000));

      bruteForceNumbersOutput.innerHTML = testCaseArray;
    }
  }
};
Then, we want to use the map method on the array, to create a new array of span elements which represents each number in the array along with the styles. We also need to chain the join method on that to remove the commas that the map method adds when the new array is created.
const bruteForceApproach = async () => {
  for (let i = 0; i < testCaseArray.length; ++i) {
    currentNum = testCaseArray[i];
    for (let j = i + 1; j < testCaseArray.length; ++j) {
      currentCompliment = testCaseArray[j];
      await new Promise((resolve) => setTimeout(resolve, 1000));

      bruteForceNumbersOutput.innerHTML = testCaseArray
        .map(
          (num, index) =>
            `
            <span ${getClassName(num)}>
            ${testCaseArray[index]}
            </span>
          `
        )
        .join("");
    }
  }
};
If we don't find a pair that adds up to the target, then we want to display a message to the user. Update the text content for the bruteForceTextOutput and assign it the following message:
const bruteForceApproach = async () => {
  for (let i = 0; i < testCaseArray.length; ++i) {
    currentNum = testCaseArray[i];
    for (let j = i + 1; j < testCaseArray.length; ++j) {
      currentCompliment = testCaseArray[j];
      await new Promise((resolve) => setTimeout(resolve, 1000));

      bruteForceNumbersOutput.innerHTML = testCaseArray
        .map(
          (num, index) =>
            `
            <span ${getClassName(num)}>
            ${testCaseArray[index]}
            </span>
          `
        )
        .join("");

      bruteForceTextOutput.textContent = `Does the sum of ${currentNum} + ${currentCompliment} equal ${target}? NO!`;
    }
  }
};
The last piece is to add a condition that checks if we found the pair of numbers that adds up to the target. If so, then we can display that final indices array and return from the function.
  if (currentNum + currentCompliment === target) {
      bruteForceTextOutput.textContent = `Final indices: [${i}, ${j}]`;
      return;
  }
To test out the brute force visualization, we will need to add an event listener to the bruteForceSolutionBtn. The event listener should listen for a "click" event and should reference the bruteForceApproach function.
bruteForceSolutionBtn.addEventListener("click", bruteForceApproach);
This should be your complete code so far:
const bruteForceSolutionBtn = document.getElementById("brute-force-visual-btn");
const bruteForceNumbersOutput = document.querySelector(
  "#brute-force-output > .numbers-array"
);
const bruteForceTextOutput = document.querySelector(
  "#brute-force-output > .result-text"
);
const testCaseArray = [11, 15, 2, 7];
const target = 9;
let currentNum;
let currentCompliment;

const getClassName = (num) => {
  switch (num) {
    case currentNum:
      return "class='current-num'";
    case currentCompliment:
      return "class='compliment-num'";
    default:
      return "";
  }
};

const bruteForceApproach = async () => {
  for (let i = 0; i < testCaseArray.length; ++i) {
    currentNum = testCaseArray[i];
    for (let j = i + 1; j < testCaseArray.length; ++j) {
      currentCompliment = testCaseArray[j];
      await new Promise((resolve) => setTimeout(resolve, 1000));

      bruteForceNumbersOutput.innerHTML = testCaseArray
        .map(
          (num, index) =>
            `
            <span ${getClassName(num)}>
            ${testCaseArray[index]}
            </span>
          `
        )
        .join("");

      bruteForceTextOutput.textContent = `Does the sum of ${currentNum} + ${currentCompliment} equal ${target}? NO!`;

      if (currentNum + currentCompliment === target) {
        bruteForceTextOutput.textContent = `Final indices: [${i}, ${j}]`;
        return;
      }
    }
  }
};

bruteForceSolutionBtn.addEventListener("click", bruteForceApproach);
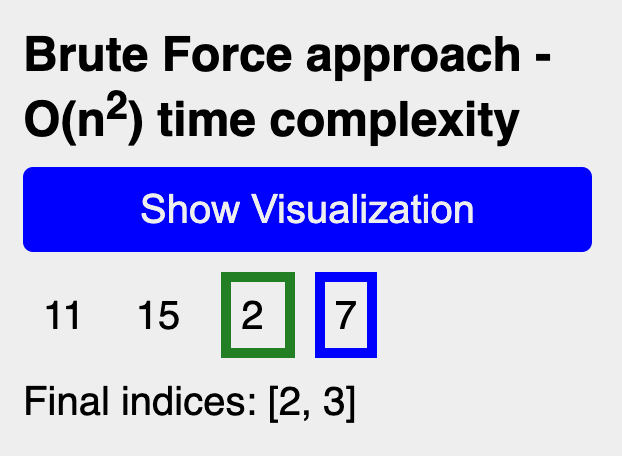
Try out your visualization by clicking on the "Show Visualization" button for the Brute force approach.
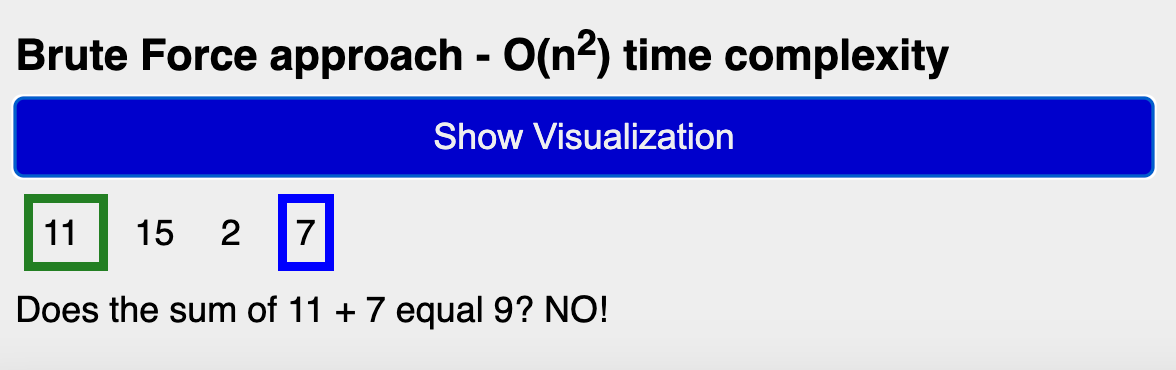 Result of clicking the "show visualization" button for brute force approach
How to Disable the bruteForceSolutionBtn When the Animation is in Progress
If you try to click on the bruteForceSolutionBtn multiple times in a row, you will see glitches in the animation. To fix that, we should disable the button when the animation is running and then re-enable it when the animation is complete.
Inside the bruteForceApproach function, set the disabled attribute for the bruteForceSolutionBtn.
const bruteForceApproach = async () => {
  bruteForceSolutionBtn.setAttribute("disabled", "");
Inside the if statement, remove the disabled attribute for the bruteForceSolutionBtn.
   if (currentNum + currentCompliment === target) {
        bruteForceTextOutput.textContent = `Final indices: [${i}, ${j}]`;
        bruteForceSolutionBtn.removeAttribute("disabled");
        return;
   }
Here is the complete code with the fix:
const bruteForceSolutionBtn = document.getElementById("brute-force-visual-btn");
const bruteForceNumbersOutput = document.querySelector(
  "#brute-force-output > .numbers-array"
);
const bruteForceTextOutput = document.querySelector(
  "#brute-force-output > .result-text"
);
const testCaseArray = [11, 15, 2, 7];
const target = 9;
let currentNum;
let currentCompliment;

const getClassName = (num) => {
  switch (num) {
    case currentNum:
      return "class='current-num'";
    case currentCompliment:
      return "class='compliment-num'";
    default:
      return "";
  }
};

const bruteForceApproach = async () => {
  bruteForceSolutionBtn.setAttribute("disabled", "");

  for (let i = 0; i < testCaseArray.length; ++i) {
    currentNum = testCaseArray[i];
    for (let j = i + 1; j < testCaseArray.length; ++j) {
      currentCompliment = testCaseArray[j];
      await new Promise((resolve) => setTimeout(resolve, 1000));

      bruteForceNumbersOutput.innerHTML = testCaseArray
        .map(
          (num, index) =>
            `
            <span ${getClassName(num)}>
            ${testCaseArray[index]}
            </span>
          `
        )
        .join("");

      bruteForceTextOutput.textContent = `Does the sum of ${currentNum} + ${currentCompliment} equal ${target}? NO!`;

      if (currentNum + currentCompliment === target) {
        bruteForceTextOutput.textContent = `Final indices: [${i}, ${j}]`;
        bruteForceSolutionBtn.removeAttribute("disabled");
        return;
      }
    }
  }
};

bruteForceSolutionBtn.addEventListener("click", bruteForceApproach);
Try out the visualization again, and now you should see that the button is disabled when the animation is running.
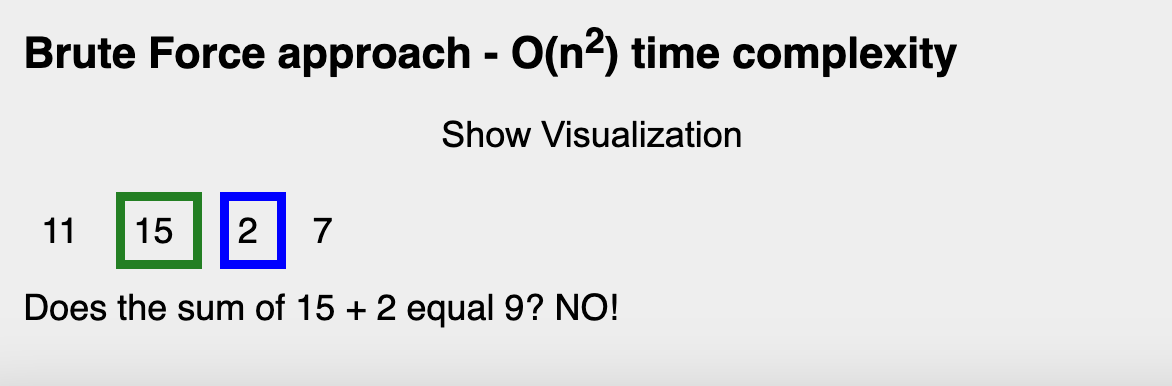 Image showing how button is disabled when animation is showing
Adding the Map Solution Visualization
Creating the const Variables
We are going to create some new const variables which represent the optimal solution button element, output, and table elements for the animation.
const optimalSolutionBtn = document.getElementById("optimal-visual-btn");
const currentValueOutput = document.getElementById("current-value-output");
const finalOptimalSolutionResult = document.getElementById(
  "final-optimal-result"
);
const table = document.getElementById("table-output");
const tableBodyOutput = document.getElementById("map-table-body");
Here is the complete list of variable declarations for both visualizations:
const bruteForceSolutionBtn = document.getElementById("brute-force-visual-btn");
const bruteForceNumbersOutput = document.querySelector(
  "#brute-force-output > .numbers-array"
);
const bruteForceTextOutput = document.querySelector(
  "#brute-force-output > .result-text"
);
const optimalSolutionBtn = document.getElementById("optimal-visual-btn");
const currentValueOutput = document.getElementById("current-value-output");
const finalOptimalSolutionResult = document.getElementById(
  "final-optimal-result"
);
const table = document.getElementById("table-output");
const tableBodyOutput = document.getElementById("map-table-body");

const testCaseArray = [11, 15, 2, 7];
const target = 9;
let currentNum;
let currentCompliment;
Creating the optimalApproach Async Function
The first step is to create the new optimalApproach function which will be an async function. You can add this below your bruteForceApproach function.
const optimalApproach = async () => {

};
Just like the bruteForceApproach function, we want to disable the button when the animation starts to prevent users from clicking it multiple times and breaking the animation.
const optimalApproach = async () => {
  optimalSolutionBtn.setAttribute("disabled", "");
};
When the page first loads, the table is hidden by default. We want to show the table element when the animation starts.
const optimalApproach = async () => {
  optimalSolutionBtn.setAttribute("disabled", "");
  table.style.display = "block";
};
Each time we run this animation, we want to display messages to the user on if we have found the correct pair or not. At the beginning of the animation, we want to clear the previous output.
const optimalApproach = async () => {
  optimalSolutionBtn.setAttribute("disabled", "");
  table.style.display = "block";
  currentValueOutput.innerHTML = "";
};
Then, we need to create an empty map object which will eventually be updated over time in the for loop.
const optimalApproach = async () => {
  optimalSolutionBtn.setAttribute("disabled", "");
  table.style.display = "block";
  currentValueOutput.innerHTML = "";
  const map = new Map();
};
Next, we need to create a for loop which will be responsible for looping through each number in the array and updating the animation overtime.
const optimalApproach = async () => {
  optimalSolutionBtn.setAttribute("disabled", "");
  table.style.display = "block";
  currentValueOutput.innerHTML = "";
  const map = new Map();

  for (let i = 0; i < testCaseArray.length; ++i) {

  }
};
Inside the loop, we need to add the expression for calculating the difference.
const optimalApproach = async () => {
  optimalSolutionBtn.setAttribute("disabled", "");
  table.style.display = "block";
  currentValueOutput.innerHTML = "";
  const map = new Map();

  for (let i = 0; i < testCaseArray.length; ++i) {
    const difference = target - testCaseArray[i];
  }
};
Then, we need to add a setTimeout which will delay the changes by 2 seconds in the HTML markup and help with the animation effect.
const optimalApproach = async () => {
  optimalSolutionBtn.setAttribute("disabled", "");
  table.style.display = "block";
  currentValueOutput.innerHTML = "";
  const map = new Map();

  for (let i = 0; i < testCaseArray.length; ++i) {
    const difference = target - testCaseArray[i];

    await new Promise((resolve) => setTimeout(resolve, 2000));
  }
};
We then need to add an if statement to check if the map has the difference value.
const optimalApproach = async () => {
  optimalSolutionBtn.setAttribute("disabled", "");
  table.style.display = "block";
  currentValueOutput.innerHTML = "";
  const map = new Map();

  for (let i = 0; i < testCaseArray.length; ++i) {
    const difference = target - testCaseArray[i];

    await new Promise((resolve) => setTimeout(resolve, 2000));

    if (map.has(difference)) {

    }
  }
};
Inside the if statement, we need to update the text content to show the final indices array result on the screen. We will use the get method to get the index value from the map.
 if (map.has(difference)) {
      finalOptimalSolutionResult.textContent = `Final indices: [${map.get(
        difference
      )}, ${i}]`;
 }
We also need to update the output for displaying a message that shows we have found the pair of numbers that adds up to the target.
  if (map.has(difference)) {
      finalOptimalSolutionResult.textContent = `Final indices: [${map.get(
        difference
      )}, ${i}]`;
      currentValueOutput.innerHTML = `
      <p>Difference(${difference}) = target(${target}) - current number(${testCaseArray[i]})</p>
      <p>Is the difference(${difference}) in our map? YES, we found that pair of numbers that add up to the target.</p>
    `;
  }
We also need to remove the disabled attribute from the optimalSolutionBtn and return from the function.
  if (map.has(difference)) {
      finalOptimalSolutionResult.textContent = `Final indices: [${map.get(
        difference
      )}, ${i}]`;
      currentValueOutput.innerHTML = `
      <p>Difference(${difference}) = target(${target}) - current number(${testCaseArray[i]})</p>
      <p>Is the difference(${difference}) in our map? YES, we found that pair of numbers that add up to the target.</p>
    `;
      optimalSolutionBtn.removeAttribute("disabled");
      return;
  }
If the pair has not been found, then we need to add an else clause.
  if (map.has(difference)) {
      finalOptimalSolutionResult.textContent = `Final indices: [${map.get(
        difference
      )}, ${i}]`;
      currentValueOutput.innerHTML = `
      <p>Difference(${difference}) = target(${target}) - current number(${testCaseArray[i]})</p>
      <p>Is the difference(${difference}) in our map? YES, we found that pair of numbers that add up to the target.</p>
    `;
      optimalSolutionBtn.removeAttribute("disabled");
      return;
  } else {

  }
Inside the else clause, we need to update the message to show that we have not found the pair and that the current number testCaseArray[i] is going to be added to the map along with its index value.
else {
      currentValueOutput.innerHTML = `
        <p>Difference(${difference}) = target(${target}) - current number(${testCaseArray[i]})</p>
        <p>Is the difference(${difference}) in our map? No.</p>
        <p>Add the current number ${testCaseArray[i]} to our map.</p>
      `;
}
We then need to update the table output with the current number and its index value.
else {
      currentValueOutput.innerHTML = `
        <p>Difference(${difference}) = target(${target}) - current number(${testCaseArray[i]})</p>
        <p>Is the difference(${difference}) in our map? No.</p>
        <p>Add the current number ${testCaseArray[i]} to our map.</p>
      `;
      tableBodyOutput.innerHTML += `
      <tr>
        <td>${testCaseArray[i]}</td>
        <td>${i}</td>
      </tr>
    `;
}
Lastly, use the set method to set the current number and index value in the map.
else {
      currentValueOutput.innerHTML = `
        <p>Difference(${difference}) = target(${target}) - current number(${testCaseArray[i]})</p>
        <p>Is the difference(${difference}) in our map? No.</p>
        <p>Add the current number ${testCaseArray[i]} to our map.</p>
      `;
      tableBodyOutput.innerHTML += `
      <tr>
        <td>${testCaseArray[i]}</td>
        <td>${i}</td>
      </tr>
    `;
      map.set(testCaseArray[i], i);
}
Here is the complete code for your optimalApproach function.
const optimalApproach = async () => {
  optimalSolutionBtn.setAttribute("disabled", "");
  table.style.display = "block";
  currentValueOutput.innerHTML = "";
  const map = new Map();

  for (let i = 0; i < testCaseArray.length; ++i) {
    const difference = target - testCaseArray[i];

    await new Promise((resolve) => setTimeout(resolve, 2000));

    if (map.has(difference)) {
      finalOptimalSolutionResult.textContent = `Final indices: [${map.get(
        difference
      )}, ${i}]`;
      currentValueOutput.innerHTML = `
      <p>Difference(${difference}) = target(${target}) - current number(${testCaseArray[i]})</p>
      <p>Is the difference(${difference}) in our map? YES, we found that pair of numbers that add up to the target.</p>
    `;
      optimalSolutionBtn.removeAttribute("disabled");
      return;
    } else {
      currentValueOutput.innerHTML = `
        <p>Difference(${difference}) = target(${target}) - current number(${testCaseArray[i]})</p>
        <p>Is the difference(${difference}) in our map? No.</p>
        <p>Add the current number ${testCaseArray[i]} to our map.</p>
      `;
      tableBodyOutput.innerHTML += `
      <tr>
        <td>${testCaseArray[i]}</td>
        <td>${i}</td>
      </tr>
    `;
      map.set(testCaseArray[i], i);
    }
  }
};
To test out this visualization, add an event listener to the optimalSolutionBtn and pass in the "click" event and optimalApproach function reference.
optimalSolutionBtn.addEventListener("click", optimalApproach);
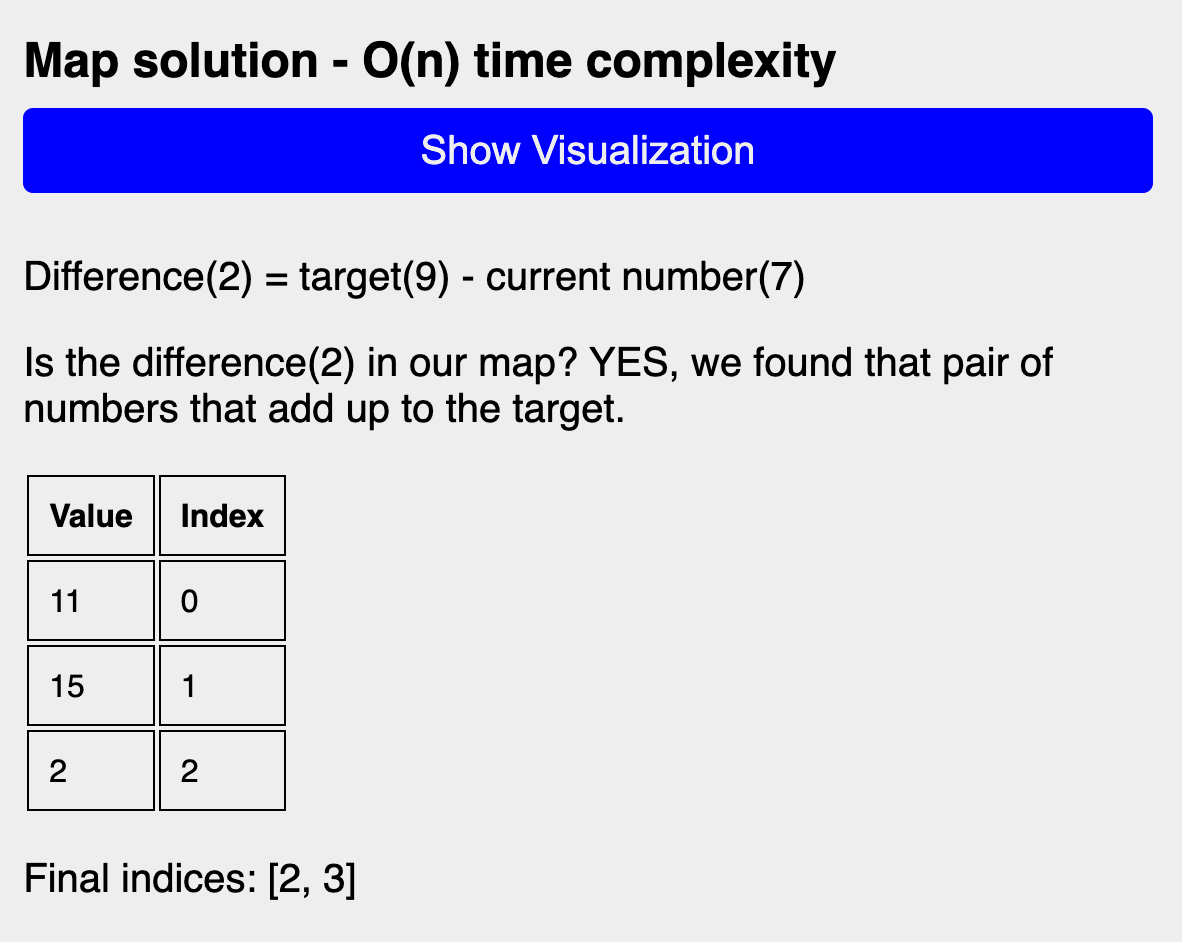
When you click on the "Show Visualization" button for the map solution, you should see the animation, as shown below:
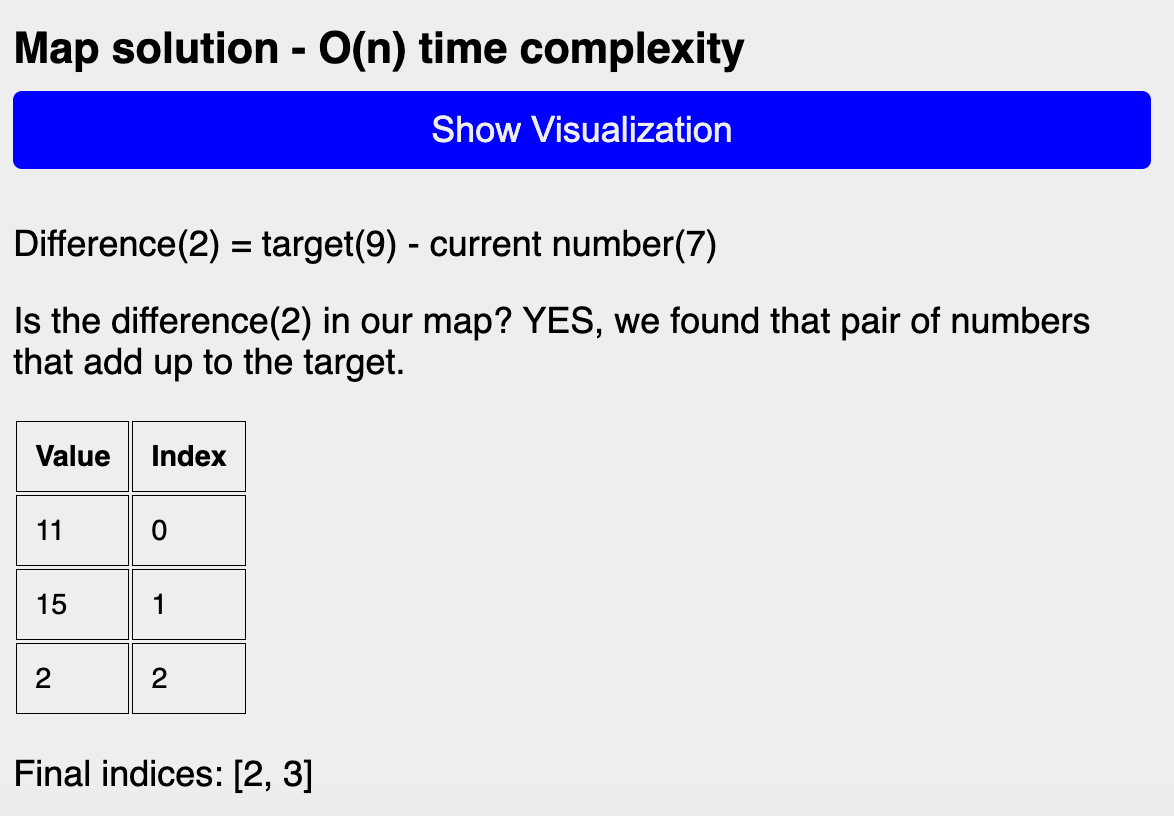 Visualization for map solution
How to Reset the Table Output for the Map Solution
If you try to run the animation multiple times, then you will see that the table shows the results from the previous run.
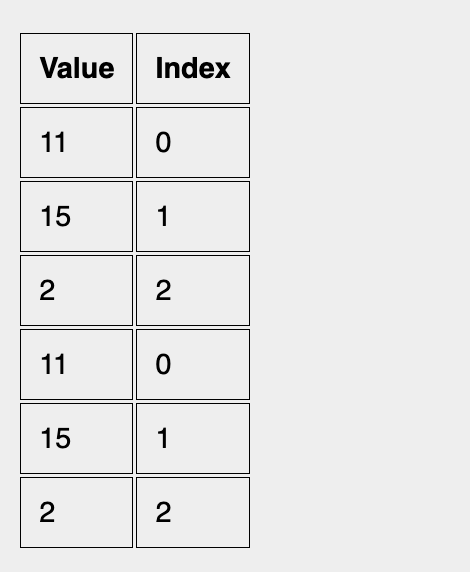 Table showing results from the previous run
To fix this, we can reset the table before each run of the animation. Start by creating a resetTable function above your optimalApproach function.
const resetTable = () => {

};

const optimalApproach = async () => {
    .........
Inside that function, clear out the table and final text results.
const resetTable = () => {
  tableBodyOutput.innerHTML = "";
  finalOptimalSolutionResult.textContent = "";
};
Call the resetTable function inside your optimalApproach function in order to see the results of resetting the table.
const optimalApproach = async () => {
  resetTable();
  optimalSolutionBtn.setAttribute("disabled", "");
    ...........
Test out your animation again, and now you should see that the table results reset before each new animation run.
Final Solution Code and Live Example
Here is the complete JavaScript solution code for both visualizations:
const bruteForceSolutionBtn = document.getElementById("brute-force-visual-btn");
const bruteForceNumbersOutput = document.querySelector(
  "#brute-force-output > .numbers-array"
);
const bruteForceTextOutput = document.querySelector(
  "#brute-force-output > .result-text"
);
const optimalSolutionBtn = document.getElementById("optimal-visual-btn");
const currentValueOutput = document.getElementById("current-value-output");
const finalOptimalSolutionResult = document.getElementById(
  "final-optimal-result"
);
const table = document.getElementById("table-output");
const tableBodyOutput = document.getElementById("map-table-body");

const testCaseArray = [11, 15, 2, 7];
const target = 9;
let currentNum;
let currentCompliment;

const getClassName = (num) => {
  switch (num) {
    case currentNum:
      return "class='current-num'";
    case currentCompliment:
      return "class='compliment-num'";
    default:
      return "";
  }
};

const bruteForceApproach = async () => {
  bruteForceSolutionBtn.setAttribute("disabled", "");

  for (let i = 0; i < testCaseArray.length; ++i) {
    currentNum = testCaseArray[i];
    for (let j = i + 1; j < testCaseArray.length; ++j) {
      currentCompliment = testCaseArray[j];
      await new Promise((resolve) => setTimeout(resolve, 1000));

      bruteForceNumbersOutput.innerHTML = testCaseArray
        .map(
          (num, index) =>
            `
              <span ${getClassName(num)}>
              ${testCaseArray[index]}
              </span>
            `
        )
        .join("");

      bruteForceTextOutput.textContent = `Does the sum of ${currentNum} + ${currentCompliment} equal ${target}? NO!`;

      if (currentNum + currentCompliment === target) {
        bruteForceTextOutput.textContent = `Final indices: [${i}, ${j}]`;
        bruteForceSolutionBtn.removeAttribute("disabled");
        return;
      }
    }
  }
};

const resetTable = () => {
  tableBodyOutput.innerHTML = "";
  finalOptimalSolutionResult.textContent = "";
};

const optimalApproach = async () => {
  resetTable();
  optimalSolutionBtn.setAttribute("disabled", "");
  table.style.display = "block";
  currentValueOutput.innerHTML = "";
  const map = new Map();

  for (let i = 0; i < testCaseArray.length; ++i) {
    const difference = target - testCaseArray[i];

    await new Promise((resolve) => setTimeout(resolve, 2000));

    if (map.has(difference)) {
      finalOptimalSolutionResult.textContent = `Final indices: [${map.get(
        difference
      )}, ${i}]`;
      currentValueOutput.innerHTML = `
      <p>Difference(${difference}) = target(${target}) - current number(${testCaseArray[i]})</p>
      <p>Is the difference(${difference}) in our map? YES, we found that pair of numbers that add up to the target.</p>
    `;
      optimalSolutionBtn.removeAttribute("disabled");
      return;
    } else {
      currentValueOutput.innerHTML = `
        <p>Difference(${difference}) = target(${target}) - current number(${testCaseArray[i]})</p>
        <p>Is the difference(${difference}) in our map? No.</p>
        <p>Add the current number ${testCaseArray[i]} to our map.</p>
      `;
      tableBodyOutput.innerHTML += `
        <tr>
          <td>${testCaseArray[i]}</td>
          <td>${i}</td>
        </tr>
      `;
      map.set(testCaseArray[i], i);
    }
  }
};

bruteForceSolutionBtn.addEventListener("click", bruteForceApproach);
optimalSolutionBtn.addEventListener("click", optimalApproach);
Here is a link again to the final live result on CodePen.
Conclusion
I hope you enjoyed that project and learned a little bit more about how the Two Sum problem works.
I encourage you to play around with the project and maybe add some new features on your own like testing out different numbers or asking for user inputs for the numbers array and targets. 👍🏾