
In this tutorial, you will learn how to build a simple whiteboard app using Python and Tkinter.
Some months ago, I was teaching a Python course. I was struggling to convey certain concepts because it was an online course, and I couldn't use a whiteboard or even a traditional board. The built-in whiteboard feature in Google Meet was also quite complex to use and share.
So, I decided to search on Google to see if there were any GitHub repositories with whiteboard apps.
I found many such repositories. But after trying a lot of them, I found that the apps were often too complicated for my needs. I wanted something simpler, where I could choose colors and line sizes, and then I could do the drawing myself.
So, what did I do? I decided to code my own app. And for this process, I chose to use Python and Tkinter, the default GUI (Graphics User Interface) toolkit that comes with Python.
The end result?
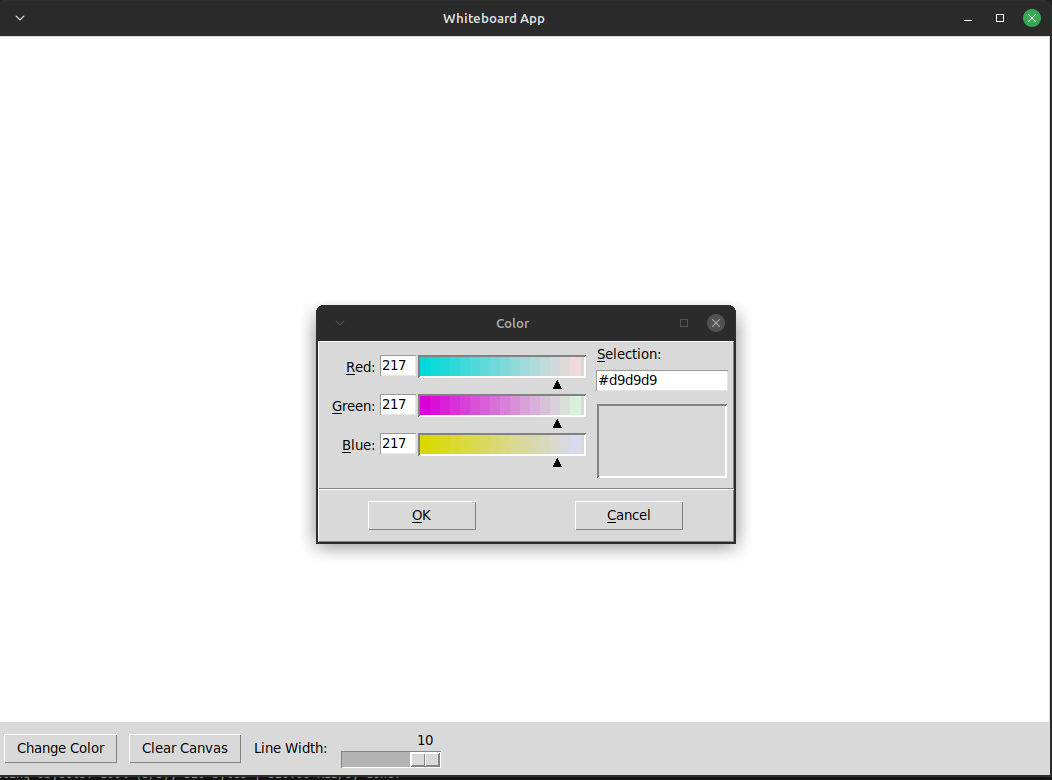
The whiteboard app windows with a white canvas to start drawing and writing and the RGB color picker.
So in this tutorial, I'll walk you through the process so you can build it yourself. This will help you sharpen your Python skills and learn about Tkinter, too.
How to Build the app's functionality
Setup your development environment
Building this app is pretty straightforward. You will need the latest Python version installed, which you can download and install from here:
If you're a Linux user, you won't need to install it as it comes with your distro. Also, you need to have a basic understanding of Python and know how to create functions.
After verifying that you already have Python installed on your computer, open Visual Studio Code or your preferred code editor to start writing code.
How to build the drawing feature
Create a Python file and begin by importing the Tkinter and color chooser modules, like this:
import tkinter as tk
from tkinter.colorchooser import askcolor
After importing Tkinter and the colorchooser module, which will open a modal to select our RGB color combinations, you can begin writing the functions to make this whiteboard work.
First, create a function to start drawing, like this:
def start_drawing(event):
    global is_drawing, prev_x, prev_y
    is_drawing = True
    prev_x, prev_y = event.x, event.y
This code defines a function named start_drawing that is meant to handle the beginning of a drawing action in a graphical user interface (GUI) application.
Let's break down what this function does:
def start_drawing(event):: This line defines a function namedstart_drawingthat takes aneventas its parameter. In GUI programming, events are actions or occurrences (like mouse clicks, key presses and so on) that trigger specific functions when they happen.global is_drawing, prev_x, prev_y: This line declares that the variablesis_drawing,prev_x, andprev_yare global variables. In Python, global variables are accessible from anywhere in the code and can be modified within functions. This line ensures that these variables are accessible within the function.is_drawing = True: This line sets theis_drawingvariable toTrue. This variable is typically used to indicate whether a drawing action is in progress. By setting it toTrue, the function signals that a drawing action has started.prev_x, prev_y = event.x, event.y: This line captures the current coordinates of the mouse cursor when thestart_drawingfunction is called. It assigns thexandycoordinates of the mouse cursor at that moment to theprev_xandprev_yvariables. These variables are used to track the starting point of the drawing action.
So when this function is called (usually in response to a mouse click event), it sets the is_drawing flag to True to indicate that a drawing action is in progress and records the initial position of the mouse cursor using the prev_x and prev_y variables. These variables are then used in the subsequent drawing actions to connect the starting point with the current cursor position to create a drawing on the canvas.
Now let's keep coding. Next up, we need to write a function to actually draw on the whiteboard, like this:
def draw(event):
    global is_drawing, prev_x, prev_y
    if is_drawing:
        current_x, current_y = event.x, event.y
        canvas.create_line(prev_x, prev_y, current_x, current_y, fill=drawing_color, width=line_width, capstyle=tk.ROUND, smooth=True)
        prev_x, prev_y = current_x, current_y
A drawing is essentially a combination of points filled with colors, functioning as a vector. To work as a vector, it needs to have a starting and ending point. So after creating a function to start drawing, you'll need a function to stop drawing, like this:
def stop_drawing(event):
    global is_drawing
    is_drawing = False
How to build the color changing feature
Now that you have the primary drawing functionality, the next step is to implement the color-changing function. This is a simple function that calls the askcolor module, which is already part of Tkinter, like this:
def change_pen_color():
    global drawing_color
    color = askcolor()[1]
    if color:
        drawing_color = color
For the last functionality, you'll create a function to adjust the line width, allowing you to choose the thickness of your lines. Here's how to implement it:
def change_line_width(value):
    global line_width
    line_width = int(value)
Now you've completed the functions. Next, you'll use Tkinter to create the window for your app and buttons for choosing colors, clearing the whiteboard, and selecting your line width.
How to Build the GUI
GUI stands for Graphical User Interface, representing the windows you interact with on your computer, smartphone, tablets, and so on.
When coding a desktop app using Python and Tkinter, you define the size, position, buttons, and any other elements you want for your program. In this case, you need to create the following assets:
A title for your app.
A white blank canvas for drawing.
A frame to hold the controls of your app in the same line.
A color button.
A clear canvas button to erase all your work and start drawing again.
A slider to select your line width.
How to create your window
Start by creating a window with a title and a white canvas:
root = tk.Tk()
root.title("Whiteboard App")

canvas = tk.Canvas(root, bg="white")
canvas.pack(fill="both", expand=True)

is_drawing = False
drawing_color = "black"
line_width = 2

root.geometry("800x600")
Let's break down what each part does:
root = tk.Tk(): This line creates the main application window. It initializes a Tkinter application and assigns it to the variableroot. This window serves as the container for all the graphical elements of the whiteboard application.root.title("Whiteboard App"): This sets the title of the application window to "Whiteboard App." The title appears in the title bar of the window and provides a name for the application.canvas = tk.Canvas(root, bg="white"): This line creates a drawing canvas within the main application window. The canvas is a white rectangular area where users can draw. It is initialized with a white background color. The canvas is assigned to the variablecanvas.canvas.pack(fill="both", expand=True): This configures the canvas to fill both the horizontal and vertical space of the application window. It allows the canvas to expand and occupy the entire window.is_drawing = False: This initializes a variableis_drawingtoFalse. It's typically used to track whether the user is currently drawing or not. When the user starts drawing, this variable is set toTrueto indicate an ongoing drawing action.drawing_color = "black": This initializes a variabledrawing_colorto "black." It specifies the color that will be used for drawing on the canvas. You can change this color as needed to draw with different colors with the functions you will add later on this tutorialline_width = 2: This initializes a variableline_widthto 2. It specifies the width of the lines or strokes used for drawing. You can adjust this value to change the thickness of the lines.root.geometry("800x600"): This sets the initial size of the application window to 800 pixels in width and 600 pixels in height. It defines the dimensions of the window when it is first displayed but you can resize your window and with it, your canvas space.
How to build your navbar and controls
Next thing you need to do is create a frame to hold the buttons or controls in the same line. This is the most comfortable way to have buttons, and it's kind of a navbar.
controls_frame = tk.Frame(root)
controls_frame.pack(side="top", fill="x")
Then, create two buttons and give them default fixed positions in your screen, like this:
color_button = tk.Button(controls_frame, text="Change Color", command=change_pen_color)
clear_button = tk.Button(controls_frame, text="Clear Canvas", command=lambda: canvas.delete("all"))

color_button.pack(side="left", padx=5, pady=5)
clear_button.pack(side="left", padx=5, pady=5)
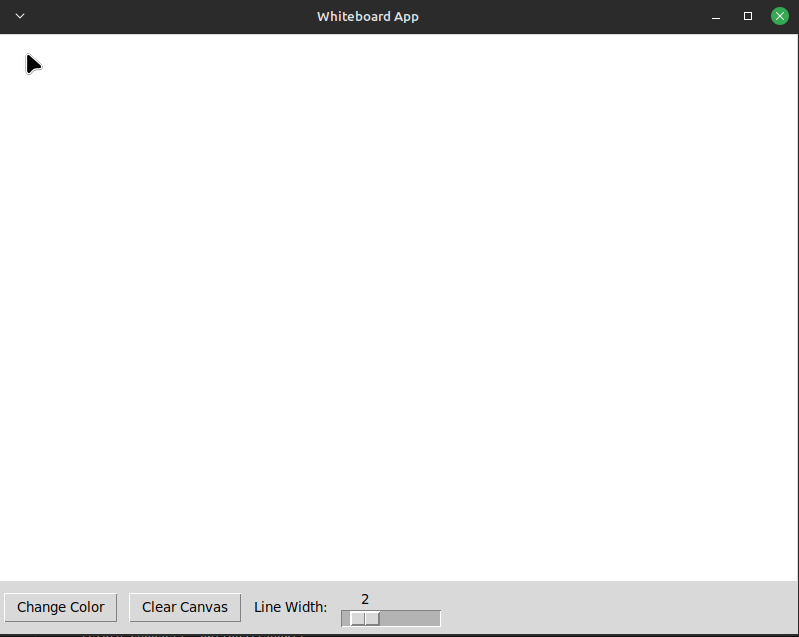
So, right now, if you run your app you will see something like this:

The window of the app with the blank canvas and two buttons, one for changing colors and one to clear the canvas.
You already have the two main buttons for your app, one to change colors and one to clear the canvas. The last control you need to create is a slider for the line width function. For that, you will write the following code:
line_width_label = tk.Label(controls_frame, text="Line Width:")
line_width_label.pack(side="left", padx=5, pady=5)

line_width_slider = tk.Scale(controls_frame, from_=1, to=10, orient="horizontal", command=lambda val: change_line_width(val))
line_width_slider.set(line_width)
line_width_slider.pack(side="left", padx=5, pady=5)
And again, let's recap what is going on here:
line_width_label = tk.Label(controls_frame, text="Line Width:"): This line creates a label widget with the text "Line Width." The label is intended to display text to describe the purpose of the following slider (which controls the line width). It is placed within thecontrols_framewidget.line_width_label.pack(side="left", padx=5, pady=5): This line configures the label's placement within thecontrols_frame.side="left": This sets the label to be placed on the left side of thecontrols_frame. It ensures that the label is aligned to the left.padx=5: It adds horizontal padding of 5 pixels around the label, creating some spacing.pady=5: It adds vertical padding of 5 pixels around the label, creating spacing.line_width_slider = tk.Scale(controls_frame, from_=1, to=10, orient="horizontal", command=lambda val: change_line_width(val)): This line creates a horizontal slider widget (Scale widget) that allows the user to select a line width. The slider ranges from a minimum value of 1 (from_=1) to a maximum value of 10 (to=10). Thecommandoption is set to call thechange_line_widthfunction with the selected value whenever the slider position changes.line_width_slider.set(line_width): This sets the initial position of the slider to the value stored in theline_widthvariable, which is initialized earlier in the code. This ensures that the slider starts at the default line width.line_width_slider.pack(side="left", padx=5, pady=5): This line configures the slider's placement within thecontrols_frame. It is placed on the left side, and padding is added to create spacing around the slider.
So, if you reach this point, your app should look like this:
How to connect your features with your GUI
But if you press the buttons or move the slider for line width, it won't work because you still need to bind or "link" the functions you coded at the beginning of this tutorial with the buttons and controls you created.
For that, you're going to write this code:
canvas.bind("<Button-1>", start_drawing)
canvas.bind("<B1-Motion>", draw)
canvas.bind("<ButtonRelease-1>", stop_drawing)

root.mainloop()
So, a last recap to understand the end of your code:
canvas.bind("<Button-1>", start_drawing): When the left mouse button is clicked on the canvas, it triggers thestart_drawingfunction.canvas.bind("<B1-Motion>", draw): While the left mouse button is held down and the mouse is moved on the canvas, it triggers thedrawfunction.canvas.bind("<ButtonRelease-1>", stop_drawing): When the left mouse button is released (button released event), it triggers thestop_drawingfunction.And finally,
root.mainloop()starts the main loop of the application, allowing it to respond to user interactions and events.
Wrapping up
I hope you enjoyed reading through this tutorial as much as I did writing it, and that the whiteboard helps you in whatever you need to do.
If you want to download the app, you can check it out here:
Until next time! Happy coding and keep coding forward to create a cool portfolio =D