

Every website gets feedback, and most of it ends up somewhere awkward. A visitor finds a broken button and emails you. Someone else leaves a comment on social media about a page that won't load on their phone. A third person fills in your contact form with a feature idea, and it sits in your inbox between a newsletter and a receipt.
When you finally sit down to fix things, the bug reports are scattered across three places. Half of them are missing details, and the ones that do make it into GitHub were copied there by hand, sometimes with the visitor's email address still pasted into a public issue.
I wanted something better for my own projects, so I built it. IssueRelay gives any React website a small support widget where visitors can ask a question, report a bug, or suggest a feature. Every report is saved to your own database first. Then an AI model called Jev classifies it, a set of plain rules in code decides where it goes, and you review it in a private dashboard.
When you confirm that a report really is a bug, IssueRelay creates one clean GitHub issue for it, with the visitor's private details removed. When you later close that issue on GitHub, the support ticket closes too.
In this tutorial, you'll learn how the whole system works, from the widget in the browser to the webhook that keeps GitHub and the dashboard in sync. You'll also see how to deploy your own copy in about 15 minutes.
IssueRelay is open source on GitHub at andrewbaisden/issuerelay, the widget is published on npm as @issuerelay/widget, and it's running in production on my portfolio website right now.
I won't paste the whole codebase into this article. The repository has every file, and the setup guide walks through installation step by step. Instead, I'll show you the small pieces of code that carry the important ideas, explain what each one does, and share what I learned while building, testing, and deploying it.
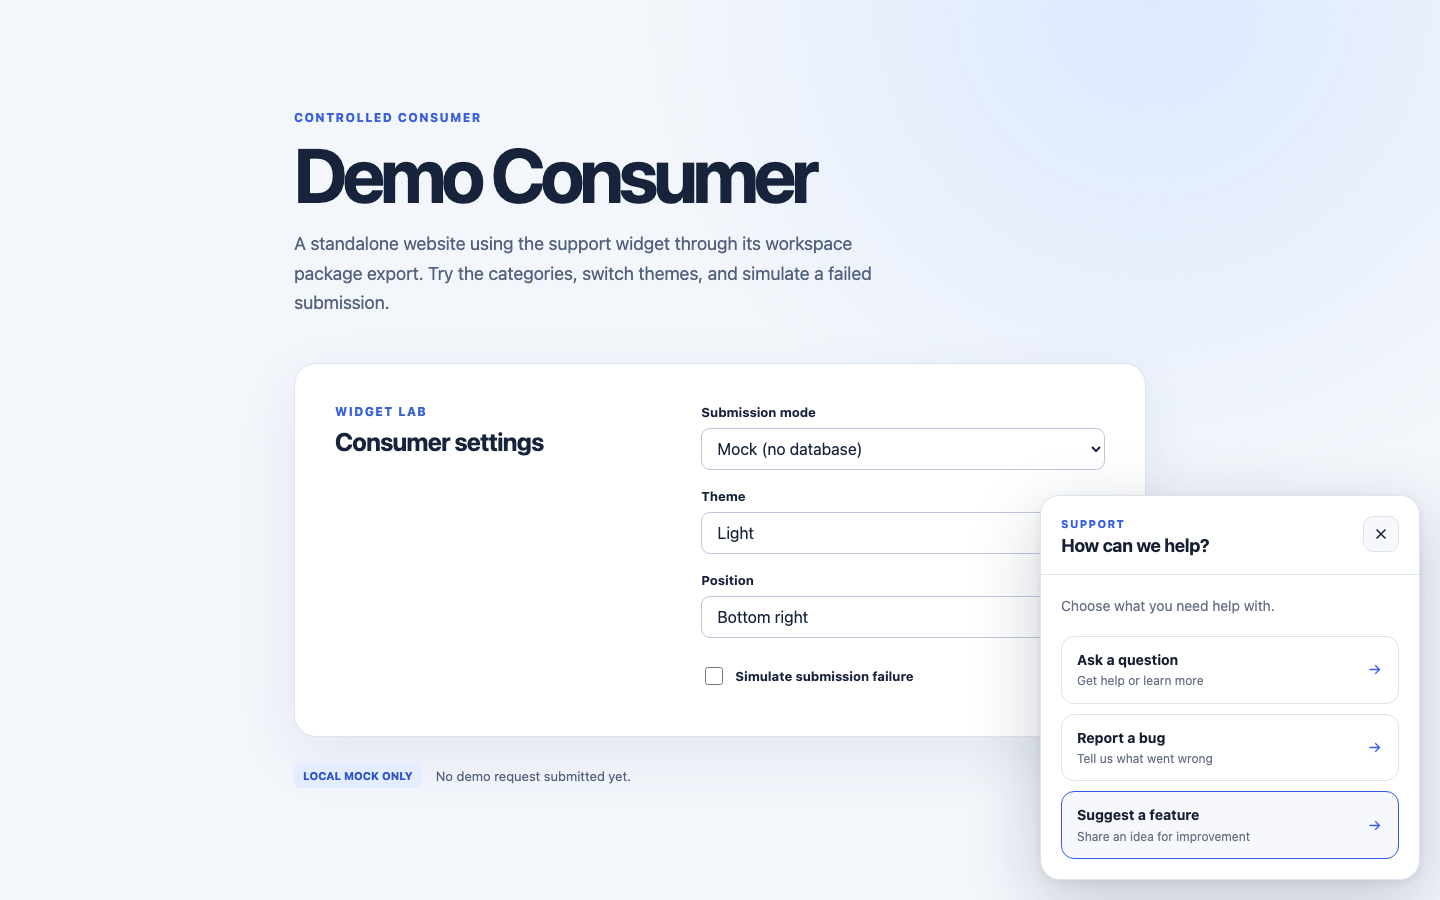
Table of Contents
Prerequisites
To follow along and deploy your own copy, you should have:
Working knowledge of React, Next.js, and TypeScript: the platform uses the Next.js App Router, and the widget is a React component.
Node.js 24 and pnpm: installed if you want to run the project locally or use the command that creates your GitHub App.
A GitHub account: plus the repository for the website or app where you want to install the widget. Confirmed bugs become issues there.
A Vercel account: The free Hobby plan is enough. You'll add a Neon PostgreSQL database through Vercel's marketplace, and Neon also has a free plan.
A TypeSafe account: at typesafe.ai for Jev, the AI model that triages reports. You need an API key from the TypeSafe console before any report can become a GitHub issue.
A React website: where you can add a component. A Next.js site is the easiest place to start.
Optional: a Resend account: if you want account emails such as password resets.
You don't need to be an AI expert to follow along. Jev is used through a small, typed SDK, and most of the interesting work is ordinary web engineering: databases, validation, authentication, and webhooks.
How an AI Support System Can Help Any Website
A support system sounds like something only big companies need, but the problem it solves shows up on almost every website:
Portfolio sites get messages from recruiters, questions about projects, and reports about pages that break on a particular browser.
SaaS products get bug reports mixed with billing questions and feature requests, and each one needs a different person or process.
Documentation sites get "this example doesn't work" reports that are really bugs in the product.
Open source projects get users who won't open a GitHub issue themselves but will happily click a button on the website.
Client sites you built for someone else get feedback that the client forwards to you days later with no details.
A good system gives you one place where every report arrives, keeps each report safe even when other services fail, and sorts reports so you spend your time on the ones that matter.
The AI part helps with the sorting, but it should never be in charge. A model can be confidently wrong, and a public GitHub issue isn't something you want to create on a guess. So IssueRelay follows one simple rule throughout: AI recommends, a human confirms, and code enforces the rules.
What We'll Build
Here's the journey of a single report through IssueRelay:
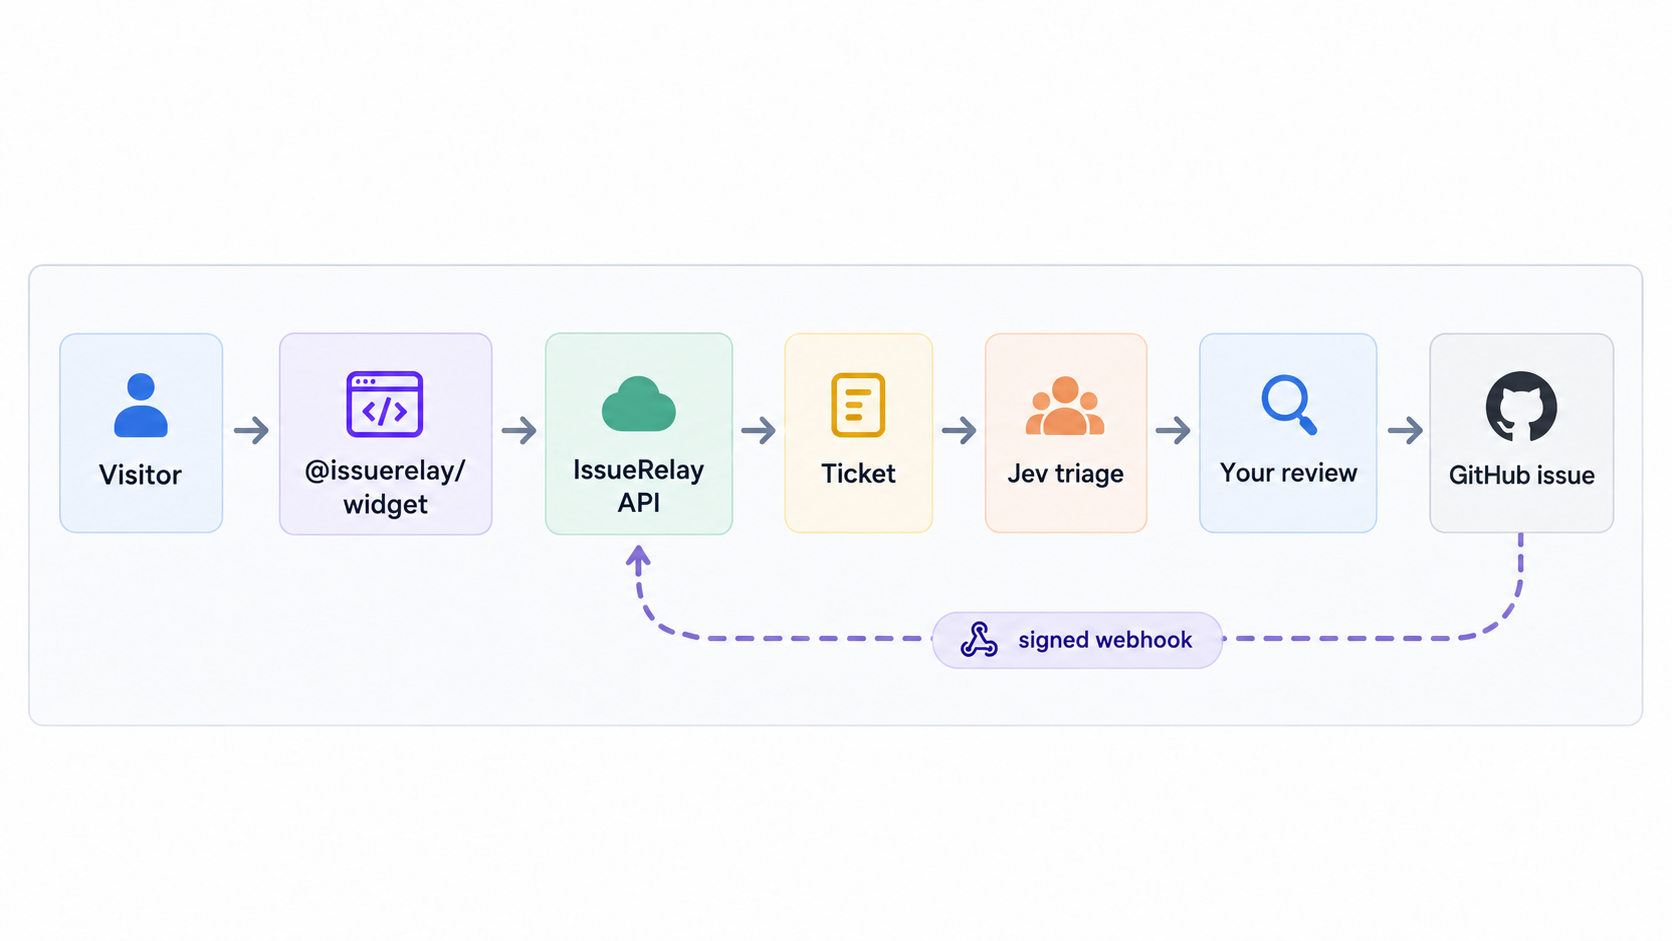
A visitor opens the widget on your site and picks a topic:
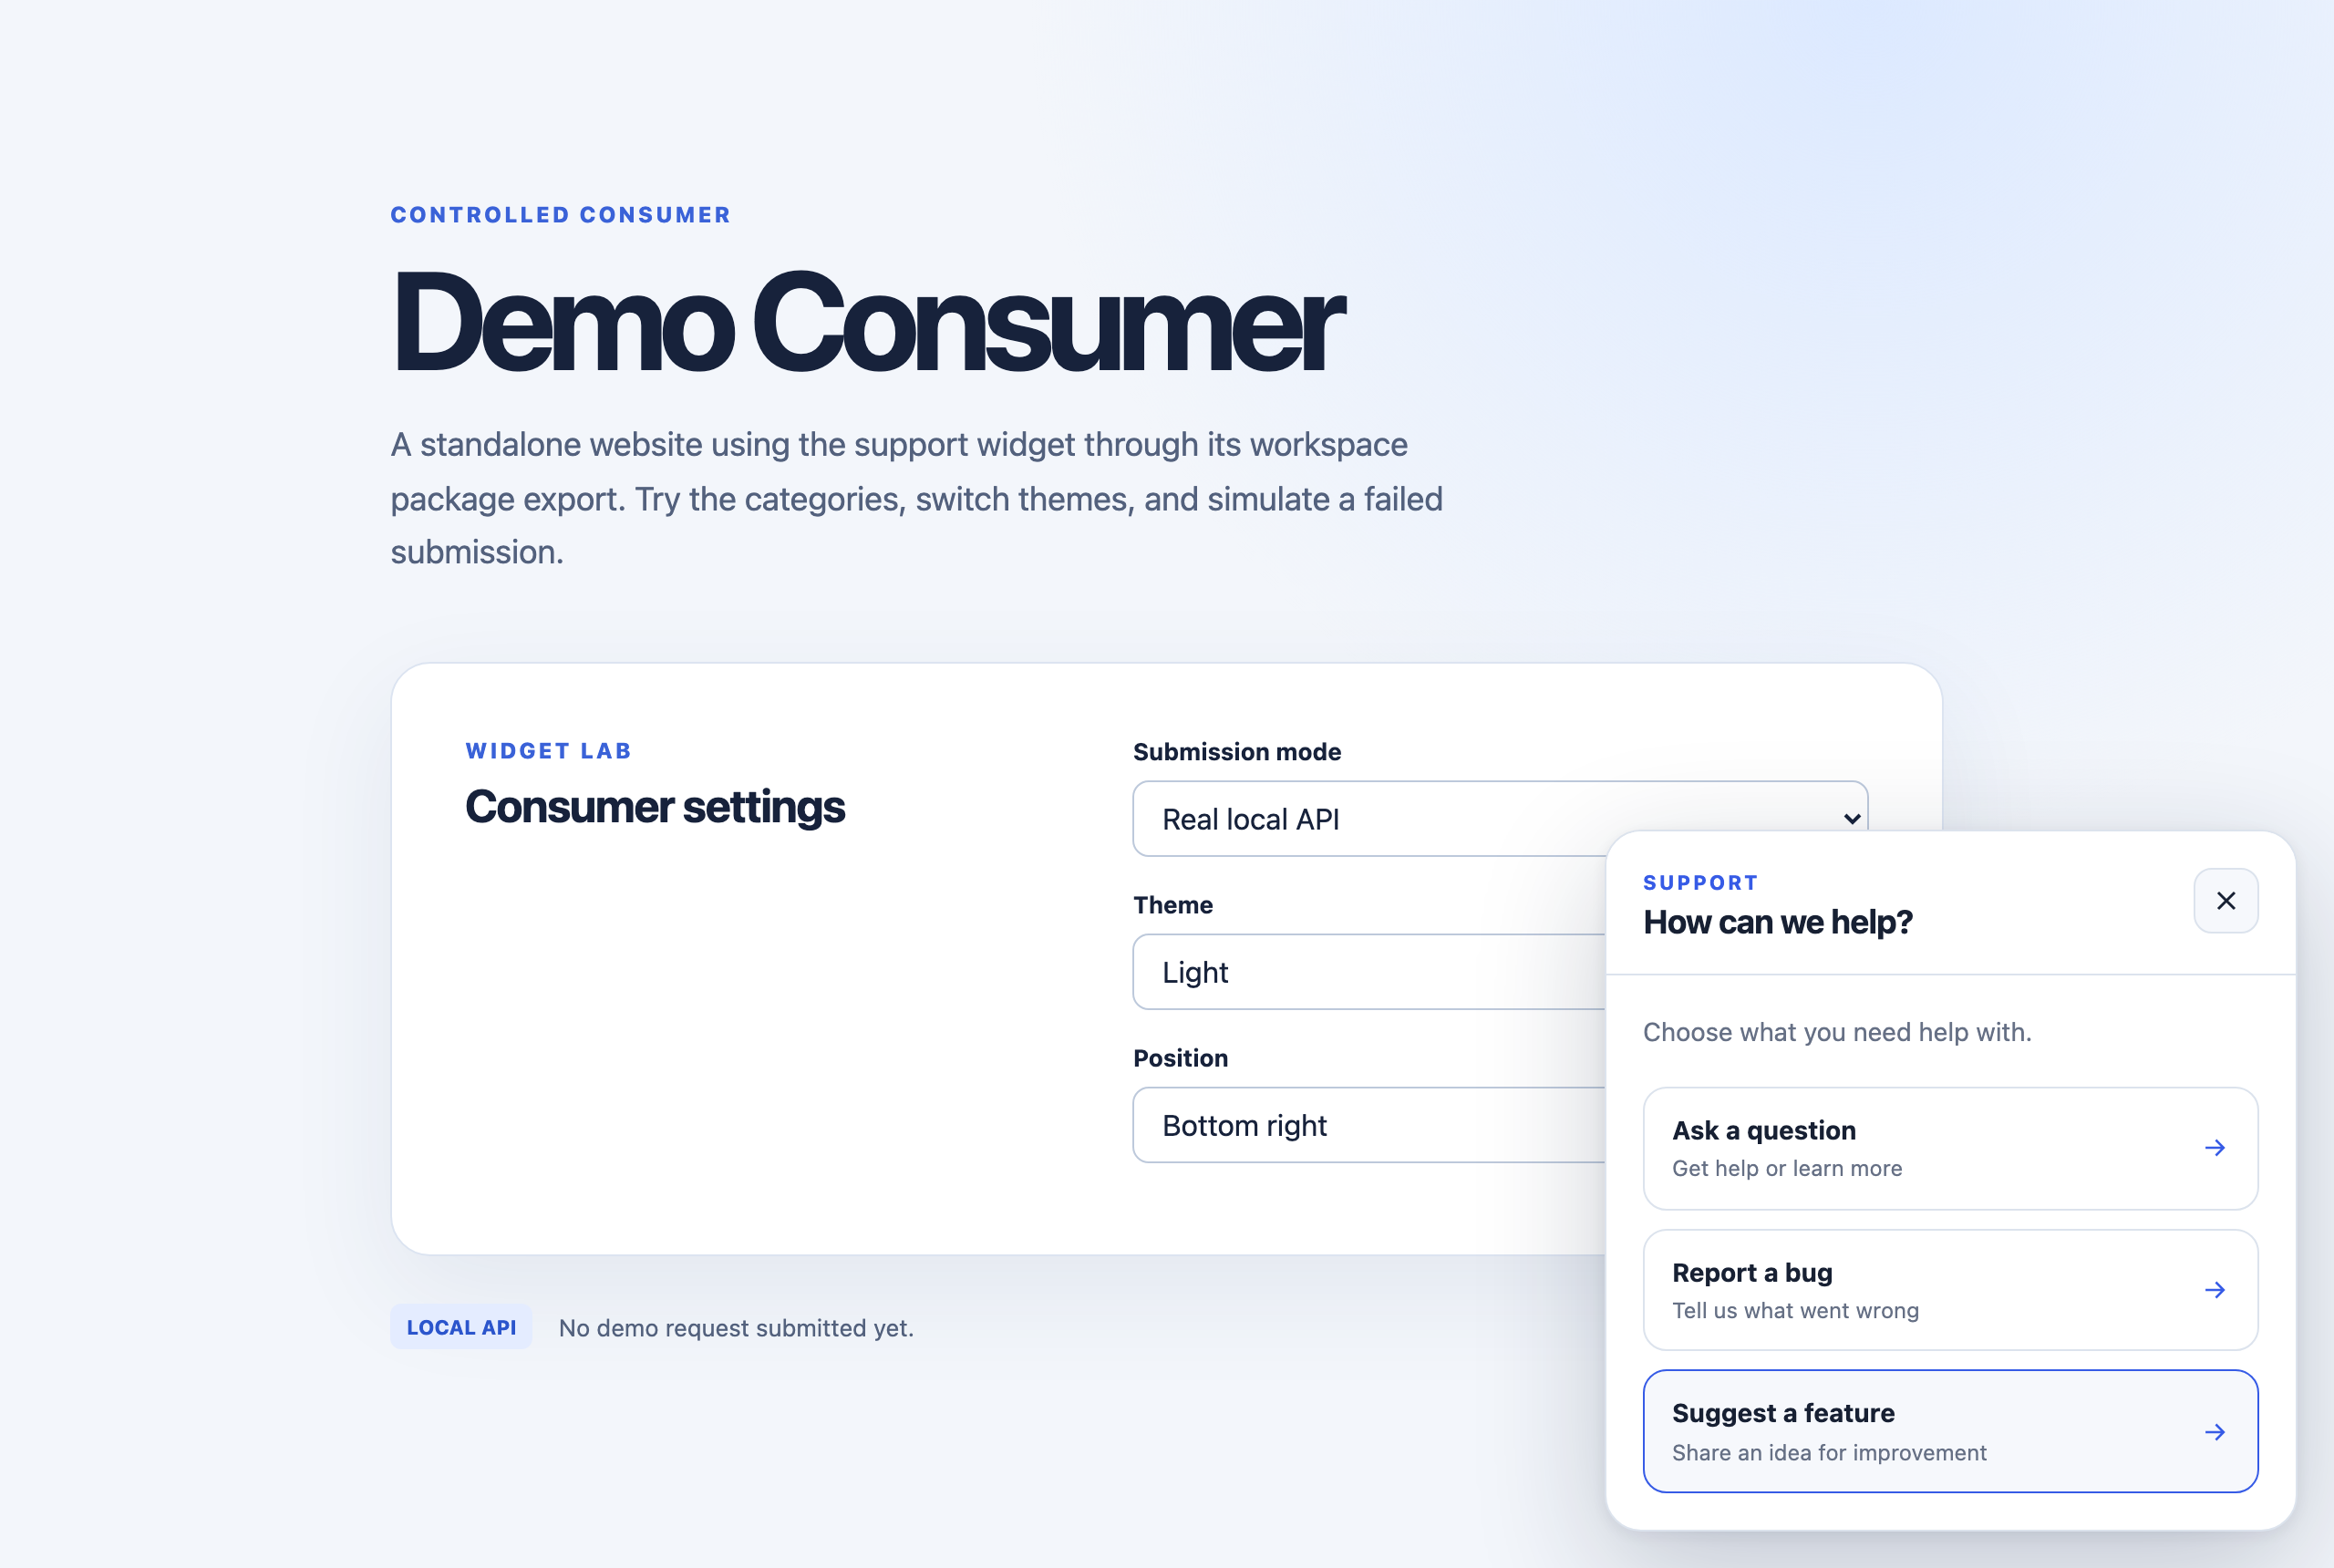
They describe the problem and can optionally leave a name and email so you can follow up:
The widget sends the report to your IssueRelay platform, which saves it and replies with a support reference the visitor can quote later:
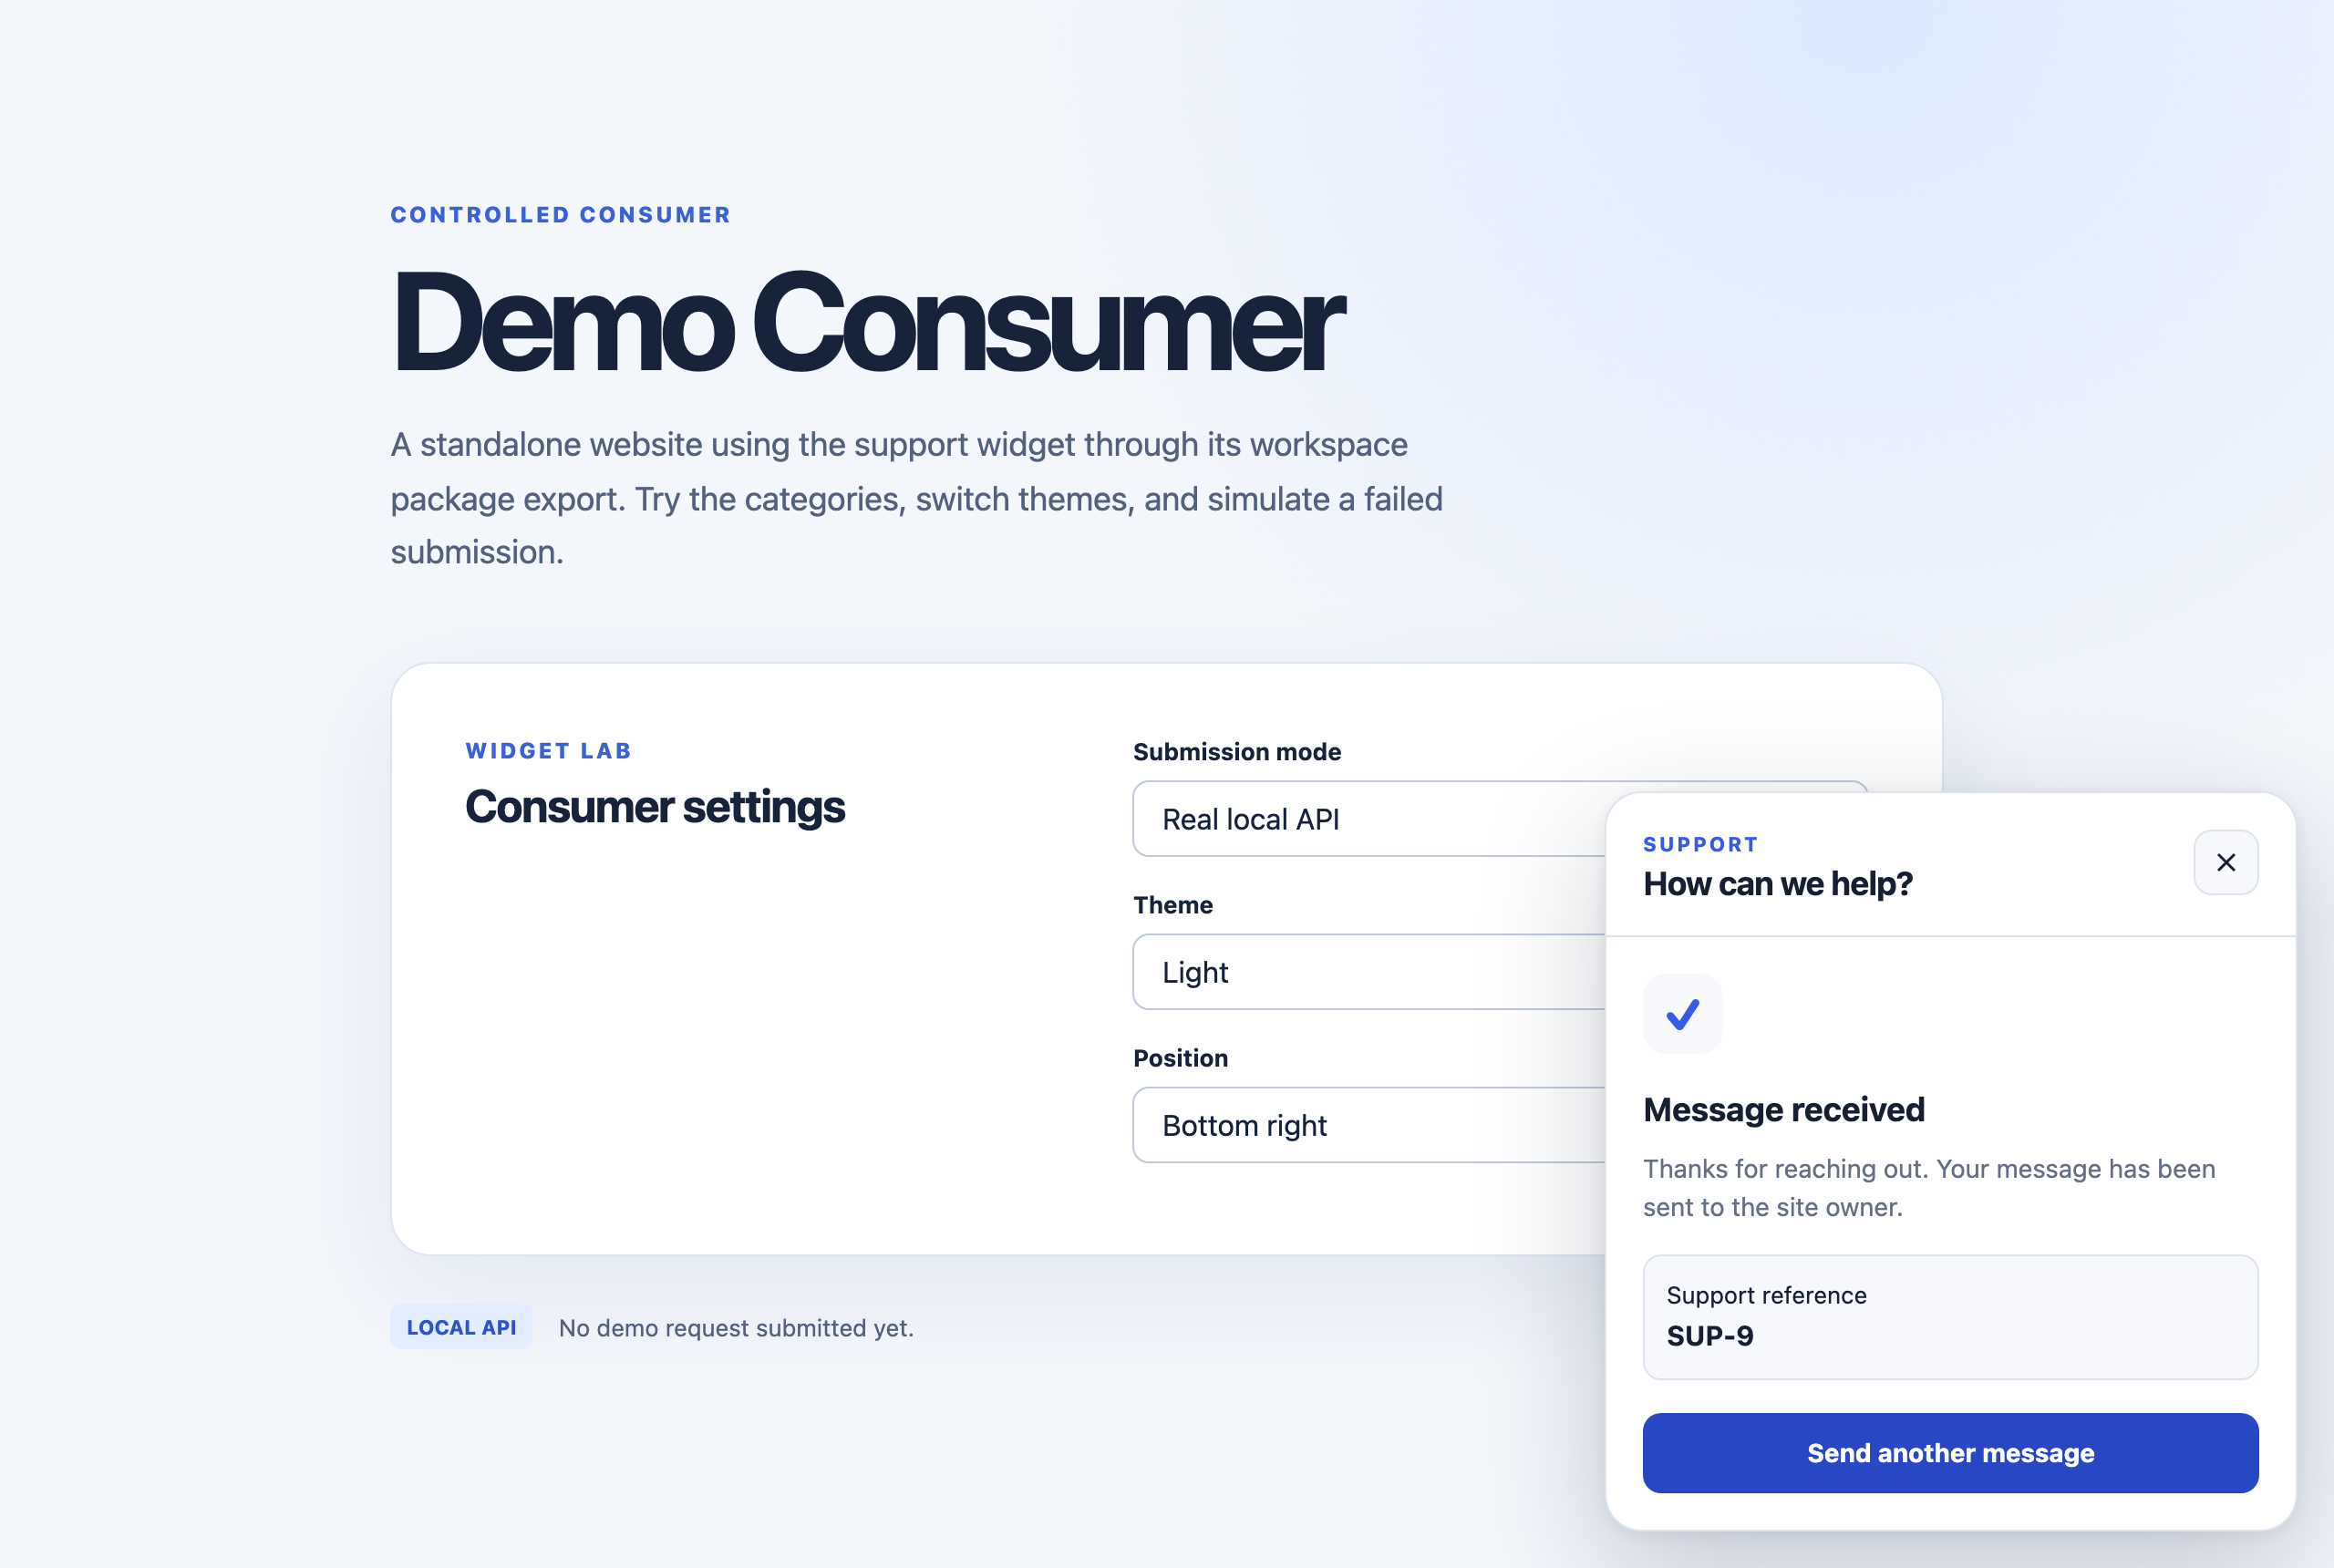
From there, the report becomes a ticket in your dashboard. Jev classifies it, you review it, and if it is a real bug, one click creates a GitHub issue in your repository.
Here's the full feature list:
An embeddable widget: Built as a React component inside a Shadow DOM, so it needs no CSS setup and never clashes with your site's styles. It works in the Next.js App Router and under a strict Content Security Policy.
Durable intake: Every report is stored in PostgreSQL before anything else runs, with protection against duplicates, per project rate limits, and a list of allowed site addresses.
Bounded AI triage: Jev recommends a type and severity from the message alone.
A private dashboard: With filters, classification history, and human review decisions that are stored separately from the AI's output.
Careful GitHub escalation: Issues are created by a GitHub App only after an owner confirms a preview, and contact details never leave IssueRelay.
Two way sync: Closing or reopening the issue on GitHub updates the ticket through signed webhooks.
Self hosting: A Deploy button, a first run setup page, and a settings page make it possible to run your own copy without touching the database.
What Is Jev?
Jev is a model from TypeSafe that's built for what TypeSafe calls "System One" tasks: quick, bounded judgments as opposed to long, open ended writing.
Instead of asking a model to write a paragraph and then trying to parse it, you give Jev some state and a set of questions, and each question has a fixed list of possible answers. Jev picks an answer for each question and returns the probability it assigned to every option.
That shape is exactly what support triage needs. A ticket is a bug, a question, a feature request, a billing problem, or spam. It's low, medium, high, or critical. There's no text for the model to invent, no prompt injection that can make it write an issue title, and no free text to clean up afterwards. The output is a label and a number, and your code can check both.
It's also cheap and fast. At the time of writing, TypeSafe lists Jev at $42 per billion input tokens, and a support message is a few dozen tokens. The IssueRelay integration sends Jev only the visitor's message and the topic they picked. It never sends names, email addresses, ticket IDs, or anything else that identifies a person.
The Tech Stack
IssueRelay is built with a modern TypeScript stack, and it's the same stack I use for my own projects. If you've read my other articles, a lot of it will look familiar:
Next.js 16 (App Router) and React 19 for the platform and the dashboard
Strict TypeScript everywhere, with Zod checking every input that crosses a trust boundary: public API requests, environment variables, AI output, and GitHub webhook payloads
PostgreSQL with Drizzle ORM and reviewed SQL migrations
Better Auth for dashboard accounts
The official TypeSafe SDK for Jev, and Octokit for the GitHub App
Vitest, React Testing Library, and Playwright for tests, and Biome for linting and formatting
pnpm workspaces to hold everything in one monorepo
Vercel, Neon, and Resend in production
The monorepo is split into small packages, each with a strict job:
| Package | Responsibility |
|---|---|
apps/web |
The platform: the public ticket API, the dashboard, setup, and the GitHub webhook |
packages/widget |
The browser widget published to npm. It never imports server code. |
packages/support-contracts |
The request and response shapes shared by the widget and the API |
packages/db |
The Drizzle schema, migrations, and every database query |
packages/ai |
The Jev adapter, the triage service, and the routing policy |
packages/github |
The GitHub App client, issue drafts, the privacy gate, and webhook handling |
packages/auth |
Better Auth setup, sessions, and workspace membership checks |
The boundaries matter more than they might look like they do. React components never talk to GitHub, Jev, or the database directly. Browser code never contains a secret. The AI package can't import the database.
Keeping those lines strict made the system much easier to test and to reason about, and it's the reason the widget can be published to npm without dragging any server code along with it.
How a Report Travels Through the System
Let's follow one report from the visitor's browser all the way to a closed GitHub issue.
Step 1: The Widget
The widget is a normal React component that you install from npm:
npm install @issuerelay/widget
Then you render it once, for example from a client component in your root layout:
"use client";

import {
  HttpSupportSubmissionClient,
  SupportWidget,
} from "@issuerelay/widget";

const submissionClient = new HttpSupportSubmissionClient({
  apiBaseUrl: "https://your-issuerelay.vercel.app",
});

export function Support() {
  return (
    <SupportWidget
      projectKey="pk_your_project_key"
      submissionClient={submissionClient}
      theme="system"
      position="bottom-right"
    />
  );
}
HttpSupportSubmissionClient is the part that talks to your platform. It posts each report to your IssueRelay API without cookies or credentials, and it gives every report a submission ID so that a retry after a network error doesn't create a second ticket.
SupportWidget is the button and panel your visitors see. The projectKey tells the platform which project the report belongs to. It's public identification, not a password, so it's safe to put in your site's code. The real protection is on the server, which only accepts reports from the site addresses you list for that project.
The "use client" line is there because the submission client is created in the browser. In the Next.js App Router, you wrap the widget in your own small client component like this and render that component from your layout.
Under the hood, the widget renders inside a Shadow DOM with its own bundled styles, so your site doesn't need Tailwind or a CSS import, and your styles can't accidentally restyle it.
You don't have to write this code by hand, either. IssueRelay's project settings page shows this exact snippet with your platform address and project key already filled in.
Step 2: Save First, Think Later
When the report reaches the API, the first thing IssueRelay does is save it. Not classify it, not send it anywhere, just store it in PostgreSQL inside a transaction.
This is the most important design decision in the whole system. AI providers have outages. GitHub has outages. If the platform called Jev before saving the report and Jev timed out, the visitor's message would be lost, and they would never know.
So the rule is simple: a report is accepted only after it's safely stored, and a failure in any later step can never erase it. If Jev is down, the ticket waits in the dashboard until you run triage again.
Before saving, the API checks a few things:
The request body matches the shared Zod contract, so bad input is rejected with a clear error.
The project key exists, and the request's origin is one of the project's allowed site addresses.
The project is under its rate limit.
The submission ID hasn't been used before. A repeated submission returns the original ticket reference instead of creating a duplicate.
Step 3: Triage with Jev
Once a ticket is stored, the triage service asks Jev to classify it. Here's the heart of the Jev adapter, from packages/ai/src/jev-classifier.ts (trimmed a little for space):
const response = await this.client.systemOne({
  state: {
    message: input.message,
    category_hint: input.categoryHint ?? null,
  },
  questions: {
    ticket_type: choice(
      "What kind of support ticket is this? The visitor-selected category hint is a weak signal, not ground truth: judge from the message content.",
      {
        question: "The visitor asks how something works or what something is.",
        bug: "Something is broken, errors, or behaves incorrectly.",
        feature_request: "The visitor requests new functionality or an improvement.",
        spam: "Unsolicited advertising, scams, or irrelevant bulk content.",
        // ...account, billing, feedback, and other
      },
    ),
    severity: choice("How urgent is this ticket?", {
      low: "Minor inconvenience, cosmetic issue, or general question.",
      medium: "Broken functionality with a workaround, or a routine request.",
      high: "Major functionality unavailable, no workaround, time-sensitive.",
      critical: "Security breach, data loss, privacy exposure, or billing harm.",
    }),
  },
});
systemOne is the TypeSafe SDK call for bounded questions. The state object is everything Jev is allowed to see: the message and the topic the visitor picked.
Notice what's missing. There's no name, no email, and no ticket ID, because none of them help with classification and all of them would be private data leaving your platform.
Each choice defines one question and its possible answers. The descriptions next to each label tell Jev what the label means. The ticket type question also tells Jev to treat the visitor's chosen topic as a weak hint, because people often pick "Report a bug" for a question, or "Ask a question" for something that's clearly broken.
What comes back isn't trusted automatically. The adapter validates the response with a Zod schema, checks that both answers are labels from the allowed lists, and uses the probability Jev gave to the chosen type label as the confidence score.
If that probability is missing or outside the range 0 to 1, the result is rejected, and the ticket stays in review instead of getting a made up number.
Step 4: Code Makes the Decisions
Jev recommends a type and a severity. It doesn't decide where a ticket goes or whether it becomes a GitHub issue. That job belongs to plain functions in packages/ai/src/policy.ts:
export function routeForType(type: TicketType): TicketRoute {
  switch (type) {
    case "bug":
      return "engineering";
    case "feature_request":
      return "product";
    case "spam":
      return "ignore";
    default:
      return "support";
  }
}

export function evaluateGitHubEscalation(input: {
  type: TicketType;
  route: TicketRoute;
  confidence: number;
}): EscalationEvaluation {
  const reasons: string[] = [];
  if (input.type !== "bug") reasons.push(`type is ${input.type}, not bug`);
  if (input.route !== "engineering") reasons.push(`route is ${input.route}, not engineering`);
  if (!(input.confidence >= GITHUB_ESCALATION_CONFIDENCE_THRESHOLD)) {
    reasons.push(`confidence ${input.confidence} is below ${GITHUB_ESCALATION_CONFIDENCE_THRESHOLD}`);
  }
  return { eligible: reasons.length === 0, reasons };
}
routeForType maps each ticket type to a queue. Bugs go to engineering, feature requests go to product, spam is quarantined, and everything else goes to support. Because this is a normal switch statement, you can read it, test it, and change it without touching the AI.
evaluateGitHubEscalation decides whether a ticket is even allowed to become a GitHub issue. It must be a bug, it must be in the engineering queue, and its confidence must be at least 0.9. Instead of returning a bare true or false, it collects the reasons a ticket failed, which the dashboard shows so you always know why the Create GitHub issue button is missing.
The 0.9 threshold lives in one configuration file with a comment that says it's an uncalibrated starting point, not a measured accuracy. I wanted that to be honest in the code: a model score of 0.99 doesn't mean the model is right 99 percent of the time.
Step 5: Human Review in the Dashboard
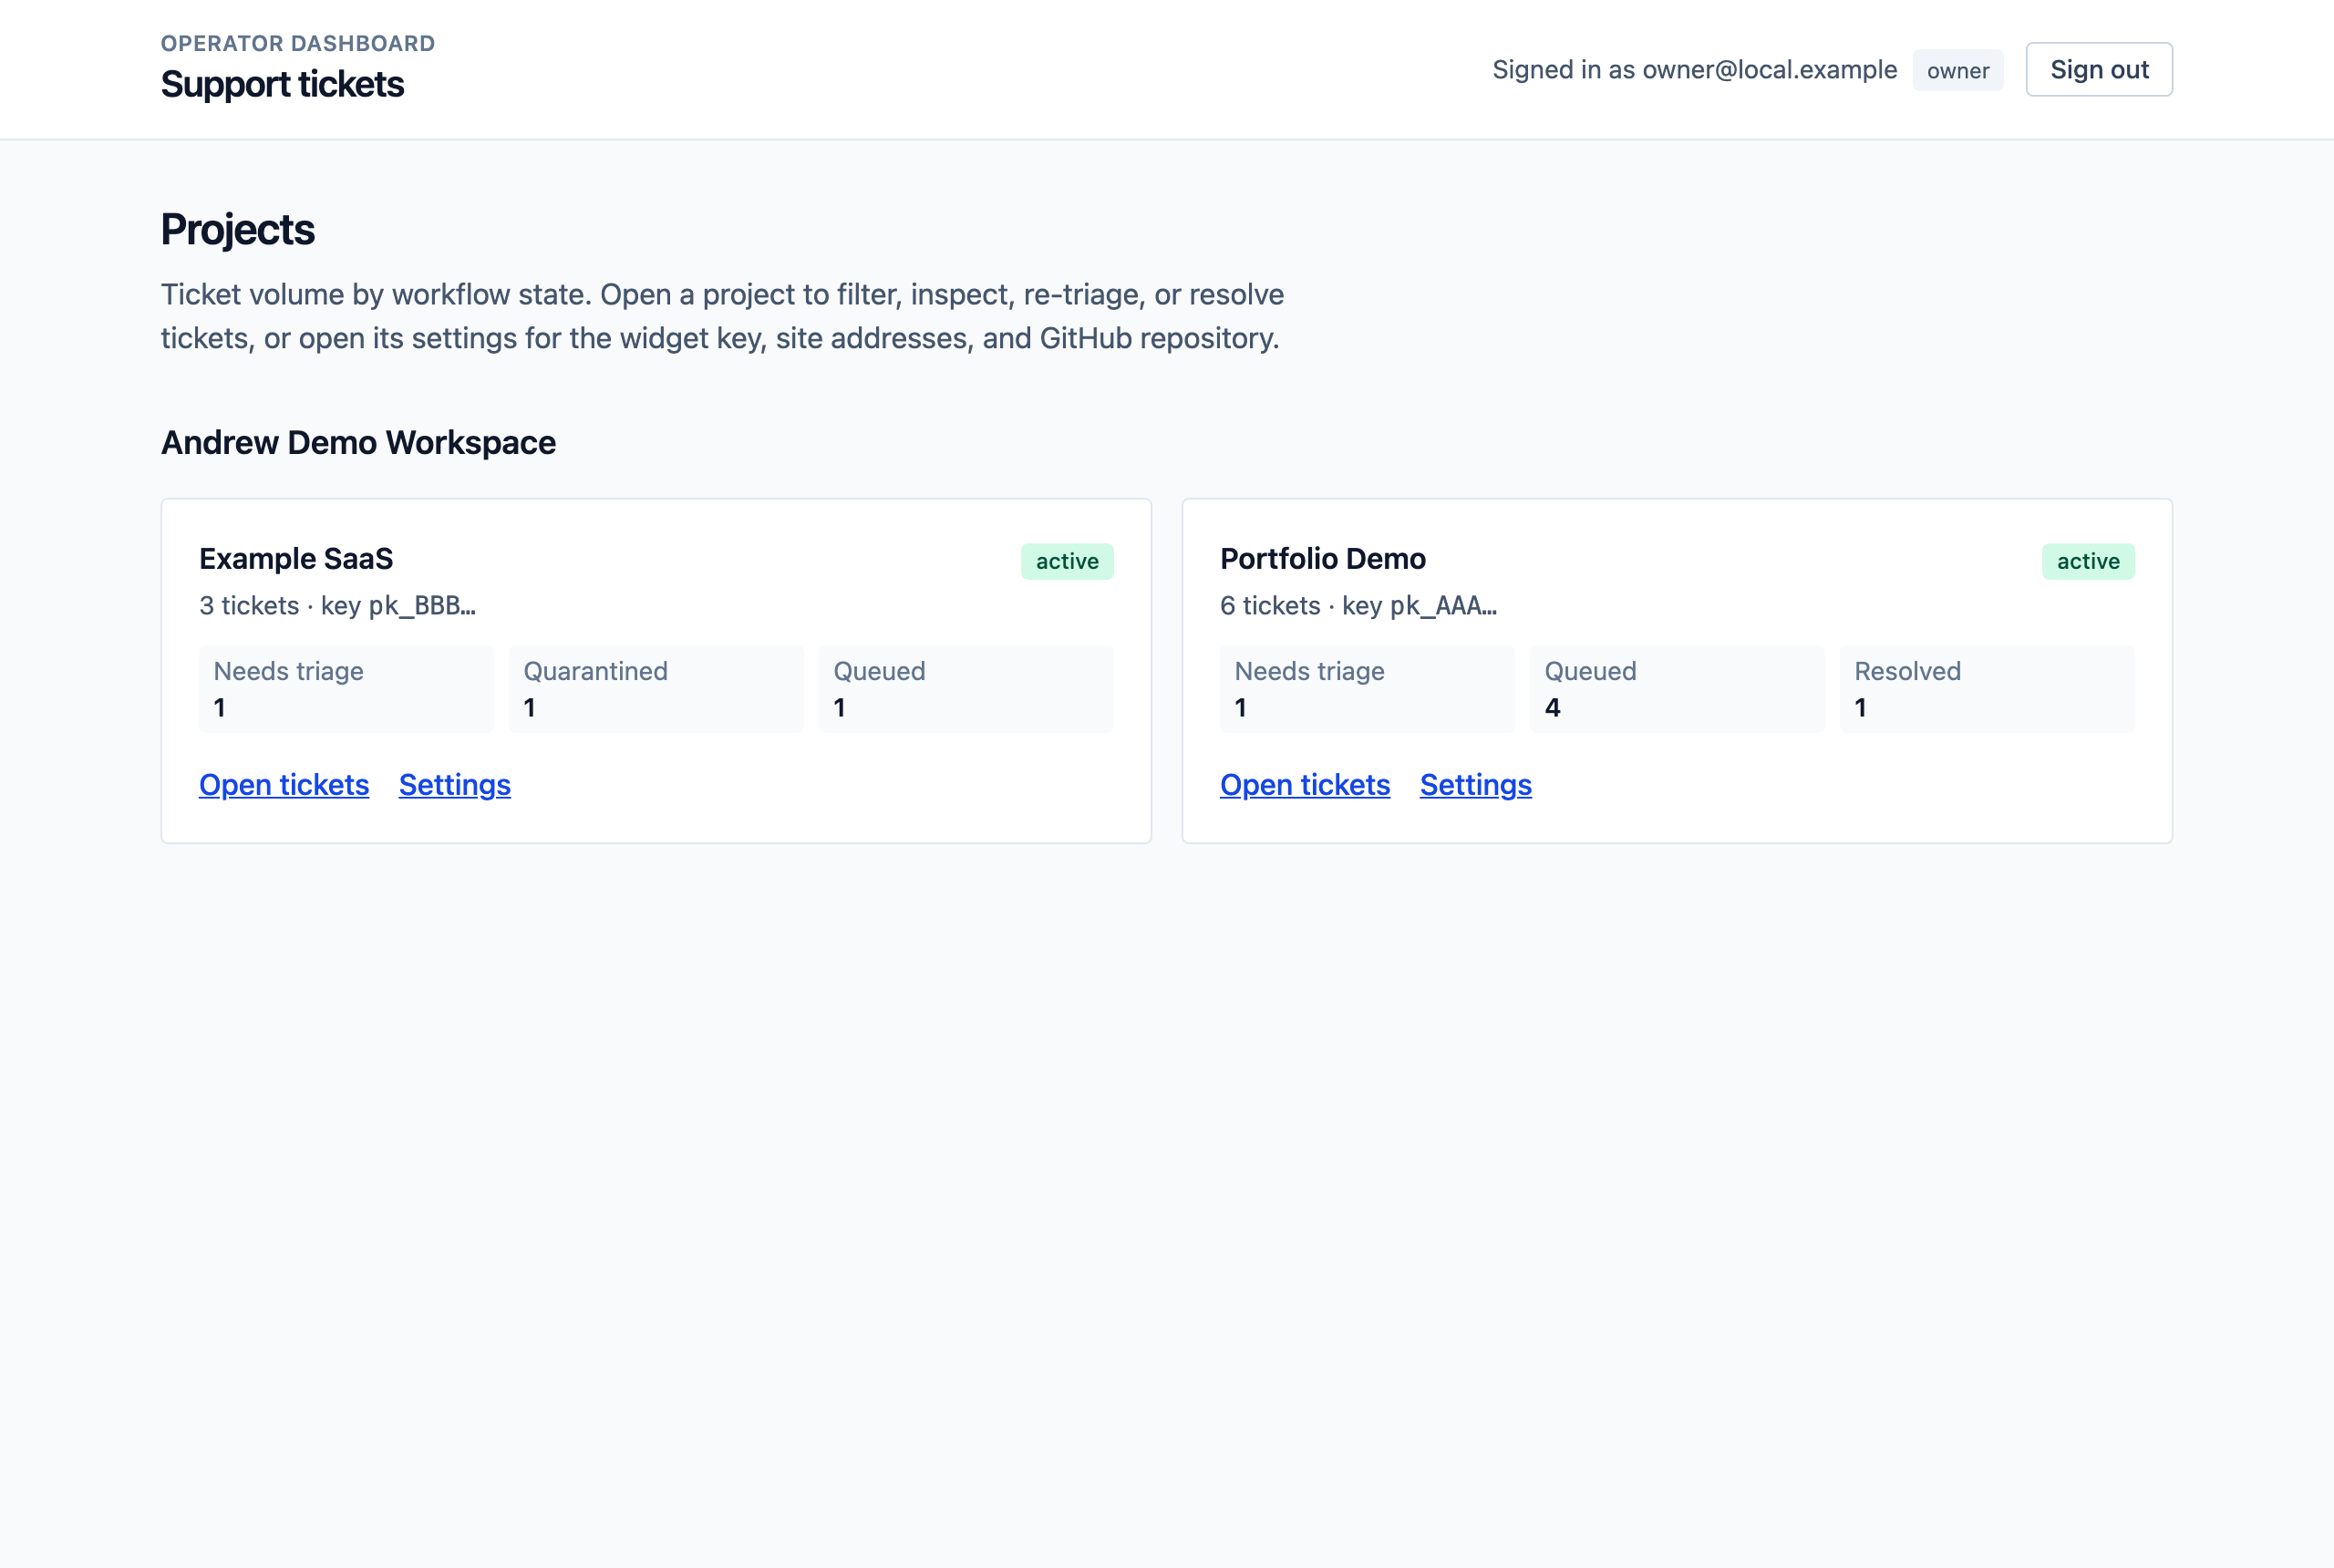
Every ticket lands in a private dashboard. The projects page shows how many tickets are in each state:
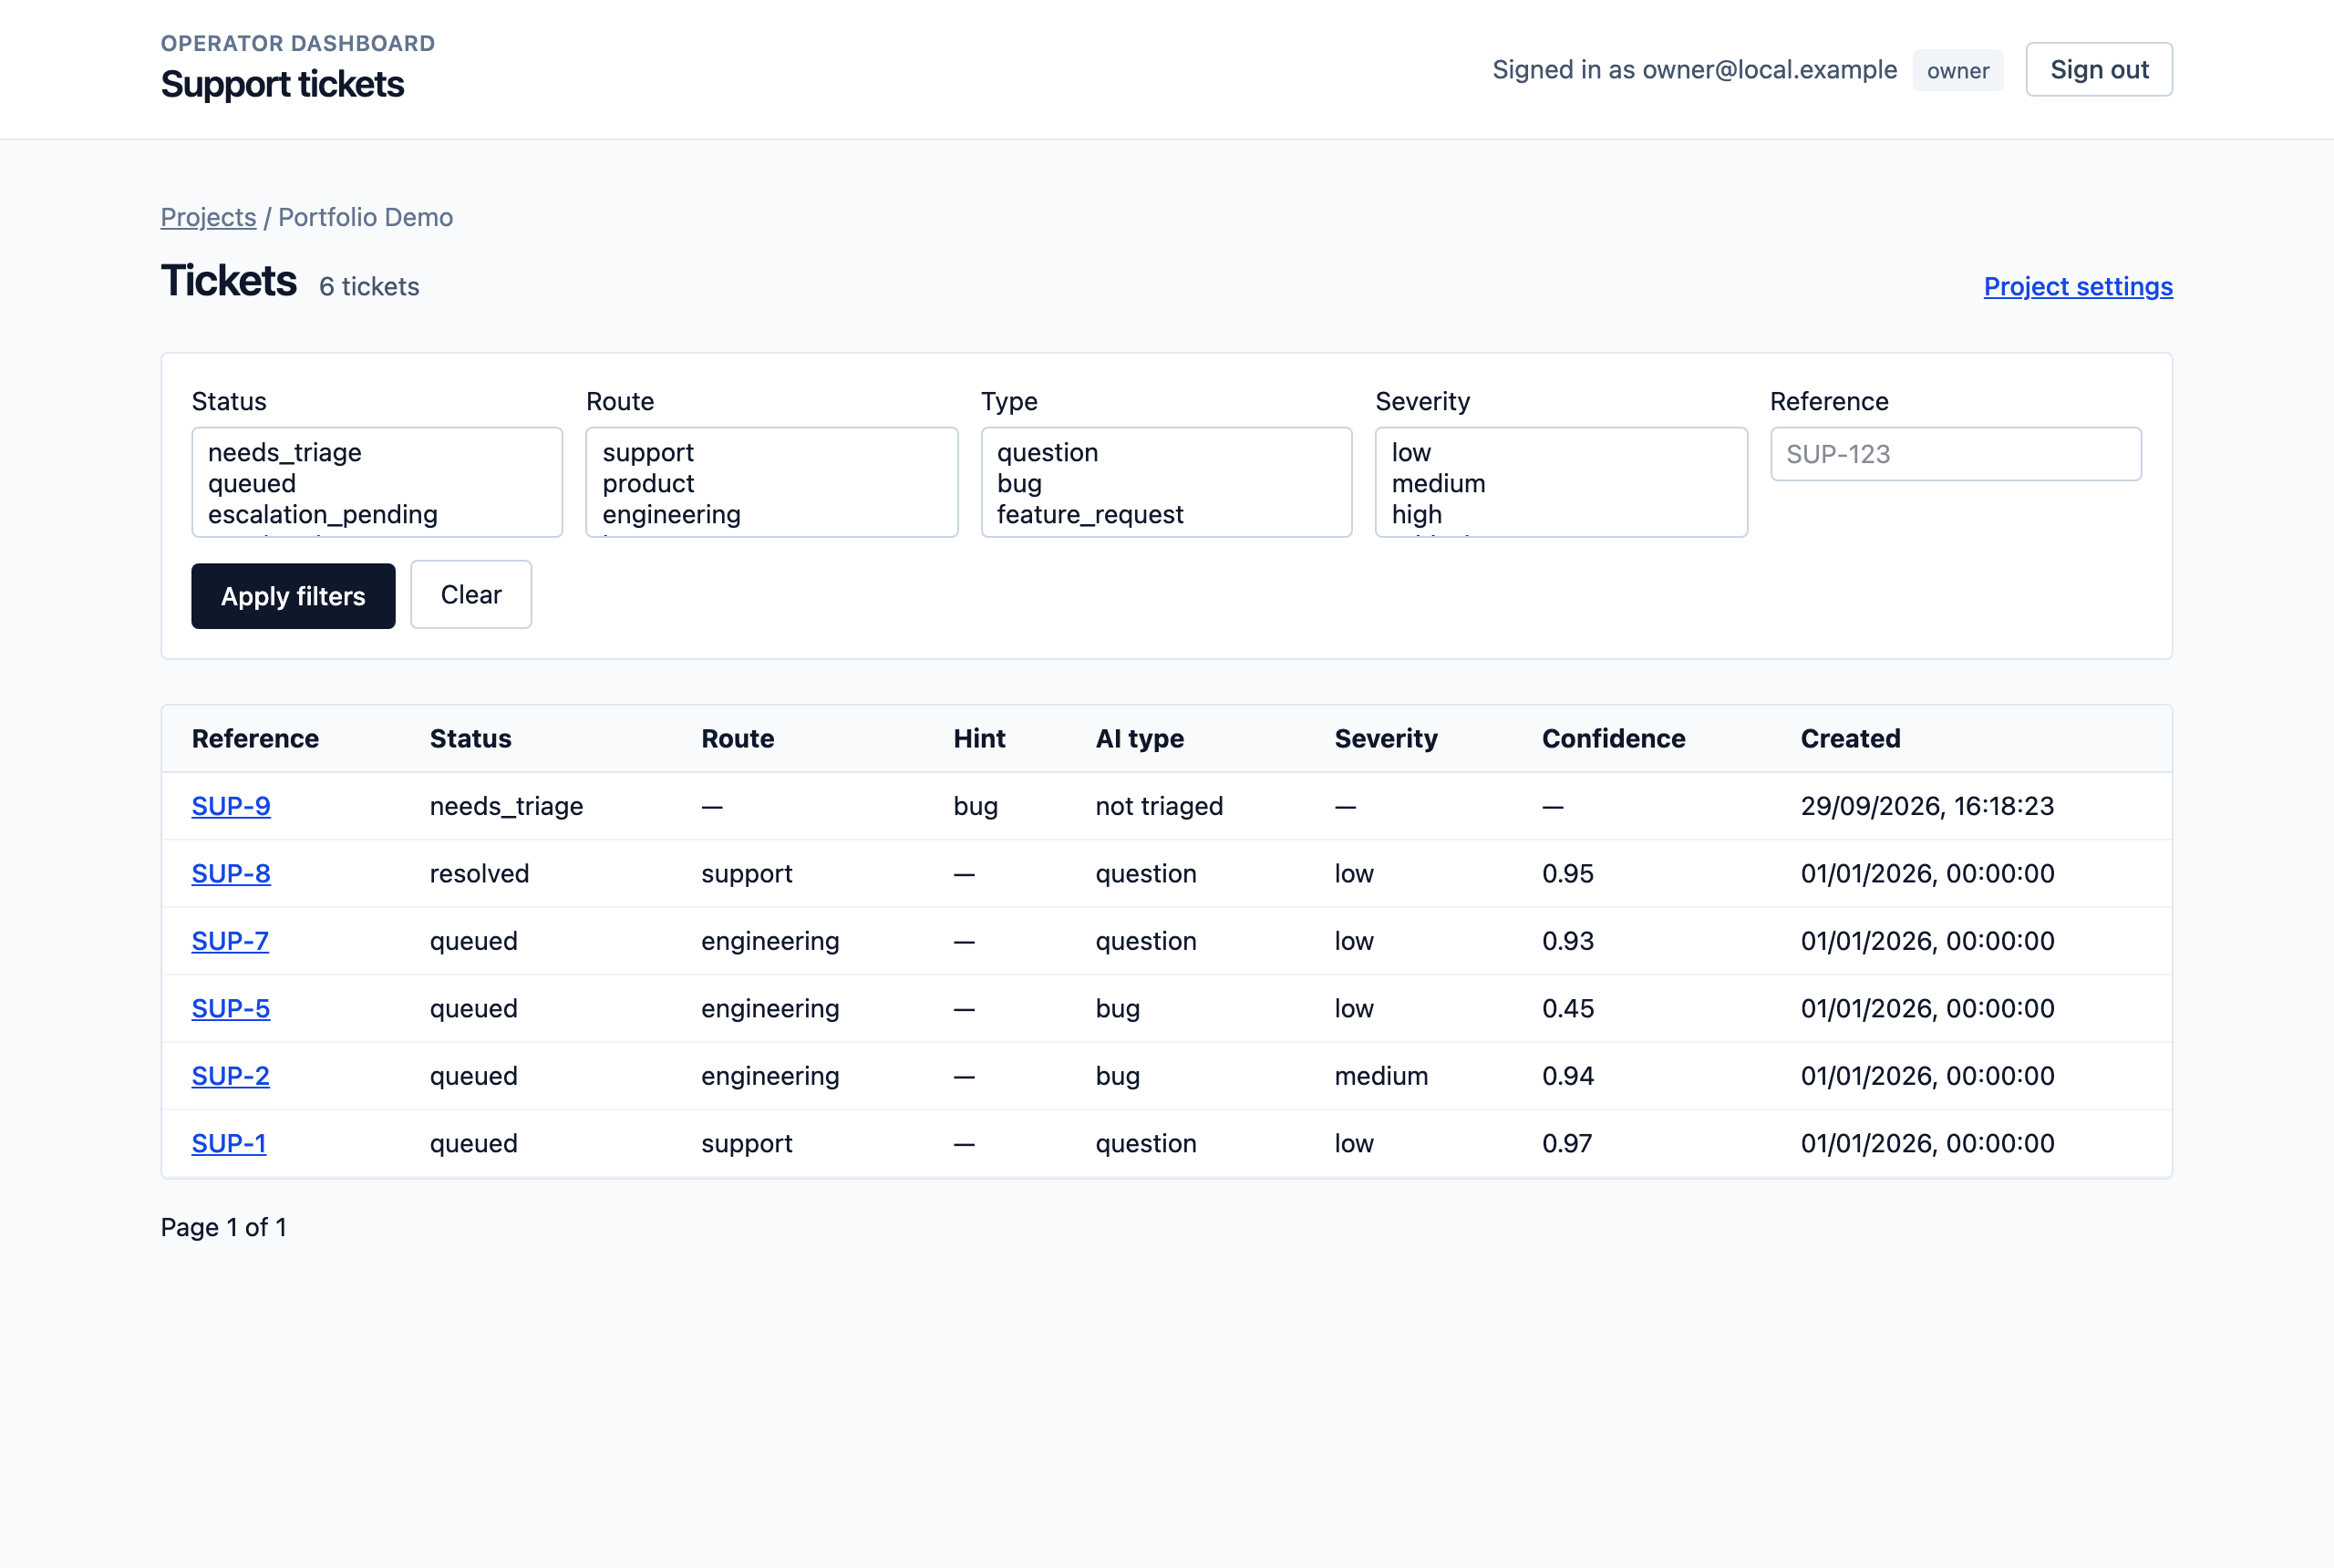
Each project has a ticket list with filters for status, route, type, severity, and reference:
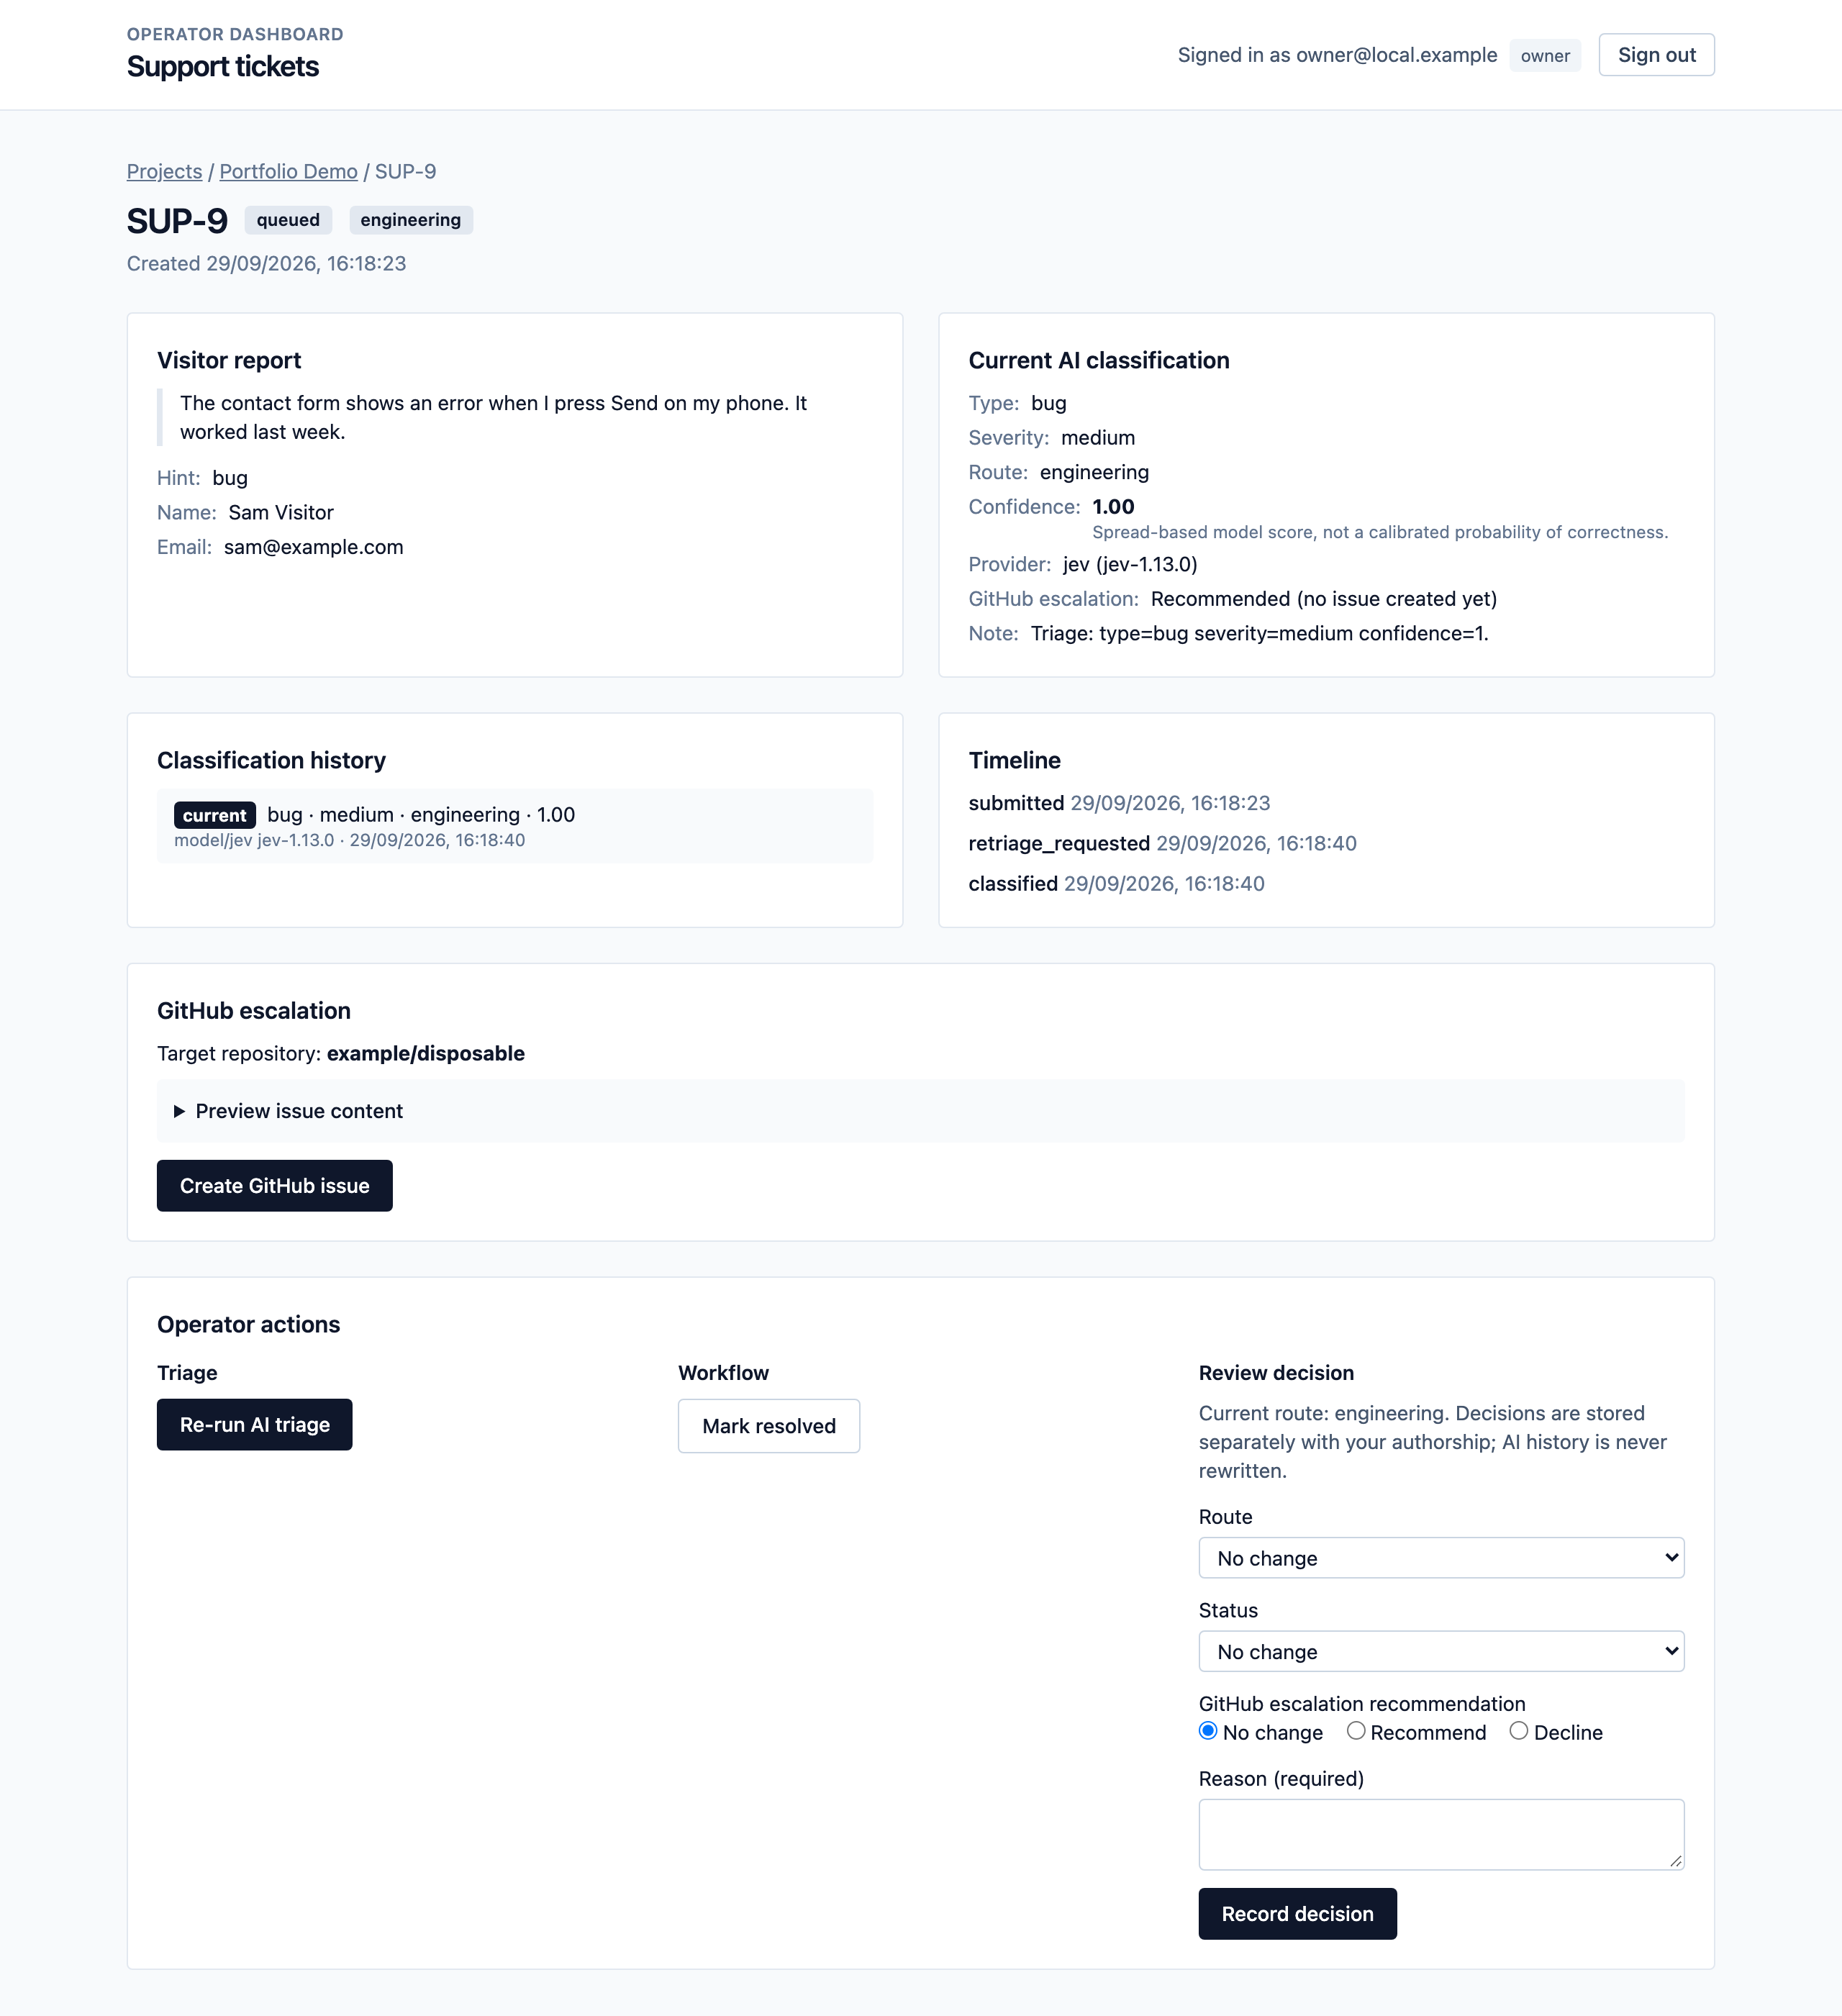
Opening a ticket shows the visitor's report, the current AI classification, the full classification history, and a timeline of everything that happened. You can run triage again, resolve the ticket, or record a review decision that changes the route, the status, or the GitHub recommendation.
One detail I care about: human decisions are stored in their own table, with the author and a required reason. The AI's history is never rewritten. If you override Jev, you can still see exactly what Jev said and when, which is important when you want to know how well the model is really doing.
The dashboard is protected by Better Auth, and every read and write is scoped to a workspace. Mutations require a same origin request, and only workspace owners can publish to GitHub.
Step 6: From Bug Report to GitHub Issue
When a ticket passes the policy, the dashboard shows a preview of the exact issue that will be created:
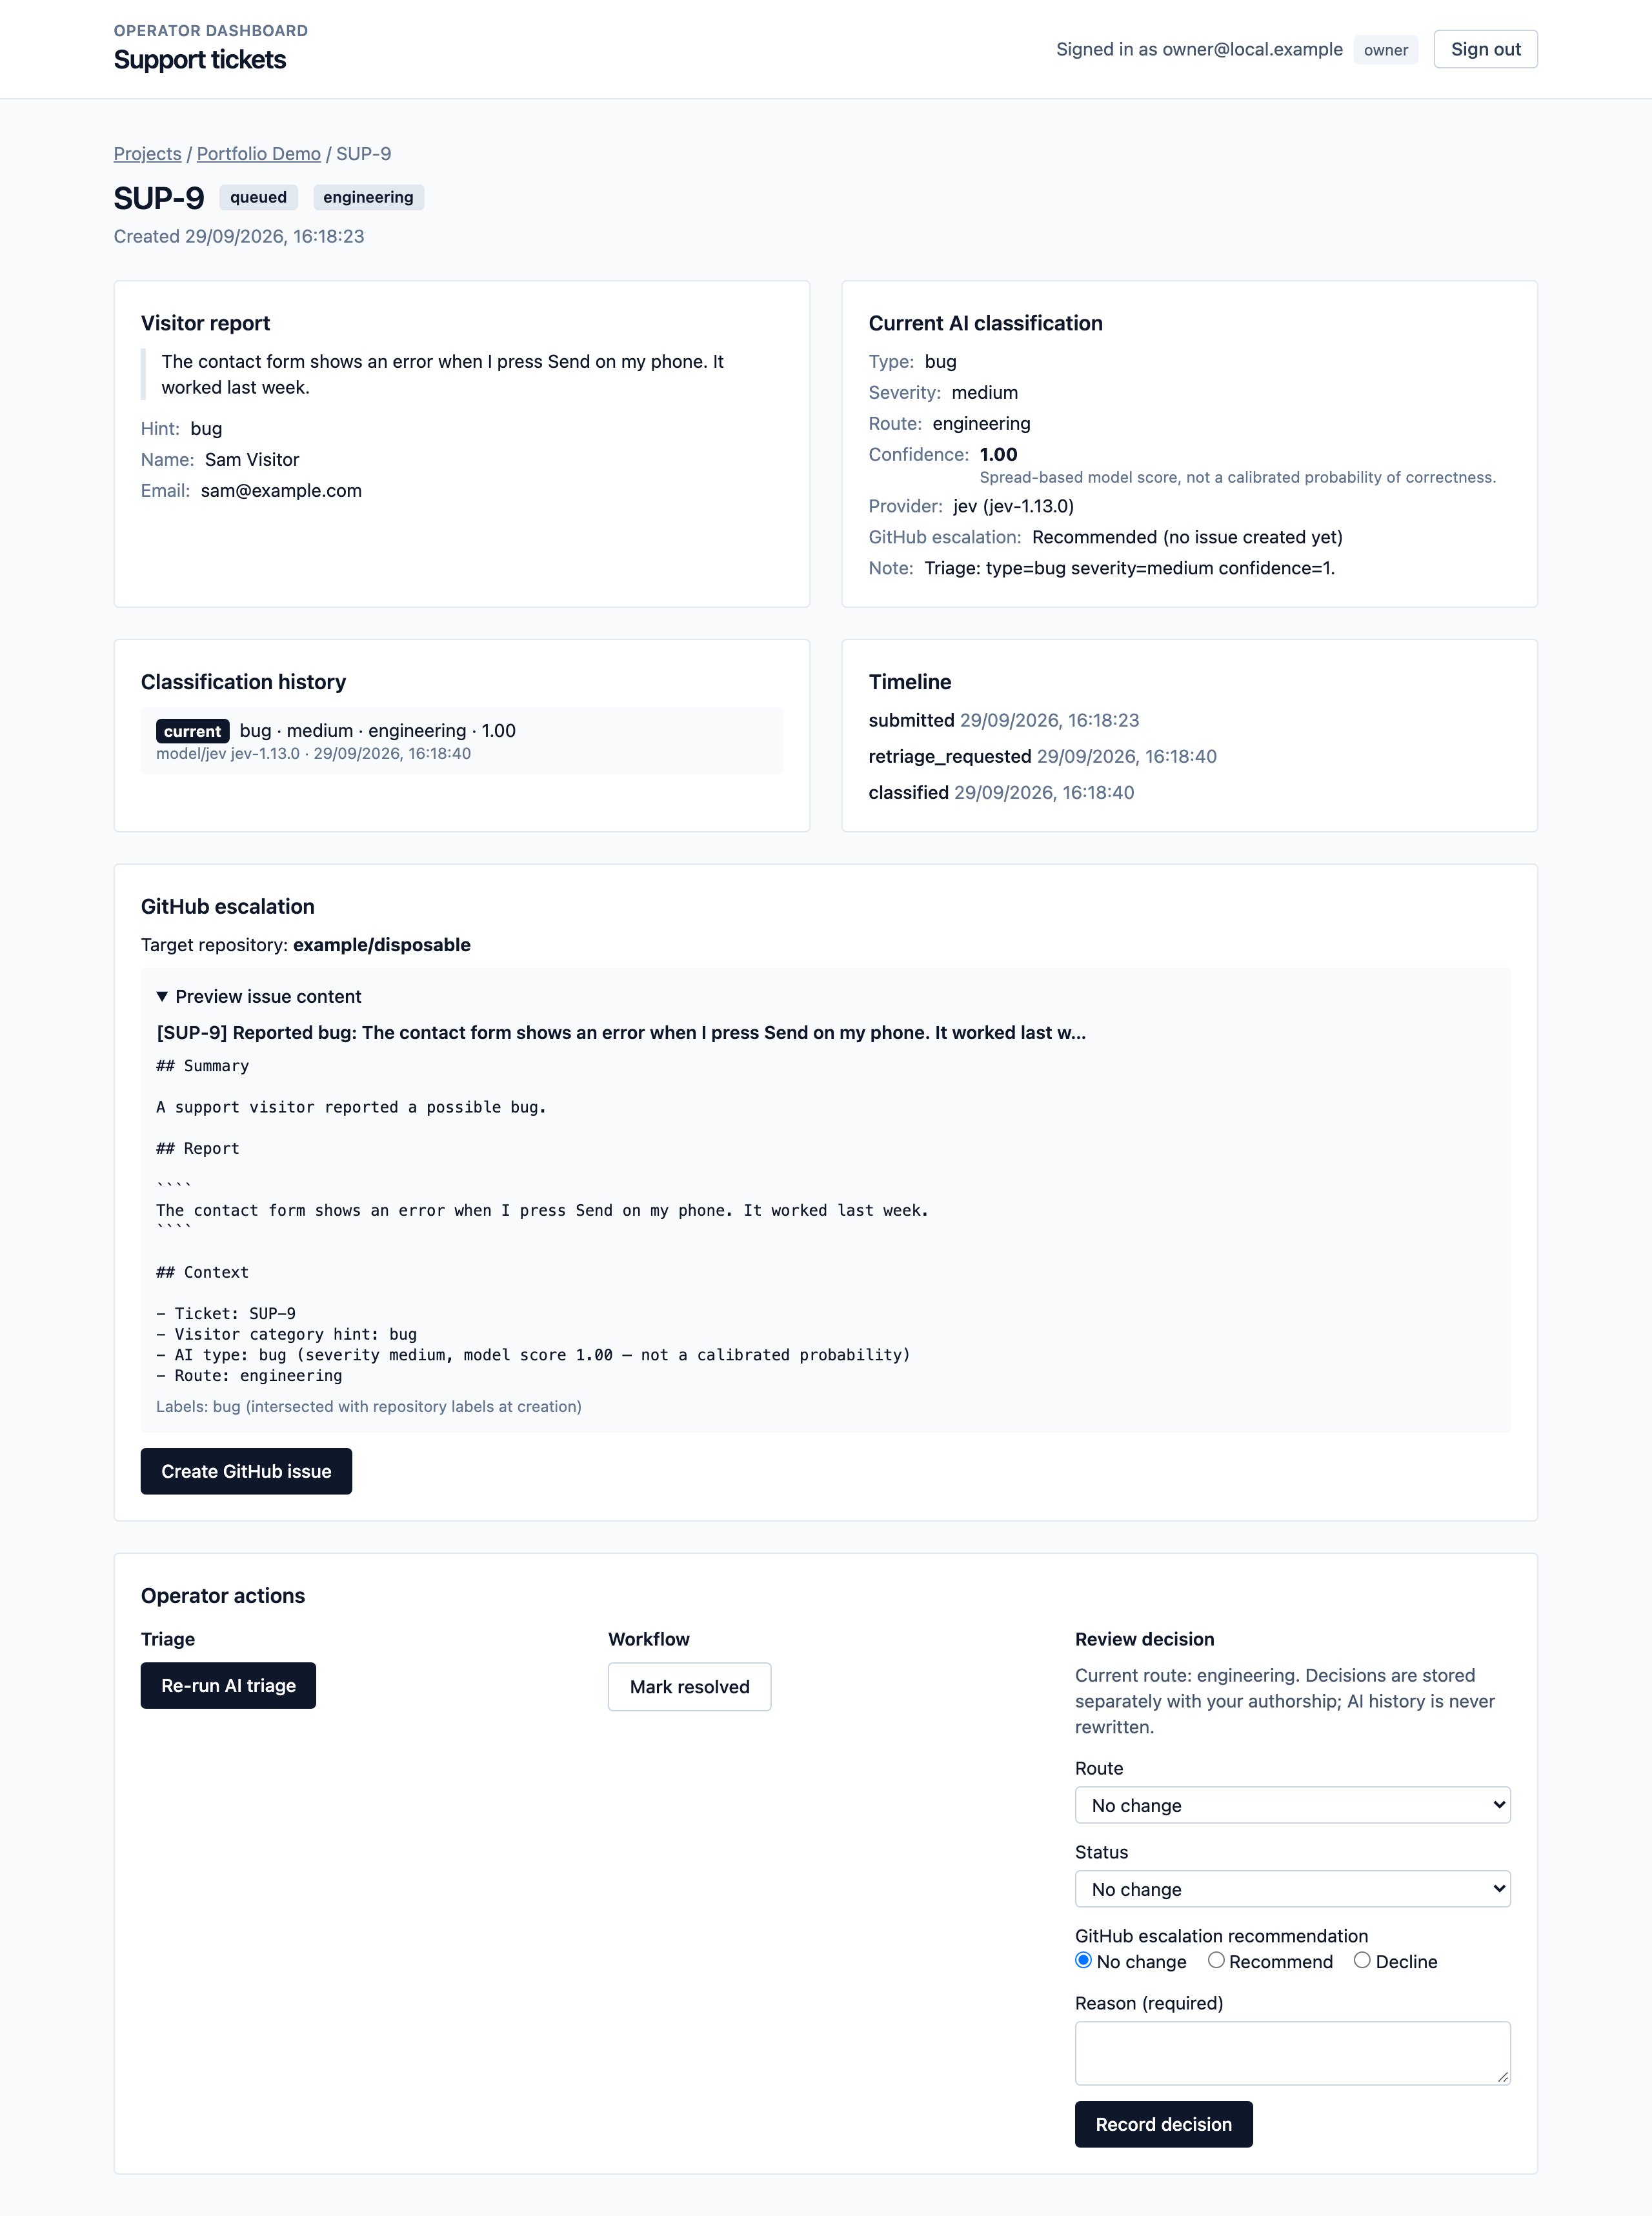
Look closely at that screenshot. The visitor left their name and email, and both are visible in the dashboard above, but neither appears anywhere in the issue preview.
That's not a coincidence. Before any issue is created, the report passes through a privacy gate in packages/github/src/privacy.ts that looks for email addresses, phone numbers, card numbers, private keys, API tokens, JSON web tokens, and password assignments. It also checks the report against the contact details the visitor submitted, so "Hi, Sam Visitor here" can't leak a name into a public issue. If anything is found, the preview is blocked and nothing is published.
When you click Create GitHub issue, a few more safeguards run:
A GitHub App, not a personal token: The App is installed only on the repositories you choose, with permission to write issues and read metadata, and nothing else.
Claim first, then create: The ticket is marked as
creatingin the database before GitHub is called, so two clicks can never create two issues.A hidden marker: Each issue body ends with an opaque HTML comment tied to the ticket. If a request times out and the result is unknown, IssueRelay searches the repository for that exact marker from its own App before it ever tries again. It never blindly retries an issue it might already have created.
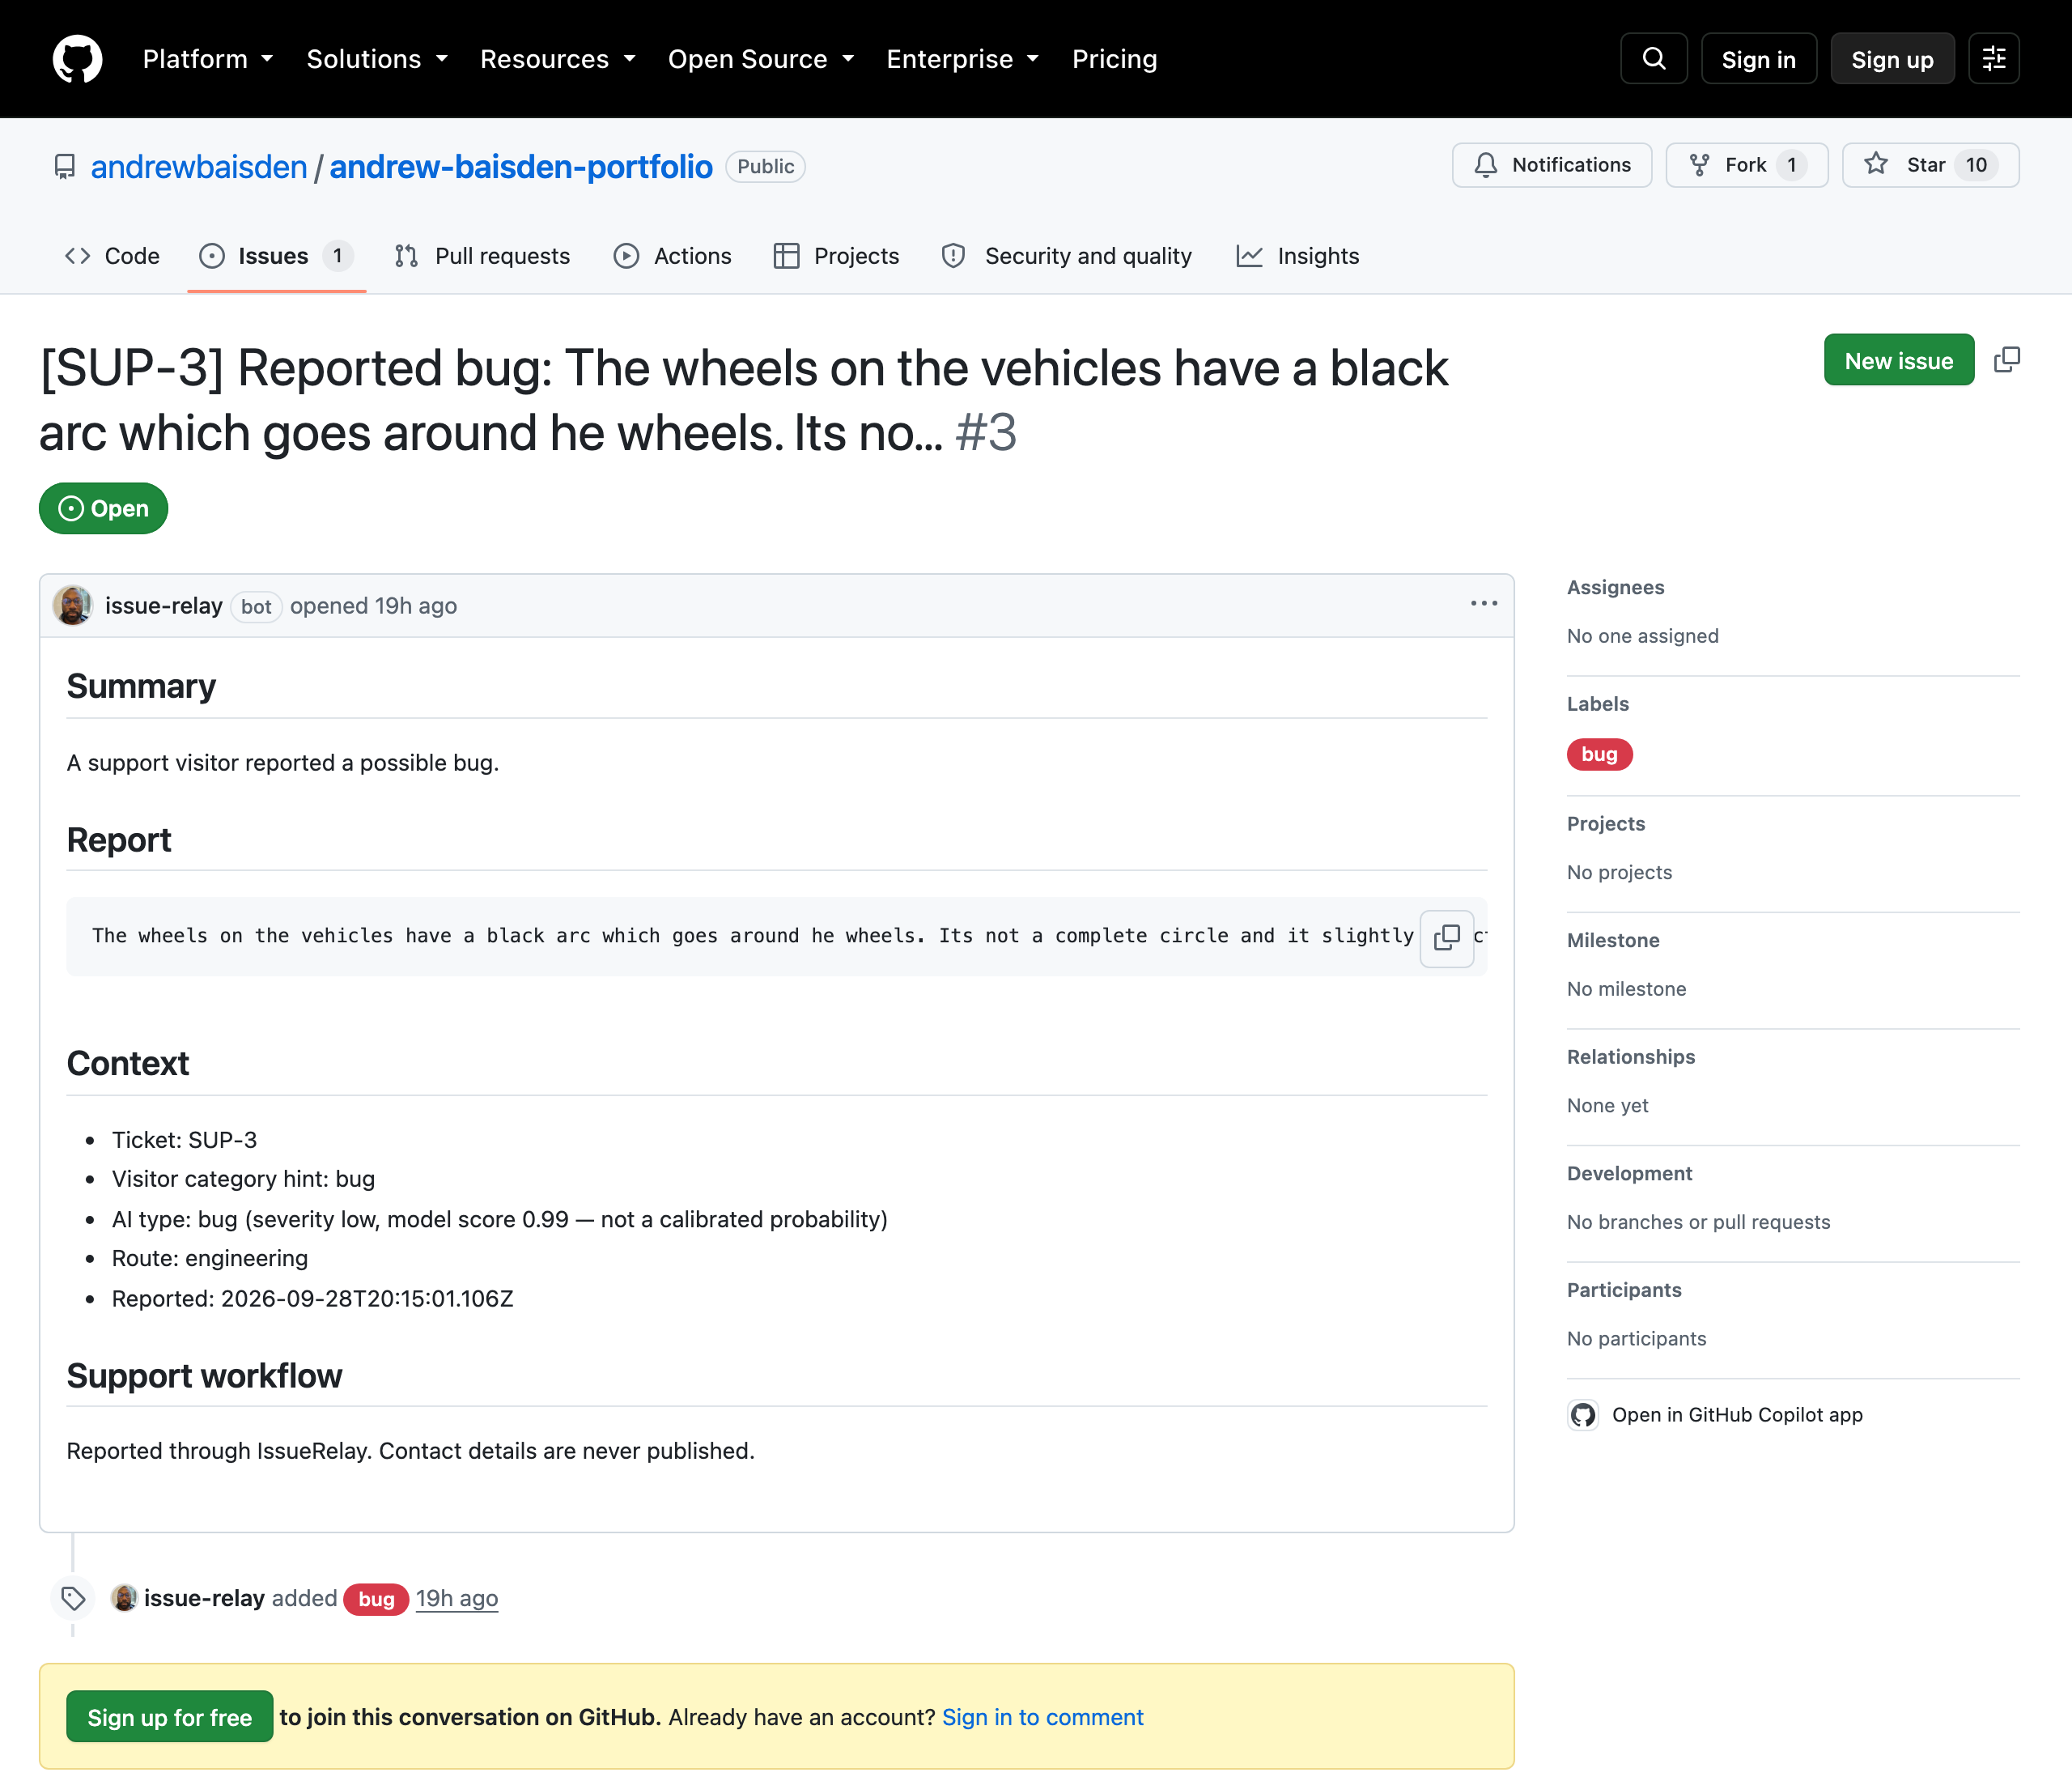
Here's a real issue that IssueRelay created on my portfolio's public repository from a visitor report. It was created by the App's bot, labelled bug, and contains the report and the AI's classification, but no contact details:
Step 7: Keeping GitHub and the Dashboard in Sync
The last piece closes the loop. When you close the issue on GitHub, GitHub sends a webhook to IssueRelay, and the ticket moves to resolved. Reopen the issue and the ticket goes back into the queue.
A webhook endpoint is public by definition, so the first thing it does is prove the request really came from GitHub. This is the verification function from packages/github/src/webhook-auth.ts:
export function verifyWebhookSignature(input: {
  secret: string;
  rawBody: Uint8Array;
  signatureHeader: string | null;
}): boolean {
  const { secret, rawBody, signatureHeader } = input;
  if (!secret || !signatureHeader?.startsWith("sha256=")) {
    return false;
  }
  const hex = signatureHeader.slice("sha256=".length);
  if (!/^[0-9a-f]{64}$/.test(hex)) return false;
  const expected = createHmac("sha256", secret).update(rawBody).digest();
  const actual = Buffer.from(hex, "hex");
  if (expected.length !== actual.length) return false;
  return timingSafeEqual(expected, actual);
}
GitHub signs every delivery with a secret that only GitHub and your platform know, and sends the signature in the X-Hub-Signature-256 header. This function computes its own HMAC SHA256 signature over the raw request bytes and compares the two.
Two details are easy to get wrong. First, the signature has to be computed over the exact bytes GitHub sent, before any JSON parsing, because parsing and reformatting would change the bytes. Second, the comparison uses timingSafeEqual, which takes the same amount of time whether the first byte or the last byte differs, so an attacker can't guess the signature one character at a time by measuring response times. The function also returns false for every kind of failure without saying which one, so it leaks nothing.
After the signature check, IssueRelay stores each delivery ID, so a repeated delivery is ignored. It updates only an issue that belongs to the matching App installation and repository, and it applies events in the order they happened on GitHub, not the order they arrived.
How to Deploy Your Own IssueRelay
You can run your own IssueRelay on Vercel and Neon in about 15 minutes. The complete walkthrough, including troubleshooting, is in docs/SELF_HOSTING.md. Here's the short version.
Step 1: Deploy
The recommended path is the Deploy with Vercel button in the README. It copies the repository into your GitHub account, adds a Neon database, and asks for three random secrets.
The first build fails on purpose because Vercel's clone screen has no Root Directory setting, so you set Root Directory to apps/web in the project settings and redeploy. The production build then creates every database table for you.
The guide also describes a Fork and Import path that makes future updates a single click, but that path hasn't been tested end to end yet.
Step 2: Run the Setup Page
Open /setup on your new site. It only works while the database has no accounts and you enter the SETUP_TOKEN you created during the deploy, so nobody who finds your URL first can claim your platform. It creates your owner account and your first project, then shows your widget key and the ready to paste widget code.
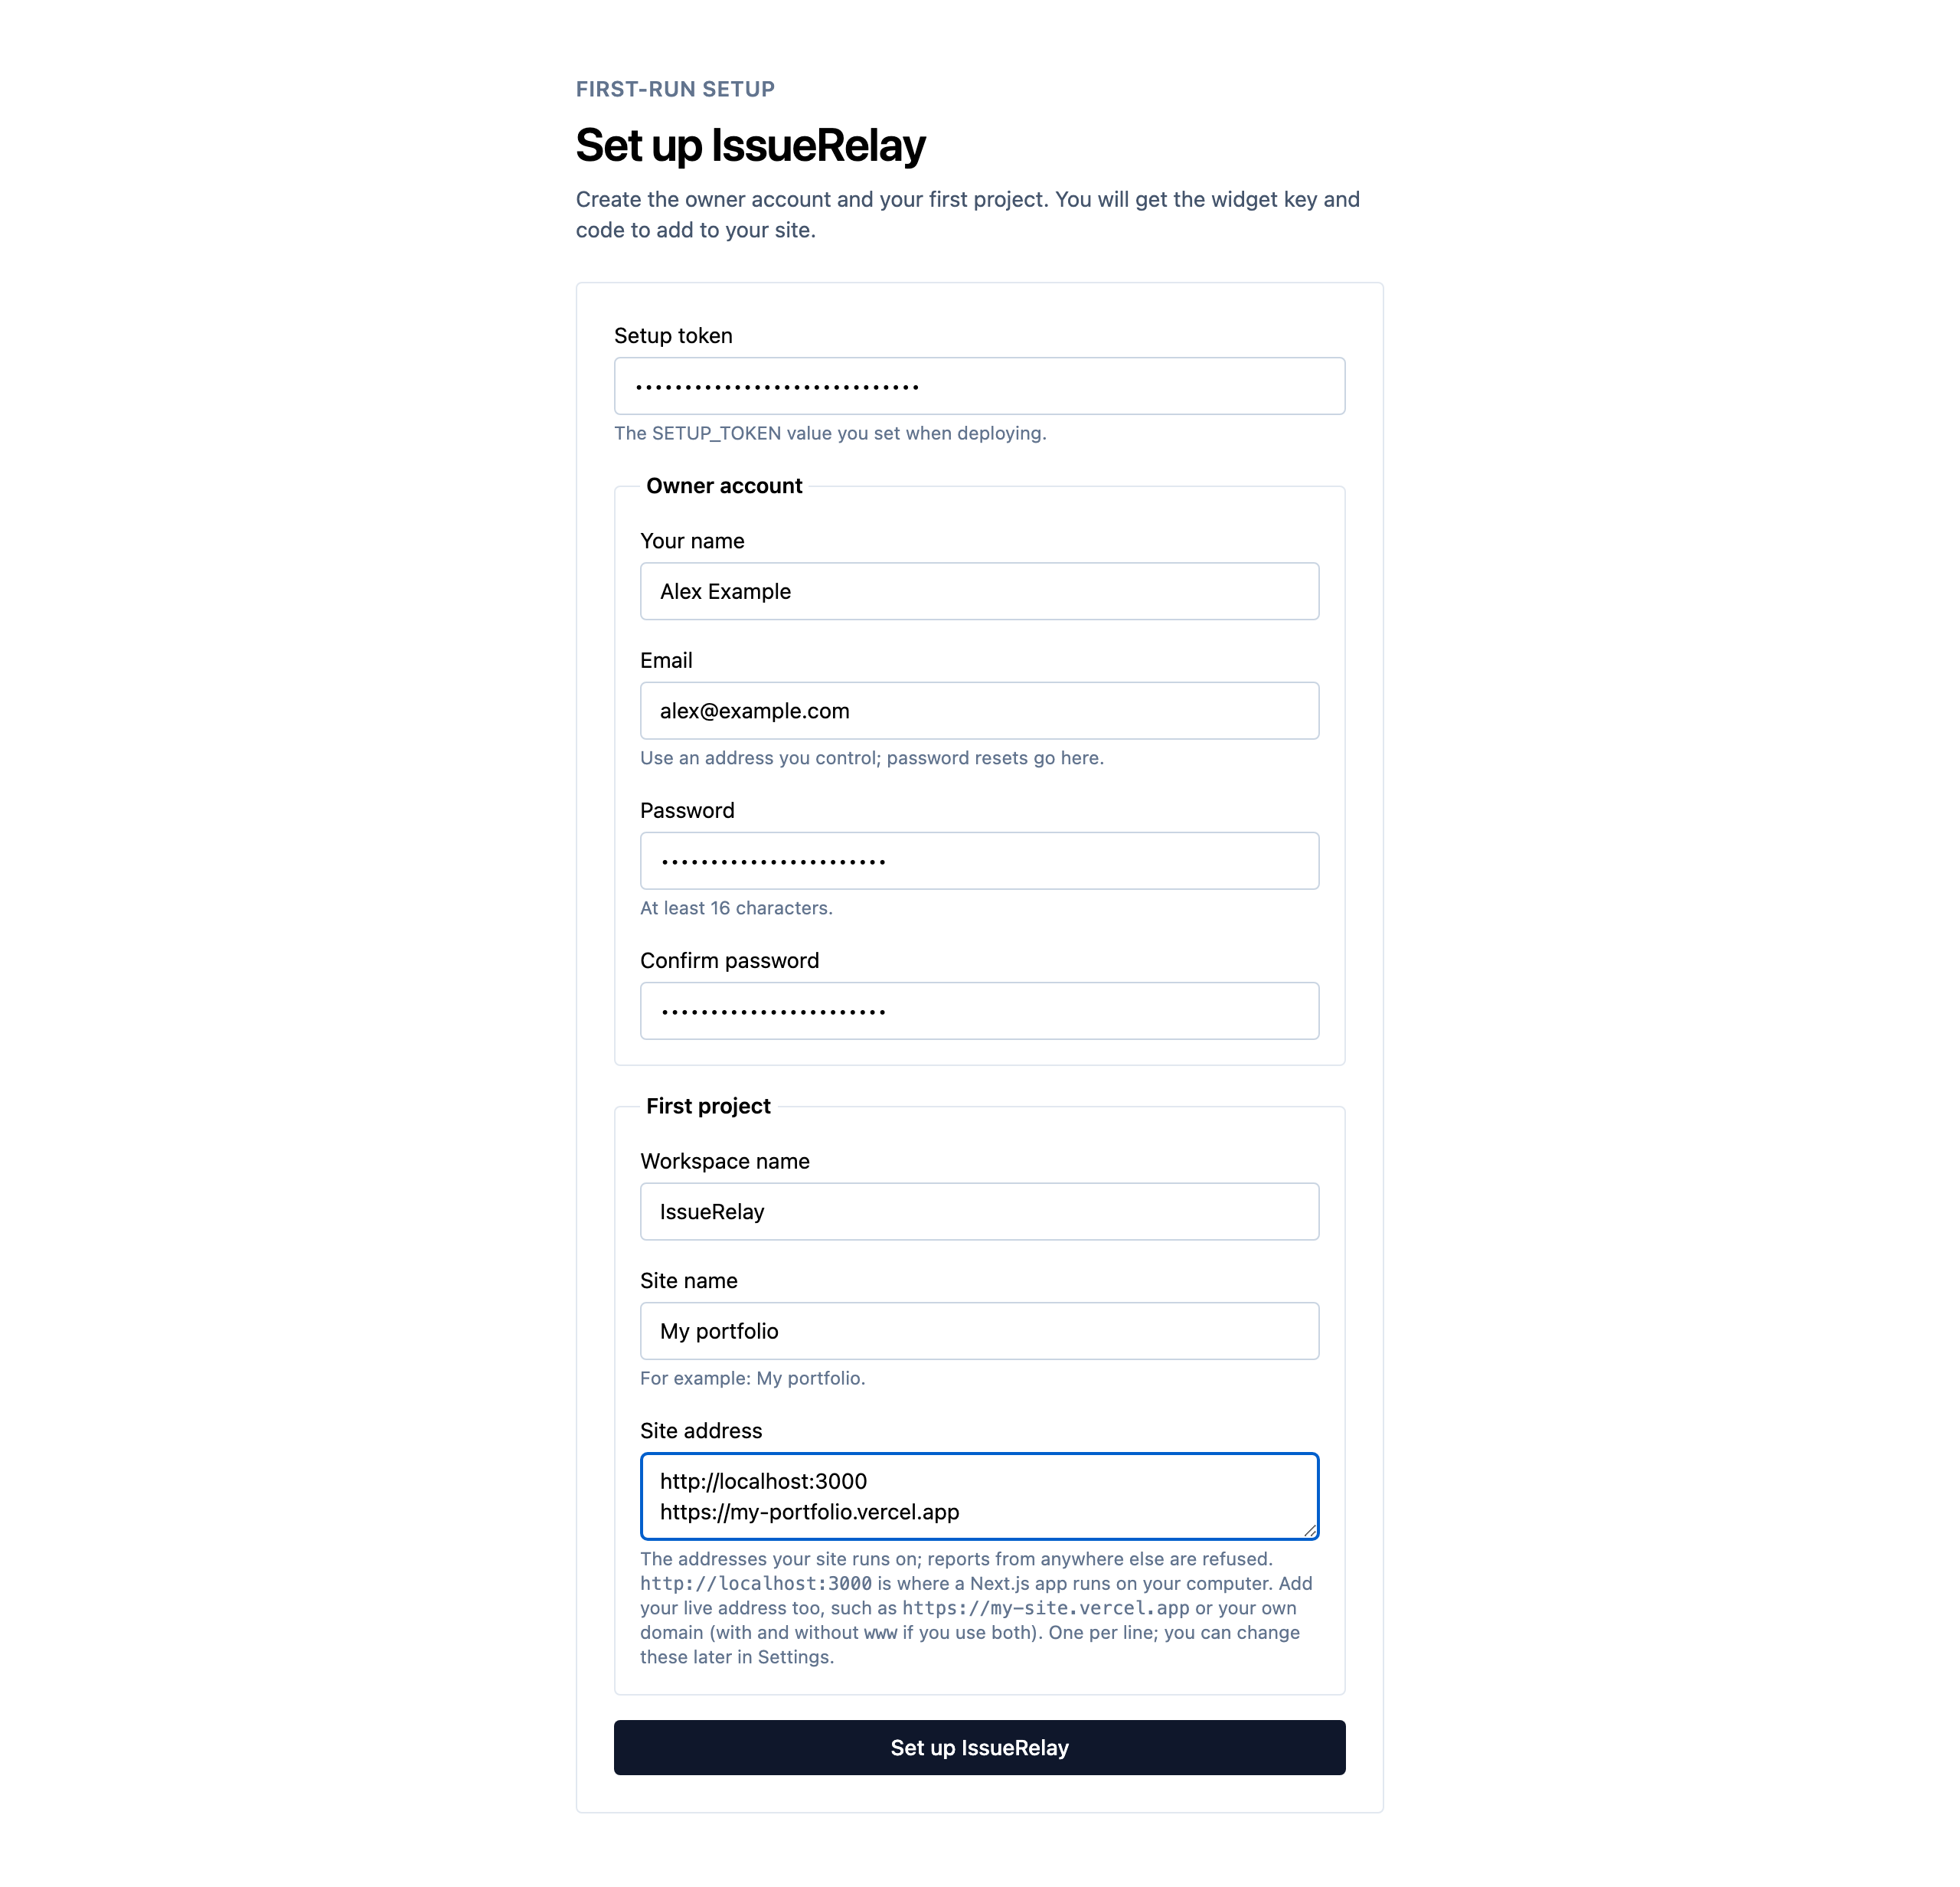
The site address field starts with http://localhost:3000, which is where a Next.js app runs on your computer. Add your live address too, such as https://my-site.vercel.app or your own domain. If you forget, the widget will politely tell visitors "We couldn't send your message," so this is the first thing to check when a report doesn't arrive.
Step 3: Create the GitHub App
Setting up a GitHub App by hand has a few easy mistakes in it. The worst one is forgetting to subscribe to the Issues event, which I did myself during testing. So IssueRelay includes a command that creates the App for you from a manifest:
pnpm github:create-app --platform https://your-issuerelay.vercel.app
This opens GitHub in your browser with everything already filled in: a private App with permission to write issues and read metadata, subscribed to the Issues event, with its webhook pointing at your platform.
You click Create GitHub App, GitHub redirects back to a temporary local server started by the command, and the command writes the App ID, private key, and webhook secret to a file that git ignores. It never prints them in your terminal. The terminal then lists the next setup phase.
Step 4: Add Your Keys and Redeploy
Add the three GitHub App values and your TYPESAFE_API_KEY to your Vercel project's environment variables, then redeploy. Jev is required for GitHub issues: without it, reports still arrive in your dashboard, but none can become an issue.
Step 5: Connect Your Repository
Install the App on the repository of the website where the widget will live, then open your project's Settings page in the dashboard and connect it. The page asks GitHub which installation and repository ID belong to that name, so a typo can't link the wrong repository.
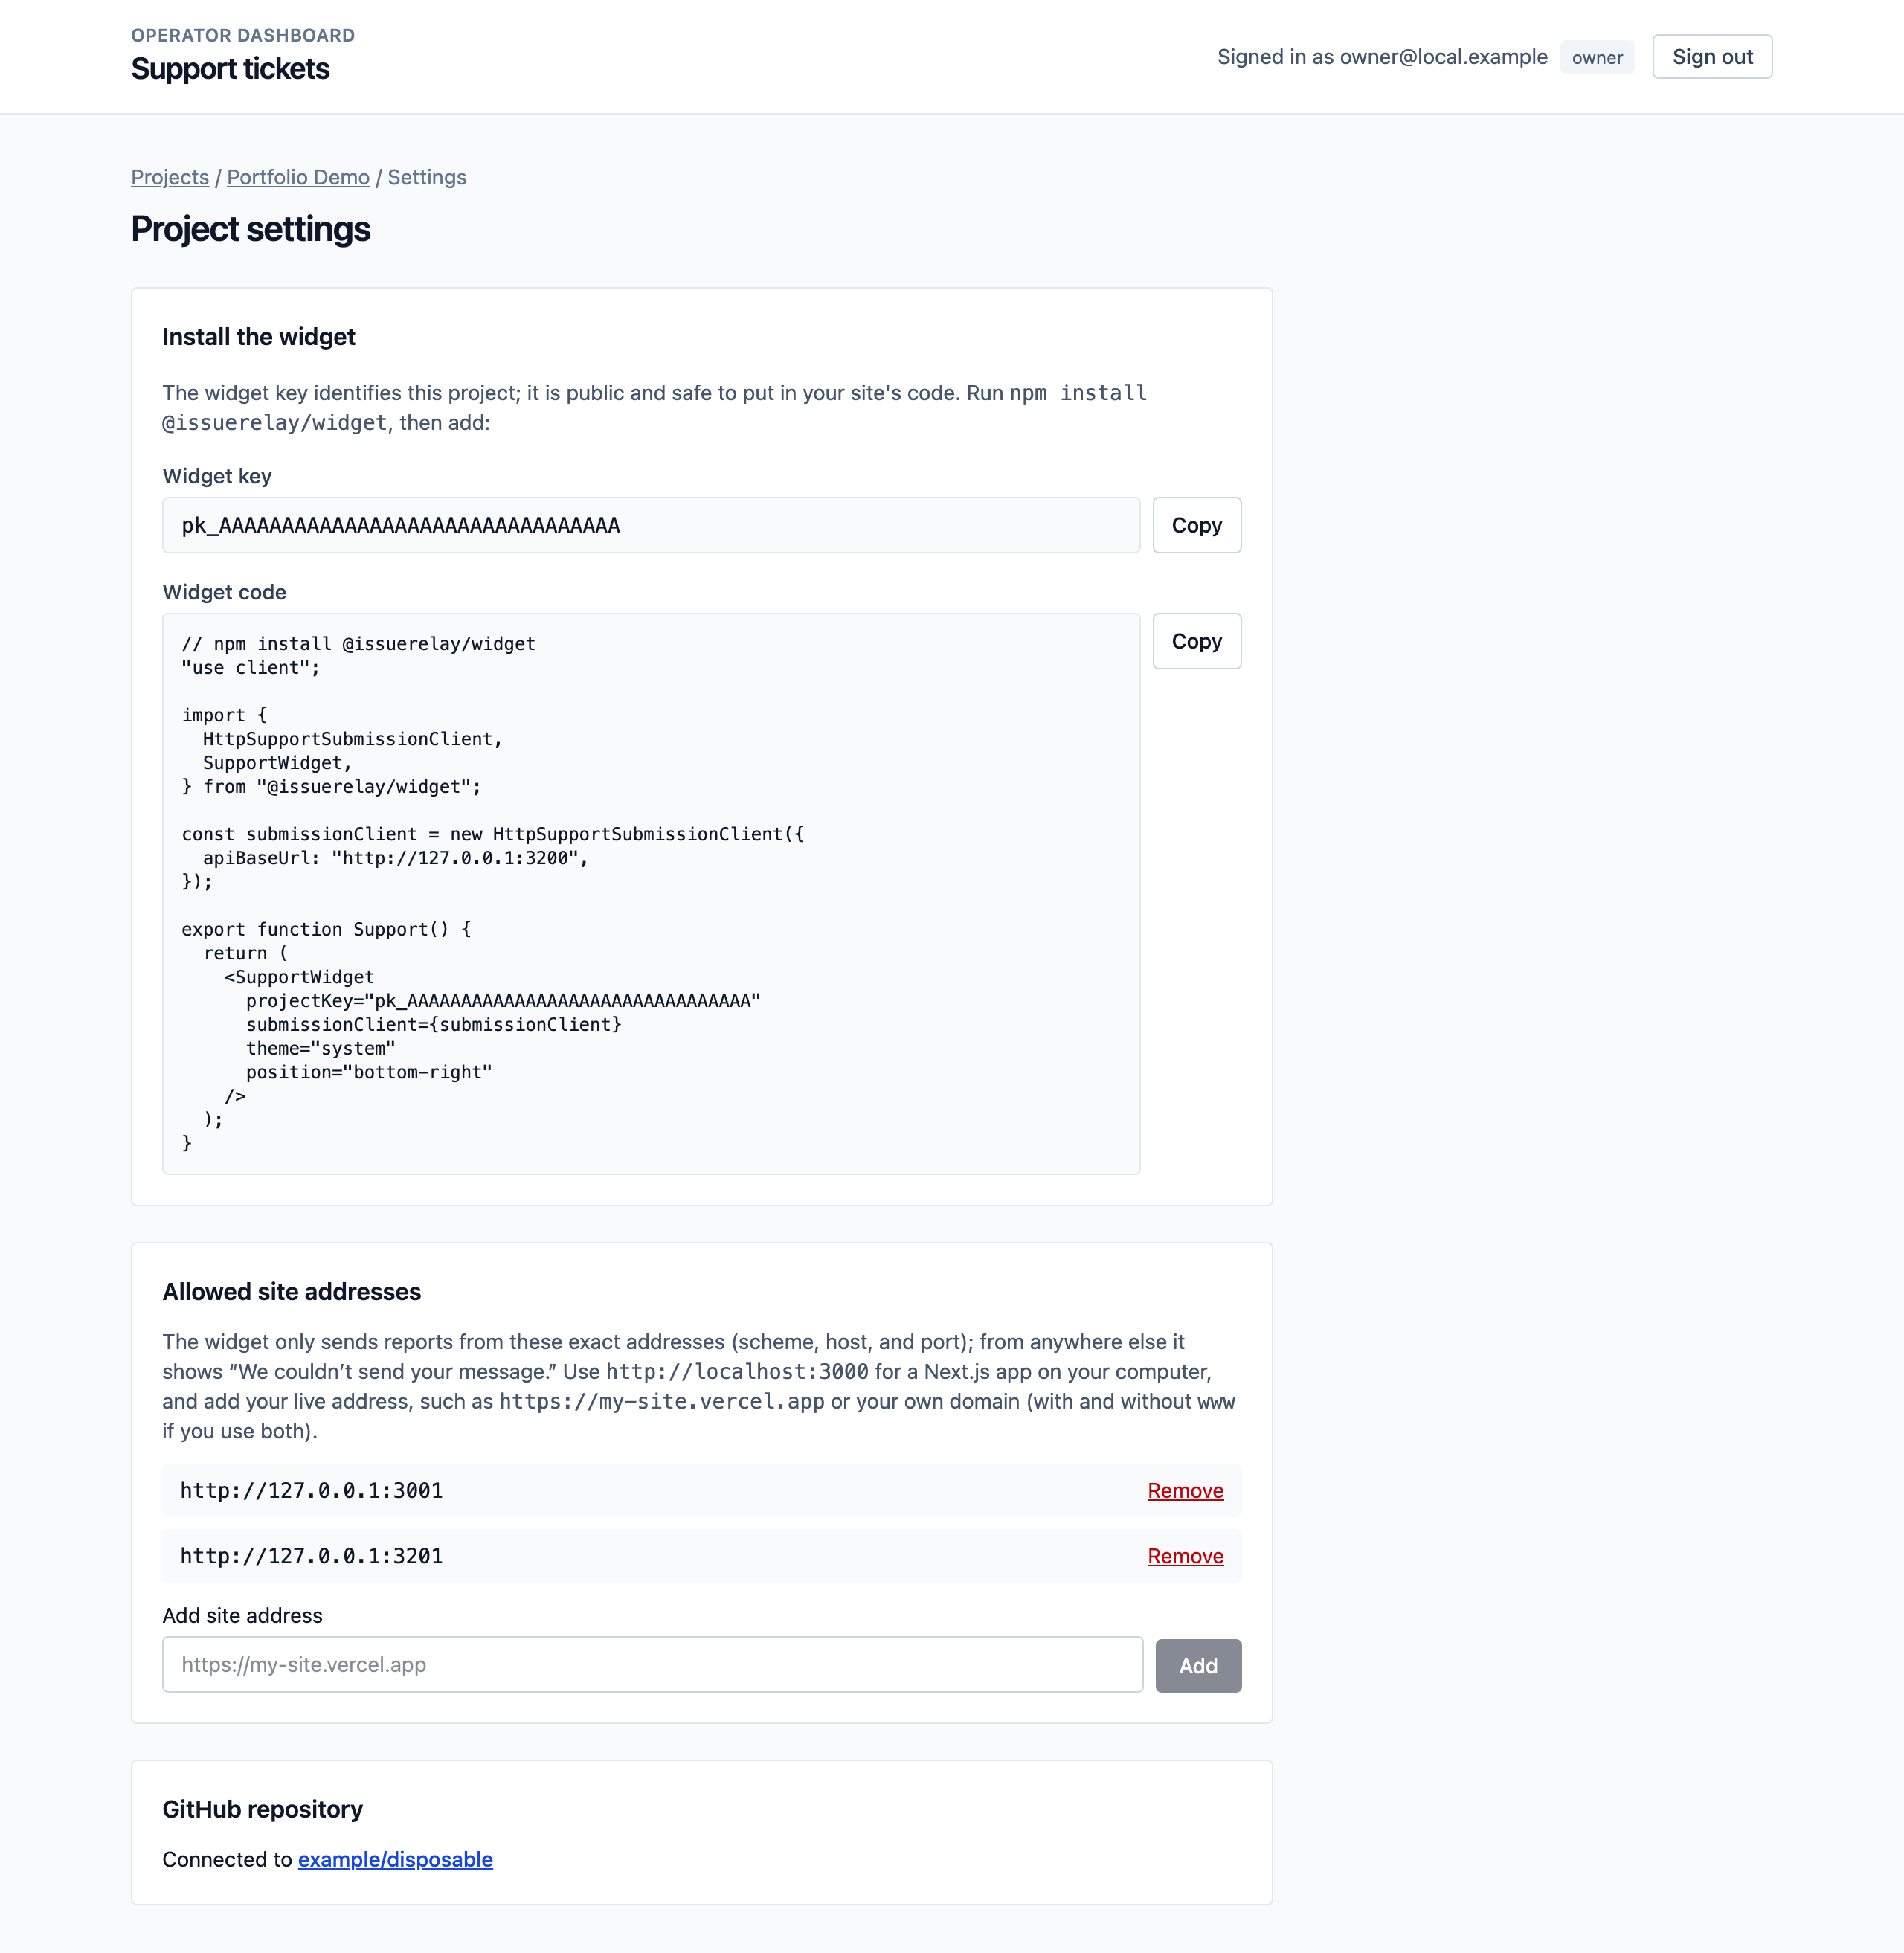
Step 6: Install the Widget
Install the widget on your site with the code from the settings page, and send your first report.
To keep your copy up to date later, pull changes from the main repository. The guide covers the one time step needed for copies made with the Deploy button, because those copies are not GitHub forks.
Running It on a Real Website
A demo is one thing, but I wanted to use IssueRelay for real, so the widget now runs on my portfolio at andrewbaisden.com:
The website design will likely change, so if you're reading this article in the future, previous builds can be found on my GitHub.
Installing it taught me a few things. My portfolio was still on React 18 for its tests, while the App Router was already rendering with React 19. So I upgraded it to React 19 first and made sure every existing test passed before adding the widget. The widget matches the site's light and dark themes, sits in the bottom right corner, and has its own unit test and browser test in the portfolio repository.
Then I tested it like a visitor would. I sent three real reports from the live site: a question, a bug, and a feature request. Jev classified all three the way I intended, with scores between 0.95 and 1.00, and the policy routed them to support, engineering, and product. The bug became issue #3 in my public portfolio repository, which is the issue shown in the screenshot earlier. I had included my name and email with that report, and neither appears in the public issue.
Testing It End to End (and What I Learned)
I didn't want a project that only worked on my machine, so testing was part of every phase instead of something saved for the end.
The test suite has several layers:
Unit tests for the widget, the API contract, the AI policy, the privacy gate, the setup page, and more. There are 180 of them, and none need a database.
Database integration tests that run against a separate PostgreSQL test database, including concurrency tests that prove two clicks can't create two GitHub issues.
Browser tests with Playwright that start their own servers on separate ports, with a separate database that is recreated for every run, so a test can never touch real data. One of those servers runs against an empty database to test the first run setup page.
A package check that builds the exact npm tarball and installs it into a Vite app with a strict Content Security Policy and into a Next.js app, both outside the monorepo, then submits a report in each.
A live journey test with 20 checks against a real GitHub App and a throwaway repository: submit a report, triage it, preview it, create the issue, check that no private data was published, close the issue on GitHub and wait for the webhook, reopen it, and check the timeline.
I ran that live journey three times: first against my local machine through a tunnel, then against production, and finally against a completely fresh copy that I deployed by following only the setup guide. All three passed 20 out of 20.
More interesting than the passes, though, are the problems each stage uncovered:
The Issues event is easy to forget: The first time I created a GitHub App by hand, it had no event subscriptions, so GitHub never told IssueRelay when issues closed. That mistake is why the
create-appcommand exists.Visitors mention their own names: A report like "Sarah here, the page is broken" from a visitor named Sarah would have put her name in a public issue. The privacy gate now compares every report against the contact details that came with it.
Zod and strict CSP don't mix in the browser: Zod 4 briefly tests whether it can use
new Function, and sites with a strict Content Security Policy report that as a violation. I removed Zod from the widget and wrote small validation checks instead, with a test that proves they agree with the server's Zod schemas on 270 form combinations.Vercel's clone flow has no Root Directory option, and Vercel picks the framework only once: My fresh deploy failed twice: once because Vercel built the repository root, and once because the framework was still set to "Other." The repository now pins Next.js in
vercel.json, and the guide warns about the first failure.Deploy button copies aren't forks: A plain
git pullfrom the main repository refuses to merge, so the guide now has a one time command to connect a copy to the main repository.GitHub issues need Jev: I originally listed Jev as optional. A careful review of the guide showed that without it, no real report can reach the confidence threshold. The guide and the settings page now say so clearly.
Log noise matters: Every database connection logged an SSL warning at error level, which made a healthy deployment look broken. The fix was to spell out the SSL mode the driver was already using, so the warning disappeared while the certificate checks stayed exactly the same.
The lesson that stuck with me most: deploying from your own documentation, word for word, finds bugs that no test will. Every one of the deployment problems above was invisible to the automated tests and obvious the moment a real person followed the guide.
How It Was Built: Phases and AI Assisted Development
IssueRelay was built in small phases, and each phase ended with a written handoff before the next one could start:
| Phase | Outcome |
|---|---|
| 0 | Product definition, architecture, decisions, security, and test plans |
| 1 and 2 | Monorepo foundation, domain model, PostgreSQL schema, and seed data |
| 3 and 4 | The widget, a demo site, and the public ticket API |
| 5 and 6 | AI triage with Jev and the operator dashboard |
| 7 and 8 | Confirmed GitHub escalation and signed webhook sync |
| 9 | Live validation of the full journey in a throwaway repository |
| 10 | Production hardening |
| 11 and 12 | Validating and publishing the widget to npm |
| Deploy | Vercel, Neon, and Resend in production |
| 13 | Installing the widget on my portfolio |
| 14 and 15 | Dogfooding (ongoing) |
| 16 | Self hosting: the Deploy button, the setup page, project settings, and the App manifest command |
My Developer Setup
I did most of the work in the terminal. My setup is:
Ghostty as my terminal, running Claude Code, Codex, and OpenCode
Cursor as my editor
The native desktop apps for ChatGPT, Claude, and OpenCode
My main model for building IssueRelay was Claude Opus 5.5 in Claude Code. For code reviews and for checking a phase before I signed it off, I used other models, including GPT-6 Sol and Grok, along with various other frontier and free models.
A second model reading the same code with fresh eyes caught real problems. For example, a Grok review of Phases 7 and 8 raised 15 findings. Seven were valid, including a race in claiming issue creation and issue markers that could be guessed, and all seven were fixed before I moved on. Three more were partly valid and five were deferred with written reasons.
Anthropic's newly released Sonnet 5.5 and OpenAI's GPT-6.1 Sol weren't used in this project.
How Better Prompts Improved the Codebase
The biggest improvement in quality didn't come from a smarter model. It came from giving the model better instructions and a better structure to work in. Here is what worked:
One phase at a time: Each prompt asked for exactly one phase with a clear outcome, and the AI wasn't allowed to start the next phase until I approved it. Small, reviewable changes were much easier to check than one giant feature.
A plan before any code: For bigger phases I asked for a plan first ("Create a plan and then go ahead with it once I approve it"). Reading a plan takes two minutes. Unpicking a wrong implementation takes an afternoon.
Rules that live in the repository: An
AGENTS.mdfile holds the project's rules, such as "persist an accepted ticket before external AI or GitHub calls," "never publish contact data to GitHub," and "do not blindly retry an ambiguous GitHub issue creation." Every AI session reads it, so the rules don't depend on me remembering to repeat them.Honest reporting: The instructions say never to report an unrun check as passing, and every handoff records the commands that were run and their real results, including failures.
Clear conditions for committing: Prompts like "commit and push when tests pass and there are no other issues" meant the full test suite ran before anything reached the main branch.
Asking for proof, not promises: Instead of asking "does self hosting work?", I asked the AI to verify it by following the guide on a fresh deployment. That single request uncovered seven documentation and configuration problems.
Feeding back real use: When I deployed a test site myself and wrote down everything that confused me, those notes went straight back into the guide, the setup page, and the settings page.
Publishing the Widget to npm
The widget is the only part of IssueRelay that is published, as @issuerelay/widget. Everything else stays private inside the monorepo.
I didn't want to publish something that only worked inside my own workspace, so the release check builds the exact tarball that npm will receive and inspects it.
It must contain only five files. It must not reference private packages, Node built ins, environment variables, or anything that looks like a key. It must then install and work in two brand new apps outside the repository, one of them under a strict Content Security Policy, with zero policy violations.
Releases are published from GitHub Actions with npm trusted publishing and provenance, so there is no long lived npm token to leak.
The result is a package of about 10 KB compressed that needs no CSS setup and depends only on React and React Hook Form. The widget README documents every prop.
What Is Next
IssueRelay is complete for self hosting, and I'm using it every day on my portfolio. Some things I would like to explore next:
A hosted version of IssueRelay, so you could sign up and add the widget without deploying anything yourself
Testing the Fork and Import path end to end so it can become the recommended way to deploy
Ideas from the roadmap, such as detecting duplicate reports, linking several reports to one issue, notifications, and syncing GitHub comments
Conclusion
In this tutorial, you saw how to build an AI support system that turns scattered website feedback into reviewed tickets and routes confirmed bugs to GitHub. Along the way, you learned how to:
Build an embeddable React widget that works on any site without CSS setup or style clashes
Save every report before calling any external service, so provider outages never lose data
Use Jev for bounded, validated classification that returns labels and probabilities instead of free text
Keep routing and publishing decisions in plain, testable code, with a human in the loop
Create GitHub issues safely with a GitHub App, a privacy gate, and a marker that prevents duplicates
Keep GitHub and your dashboard in sync with signed, verified webhooks
Deploy your own copy on Vercel and Neon, and test it end to end, including against your own documentation
The best way to understand IssueRelay is to try it. You can explore the code on GitHub, deploy your own copy with the self hosting guide, and add the widget to your site with npm install @issuerelay/widget from npm. If it helps you, a star on the repository is always appreciated.


