
By Daniel K. Hunter
Forms are hard.
Knowing how to properly collect and validate user data is one of the most important skills a frontend developer needs to have. But it's hard because edge cases abound.
You have to consider all of the ways a user could break your pretty little form while simultaneously providing an excellent user experience.
The UX piece is important because forms are the gatekeepers to conversions for products and services. If you, as a front end developer, get it wrong, there could be significant financial consequences.
This is why there are thousands (slight exaggeration) of form libraries out there that implement industry best practices.
There is nothing wrong with using these libraries. The problem arises when devs use them without understanding how forms actually work and why certain patterns are considered standards.
I'm going to show you how I would build a signup form from scratch, using only HTML, CSS, and JavaScript.
Ok, without further ado, let's dive in.
The single (default) state trap
Desktop

Mobile
When you're presented with a design like this, your first question should be, how many states aren't represented here?
The examples above represent one state (when a user visits the login page, this is what they will see on desktop and on mobile).
Other states would include:
- Error State
- What happens if I enter an email that already exists?
- Loading State
- What happens when I submit the form?
When planning your work, make sure to consider what isn't in the design that must be accounted for. You need to carefully review the feature requirements and ask questions if you think something is missing.
Feature Requirements
Speaking of requirements...
As a developer, you'll often be presented with a PRD (Product Requirements Document) from a product manager, designer, or project manager.
These documents are usually broken down further into individual user stories that you'll execute during a sprint.
Putting my product manager hat on, here are the feature requirements for our form:
- The user must provide an email address
- The password must be at least 10 characters long and contain at least one uppercase letter, number, and special character.
- We should show error messages to the user when they don't meet the requirements
Markup
The first code we'll write will be HTML with a just a dash of CSS.
Doesn't seem like much yet but there's some good work here. Let's dive in a bit.
- We've setup side and main elements along with our form
- I'm using BEM as a guide for creating class names and semantic HTML elements for readability.
- Our sign up page takes a mobile first approach, meaning we write mobile styles first and add breakpoints for desktop styles.
- I'm leveraging CSS grid for the overall layout and Flexbox for position elements in the main section.
- I've added a submit event listener for the form along with an event handler function that simply logs the event object for now.
Validation
Let's leverage some built in validation logic by choosing our input types wisely. We'll use the following:
- Email input type
- Password input type
The email input type gives us a couple of nice validations for free.
- It checks to make sure the
@symbol is used - It also checks that there's text after the symbol
Since both Email and Password are required, let's add the required attribute to both elements. We'll also add a minlength attribute to the password input.
<form id="dkh-signup-form">
  <div class="dkh-form-header">
    <div>
      <small>Sign up with</small>
      <div class="dkh-form-header__social-wrapper">
        <button type="button" class="dkh-btn dkh-btn-icon dkh-btn-github">
          Github
        </button>
        <button type="button" class="dkh-btn dkh-btn-icon dkh-btn-twitter">
          Twitter
        </button>
      </div>
    </div>
  </div>
  <div class="dkh-form-body">
    <small>Or sign in with email and password</small>
    <div class="dkh-form-field">
      <fieldset>
        <input autofocus class="dkh-form-field__input" name="email" type="email" id="email" required placeholder="Email">
      </fieldset>
      <div class="dkh-form-field__messages"></div>
    </div>
    <div class="dkh-form-field">
      <fieldset>
        <input class="dkh-form-field__input" name="password" type="password" id="password" required minlength="10" placeholder="Password">
      </fieldset>
      <div class="dkh-form-field__messages"></div>
    </div>
  </div>
  <div class="dkh-form-footer">
    <button class="dkh-btn dkh-btn-primary" type="submit">Sign Up</button>
  </div>
</form>
The type=email attribute tells the browser that it should validate the input as an email.
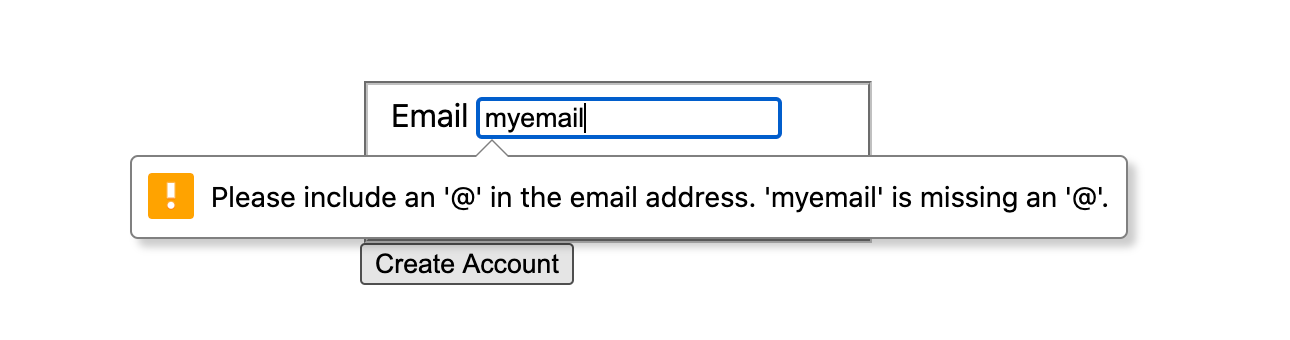
The minlength attribute on the password input gives us this helpful error message:

Now, in our handleSignupFormSubmit function, we can use the FormData API to get the values from our form, and eventually submit them to an API.
function handleSignupFormSubmit(e) {
  // prevent default browser behaviour
  e.preventDefault();

  const formDataEntries = new FormData(signupForm).entries();
  const { email, password } = Object.fromEntries(formDataEntries);

  // submit email and password to an API
}
Error messages
The error messages that are rendered by the browser are helpful to start, but what if you want these messages to render below their respective form input? What if you want to control how they look?
Sadly, the browser doesn't give us any control over how the default error message are rendered. So this is where our dkh-form-field__messages div elements come into play. We can render our custom error messages inside these elements.
Let's write a couple custom validation functions to check that our user's password and email values meet the requirements.
function validatePassword(password, minlength) {
  if (!password) return 'Password is required';

  if (password.length < minlength) {
    return `Please enter a password that's at least ${minlength} characters long`;
  }

  const hasCapitalLetter = /[A-Z]/g;
  if (!hasCapitalLetter.test(password)) {
    return 'Please use at least one capital letter.';
  }

  const hasNumber = /\d/g;
  if (!hasNumber.test(password)) {
    return 'Please use at least one number.';
  }

  return '';
}
function validateEmail(email) {
  if (!email) return 'Email is required';

  const isValidEmail = /^\S+@\S+$/g
  if (!isValidEmail.test(email)) {
    return 'Please enter a valid email';
  }

  return '';
}
The regex /^\\S+@\\S+$/g is far from bullet proof, but it at least checks to make sure there are characters before and after the @ symbol.
The best way to validate an email is to send a confirmation email to any user that signs up. The user would then have to open that email and click a link to confirm that their email address is valid.
If you'd like to dig deeper into client side email validation, this is a great thread.
Now, let's figure out how to render the error messages to the page.
function handleSignupFormSubmit(e) {
  // prevent default browser behaviour
  e.preventDefault();

  const formDataEntries = new FormData(signupForm).entries();
  const { email, password } = Object.fromEntries(formDataEntries);

  const emailErrorMessage = validateEmail(email);
  const passowrdErrorMessage = validatePassword(password);

  if (!emailErrorMessage) {
        // select the email form field message element
    const emailErrorMessageElement = document.querySelector('.email .dkh-form-field__messages');
    // show email error message to user
    emailErrorMessageElement.innerText = emailErrorMessage;
  }

  if (passowrdErrorMessage) {
        // select the email form field message element
    const passwordErrorMessageElement = document.querySelector('.password .dkh-form-field__messages');
    // show password error message to user
    passwordErrorMessageElement.innerText = passowrdErrorMessage;
  }
}
One additional thing I'll call out: in order for these messages to show up, we need to remove the required attributes from both the email and password inputs.
We need to change the type attribute value for the email input.
<input autofocus class="dkh-form-field__input" type="text" name="email" id="email" required placeholder="Email">
We also need to remove the minlength attribute from the password input.
<input class="dkh-form-field__input" name="password" type="password" id="password" required placeholder="Password">
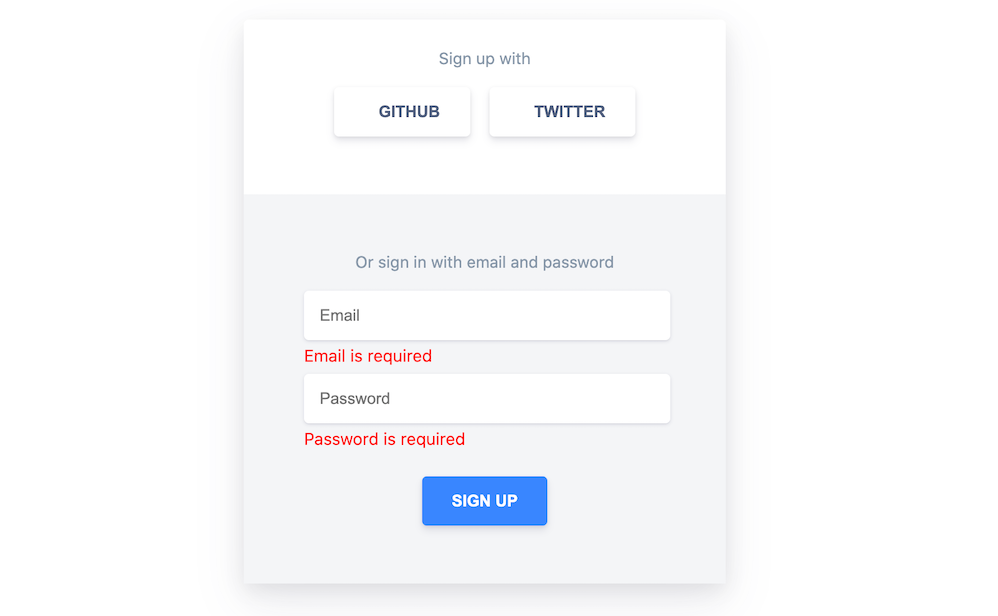
Updating these attributes removes the browser-based validation in favor of our own validation logic. Here's how our custom error messages will render:

Styles
I leave CSS until the end because, in my personal experience, it's a little harder to focus on logic when the visual design is complete.
When a component or page "looks" done to the eye it can create a false sense that it is actually done. I don't have any research to back this up, just my personal opinion.
Here's the state of our code after adding quite a bit of CSS.
Desktop

Mobile
Error State
I included font awesome icons for the Github and Twitter Buttons.
<div class="dkh-form-header">
  <div>
    <small>Sign up with</small>
    <div class="dkh-form-header__social-wrapper">
      <button type="button" class="dkh-btn dkh-btn-icon dkh-btn-github">
        <i class="fab fa-github fa-lg"></i>
        Github
      </button>
      <button type="button" class="dkh-btn dkh-btn-icon dkh-btn-twitter">
        <i class="fab fa-twitter fa-lg"></i>
        Twitter
      </button>
    </div>
  </div>
</div>
Summary
We have created the building blocks to build sign up and log in forms without 3rd party libraries. You can check out the final source code here.
If you're using a framework like React or Vue, there are a ton of awesome form and validation libraries. You can lean on them to get the job done quickly.
However, if you're new to software development, I would encourage you to focus on the fundamentals first before using these tools.
I got my first job as a developer five years ago and my journey into tech has forever changed my life for the better. I believe that it's important to focus on and master the fundamentals so that you can more easily grasp tools like React and Vue.
One of the problems I noticed when running a meetup myself for years was that people who were new to coding reached for libraries and frameworks too quickly. This ended up hurting them and many struggled during interviews.
If you are learning how to code and could use some help, feel free to reach out to me on twitter. Looking forward to helping however I can.