
By Nishant Kumar
In this tutorial, let's learn how to build dynamic forms in React. Using dynamic forms, we can add fields or remove them depending on our needs.
So, let's get started.
How to Create a Form in React
Let's create a simple form first. The syntax is straightforward:
import './App.css';

function App() {
  return (
    <div className="App">
      <form>
        <div>
          <input
            name='name'
            placeholder='Name'
          />
          <input
            name='age'
            placeholder='Age'
          />
        </div>
      </form>
    </div>
  );
}

export default App;
Here's what it'll look like:
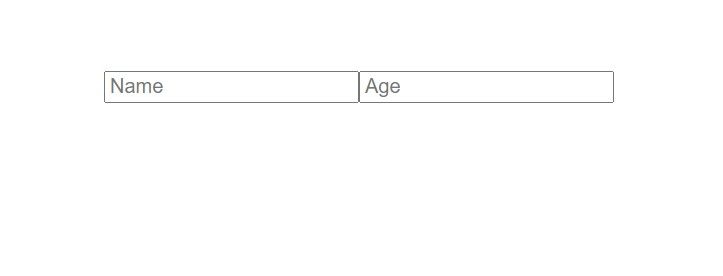
We have two input fields, which are Name and Age. But these fields are static. So, let's made them dynamic using React States.
How to Make Forms Dynamic in React
Create one state called InputFields. It will have an object, with name and age properties.
const [inputFields, setInputFields] = useState([
    {name: '', age: ''}
])
Now, let's map our form fields from their inputFields state.
import { useState } from 'react';
import './App.css';

function App() {
  const [inputFields, setInputFields] = useState([
    { name: '', age: '' }
  ])
  return (
    <div className="App">
      <form>
        {inputFields.map((input, index) => {
          return (
            <div key={index}>
              <input
                name='name'
                placeholder='Name'
              />
              <input
                name='age'
                placeholder='Age'
              />
            </div>
          )
        })}
      </form>
    </div>
  );
}

export default App;
Now, we will see only one set of input fields, because we have only one object in the inputFields state. If we add more objects, we will see multiple input fields.
How to Add the Values from inputFields State
Now, let's add the values from the inputFields state to the input fields.
import { useState } from 'react';
import './App.css';

function App() {
  const [inputFields, setInputFields] = useState([
    { name: '', age: '' }
  ])
  return (
    <div className="App">
      <form>
        {inputFields.map((input, index) => {
          return (
            <div key={index}>
              <input
                name='name'
                placeholder='Name'
                value={input.name}
              />
              <input
                name='age'
                placeholder='Age'
                value={input.age}
              />
            </div>
          )
        })}
      </form>
    </div>
  );
}

export default App;
The values will be input.name and input.age.
Let's also add an onChange event that will run when we type something in the input fields.
Create a function called handleFormChange.
const handleFormChange = () => {

}
Assign this function to the input fields as an onChange event.
<div key={index}>
              <input
                name='name'
                placeholder='Name'
                value={input.name}
                onChange={event => handleFormChange(index, event)}
              />
              <input
                name='age'
                placeholder='Age'
                value={input.age}
                onChange={event => handleFormChange(index, event)}
              />
            </div>
This onChange event takes two parameters, index and event. Index is the index of the array and event is the data we type in the input field. We are passing those to the handleFormChange function.
const handleFormChange = (index, event) => {

}
But the thing is, if we try to type something in the input fields, we won't be able to. Because we haven't set the states in the formFields state. So, let's do that.
 const handleFormChange = (index, event) => {
    let data = [...inputFields];
 }
Let's store our inputFields state into a variable called data using the spread operator (the three dots ...).
Then, we will target the index of the data variable using the index parameter, and the name of the property, too.
const handleFormChange = (index, event) => {
    let data = [...inputFields];
    data[index][event.target.name] = event.target.value;
}
For example, suppose we are typing in the input field with index 0. So, we are specifying the index in data, and the property name, using event.target.name. And inside this data index, we are storing the values from input fields using event.target.value.
Now, we need to store this data back inside the inputFields array using the setInputFields method.
const handleFormChange = (index, event) => {
   let data = [...inputFields];
   data[index][event.target.name] = event.target.value;
   setInputFields(data);
}
Now, if we type something in the input fields, it will show up in the input fields.
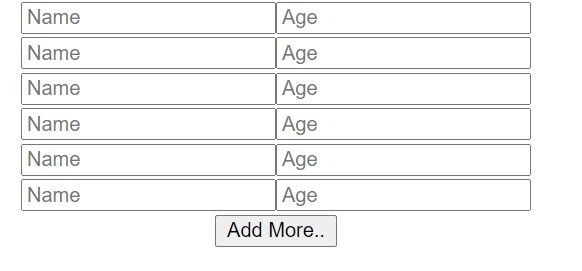
How to Add More Form Fields
Let's create a button to add more form fields.
<button>Add More..</button>
And a function, too, that will be triggered when this button is clicked.
const addFields = () => {

}
Let's add the function to the button via an onClick event.
<button onClick={addFields}>Add More..</button>
Now, in the addFields function, we need to create an object. And every time we click the button, it will be pushed to the inputFields state, thus creating a new input field.
const addFields = () => {
    let newfield = { name: '', age: '' }
}
Then set this newField inside the inputFields state.
const addFields = () => {
    let newfield = { name: '', age: '' }

    setInputFields([...inputFields, newfield])
}
Here, we are also setting the existing inputFields using the spread operator, in conjunction with the newfield.
If we click the Add Field button now, it will create a new input field.
How to Create a Submit Button
Let's create a Submit button and one function to see our data when we submit the form.
<button>Submit</button>
We also need a function that will be triggered when we click this button. It will log the data in the console, from the input fields. It also has a method called e.preventDefault() that will prevent the page from getting refreshed.
const submit = (e) => {
    e.preventDefault();
    console.log(inputFields)
}
Add this function to the Submit button:
<button onClick={submit}>Submit</button>
And also in the form tag:
<form onSubmit={submit}>
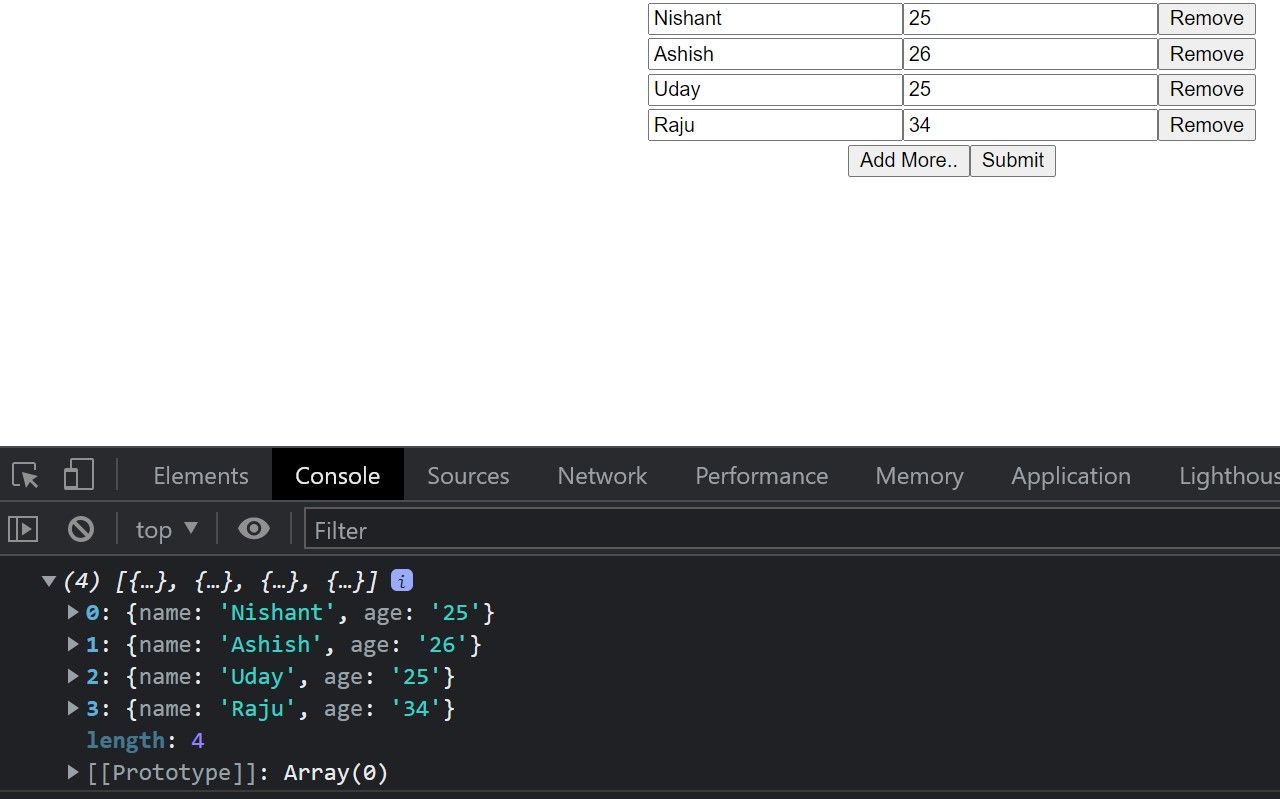
If we submit, we will see our data in the console:
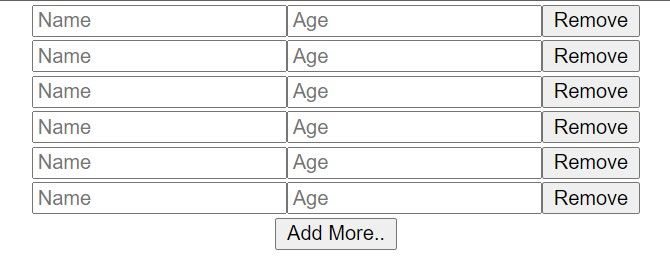
How to Remove the fields using a Remove Button
Now let's create a Button for removing these fields if we don't want them.
<form>
        {inputFields.map((input, index) => {
          return (
            <div key={index}>
              <input
                name='name'
                placeholder='Name'
                value={input.name}
                onChange={event => handleFormChange(index, event)}
              />
              <input
                name='age'
                placeholder='Age'
                value={input.age}
                onChange={event => handleFormChange(index, event)}
              />
              <button>Remove</button>
            </div>
          )
        })}
      </form>
We need a function as well.
const removeFields = () => {

}
So, assign this function to the Remove button.
<button onClick={() => removeFields(index)}>Remove</button>
We are passing the index as a parameter, which is the index of input fields.
Then, receive this index in the function.
const removeFields = (index) => {

}
And just like before, we need to create a new variable and store the inputFields state in that new variable.
const removeFields = (index) => {
    let data = [...inputFields];
}
Then, we need to splice this data variable by the index. Then we need to store it in the inputFields state using setInputFields.
const removeFields = (index) => {
    let data = [...inputFields];
    data.splice(index, 1)
    setInputFields(data)
}
Now, if we click remove, it will remove that form field.
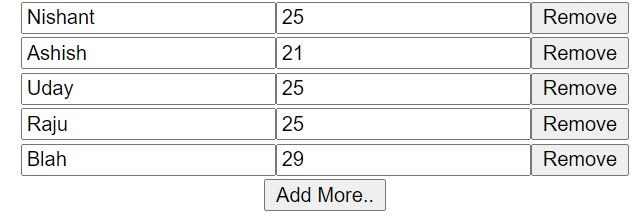
So we have five input fields here, with five different names. Let's remove the input of Nishant.
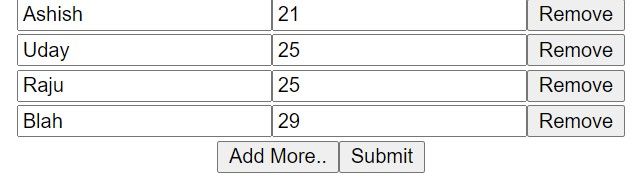
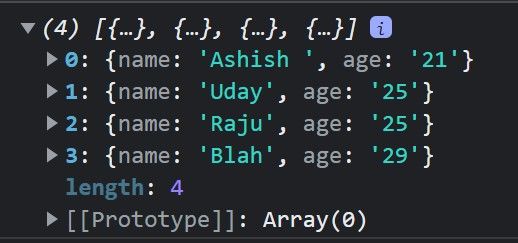
You see it has been removed. And if we submit, we will see our updated data in the console.
Wrapping Up
Now you know how to create dynamic forms in React. Congrats!
You can also watch my video on the same topic Dynamic Forms - How to Add Dynamic Forms in React.
Try out the code here – https://github.com/nishant-666/Dynamic-Forms.
Happy learning :)