
Every team that ships software eventually builds a staging environment. And every team that builds a staging environment eventually discovers the same problem.
Staging is shared. One environment, many pull requests. Someone deploys a half-finished feature to test it. Someone else deploys on top of that. A third person runs a database migration. By Thursday afternoon, nobody can tell which version of which branch is actually running, and the sentence "it works on staging" has stopped carrying any information at all.
The workarounds are familiar: a Slack channel where people claim staging like a meeting room, a rotating deploy schedule, or a second staging environment, then a third, each one drifting further from production configuration than the last.
There's a better pattern, and platform teams at companies like Vercel, Netlify, and Shopify have made it standard: give every pull request its own environment.
Open a PR, and a fresh, isolated copy of your application deploys automatically. Push another commit, and it updates. Merge or close the PR, and the whole thing deletes itself. No queue, no claiming, no cleanup, and no drift.
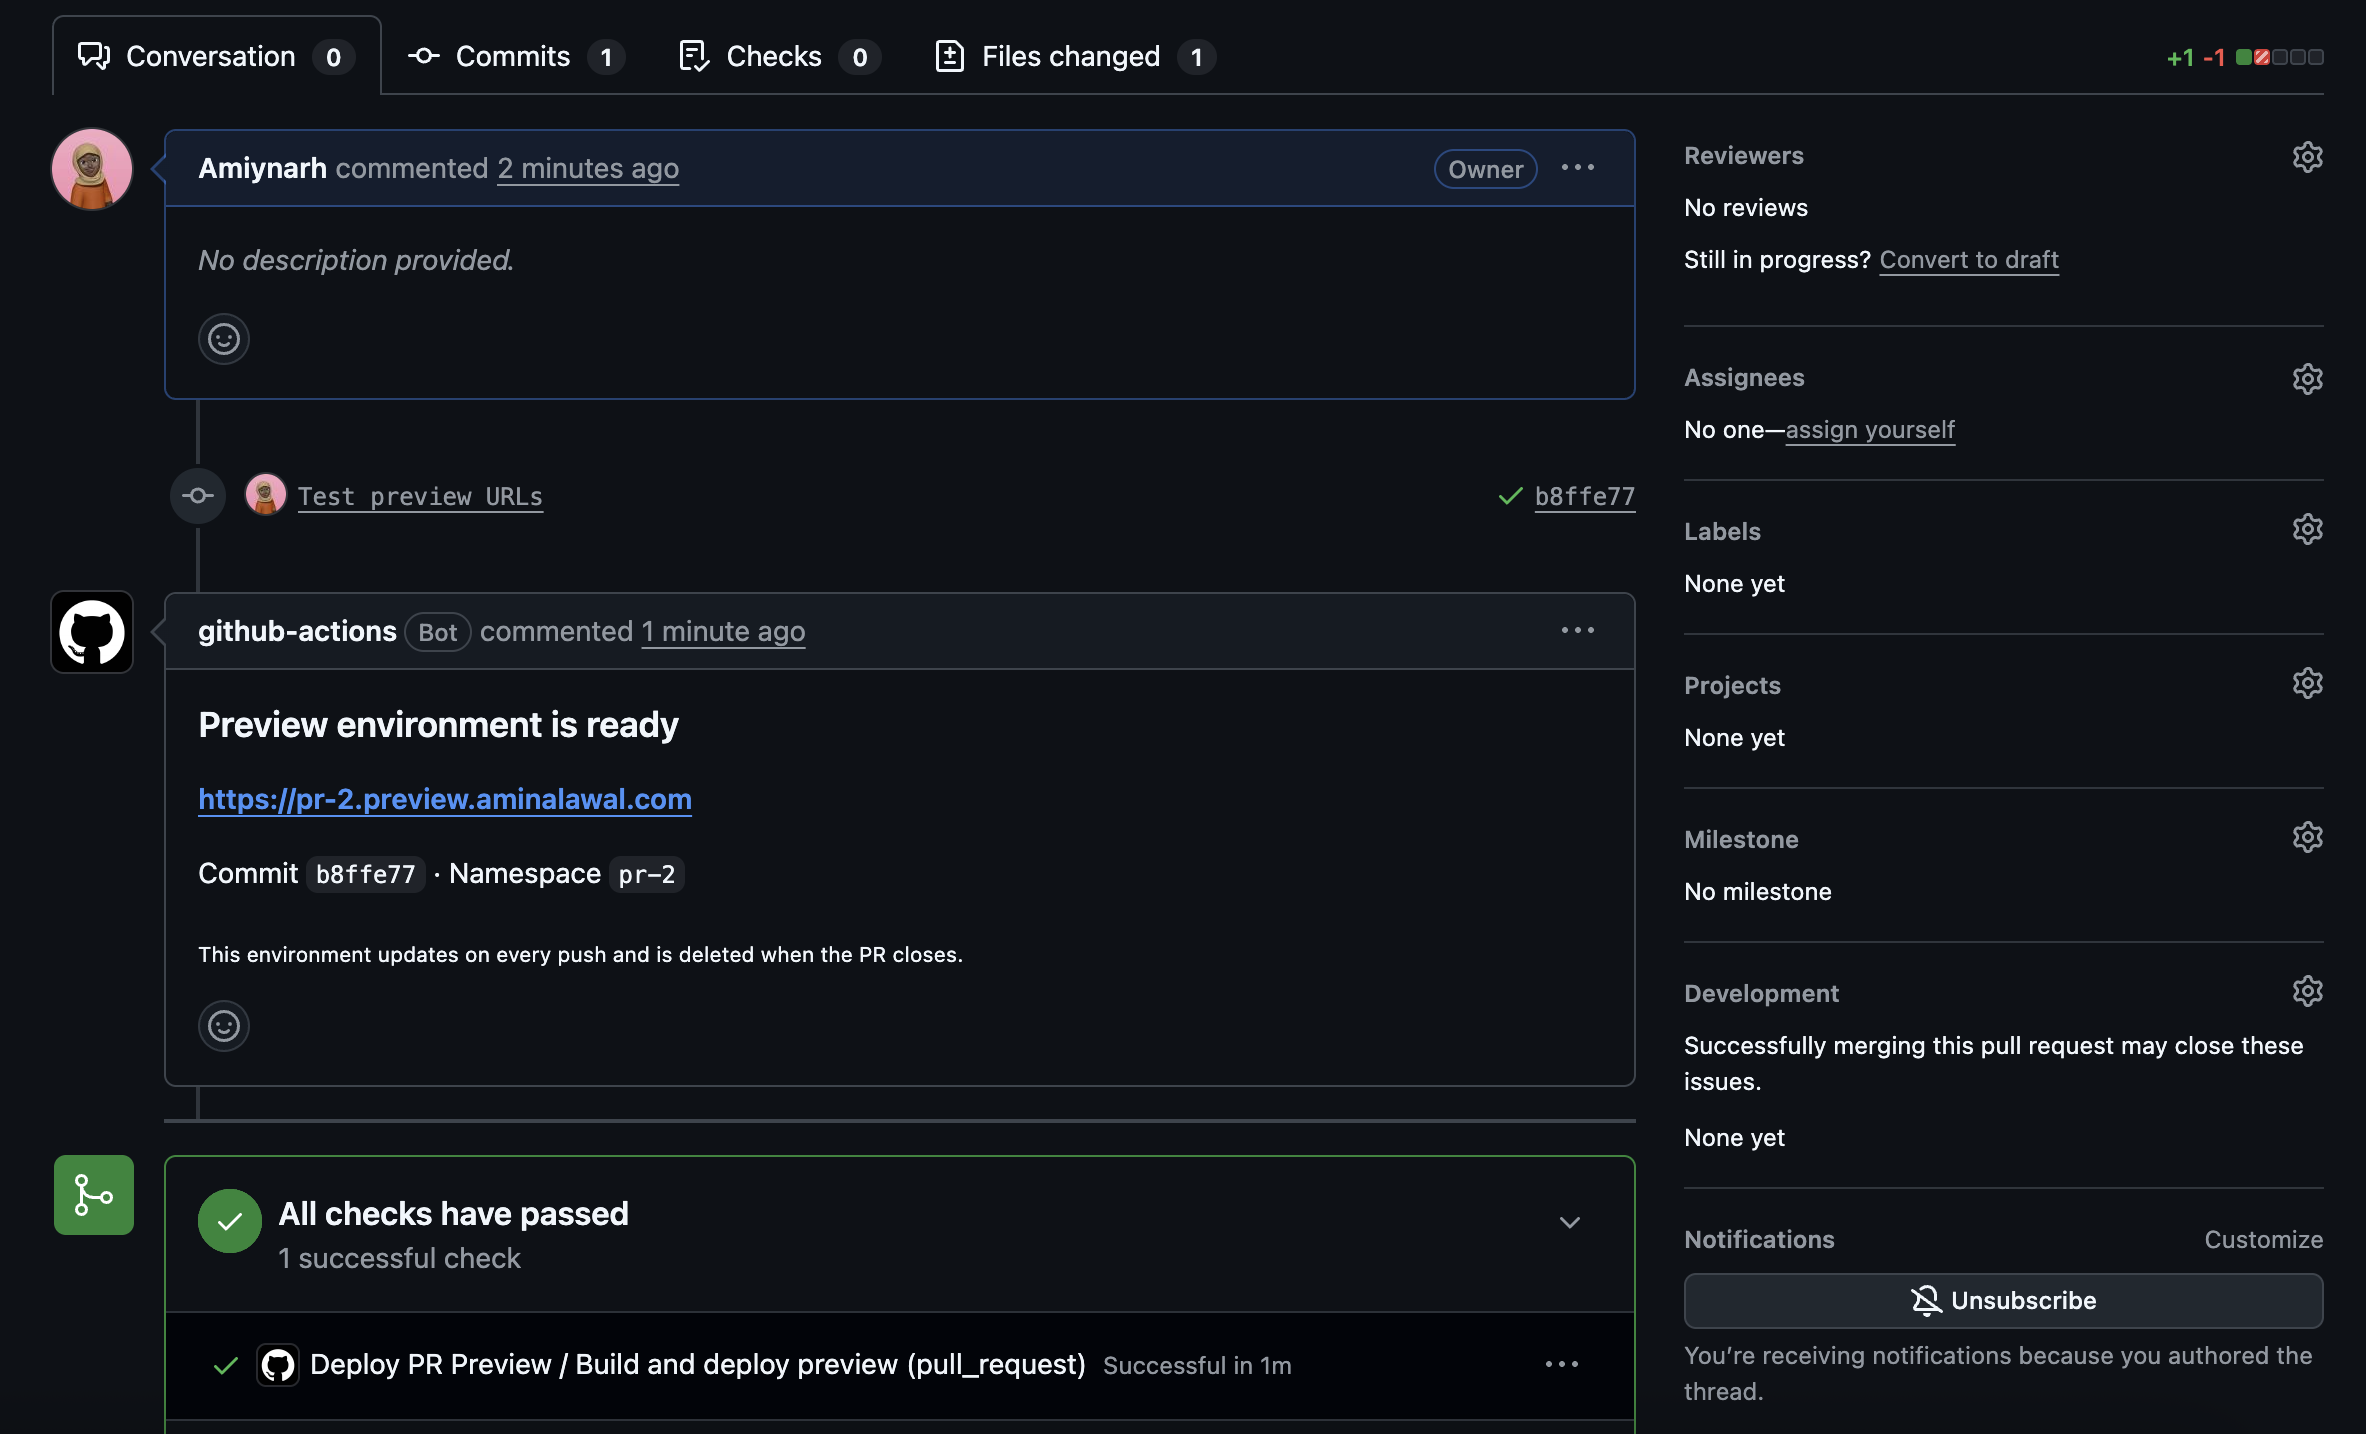
That's what we're building in this tutorial. Here's what it looks like from the reviewer's side. A bot comment appearing on the pull request with a live, working URL
What You'll Build
By the end of this handbook, you'll have a working system where:
Opening a pull request triggers a GitHub Actions workflow that builds a container image tagged specifically for that PR
The image is pushed to Google Artifact Registry
A dedicated Kubernetes namespace (
pr-42,pr-43, and so on) is created inside a GKE cluster, with resource quotas applied before anything deploysThe application deploys into that namespace, completely isolated from every other PR's environment
A shared Ingress controller routes
pr-42.preview.yourdomain.comto that namespace, with a valid TLS certificate issued automaticallyA bot comments the live URL on the pull request, updating the same comment on every push
Pushing new commits redeploys the environment with the updated code
Closing or merging the PR deletes the namespace and everything inside it
A scheduled job catches any environment the teardown missed
You'll also build the underlying infrastructure with Terraform, with three key design decisions, each with its own section.
No service account keys: GitHub Actions authenticates to Google Cloud through Workload Identity Federation. Short-lived OIDC tokens verified against a repository claim. Service account JSON keys sitting in GitHub secrets are one of the most common security problems in CI/CD pipelines today, and you don't need one.
One load balancer, not one per PR: A single shared Ingress controller routes every environment by hostname, and one wildcard DNS record covers every hostname that will ever exist. The naïve version provisions a cloud load balancer per environment, which gets expensive quickly.
Cleanup that assumes failure: Teardown runs when a PR closes. But a scheduled reaper also deletes namespaces whose PR is gone or that have outlived a maximum age, because even 95% effective automated cleanup still leaks, and leaks show up on the bill.
Here's the architecture we're working toward:
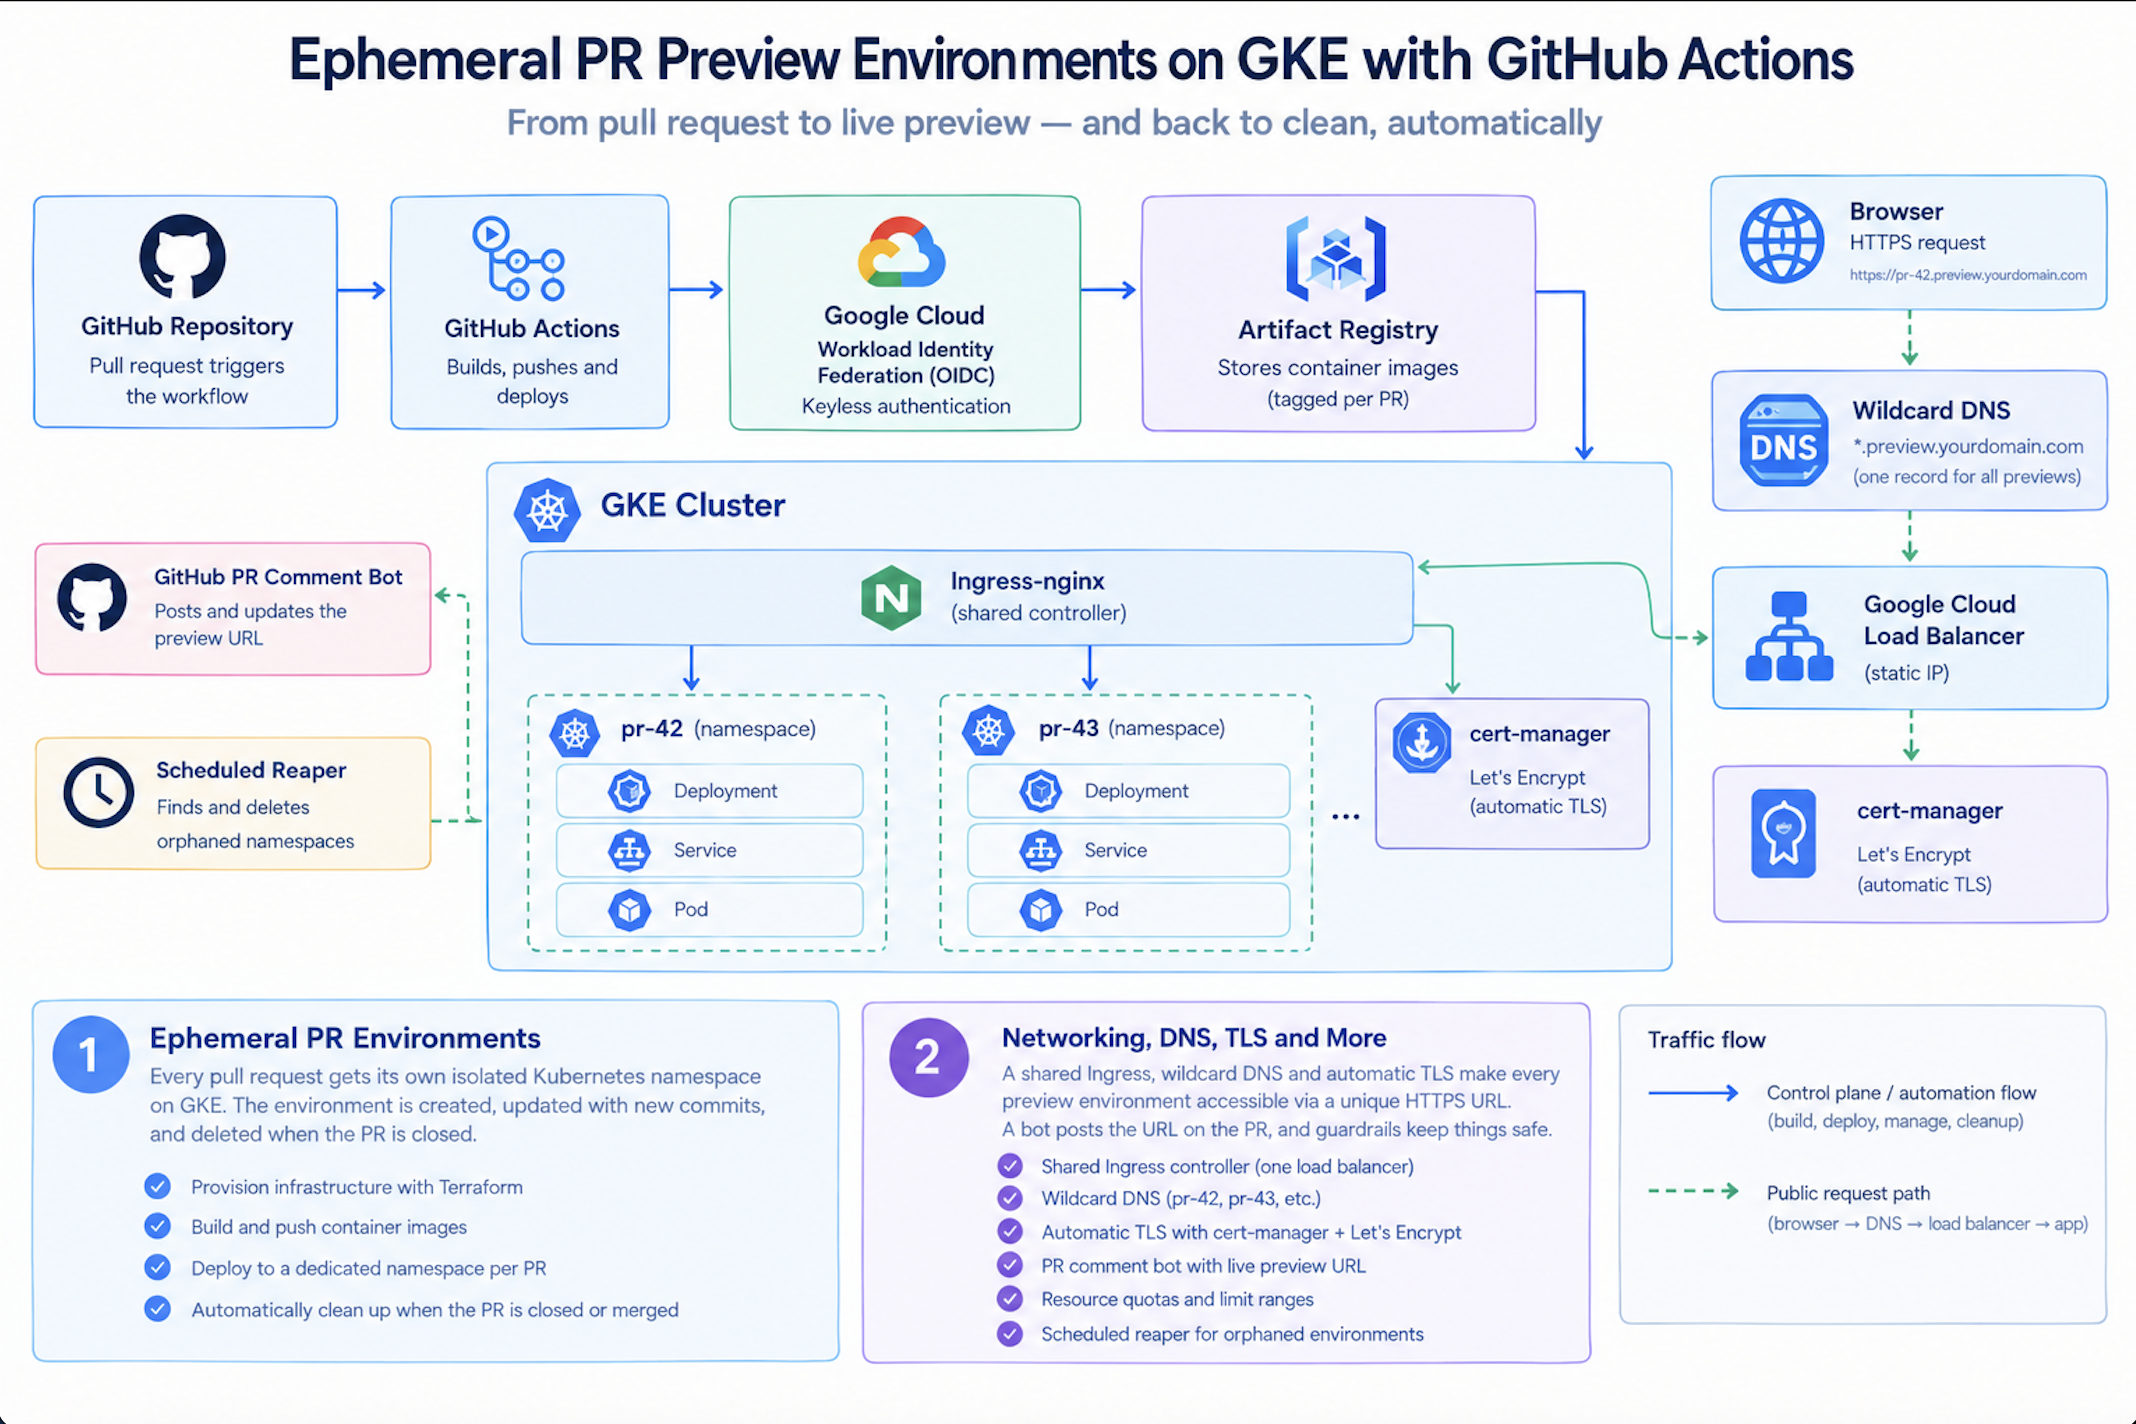
The diagram traces two separate paths through the same system.
The solid blue path is automation. A pull request triggers GitHub Actions, which authenticates to Google Cloud through Workload Identity Federation, pushes a PR-tagged image to Artifact Registry, and deploys into a dedicated namespace inside the GKE cluster.
Each namespace (pr-42, pr-43, and so on) holds its own Deployment, Service, and Pod, completely isolated from every other one.
Two more automated pieces sit alongside it: a bot that posts and updates the preview URL on the pull request, and a scheduled reaper that finds and deletes orphaned namespaces.
The dashed green path is public traffic. A browser request for a preview URL resolves through a single wildcard DNS record to one Google Cloud load balancer, which hands it to a shared NGINX Ingress controller. That controller reads the request's Host header and routes it to the right namespace. cert-manager runs beside it, requesting certificates from Let's Encrypt so each environment gets its own valid TLS certificate.
The important detail is what doesn't multiply. One load balancer, one DNS record, and one Ingress controller serve every environment, no matter how many pull requests are open.
Table of Contents
Prerequisites
Before you start, make sure you have the following ready:
A Google Cloud project with billing enabled. If you don't have one, create it at console.cloud.google.com. Running this tutorial costs roughly $5–10 depending on how long you leave the cluster up. Don't skip the cleanup section at the end.
gcloudCLI installed and authenticated. Rungcloud auth loginto sign in, andgcloud config set project YOUR_PROJECT_IDto point it at your project.Terraform version 1.5 or later. Check with
terraform version.kubectlinstalled. This is the CLI for interacting with Kubernetes clusters.Docker installed locally, for testing the build before you hand it to CI.
A GitHub repository that you own. This needs to be a repository you can push branches to and open pull requests against, since that's the trigger for everything we build.
Basic familiarity with Docker (images, layers, Dockerfile), Kubernetes (pods, deployments, services, namespaces), and GitHub Actions (workflows, jobs, steps). You don't need to be an expert, but you should know what these things are.
Helm version 3, for installing the Ingress controller and cert-manager. Check with
helm version.A domain name you control, with the ability to add DNS records. It doesn't matter where it's registered. You'll dedicate one subdomain to previews, like
preview.yourdomain.com, and every environment lives beneath it.
A note on the domain requirement: this is the part of the project that can't be faked. Let's Encrypt needs to verify that you control the domain before it will issue a certificate, and it verifies this by making a real HTTP request from the public internet. A .local domain, an entry in /etc/hosts, or a domain you don't own won't work.
If you don't have a spare domain, a .dev or .xyz costs a few pounds a year and is worth having for exactly this kind of project.
One more thing worth bringing your attention to early: you'll also need the gke-gcloud-auth-plugin. Recent versions of gcloud prompt you to install it the first time you connect to a GKE cluster. You can install it ahead of time with:
gcloud components install gke-gcloud-auth-plugin
Step 1: Set Up the Project Structure
Let's lay out the directories first, so you have a clear mental model of where everything lives.
mkdir -p pr-preview-envs/{app,terraform,k8s/base,.github/workflows}
cd pr-preview-envs
git init
Here's what each directory holds:
app/: the Go application and its Dockerfileterraform/: infrastructure as code: the GKE cluster, Artifact Registry, and Workload Identity Federation setupk8s/base/: the base Kubernetes manifests that every preview environment is built from.github/workflows/: the two GitHub Actions workflows that create and destroy environments
Connect this to a GitHub repository now, because the Workload Identity Federation setup in Step 5 needs to know your repository's full name (owner/repo):
git remote add origin https://github.com/YOUR_USERNAME/pr-preview-envs.git
Step 2: Write the Application
We need something to deploy. We'll use Go, for three reasons that matter to this project specifically.
First, Go compiles to a single statically-linked binary. There's no runtime to install and no interpreter, which means very small container images, and small images mean fast pushes and fast pulls, which matters a lot when you're building an image on every single commit to every open PR.
Second, Go's -ldflags -X mechanism lets us inject values into the binary at build time. We'll use this to bake the PR number and Git commit SHA directly into the application, so the running app can tell us exactly which build it is.
And lastly, build times are fast, and CI minutes aren't free.
Create app/main.go:
package main

import (
	"fmt"
	"net/http"
	"os"
)

// These values are empty at compile time and get injected by the
// linker via -ldflags -X during the Docker build. See the Dockerfile.
var (
	prNumber = "local"
	gitSha   = "dev"
)

func handler(w http.ResponseWriter, r *http.Request) {
	// Kubernetes injects these via the Downward API — see deployment.yaml
	namespace := os.Getenv("POD_NAMESPACE")
	podName := os.Getenv("POD_NAME")

	if namespace == "" {
		namespace = "not-in-kubernetes"
	}
	if podName == "" {
		podName, _ = os.Hostname()
	}

	fmt.Fprintf(w, "Preview environment is live\n\n")
	fmt.Fprintf(w, "PR number  : %s\n", prNumber)
	fmt.Fprintf(w, "Git SHA    : %s\n", gitSha)
	fmt.Fprintf(w, "Namespace  : %s\n", namespace)
	fmt.Fprintf(w, "Pod name   : %s\n", podName)
}

func healthz(w http.ResponseWriter, r *http.Request) {
	w.WriteHeader(http.StatusOK)
	fmt.Fprintln(w, "ok")
}

func main() {
	http.HandleFunc("/", handler)
	http.HandleFunc("/healthz", healthz)

	fmt.Println("Server starting on port 8080...")
	if err := http.ListenAndServe(":8080", nil); err != nil {
		fmt.Fprintf(os.Stderr, "server error: %v\n", err)
		os.Exit(1)
	}
}
Initialize the Go module from inside app/:
cd app
go mod init preview-app
Let's walk through what this code does and why each piece is here.
var prNumber = "local" and var gitSha = "dev" are package-level string variables with default values. The defaults are what you'll see if you run the binary locally without going through the Docker build.
During the CI build, the Go linker overwrites them with the real PR number and commit SHA. This is the single most useful debugging feature in the whole project: when you hit a preview environment, the app itself tells you exactly which commit it was built from. There's no guessing.
os.Getenv("POD_NAMESPACE") and os.Getenv("POD_NAME") read environment variables that Kubernetes injects into the container using something called the Downward API. We'll configure that in the deployment manifest in Step 8.
The Downward API lets a pod read metadata about itself (its own name, namespace, and labels) without needing any Kubernetes API credentials. It's the cleanest way for an app to know where it's running.
The handler function is registered on the root path /. It writes the PR number, commit SHA, namespace, and pod name to the response. It's four pieces of information that together answer "what exactly am I looking at right now?"
The healthz function is registered on /healthz, and returns HTTP 200 with the text ok. Kubernetes uses this endpoint for liveness and readiness probes, which we'll wire up in the deployment manifest.
http.ListenAndServe(":8080", nil) starts the server on port 8080. If it fails to start, it prints the error and exits with a non-zero code, so Kubernetes knows the container is broken and can restart it.
Test it locally before moving on:
go run main.go
In a second terminal:
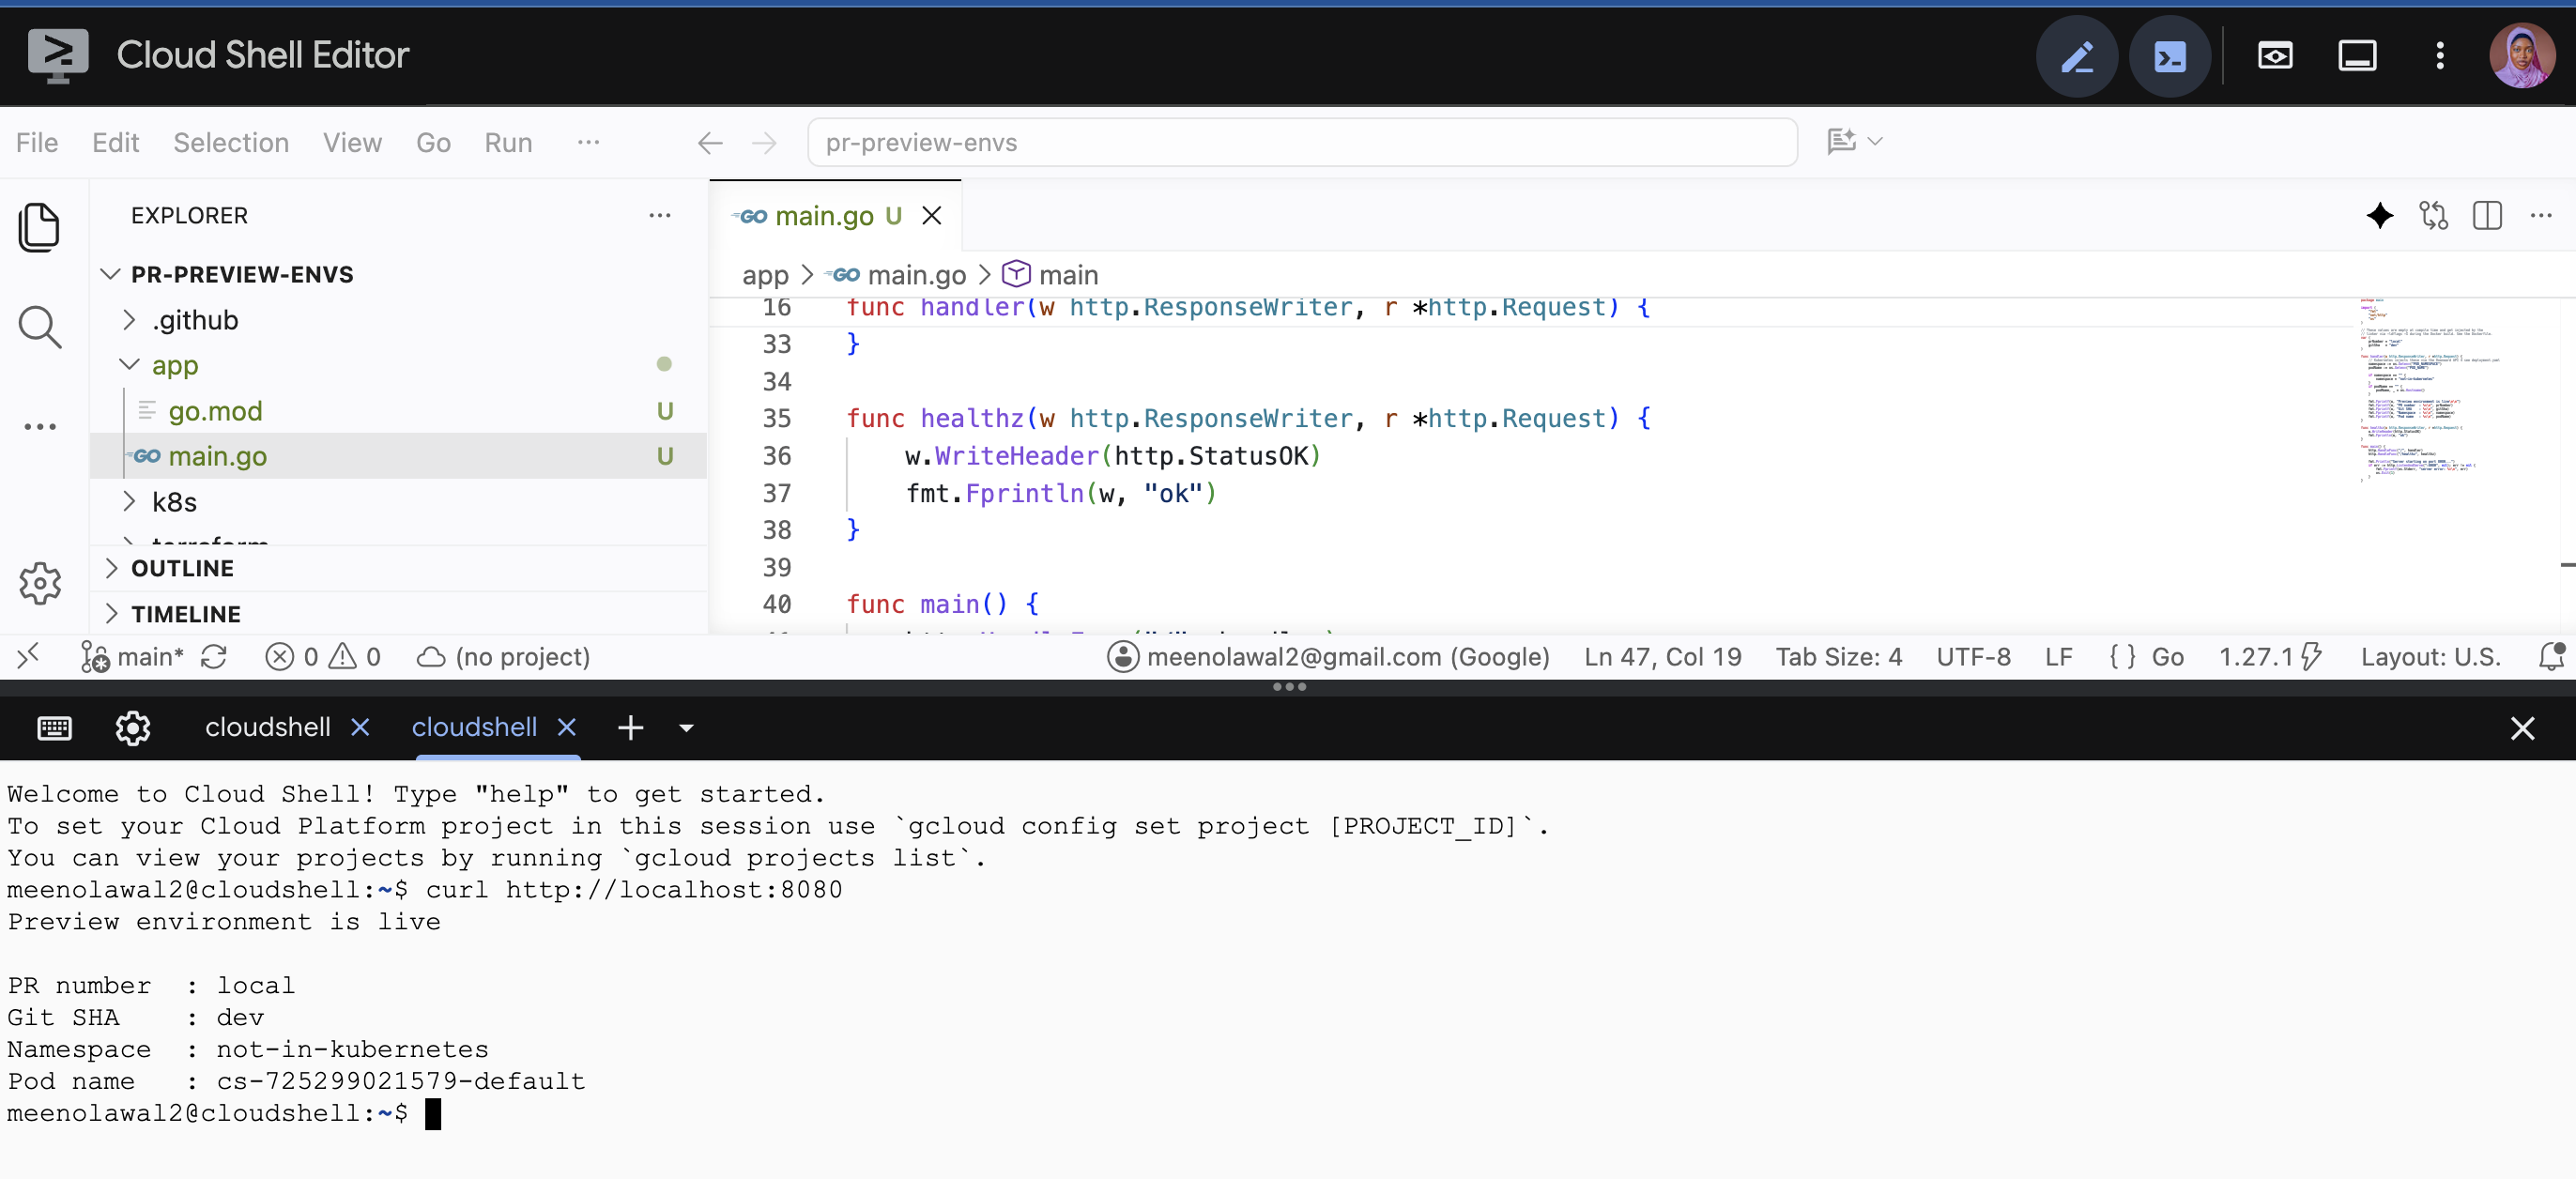
curl http://localhost:8080
You should see PR number : local and Git SHA : dev, since you're running outside the Docker build. That's the expected local behaviour.
Step 3: Write the Dockerfile
Create app/Dockerfile:
# -----------------------------------------------------------
# Stage 1: Build
# -----------------------------------------------------------
FROM golang:1.27-alpine AS builder
#Ensure the version matches what is in your go.mod file

# These are injected by the CI pipeline at build time
ARG PR_NUMBER=local
ARG GIT_SHA=dev

WORKDIR /app

# Copy go.mod first so Docker can cache the dependency layer
COPY go.mod .
RUN go mod download

COPY main.go .

# -w -s strips debug symbols (~30% smaller binary)
# -X overwrites package-level string variables at link time
RUN CGO_ENABLED=0 go build \
    -ldflags="-w -s -X main.prNumber=${PR_NUMBER} -X main.gitSha=${GIT_SHA}" \
    -o server main.go

# -----------------------------------------------------------
# Stage 2: Runtime
# -----------------------------------------------------------
FROM alpine:latest

RUN addgroup -S appgroup && adduser -S appuser -G appgroup
USER appuser

WORKDIR /app
COPY --from=builder /app/server .

EXPOSE 8080
CMD ["./server"]
There are a few things happening here worth understanding properly.
1. The -ldflags -X Injection
-X main.prNumber=${PR_NUMBER}
The -X linker flag sets the value of a package-level string variable at link time. The syntax is -X importpath.name=value. Since our variables live in package main, the import path is just main.
This only works on string variables that are already declared in the source. You can't create new variables this way, and you can't inject into an int or a bool. That's why prNumber is a string in main.go even though it holds a number.
Why do this instead of just passing an environment variable through the deployment manifest? Because build metadata belongs to the image, not the deployment. If you pass it as an env var, someone can deploy image abc123 with an env var claiming it's commit def456, and the app will happily lie to you. Baking it into the binary means the image can only ever report what it actually is.
The CGO_ENABLED=0 Flag
By default, Go can link against C libraries. When it does, the resulting binary depends on the system's C library being present at runtime. Alpine uses musl instead of the more common glibc, and that mismatch is a classic source of "works in the builder stage, crashes in the runtime stage" errors.
Setting CGO_ENABLED=0 forces a pure-Go, fully static binary with no external library dependencies. It will run on any Linux system, including a scratch image with nothing in it at all.
COPY go.mod . Before COPY main.go .
Docker builds images layer by layer and caches each layer. By copying only go.mod first and running go mod download before copying the source code, we create a cached dependency layer.
On subsequent builds (and remember, this pipeline builds on every commit to every open PR), Docker skips the dependency download entirely as long as go.mod hasn't changed. On a real project with dozens of dependencies, this is the difference between a 20-second build and a 3-minute build, multiplied by every push your team makes.
The Non-Root User
RUN addgroup -S appgroup && adduser -S appuser -G appgroup
USER appuser
Containers run as root by default. If an attacker finds a vulnerability in your application, running as root inside the container gives them significantly more room to escalate. Creating an unprivileged user and switching to it limits the blast radius. It costs you two lines, and there's no reason not to do it.
Build and test it locally:
docker build --build-arg PR_NUMBER=99 --build-arg GIT_SHA=abc1234 -t preview-app:test .
docker run -p 8080:8080 preview-app:test
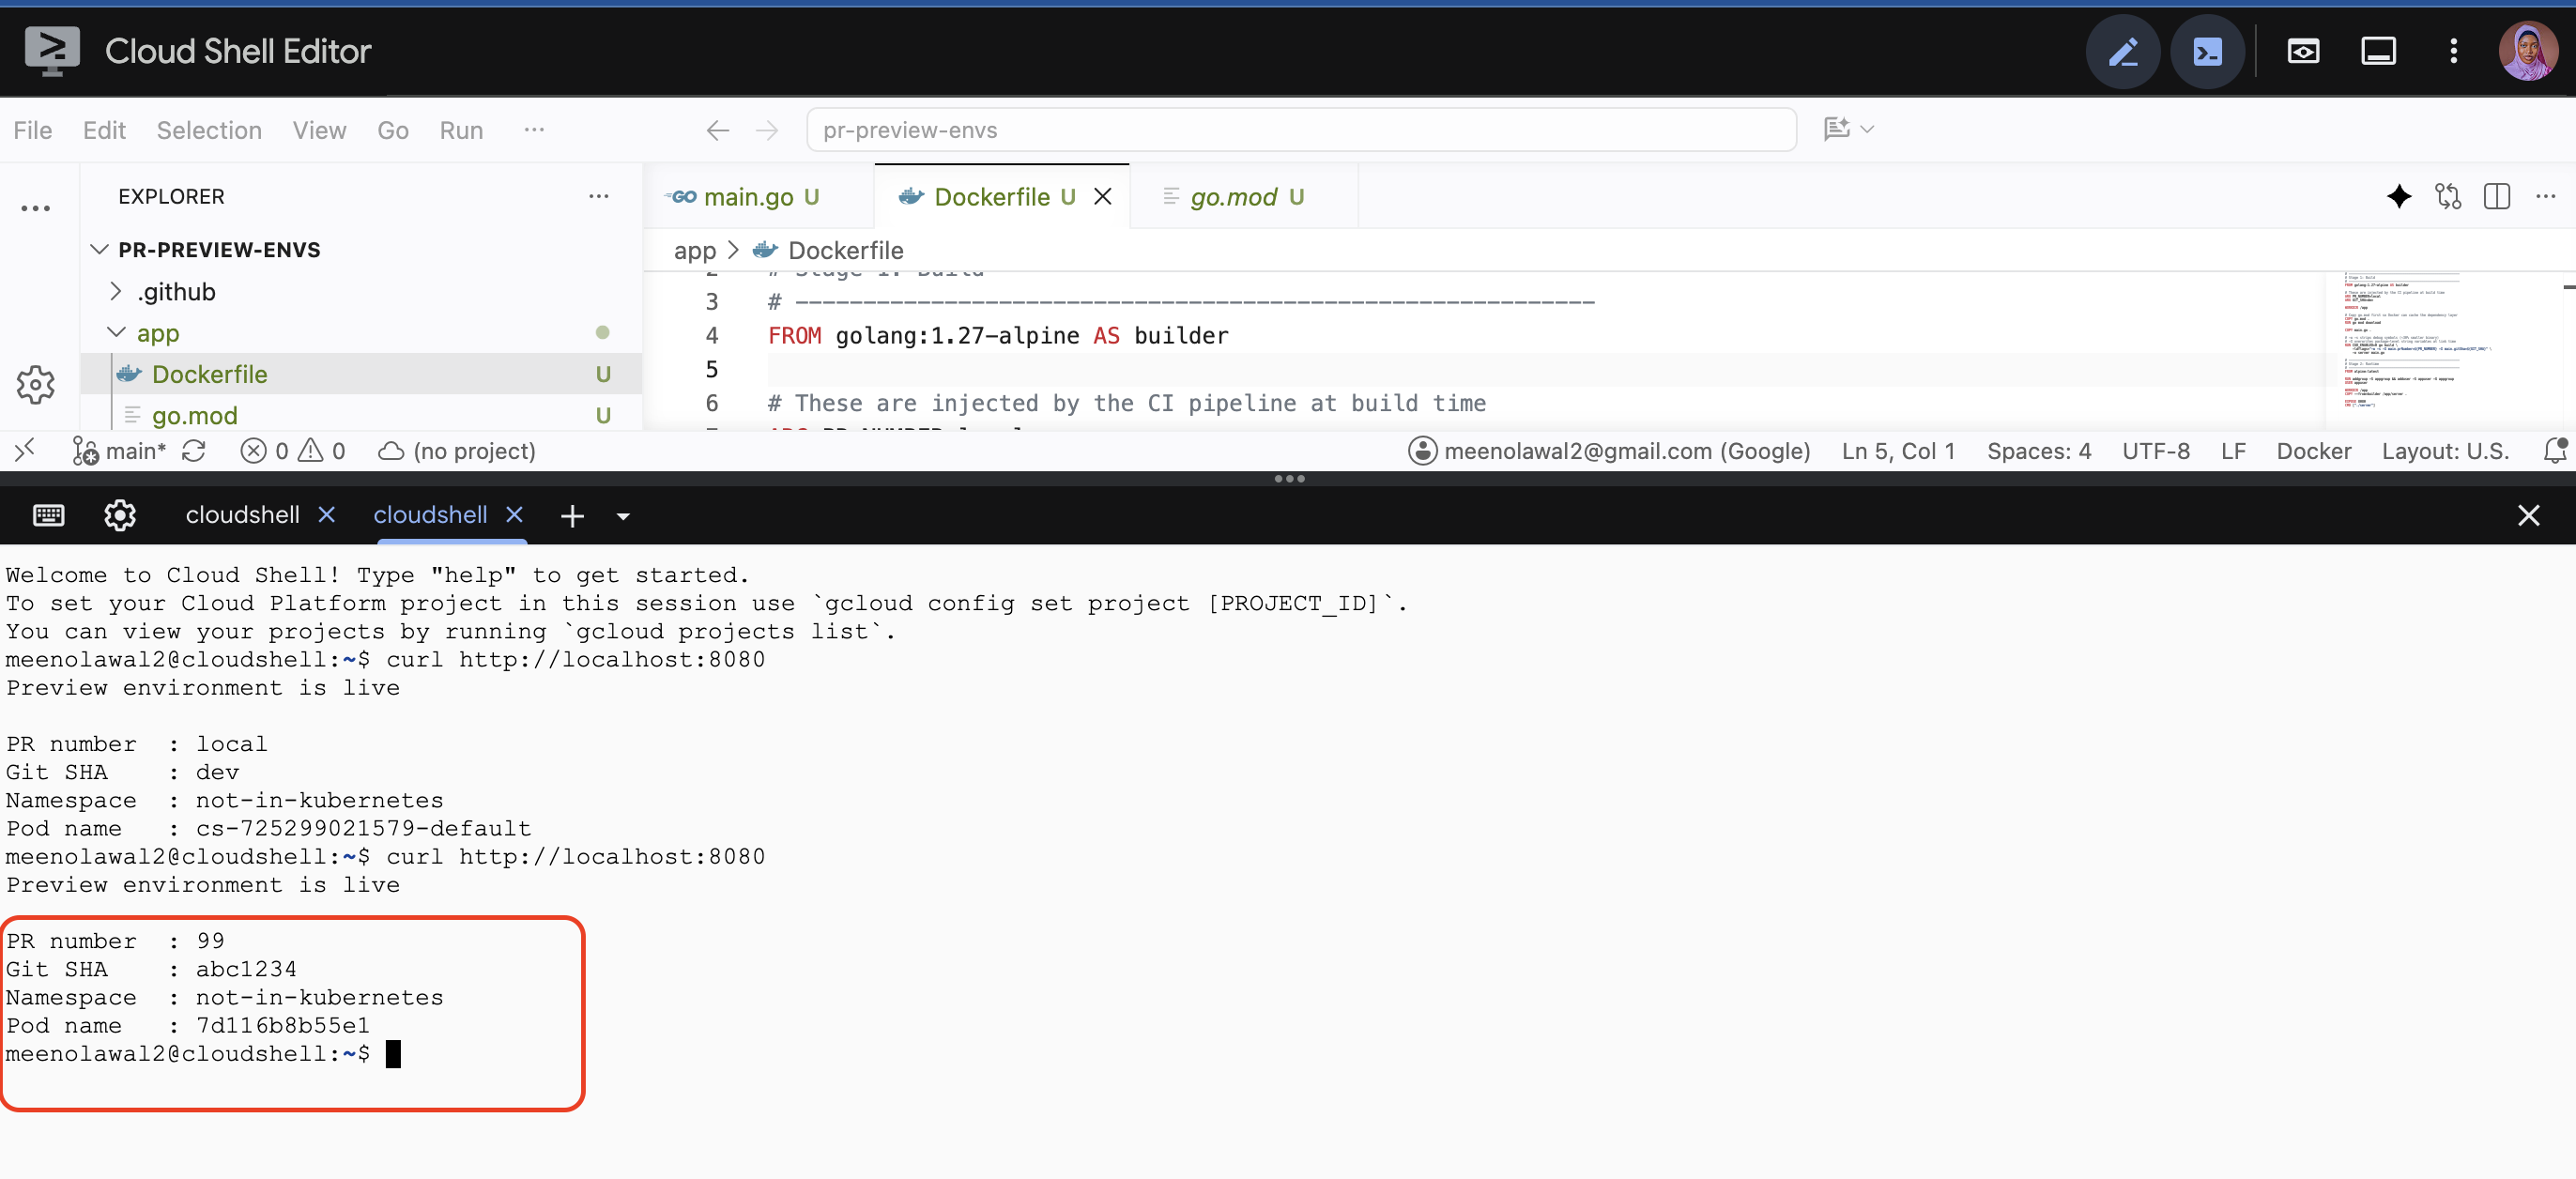
Then curl http://localhost:8080 in another terminal. You should now see PR number : 99 and Git SHA : abc1234. The injection works.
Step 4: Provision the Infrastructure with Terraform
Now we'll build the cloud infrastructure. We're using Terraform rather than a series of gcloud commands for a reason that becomes obvious the moment something goes wrong: with Terraform, terraform destroy cleans up everything you created, in the right order, with no orphaned resources quietly billing you.
Create terraform/variables.tf:
variable "project_id" {
  description = "GCP project ID"
  type        = string
}

variable "region" {
  description = "GCP region"
  type        = string
  default     = "europe-west2"
}

variable "zone" {
  description = "GCP zone. A zonal cluster is cheaper than a regional one."
  type        = string
  default     = "europe-west2-a"
}

variable "cluster_name" {
  description = "Name of the GKE cluster"
  type        = string
  default     = "pr-preview-cluster"
}

variable "github_repo" {
  description = "GitHub repository in owner/repo format, e.g. amina/pr-preview-envs"
  type        = string
}

variable "machine_type" {
  description = "Node machine type"
  type        = string
  default     = "e2-standard-2"
}

variable "node_count" {
  description = "Number of nodes in the pool"
  type        = number
  default     = 2
}
Now create terraform/main.tf:
terraform {
  required_version = ">= 1.5"
  required_providers {
    google = {
      source  = "hashicorp/google"
      version = "~> 5.0"
    }
  }
}

provider "google" {
  project = var.project_id
  region  = var.region
}

# Look up the project so we can reference its numeric project number,
# which Workload Identity Federation requires (it doesn't accept the
# human-readable project ID).
data "google_project" "current" {}

# -----------------------------------------------------------
# Enable required APIs
# -----------------------------------------------------------
resource "google_project_service" "apis" {
  for_each = toset([
    "container.googleapis.com",
    "artifactregistry.googleapis.com",
    "iamcredentials.googleapis.com",
    "sts.googleapis.com",
  ])

  service            = each.value
  disable_on_destroy = false
}

# -----------------------------------------------------------
# Artifact Registry — where preview images live
# -----------------------------------------------------------
resource "google_artifact_registry_repository" "preview" {
  location      = var.region
  repository_id = "pr-preview"
  description   = "Container images for PR preview environments"
  format        = "DOCKER"

  depends_on = [google_project_service.apis]
}

# -----------------------------------------------------------
# GKE cluster
# -----------------------------------------------------------
resource "google_container_cluster" "primary" {
  name     = var.cluster_name
  location = var.zone

  # Create the cluster with a throwaway default pool, then remove it
  # and manage nodes through a separate node pool resource. This is the
  # standard pattern — it lets you resize or upgrade the node pool
  # without recreating the cluster control plane.
  remove_default_node_pool = true
  initial_node_count       = 1

  networking_mode = "VPC_NATIVE"
  ip_allocation_policy {}

  # Set to true before you use this for anything real.
  deletion_protection = false

  depends_on = [google_project_service.apis]
}

resource "google_container_node_pool" "primary_nodes" {
  name       = "${var.cluster_name}-pool"
  location   = var.zone
  cluster    = google_container_cluster.primary.name
  node_count = var.node_count

  node_config {
    machine_type = var.machine_type
    disk_size_gb = 50

    oauth_scopes = [
      "https://www.googleapis.com/auth/cloud-platform",
    ]

    labels = {
      purpose = "pr-preview-envs"
    }
  }

  management {
    auto_repair  = true
    auto_upgrade = true
  }
}
There are a few things that're worth calling out here.
data "google_project" "current" isn't creating anything. It's a data source, which reads existing information from your provider. We need it because Workload Identity Federation identifies your project by its numeric project number, not the project ID you type in the console. Rather than making you look it up manually and paste it in, Terraform fetches it for you.
for_each on google_project_service: instead of writing four nearly identical resource blocks to enable four APIs, for_each iterates over a set and creates one resource per item. disable_on_destroy = false means terraform destroy won't turn these APIs off, which is what you want, because other things in your project might be using them.
remove_default_node_pool = true: GKE insists on creating a default node pool when you create a cluster. Setting this immediately deletes it, and we define our own node pool as a separate resource. The benefit is that node pool changes (resizing, changing machine type, upgrading) don't force a change to the cluster resource itself.
node_count = 2 with e2-standard-2: two nodes with 2 vCPU and 8GB each. Preview environments are small, but you'll have several running at once, plus GKE's own system pods. Two nodes give you comfortable headroom. If you plan to keep more than about eight preview environments alive simultaneously, bump this up.
deletion_protection = false: GKE added this as a guard against accidentally destroying production clusters. We're disabling it because this is a tutorial cluster you'll delete at the end. If you adapt this for real use, set it to true.
Step 5: Set Up Keyless Authentication with Workload Identity Federation
This is the section that matters most, so let's take it slowly.
The Problem With Service Account Keys
GitHub Actions needs permission to push images to Artifact Registry and deploy to your GKE cluster. The way most tutorials handle this is:
Create a service account in GCP
Generate a JSON key for it
Paste that JSON into a GitHub secret called
GCP_SA_KEYLoad it in the workflow
This works, but it's also a security problem, and here's why:
First, the key never expires. A service account JSON key is a long-lived credential. It's valid until someone explicitly revokes it, which in practice means it's valid forever, because nobody remembers to rotate them.
Second, the key is a bearer token. Anyone who obtains that JSON file is your service account. No second factor, IP restriction, or expiry. Copy the file, and use it from anywhere in the world.
Third, the blast radius is enormous. GitHub secrets are exposed to workflows. A compromised third-party action, a malicious dependency in your build, or a workflow modified in a pull request can exfiltrate that secret. Once it's out, an attacker has persistent access to your cloud project.
This isn't theoretical. Leaked service account keys are one of the most common root causes in cloud security incidents.
How Workload Identity Federation Fixes It
Workload Identity Federation removes the long-lived key entirely. Here's the flow:
GitHub Actions generates a short-lived OIDC token for the running workflow. This token is signed by GitHub and contains verified claims: which repository is running, which branch, which workflow, and which actor.
Your workflow presents that token to Google Cloud's Security Token Service.
Google checks the token's signature against GitHub's public keys, and checks the claims against rules you configured, specifically that the token came from your repository and no other.
If everything matches, Google issues a short-lived access token, typically valid for about an hour.
The workflow uses that token, and it expires shortly after.
There's no secret stored anywhere. Nothing to leak, rotate, or revoke. If someone forks your repository and runs the same workflow, the OIDC token they generate will carry their repository name in its claims, Google's check will fail, and they get nothing.
Add this to terraform/main.tf:
# -----------------------------------------------------------
# Service account that GitHub Actions will impersonate
# -----------------------------------------------------------
resource "google_service_account" "github_actions" {
  account_id   = "github-actions-preview"
  display_name = "GitHub Actions — PR Preview Environments"
}

# Permission to push images to Artifact Registry
resource "google_project_iam_member" "artifact_writer" {
  project = var.project_id
  role    = "roles/artifactregistry.writer"
  member  = "serviceAccount:${google_service_account.github_actions.email}"
}

# Permission to create namespaces and deploy workloads in GKE.
# container.developer grants full access to Kubernetes API objects,
# but NOT permission to modify the cluster itself.
resource "google_project_iam_member" "gke_developer" {
  project = var.project_id
  role    = "roles/container.developer"
  member  = "serviceAccount:${google_service_account.github_actions.email}"
}

# -----------------------------------------------------------
# Workload Identity Federation
# -----------------------------------------------------------
resource "google_iam_workload_identity_pool" "github" {
  workload_identity_pool_id = "github-pool"
  display_name              = "GitHub Actions Pool"
  description               = "Identity pool for GitHub Actions OIDC"

  depends_on = [google_project_service.apis]
}

resource "google_iam_workload_identity_pool_provider" "github" {
  workload_identity_pool_id          = google_iam_workload_identity_pool.github.workload_identity_pool_id
  workload_identity_pool_provider_id = "github-provider"
  display_name                       = "GitHub OIDC Provider"

  # Map claims from the GitHub OIDC token to Google attributes
  attribute_mapping = {
    "google.subject"       = "assertion.sub"
    "attribute.actor"      = "assertion.actor"
    "attribute.repository" = "assertion.repository"
  }

  # CRITICAL: without this condition, ANY GitHub repository on the
  # internet could authenticate against your pool.
  attribute_condition = "assertion.repository == '${var.github_repo}'"

  oidc {
    issuer_uri = "https://token.actions.githubusercontent.com"
  }
}

# Allow tokens from your specific repo to impersonate the service account
resource "google_service_account_iam_member" "github_impersonation" {
  service_account_id = google_service_account.github_actions.name
  role               = "roles/iam.workloadIdentityUser"
  member             = "principalSet://iam.googleapis.com/projects/${data.google_project.current.number}/locations/global/workloadIdentityPools/${google_iam_workload_identity_pool.github.workload_identity_pool_id}/attribute.repository/${var.github_repo}"
}
Let's break down the parts that trip people up.
attribute_mapping: GitHub's OIDC token contains a set of claims. This block tells Google which claims to read and what to call them internally. assertion.sub is the token's subject (something like repo:owner/name:ref:refs/heads/main). assertion.repository is the full repository name. google.subject is required, while the others are optional attributes you can then write rules against.
attribute_condition: read this line twice, because getting it wrong is a serious vulnerability:
attribute_condition = "assertion.repository == '${var.github_repo}'"
Without this condition, your identity pool trusts the GitHub OIDC issuer, which means it trusts every repository on GitHub. Anyone who knows your pool's resource path (which isn't secret and appears in workflow files) could authenticate and impersonate your service account.
This condition narrows the trust to exactly one repository. Google now requires an attribute condition when you map assertion.repository, precisely because so many people got this wrong.
principalSet://...: this is the identity being granted the workloadIdentityUser role. Read it right to left: any principal in the github-pool whose attribute.repository equals your repo may impersonate this service account. Note that it uses data.google_project.current.number, which is the numeric project number, not the project ID. Using the project ID here produces an error that doesn't clearly explain what's wrong, and it's one of the most common mistakes with WIF.
Why roles/container.developer and not roles/container.admin? container.developer grants full access to Kubernetes API objects inside clusters: creating namespaces, applying deployments, deleting resources. container.admin additionally allows modifying the clusters themselves: resizing node pools, upgrading, deleting the cluster entirely.
Our workflow never needs to touch the cluster's own configuration, so it shouldn't have permission to. This is least privilege in practice: grant exactly what the job requires and nothing beyond it.
Now create terraform/outputs.tf:
output "cluster_name" {
  value = google_container_cluster.primary.name
}

output "cluster_zone" {
  value = var.zone
}

output "artifact_registry_url" {
  description = "Base URL for pushing images"
  value       = "${var.region}-docker.pkg.dev/${var.project_id}/${google_artifact_registry_repository.preview.repository_id}"
}

output "workload_identity_provider" {
  description = "Paste this into the GitHub Actions workflow"
  value       = "projects/${data.google_project.current.number}/locations/global/workloadIdentityPools/${google_iam_workload_identity_pool.github.workload_identity_pool_id}/providers/${google_iam_workload_identity_pool_provider.github.workload_identity_pool_provider_id}"
}

output "service_account_email" {
  description = "Paste this into the GitHub Actions workflow"
  value       = google_service_account.github_actions.email
}

output "get_credentials_command" {
  value = "gcloud container clusters get-credentials ${google_container_cluster.primary.name} --zone ${var.zone} --project ${var.project_id}"
}
Those outputs aren't decoration. workload_identity_provider and service_account_email are the two values you'll paste into your GitHub Actions workflow, and both are tedious to construct by hand.
Step 6: Apply the Terraform Configuration
From inside the terraform/ directory:
terraform init
This downloads the Google provider and sets up the backend. You should see "Terraform has been successfully initialized!"
Now preview what will be created:
terraform plan \
  -var="project_id=YOUR_PROJECT_ID" \
  -var="github_repo=YOUR_USERNAME/pr-preview-envs"
Read the plan output. Terraform tells you exactly what it intends to create before it creates anything. You should see roughly a dozen resources to add and none to change or destroy.
If that looks right:
terraform apply \
  -var="project_id=YOUR_PROJECT_ID" \
  -var="github_repo=YOUR_USERNAME/pr-preview-envs"
Type yes when prompted. Cluster creation takes about five minutes.
Tip: typing those -var flags repeatedly gets old fast. Create a file called terraform.tfvars containing project_id = "your-project-id" and github_repo = "you/pr-preview-envs", and Terraform picks it up automatically. Add it to .gitignore.
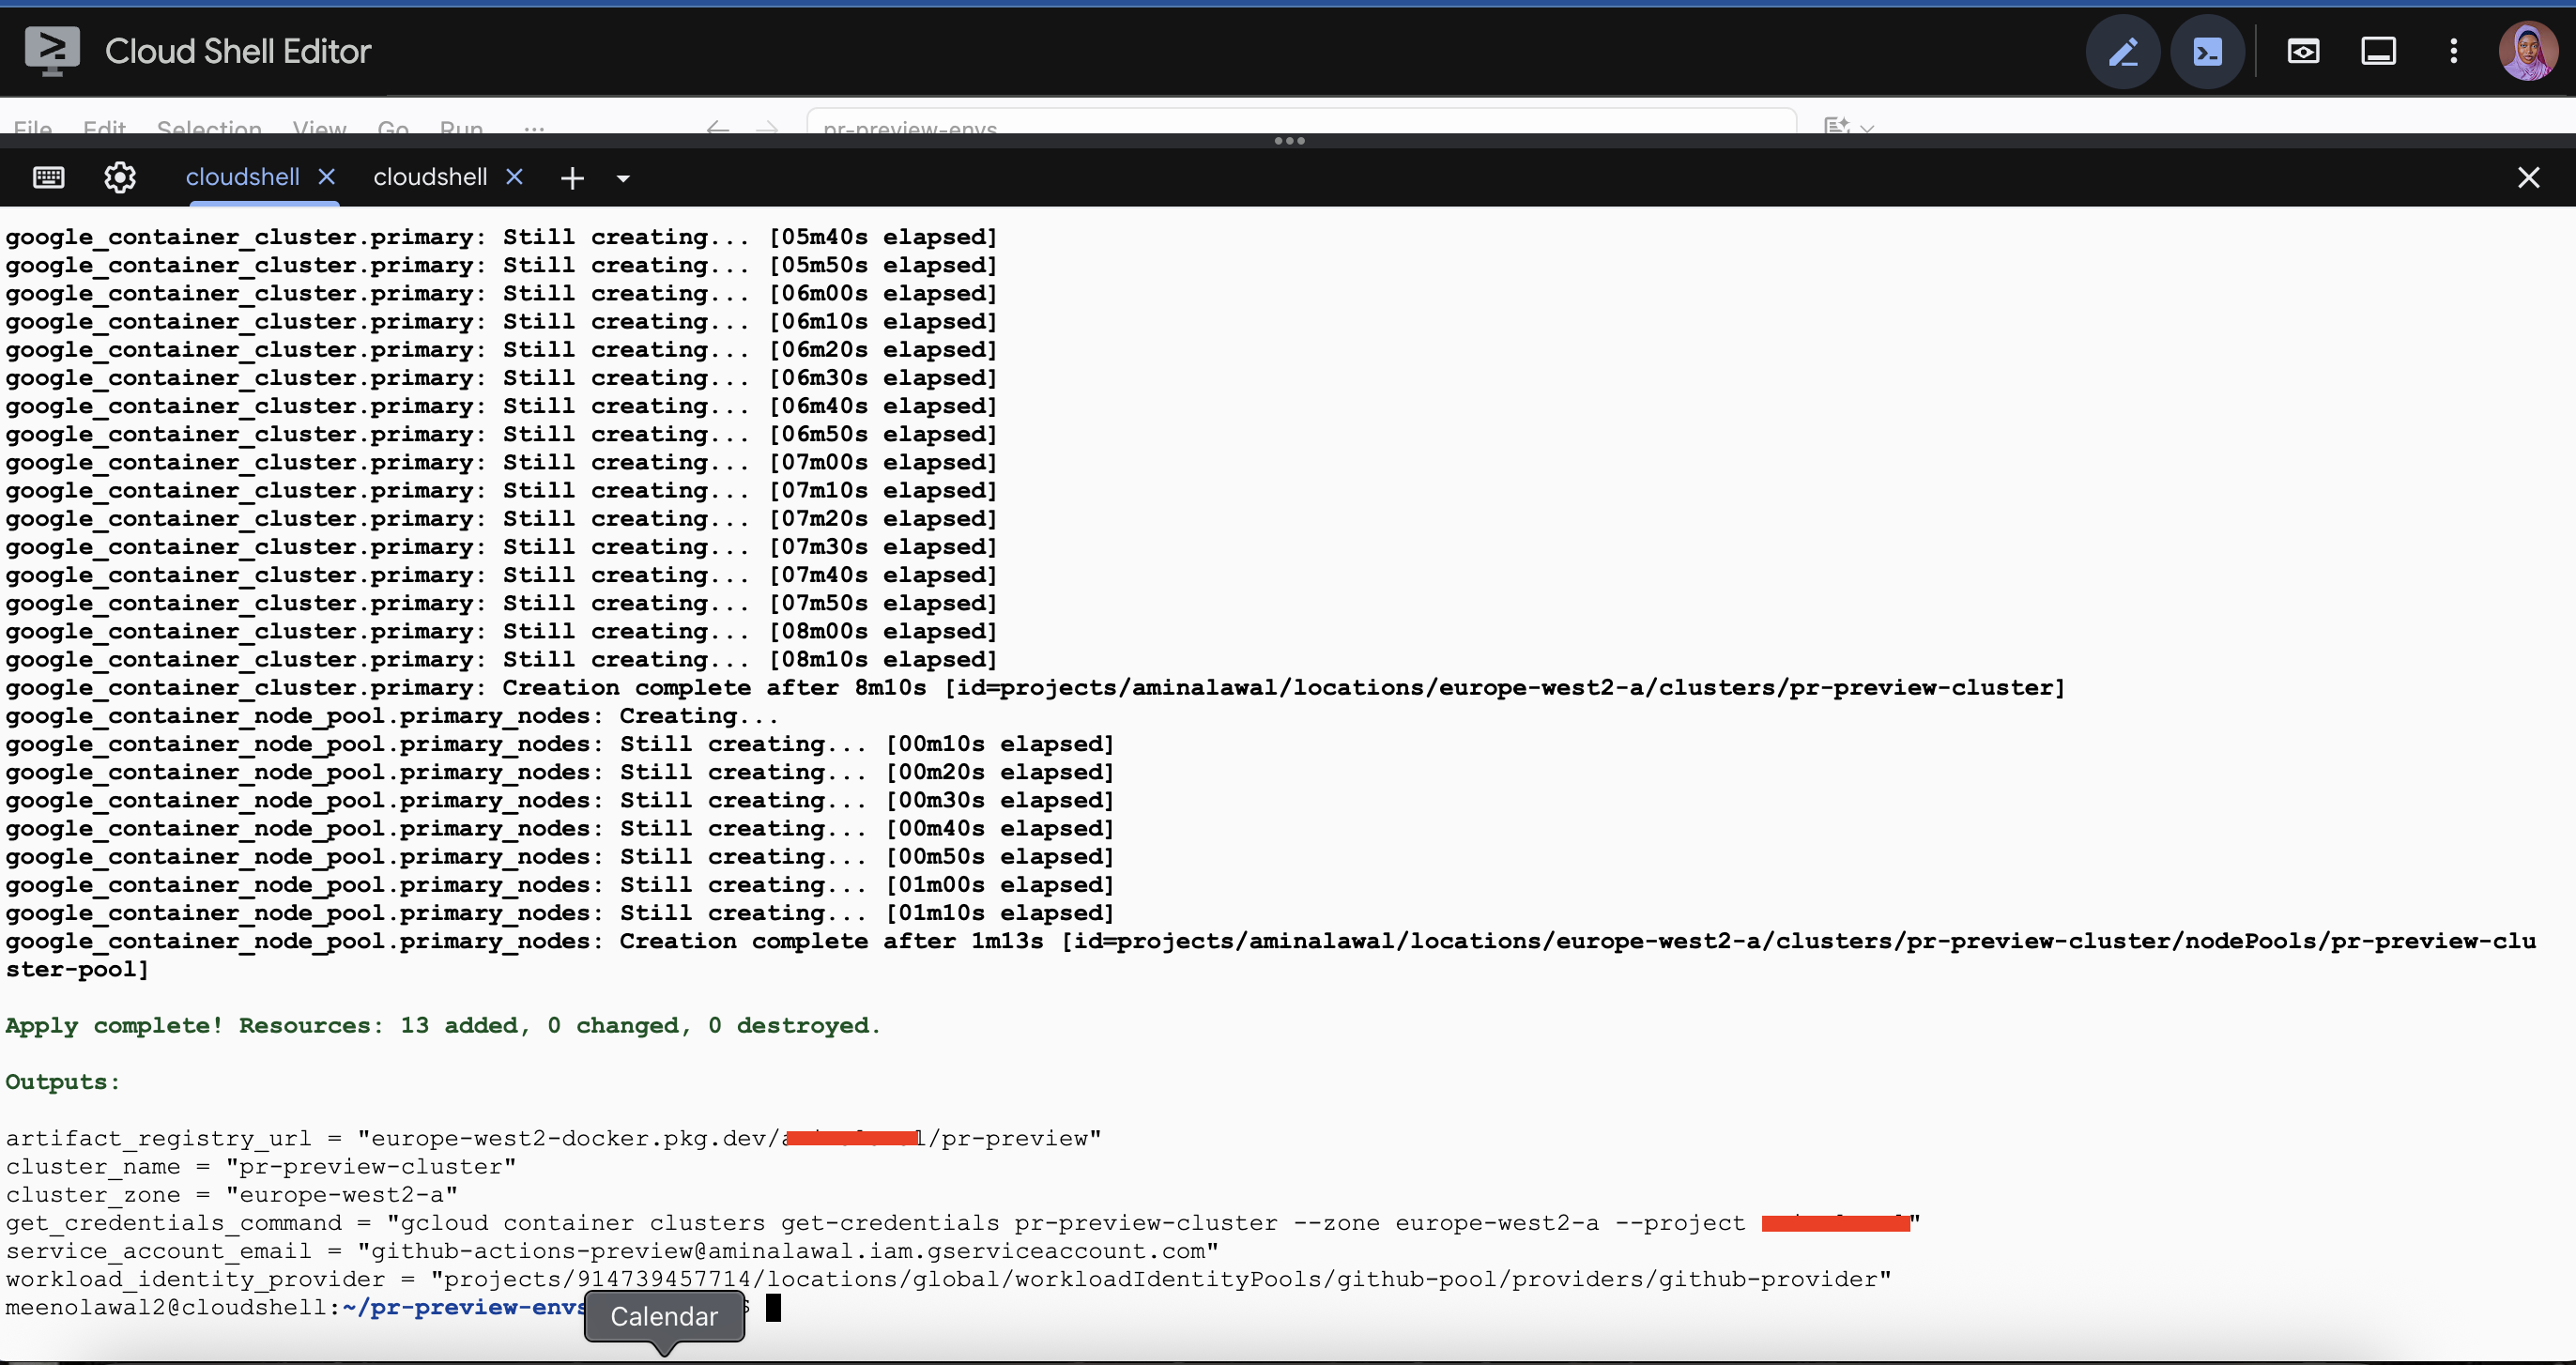
When it finishes, Terraform prints your outputs. Save these, as you'll need them in Step 9:
artifact_registry_url = "europe-west2-docker.pkg.dev/your-project/pr-preview"
service_account_email = "github-actions-preview@your-project.iam.gserviceaccount.com"
workload_identity_provider = "projects/123456789/locations/global/workloadIdentityPools/github-pool/providers/github-provider"
You can print them again any time with terraform output.
Connect kubectl to the new cluster using the command from the get_credentials_command output:
gcloud container clusters get-credentials pr-preview-cluster \
  --zone europe-west2-a \
  --project YOUR_PROJECT_ID
Verify:
kubectl get nodes
You should see two nodes in Ready state.

Step 7: Prove the Lifecycle Manually
Before automating anything, do it by hand once.
This isn't busywork. Automation is fundamentally just a script running commands you could have typed. If you don't know what the commands are, you can't debug the automation when it fails...and it will fail, usually at 11 pm before a demo. Ten minutes here saves hours later.
Create a namespace:
kubectl create namespace pr-test
Deploy a placeholder into it:
kubectl create deployment hello \
  --image=nginx:1.27-alpine \
  --namespace=pr-test
Check it:
kubectl get pods --namespace=pr-test
Now the important part – prove the isolation:
kubectl get pods --all-namespaces | grep hello
The pod exists only in pr-test. Nothing in default or any other namespace knows about it. That's the property the entire project is built on: a namespace is a boundary, and everything inside one PR's namespace is invisible to every other.
Now tear it down:
kubectl delete namespace pr-test
Watch what happens:
kubectl get namespace pr-test
For a few seconds, you'll see Terminating, then the namespace disappears entirely. Deleting a namespace deletes every resource inside it: deployments, pods, services, config maps, secrets, everything. One command, complete cleanup.
That single property is why namespace-per-PR is such a good fit for preview environments. Teardown isn't a careful sequence of deletions you have to get right. It's one command that can't leave anything behind.
Step 8: Write the Kubernetes Manifests with Kustomize
Every preview environment deploys the same application. The only differences between pr-42 and pr-43 are the namespace and the image tag.
This is exactly the problem Kustomize solves. You write the manifests once as a base, then apply small, declarative changes on top of it (an overlay) without templating, string substitution, or sed scripts mangling your YAML.
Kustomize is built into kubectl (that's the -k flag), so there's nothing extra to install.
Create k8s/base/deployment.yaml:
apiVersion: apps/v1
kind: Deployment
metadata:
  name: preview-app
  labels:
    app: preview-app
spec:
  replicas: 1
  selector:
    matchLabels:
      app: preview-app
  template:
    metadata:
      labels:
        app: preview-app
    spec:
      containers:
        - name: preview-app
          # This is a placeholder. The overlay replaces it with the
          # real registry path and PR-specific tag.
          image: preview-app
          ports:
            - containerPort: 8080
          env:
            # Downward API: the pod learns its own identity
            - name: POD_NAMESPACE
              valueFrom:
                fieldRef:
                  fieldPath: metadata.namespace
            - name: POD_NAME
              valueFrom:
                fieldRef:
                  fieldPath: metadata.name
          livenessProbe:
            httpGet:
              path: /healthz
              port: 8080
            initialDelaySeconds: 5
            periodSeconds: 10
          readinessProbe:
            httpGet:
              path: /healthz
              port: 8080
            initialDelaySeconds: 2
            periodSeconds: 5
          resources:
            requests:
              cpu: "50m"
              memory: "64Mi"
            limits:
              cpu: "200m"
              memory: "128Mi"
Create k8s/base/service.yaml:
apiVersion: v1
kind: Service
metadata:
  name: preview-app
spec:
  selector:
    app: preview-app
  ports:
    - protocol: TCP
      port: 80
      targetPort: 8080
  type: ClusterIP
Create k8s/base/kustomization.yaml:
apiVersion: kustomize.config.k8s.io/v1beta1
kind: Kustomization

resources:
  - deployment.yaml
  - service.yaml
There are some deliberate choices here.
replicas: 1: production runs multiple replicas for availability. A preview environment doesn't need high availability. One replica per environment, multiplied across every open PR, keeps your node count and your bill sane.
image: preview-app: a bare placeholder with no registry and no tag. It would never pull as-is. Kustomize's image transformer matches on this name and replaces it wholesale, so the base manifest never needs to know your registry URL.
The Downward API env block: this is where POD_NAMESPACE and POD_NAME come from. fieldRef reads a field from the pod's own spec at runtime and exposes it as an environment variable. No API calls, credentials, or service account needed.
type: ClusterIP: internal-only. Each LoadBalancer service provisions a real Google Cloud load balancer with a real hourly cost and a public IP. Doing that per PR would be expensive and wasteful. We'll reach the app with kubectl port-forward for now, and in Step 13 a single shared Ingress controller takes over, serving every environment through one load balancer.
Resource requests and limits: requests reserve capacity so the scheduler knows how much room a pod needs. limits cap what it can consume. Without limits, one runaway preview environment could starve every other one on the node. With many short-lived environments coming and going, this isn't optional.
Test the base renders correctly:
kubectl kustomize k8s/base
That prints the rendered YAML without applying it. This is useful for debugging.
Step 9: Build the Spin-Up Workflow
Now we connect everything.
Create .github/workflows/preview-deploy.yml:
name: Deploy PR Preview

on:
  pull_request:
    types: [opened, synchronize, reopened]

# If someone pushes three commits quickly, cancel the older runs.
# Without this, three deploys race each other into the same namespace
# and whichever finishes last wins — which may not be the newest commit.
concurrency:
  group: preview-${{ github.event.pull_request.number }}
  cancel-in-progress: true

permissions:
  contents: read
  id-token: write   # REQUIRED for Workload Identity Federation
  pull-requests: write

env:
  PROJECT_ID: YOUR_PROJECT_ID
  REGION: europe-west2
  CLUSTER_NAME: pr-preview-cluster
  CLUSTER_ZONE: europe-west2-a
  REPOSITORY: pr-preview
  IMAGE_NAME: preview-app

jobs:
  deploy:
    name: Build and deploy preview
    runs-on: ubuntu-latest

    steps:
      - name: Check out code
        uses: actions/checkout@v4

      - name: Set environment variables
        run: |
          PR_NUMBER=${{ github.event.pull_request.number }}
          SHORT_SHA=$(echo "${{ github.event.pull_request.head.sha }}" | cut -c1-7)

          echo "PR_NUMBER=${PR_NUMBER}"   >> $GITHUB_ENV
          echo "SHORT_SHA=${SHORT_SHA}"   >> $GITHUB_ENV
          echo "NAMESPACE=pr-${PR_NUMBER}" >> $GITHUB_ENV
          echo "IMAGE_TAG=pr-${PR_NUMBER}-${SHORT_SHA}" >> $GITHUB_ENV
          echo "IMAGE_BASE=${{ env.REGION }}-docker.pkg.dev/${{ env.PROJECT_ID }}/${{ env.REPOSITORY }}/${{ env.IMAGE_NAME }}" >> $GITHUB_ENV

      - name: Authenticate to Google Cloud
        uses: google-github-actions/auth@v2
        with:
          workload_identity_provider: ${{ secrets.WIF_PROVIDER }}
          service_account: ${{ secrets.WIF_SERVICE_ACCOUNT }}

      - name: Set up gcloud
        uses: google-github-actions/setup-gcloud@v2

      - name: Configure Docker for Artifact Registry
        run: gcloud auth configure-docker ${{ env.REGION }}-docker.pkg.dev --quiet

      - name: Build and push image
        run: |
          docker build \
            --build-arg PR_NUMBER="${PR_NUMBER}" \
            --build-arg GIT_SHA="${SHORT_SHA}" \
            -t "${IMAGE_BASE}:${IMAGE_TAG}" \
            ./app

          docker push "${IMAGE_BASE}:${IMAGE_TAG}"

      - name: Get GKE credentials
        uses: google-github-actions/get-gke-credentials@v2
        with:
          cluster_name: ${{ env.CLUSTER_NAME }}
          location: ${{ env.CLUSTER_ZONE }}

      - name: Create namespace
        run: |
          # --dry-run=client | apply makes this idempotent.
          # Running it on an existing namespace is a no-op, not an error.
          kubectl create namespace "${NAMESPACE}" \
            --dry-run=client -o yaml | kubectl apply -f -

      - name: Generate Kustomize overlay
        run: |
          mkdir -p k8s/overlays/"${NAMESPACE}"
          cat > k8s/overlays/"${NAMESPACE}"/kustomization.yaml <<EOF
          apiVersion: kustomize.config.k8s.io/v1beta1
          kind: Kustomization

          namespace: ${NAMESPACE}

          resources:
            - ../../base

          images:
            - name: preview-app
              newName: ${IMAGE_BASE}
              newTag: ${IMAGE_TAG}
          EOF

          echo "--- Rendered manifest ---"
          kubectl kustomize k8s/overlays/"${NAMESPACE}"

      - name: Deploy
        run: kubectl apply -k k8s/overlays/"${NAMESPACE}"

      - name: Wait for rollout
        run: |
          kubectl rollout status deployment/preview-app \
            --namespace="${NAMESPACE}" \
            --timeout=180s

      - name: Show deployment details
        run: |
          echo "Namespace: ${NAMESPACE}"
          kubectl get pods,svc --namespace="${NAMESPACE}"
Add the Two Secrets
Go to your repository on GitHub and go to Settings, Secrets and variables, Actions, and New repository secret. Add:
| Secret name | Value |
|---|---|
WIF_PROVIDER |
The workload_identity_provider output from Terraform |
WIF_SERVICE_ACCOUNT |
The service_account_email output from Terraform |
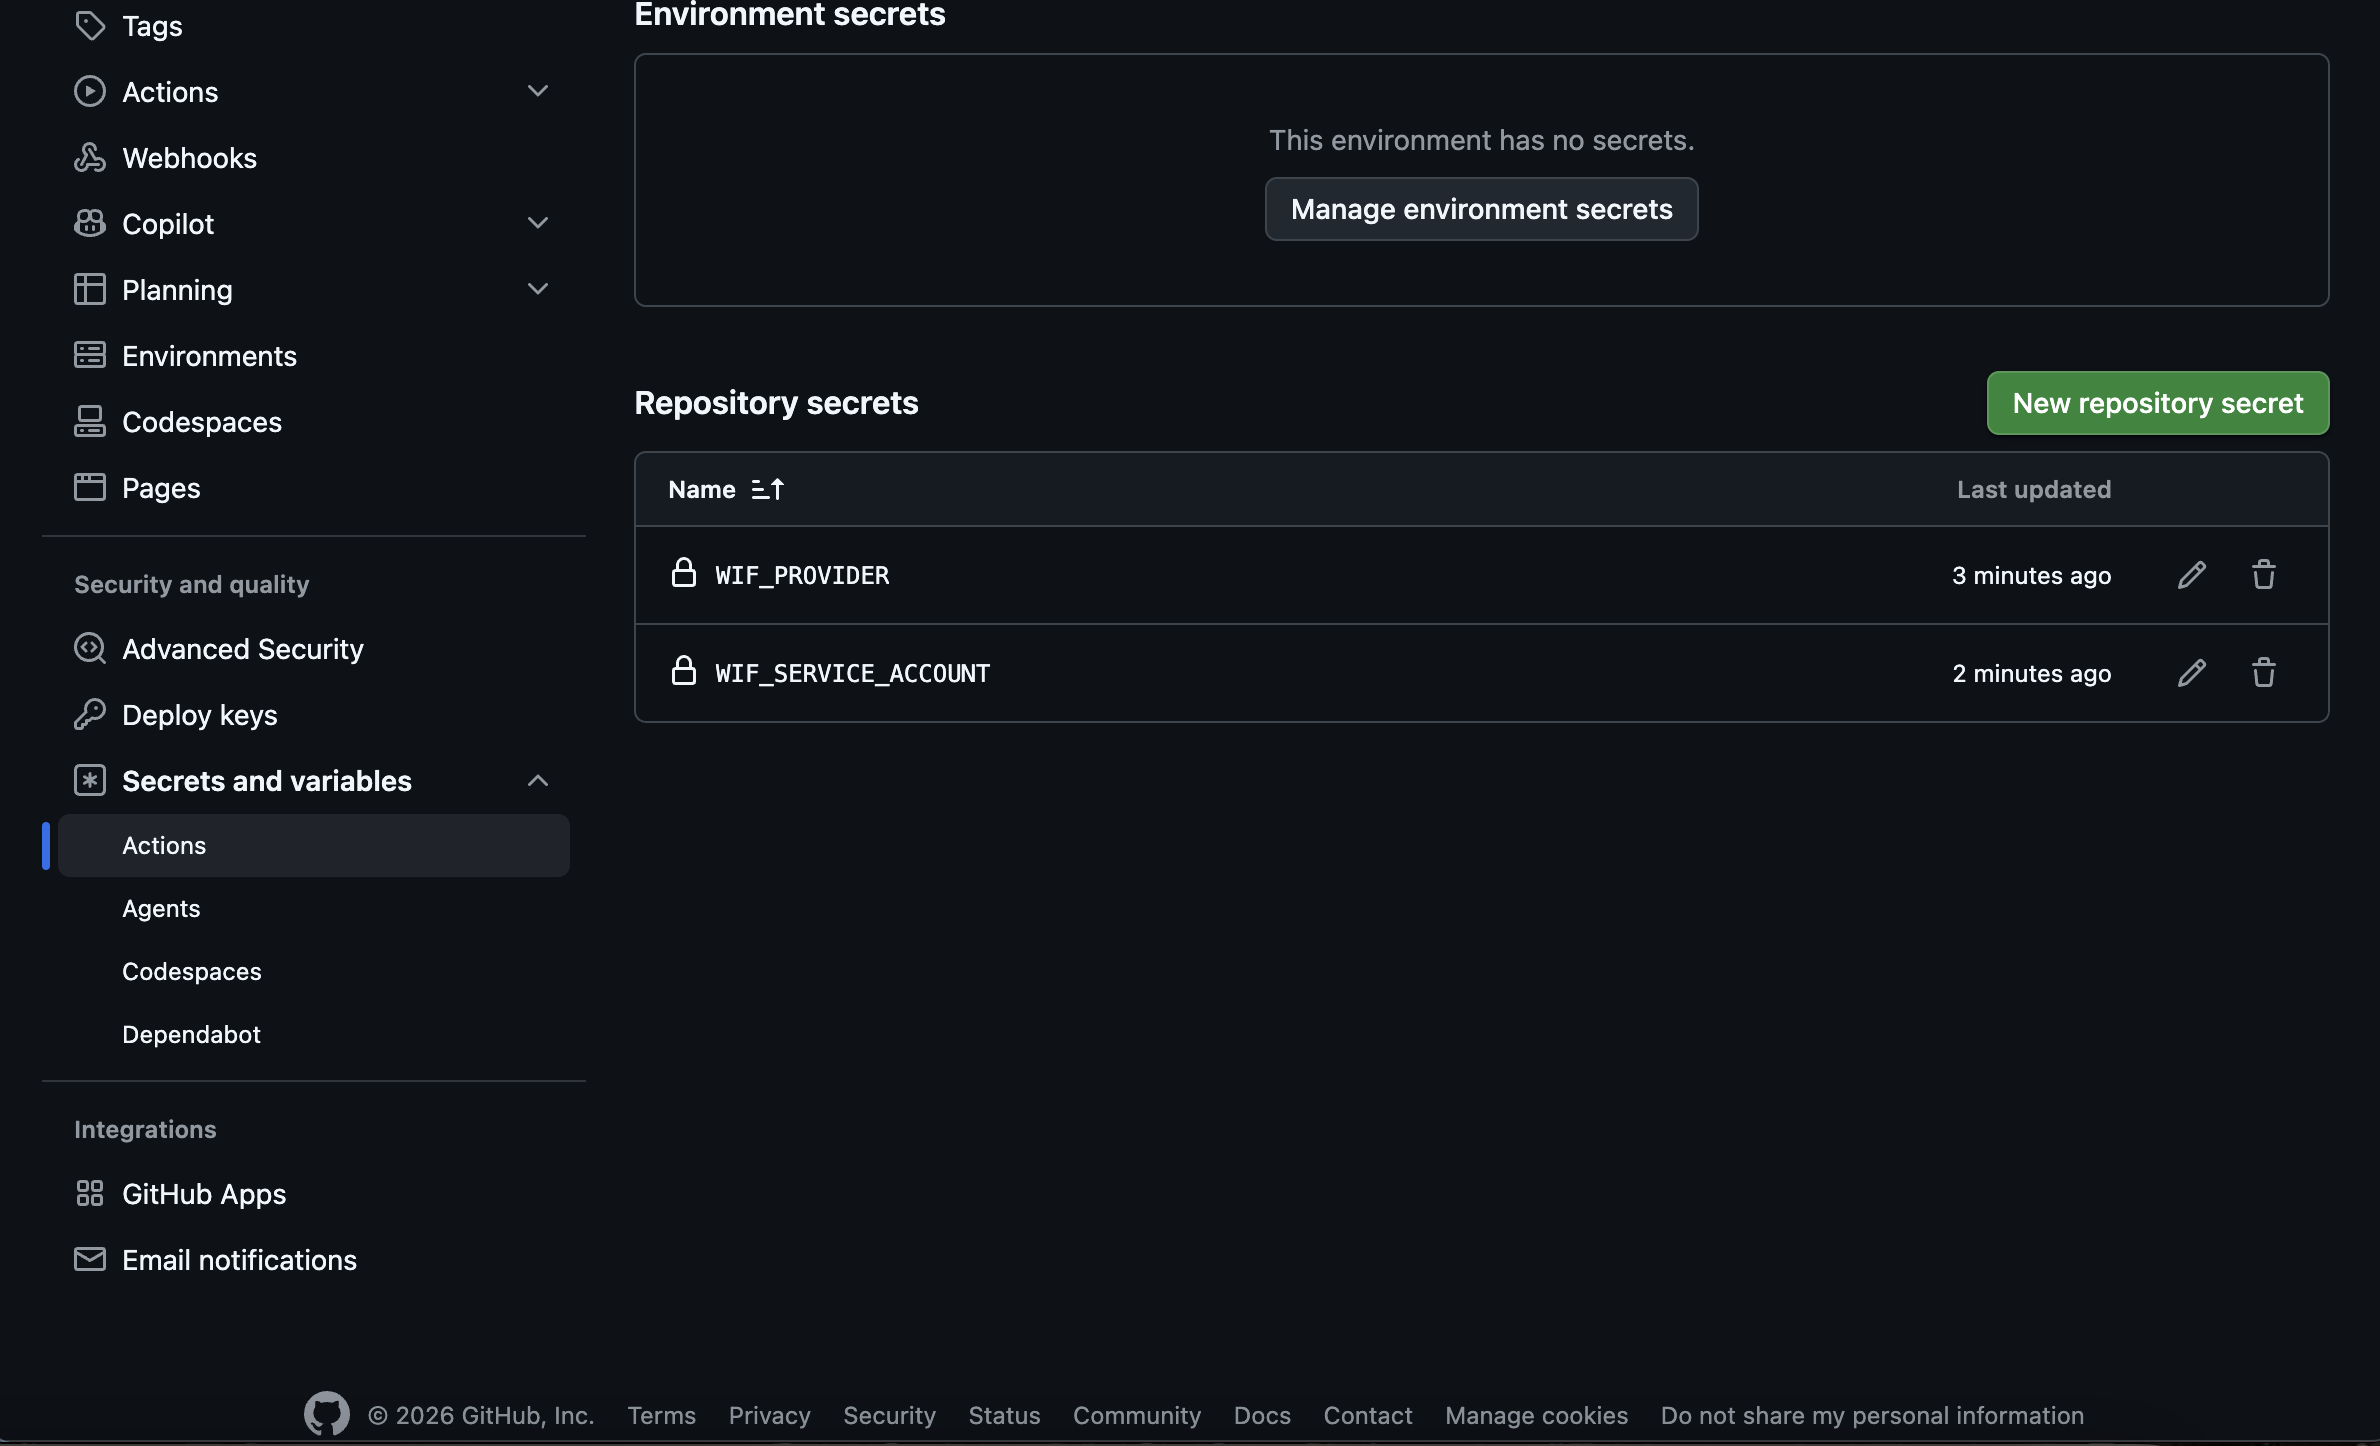
Neither of these is a credential. The provider path and service account email are identifiers, not secrets. They grant nothing on their own, because the OIDC token and the attribute condition are what actually control access. Storing them as secrets is just tidiness. Update PROJECT_ID and the region values in the workflow's env: block to match your setup.
Understanding the Workflow
on: pull_request: types: [opened, synchronize, reopened]: these are three distinct triggers.
openedfires when the PR is first created.synchronizefires on every subsequent push to the branch, which is what keeps the environment current.reopenedhandles a PR that was closed and then reopened. Without it, that PR would have a torn-down environment and nothing to recreate it.
concurrency: this one saves real debugging time. Push three commits in quick succession, and you get three workflow runs targeting the same namespace. They race. The one that finishes last wins, and that's not necessarily the newest code. A fast early build can overtake a slow later one, leaving your preview environment silently running stale code while the PR shows green. Grouping by PR number with cancel-in-progress: true means only the newest run survives.
permissions: id-token: write: without this line, nothing else works. It's what allows the workflow to request an OIDC token from GitHub. Leave it out and google-github-actions/auth fails with an error about being unable to get an ID token. This is the single most common WIF setup mistake.
$GITHUB_ENV: writing KEY=value to this file makes the variable available in all subsequent steps. Not the current one, as a variable you write in a step can't be read later in that same step. It's why the setup happens in its own step at the top.
github.event.pull_request.head.sha: note this rather than github.sha. On pull_request events, GitHub checks out a merge commit. This is a temporary commit combining your branch with the base branch. github.sha refers to that merge commit, which doesn't exist in your repository's history and will confuse anyone who tries to look it up. head.sha is the actual last commit on the PR branch, which is what a developer expects to see.
--dry-run=client -o yaml | kubectl apply -f - is a small trick worth stealing. kubectl create namespace fails if the namespace already exists, which would break every push after the first. This pipeline generates the namespace YAML without contacting the cluster, then pipes it toapply, which creates it if it's missing and does nothing if it isn't. Idempotent by construction.
The heredoc overlay: instead of committing an overlay per PR (impossible, as you don't know PR numbers in advance), the workflow writes one at runtime and throws it away when the runner is destroyed. It's ephemeral configuration for an ephemeral environment.
kubectl rollout status is what makes the workflow honest. Without it, the job succeeds the moment kubectl apply is accepted by the API server, which happens before a single pod has started. A crash-looping image would still show a green check. rollout status blocks until pods are actually ready, or fails after 180 seconds. Green means working.
A Note on Forked Pull Requests
Something is worth knowing before you deploy this anywhere public: pull requests from forks do not receive id-token: write permission, by design. GitHub blocks it so a stranger can't open a PR that steals your cloud credentials.
For a private repository or a personal project, this doesn't affect you. For a public repository accepting outside contributions, you'd need a workflow_run-based pattern where a privileged workflow runs from the base repository after the untrusted build completes. That's beyond this handbook's scope, but if you're deploying this on an open-source project, don't skip it.
Step 10: Build the Teardown Workflow
Spin-up is only half the value. An environment that never disappears is just a slow leak in your cloud bill.
Create .github/workflows/preview-teardown.yml:
name: Tear Down PR Preview

on:
  pull_request:
    types: [closed]

permissions:
  contents: read
  id-token: write

env:
  PROJECT_ID: YOUR_PROJECT_ID
  CLUSTER_NAME: pr-preview-cluster
  CLUSTER_ZONE: europe-west2-a

jobs:
  teardown:
    name: Delete preview namespace
    runs-on: ubuntu-latest

    steps:
      - name: Set namespace
        run: echo "NAMESPACE=pr-${{ github.event.pull_request.number }}" >> $GITHUB_ENV

      - name: Authenticate to Google Cloud
        uses: google-github-actions/auth@v2
        with:
          workload_identity_provider: ${{ secrets.WIF_PROVIDER }}
          service_account: ${{ secrets.WIF_SERVICE_ACCOUNT }}

      - name: Get GKE credentials
        uses: google-github-actions/get-gke-credentials@v2
        with:
          cluster_name: ${{ env.CLUSTER_NAME }}
          location: ${{ env.CLUSTER_ZONE }}

      - name: Delete namespace
        run: |
          echo "Deleting namespace ${NAMESPACE}"
          kubectl delete namespace "${NAMESPACE}" \
            --ignore-not-found=true \
            --wait=false

      - name: Confirm
        run: |
          echo "Preview environment for PR #${{ github.event.pull_request.number }} torn down."
A few details here matter more than they might seem.
First, types: [closed] covers merges too. GitHub doesn't have a separate merged event type. Merging a pull request fires closed with the payload field merged: true. So this single trigger handles both "merged successfully" and "abandoned and closed." Both should tear down the environment, so we don't need to distinguish between them.
Next, --ignore-not-found=true: if the namespace doesn't exist (perhaps the deploy failed, or someone deleted it manually), kubectl delete would normally exit with an error and mark the workflow red. That's a false alarm: the desired end state is "namespace doesn't exist," and it doesn't. This flag makes the step succeed when there's nothing to do.
Finally, --wait=false: namespace deletion is asynchronous. Kubernetes marks itTerminating, then works through deleting every resource inside it. Waiting for that to complete could hold your CI runner for a minute or more, for no benefit. Fire the delete and let the cluster finish on its own time.
Step 11: Open a Pull Request and Watch It Work
Commit everything and push:
git add .
git commit -m "Add PR preview environment infrastructure"
git push -u origin main
Now create a branch and make a visible change:
git checkout -b test-preview
Edit app/main.go. Change the first line of the handler output:
fmt.Fprintf(w, "Preview environment is live — testing the pipeline\n\n")
Commit and push:
git add .
git commit -m "Test preview environment"
git push -u origin test-preview
Open a pull request on GitHub, then go to the Actions tab. You should see "Deploy PR Preview" running.
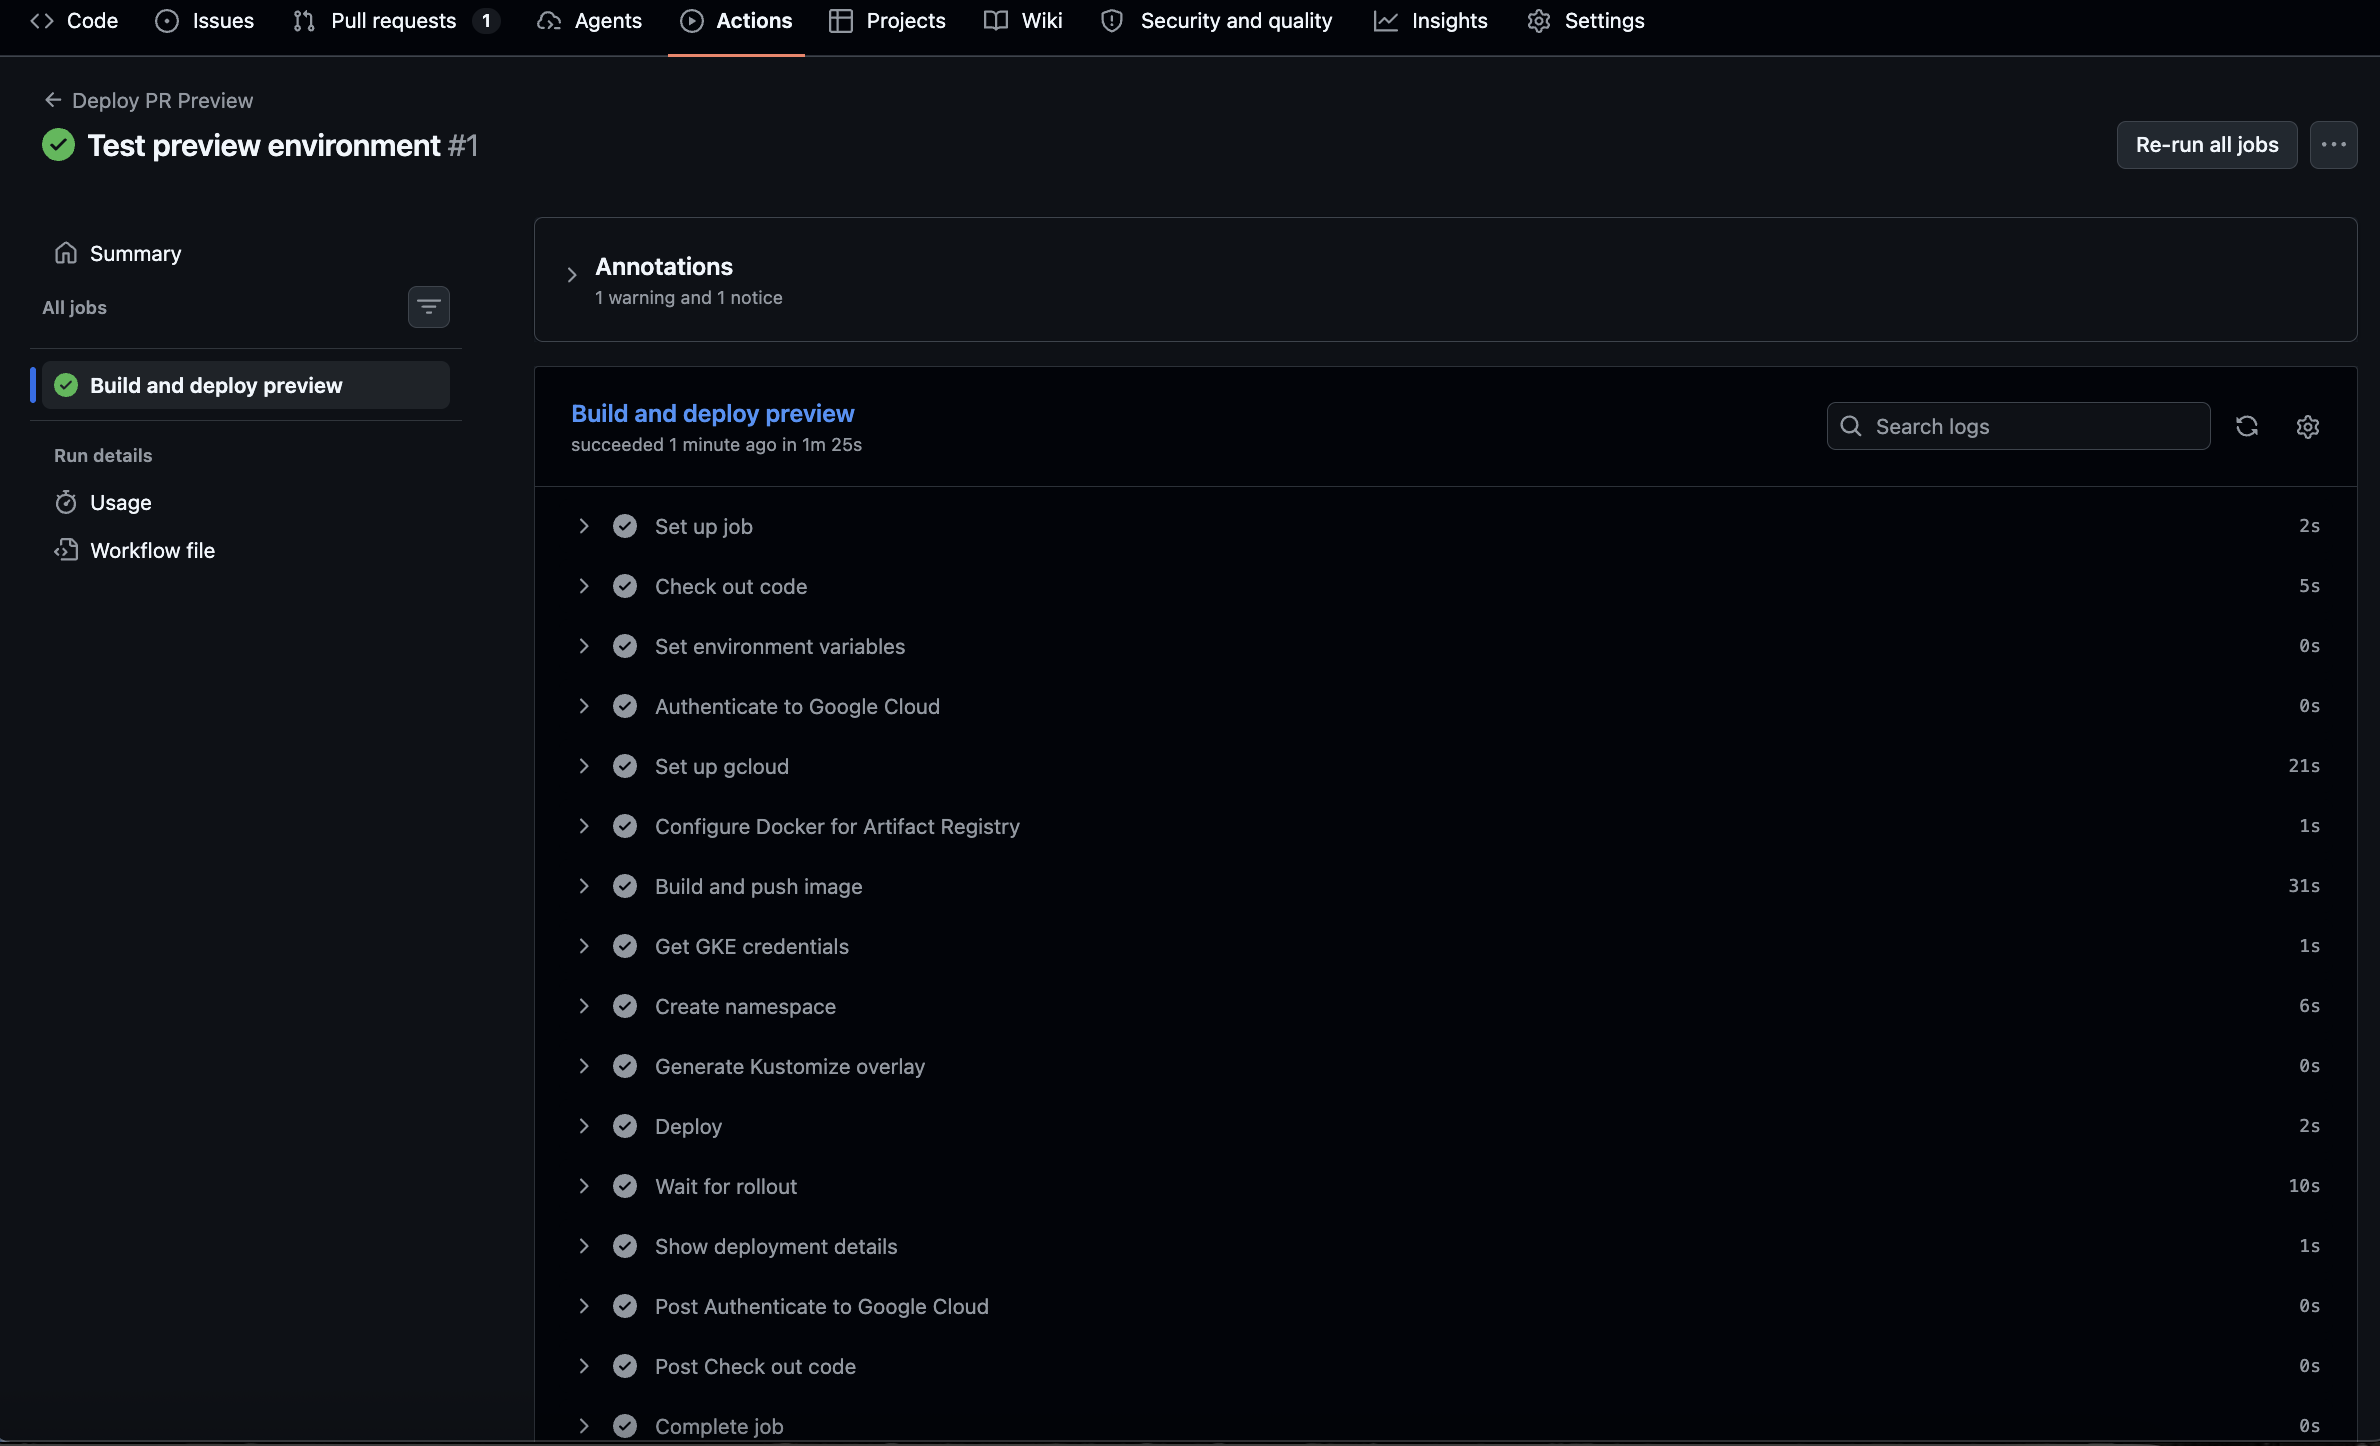
Watch the steps in order: authentication succeeds without a key, the image builds and pushes, the namespace is created, Kustomize renders the overlay (you'll see the fully resolved manifest printed), the deployment applies, and rollout status waits until pods are ready.
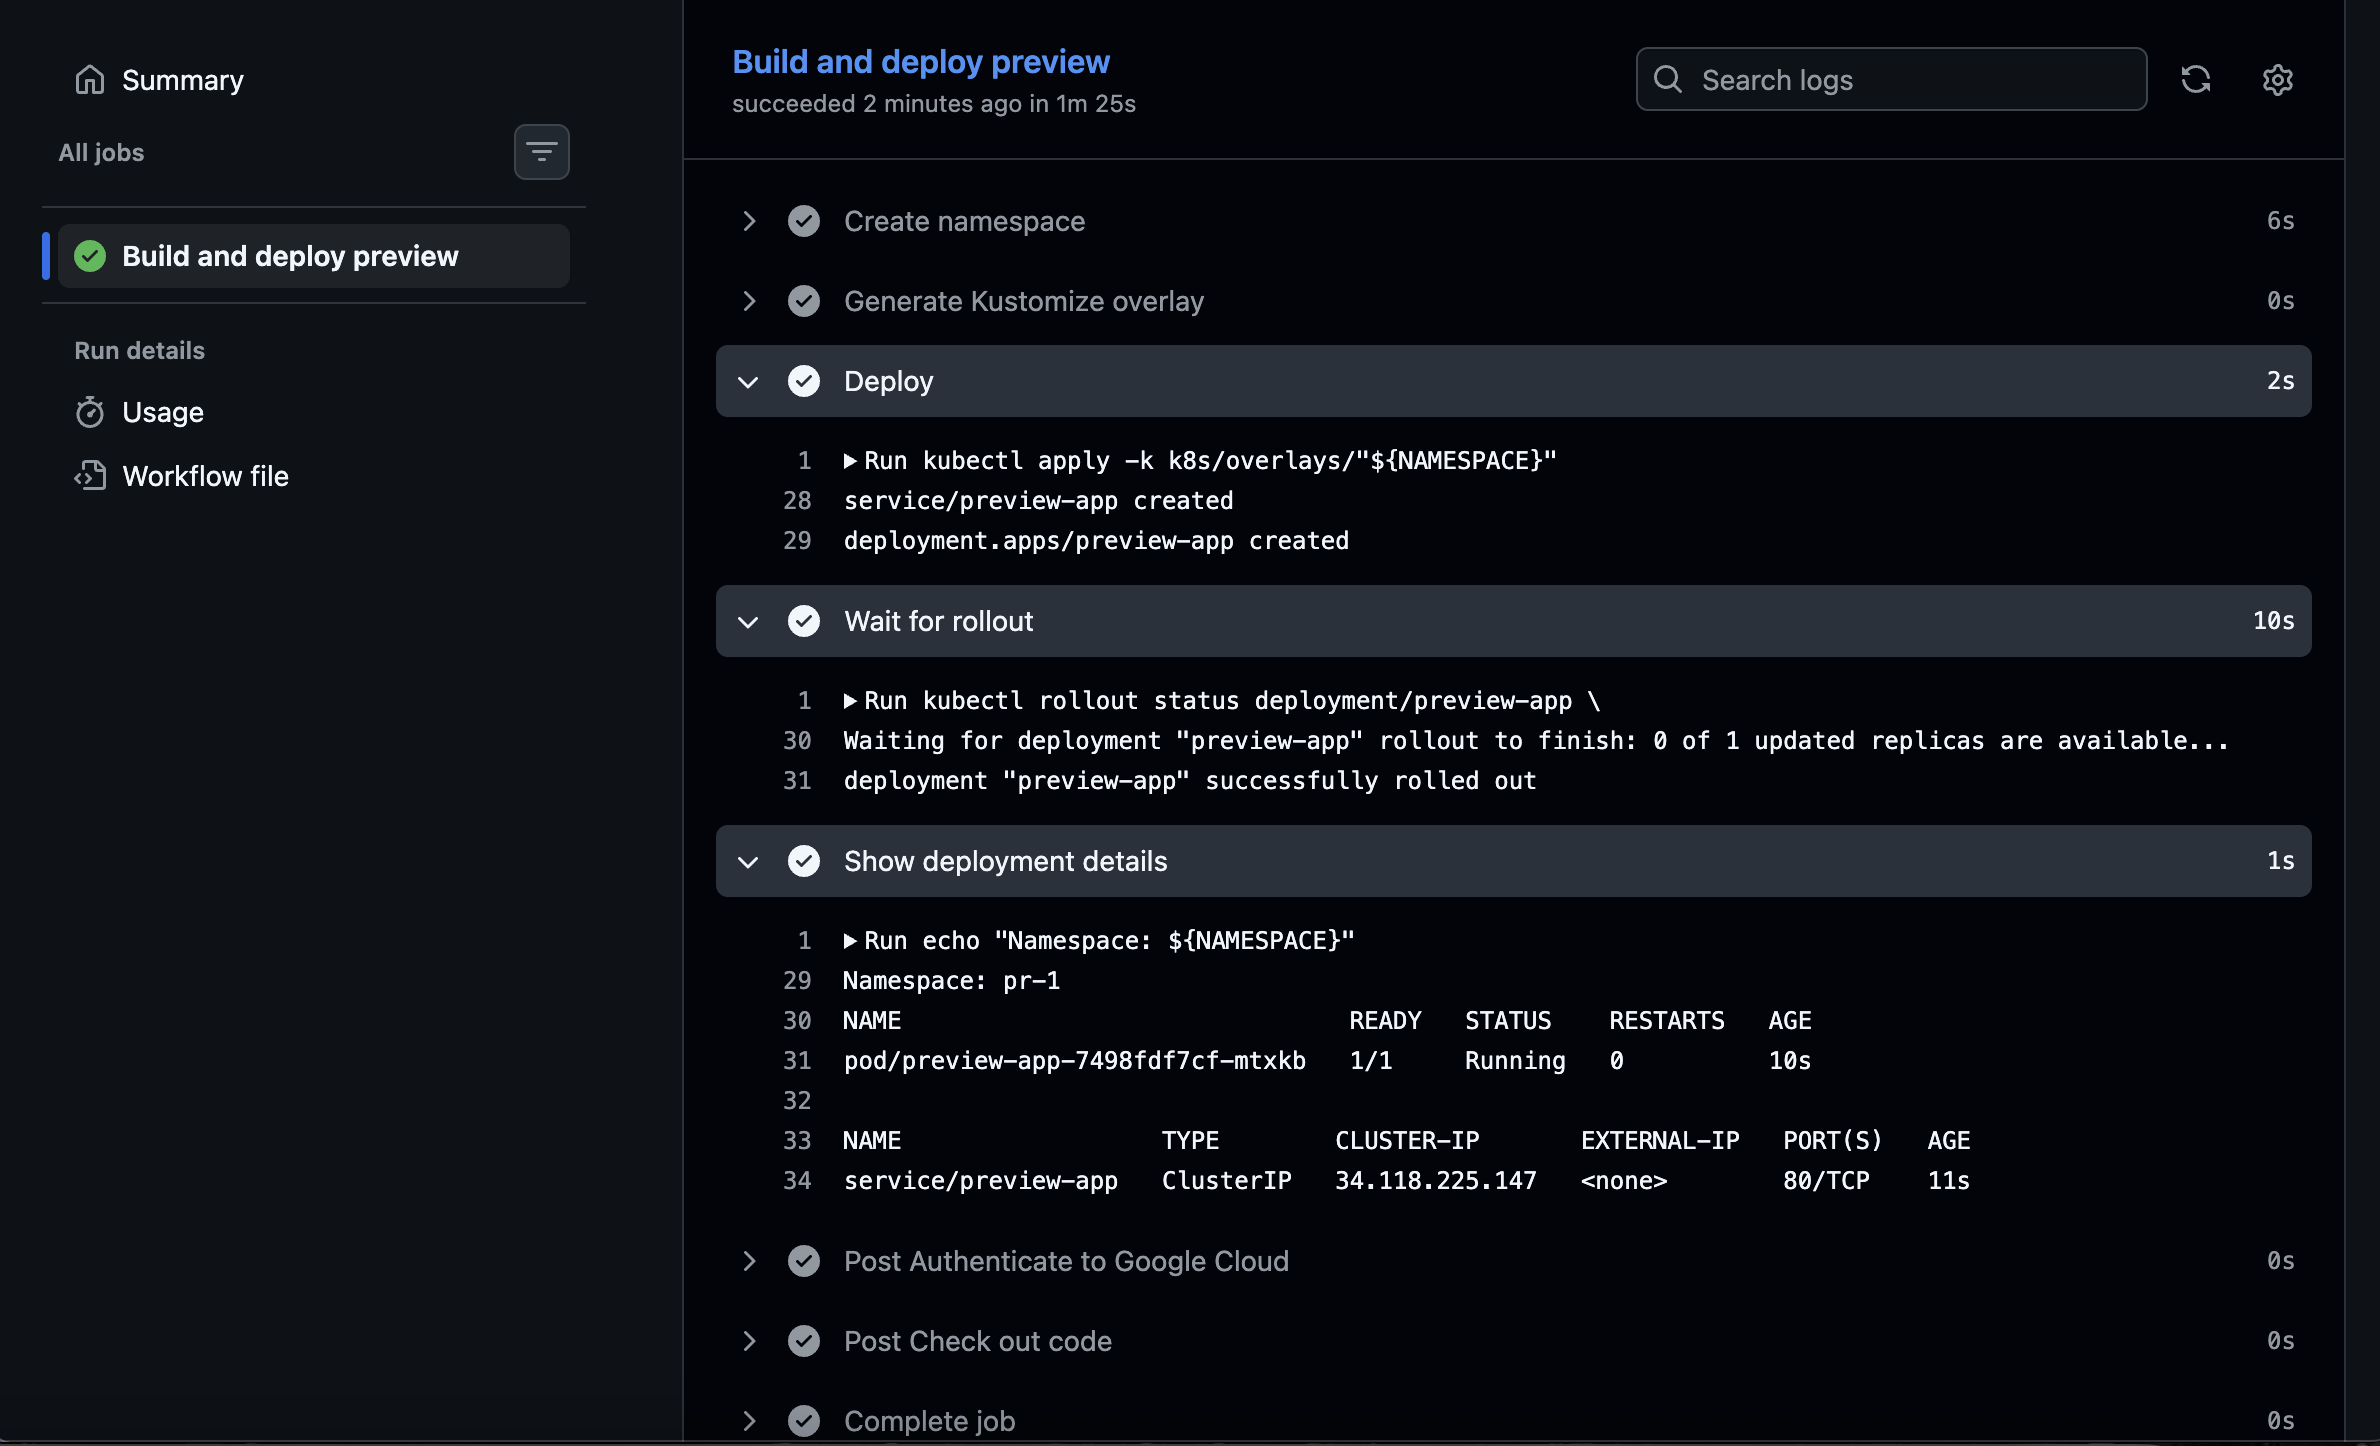
Once it's green, verify from your terminal:
kubectl get namespaces | grep pr-
You should see your pr-1 (or whatever number your PR got).
kubectl get pods --namespace=pr-1
Now reach the application:
kubectl port-forward --namespace=pr-1 service/preview-app 8080:80
In a second terminal:
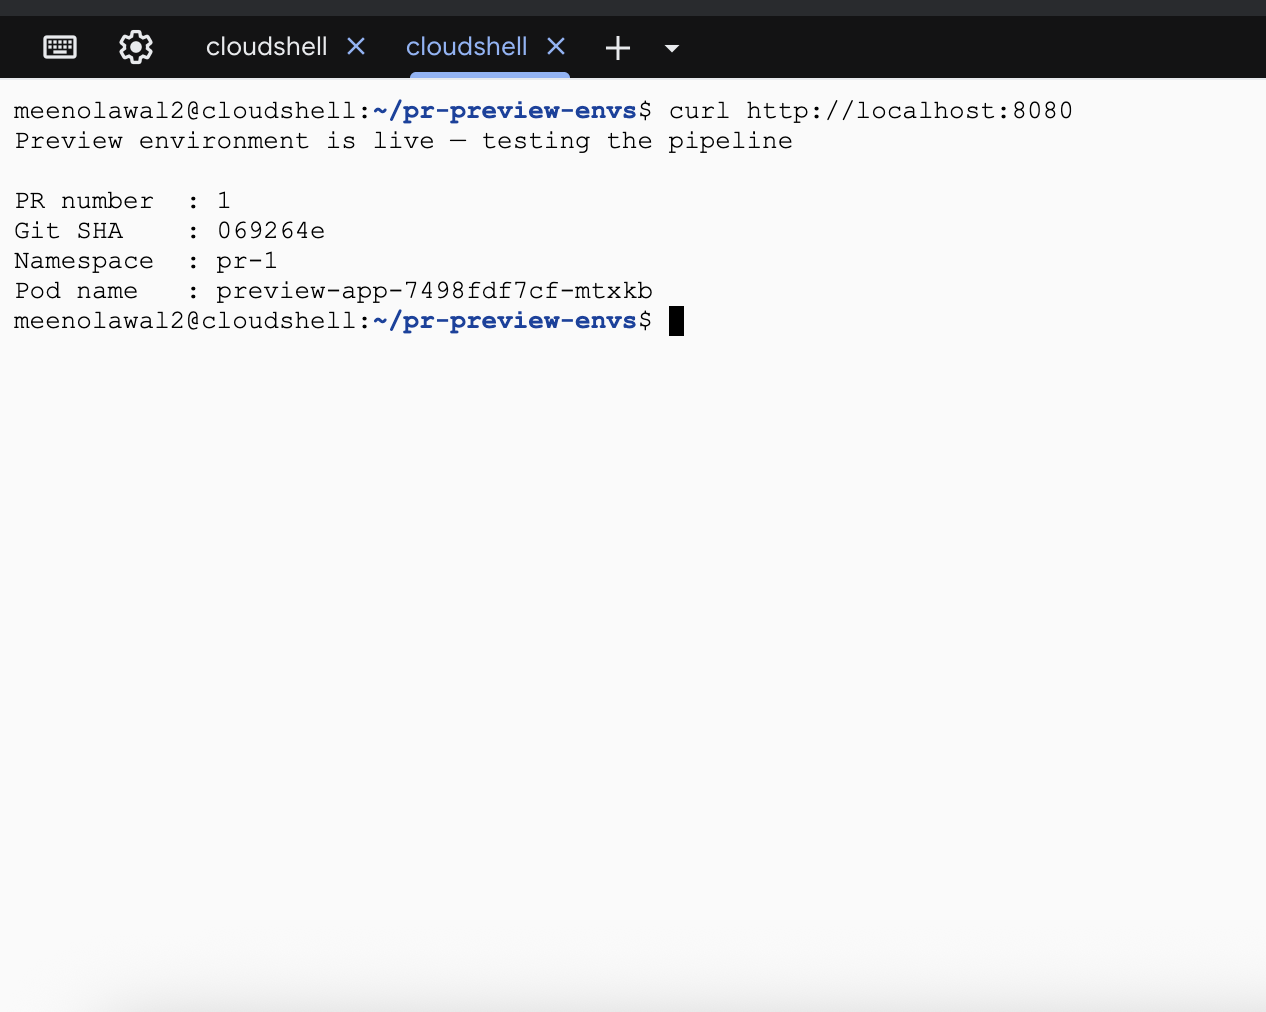
curl http://localhost:8080
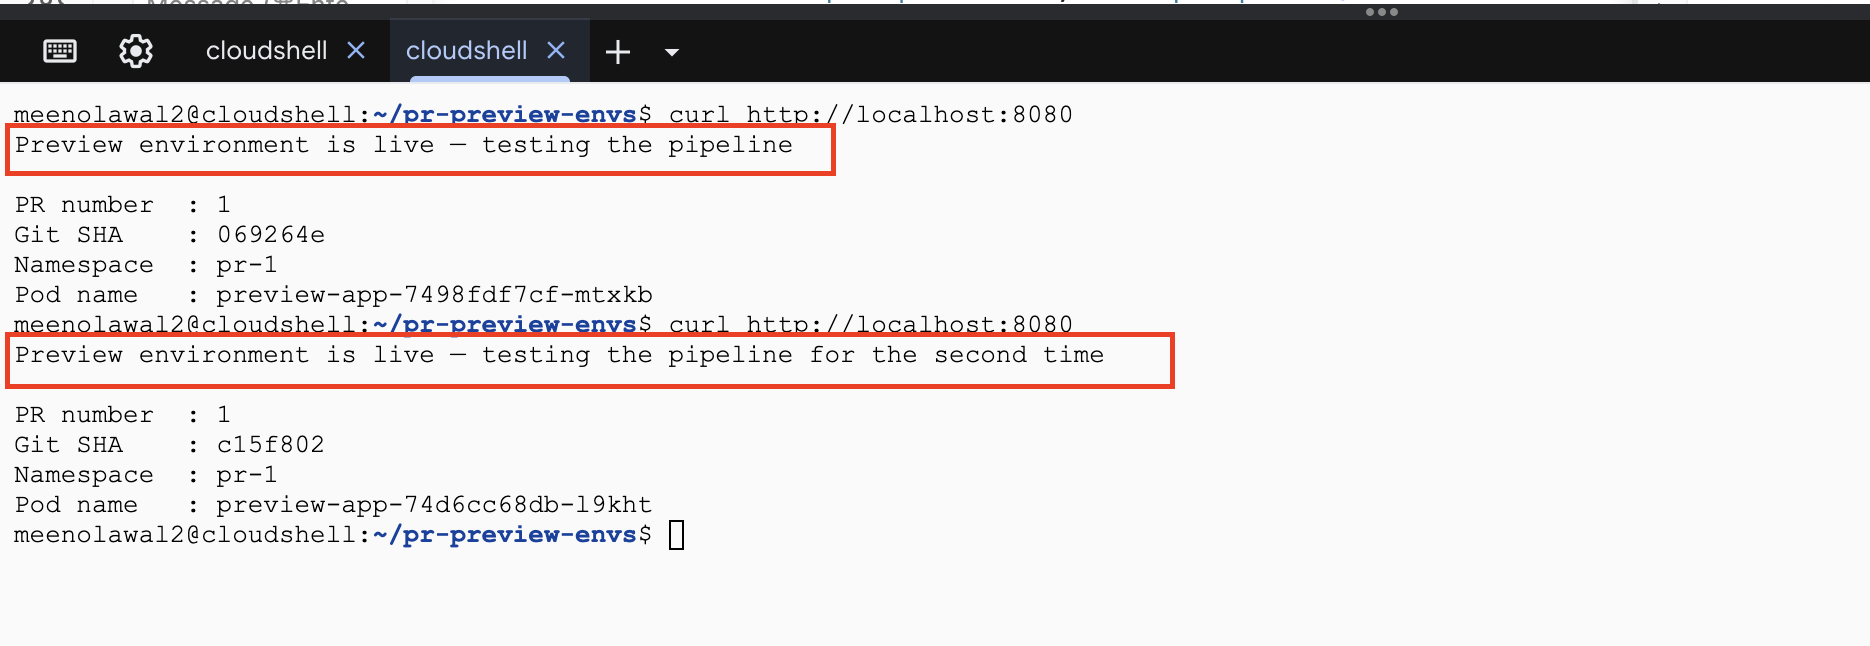
You should see:
Preview environment is live — testing the pipeline

PR number  : 1
Git SHA    : a1b2c3d
Namespace  : pr-1
Pod name   : preview-app-7d9f8b6c4-xk2mp
The application is reporting the PR number and commit SHA that were baked into its binary at build time, and the namespace it discovered through the Downward API. Every one of those values was resolved by a different part of the pipeline, and they all agree. That's your proof the whole chain works.
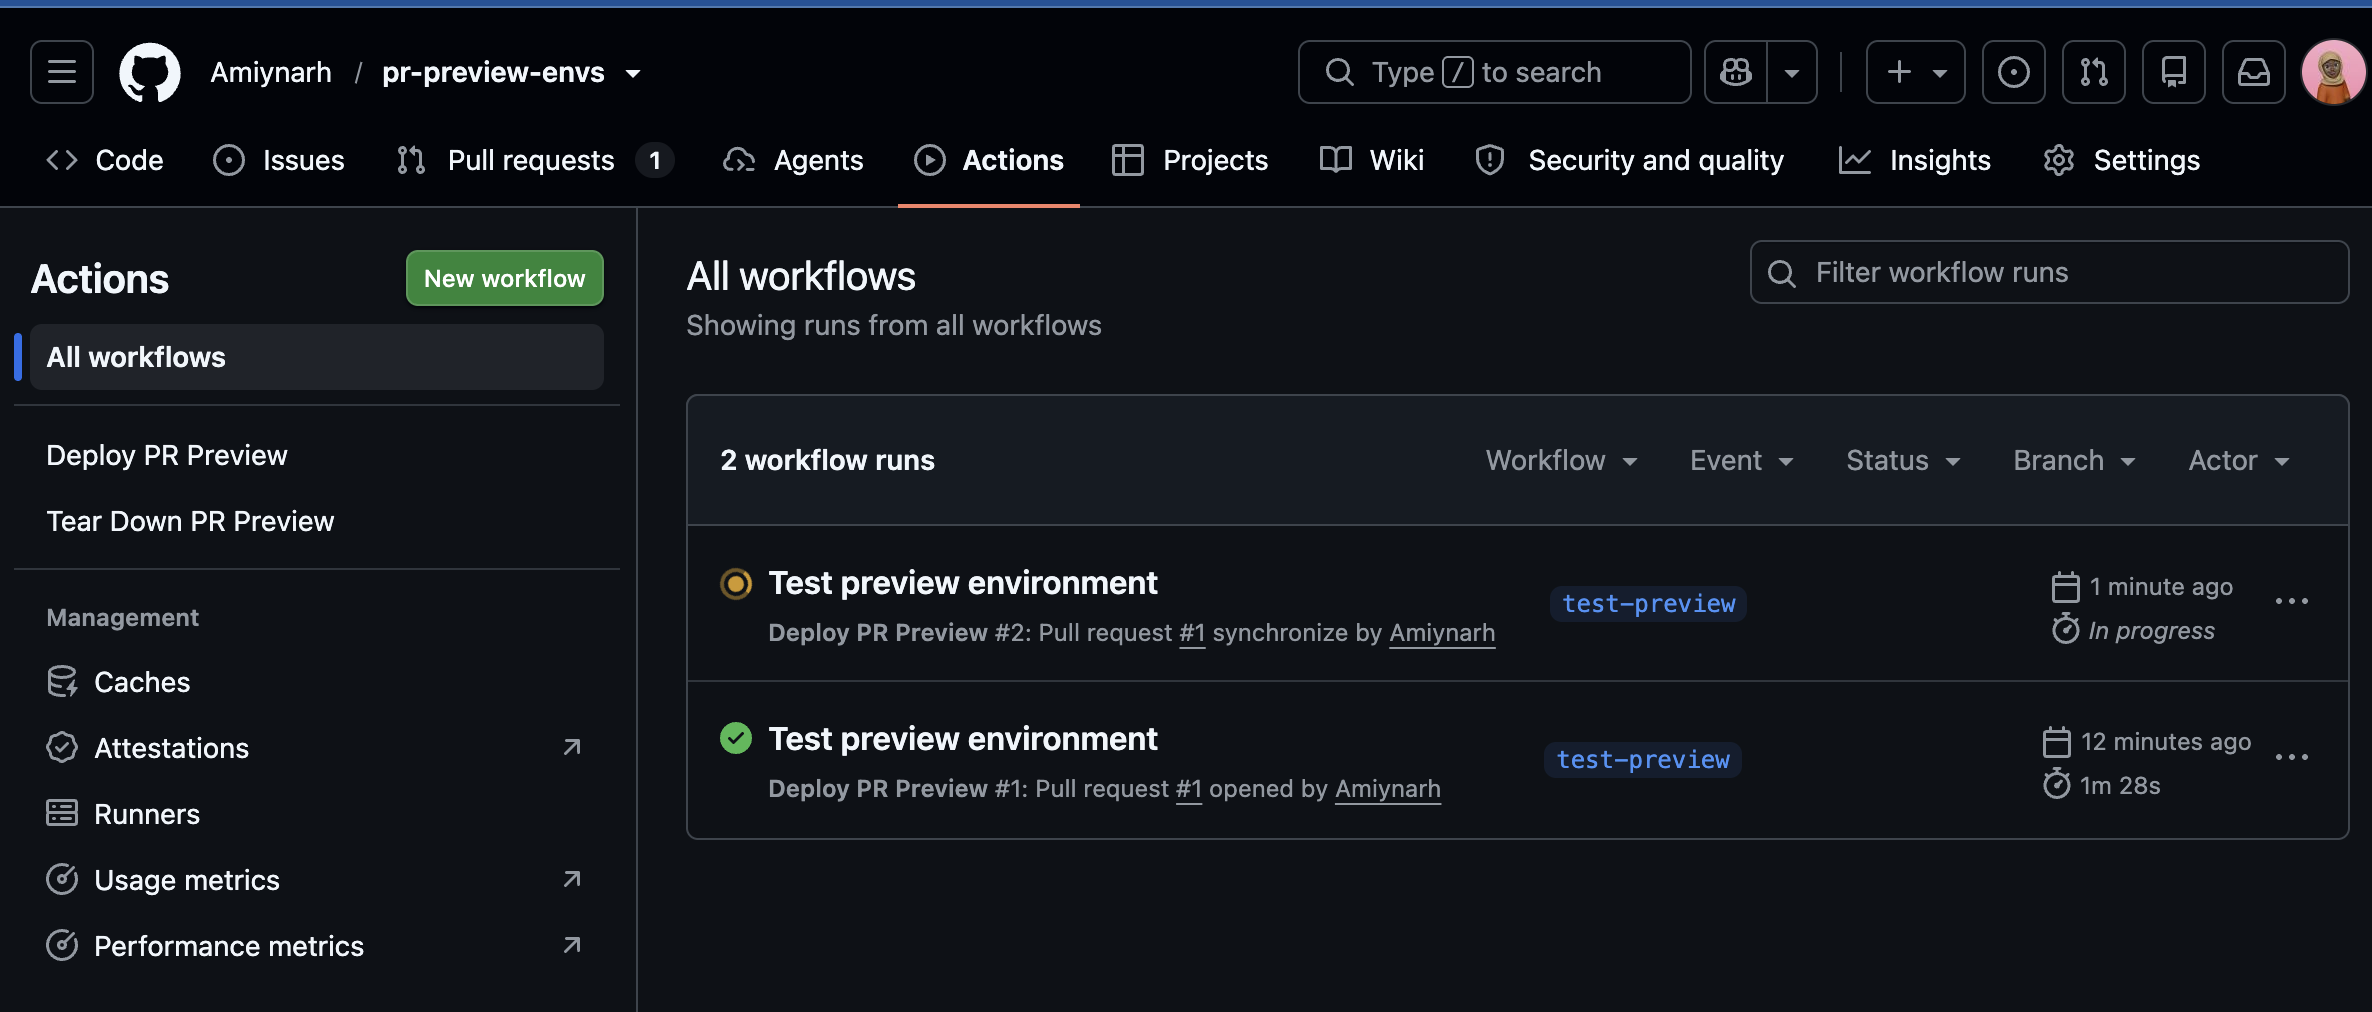
Now push another commit to the same branch and watch the environment update in place.
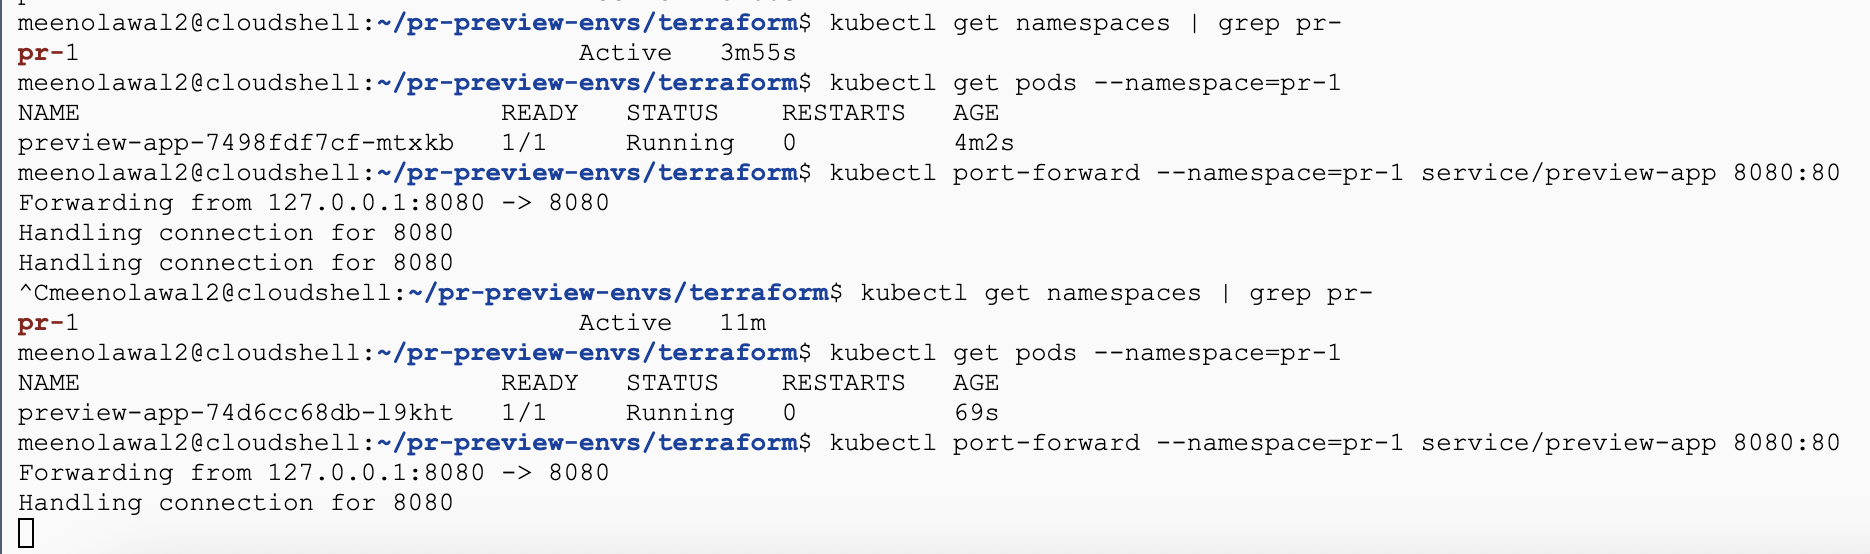
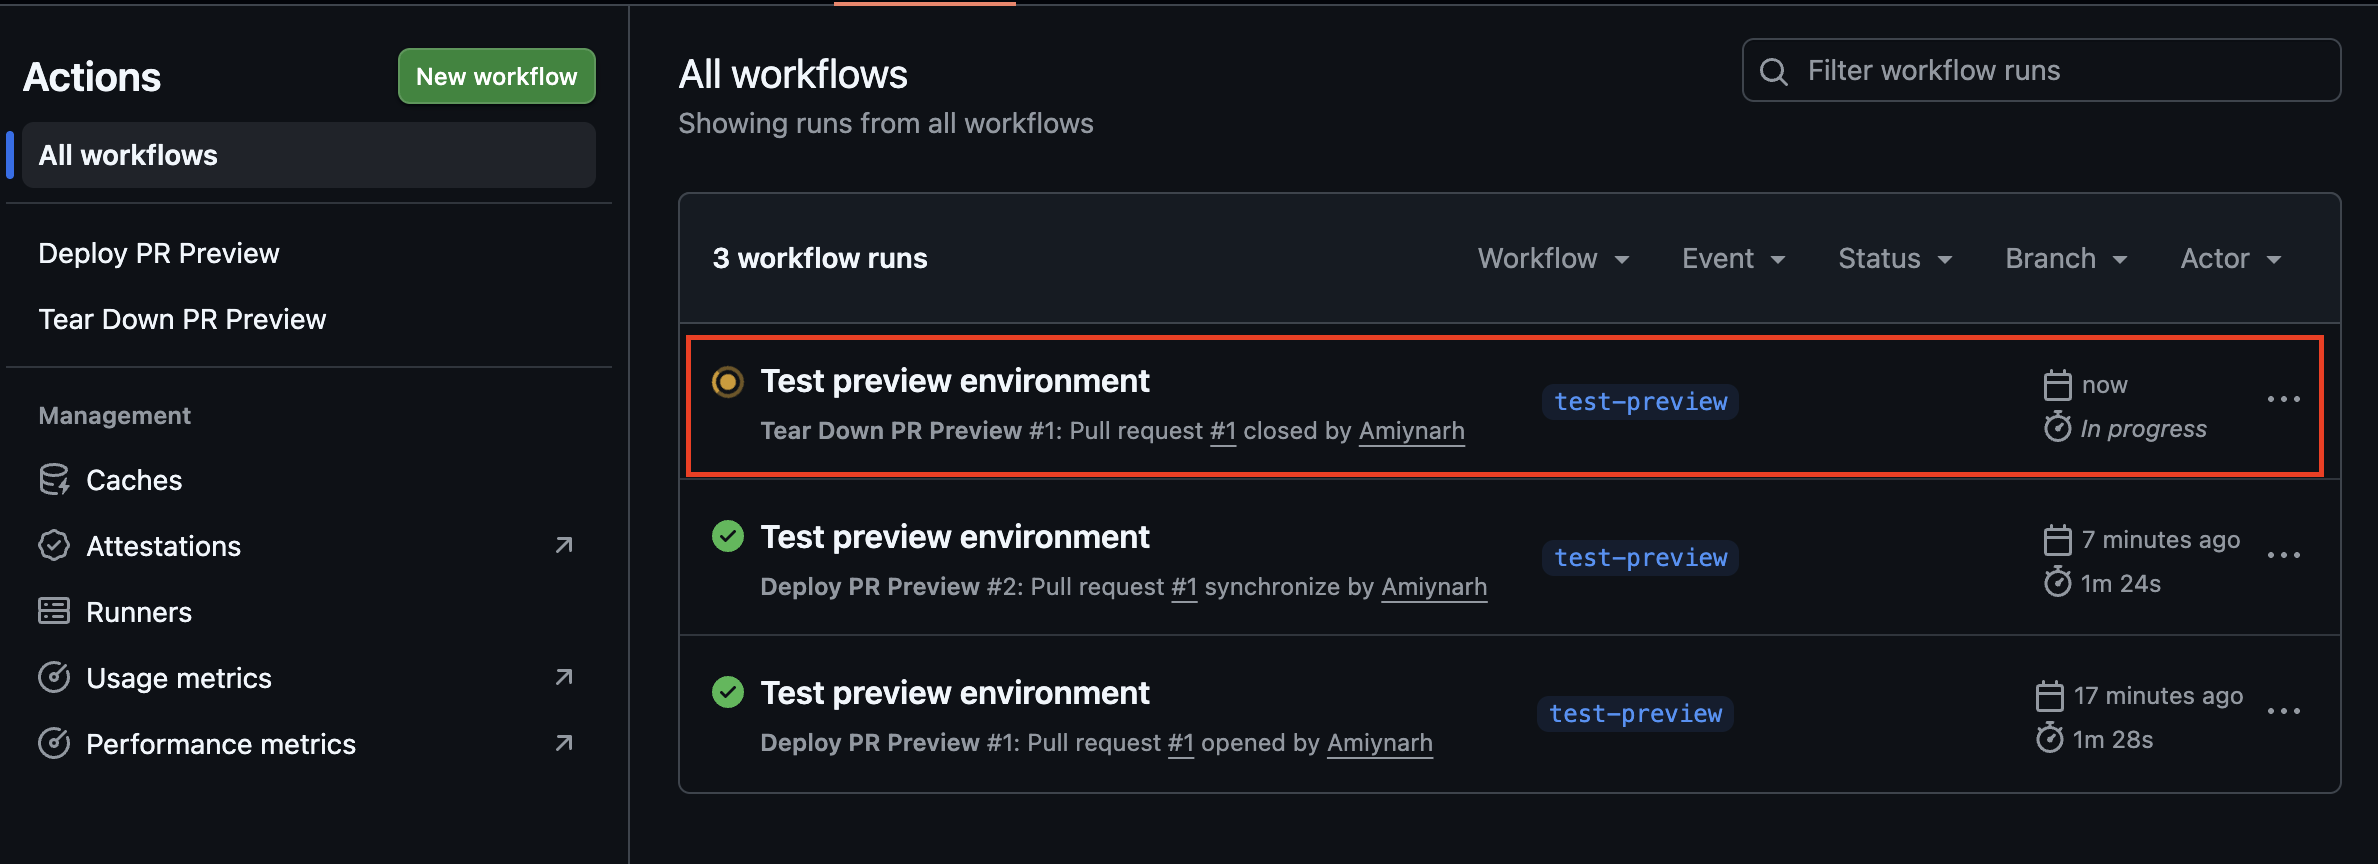
Then close the pull request and watch the teardown workflow fire.
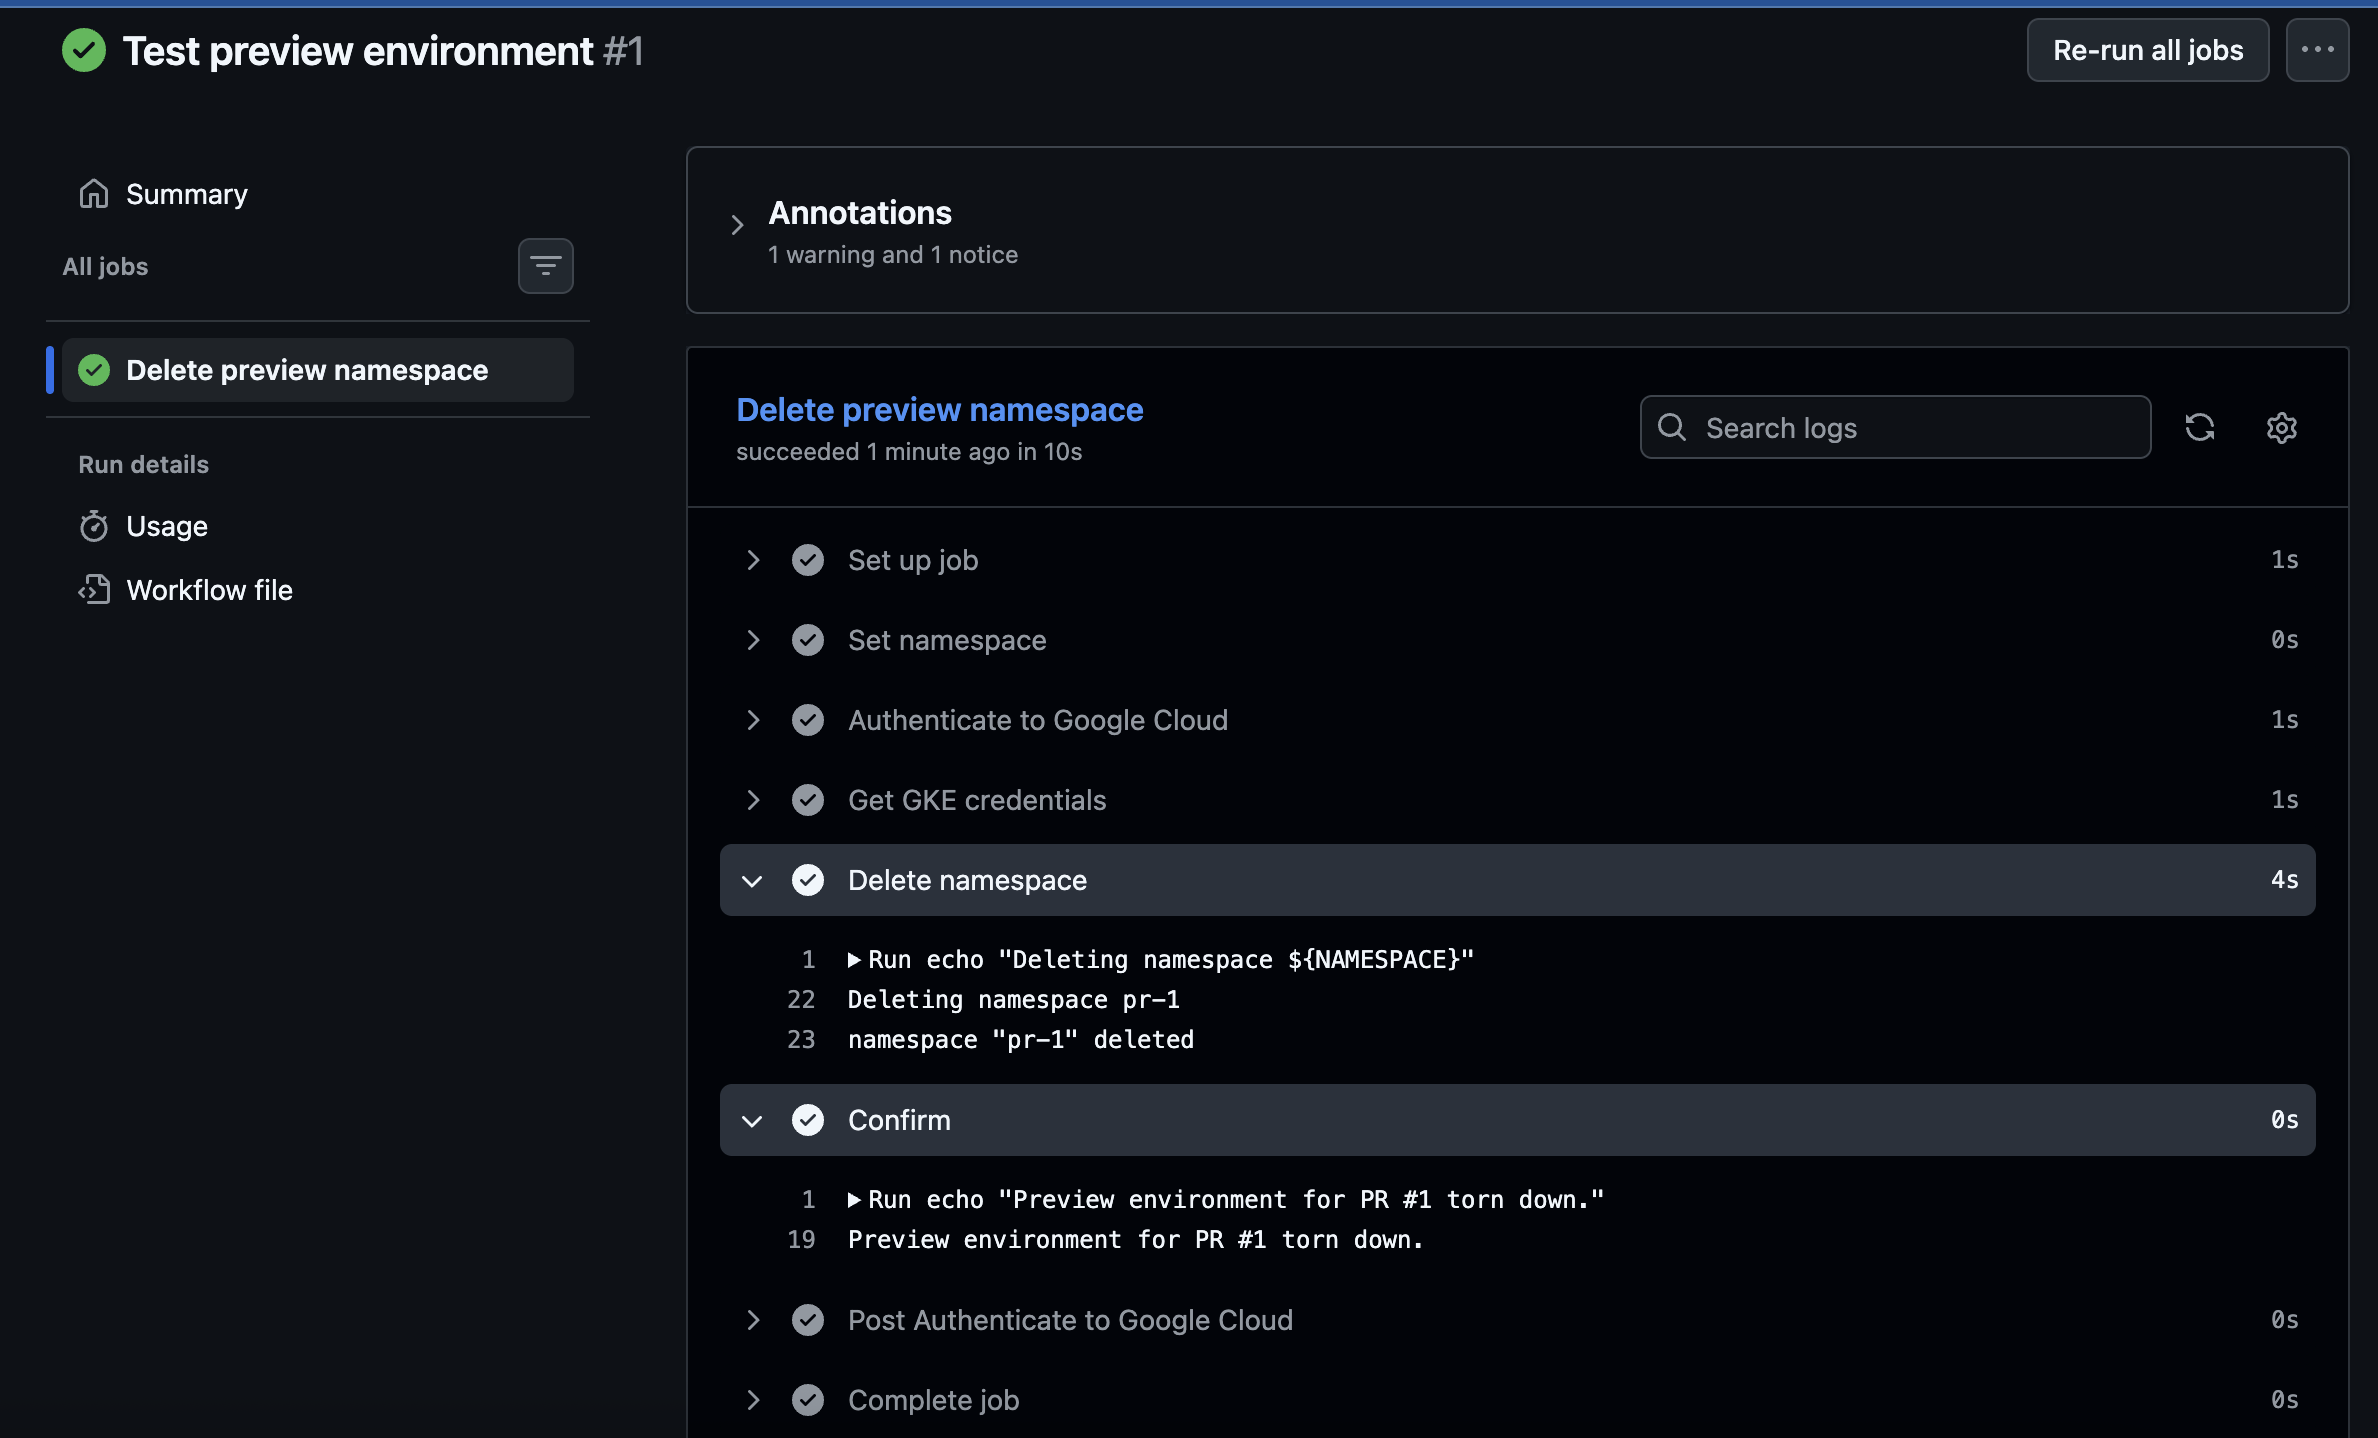
kubectl get namespace pr-1
Terminating, then gone.

What You Have, and What's Still Missing
Stop and take stock, because the hard infrastructure work is done. A pull request now produces a real, isolated environment with no manual steps, and closing it removes every trace. That's the whole lifecycle, automated.
But look again at how you reached it:
kubectl port-forward --namespace=pr-1 service/preview-app 8080:80
That requires kubectl installed, credentials for the cluster, permission to use them, and knowledge of which namespace maps to which PR. This is fine for the person who built the pipeline, but it's useless for the designer checking a spacing change, the product manager reviewing a copy edit, or the QA engineer clicking through a flow before sign-off.
The whole point of a preview environment is that anyone can look at the change. An environment only engineers can reach isn't really a preview environment. It's a debugging tool.
The rest of this tutorial closes that gap, and then makes the result safe to leave running. First, we'll set up a public HTTPS URL for every environment. Then we'll build the guardrails and go through the cleanup that stop it becoming a quiet line item on your cloud bill.
Step 12: Reserve a Static IP Address
Before installing anything, you'll need to reserve an external IP address.
This matters because when you install the Ingress controller, it creates a Kubernetes Service of type LoadBalancer, and Google Cloud provisions a real load balancer with a public IP. By default, that IP is ephemeral. If the Service is deleted and recreated, you get a different one.
Your wildcard DNS record points at that IP. If it changes, every preview environment breaks at once, and you won't find out until someone tells you the link is dead. Reserving the IP first means it belongs to your project, not to the load balancer, and it survives anything you do to the cluster.
Add this to terraform/main.tf:
# -----------------------------------------------------------
# Static external IP for the Ingress controller
# -----------------------------------------------------------
resource "google_compute_address" "ingress" {
  name         = "pr-preview-ingress-ip"
  region       = var.region
  address_type = "EXTERNAL"

  depends_on = [google_project_service.apis]
}
And add the output to terraform/outputs.tf:
output "ingress_ip" {
  description = "Point your wildcard DNS record at this address"
  value       = google_compute_address.ingress.address
}
You'll also want compute.googleapis.com in the APIs list if it isn't there already. Update the for_each set in your google_project_service resource:
  for_each = toset([
    "container.googleapis.com",
    "artifactregistry.googleapis.com",
    "iamcredentials.googleapis.com",
    "sts.googleapis.com",
    "compute.googleapis.com",
  ])
Apply it:
cd terraform
terraform apply \
  -var="project_id=YOUR_PROJECT_ID" \
  -var="github_repo=YOUR_USERNAME/pr-preview-envs"
Note the IP that comes back:
terraform output ingress_ip
Write it down. You'll use it twice in the next two steps.
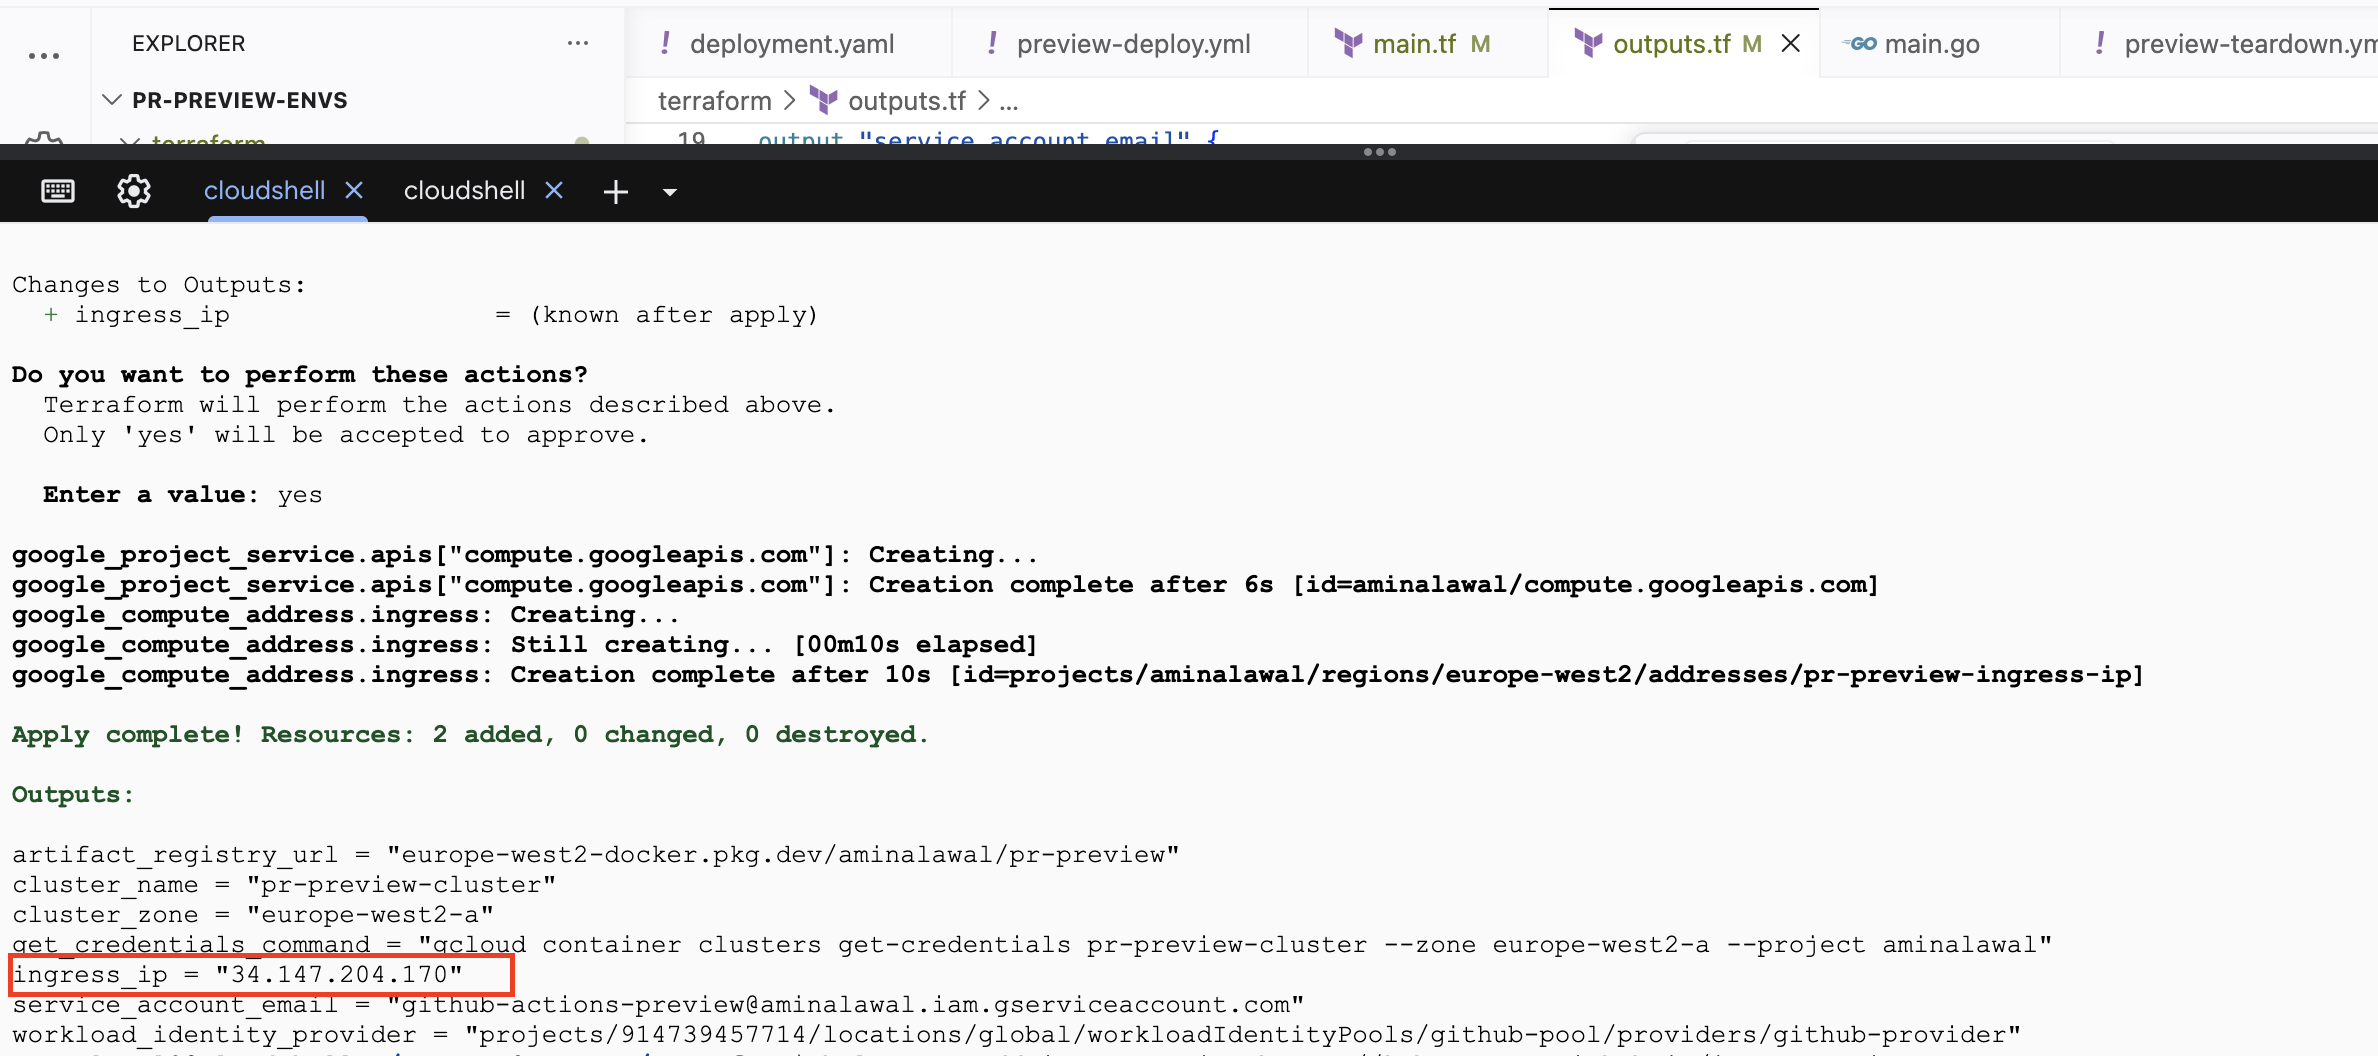
Important: this must be a regional address in the same region as your cluster, which is what region = var.region gives you. Google Cloud also offers global addresses, used by global HTTP(S) load balancers.
The Service type LoadBalancer that ingress-nginx creates is a regional load balancer, and it can't bind a global address. Mixing these up produces a Service stuck in Pending forever with an error that doesn't clearly explain why.
Step 13: Install the Ingress Controller
An Ingress is a Kubernetes resource that describes HTTP routing rules: "requests for this hostname go to that Service." But the Ingress resource is only a description. Something has to actually read those rules and route traffic, and that something is an Ingress controller.
We'll use ingress-nginx, which is the community-maintained controller built on NGINX. It runs as pods in your cluster, watches the Kubernetes API for Ingress resources, and rewrites its own NGINX configuration whenever one changes.
The architectural point that makes this work for preview environments is that one controller serves every namespace. Each preview environment creates its own Ingress resource. The controller picks it up, adds a routing rule for that hostname, and sends traffic to the right Service. The controller doesn't care how many environments exist.
Contrast this with what we'd otherwise do. If each preview environment used a LoadBalancer Service, every PR would provision its own Google Cloud load balancer, each with an hourly charge and its own IP address that DNS would need to know about. Ten open PRs would mean ten load balancers. With a shared Ingress controller, ten open PRs mean one.
Install it with Helm:
helm repo add ingress-nginx https://kubernetes.github.io/ingress-nginx
helm repo update

helm install ingress-nginx ingress-nginx/ingress-nginx \
  --namespace ingress-nginx \
  --create-namespace \
  --set controller.service.loadBalancerIP="YOUR_STATIC_IP" \
  --set controller.service.externalTrafficPolicy=Local
Replace YOUR_STATIC_IP with the address from Step 12.
Let's break down the flags before we go on:
--namespace ingress-nginx --create-namespace: the controller gets its own namespace, separate from any preview environment. It's shared infrastructure, and it should never be caught up in a preview environment's teardown.
controller.service.loadBalancerIP: tells GKE to bind the load balancer to the specific address you reserved, rather than allocating a new one. This is the line that makes your DNS record stable.
controller.service.externalTrafficPolicy=Local: preserves the client's real source IP. Without it, Kubernetes may route a request through an intermediate node, and by the time it reaches NGINX the source IP has been rewritten to a node's internal address. Your access logs would show cluster IPs instead of real visitors.
The tradeoff is that traffic only lands on nodes actually running a controller pod, which is fine here.
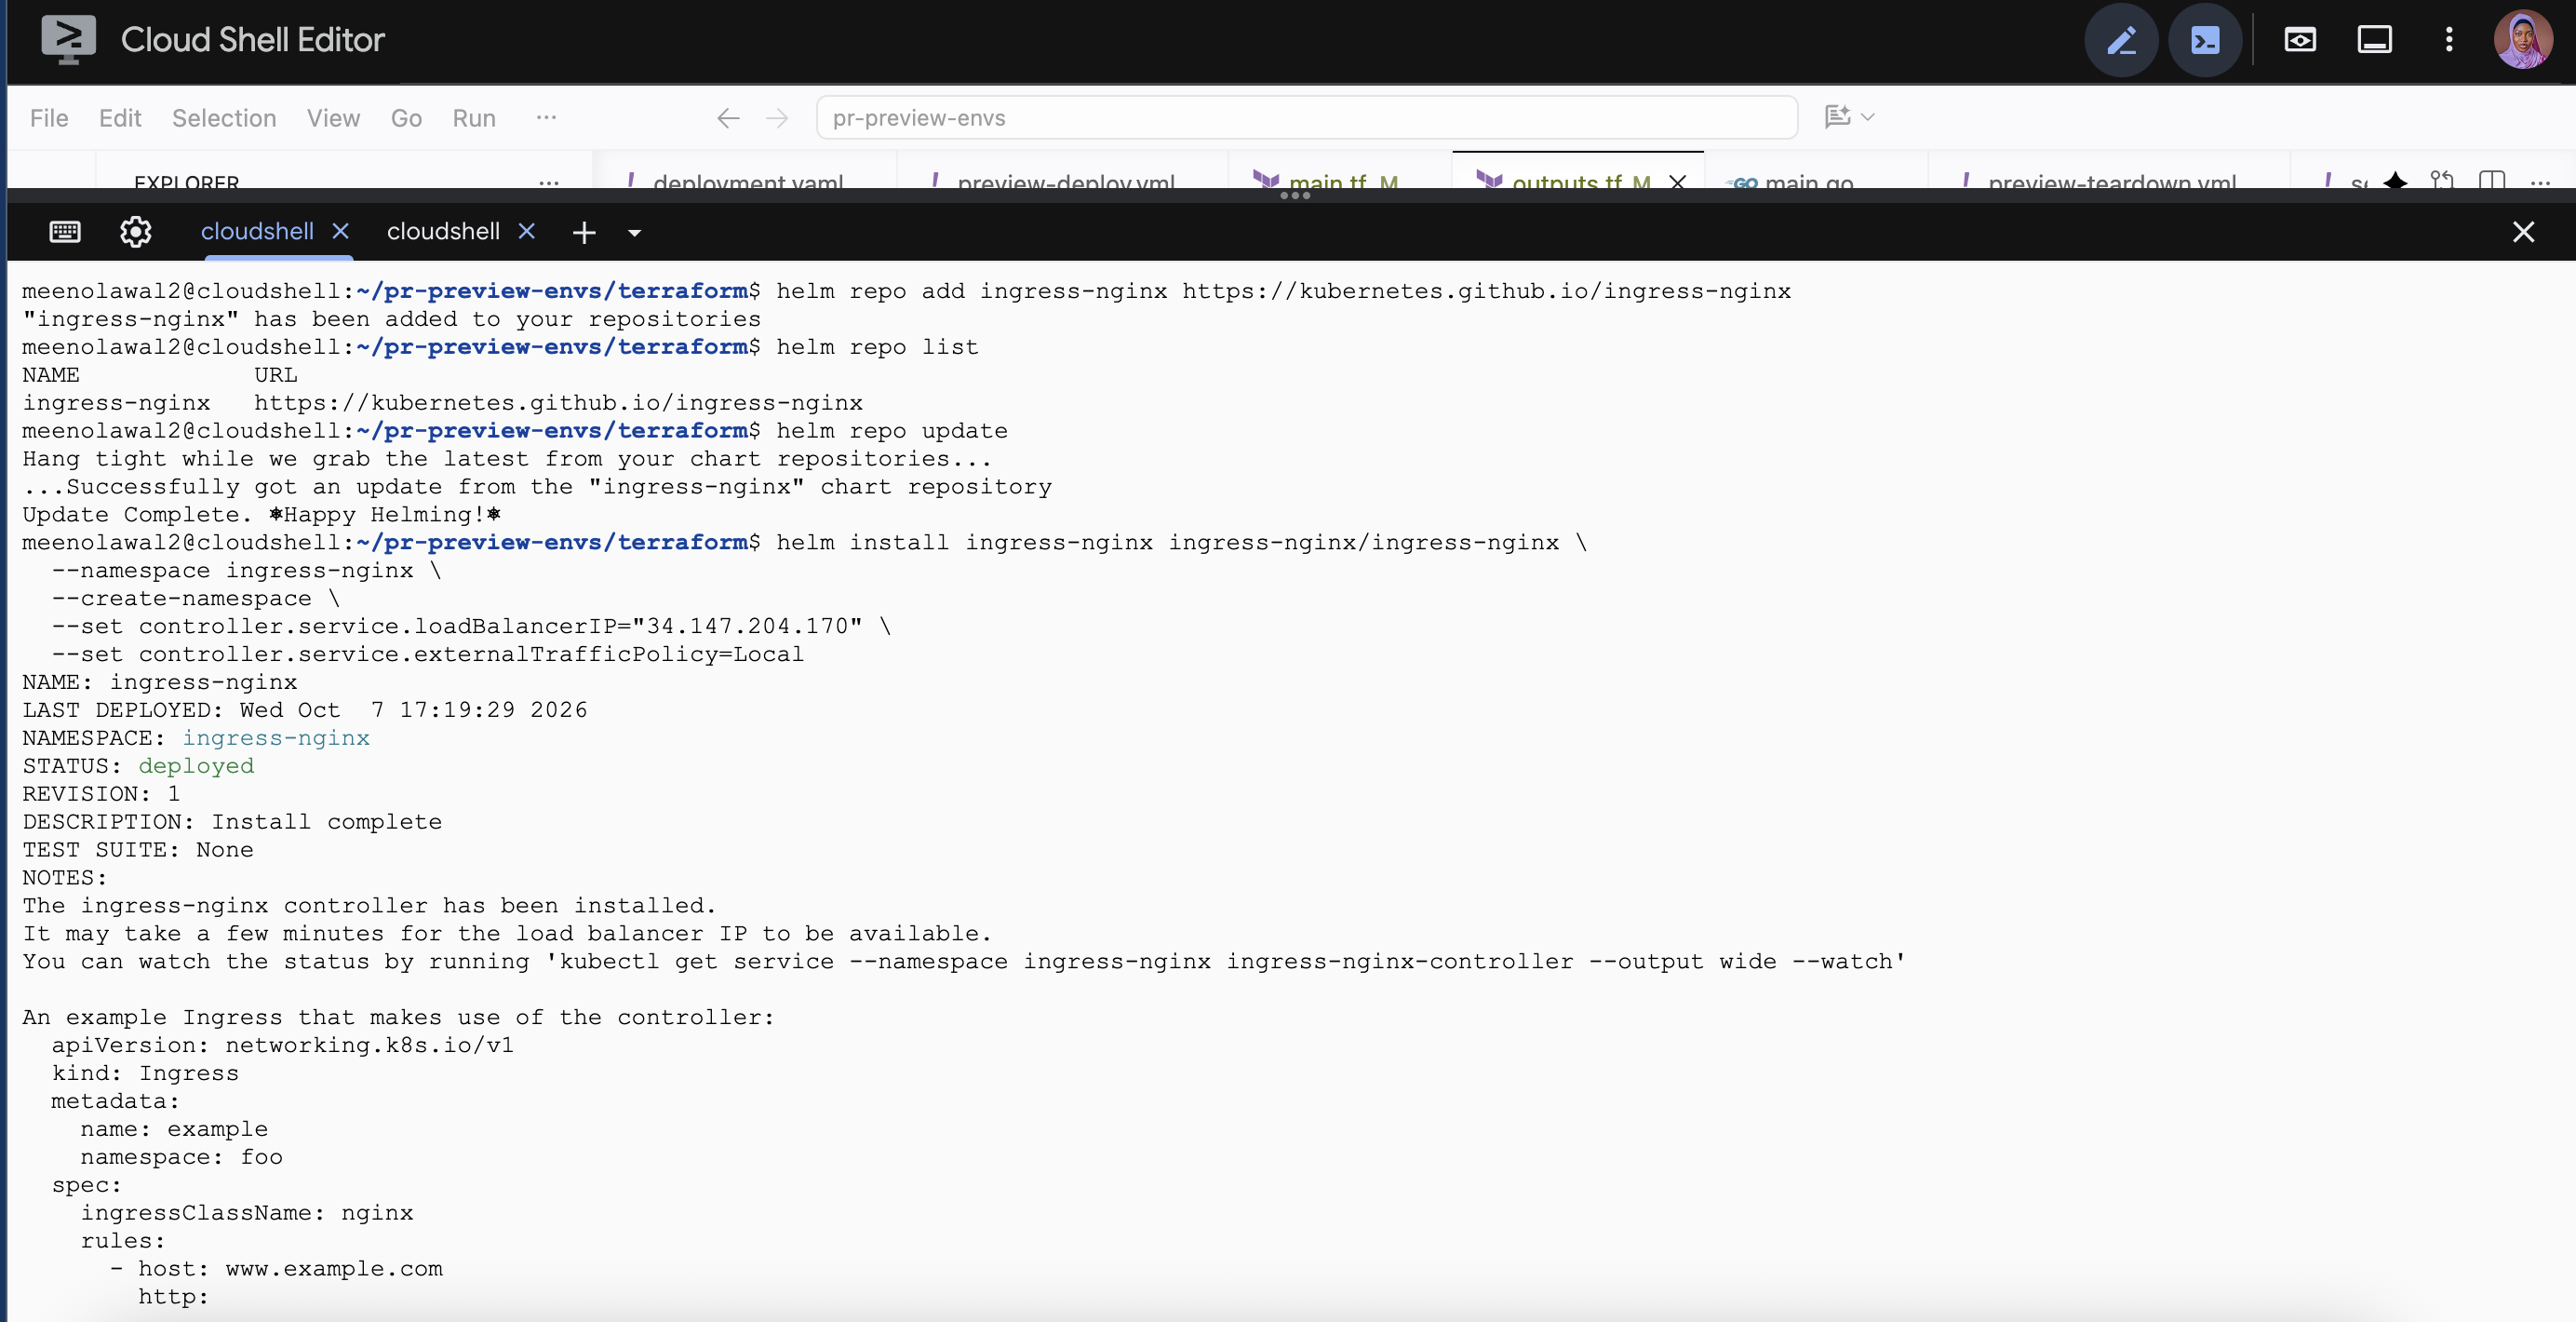
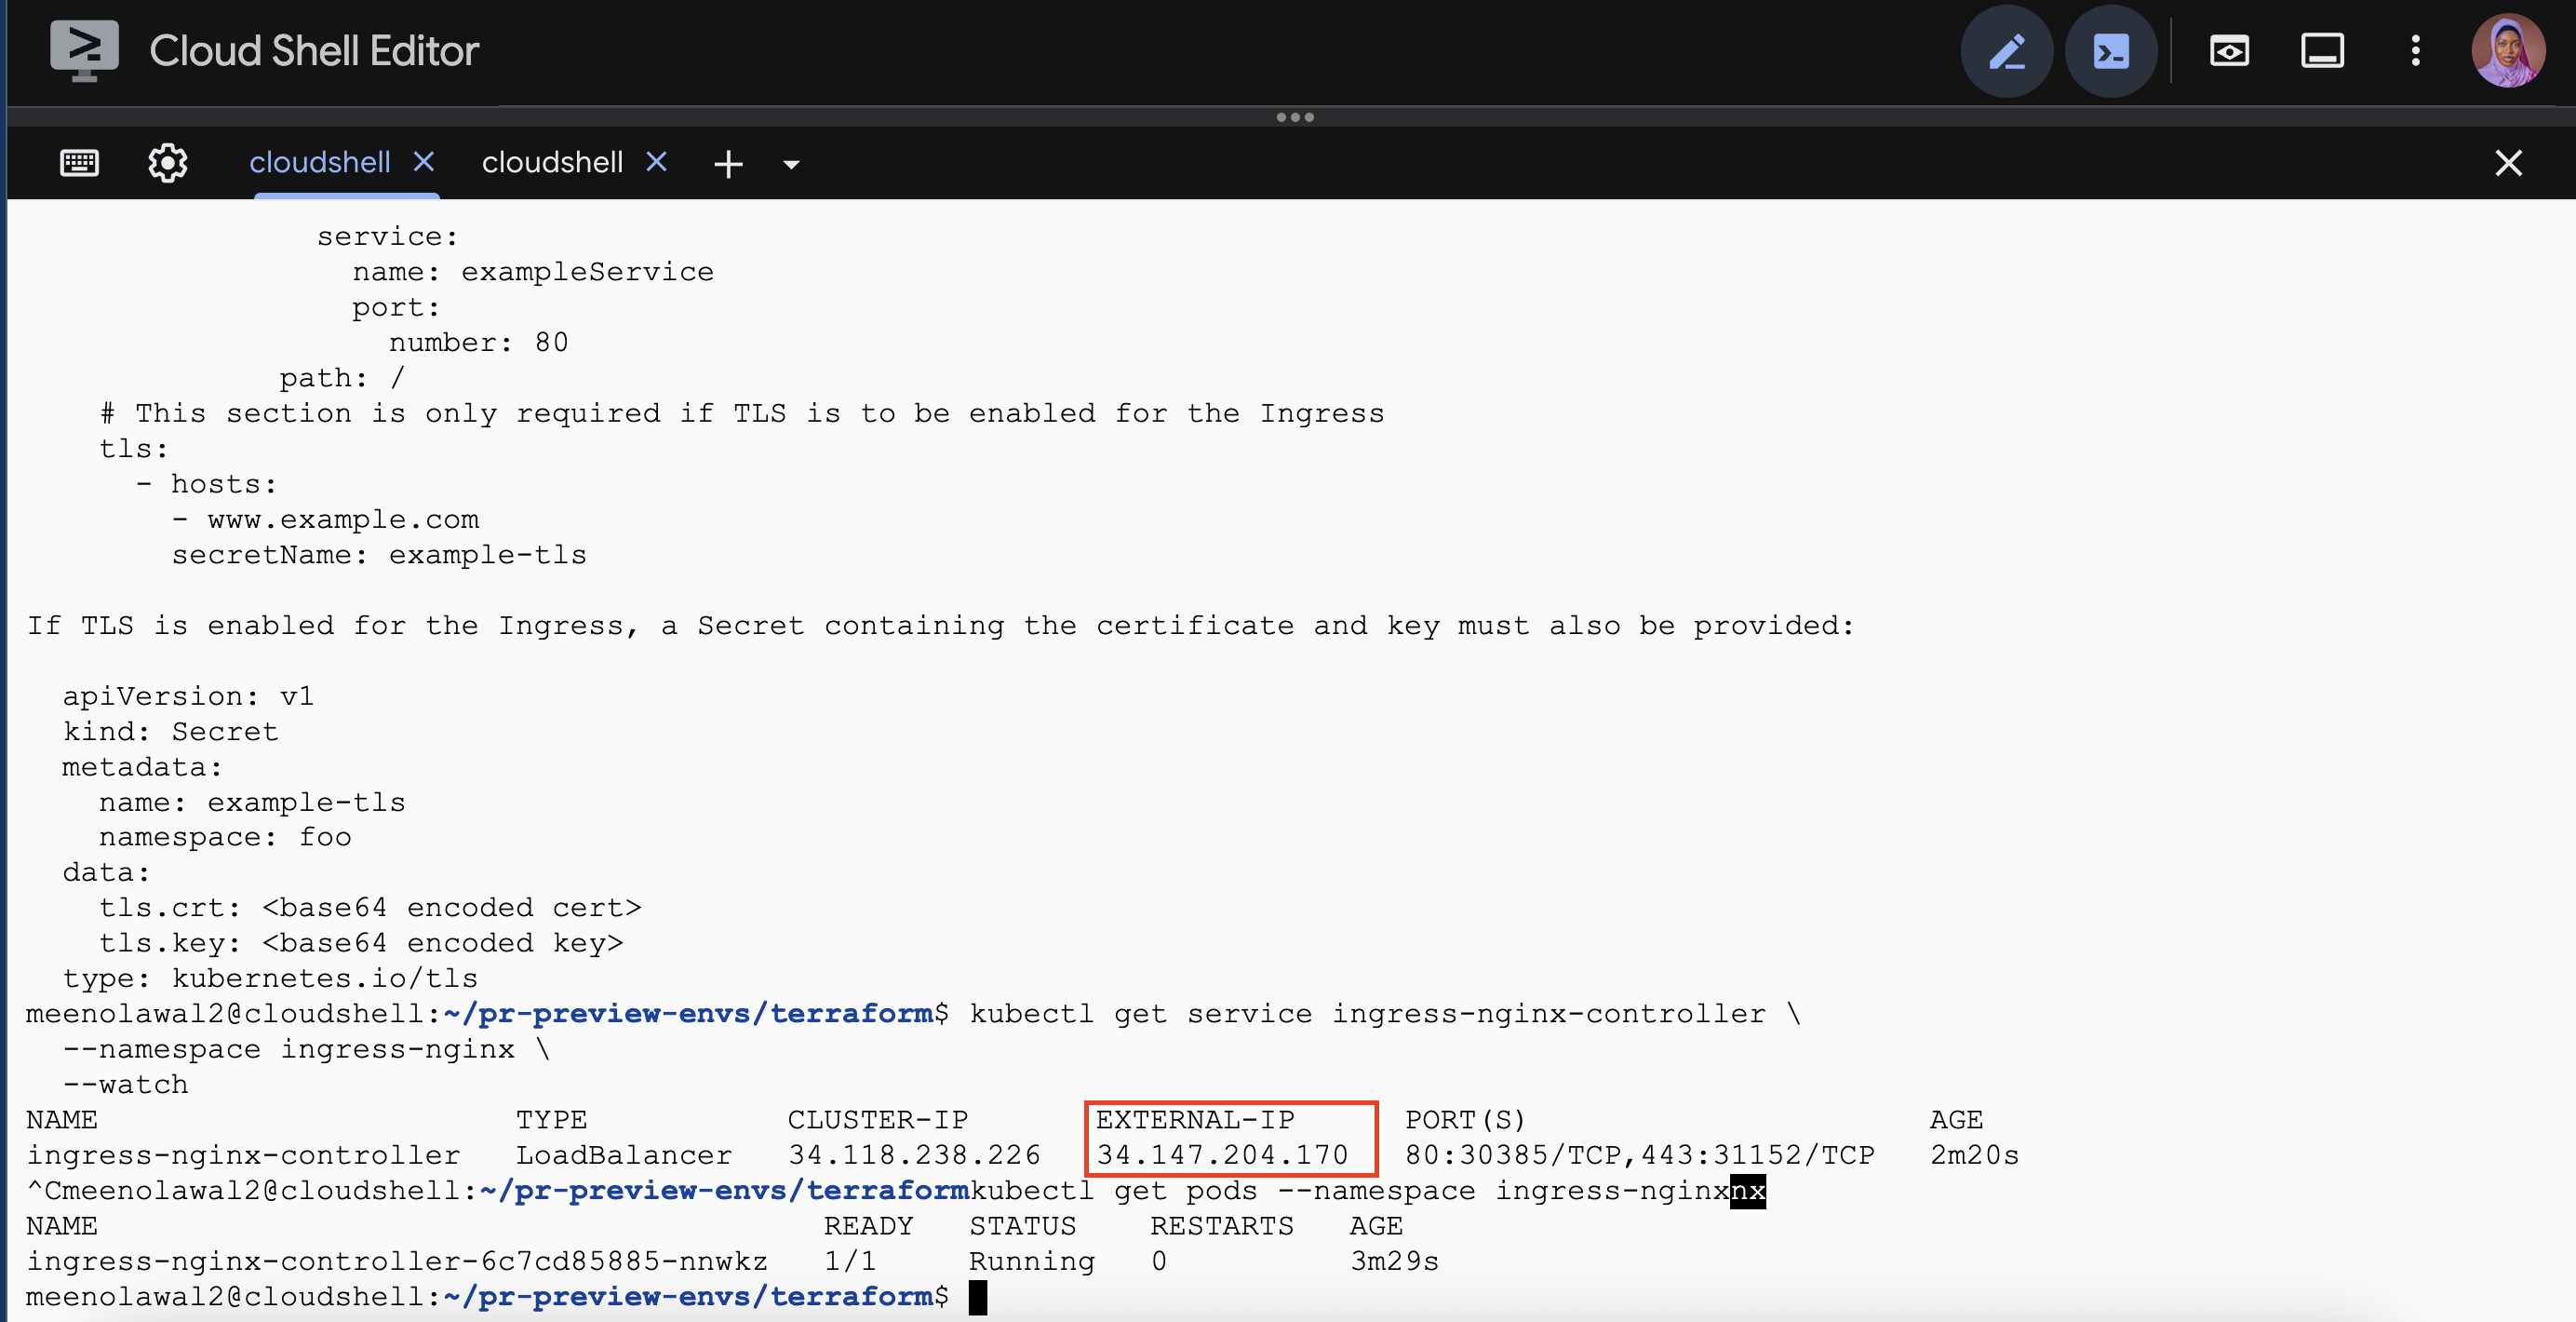
Watch for the external IP to be assigned:
kubectl get service ingress-nginx-controller \
  --namespace ingress-nginx \
  --watch
It shows <pending> for a minute or two while Google provisions the load balancer, then displays your static IP from Step 12. Press Ctrl+C once it appears.
Verify that the controller is healthy:
kubectl get pods --namespace ingress-nginx
Step 14: Point Wildcard DNS at the Load Balancer
This step takes about two minutes and is the piece that makes the whole pattern scale.
Go to wherever your domain's DNS is managed and create a single A record:
| Field | Value |
|---|---|
| Type | A |
| Name / Host | *.preview |
| Value | Your static IP from Step 1 |
| TTL | 300 (or the lowest your provider allows) |
That's it. That's the entire DNS configuration for the project.
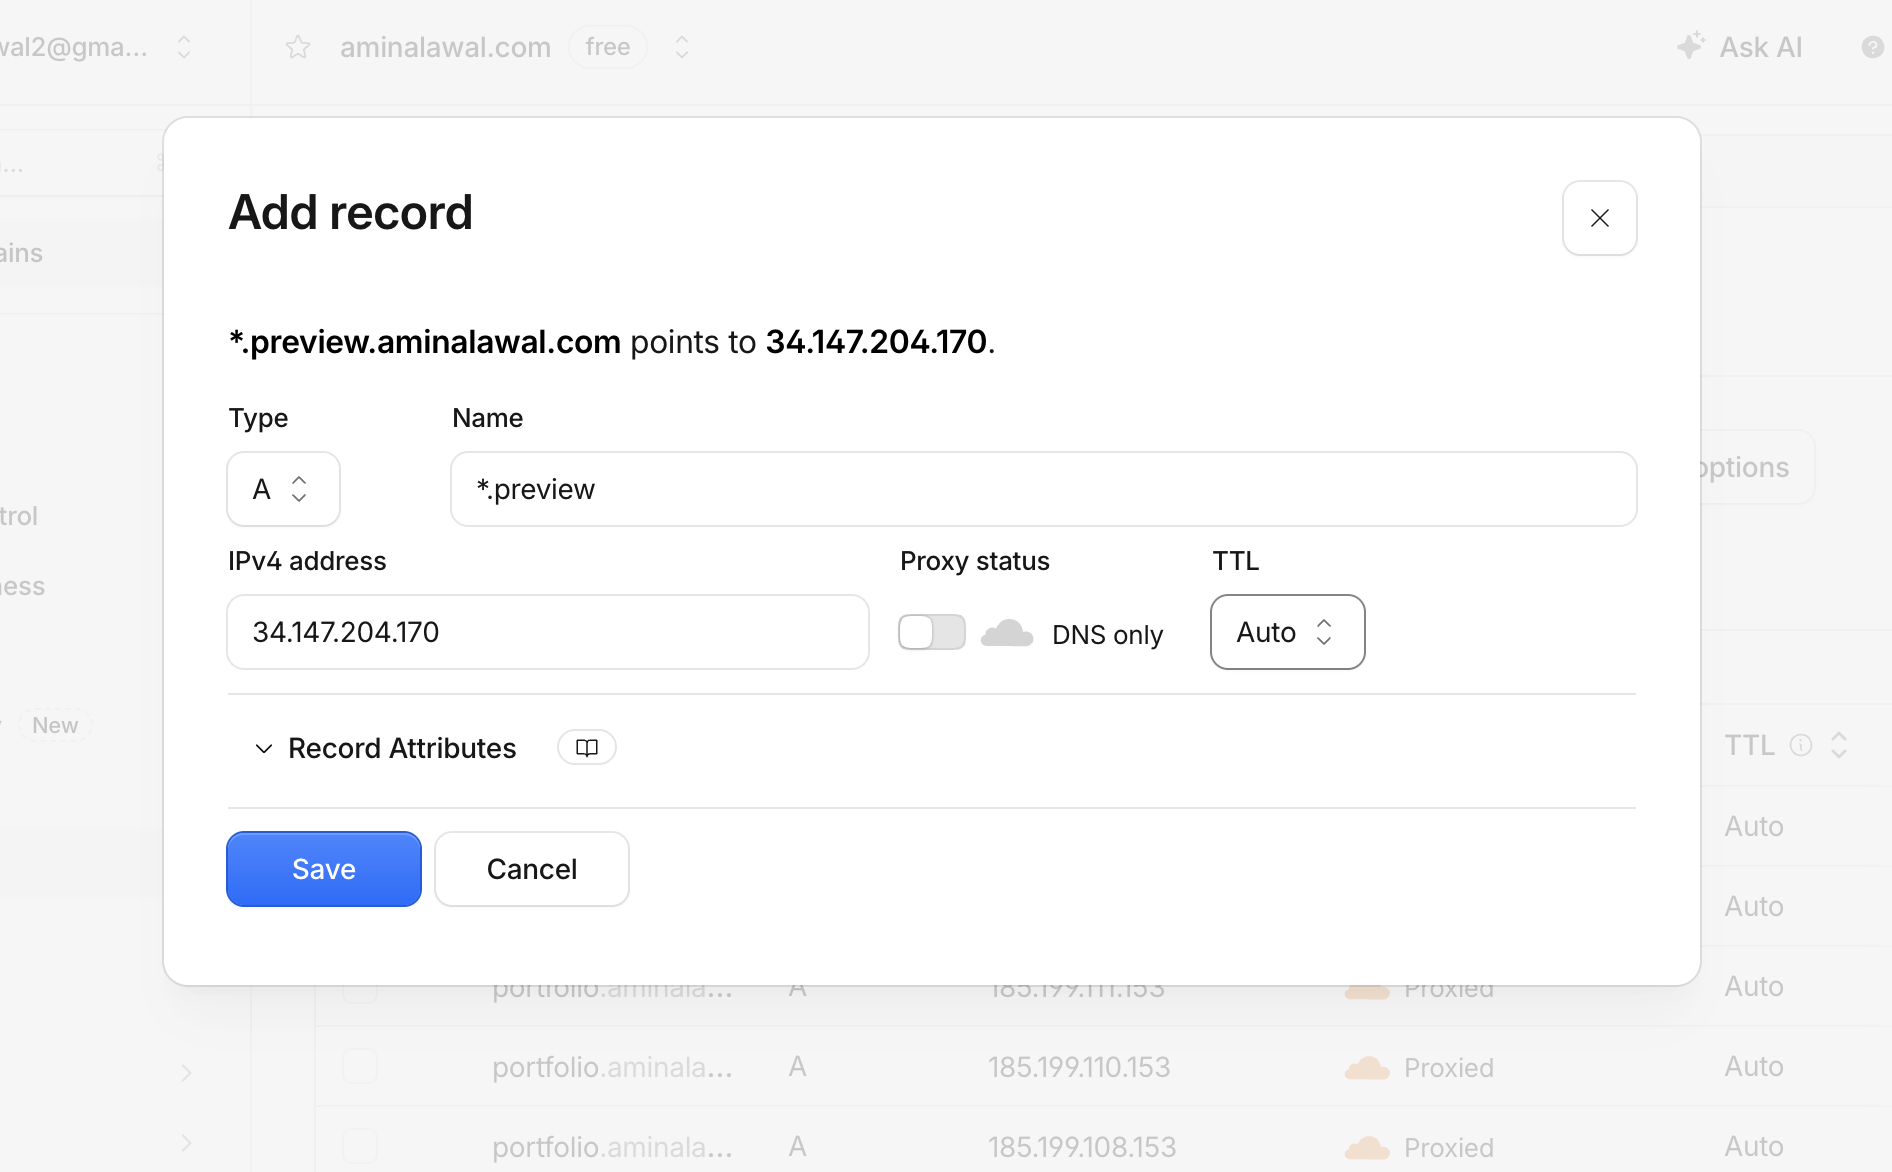
Here's why one record is enough. A wildcard DNS record matches any label in that position. *.preview.yourdomain.com resolves pr-1.preview.yourdomain.com, pr-42.preview.yourdomain.com, and pr-99999.preview.yourdomain.com, all to the same IP, all without anyone creating a record for them.
This is worth pausing on, because it's the design decision that keeps the system simple. The obvious approach would be to have the CI pipeline create a DNS record when a PR opens and delete it when the PR closes. That means DNS API credentials in your pipeline, another thing to fail, another thing to leak, and another source of orphaned resources.
The wildcard approach eliminates that entire category of work: DNS is configured once, manually, and never touched again.
Routing to the right environment doesn't happen in DNS. Every hostname resolves to the same load balancer, and the Ingress controller reads the Host header of each incoming request to decide which namespace's Service should handle it.
Verify the record has propagated:
dig +short anything-at-all.preview.yourdomain.com
You should get your static IP back. Note that the subdomain doesn't need to exist yet. That's the whole point of a wildcard.

If nothing comes back, wait a few minutes and try again. DNS propagation is usually fast with a low TTL, but it isn't instant.
Step 15: Install cert-manager and Create a ClusterIssuer
Now for HTTPS.
cert-manager is a Kubernetes controller that automates the full certificate lifecycle. It watches for Ingress resources annotated with an issuer, requests a certificate from a certificate authority, proves you control the domain, stores the certificate in a Kubernetes Secret, and renews it before it expires. Ther eare no cron jobs, manual renewal, or expired-certificate incident at 3 am.
Install it:
helm repo add jetstack https://charts.jetstack.io
helm repo update

helm install cert-manager jetstack/cert-manager \
  --namespace cert-manager \
  --create-namespace \
  --version v1.21.2 \
  --set crds.enabled=true
--set crds.enabled=true Installs cert-manager's Custom Resource Definitions: Certificate, Issuer, ClusterIssuer, CertificateRequest and others. These extend the Kubernetes API with new resource types. Without them, cert-manager has nothing to watch for. (If you're following an older tutorial that uses installCRDs=true, that flag was renamed in v1.15.)
Check it's running:
kubectl get pods --namespace cert-manager
You should see three pods: the controller, the webhook, and cainjector.

Create the ClusterIssuer
An Issuer tells cert-manager where to get certificates from. A ClusterIssuer is the same thing with cluster-wide scope, which is what we need. A namespaced Issuer would have to be recreated in every single preview namespace.
Create k8s/cluster/letsencrypt-staging.yaml:
apiVersion: cert-manager.io/v1
kind: ClusterIssuer
metadata:
  name: letsencrypt-staging
spec:
  acme:
    # Let's Encrypt's staging environment. Certificates from this
    # server are NOT trusted by browsers, but the rate limits are
    # far more generous. Use this while debugging.
    server: https://acme-staging-v02.api.letsencrypt.org/directory
    email: YOUR_EMAIL@example.com
    privateKeySecretRef:
      name: letsencrypt-staging-account-key
    solvers:
      - http01:
          ingress:
            ingressClassName: nginx
And k8s/cluster/letsencrypt-prod.yaml:
apiVersion: cert-manager.io/v1
kind: ClusterIssuer
metadata:
  name: letsencrypt-prod
spec:
  acme:
    server: https://acme-v02.api.letsencrypt.org/directory
    email: YOUR_EMAIL@example.com
    privateKeySecretRef:
      name: letsencrypt-prod-account-key
    solvers:
      - http01:
          ingress:
            ingressClassName: nginx
Apply both:
kubectl apply -f k8s/cluster/letsencrypt-staging.yaml
kubectl apply -f k8s/cluster/letsencrypt-prod.yaml
Confirm they're ready:
kubectl get clusterissuer
Both should show READY: True.

Why Two Issuers?
This isn't redundancy. It's how you avoid a frustrating afternoon.
Let's Encrypt enforces strict rate limits on its production environment. The one that matters here is 50 certificates per registered domain per week. There's also a duplicate-certificate limit of 5 per week for the identical set of hostnames.
While you're setting this up, you'll likely misconfigure something. The Ingress annotation will be wrong, or the HTTP-01 challenge won't route correctly, or DNS won't have propagated. Each failed attempt burns against your quota, and once you hit the limit you're locked out for a week with no appeal.
The staging issuer has far looser limits. Its certificates are signed by an untrusted root, so browsers show a warning, but that warning is itself proof the pipeline works. If you see a certificate warning naming "Let's Encrypt Staging," everything functioned correctly, and the only remaining step is switching issuers.
Use letsencrypt-staging until the flow works end to end, then switch to letsencrypt-prod.
How the HTTP-01 Challenge Works
This is worth understanding, because it's what breaks when things go wrong.
When cert-manager requests a certificate for pr-42.preview.yourdomain.com, Let's Encrypt needs proof you control that hostname. With the HTTP-01 solver, the sequence is:
Let's Encrypt gives cert-manager a random token.
cert-manager creates a temporary pod, Service, and Ingress rule that serves that token at
http://pr-42.preview.yourdomain.com/.well-known/acme-challenge/<token>.Let's Encrypt makes a real HTTP request to that URL from the public internet.
If the token matches, domain control is proven and the certificate is issued.
cert-manager deletes the temporary resources and stores the certificate in a Secret.
Three things must be true for this to work, and they're the three things to check when it doesn't: DNS must resolve the hostname to your load balancer, port 80 must be reachable from the internet (don't redirect everything to HTTPS at the load balancer level. The challenge is plain HTTP), and the Ingress controller must be routing correctly.
A Note on Scale
HTTP-01 issues one certificate per hostname, and every preview environment has a unique hostname. That's one certificate per pull request.
Against Let's Encrypt's 50-per-week limit, that's comfortable for a solo project or a small team. An active team opening more than 50 PRs a week would hit the ceiling.
The production answer is to issue a single wildcard certificate for *.preview.yourdomain.com and share it across every namespace. Wildcards can't be issued over HTTP-01. They require the DNS-01 challenge, where cert-manager proves control by creating a TXT record instead of serving a file.
With Cloud DNS, cert-manager can do this automatically using a Google service account. You'd then replicate the resulting Secret into each preview namespace with a tool like reflector.
That's more moving parts than this handbook needs, but it's the right answer once your PR volume justifies it, and it's worth knowing that limit exists before you hit it.
Step 16: Add an Ingress to the Base Manifests
Now we'll give the application a route.
Create k8s/base/ingress.yaml:
apiVersion: networking.k8s.io/v1
kind: Ingress
metadata:
  name: preview-app
  annotations:
    # Tells cert-manager to request a certificate for the hosts
    # listed under spec.tls, using this ClusterIssuer.
    cert-manager.io/cluster-issuer: letsencrypt-staging
    # Redirect HTTP to HTTPS once the certificate exists.
    nginx.ingress.kubernetes.io/ssl-redirect: "true"
spec:
  ingressClassName: nginx
  tls:
    - hosts:
        - preview-host-placeholder
      secretName: preview-app-tls
  rules:
    - host: preview-host-placeholder
      http:
        paths:
          - path: /
            pathType: Prefix
            backend:
              service:
                name: preview-app
                port:
                  number: 80
Add it to k8s/base/kustomization.yaml:
You created this file back in Step 8 with two resources. Add the Ingress to it:
apiVersion: kustomize.config.k8s.io/v1beta1
kind: Kustomization

resources:
  - deployment.yaml
  - service.yaml
  - ingress.yaml
Here are the pieces that matter:
cert-manager.io/cluster-issuer: this single annotation is what triggers the entire certificate workflow. cert-manager watches for it, reads the hostnames from spec.tls, and does everything else. Note it's set to letsencrypt-staging for now. We'll switch to production once the flow is proven.
ingressClassName: nginx: identifies which controller should handle this Ingress. A cluster can run several controllers simultaneously, and this field prevents them from fighting over the same resource. Older tutorials use the kubernetes.io/ingress.class annotation, which is deprecated.
secretName: preview-app-tls: where cert-manager stores the issued certificate. It's created automatically in the same namespace as the Ingress, so each preview environment has its own.
preview-host-placeholder: deliberately not a valid hostname. It appears twice: once in spec.tls.hosts and once in spec.rules.host, and both get replaced per PR in the next step. Using something that obviously isn't a real domain means that if the patch ever fails, you get an immediate visible error rather than a subtle misroute.
pathType: Prefix with path: /: matches every path on the host. Preview environments serve the whole application, not a subpath.
Step 17: Patch the Hostname Per Pull Request
Each environment needs its own hostname substituted into two places in the Ingress. Kustomize handles this with a JSON 6902 patch. A precise operation that targets an exact path within a resource.
In Step 9, the workflow generated an overlay that set the namespace and image tag. We extend that generated overlay with a patch block. Here's what the complete generated kustomization.yaml looks like for PR 42:
apiVersion: kustomize.config.k8s.io/v1beta1
kind: Kustomization

namespace: pr-42

resources:
  - ../../base

images:
  - name: preview-app
    newName: europe-west2-docker.pkg.dev/your-project/pr-preview/preview-app
    newTag: pr-42-a1b2c3d

patches:
  - target:
      kind: Ingress
      name: preview-app
    patch: |-
      - op: replace
        path: /spec/rules/0/host
        value: pr-42.preview.yourdomain.com
      - op: replace
        path: /spec/tls/0/hosts/0
        value: pr-42.preview.yourdomain.com
The patch syntax reads literally: in the resource matching kind: Ingress, name: preview-app, replace the value at /spec/rules/0/host, and replace the value at /spec/tls/0/hosts/0.
The 0 indices are array positions. /spec/rules/0 is the first (and only) rule. /spec/tls/0/hosts/0 is the first hostname in the first TLS block. If you later add a second hostname per environment, you'd add another operation targeting index 1.
Why a JSON 6902 patch rather than a strategic merge patch? Because strategic merge on an array of objects is ambiguous. Kubernetes has to guess whether you mean "replace this list" or "merge into an existing entry," and the answer depends on per-field merge keys. For replacing a single value at a known position, an explicit op: replace says exactly what you mean and fails loudly if the path doesn't exist.
The workflow generates this file at runtime, so you never commit a per-PR overlay. We'll write that step in Step 19.
Step 18: Add Guardrails with ResourceQuota and LimitRange
Before we wire up the workflow, let's stop a preview environment from being able to take down the cluster.
Right now nothing prevents a pull request from deploying a manifest requesting 32 CPUs, or scaling to 200 replicas, or creating a dozen LoadBalancer Services. Someone doesn't need bad intent for this to happen. A bad merge, a copied manifest, or a typo in a replica count does it just as effectively.
Two Kubernetes resources solve this, and they work together.
Create k8s/cluster/namespace-guardrails.yaml as a template:
apiVersion: v1
kind: ResourceQuota
metadata:
  name: preview-quota
spec:
  hard:
    requests.cpu: "1"
    requests.memory: 1Gi
    limits.cpu: "2"
    limits.memory: 2Gi
    pods: "10"
    services: "5"
    services.loadbalancers: "0"
    persistentvolumeclaims: "2"
---
apiVersion: v1
kind: LimitRange
metadata:
  name: preview-limits
spec:
  limits:
    - type: Container
      # Applied to containers that don't specify their own
      defaultRequest:
        cpu: 50m
        memory: 64Mi
      default:
        cpu: 200m
        memory: 128Mi
      # Hard ceiling — a container asking for more is rejected
      max:
        cpu: "1"
        memory: 512Mi
What Each One Does
A ResourceQuota caps the total consumption of an entire namespace. Add up every pod's requests and limits. The sum can't exceed these numbers. A request that would push the namespace over its quota is rejected by the API server at admission time, before anything is scheduled.
The services.loadbalancers: "0" line is worth highlighting. It makes it structurally impossible for a preview environment to provision a Google Cloud load balancer, even if someone commits a manifest with type: LoadBalancer. That's a direct financial guardrail: the most expensive mistake this system could make is now unrepresentable.
A LimitRange operates on individual containers rather than the namespace total. It sets defaults for containers that don't specify resources, and a hard maximum that no single container may exceed.
Why They Must Be Deployed Together
Once a ResourceQuota that constrains requests.cpu exists in a namespace, every container in that namespace must declare resource requests. A pod without them is rejected outright, because Kubernetes can't verify it fits within the quota if it doesn't know what it's asking for.
That means adding a ResourceQuota on its own will break any manifest that omits resource specs, and most manifests found in the wild do omit them.
The LimitRange fixes this by supplying defaults. A container with no resource spec gets the defaultRequest and default values injected automatically at admission time, which satisfies the quota's requirement.
Deploy one without the other, and you get confusing failures. Deploy both and the system is forgiving of incomplete manifests while still being strictly bounded.
Sizing the Numbers
The values above suit a small application like ours. To adjust them, work backwards from your node capacity.
Two e2-standard-2 nodes give you 4 vCPU and 16GB total, minus roughly 15% that GKE reserves for system components. Call it 3.4 usable vCPU. With requests.cpu: "1" per namespace, three preview environments could theoretically fill the cluster.
Our application requests only 50m CPU, so in practice you'll fit far more than three. But the quota is a ceiling on what a namespace may request, and you should set it well below "one PR can consume everything."
If you expect ten concurrent environments, size the per-namespace quota at roughly a tenth of usable capacity, or add nodes.
Step 19: Update the Deploy Workflow
Here's the complete .github/workflows/preview-deploy.yml, with everything added in this section marked # NEW. Replace your Step 9 version with this one.
name: Deploy PR Preview

on:
  pull_request:
    types: [opened, synchronize, reopened]

concurrency:
  group: preview-${{ github.event.pull_request.number }}
  cancel-in-progress: true

permissions:
  contents: read
  id-token: write
  pull-requests: write

env:
  PROJECT_ID: YOUR_PROJECT_ID
  REGION: europe-west2
  CLUSTER_NAME: pr-preview-cluster
  CLUSTER_ZONE: europe-west2-a
  REPOSITORY: pr-preview
  IMAGE_NAME: preview-app
  # NEW: the base domain for all preview environments
  PREVIEW_DOMAIN: preview.yourdomain.com
  # NEW: switch to letsencrypt-prod once the flow is proven
  CLUSTER_ISSUER: letsencrypt-staging

jobs:
  deploy:
    name: Build and deploy preview
    runs-on: ubuntu-latest

    steps:
      - name: Check out code
        uses: actions/checkout@v4

      - name: Set environment variables
        run: |
          PR_NUMBER=${{ github.event.pull_request.number }}
          SHORT_SHA=$(echo "${{ github.event.pull_request.head.sha }}" | cut -c1-7)

          echo "PR_NUMBER=${PR_NUMBER}"    >> $GITHUB_ENV
          echo "SHORT_SHA=${SHORT_SHA}"    >> $GITHUB_ENV
          echo "NAMESPACE=pr-${PR_NUMBER}" >> $GITHUB_ENV
          echo "IMAGE_TAG=pr-${PR_NUMBER}-${SHORT_SHA}" >> $GITHUB_ENV
          echo "IMAGE_BASE=${{ env.REGION }}-docker.pkg.dev/${{ env.PROJECT_ID }}/${{ env.REPOSITORY }}/${{ env.IMAGE_NAME }}" >> $GITHUB_ENV
          # NEW: the hostname this environment will be reachable at
          echo "PREVIEW_HOST=pr-${PR_NUMBER}.${{ env.PREVIEW_DOMAIN }}" >> $GITHUB_ENV

      - name: Authenticate to Google Cloud
        uses: google-github-actions/auth@v2
        with:
          workload_identity_provider: ${{ secrets.WIF_PROVIDER }}
          service_account: ${{ secrets.WIF_SERVICE_ACCOUNT }}

      - name: Set up gcloud
        uses: google-github-actions/setup-gcloud@v2

      - name: Configure Docker for Artifact Registry
        run: gcloud auth configure-docker ${{ env.REGION }}-docker.pkg.dev --quiet

      - name: Build and push image
        run: |
          docker build \
            --build-arg PR_NUMBER="${PR_NUMBER}" \
            --build-arg GIT_SHA="${SHORT_SHA}" \
            -t "${IMAGE_BASE}:${IMAGE_TAG}" \
            ./app

          docker push "${IMAGE_BASE}:${IMAGE_TAG}"

      - name: Get GKE credentials
        uses: google-github-actions/get-gke-credentials@v2
        with:
          cluster_name: ${{ env.CLUSTER_NAME }}
          location: ${{ env.CLUSTER_ZONE }}

      - name: Create namespace
        run: |
          kubectl create namespace "${NAMESPACE}" \
            --dry-run=client -o yaml | kubectl apply -f -

          # NEW: label it so the reaper knows this namespace is ours
          kubectl label namespace "${NAMESPACE}" \
            app.kubernetes.io/managed-by=pr-preview \
            preview.pr="${PR_NUMBER}" \
            --overwrite

      # NEW: apply the quota and limits before anything deploys
      - name: Apply namespace guardrails
        run: |
          kubectl apply -f k8s/cluster/namespace-guardrails.yaml \
            --namespace="${NAMESPACE}"

      - name: Generate Kustomize overlay
        run: |
          mkdir -p k8s/overlays/"${NAMESPACE}"
          cat > k8s/overlays/"${NAMESPACE}"/kustomization.yaml <<EOF
          apiVersion: kustomize.config.k8s.io/v1beta1
          kind: Kustomization

          namespace: ${NAMESPACE}

          resources:
            - ../../base

          images:
            - name: preview-app
              newName: ${IMAGE_BASE}
              newTag: ${IMAGE_TAG}

          patches:
            - target:
                kind: Ingress
                name: preview-app
              patch: |-
                - op: replace
                  path: /spec/rules/0/host
                  value: ${PREVIEW_HOST}
                - op: replace
                  path: /spec/tls/0/hosts/0
                  value: ${PREVIEW_HOST}
                - op: replace
                  path: /metadata/annotations/cert-manager.io~1cluster-issuer
                  value: ${CLUSTER_ISSUER}
          EOF

          echo "--- Rendered manifest ---"
          kubectl kustomize k8s/overlays/"${NAMESPACE}"

      - name: Deploy
        run: kubectl apply -k k8s/overlays/"${NAMESPACE}"

      - name: Wait for rollout
        run: |
          kubectl rollout status deployment/preview-app \
            --namespace="${NAMESPACE}" \
            --timeout=180s

      # NEW: wait for the TLS certificate to be issued
      - name: Wait for certificate
        continue-on-error: true
        run: |
          echo "Waiting for TLS certificate for ${PREVIEW_HOST}..."
          kubectl wait certificate/preview-app-tls \
            --namespace="${NAMESPACE}" \
            --for=condition=Ready \
            --timeout=180s

      - name: Show deployment details
        run: |
          echo "Preview URL: https://${PREVIEW_HOST}"
          kubectl get pods,svc,ingress,certificate --namespace="${NAMESPACE}"
There are a few things to understand about the new steps.
The ~1 in the annotation patch path: this looks like a typo and isn't:
path: /metadata/annotations/cert-manager.io~1cluster-issuer
JSON Pointer paths use / as a separator, so a literal / inside a key has to be escaped. The escape sequence is ~1. (And ~ itself escapes to ~0.) Since the annotation key iscert-manager.io/cluster-issuer, the pointer becomes cert-manager.io~1cluster-issuer. Get this wrong, and the patch silently targets a path that doesn't exist.
Namespace labels: The app.kubernetes.io/managed-by=pr-preview label is what makes the reaper in Step 21 safe. A cleanup job that deletes namespaces matching a name pattern is one bad regex away from deleting something important. A job that only ever touches namespaces carrying a label it applied itself has a much smaller worst case.
Guardrails before deploy: The ResourceQuota must exist before the application deploys, not after. Applying it afterwards means the first deployment escapes it entirely, and you'd only find out when something exceeded a limit that was never enforced.
continue-on-error: true on the certificate wait: This is deliberate. Certificate issuance depends on Let's Encrypt, an external service with rate limits and occasional slowness. If issuance is delayed, the environment is still deployed and still works over HTTP.
So failing the entire workflow would be wrong. We note the problem and continue. The PR comment in the next step reflects whether the certificate is actually ready.
Step 20: Comment the URL on the Pull Request
The environment is live. Now it's time to tell people about it.
Add this step to the end of the deploy job:
      - name: Comment preview URL on PR
        uses: actions/github-script@v7
        with:
          script: |
            const host = process.env.PREVIEW_HOST;
            const sha = process.env.SHORT_SHA;
            const ns = process.env.NAMESPACE;

            // A hidden marker so we can find our own comment later
            const marker = '<!-- pr-preview-environment -->';

            const body = [
              marker,
              '### Preview environment is ready',
              '',
              `**https://${host}**`,
              '',
              `Commit \`${sha}\` · Namespace \`${ns}\``,
              '',
              '<sub>This environment updates on every push and is deleted when the PR closes.</sub>',
            ].join('\n');

            const { data: comments } = await github.rest.issues.listComments({
              owner: context.repo.owner,
              repo: context.repo.repo,
              issue_number: context.issue.number,
            });

            const existing = comments.find(c => c.body.includes(marker));

            if (existing) {
              await github.rest.issues.updateComment({
                owner: context.repo.owner,
                repo: context.repo.repo,
                comment_id: existing.id,
                body,
              });
            } else {
              await github.rest.issues.createComment({
                owner: context.repo.owner,
                repo: context.repo.repo,
                issue_number: context.issue.number,
                body,
              });
            }
So why this approach?
actions/github-script is maintained by GitHub itself and gives you an authenticated Octokit client with no setup. There are third-party actions that post PR comments in fewer lines, but every third-party action in a workflow with write permissions is a supply chain dependency.
Given the effort we spent in Step 5 removing a long-lived credential, adding an unaudited action that can write to your repository would be an odd trade.
The hidden marker comment is the mechanism that makes this a sticky comment. <!-- pr-preview-environment --> renders as nothing in GitHub's markdown, but it's present in the comment body. On each run, we list the PR's comments, look for one containing the marker, and update it if found.
Without this, a PR with fifteen commits gets fifteen near-identical bot comments, and the thread becomes unreadable. Reviewers start ignoring bot comments entirely, which defeats the purpose. One comment that stays current is the difference between a useful tool and noise.
process.env.PREVIEW_HOST: values written to $GITHUB_ENV in earlier steps are available as environment variables in the script. This is cleaner than interpolating ${{ }} expressions directly into JavaScript, which can break in surprising ways if a value contains quotes or backticks.
context.issue.number works on pull_request events because GitHub treats pull requests as a specialised kind of issue. It's why we use the issues API to comment on a PR.
The step needs pull-requests: write, which the workflow already declares.
Step 21: Build the Reaper
Here's the uncomfortable truth about the teardown workflow from Part 1: it will eventually fail to run.
The failure modes are mundane. Someone closes a PR while GitHub Actions is having an incident. A workflow file gets edited on a branch in a way that breaks the teardown job. Someone deletes a branch without closing its PR. A repository is archived with PRs still open. GitHub's event delivery hiccups.
None of these are common. All of them leave a namespace running indefinitely, consuming cluster capacity and (if it happens enough) real money. Cleanup that works 95% of the time is still a leak.
The fix is a reaper: a scheduled job that periodically compares what's running against what should be running, and deletes the difference.
Create .github/workflows/preview-reaper.yml:
name: Reap Orphaned Preview Environments

on:
  schedule:
    # 03:00 UTC daily
    - cron: '0 3 * * *'
  # Allow manual runs from the Actions tab
  workflow_dispatch:

permissions:
  contents: read
  id-token: write
  pull-requests: read

env:
  PROJECT_ID: YOUR_PROJECT_ID
  CLUSTER_NAME: pr-preview-cluster
  CLUSTER_ZONE: europe-west2-a
  # Delete environments older than this even if the PR is still open
  MAX_AGE_DAYS: 7

jobs:
  reap:
    name: Delete orphaned namespaces
    runs-on: ubuntu-latest

    steps:
      - name: Authenticate to Google Cloud
        uses: google-github-actions/auth@v2
        with:
          workload_identity_provider: ${{ secrets.WIF_PROVIDER }}
          service_account: ${{ secrets.WIF_SERVICE_ACCOUNT }}

      - name: Get GKE credentials
        uses: google-github-actions/get-gke-credentials@v2
        with:
          cluster_name: ${{ env.CLUSTER_NAME }}
          location: ${{ env.CLUSTER_ZONE }}

      - name: Reap
        env:
          GH_TOKEN: ${{ secrets.GITHUB_TOKEN }}
        run: |
          set -euo pipefail

          echo "Fetching open pull requests..."
          OPEN_PRS=$(gh pr list \
            --repo "${{ github.repository }}" \
            --state open \
            --limit 500 \
            --json number \
            --jq '.[].number')

          echo "Open PRs: ${OPEN_PRS:-none}"
          echo ""

          # Only consider namespaces we created ourselves.
          NAMESPACES=$(kubectl get namespaces \
            -l app.kubernetes.io/managed-by=pr-preview \
            -o jsonpath='{range .items[*]}{.metadata.name}{"\t"}{.metadata.labels.preview\.pr}{"\t"}{.metadata.creationTimestamp}{"\n"}{end}')

          if [ -z "${NAMESPACES}" ]; then
            echo "No preview namespaces found. Nothing to do."
            exit 0
          fi

          NOW=$(date -u +%s)
          MAX_AGE_SECONDS=$(( MAX_AGE_DAYS * 86400 ))
          DELETED=0

          while IFS=$'\t' read -r NS PR_NUM CREATED; do
            [ -z "${NS}" ] && continue

            CREATED_EPOCH=$(date -u -d "${CREATED}" +%s)
            AGE=$(( NOW - CREATED_EPOCH ))
            AGE_DAYS=$(( AGE / 86400 ))

            REASON=""

            # Rule 1: the PR is no longer open
            if ! echo "${OPEN_PRS}" | grep -qx "${PR_NUM}"; then
              REASON="PR #${PR_NUM} is not open"
            # Rule 2: the environment has outlived MAX_AGE_DAYS
            elif [ "${AGE}" -gt "${MAX_AGE_SECONDS}" ]; then
              REASON="environment is ${AGE_DAYS} days old (max ${MAX_AGE_DAYS})"
            fi

            if [ -n "${REASON}" ]; then
              echo "DELETING ${NS} — ${REASON}"
              kubectl delete namespace "${NS}" \
                --ignore-not-found=true \
                --wait=false
              DELETED=$(( DELETED + 1 ))
            else
              echo "KEEPING  ${NS} — PR #${PR_NUM} open, ${AGE_DAYS}d old"
            fi
          done <<< "${NAMESPACES}"

          echo ""
          echo "Reaped ${DELETED} namespace(s)."
Where does GITHUB_TOKEN come from?
Unlike WIF_PROVIDER and WIF_SERVICE_ACCOUNT, which you created in Step 6, GITHUB_TOKEN isn't something you set up. You won't find it on the secrets page, and you shouldn't add it there.
GitHub mints a fresh installation token at the start of every workflow run, exposes it as secrets.GITHUB_TOKEN, and revokes it the moment the job finishes. It's scoped to the repository running the workflow and nothing else.
Understanding the Reaper
The reaper runs from GitHub Actions, not inside the cluster. A CronJob in Kubernetes would need a GitHub token stored as a cluster Secret to query open PRs. That's a long-lived credential sitting in the cluster, which is exactly what we avoided in Step 5.
A scheduled workflow already has GITHUB_TOKEN (scoped, automatic, short-lived) and already authenticates to GCP through Workload Identity Federation. No new secrets.
The label selector is the safety mechanism. The query is -l app.kubernetes.io/managed-by=pr-preview, not a name pattern like pr-*. This is a deliberate choice: a name-pattern match would happily delete a production namespace someone named pr-routing-service. The reaper can only ever see namespaces that the deploy workflow explicitly labelled, which means the set of things it could possibly delete is the set of things it created.
Be careful when you adapt this. Any cleanup automation should operate on a positive allowlist it controls, never a pattern that could match something it didn't create.
We also have two deletion rules, for two different problems. Rule 1 catches the actual orphan. A namespace whose PR is closed but whose teardown never ran. Rule 2 catches the stale environment: a PR that's been open for three weeks, hasn't been touched in two, and is quietly holding cluster capacity. Seven days is a reasonable default. If someone needs their environment back, they just push a commit, and it redeploys in a couple of minutes.
set -euo pipefail: -e exits on any command failure, -u errors on undefined variables, and -o pipefail makes a pipeline fail if any stage fails rather than only the last. In a script whose job is deleting things, silent failure is the worst outcome. If something goes wrong, stop immediately.
grep -qx: the -x flag requires the whole line to match. Without it, PR 4 would match against open PR 42 and the reaper would spare an orphaned namespace forever. It's a small flag, but a real bug.
workflow_dispatch lets you run the reaper manually from the Actions tab. Do that the first few times and read the output before trusting the schedule. The log prints KEEPING or DELETING with a reason for every namespace, so you can verify the logic matches your expectations before it runs unattended.
Step 22: Test the Whole Thing
Commit everything and push:
git add .
git commit -m "Add Ingress, TLS, PR comments, guardrails, and reaper"
git push
Create a branch, make a visible change, and open a pull request:
git checkout -b test-preview-urls
# edit app/main.go — change the greeting text
git add .
git commit -m "Test preview URLs"
git push -u origin test-preview-urls
Open the PR and watch the Actions tab.
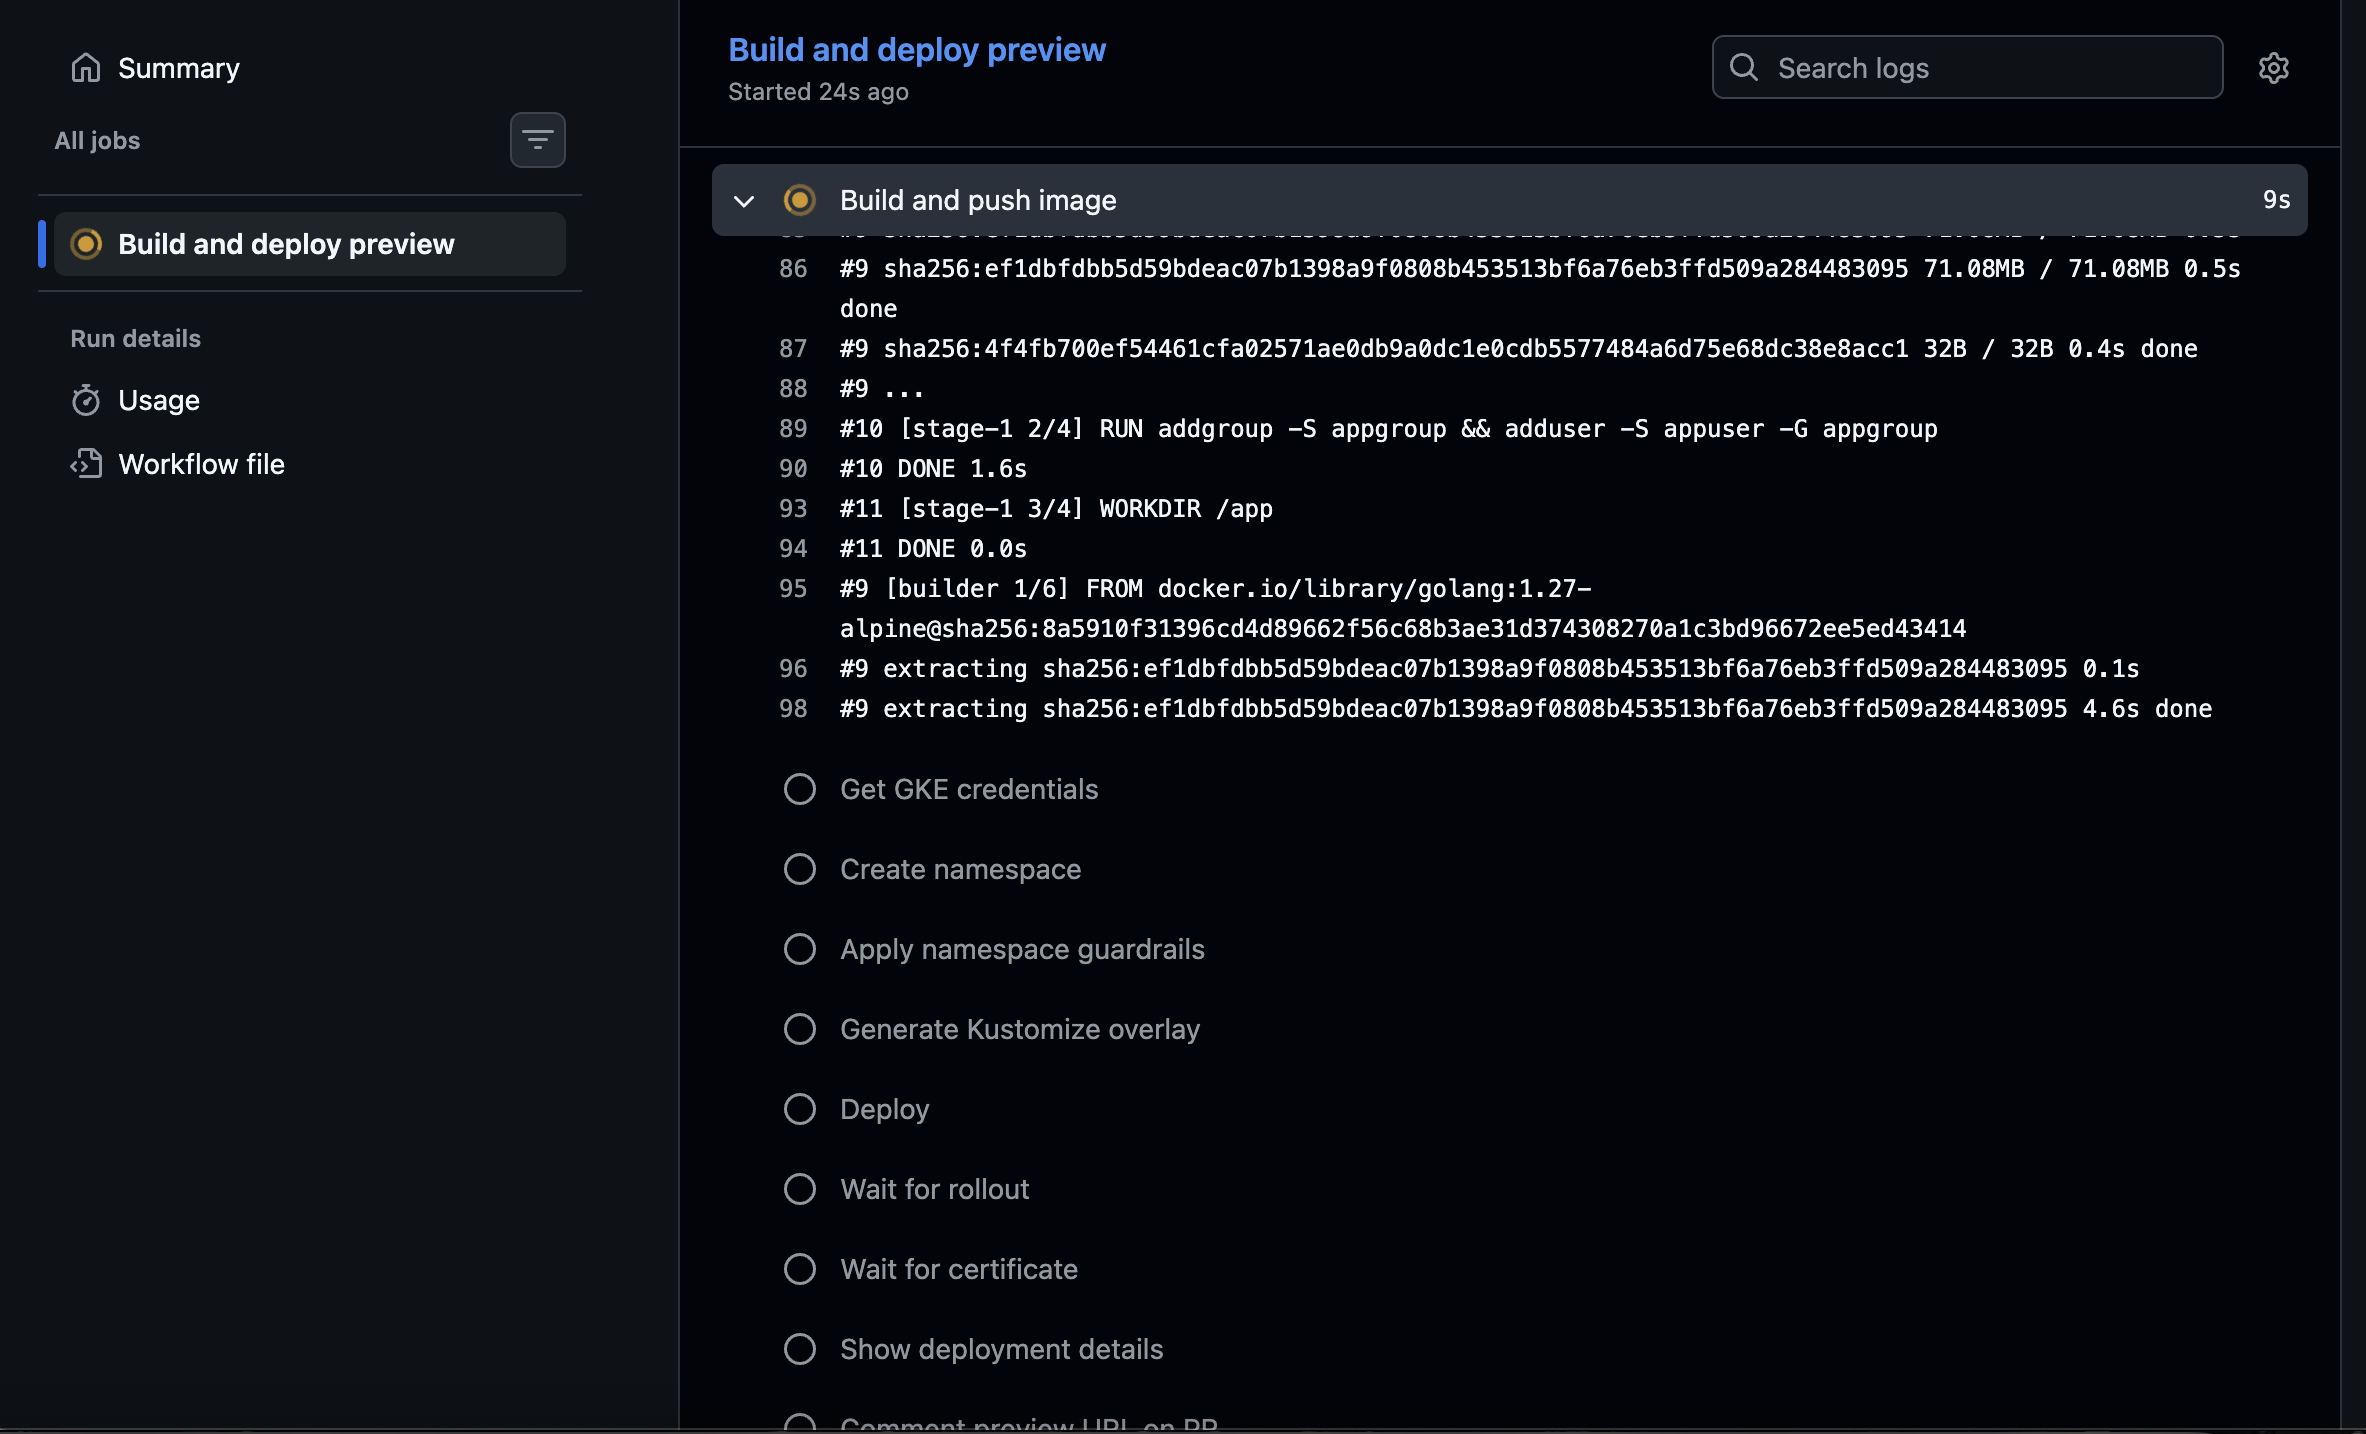
When it finishes, the bot comment should appear with your URL. Open it.
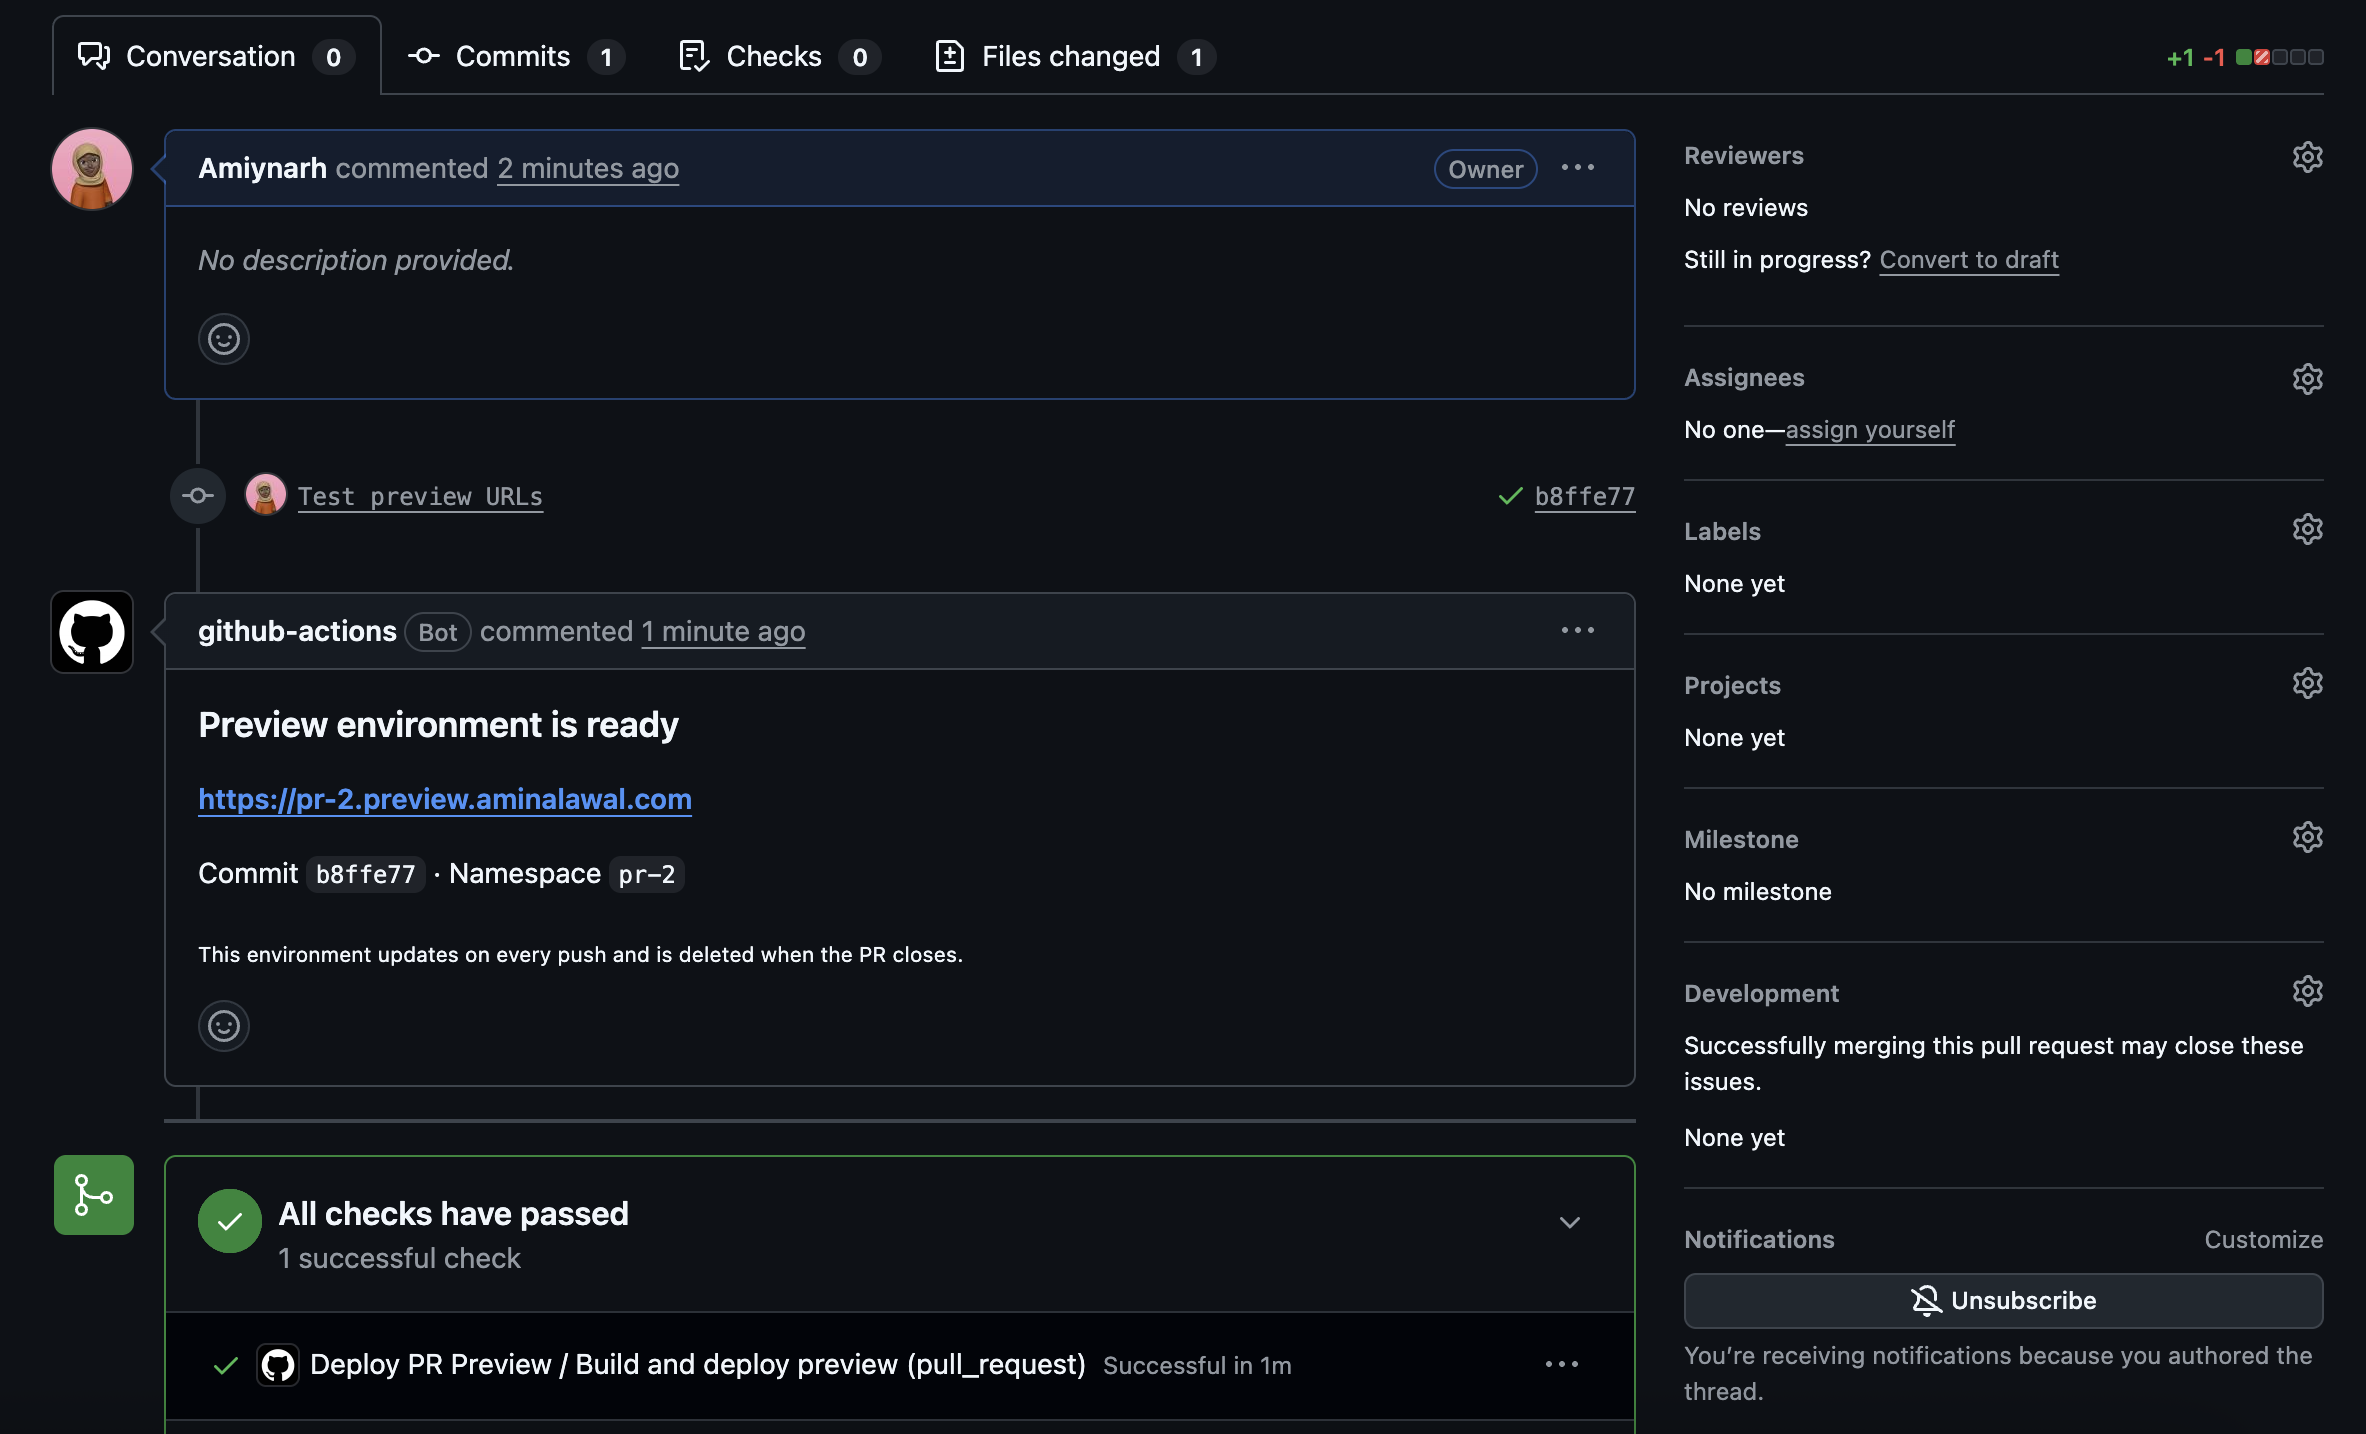
Because you're still on the staging issuer, your browser will show a certificate warning. Something like "Your connection is not private," with an issuer of "Let's Encrypt Staging."
This is the success condition. It means DNS resolved, the load balancer routed, the Ingress matched the hostname, the HTTP-01 challenge completed, and a certificate was issued. Everything worked. The certificate simply comes from an untrusted test authority.
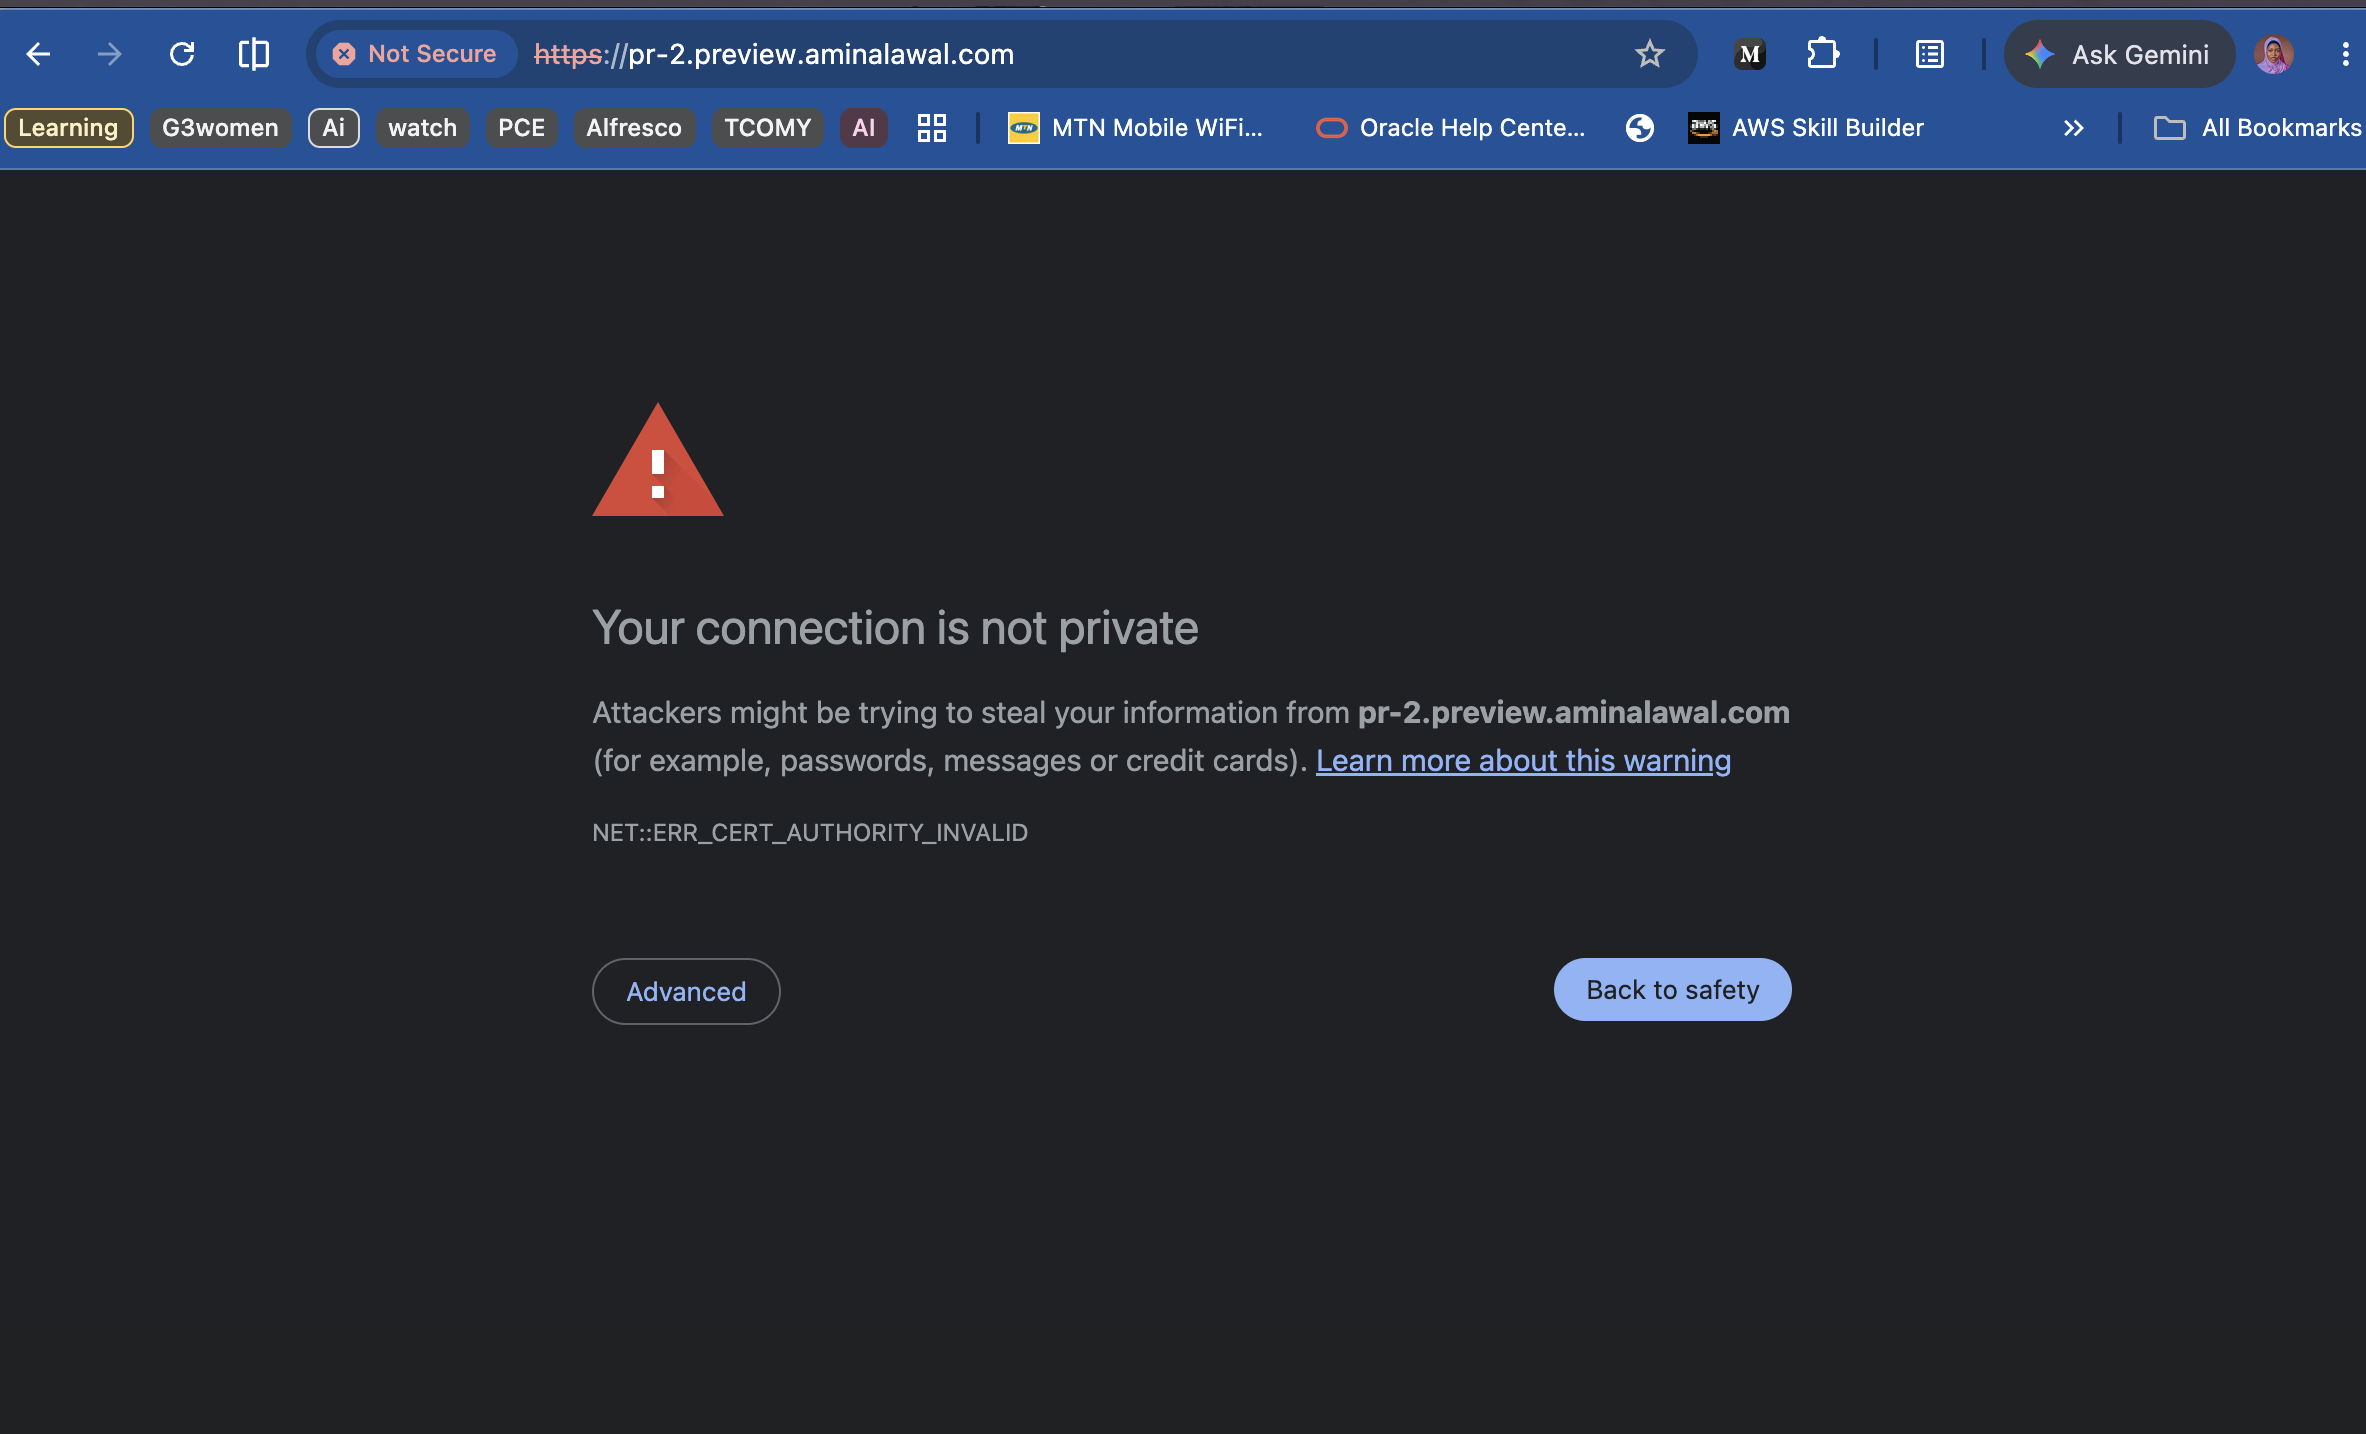
Click Advanced, pass through the warning, and confirm the application responds with the right PR number and namespace.
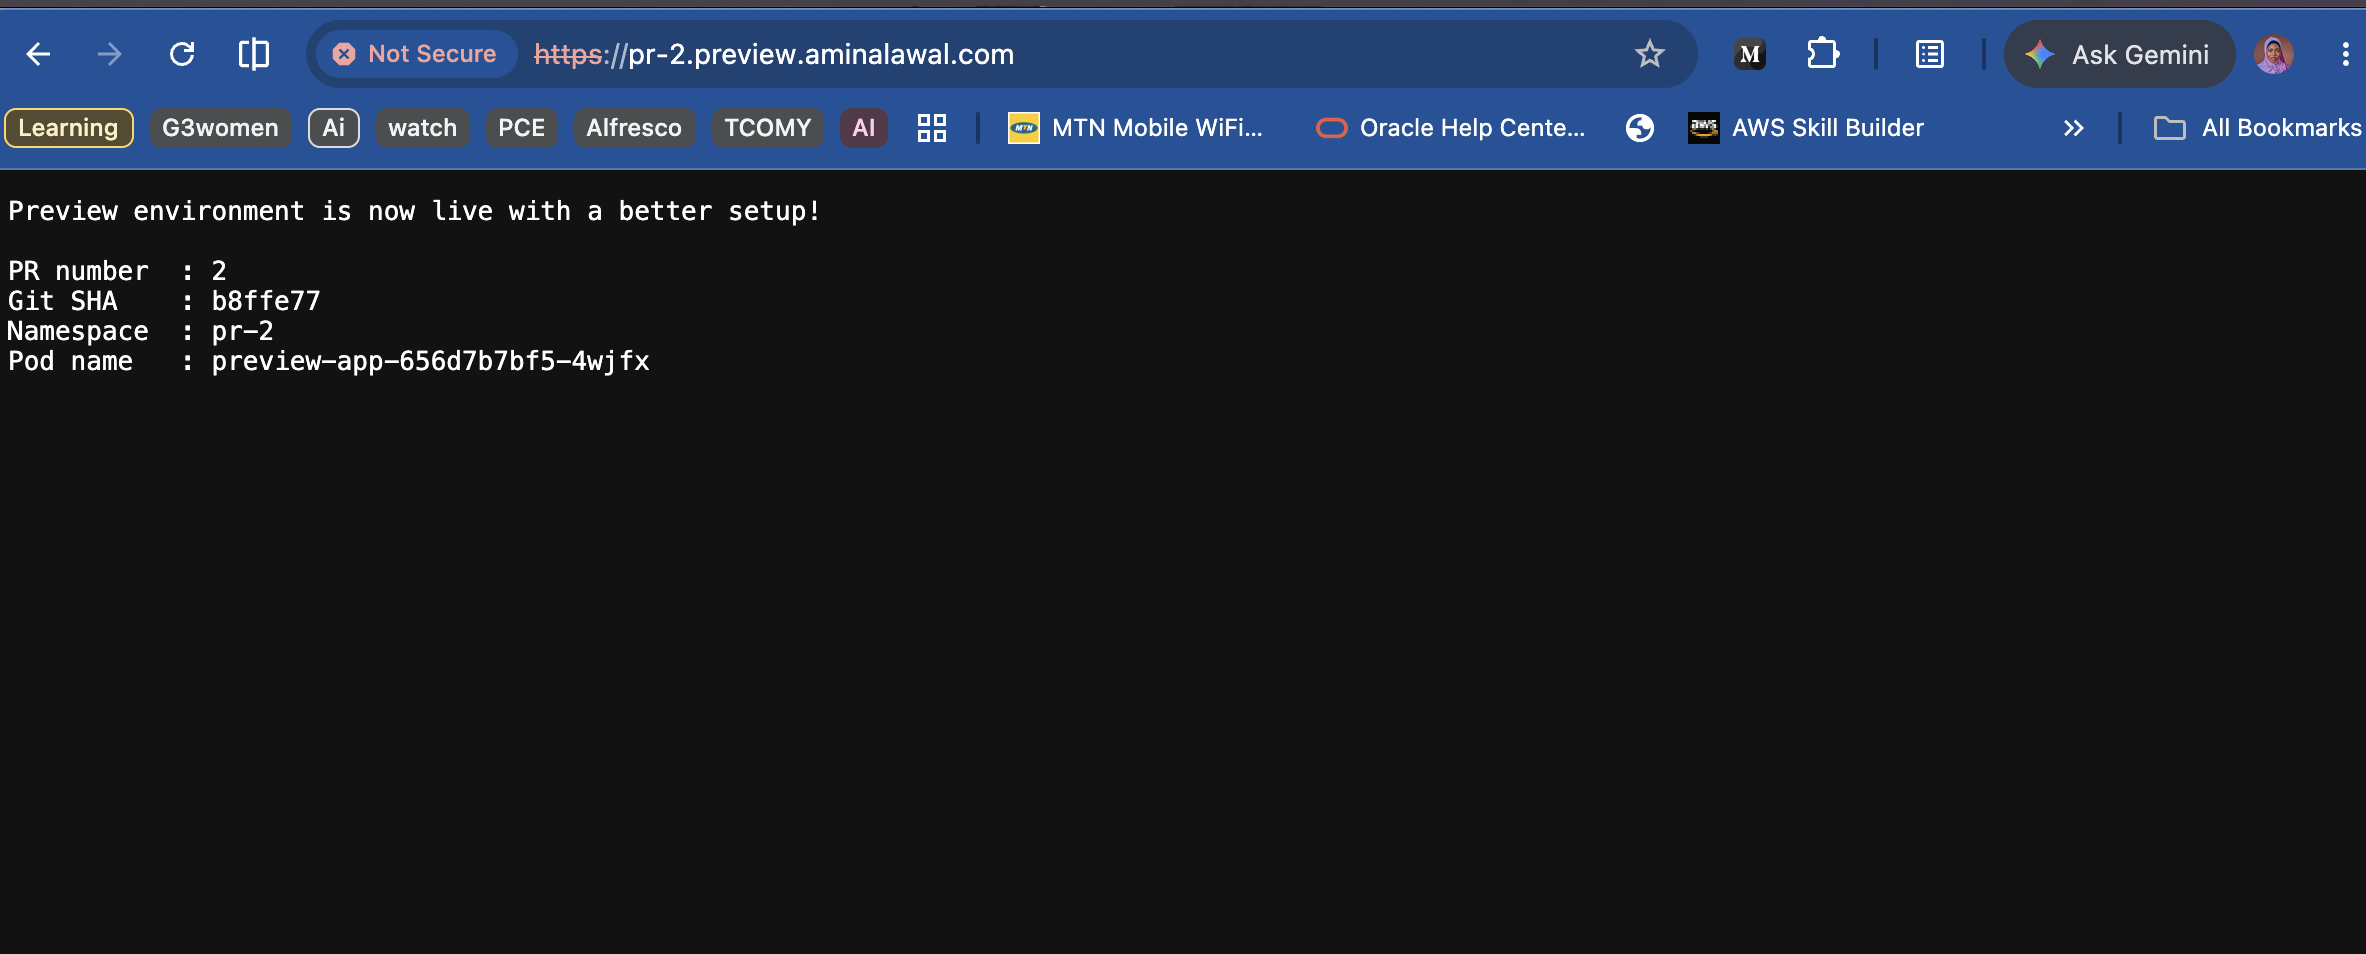
Check the certificate from the command line:
kubectl get certificate --namespace=pr-2
#Ensure you use your own pr-number
You want READY: True. If it's False, inspect what's happening:
kubectl describe certificate preview-app-tls --namespace=pr-2
kubectl get challenges --all-namespaces
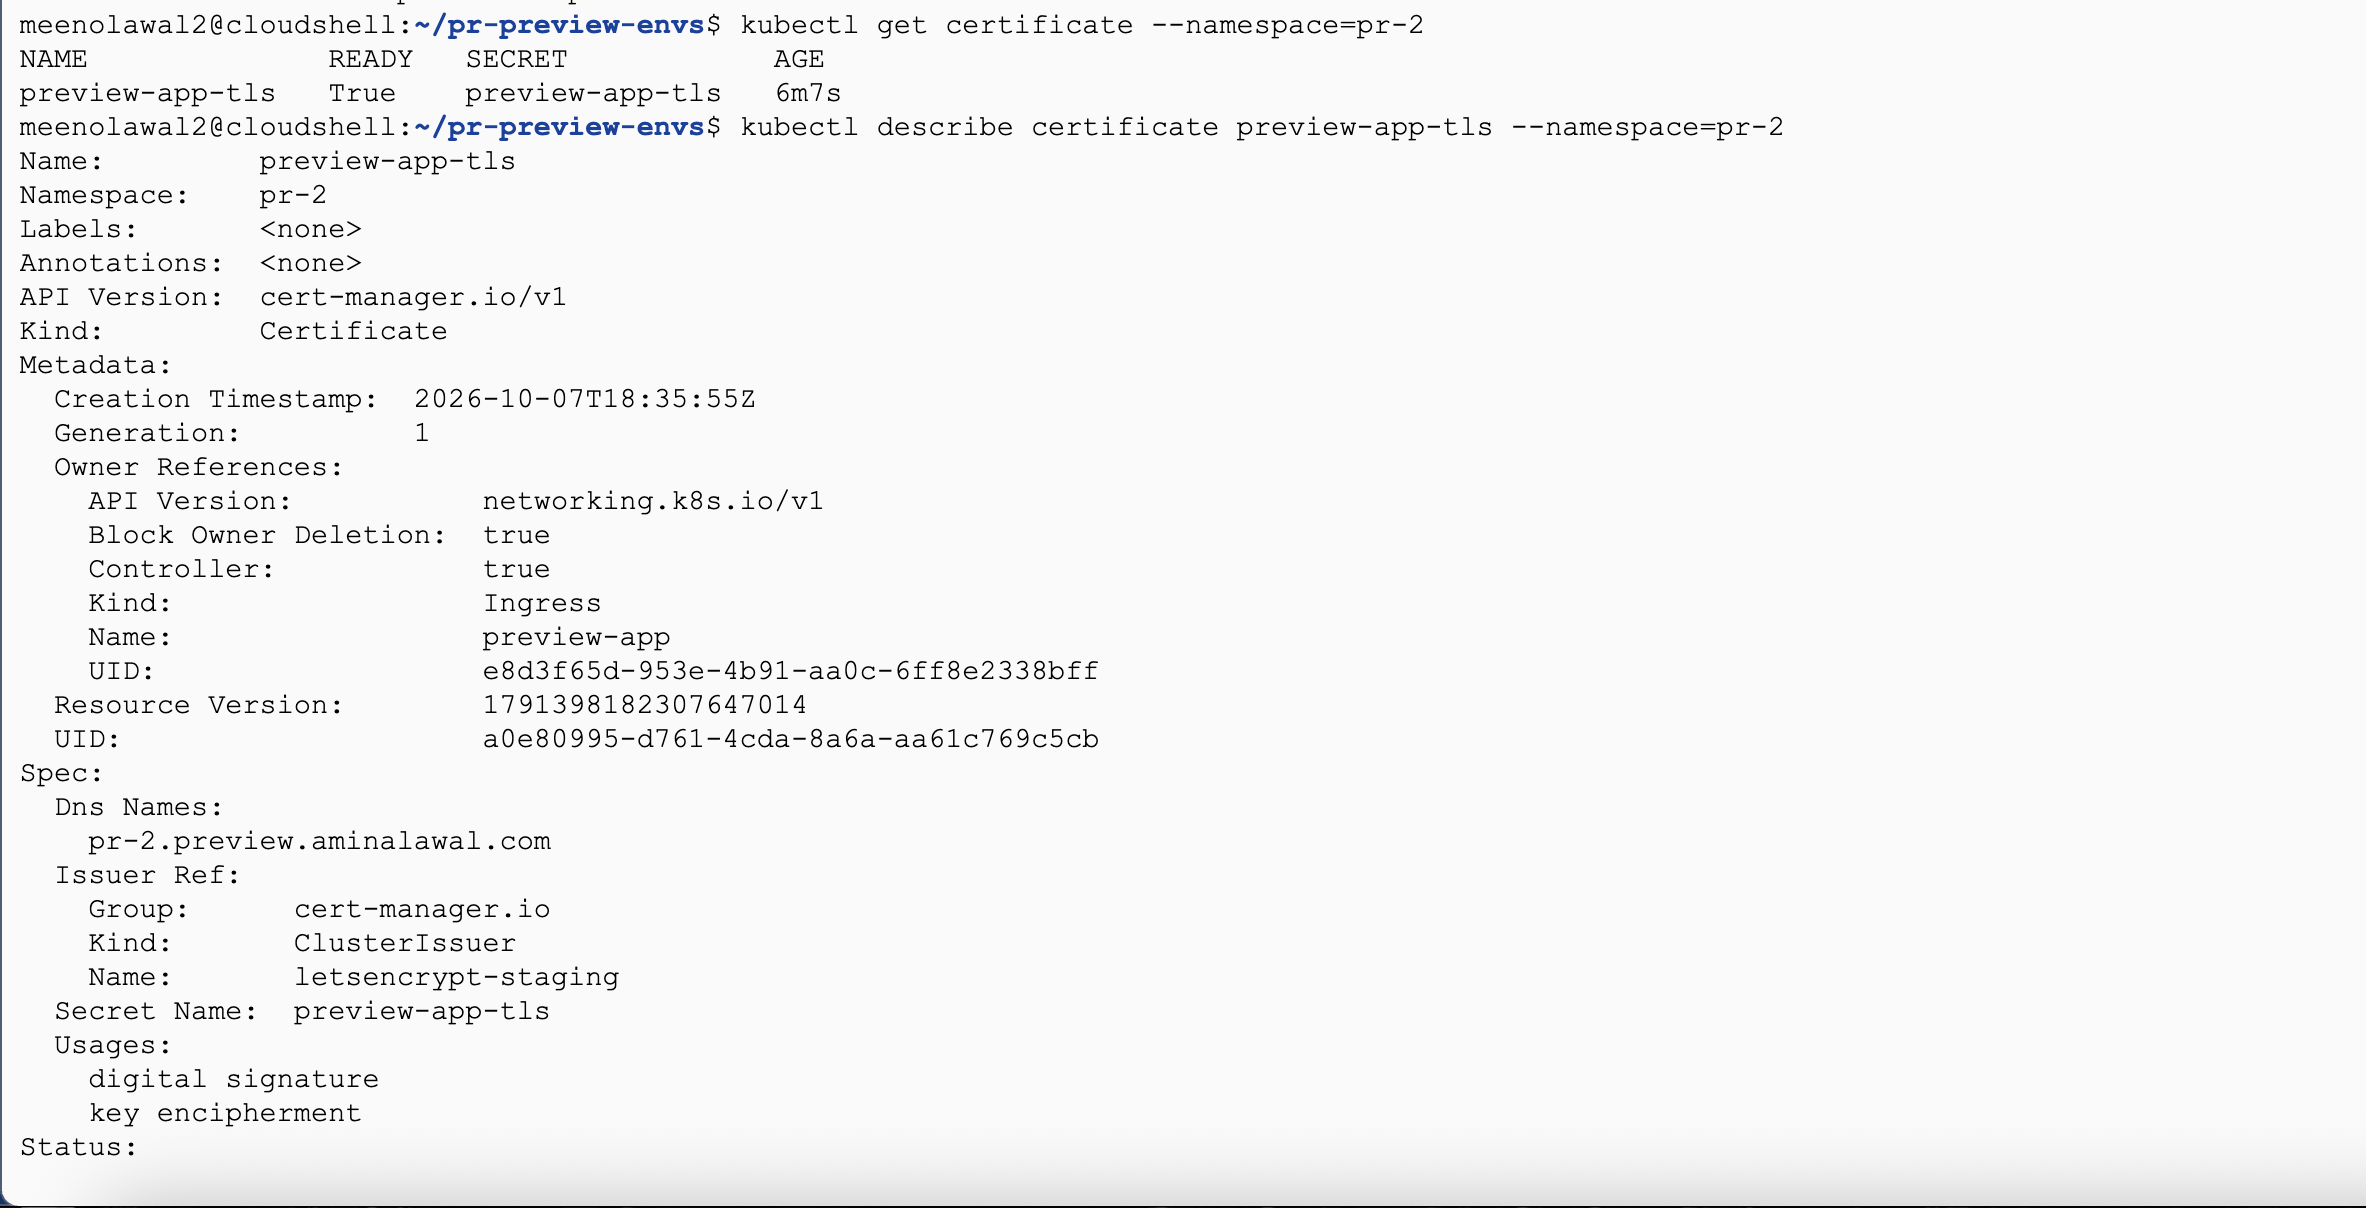
A pending challenge that never resolves almost always means DNS or port 80 reachability. Confirm with:
curl -I http://pr-2.preview.yourdomain.com/.well-known/acme-challenge/test
You want any HTTP response from NGINX. A 404 is fine, as it proves that the routing works. A connection timeout means the request isn't reaching your cluster.

Switch to Production Certificates
Once the staging flow works end to end, change one line in the workflow's env: block:
CLUSTER_ISSUER: letsencrypt-prod
Make this change on your existing PR branch and push it. You don't need to close the pull request or merge to main first. You can also change the message in your main.go file to confirm everything works.
Push a new commit to the PR. The environment redeploys, cert-manager requests a real certificate, and this time the browser shows a padlock.
Open the URL in a private browsing window to check. Your browser cached an exception for the staging certificate against that hostname, and a normal tab may show a trusted-looking page that's really just a remembered override and still shows not secure.
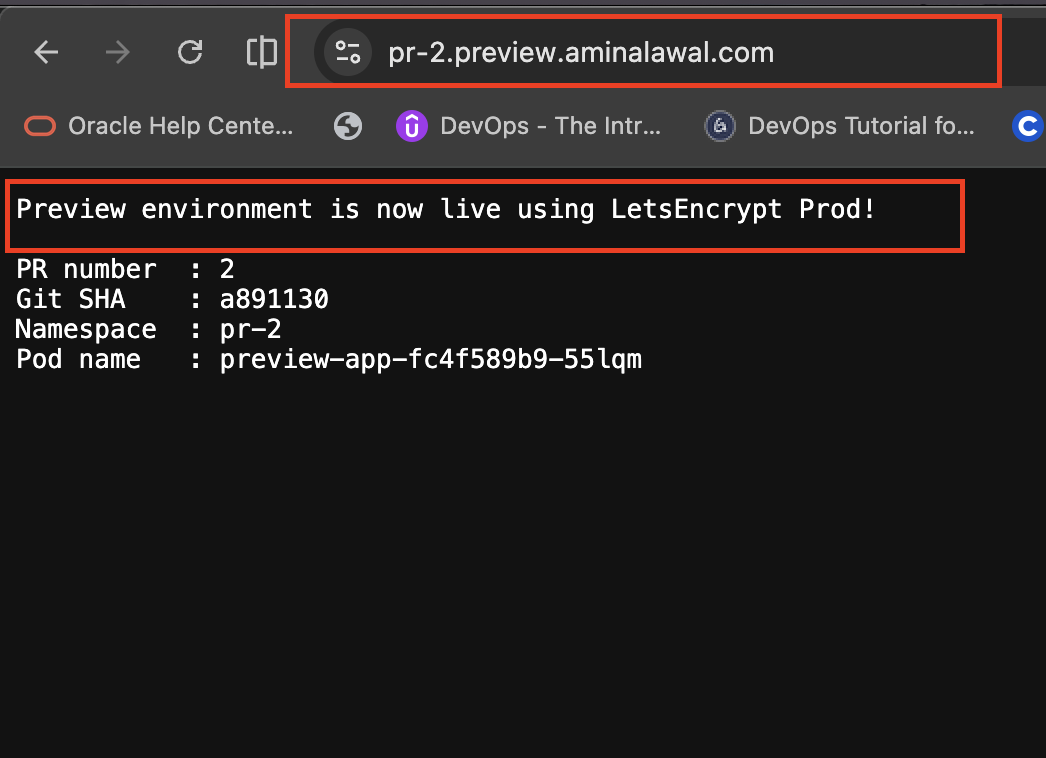
Verify the Guardrails
Confirm the quota is active:
kubectl describe resourcequota preview-quota --namespace=pr-2
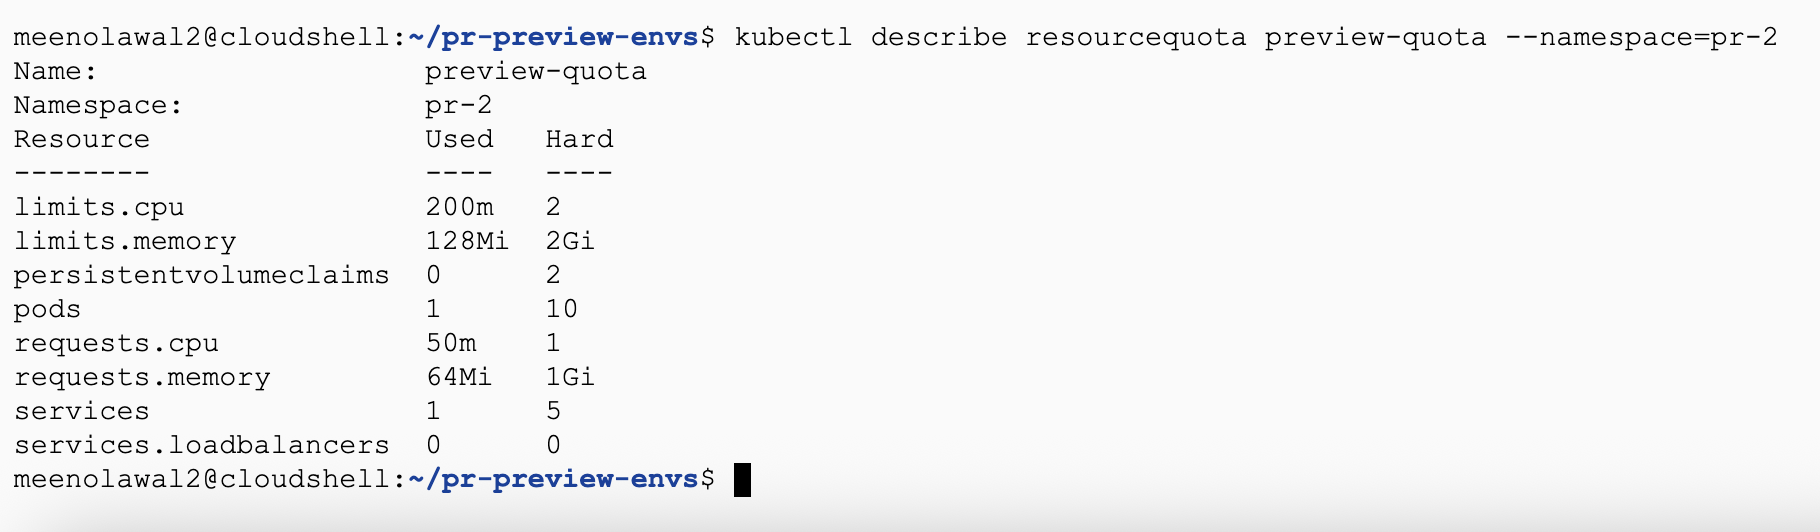
You'll see used versus hard limits for each resource. Then try to break it:
kubectl scale deployment/preview-app --replicas=50 --namespace=pr-2
kubectl get events --namespace=pr-2 | grep -i quota
The deployment will scale partway and then stop, with events explaining that it exceeded the quota. That's the guardrail doing its job: the namespace is bounded, and the rest of the cluster is unaffected.
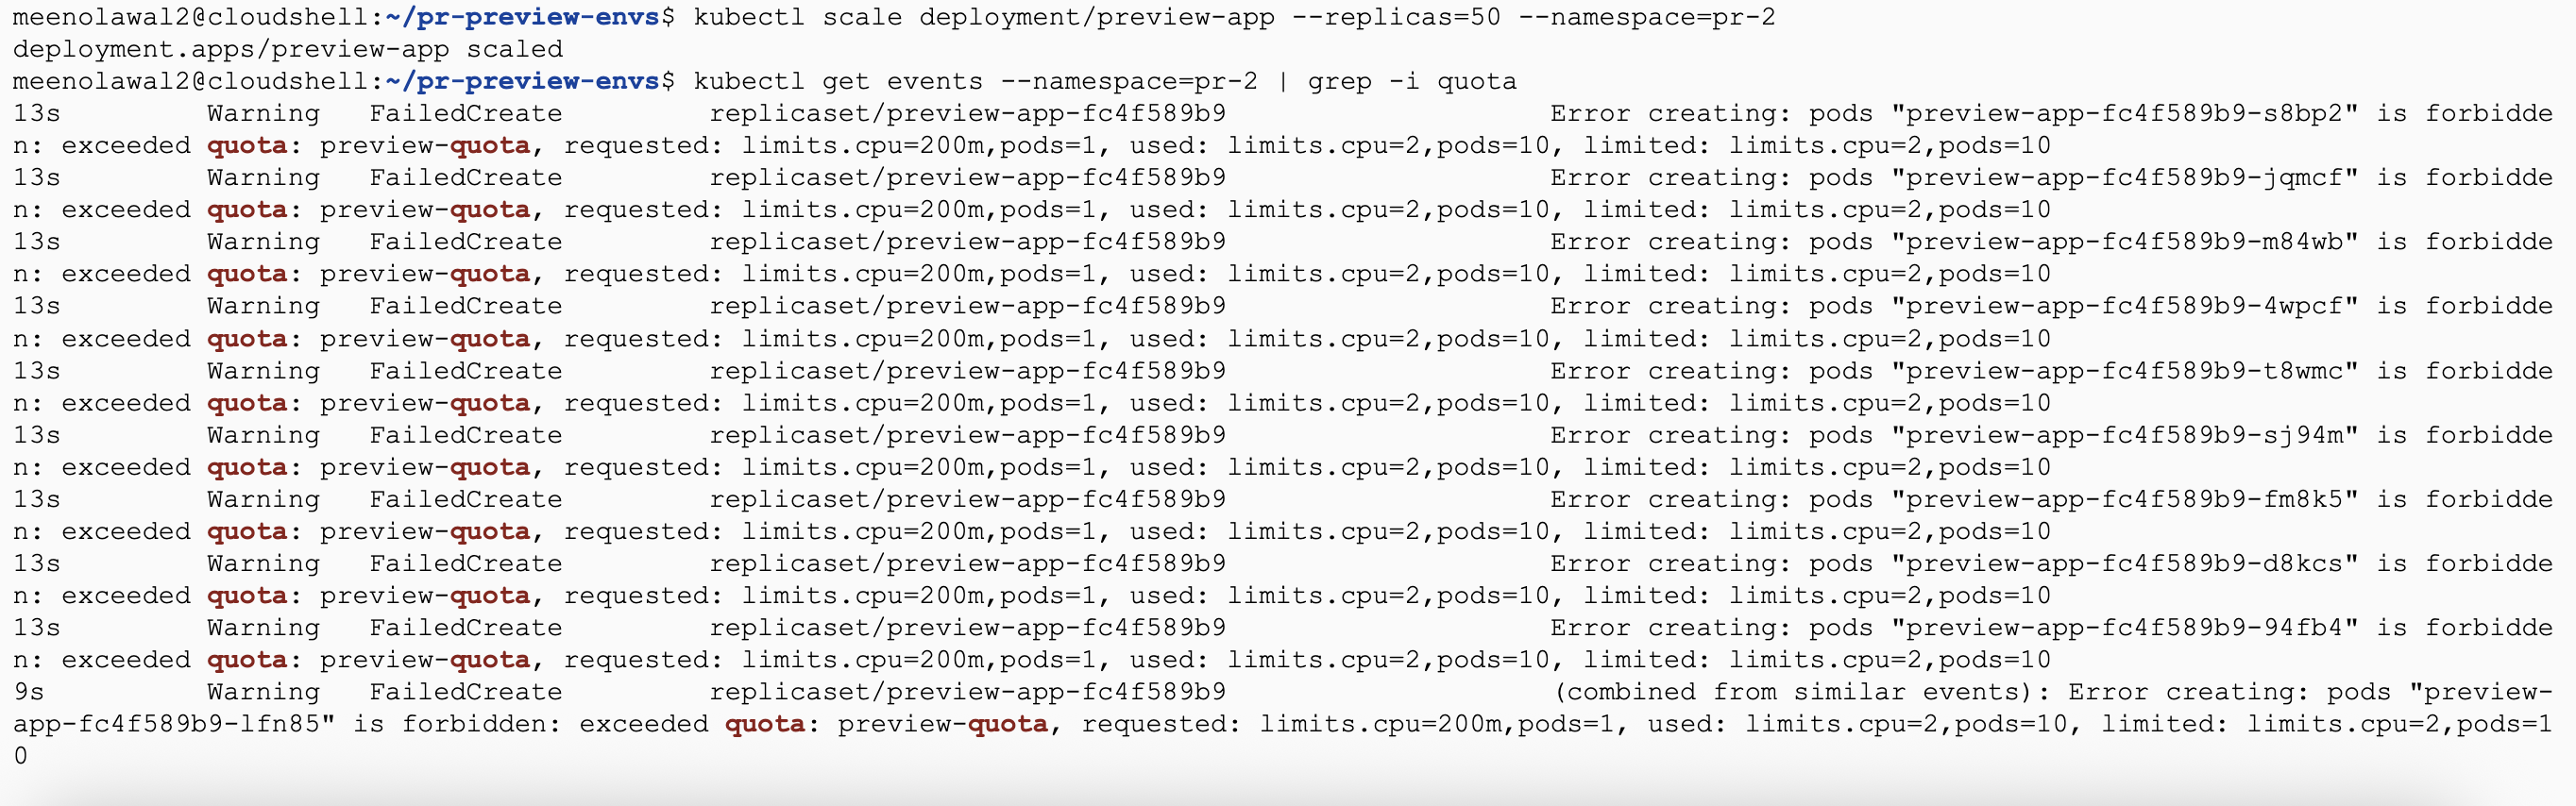
Verify Teardown and the Reaper
Close the pull request. The teardown workflow fires and the namespace goes to Terminating.
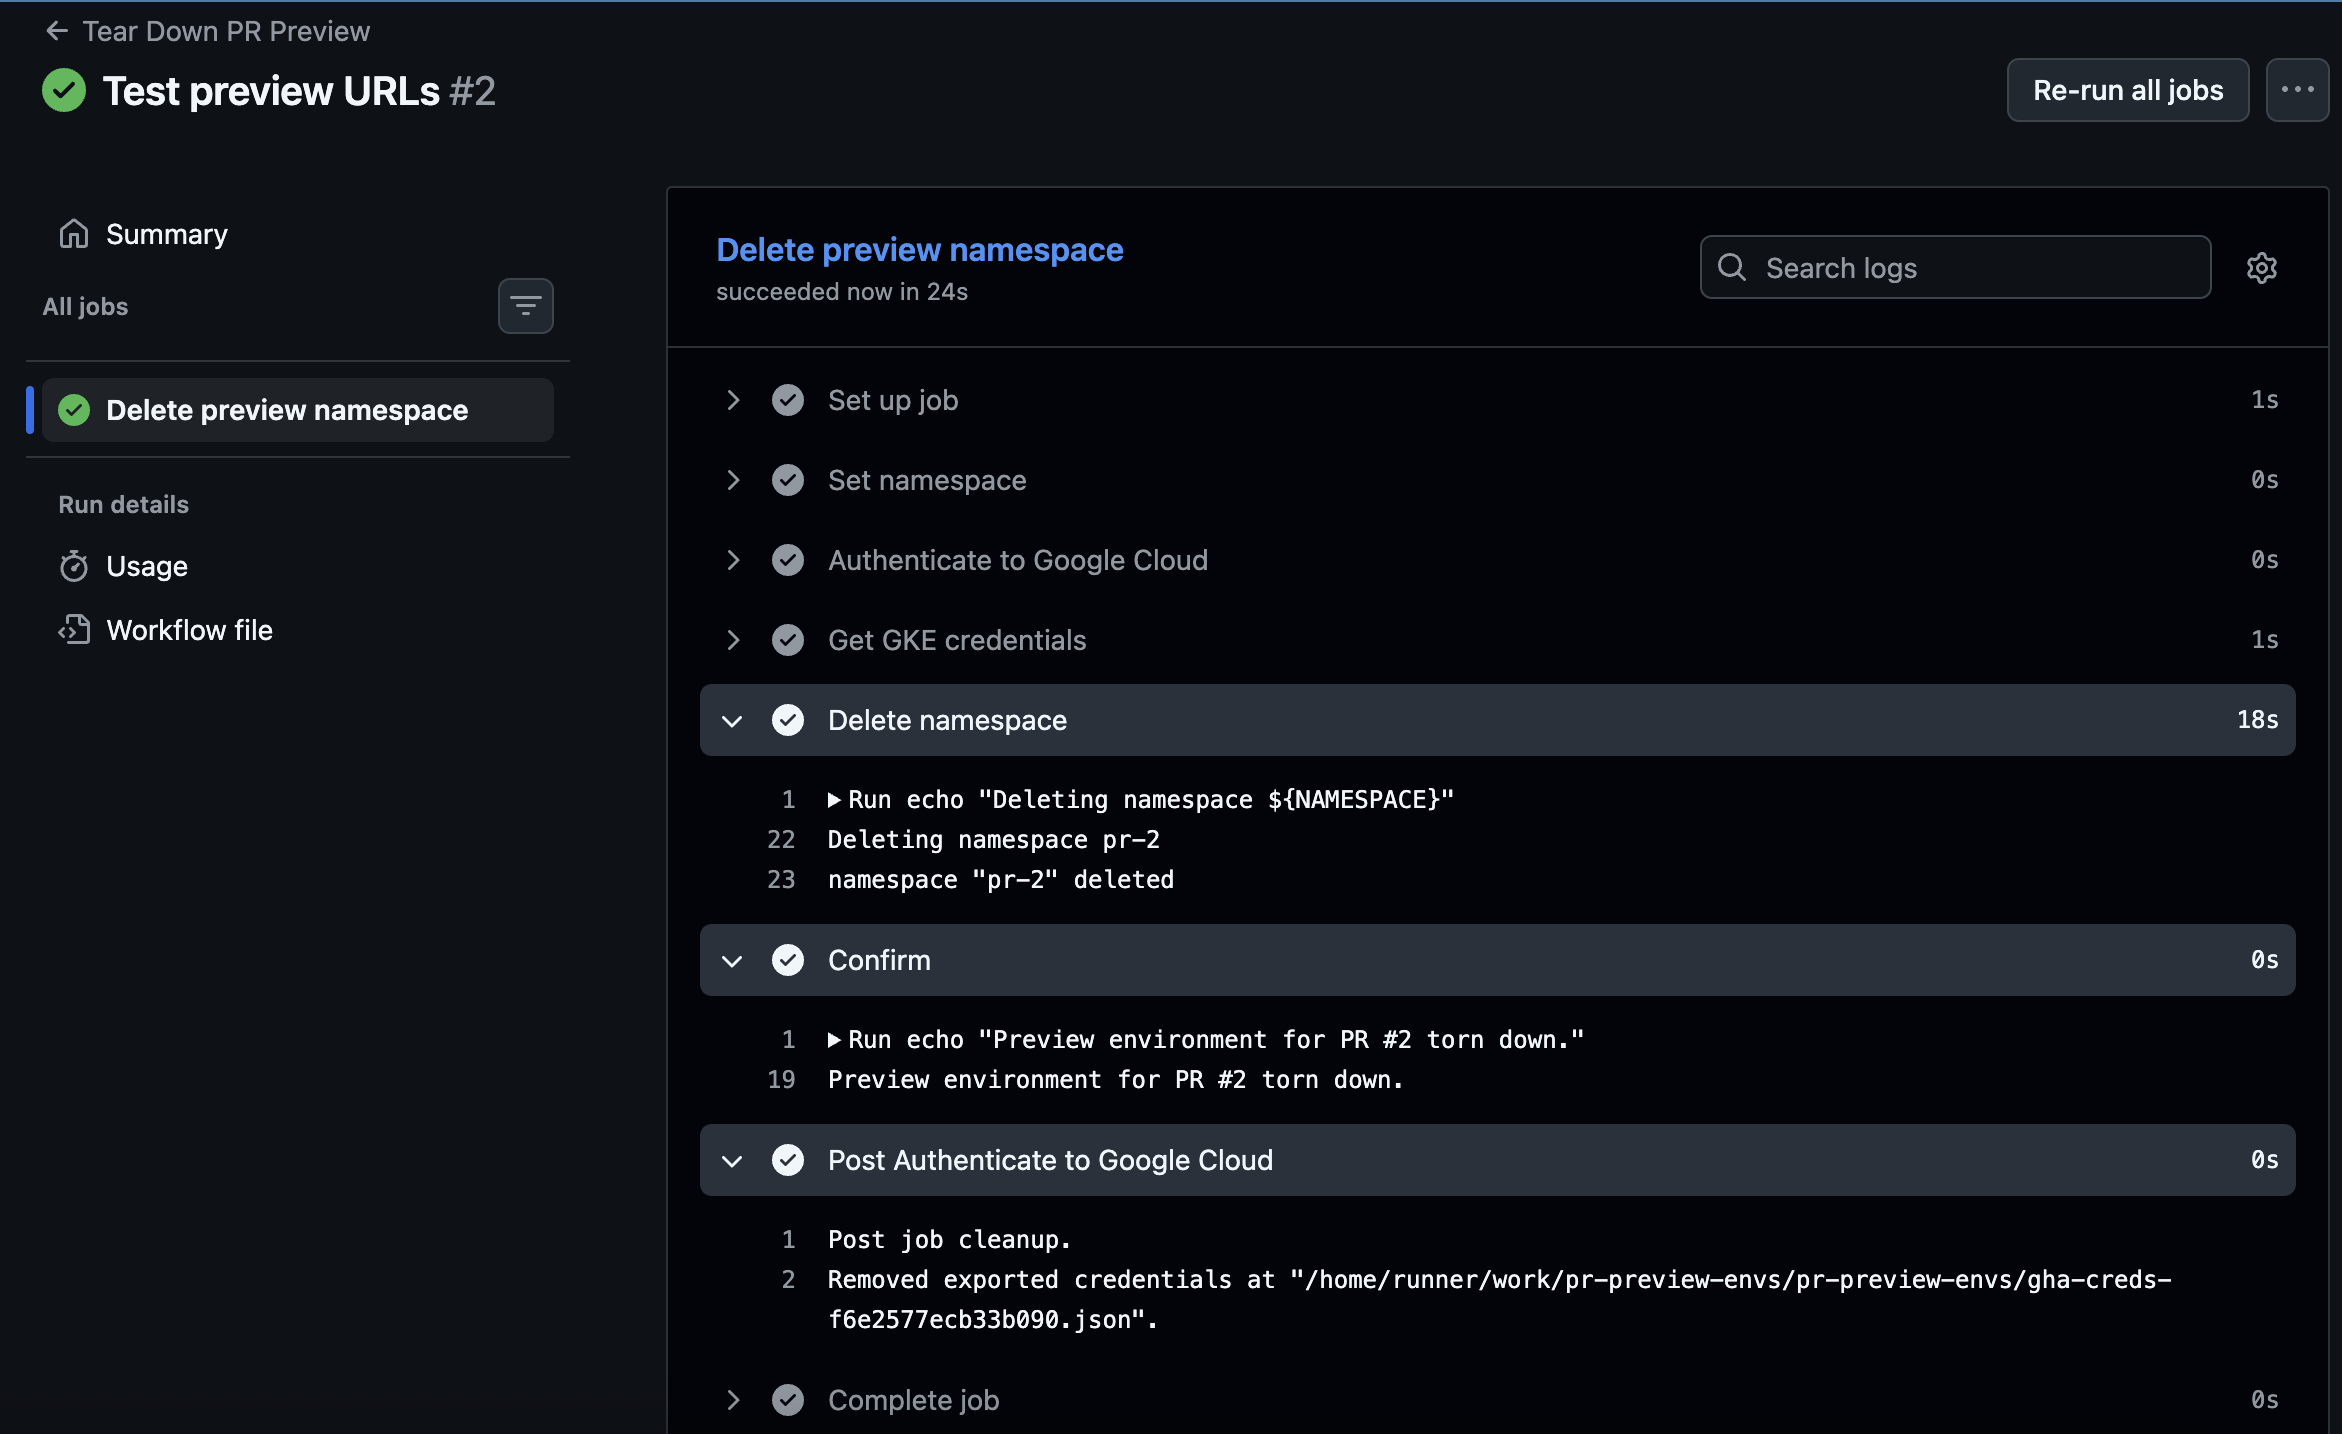
Then test the reaper on a namespace it shouldn't touch. Create one manually without the label:
kubectl create namespace pr-9999

Run the reaper manually from the Actions tab.
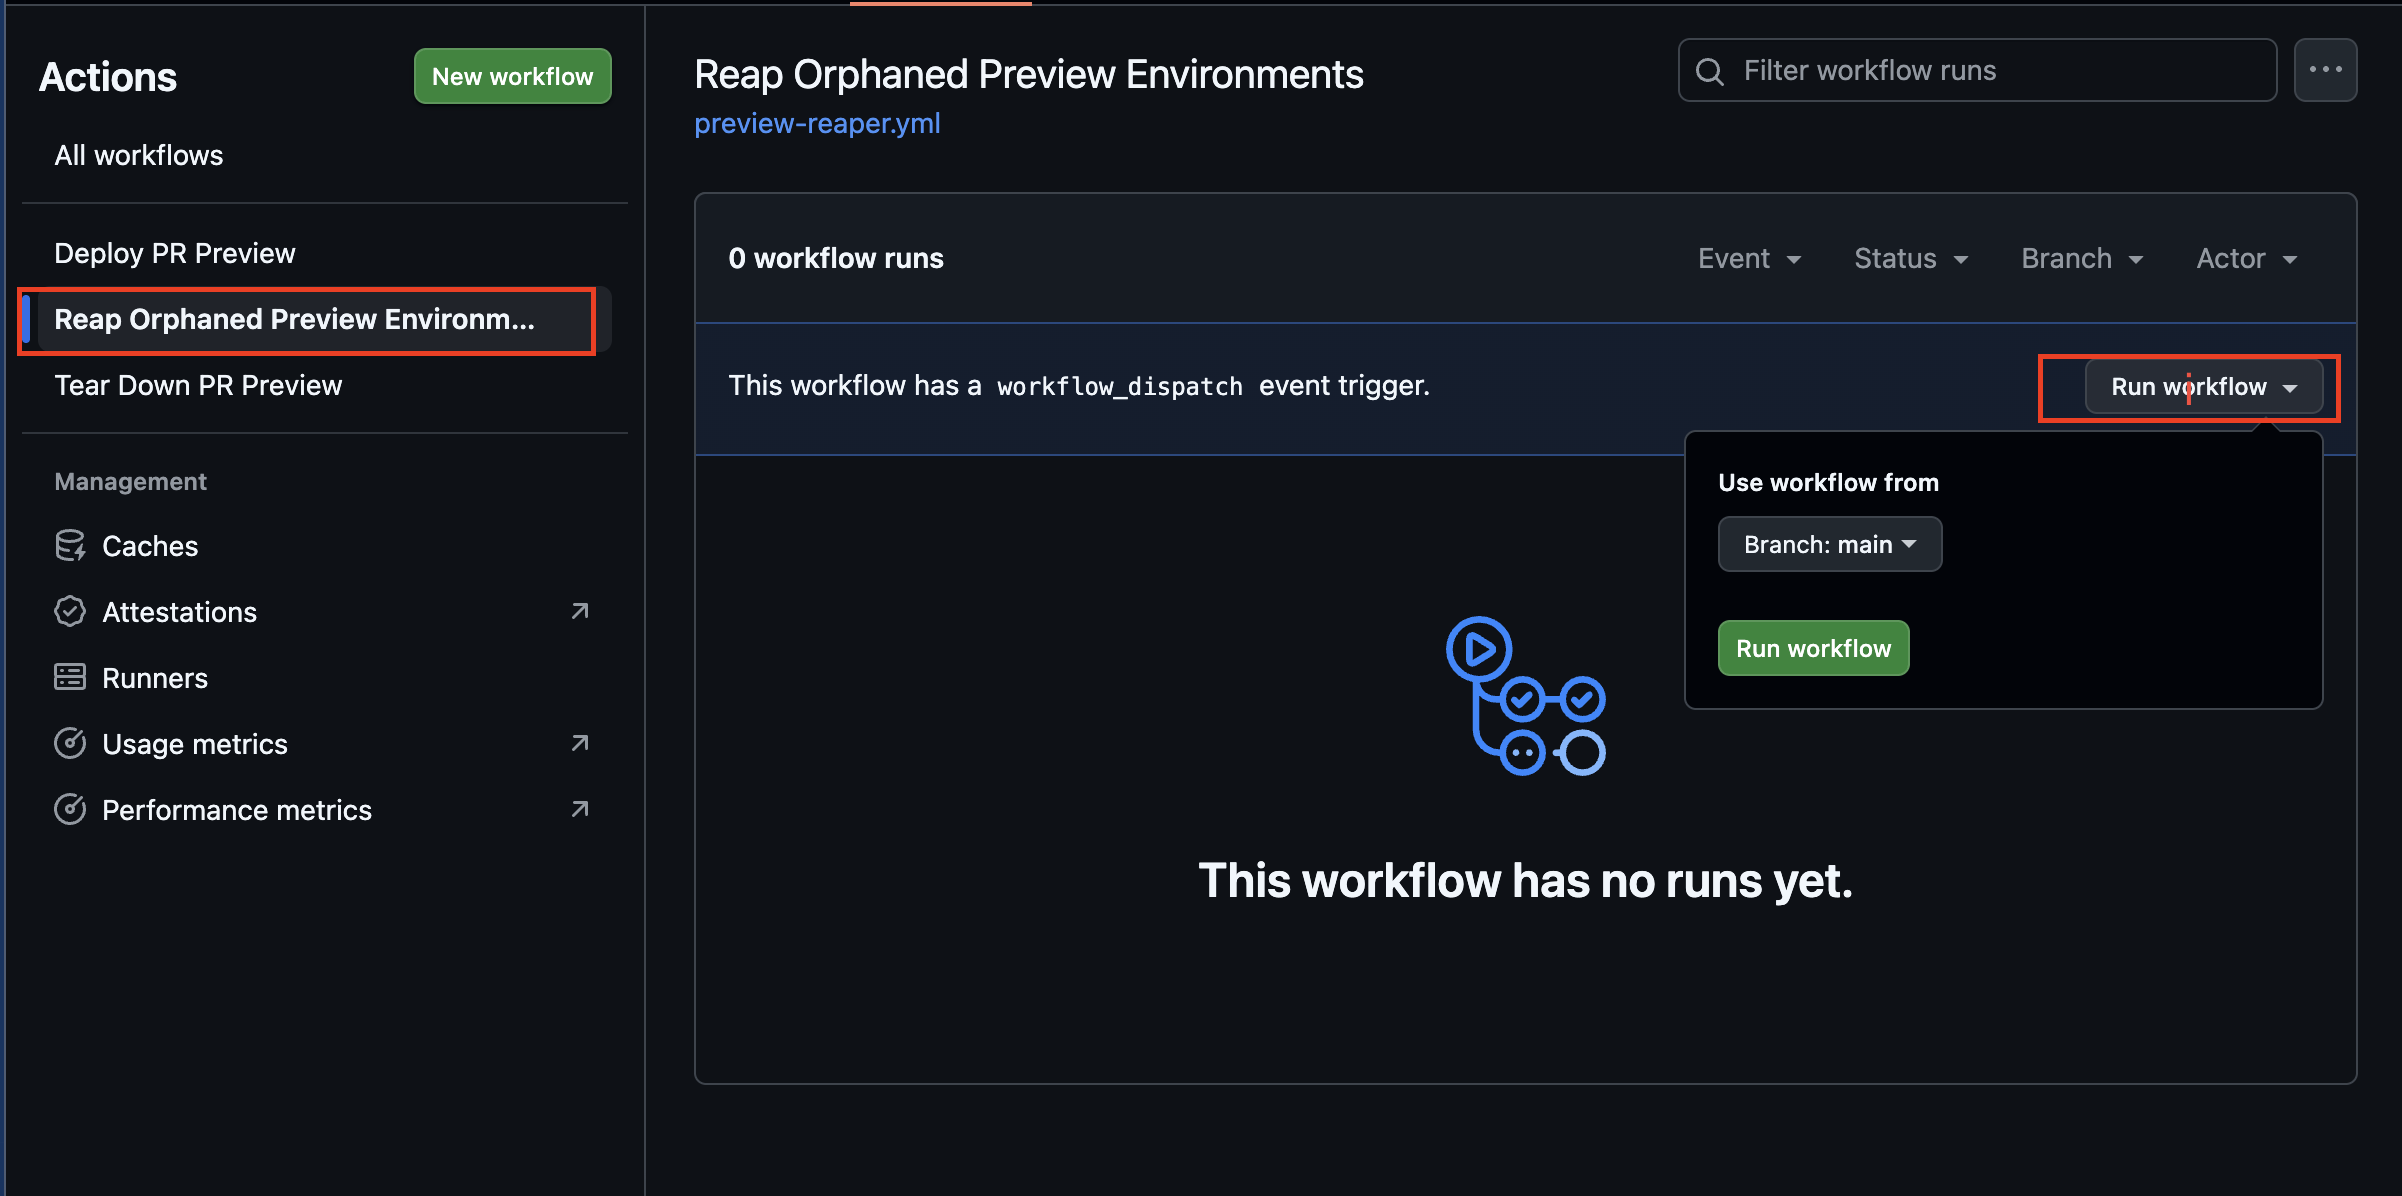
It should ignore pr-9999 entirely, because that namespace carries no app.kubernetes.io/managed-by=pr-preview label. The log won't even mention it.
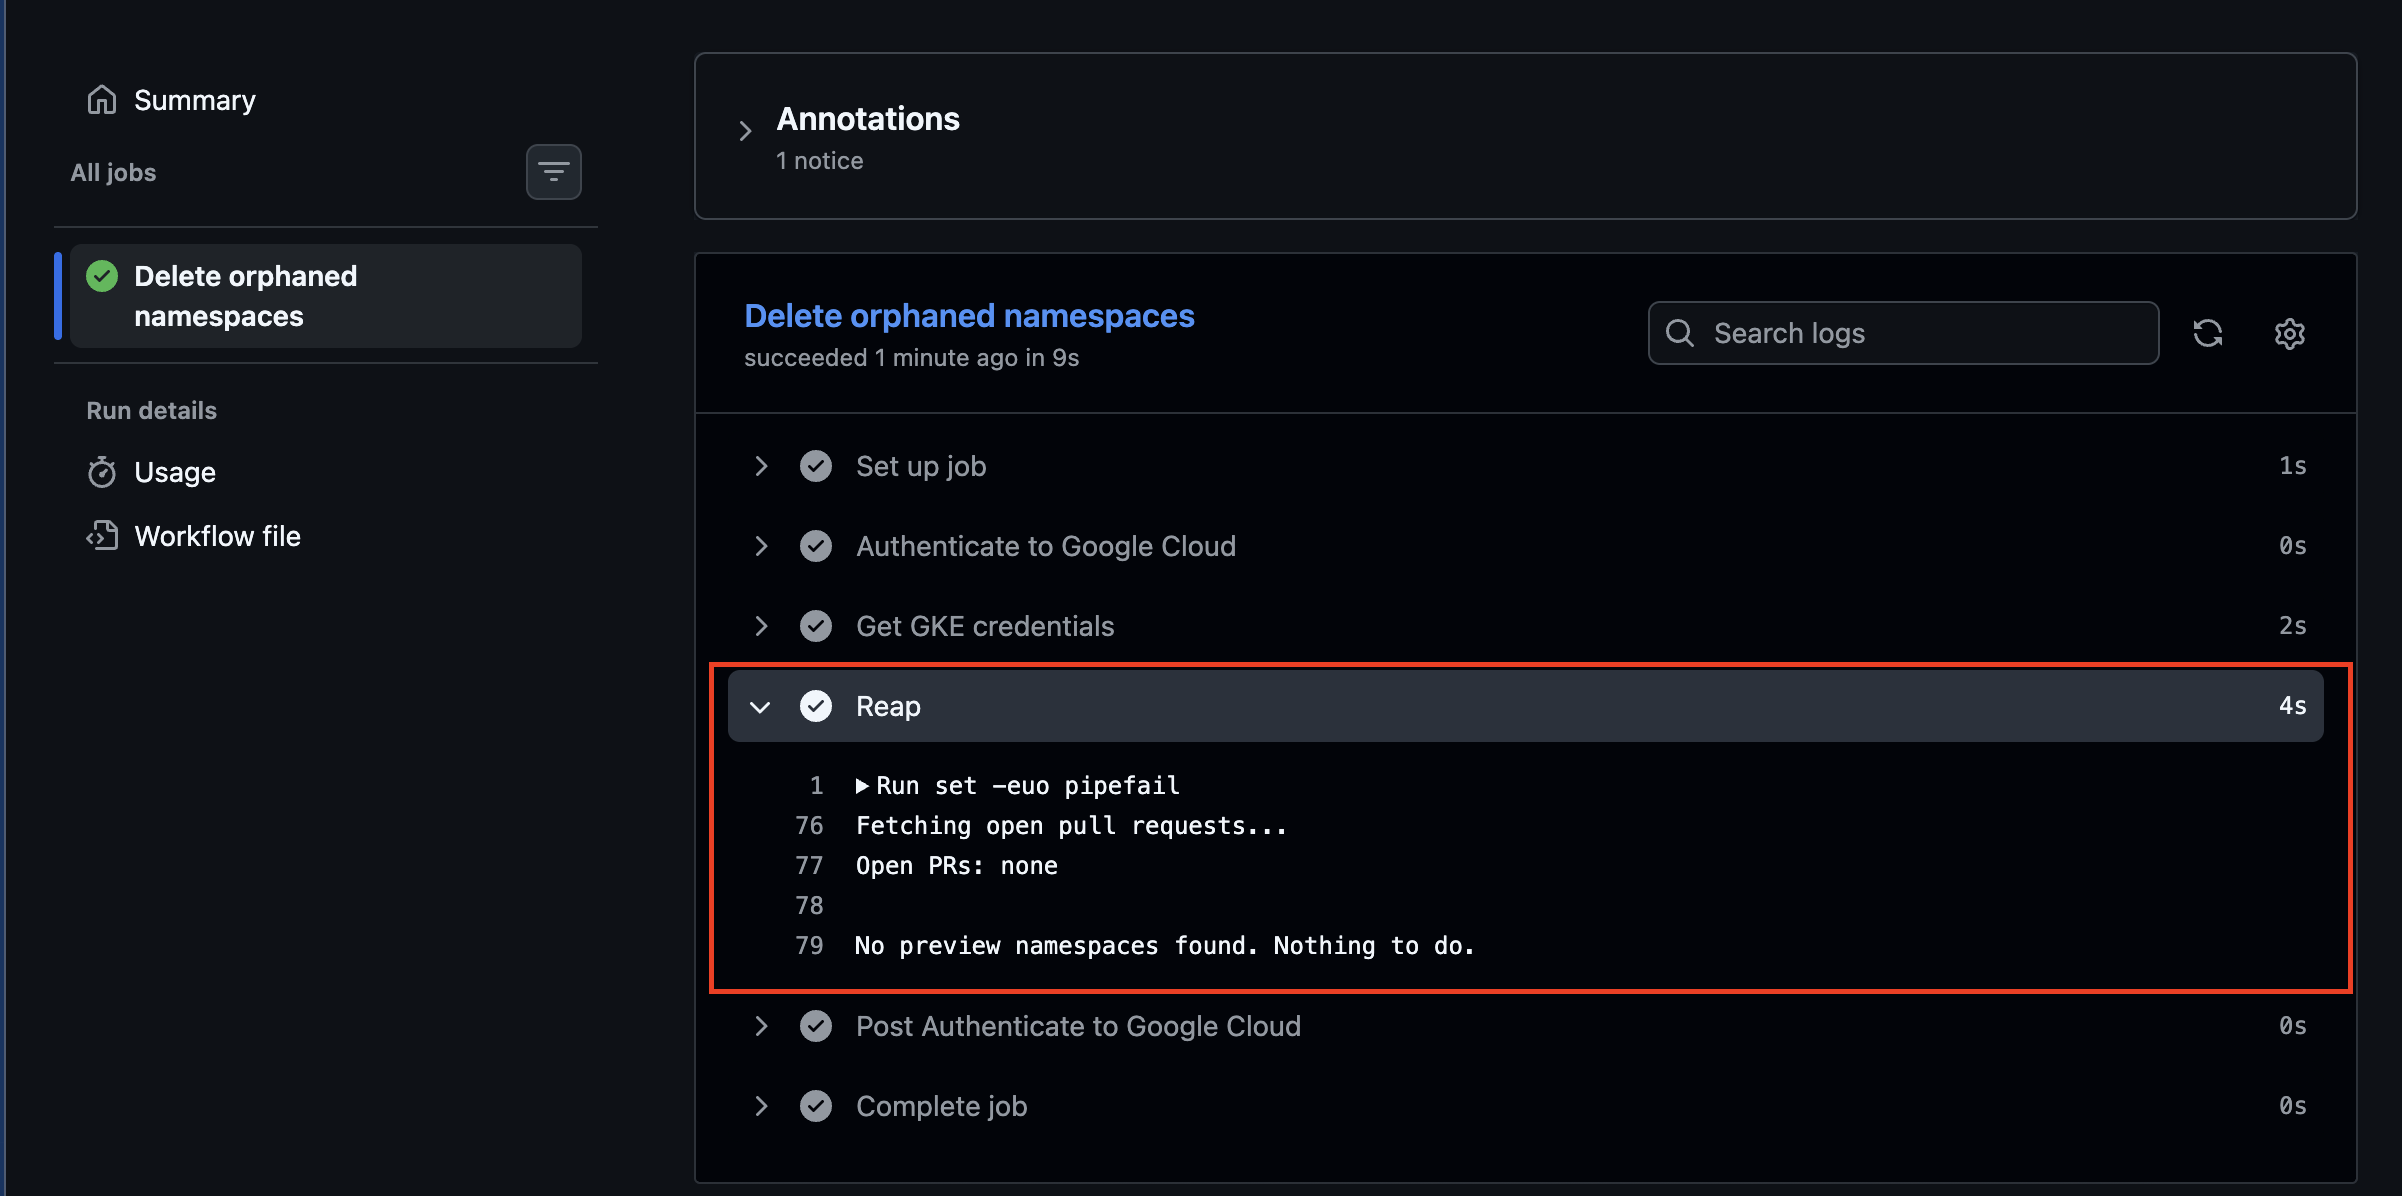
Clean it up yourself:
kubectl delete namespace pr-9999
That test matters more than it looks. You've just verified that your automated deletion job can't touch things it didn't create.
What This Costs
We should be concrete about this, since cost control is half the argument for this pattern.
Running continuously in europe-west2, here are the approximate monthly figures:
| Component | Approximate cost |
|---|---|
| GKE control plane | ~$74/month (one zonal cluster, free tier covers one cluster on some accounts) |
2 × e2-standard-2 nodes |
~$97/month |
| Regional load balancer | ~$18/month + data processing |
| Static IP (in use) | Free while attached |
| Artifact Registry storage | ~$0.10/GB/month |
| Let's Encrypt certificates | Free |
| GitHub Actions (public repo) | Free |
Call it roughly $190/month for the always-on infrastructure, regardless of how many preview environments you run.
The number that matters is what doesn't scale with PR count. One load balancer serves every environment. One DNS record covers every hostname. Certificates are free. The marginal cost of the eleventh preview environment is only the node capacity its pods consume, a few pence a day for an application this size.
Compare that with the naïve approach of a LoadBalancer Service per environment: ten open PRs would add roughly $180/month in load balancers alone, and that's before anyone forgets to clean one up. The services.loadbalancers: "0" line in the ResourceQuota exists specifically to make that mistake impossible.
There are two ways to cut the standing cost for a personal project. Use spot nodes, add spot = true to the node_config block in Terraform for roughly a 60–70% discount on node hours. Preview environments are the ideal spot workload: if a node is reclaimed, pods reschedule, and the worst case is a preview environment briefly restarting. Or scale the node pool to zero overnight with a scheduled workflow, since nobody reviews PRs at 3 am.
Cleanup
When you're finished:
# Delete every preview namespace
kubectl delete namespaces -l app.kubernetes.io/managed-by=pr-preview

# Remove the shared infrastructure
helm uninstall cert-manager --namespace cert-manager
helm uninstall ingress-nginx --namespace ingress-nginx
kubectl delete namespace cert-manager ingress-nginx
Uninstall the Helm releases before running terraform destroy. The Ingress controller's Service owns a Google Cloud load balancer that Terraform doesn't know about, because Kubernetes created it rather than Terraform. Destroying the cluster first can orphan that load balancer, leaving it billing quietly in a project with nothing else in it.
If You Plan to Rebuild This Later
Don't run a full terraform destroy. Tear down only the expensive parts:
cd terraform
terraform destroy
-var="project_id=YOUR_PROJECT_ID"
-var="github_repo=YOUR_USERNAME/pr-preview-envs"
Here's why. When you delete a Workload Identity Pool, Google doesn't remove it immediately. It marks it DELETED and reserves the ID for 30 days. Terraform forgets about it, but Google hasn't. Recreating the stack within that window fails with:
Error: Error creating WorkloadIdentityPool: googleapi: Error 409: Requested entity already exists
Almost all of your cost is the cluster and its nodes. The identity pool, provider, service account, IAM bindings, static IP, and Artifact Registry repository cost nothing or pennies to leave in place. Rebuilding later is then just terraform apply, and your WIF_PROVIDER and WIF_SERVICE_ACCOUNT secrets in GitHub stay valid. No need to update them.
If you want to keep the cluster but stop paying for idle nodes, scale the node pool to zero instead:
gcloud container clusters resize pr-preview-cluster
--node-pool pr-preview-cluster-pool
--num-nodes 0
--zone europe-west2-a
You still pay for the GKE control plane, so this reduces cost rather than eliminating it.
If you're done for good:
cd terraform
terraform destroy
-var="project_id=YOUR_PROJECT_ID"
-var="github_repo=YOUR_USERNAME/pr-preview-envs"
Then confirm nothing was left behind:
gcloud compute forwarding-rules list
gcloud compute addresses list
Both should be empty, or contain only resources belonging to other projects of yours. Don't forget to remove the wildcard DNS record too.
Conclusion
You've built something that most engineering teams either don't have or pay a vendor for.
You wrote a Go application that reports its own build metadata, injected at compile time through linker flags, so a running environment can always tell you exactly which commit it came from. You wrapped it in a multi-stage Dockerfile that produces a small, statically linked, non-root image
You provisioned a GKE cluster and an Artifact Registry repository with Terraform, which means the whole environment is reproducible and destroyable with a single command. You set up Workload Identity Federation so GitHub Actions authenticates to Google Cloud with short-lived OIDC tokens instead of a long-lived service account key, scoped to exactly one repository by an attribute condition.
You wrote base Kubernetes manifests once and used Kustomize overlays, generated at runtime, to deploy the same application into a different namespace with a different image tag and a different hostname for every pull request. You put a single shared Ingress controller in front of every environment and gave it a stable static IP, so one load balancer serves any number of previews. You pointed one wildcard DNS record at it, which means a new environment needs no DNS work at all: routing happens on the Host header inside the cluster. You added cert-manager so every environment gets a valid, auto-renewing TLS certificate, and made the pipeline announce itself with a sticky PR comment that updates in place.
You bounded each namespace with a ResourceQuota and LimitRange, including one line that makes the most expensive possible mistake structurally impossible. And you built a reaper that catches what the happy path misses, operating only on namespaces it can prove it created.
The result is that an isolated, production-shaped, publicly reachable environment is the default for every change, not something a developer has to request, claim in a Slack channel, or remember to clean up.
Where to Go From Here
There are a few directions you can explore. Here they are, roughly in order of how much they'd improve a real team's experience:
Seed data for each environment. The biggest limitation of what we built is that the application is stateless. Real applications need a database. The common patterns are a per-namespace ephemeral database seeded from a sanitised snapshot, or a shared database with per-environment schema isolation. This is the single hardest problem in preview environments and where most of the remaining engineering effort goes.
Run your test suite against the preview. Once the environment has a real URL, end-to-end tests can run against it in CI, a far stronger signal than tests against mocks.
Wildcard certificates via DNS-01. As covered in Step 15, this removes the Let's Encrypt rate limit ceiling once your PR volume approaches it.
Move to GitOps. Rather than the workflow running
kubectl applydirectly, have it commit the rendered manifests to a repository that Argo CD or Flux reconciles. The cluster's state then has a git history, and your CI pipeline no longer needs cluster write access at all.Preview environment metrics. Hook the namespaces into the cost visibility tooling you'd use elsewhere, and you can answer "what do preview environments actually cost us per month" with a number rather than a shrug.
Project File Structure
pr-preview-envs/
├── app/
│   ├── main.go                      — Go HTTP server reporting build metadata
│   ├── go.mod                       — Go module definition
│   └── Dockerfile                   — Multi-stage build with ldflags injection
├── terraform/
│   ├── main.tf                      — GKE, Artifact Registry, WIF, static IP
│   ├── variables.tf                 — Input variables
│   └── outputs.tf                   — Cluster, WIF, and ingress IP values
├── k8s/
│   ├── base/
│   │   ├── deployment.yaml          — Deployment with probes and Downward API
│   │   ├── service.yaml             — ClusterIP Service
│   │   ├── ingress.yaml             — Ingress with cert-manager annotation
│   │   └── kustomization.yaml       — Base Kustomize config
│   └── cluster/
│       ├── letsencrypt-staging.yaml — Staging ClusterIssuer
│       ├── letsencrypt-prod.yaml    — Production ClusterIssuer
│       └── namespace-guardrails.yaml — ResourceQuota and LimitRange
└── .github/
    └── workflows/
        ├── preview-deploy.yml       — Build, deploy, certificate, PR comment
        ├── preview-teardown.yml     — Delete namespace on PR close
        └── preview-reaper.yml       — Scheduled orphan cleanup
All source files for this tutorial are available in the companion GitHub repository: https://github.com/Amiynarh/pr-preview-envs.


