
By Olasunkanmi Balogun
In this in-depth tutorial, you'll learn how to build a full-stack Kanban task management app. Along the way, we'll explore the synergies between technologies like Next.js (featuring a dive into the app router), Next-auth for user authentication, and Firebase, a backend as a service platform to save user data in a database.
We'll also cover how you can integrate Firebase Firestore with Redux Toolkit which enables you to cache data you have retrieved from the database to improve performance. You will also learn how to manage state with Redux Toolkit.
To wrap it up, we will employ React-beautiful-dnd, a library that effortlessly integrates drag-and-drop interactions into our Kanban boards to enhance the user experience.
Here's what we'll cover:
- How to implement authentication with the
next-auth.jslibrary - How to set up and integrate the
Reduxstore with Firestore in Next.js. - How to build and populate the Kanban app markup with data
- How to implement Create, Read, Update, and Delete (CRUD) operations on boards and tasks.
- How to implement drag and drop with
react-beautiful-dndlibrary.
Prerequisites
- You should have prior experience working with the
Reactjs/Next.jsframework. - You should have an understanding of type annotations in TypeScript, and ultimately, working with
TypeScriptin React. - An understanding of DSA in
JavaScriptis a plus. - Experience with
Redux-toolkitlibrary will also be a plus.
A few notes:
- This article will focus primarily on functionality, but we'll use
Tailwind CSSfor styling. - I'll also include comments with each code snippet provided throughout this article to explain the code better. Keep an eye out for them.
Table Of Contents
- How To Implement Authentication With next-auth.js
- How to Configure the Redux Store
- How to Create Your Kanban App Markup
- How to Configure Firebase Firestore
- How to Add Initial Data to the Firestore Database
- How to Use RTK Query to Fetch Data from Cloud Firestore
- How to Fetch and Populate Data
- How to Implement CRUD Operations
- How to Implement Drag and Drop Functionality
- Conclusion
When you are ready, let's dive in.
How To Implement Authentication With next-auth.js
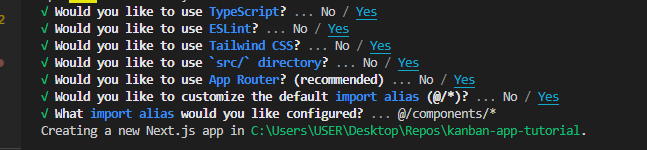
Begin by running the following command in your terminal to create a new Next.js project:
npx create-next-app@latest kanban-app-tutorial
Throughout the installation process, you will encounter prompts. Make sure you enable TypeScript and Tailwind CSS, as both will be integral to our project development.
Go ahead and clean out the redundant code that comes with the project. Delete the content in the page.tsx file and paste the code below as a placeholder:
export default function Home() {
  return (
    <main>
      <p>Hi</p>
    </main>
  )
}
Also, edit the content in the global.css file and leave only the Tailwind CSS imports.
Once these modifications are complete, install the next-auth.js library with the following command:
npm install next-auth
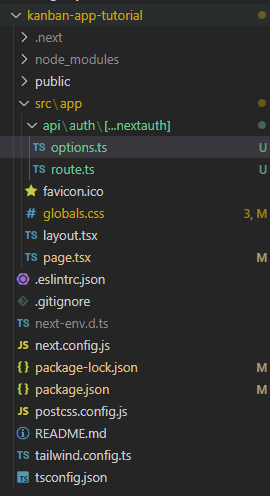
After successful installation, create an api folder in your root app folder, and inside it create an auth folder. Then, create a [...nextauth] folder inside the auth folder.
Finally, create two files named route.ts and options.ts inside the [...nextauth] folder.
Your file structure should look like the following:
Among the various next-auth.js providers, we will exclusively utilize the Google Provider to execute the authentication process.
In the option.ts file, paste the following code:
import type { NextAuthOptions } from "next-auth";
import GoogleProvider from "next-auth/providers/google";

export const options: NextAuthOptions = {
  providers: [
    GoogleProvider({
      clientId: process.env.GOOGLE_CLIENT_ID as string,
      clientSecret: process.env.GOOGLE_CLIENT_SECRET as string,
    }),
  ],
  secret: process.env.NEXTAUTH_URL,
};
Here, we imported the NextAuthOptions type provided by next-auth for the sake of type safety concerning the options variable.
In the above code, the options object is where whichever provider we want to utilize will be housed (the Google Provider in this case).
You can get your clientId and clientSecret values from the Google Cloud Platform. If you need a step-by-step guide on how to get them, refer to this guide.
Once you have gotten them, create a .env file in the root folder of your application and paste the values in their respective variables.
Lastly, create a secret key for the NEXTAUTH_SECRET variable using the following terminal command:
openssl rand -base64 32
Ultimately, your .env file should contain these variables and values:
GOOGLE_CLIENT_ID = <client ID value>
GOOGLE_CLIENT_SECRET = <client secret value>
NEXT_AUTH_SECRET = <next auth secret>
Important: You’ll also need these environment variables in production. So, don’t forget to update your production environment variable in your project settings on Vercel.
Proceed to the route.ts file and paste the following code in it:
import NextAuth from "next-auth/next";
import { options } from "./options";

const handler = NextAuth(options);

export { handler as GET, handler as POST };
Here, we imported the options variable from the option.ts file and passed it as a parameter to the NextAuth function, assigning the result to the handler variable.
The final statement ensures that any GET or POST request sent to the api/auth/[...nextauth] route will be managed by next-auth.js.
However, authentication won't be initiated yet because we haven't informed next-auth.js about which pages should be protected.
To implement protected routes, generate a middleware.ts file in the root src folder and insert the following code:
export { default } from 'next-auth/middleware'

export const config = { matcher: ['/'] }
The matcher property in the config object is an array containing the routes you want the middleware to protect. In this case, '/' designates the home page, indicating that the middleware protects the home page.
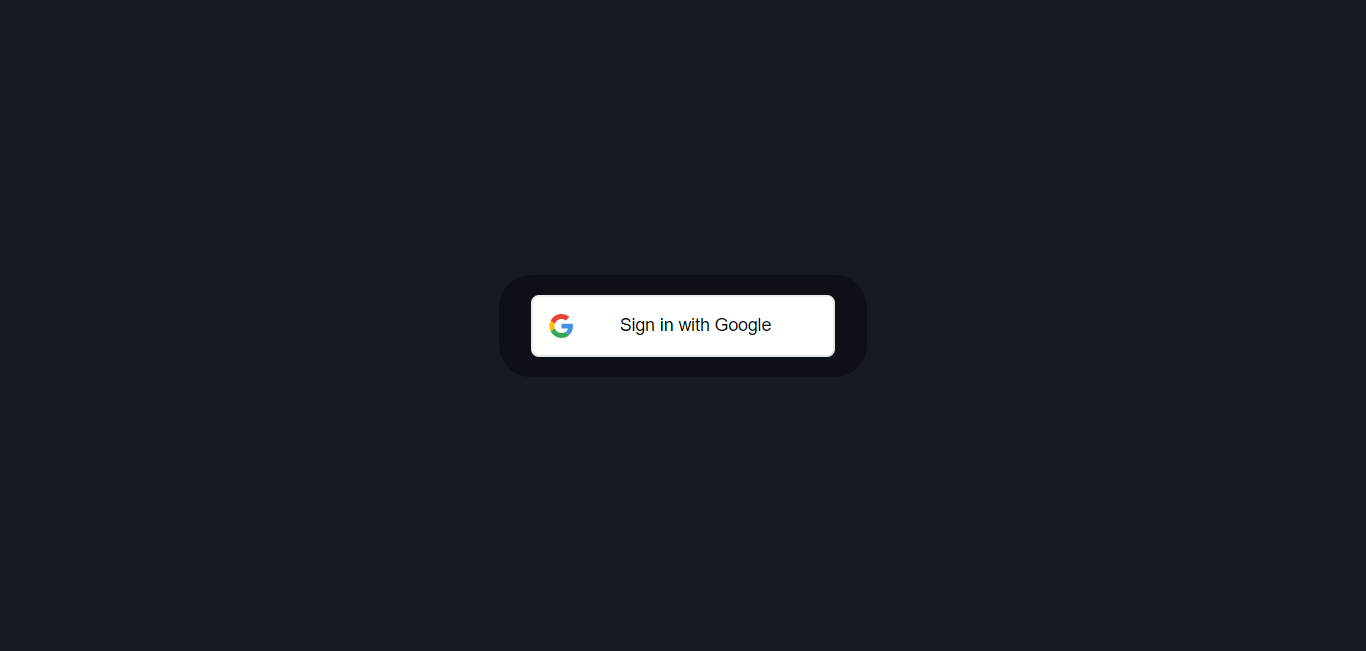
When you run your project server (with npm run dev), you should see an authentication page as seen below:
Now, let's configure the Redux store in our application.
How to Configure the Redux Store
To set up the Redux store in your application, follow these steps:
- Begin by installing the necessary packages. Run the following command in your terminal:
npm install @reduxjs/toolkit react-redux
This installs the Redux Toolkit and react-redux for React bindings.
- In the root
srcdirectory, create a folder namedredux. Within this folder, create astore.tsfile. Paste the following code into thestore.tsfile:
   // store.ts

   import { configureStore } from "@reduxjs/toolkit";
   import { setupListeners } from "@reduxjs/toolkit/dist/query";

   // Create the Redux store
   export const store = configureStore({
     reducer: {}, // Add your reducers here
   });

   // Setup listeners for refetch behaviors
   setupListeners(store.dispatch);

   // Define RootState and AppDispatch types
   export type RootState = ReturnType<typeof store.getState>;
   export type AppDispatch = typeof store.dispatch;
In this code snippet, configureStore is used to create the Redux store, and setupListeners is called to handle refetchOnFocus and refetchOnReconnect behaviours.
- Now, create another file in the same
reduxfolder namedhooks.tsand add the following code:
// hooks.ts
import { TypedUseSelectorHook, useDispatch, useSelector } from "react-redux";
import type { RootState, AppDispatch } from "./store";
// Typed versions of useDispatch and useSelector hooks

export const useAppDispatch = () => useDispatch<AppDispatch>();
export const useAppSelector: TypedUseSelectorHook<RootState> = useSelector;
This code creates typed versions of the useDispatch and useSelector hooks to ensure type safety when interacting with the Redux store.
- Still in the
reduxfolder, create a file namedprovider.tsxwith the following code snippet:
// provider.tsx
'use client'
import { store } from "./store";
import { Provider } from "react-redux";

// Custom provider component
export function Providers({ children }: { children: React.ReactNode }) {
   return <Provider store={store}>{children}</Provider>;
 }
This file defines a custom provider component to wrap around your application components.
- In your application layout file (
src/app/layout.tsx), import theProviderscomponent and wrap it around your main layout as seen below:
// layout.tsx

import type { Metadata } from 'next'
import { Plus_Jakarta_Sans } from "next/font/google";
import './globals.css'
import { Providers } from "@/components/redux/provider";

//font we'll use throughout the project
const pjs = Plus_Jakarta_Sans({ subsets: ["latin"], display: "swap" });
// Metadata definition
export const metadata: Metadata = {
   title: 'Create Next App',
   description: 'Generated by create next app',
  }

// RootLayout component
export default function RootLayout({
   children,
   }: {
   children: React.ReactNode
 }) {
   return (
      <html lang="en" className={pjs.className}>
        <body>
          <Providers>
            {children}
          </Providers>
        </body>
      </html>
  );
}
By wrapping your components with the Providers component, you ensure that every component in your application has access to the Redux store.
Up to this point, your folder structure should look like this:
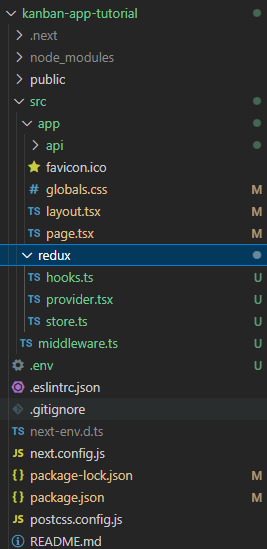
With these steps, you have successfully integrated the Redux store into your application, and you are ready to create slices for your application.
Before diving into the implementation of slices, let's create the markup for our application.
How to Create Your Kanban App Markup
This section guides you through the process of building the markup for your Kanban app. By the end of this section, your markup should resemble the image below:

Let's start by creating the navbar component.
- Begin by establishing a
componentsfolder within theappdirectory. Inside it, create aNavbar.tsxfile and insert the following code:
// src/app/components/Navbar.tsx

export default function Navbar() {

return (
  <nav className="bg-white border flex h-24">
    <div className="flex-none w-[18.75rem] border-r-2 flex items-center pl-[2.12rem]">
      <p className="font-bold text-3xl"> Kanban App </p>
    </div>

   <div className="flex justify-between w-full items-center pr-[2.12rem]">
       <p className="text-black text-2xl font-bold pl-6">
         Board Name
       </p>

      <div className="flex items-center space-x-3">
        <button className="bg-blue-500 text-black px-4 py-2 flex rounded-3xl items-center space-x-2">
           <p>+ Add New Task</p>
        </button>
          <div className="flex items-center">
            <button className="text-3xl mb-4">...</button>
          </div>
        </div>
      </div>
    </nav>
  )}
- Next, render the
Navbarcomponent in thesrc/app/layout.tsxfile:
   import type { Metadata } from 'next'
   import { Providers } from "@/components/redux/provider";
   import Navbar from './components/Navbar';
   import { Plus_Jakarta_Sans } from "next/font/google";
   import './globals.css'

   const pjs = Plus_Jakarta_Sans({ subsets: ["latin"], display: "swap" });

   export const metadata: Metadata = {
    title: 'Create Next App',
    description: 'Generated by create next app',
   }

   export default function RootLayout({
    children,
   }: {
    children: React.ReactNode
   }) {
   return (
    <html lang="en" className={pjs.className}>
      <body>
        <Providers>
          <Navbar />  {/* Render the component here */}
          {children}
        </Providers>
      </body>
    </html>
    )}
Now, the Navbar component is available globally across all pages in the application since it's rendered in the root layout component.
After implementing these changes, upon signing in to your application on localhost:3000, you should observe the UI as depicted in the image below.
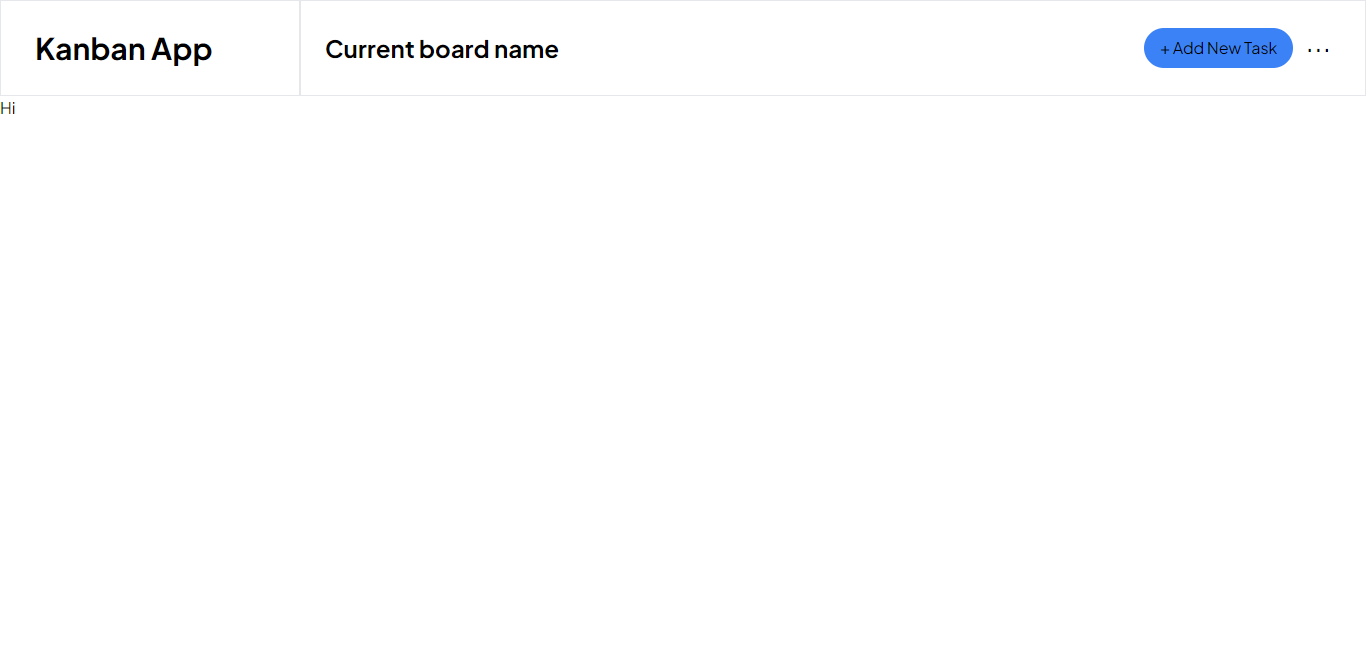
The placeholder "Current board name" in the navbar will eventually be replaced with the name of an active board once we populate the app with data.
The "Add New Task" button is designed to open the "Add new tasks" modal, and the ellipsis next to it will trigger a dropdown for editing and deleting a board. The implementation of this dropdown is the focus of the next step.
- Create a
Dropdown.tsxfile in the samecomponentsfolder, and paste the following code into it:
   //src/app/components/Dropdown.tsx

   interface IDropdown {
    show: boolean
   }

   export default function Dropdown({ show }: IDropdown) {

    return (
      <div
        className={`${
          show ? "block" : "hidden"
        } w-48 absolute top-full bg-white
         border shadow-lg right-0 py-2 rounded-2xl`}
      >
        <div className="hover:bg-gray-300">
          <button className="text-sm px-4 py-2">Edit Board</button>
        </div>
        <div className="hover:bg-gray-300">
          <button className="text-sm px-4 py-2">
            Delete Board
          </button>
        </div>
      </div>
    )}
This component takes a show parameter of type boolean as a prop. The dropdown content is displayed when show is true and hidden when it's false.
Now, proceed to the Navbar.tsx file and update the code to render the Dropdown component. Pay attention to the comments in the code snippet below to get a grasp of the updates here:
   //src/app/components/Navbar.tsx

   'use client' // we made this a client component since we have to make use of useState

   import Dropdown from "./Dropdown";
   import { useState } from 'react'

   export default function Navbar() {

   const [show, setShow] = useState<boolean>(false); // this will manage the state of the show variable

   return (
    <nav className="bg-white border flex h-24">
      <div className="flex-none w-[18.75rem] border-r-2 flex items-center pl-[2.12rem]">
        <p className="font-bold text-3xl"> Kanban App </p>
      </div>

      <div className="flex justify-between w-full items-center pr-[2.12rem]">
        <p className="text-black text-2xl font-bold pl-6">Current board name</p>

        <div className="flex items-center space-x-3">
          <button className="bg-blue-500 text-black px-4 py-2 flex rounded-3xl items-center space-x-2">
            <p>+ Add New Task</p>
          </button>
          <div className="relative flex items-center">
            <button
            onClick={() => setShow(!show)} // trigger function that shows dropdown here
            className="text-3xl mb-4">...</button>
            <Dropdown show={show}/>  {/* render dropdown here and pass show as prop */}
          </div>
        </div>
      </div>
    </nav>
    )}
After you make these adjustments in your Navbar component, you can now toggle the dropdown by clicking on the ellipsis:

In the next step, we'll implement components that make up the body of our application, specifically the sidebar components and board that displays the tasks.
- To implement the sidebar, create a
Sidebar.tsxfile within the samecomponentsdirectory. Paste the following code into it:
   // src/app/components/Sidebar.tsx

   export default function Sidebar() {
   return (
    <aside className="w-[18.75rem] flex-none dark:bg-dark-grey h-full py-6 pr-6">
      <p className="text-medium-grey pl-[2.12rem] text-[.95rem] font-semibold uppercase pb-3">
        {`All Boards (0)`}
      </p>
      <div className="cursor-pointer flex items-center rounded-tr-full rounded-br-full bg-blue-500 space-x-2 pl-[2.12rem] py-3 pb-3">
        <p className="text-white text-lg capitalize">Current board name</p>
      </div>
      <button className="flex items-center space-x-2 pl-[2.12rem] py-3">
        <p className="text-base font-bold capitalize text-main-purple">
          + Create New Board
        </p>
      </button>
    </aside>
   );
   }
- Following this, create another file named
BoardTasks.tsxand paste the code below to it. This component will contain the contents of an active board task. Since the app is not yet populated with data, we'll use a placeholder that will be substituted by actual tasks later.
   // src/app/components/BoardTasks.tsx

   export default function BoardTasks() {
   return (
    <div className="overflow-x-auto overflow-y-auto w-full bg-stone-200">
      <div className="w-full h-full flex justify-center items-center">
        <div className="flex flex-col items-center">
          <p className="text-black text-sm">
            This board is empty. Create a new column to get started.
          </p>
          <button className="bg-blue-500 text-black px-4 py-2 flex mt-6 rounded-3xl items-center space-x-2">
            <p>+ Add New Column</p>
          </button>
        </div>
      </div>
    </div>
    );
   }
- Then, paste the following code in your
src/app/page.tsxfile to render both theSidebarandBoardTaskscomponents:
   import Sidebar from "./components/Sidebar";
   import BoardTasks from "./components/BoardTasks";

   export default function Home() {
   return (
    <main className="flex h-full">
      <Sidebar />
      <BoardTasks />
    </main>
   );
   }
Up to this point, your file structure should resemble the following:
- Finally, in the root
layout.tsxfile, update the style of thebodytag as shown below:
 // src/app/layout.tsx
   // rest of the code here
   export default function RootLayout({
   children,
   }: {
   children: React.ReactNode;
   }) {
   return (
    <html lang="en" className={pjs.className}>
      <body className='pb-24 h-screen overflow-hidden'> {/* update style here*/}
        {/* rest of the code here */}
      </body>
    </html>
   );
   }
This adjustment ensures that the content in the BoardTasks component is scrollable on both the x and y axis if it exceeds the length and breadth of the screen.
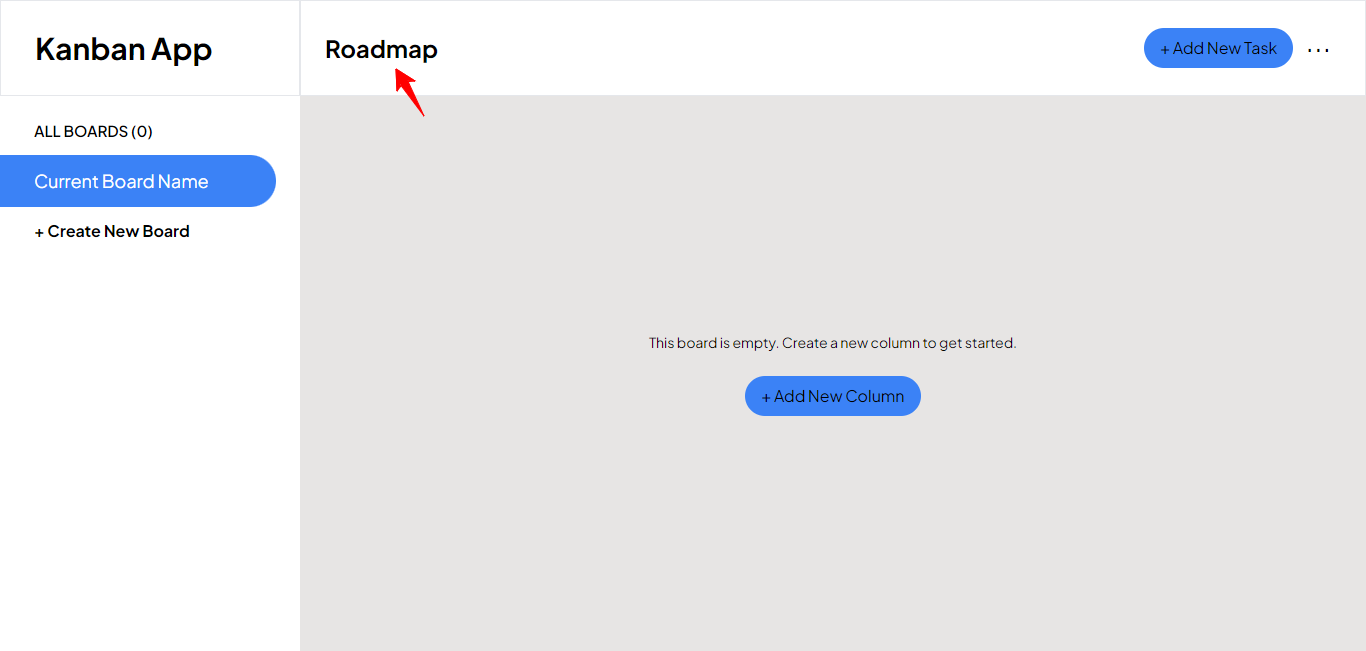
With this, the markup for our app is complete. Your UI should resemble this if you have been following along:
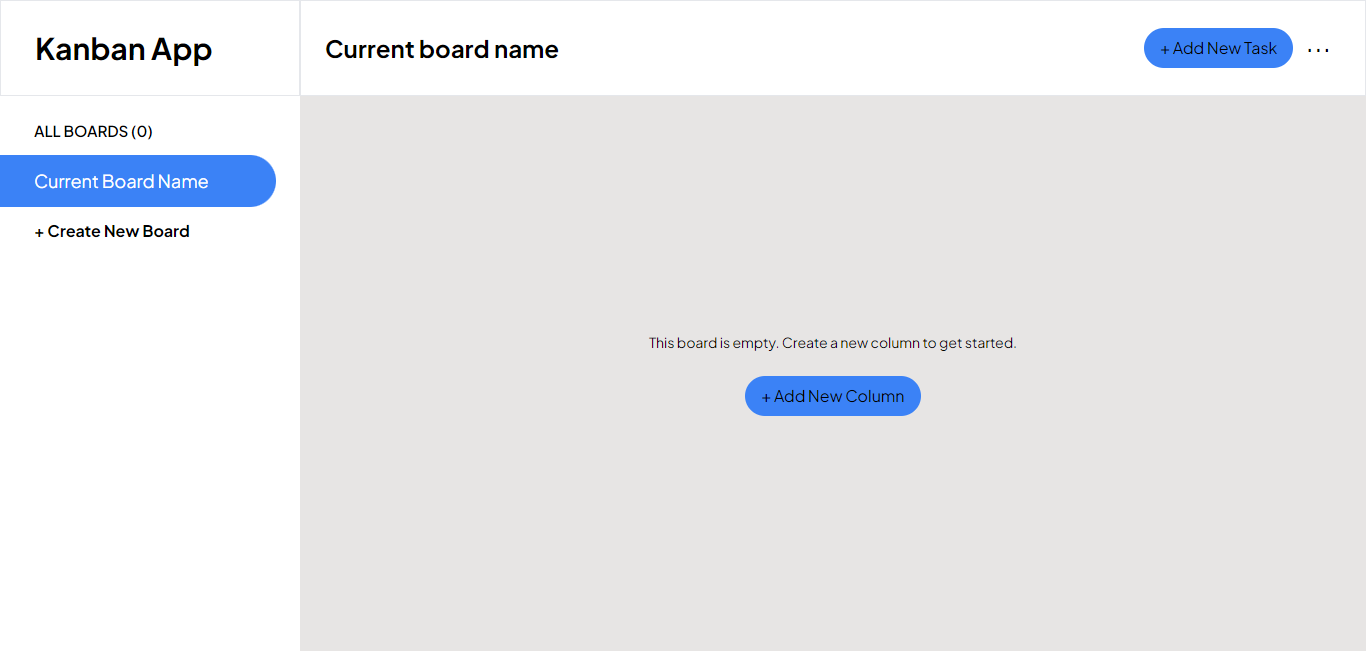
The sidebar will display the number of boards and the names of available boards in the app. Clicking different boards in the sidebar will switch to the selected board, and clicking "Create New Board" in the sidebar opens the "Add New Board" modal.
Right next to the sidebar, the tasks in each board will be displayed in columns. The current screen will be displayed if the board has no tasks yet. The "+Add New Column" button will open a modal used to add a column to a board.
All these features will be activated as we populate the application with data.
Moving forward, the next section will guide you in integrating Firebase Firestore into your application.
How to Configure Firebase Firestore
To integrate Firestore into your application, you'll need to create a Firebase project using the Firebase console. Feel free to name the project according to your preference, but for the sake of this tutorial, let's name it "Kanban-app-tutorial."
Once the project is created, you'll be prompted to register your app. After registration, install Firebase in your application. Install the Firebase package with the following command in your terminal:
npm install firebase
Now, you need to initialize Cloud Firestore in your application. Create a folder named utils and within it, create a firebaseConfig.ts file. Paste your Firebase configuration into it as shown below:
import { initializeApp } from "firebase/app";
import { getFirestore } from "firebase/firestore";

// Your web app's Firebase configuration
const firebaseConfig = {
 // Paste your Firebase config here
};

// Initialize Firebase
const app = initializeApp(firebaseConfig);
// Initialize Firestore and export it
export const db = getFirestore(app);
Finally, navigate to your newly created project on the cloud platform and create a Cloud Firestore database. Following this, proceed to the "Rules" tab and modify the read and write rules from false to true as illustrated in the image:
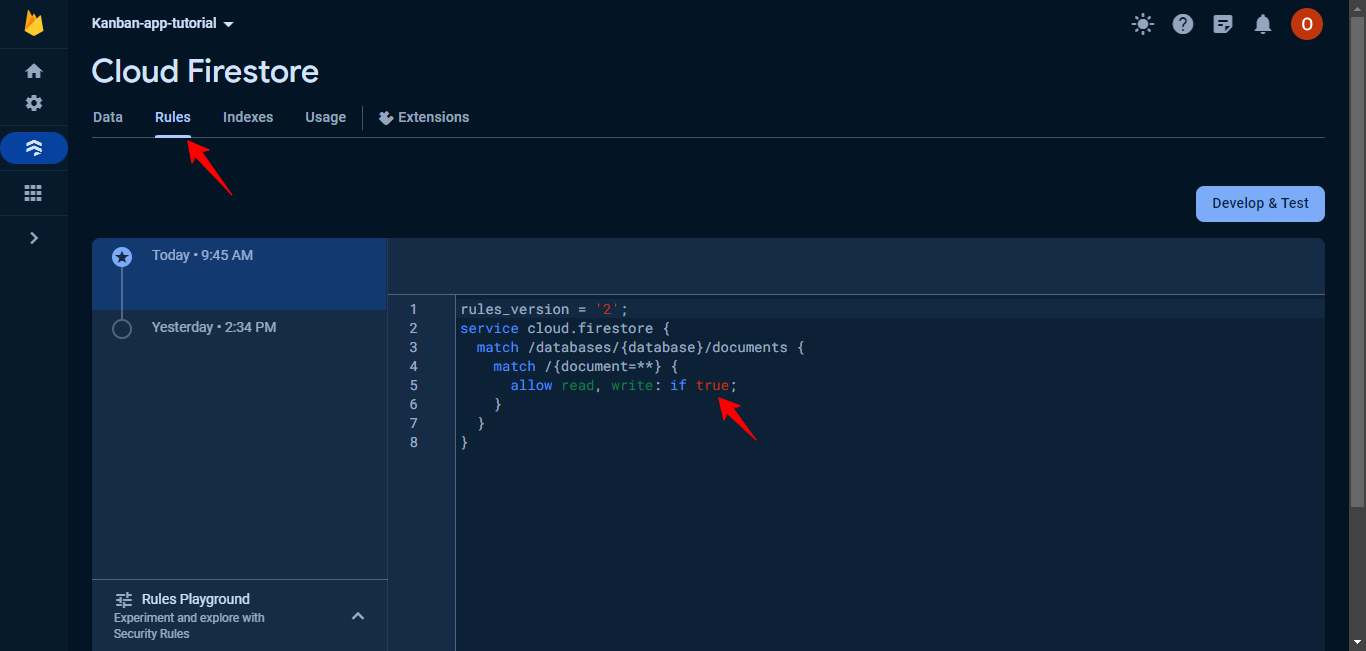
This will enable anyone to add data to the database without restrictions. Note that this is not recommended for production – we are implementing it like this for the purpose of this article.
With this setup complete, we can now begin adding data to the Cloud Firestore.
How to Add Initial Data to the Firestore Database
Our goal is to ensure that users aren't greeted with an empty board when they complete the authentication process. Instead, we want to present them with dummy task data that they can interact with, allowing them to explore the application's features.
Also, we aim to make this data user-specific, forming the foundation for each user to build upon by creating new boards and tasks.
To accomplish this, when a new user signs in, we'll generate a new document in the database for that user.
Here's a breakdown of our approach:
Check if the user is new: We need to determine whether the user is signing in for the first time. This way, we can automatically create a new document for the user in the database.
Create a new user document: If the user is new, we proceed to create a new data entry in the database specifically for that user.
To begin, create a data.js file inside the utils folder we created earlier (this will contain our dummy data for a board). Paste the provided data code into it.
//used to generate new id
export const id = () => Math.random().toString(36).substring(2, 10);

export const data = {
  "boards": [
    {
      id: id(),
      name: "Roadmap",
      columns: [
        {
          id: id(),
          name: "Now",
          tasks: [
            {
              id: id(),
              title: "Launch version one",
              status: "Now"
            },
            {
              id: id(),
              title: "Review early feedback and plan next steps for roadmap",
              status: "Now"
            }
          ]
        },
        {
          id: id(),
          name: "Next",
          tasks: []
        },
        {
          id: id(),
          name: "Later",
          tasks: []
        }
      ]
    }
  ]
}
Now, navigate to the src/app/page.tsx file and modify it as demonstrated below:
"use client";
import Sidebar from "./components/Sidebar";
import BoardTasks from "./components/BoardTasks";
// Firestore methods: collection and getDocs for document reference, addDoc for adding a document
import { collection, getDocs, addDoc } from "firebase/firestore";
// Connect our app to Firestore
import { db } from "./utils/firebaseConfig";
import { useEffect, useState } from "react";
// Import getSession from next-auth library to retrieve signed-in user details
import { getSession } from "next-auth/react";
// Import data from data.json, used to initialize the Firestore database for new users
import { data } from "./utils/data.json";

export default function Home() {
  // Manage user details in this state. Key index in TypeScript ensures type safety.
  const [userDetails, setUserDetails] = useState<{ [key: string]: any }>();

  // Get user session using getSession. Contains user's name and email, then passed to user details state.
  const getUserSession = async () => {
    const session = await getSession();
    if (session) {
      setUserDetails(session.user);
    }
  };

  const handleAddDoc = async () => {
    if (userDetails) {
      // Execute code inside curly braces only when `userDetails` is true.

      // Reference to the document with the user's email to check its existence in the database.
      const docRef = collection(db, "users", userDetails.email, "tasks");
      const getDos = await getDocs(docRef);

      // If the document exists, terminate the program.
      if (getDos.docs.length > 0) {
   ;     return;
      } else {
        // If not, submit a new document containing the data from data.json for the user in the database.
        try {
          await addDoc(
            collection(db, "users", userDetails.email, "tasks"),
            data
          );
        } catch (e) {
          console.error("Error adding document: ", e);
        }
      }
    }
  };

  useEffect(() => {
    getUserSession(); // Call getUserSession function after the page renders.
  }, []);

  useEffect(() => {
    handleAddDoc(); // Call handleAddDoc function after the user details update.
  }, [userDetails]);

  return (
    <main className="flex h-full">
      <Sidebar />
      <BoardTasks />
    </main>
  );
}
This code ensures that when a user logs in, their details are fetched and checked. If it's a new user, a new document with initial dummy data is added to the Firestore database under the user's email. Make sure you've read through the comments I added if you need any further explanation.
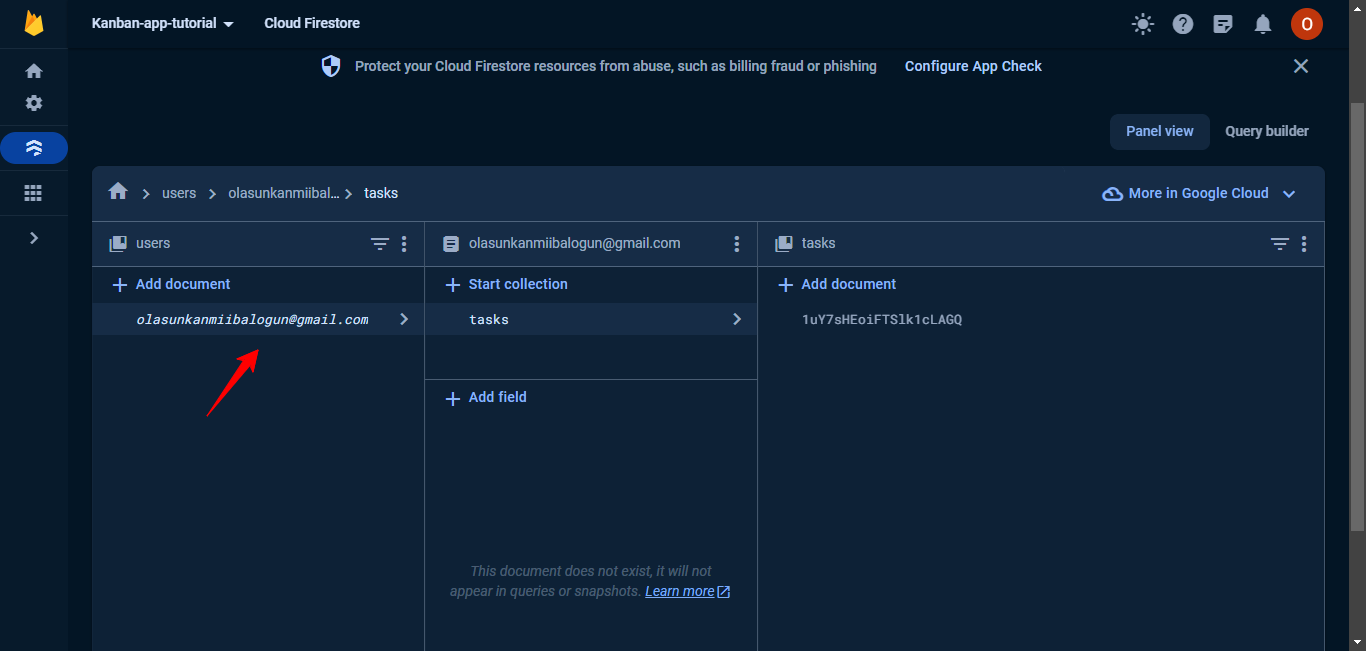
Upon visiting your project console, you'll notice the presence of a document created for the signed-in user (which is you):
The initial setup is now complete, enabling us to fetch data and initiate the population of our application. But before directly interacting with the data, we'll employ RTK query, which is included in the Redux toolkit package, as an intermediary.
This approach not only eliminates the need to write data fetching and caching logic in various components repeatedly, but also eliminates background revalidation, so we don't need explicit manual refreshes.
The next section will explore this process.
How to Use RTK Query to Fetch Data from Cloud Firestore
Here, we'll begin the process of creating slices for the reducer, starting with the development of the slice dedicated to data fetching.
Within the src/redux directory, create a new folder named services.
Inside the newly created services folder, establish a file named apiSlice.ts. Copy and paste the provided code into this file:
   import { createApi, fakeBaseQuery } from "@reduxjs/toolkit/query/react";
   import { getSession } from "next-auth/react";
   import { collection, getDocs } from "firebase/firestore";
   import { db } from "@/components/app/utils/firebaseConfig";

   // Create the Firestore API using createApi
   export const fireStoreApi = createApi({
   reducerPath: "firestoreApi", // Specifies the path for the reducer
   baseQuery: fakeBaseQuery(), // Utilizes fakeBaseQuery because Firebase has no traditional REST API endpoint
   tagTypes: ["Tasks"], // Defines tag types for caching purposes
   endpoints: (builder) => ({
    fetchDataFromDb: builder.query<{ [key: string]: any }[], void>({
      // Utilizes builder.query for making requests; builder.mutation can be used for CRUD operations
      async queryFn() {
        // Employs queryFn since we are not fetching data from a conventional API;
        // This allows us to include arbitrary code, as long as we return our data in the { data: results } format

        try {
          const session = await getSession();
          const { user } = session!;
            const ref = collection(db, `users/${user?.email}/tasks`);
            const querySnapshot = await getDocs(ref);
            return { data: querySnapshot.docs.map((doc) => doc.data()) };
            // Data must be returned in this format when using queryFn

        } catch (e) {
          return { error: e };
        }
      },
      providesTags: ["Tasks"], // Specifies tags for caching
    }),
   }),
   });

   // Export hooks for using the created endpoint
   export const { useFetchDataFromDbQuery } = fireStoreApi;
This code establishes a Firestore API using createApi, defining an endpoint for fetching data. The use of fakeBaseQuery is intentional, considering Firebase doesn't have a conventional base URL.
The code also integrates caching and invalidation through tags. In this slice, we've specified tagTypes as 'Tasks'. In subsequent sections, we'll explore how invalidation and refetching can be done through tags.
In the slice, endpoints can be perceived as API endpoints. Functions defined within this endpoints function will be exported in the form of use...Query if it's a builder.query function (as in this case, useFetchDataFromDbQuery), and use...Mutation if it's a builder.mutation function (more on this later).
Now, we'll lay the foundation for incorporating the slices we generate into the Redux store. Since we will create multiple slices in the future, it's prudent to compile them into a dedicated file using combineReducers.
Next, create a rootReducer.ts file within the src/redux folder. Embed the following code snippet into this file to integrate the previously created apiSlice:
  import { combineReducers } from "@reduxjs/toolkit";
   import { fireStoreApi } from "./services/apiSlice";

   export const rootReducer = combineReducers({
    [fireStoreApi.reducerPath]: fireStoreApi.reducer,
   });
In this snippet, we imported the earlier-created apiSlice and include it in the combineReducers function, specifying the key-value pair as [fireStoreApi.reducerPath]: fireStoreApi.reducer.
This configuration ensures that the state managed by the apiSlice is effectively integrated into the Redux store.
Finally, we'll add the rootReducer to the Redux store here. Navigate to the src/redux/store.ts and modify it like below:
import { configureStore } from "@reduxjs/toolkit";
   import { setupListeners } from "@reduxjs/toolkit/dist/query";
   import { rootReducer } from "./rootReducer";
   import { fireStoreApi } from "./services/apiSlice";

   export const store = configureStore({
    reducer: rootReducer,
    middleware: (getDefaultMiddleware) => getDefaultMiddleware().concat(fireStoreApi.middleware),
   });
   setupListeners(store.dispatch)
   export type RootState = ReturnType<typeof store.getState>;
   export type AppDispatch = typeof store.dispatch;
Here, we integrate our rootReducer into the store and pass the fireStoreApi.middleware to the middleware prop of the configureStore function. This ensures that the Redux store uses the middleware for making requests to Firestore.
Now, we can safely start the process of fetching and populating our application with data, which will be the focus of the upcoming section.
How to Fetch and Populate Data
Our approach begins with populating data in the Navbar component, followed by the Sidebar, and finally, the BoardTasks.
How to populate the navbar
For the Navbar, we want to display the name of the current board. But since we'll need this information in other parts of the app, we'll also store it centrally in the Redux store.
To achieve this, we'll create a new slice called appSlice, which will manage the state related to the current board name. This slice will also be responsible for handling logic and state unrelated to API calls.
First, create a features folder within the src/redux directory.
Inside the features folder, create a file named appSlice.ts and paste the following code:
   import { createSlice, PayloadAction } from "@reduxjs/toolkit";
   import { RootState } from "../store";

   // Define the initial state for the slice
   const initialState = {
    currentBoardName: "",
   };

   export const features = createSlice({
   // Name of the slice
   name: "features",
   initialState,
   // Functions that update the initialState are written inside the reducers object
   reducers: {
    // This function updates the board name when called
    setPageTitle: (state, action: PayloadAction<string>) => {
      state.currentBoardName = action.payload;
    },
   },
   });

   // Export the functions defined inside the reducers here
   export const { setPageTitle } = features.actions;

   // Selector function to retrieve the current board name from the state
   export const getPageTitle = (state: RootState) => state.features.currentBoardName;

   // Export the reducer for use in the Redux store
   export default features.reducer;
This code defines the appSlice slice, which includes the initial state, reducers, and actions for managing the current board name.
To make the appSlice available globally, we must integrate it into the Redux store. Open the src/redux/rootReducer.ts file and modify it as follows:
   // src/redux/rootReducer.ts
   import { combineReducers } from "@reduxjs/toolkit";
   import { fireStoreApi } from "./services/apiSlice";
   import  featuresReducer  from "./features/appSlice";

   export const rootReducer = combineReducers({
   //add the features slice here
   features: featuresReducer,
   [fireStoreApi.reducerPath]: fireStoreApi.reducer,
   });
This updated rootReducer now includes the featuresReducer, making the appSlice available throughout the application.
Next, we need to update the Navbar component to fetch the current board name from the Redux store and display it. Open the app/components/Navbar.tsx file and make the following changes:
  'use client'

   import Dropdown from "./Dropdown";
   import { useState, useEffect } from 'react'
   // Import Redux functions and selectors for managing board names
   import { setCurrentBoardName, getCurrentBoardName } from '../../redux/features/appSlice'
   import { useAppDispatch, useAppSelector } from '@/components/redux/hooks'
   // Import the data-fetching hook from the API slice
   import { useFetchDataFromDbQuery } from "@/components/redux/services/apiSlice";

   export default function Navbar() {
    const [show, setShow] = useState<boolean>(false);
   // Destructuring assignment to extract data from the useFetchDataFromDbQuery hook
   const { data } = useFetchDataFromDbQuery();
   // Access the Redux dispatch function for calling actions
   const dispatch = useAppDispatch();

   // Effect hook to run when the data updates
   useEffect(() => {
    if (data) {
      // When a user signs in, set the currentBoardName to the first board's name
      const activeBoard = data[0].boards[0];
      dispatch(setCurrentBoardName(activeBoard.name));
    }
   }, [data]);

   // Select the current board name from the Redux store
   const currentBoardName = useAppSelector(getCurrentBoardName);

   return (
    <nav className="bg-white border flex h-24">
      <div className="flex-none w-[18.75rem] border-r-2 flex items-center pl-[2.12rem]">
        <p className="font-bold text-3xl"> Kanban App </p>
      </div>

      <div className="flex justify-between w-full items-center pr-[2.12rem]">
        {/* populate the current board name in the navbar */}
        <p className="text-black text-2xl font-bold pl-6">{currentBoardName}</p>

        <div className="flex items-center space-x-3">
          <button className="bg-blue-500 text-black px-4 py-2 flex rounded-3xl items-center space-x-2">
            <p>+ Add New Task</p>
          </button>
          <div className="relative flex items-center">
            <button onClick={() => setShow(!show)} className="text-3xl mb-4">
              ...
            </button>
            <Dropdown show={show} />
          </div>
        </div>
      </div>
    </nav>
   );
   }
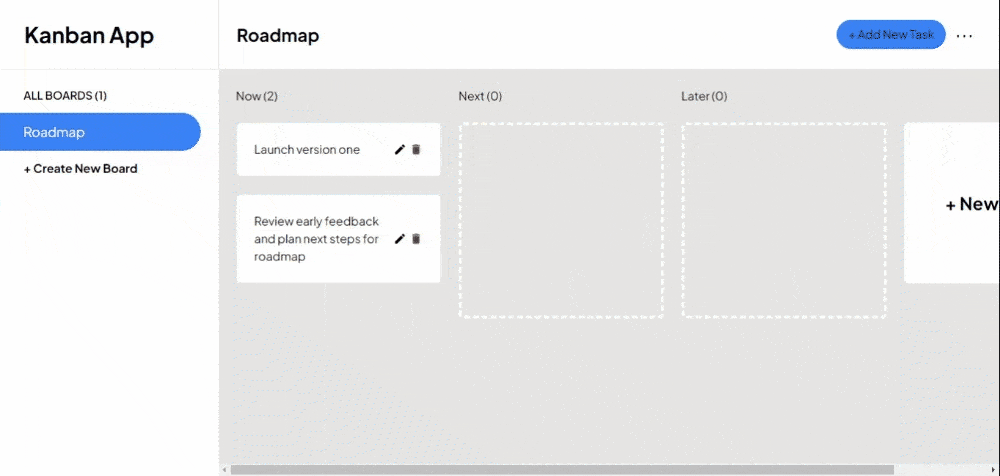
After these updates, your navbar should now display the name of the current board, which is "Roadmap":
How to populate the sidebar
Once populated with data, the sidebar will display the number of boards and the names of the available boards in the application. Clicking on different boards in the sidebar will switch the view to the selected board.
While we currently only have one board available in the data, we'll lay the groundwork for these features to support multiple boards in the future.
Navigate to the Sidebar component and make the following edits as seen below:
import { useState } from "react";
import { useAppDispatch } from "@/components/redux/hooks";
import { useFetchDataFromDbQuery } from "@/components/redux/services/apiSlice";
import { setCurrentBoardName } from "@/components/redux/features/appSlice";

export default function Sidebar() {
  // State to keep track of the index of the active board during navigation
  const [active, setActive] = useState<number>(0);

  const { data } = useFetchDataFromDbQuery();
  const dispatch = useAppDispatch();

  // Function to handle navigation through boards
  const handleNav = (index: number, name: string) => {
    setActive(index);
    dispatch(setCurrentBoardName(name));
  };

  return (
    <aside className="w-[18.75rem] flex-none dark:bg-dark-grey h-full py-6 pr-6">
      {data && (
        <>
          {/* Display the number of boards available in the data */}
          <p className="text-medium-grey pl-[2.12rem] text-[.95rem] font-semibold uppercase pb-3">
            {`All Boards (${data[0]?.boards.length})`}
          </p>
          {/* Display the names of each board */}
          {data[0]?.boards.map(
            (board: { [key: string]: any }, index: number) => {
              const { name, id } = board;
              const isActive = index === active; // Check if the board is active
              return (
                <div
                  key={id}
                  onClick={() => handleNav(index, name)} // Handle navigation through boards on click
                  className={`${
                    isActive ? 'rounded-tr-full rounded-br-full bg-blue-500 text-white' : 'text-black'
                  } cursor-pointer flex items-center
                  space-x-2 pl-[2.12rem] py-3 pb-3`}
                >
                  <p className="text-lg capitalize">{name}</p>
                </div>
              );
            }
          )}
        </>
      )}
      <button className="flex items-center space-x-2 pl-[2.12rem] py-3">
        <p className="text-base font-bold capitalize text-main-purple">
          + Create New Board
        </p>
      </button>
    </aside>
  );
}
With the above code, we have prepared the sidebar for handling multiple boards in the future. When multiple boards are available in the data, the sidebar will dynamically display them, allowing users to switch between them seamlessly.
Up to this point, your sidebar UI should reflect these updates:

Moving forward, in the next section we'll populate the BoardTasks component.
How to populate the BoardTasks component
In this section, the goal is to present a maximum of seven task columns on the screen. If there are fewer than seven columns, we'll display an option to add more. Also, we'll want to have an indication of an empty column for columns without tasks.
Each task card should feature edit and delete icons. These will serve as placeholders for forthcoming modal functionalities.
To implement these changes, go to the BoardTasks component and make the following updates:
import { useEffect, useState } from "react";
import { useFetchDataFromDbQuery } from "@/components/redux/services/apiSlice";
import { useAppSelector } from "@/components/redux/hooks";
import { getCurrentBoardName } from "@/components/redux/features/appSlice";
import { MdEdit, MdDelete } from "react-icons/md";

// Define types for the tasks data
interface ITask {
  title: string;
  description: string;
  status: string;
}

// Define types for the data in each column
interface Column {
  name: string;
  tasks?: ITask[];
}

export default function BoardTasks() {
  // Get loading state and data from the useFetchDataFromDbQuery endpoint
  const { isLoading, data } = useFetchDataFromDbQuery();
  // Manage column data in columns state
  const [columns, setColumns] = useState<Column[]>([]);
  // Get active board name from the redux store
  const activeBoard = useAppSelector(getCurrentBoardName);

  // Once data fetches successfully, this function in the useEffect runs
  useEffect(() => {
    if (data !== undefined) {
      const [boards] = data;
      if (boards) {
        // Get the data of the active board
        const activeBoardData = boards.boards.find(
          (board: { name: string }) => board.name === activeBoard
        );
        if (activeBoardData) {
          const { columns } = activeBoardData;
          setColumns(columns);
        }
      }
    }
  }, [data, activeBoard]);

  return (
    <div className="overflow-x-auto overflow-y-auto w-full p-6 bg-stone-200">
      {/* If data has not been fetched successfully, display a loading state, else display the column of tasks */}
      {isLoading ? (
        <p className="text-3xl w-full text-center font-bold">Loading tasks...</p>
      ) : (
        <>
          {/* If columns of tasks isn't empty: display the tasks, else display the prompt to add a new column */}
          {columns.length > 0 ? (
            <div className="flex space-x-6">
              {columns.map((column) => {
                const { id, name, tasks } = column;
                return (
                  <div key={id} className="w-[17.5rem] shrink-0">
                    <p className="text-black">{`${name} (${
                      tasks ? tasks?.length : 0
                    })`}</p>

                    {tasks &&
                      // Display the tasks if there are tasks in the column, if not, display an empty column
                      (tasks.length > 0 ? (
                        tasks.map((task) => {
                          const { id, title, status } = task;

                          return (
                            <div
                              key={id}
                              className="bg-white p-6 rounded-md mt-6 flex items-center justify-between border"
                            >
                              <p>{title}</p>
                              <div className="flex items-center space-x-1">
                                <MdEdit className="text-lg cursor-pointer" />
                                <MdDelete className="text-lg cursor-pointer text-red-500" />
                              </div>
                            </div>
                          );
                        })
                      ) : (
                        <div className="mt-6 h-full rounded-md border-dashed border-4 border-white" />
                      ))}
                  </div>
                );
              })}
              {/* If the number of columns of tasks is less than 7, display an option to add more columns */}
              {columns.length < 7 ? (
                <div className="rounded-md bg-white w-[17.5rem] mt-12 shrink-0 flex justify-center items-center">
                  <p className="cursor-pointer font-bold text-black text-2xl">
                    + New Column
                  </p>
                </div>
              ) : (
                ""
              )}
            </div>
          ) : (
            <div className="w-full h-full flex justify-center items-center">
              <div className="flex flex-col items-center">
                <p className="text-black text-sm">
                  This board is empty. Create a new column to get started.
                </p>
                <button className="bg-blue-500 text-black px-4 py-2 flex mt-6 rounded-3xl items-center space-x-2">
                  <p>+ Add New Column</p>
                </button>
              </div>
            </div>
          )}
        </>
      )}
    </div>
  );
}
After you make these edits, your UI should now reflect the changes as demonstrated in the GIF below:

Next, we'll turn our attention to implementing CRUD (Create, Read, Update, and Delete) operations throughout our application.
How to Implement CRUD Operations
Before we dive into implementing CRUD functionalities throughout our app, we need to establish the updateBoardToDb mutation endpoint within the apiSlice. This endpoint will allow us to make necessary updates to our database for CRUD actions.
Integrate the following code into your redux/services/apiSlice.ts file to include the mutation endpoint:
import { createApi, fakeBaseQuery } from "@reduxjs/toolkit/query/react";
import { getSession } from "next-auth/react";
// additionally import the doc and updateDoc method from firestore to get user document reference and update the document, respectively
import { collection, doc, getDocs, updateDoc } from "firebase/firestore";
import { db } from "@/components/app/utils/firebaseConfig";

export const fireStoreApi = createApi({
  reducerPath: "firestoreApi",
  baseQuery: fakeBaseQuery(),
  tagTypes: ["Tasks"],
  endpoints: (builder) => ({
    fetchDataFromDb: builder.query<{ [key: string]: any }[], void>({
      async queryFn() {
        try {
          const session = await getSession();
          if (session?.user) {
            const { user } = session;
            const ref = collection(db, `users/${user.email}/tasks`);
            const querySnapshot = await getDocs(ref);
            return { data: querySnapshot.docs.map((doc) => doc.data()) };
          }
        } catch (e) {
          return { error: e };
        }
      },
      providesTags: ["Tasks"],
    }),
    // endpoint for CRUD actions
    updateBoardToDb: builder.mutation({
      async queryFn(boardData) {
        try {
          const session = await getSession();
          if (session?.user) {
            const { user } = session;
            const ref = collection(db, `users/${user.email}/tasks`);
            const querySnapshot = await getDocs(ref);
            const boardId = querySnapshot.docs.map((doc) => {
              return doc.id;
            });
            await updateDoc(doc(db, `users/${user.email}/tasks/${boardId}`), {
              boards: boardData,
            });
          }
          return { data: null };
        } catch (e) {
          return { error: e };
        }
      },
      invalidatesTags: ["Tasks"], // this will be used to invalidate the initially fetched data.
      // Data will have to be refetched once this enpoint has been called
    }),
  }),
});

// Export hooks for using the created endpoint
export const { useFetchDataFromDbQuery, useUpdateBoardToDbMutation } =
  fireStoreApi;
Upon calling the useUpdateBoardToDbMutation endpoint, our database data will be updated accordingly.
Following each update, Redux seamlessly performs background refreshes to ensure we're operating with the latest data. This functionality is enabled by the invalidatesTags property we passed to the updateBoardToDb endpoint.
Having successfully implemented the CRUD endpoint, our next step is to implement the features for adding and editing boards.
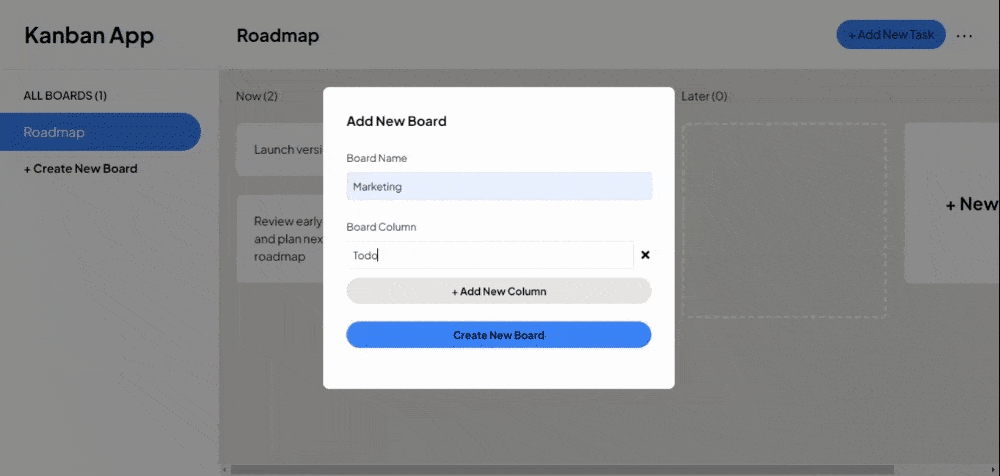
How to add and edit a board
Once we've completed the UI implementation, the modal for adding a new board should resemble the following:

Similarly, for editing a board:
If you look at the images above, you can see that both modals share a striking resemblance, differing only in their titles.
This presents an excellent opportunity to implement the DRY (Don't Repeat Yourself) concept in programming. In a few steps, we'll explore how to leverage a single modal to fulfill both purposes.
First, we'll use the react-modal library to create a custom modal component. This allows us to avoid building from scratch.
To begin, install the react-modal library by running the following command:
npm i react-modal
Then create a Modal.tsx file in the app/components directory and add the provided code. This code defines a custom modal component with styling.
import ReactModal from "react-modal";

interface ModalProps {
  children?: React.ReactNode;
  isOpen: boolean;
  onRequestClose: () => void;
}

ReactModal.setAppElement("*");

export function Modal({ children, isOpen, onRequestClose }: ModalProps) {
  const modalStyle = {
    overlay: {
      zIndex: "900000",
      backgroundColor: "rgba(0,0,0,0.45)",
      display: "flex",
      justifyContent: "center",
      alignItems: "center",
    },
    content: {
      top: "50%",
      left: "50%",
      right: "auto",
      bottom: "auto",
      marginRight: "-50%",
      transform: "translate(-50%, -50%)",
      padding: "0px",
      borderRadius: ".5rem",
      width: "auto",
      backgroundColor:  "#fff",
      border: "none",
    },
  };

  return (
    <ReactModal
      onRequestClose={onRequestClose}
      isOpen={isOpen}
      style={modalStyle}
    >
      {children}
    </ReactModal>
  );
}

interface ModalBody {
  children: React.ReactNode;
}

export function ModalBody({ children }: ModalBody) {
  return <form className="w-[21.4rem] md:w-[30rem] p-8">{children}</form>;
}
In this code, we have implemented and styled the overlay and body (content) of the modal.
Now, create a folder named AddAndEditBoardModal.tsx and paste the provided code into it as a placeholder. Don't worry about the red squiggly lines you get in your code editor for now – we'll address them in a bit.
   import { Modal, ModalBody } from "./Modal";

   export default function AddAndEditBoardModal() {

    return (
      <Modal isOpen onRequestClose>
        <ModalBody>
         <p>Add and Edit Board Modal</p>
        </ModalBody>
      </Modal>
    );
   }
In this code, we imported our custom modal component, and we've wrapped it around a placeholder text.
Next, render the newly created modal component in the app/page.tsx component:
   // rest of imports here
   import AddAndEditBoardModal from "./components/AddAndEditBoardModal";
   // rest of the code here
   export default function Home() {
   return (
    <main className="flex h-full">
      <Sidebar />
      <BoardTasks />
      {/* render modal component here */}
      <AddAndEditBoardModal />
    </main>
   );
   }
In this step, we've created a placeholder for the AddAndEditBoardModal component and rendered it in the Page.tsx component.
Next, we'll implement the functions to trigger the modal and manage the open and close state in the redux store to maintain clean code and avoid prop drilling.
Navigate to your redux/features/appSlice.ts file and update it with the code below:
   import { createSlice, PayloadAction } from "@reduxjs/toolkit";
   import { RootState } from "../store";

   const initialState = {
   currentBoardName: "",
   // Manage the state for opening and closing the Add and Edit Board modal
   isAddAndEditBoardModal: { isOpen: false, variant: "" },
   };

   export const features = createSlice({
    name: "features",
    initialState,

    reducers: {
     setCurrentBoardName: (state, action: PayloadAction<string>) => {
      state.currentBoardName = action.payload;
    },
    // Open the Add and Edit Board modal with a specified variant (add or edit)
    openAddAndEditBoardModal: (state, { payload }) => {
      state.isAddAndEditBoardModal.isOpen = true;
      // Set the kind of modal to open (add board or edit board) based on the variant parameter
      state.isAddAndEditBoardModal.variant = payload;
    },
    // Close the Add and Edit Board modal
    closeAddAndEditBoardModal: (state) => {
      state.isAddAndEditBoardModal.isOpen = false;
      state.isAddAndEditBoardModal.variant = "";
    },
   },
   });
   export const {
   setCurrentBoardName,
   openAddAndEditBoardModal,
   closeAddAndEditBoardModal,
   } = features.actions;
   export const getCurrentBoardName = (state: RootState) => state.features.currentBoardName;
   // Selector functions to retrieve isOpen value of state from the isAddAndRditBoardModal state
   export const getAddAndEditBoardModalValue = (state: RootState) => state.features.isAddAndEditBoardModal.isOpen;
   // Selector functions to retrieve isOpen value of state from the isAddAndRditBoardModal state
   export const getAddAndEditBoardModalVariantValue = (state: RootState) => state.features.isAddAndEditBoardModal.variant;
   // Export the reducer for use in the Redux store
   export default features.reducer;
Then, navigate back to the AddAndEditBoardModal.tsx component and update it as seen below:
   import { Modal, ModalBody } from "./Modal";
   import { useAppSelector, useAppDispatch } from "@/components/redux/hooks";
   //import needed functions from the appSlice
   import {
   getAddAndEditBoardModalValue,
   getAddAndEditBoardModalVariantValue,
   closeAddAndEditBoardModal,
   } from "@/components/redux/features/appSlice";

   export default function AddAndEditBoardModal() {
   // get the variant of the modal
   const modalVariant = useAppSelector(getAddAndEditBoardModalVariantValue);
   const dispatch = useAppDispatch();
   // opens that modal is isOpen evaluates to true
   const isOpen = useAppSelector(getAddAndEditBoardModalValue);
   // close the modal
   const closeModal = () => dispatch(closeAddAndEditBoardModal());

   return (
    <Modal isOpen={isOpen} onRequestClose={closeModal}>
      <ModalBody>
        {/* display the variant(title) of the modal */}
        <p>{modalVariant}</p>
      </ModalBody>
    </Modal>
   );
   }
Following these updates, we can safely implement the trigger for the add and edit board modal.
Next, navigate to the Sidebar component and update the button with the "+ Create new board" text so it opens the "Add Board" modal when clicked:
   // add this to the imports
   import { openAddAndEditBoardModal } from "@/components/redux/features/appSlice";

   export default function Sidebar() {
    // rest of code here
   return (
     <aside className="w-[18.75rem] flex-none dark:bg-dark-grey h-full py-6 pr-6">
       {/* rest of code here */}
       {/* trigger the create new board modal */}
       <button
         onClick={() => dispatch(openAddAndEditBoardModal("Add New Board"))}
         className="flex items-center space-x-2 pl-[2.12rem] py-3"
       >
         <p className="text-base font-bold capitalize text-main-purple">
           + Create New Board
         </p>
       </button>
     </aside>
   );
   }
Now, upon clicking the "+ Create new board" button in the sidebar, the modal containing the "Add new board" text should appear. You should also be able to close it by clicking on the overlay:

Next, we'll implement the trigger for the edit board modal.
Navigate to the app/components/Dropdown.tsx component and update the "Edit board" button as follows:
   import { useAppDispatch } from '@/components/redux/hooks'
   import { openAddAndEditBoardModal } from '@/components/redux/features/appSlice';

   interface IDropdown {
    show: boolean
   }

   export default function Dropdown({ show }: IDropdown) {

    const dispatch = useAppDispatch()

    return (
      <div
        className={`${
          show ? "block" : "hidden"
        } w-48 absolute top-full bg-white
         border shadow-lg right-0 py-2 rounded-2xl`}
      >
        <div className="hover:bg-gray-300">
        {/* trigger Edit Board modal here */}
          <button
           onClick={() => dispatch(openAddAndEditBoardModal('Edit Board'))}
           className="text-sm px-4 py-2">Edit Board</button>
        </div>
        <div className="hover:bg-gray-300">
          <button className="text-sm px-4 py-2">
            Delete Board
          </button>
        </div>
      </div>
    );
   }
After making this update, clicking on the "Edit board" button in the dropdown will open the edit board modal, as illustrated in the GIF below:
The option to add a new column to the BoardTasks component should also open this modal when clicked. So navigate to the BoardTasks component and import the openAddEditBoardModal function and useAppDispatch hook from appSlice and redux hooks, respectively.
Then declare the dispatch function in the component with this statement: const dispatch = useAppDispatch()
Finally, update the "+New Column" div element to open the "Edit board" modal when clicked:
   // rest of the code
    <div
    onClick={() => dispatch(openAddAndEditBoardModal("Edit Board"))
    className="rounded-md bg-white w-[17.5rem] mt-12 shrink-0 flex justify-center items-center">
   <p className="cursor-pointer font-bold text-black text-2xl">  + New Column </p>
   </div>
   //rest of the code
After these updates, the "Edit board" modal should open up when the "+New Column" card is clicked:

In the upcoming steps, we'll construct the complete markup and functionalities for our modal.
Referring to the images of both modals presented at the start of this section, in the "Add New Board" modal, the fields for board and column names should be blank. In contrast, the "Edit Board" modal should display the existing name and columns of the board and should be editable.
The "+ Add New Column" button in both modals allows the addition of more fields to the board's columns, and subsequently, the updated data is sent to the database.
Keep in mind that, given the frontend-centric nature of this project, a significant portion of the business logic will be handled on the front-end. However, don’t worry; we will take this snippet by snippet until we completely implement all features.
To begin, update the AddAndEditBoardModal component by pasting the code below:
import { useState, useEffect } from "react";
import { Modal, ModalBody } from "./Modal";
import { useAppSelector, useAppDispatch } from "@/components/redux/hooks";
//import needed functions from the appSlice
import {
  getAddAndEditBoardModalValue,
  getAddAndEditBoardModalVariantValue,
  closeAddAndEditBoardModal,
  getCurrentBoardName,
} from "@/components/redux/features/appSlice";
import {
  useFetchDataFromDbQuery,
  useUpdateBoardToDbMutation,
} from "@/components/redux/services/apiSlice";
import { FaTimes } from "react-icons/fa";
import { id } from '../utils/data'
// define types for boarddata
interface IBoardData {
  id: string,
  name: string;
  columns: {
    id: string;
    name: string;
    columns?: { name: string; tasks?: { [key: string]: any }[] };
  }[];
}
// dummy add board data for the "Add board" modal
let addBoardData = {
  id: id(),
  name: "",
  columns: [
    {
      id: id(),
      name: "",
      tasks:
 [],
    },
  ],};

export default function AddAndEditBoardModal() {
// rest of the code
}
Here, we have made the necessary imports and defined a type for board data - which we will use when populating the modal. We also implemented dummy data for the add board modal. We will see how this will be of use in a bit.
Next, go to the AddAndEditBoardModal function and paste the following code into it to declare variables and state values. The comments explain the future use of each of the declarations.
 //manage the board data state
  const [boardData, setBoardData] = useState<IBoardData>();
  // check if the board name field is empty
  const [isBoardNameEmpty, setIsBoardNameEmpty] = useState<boolean>(false);
  // will be used to check if any of the board column field is empty
  const [emptyColumnIndex, setEmptyColumnIndex] = useState<number>();

  // get the variant of the modal
  const modalVariant = useAppSelector(getAddAndEditBoardModalVariantValue);
  // check the type of the open modal, whether Add new board, or Edit board
  const isVariantAdd = modalVariant === "Add New Board";
  const dispatch = useAppDispatch();
  // opens that modal if isOpen evaluates to true
  const isOpen = useAppSelector(getAddAndEditBoardModalValue);
  const currentBoardTitle = useAppSelector(getCurrentBoardName);
  // close the modal
  const closeModal = () => dispatch(closeAddAndEditBoardModal());
  // Fetch data from the database to populate the edit board modal
  let { data } = useFetchDataFromDbQuery();
  // Mutation hook for updating the board in the database
  const [updateBoardToDb, { isLoading }] = useUpdateBoardToDbMutation();
Here, we’ll implement the functions that will be responsible for the modal’s functionality. Paste the following code just below the declarations above:
  // Effect to set initial data for the modal based on the variant
  useEffect(() => {
    if (data) {

      if (isVariantAdd) {
        setBoardData(addBoardData);
      } else {
        const activeBoard = data[0].boards.find(
          (board: { name: string }) => board.name === currentBoardTitle
        );
        setBoardData(activeBoard);
      }
    }
  }, [data, modalVariant]);

  // Effect to clear error messages after a certain time
  useEffect(() => {
    const timeoutId = setTimeout(() => {
      setIsBoardNameEmpty(false);
      setEmptyColumnIndex(undefined);
    }, 3000);
    return () => clearTimeout(timeoutId);
  }, [emptyColumnIndex, isBoardNameEmpty]);

  // Handler for board name change
  const handleBoardNameChange = (e: React.ChangeEvent<HTMLInputElement>) => {
    if (boardData) {
      const newName = { ...boardData, name: e.target.value };
      setBoardData(newName);
    }
  };

  // Handler for column name change. These kind of functions are called closures

  const handleColumnNameChange = (index: number) => {
    return function (e: React.ChangeEvent<HTMLInputElement>) {
      // handle change for create new board modal
      if (boardData) {
        const modifyColumns = boardData.columns.map((column, columnIndex) => {
          if (columnIndex === index) {
            return { ...column, name: e.target.value };
          }
          return column;
        });
        const modifiedColumn = { ...boardData, columns: modifyColumns };
        setBoardData(modifiedColumn);
      }
    };
  };

  // Handler for adding a new column to the form
  const handleAddNewColumn = () => {
    // max columns we want to have in a board is 7
    if (boardData && boardData.columns.length < 6) {
      // Make a copy of the existing boardData
      const updatedBoardData = { ...boardData };
      // Create a new column object
      const newColumn = { id: id(), name: "", tasks: [] };
      // Push the new column to the columns array in the copy
      updatedBoardData.columns = [...updatedBoardData.columns, newColumn];
      // Update the state with the modified copy
      setBoardData(updatedBoardData);
    }
  };

  // Handler for deleting a column in the form
  const handleDeleteColumn = (index: number) => {
    if (boardData) {
      const filteredColumns = boardData.columns.filter(
        (_column, columnIndex) => columnIndex !== index
      );
      setBoardData({ ...boardData, columns: filteredColumns });
    }
  };

  // Handler for adding a new board to the database
  const handleAddNewBoardToDb = (e: React.FormEvent<HTMLButtonElement>) => {
    e.preventDefault();

    // check if any of the column names are empty before submiting
    const emptyColumnStringChecker = boardData?.columns.some(
      (column) => column.name === ""
    );

    //condition to run if the board name is empty
    if (boardData?.name === "") {
      setIsBoardNameEmpty(true);
    }

    //if any of the column names is empty, update the emptyColumnIndex with its index
    if (emptyColumnStringChecker) {
      const emptyColumn = boardData?.columns.findIndex(
        (column) => column.name == ""
      );
      setEmptyColumnIndex(emptyColumn);
    }

    if (boardData?.name !== "" && !emptyColumnStringChecker) {
      //submit to the database after verifying that the board name and none of the column names aren't empty
      if (data) {
        let [boards] = data;
        const addBoard = [...boards.boards, boardData];
        boards = addBoard;
        updateBoardToDb(boards);
      }
    }
  };

  // Handler for editing a board in the database
  const handleEditBoardToDb = (e: React.FormEvent<HTMLButtonElement>) => {
    e.preventDefault();
    const emptyColumnStringChecker = boardData?.columns.some(
      (column) => column.name === ""
    );
    //condition to run if the board name is empty
    if (boardData?.name === "") {
      setIsBoardNameEmpty(true);
    }
    //if any of the column names is empty, update the emptyColumnIndex with its index
    if (emptyColumnStringChecker) {
      const emptyColumn = boardData?.columns.findIndex(
        (column) => column.name == ""
      );
      setEmptyColumnIndex(emptyColumn);
    }
    //submit to the database after verifying that the board name and none of the column names aren't empty
    if (boardData?.name !== "" && !emptyColumnStringChecker) {
      if (data) {
        const [boards] = data;
        const boardsCopy = [...boards.boards];
        const activeBoardIndex = boardsCopy.findIndex(
          (board: { name: string }) => board.name === currentBoardTitle
        );
        const updatedBoard = {
          ...boards.boards[activeBoardIndex],
          name: boardData!.name,
          columns: boardData!.columns,
        } ;
        boardsCopy[activeBoardIndex] = updatedBoard;
        updateBoardToDb(boardsCopy);
      }
    }
  };
Finally, update the return statement of the component by pasting the below code snippet into it:
return (
    <Modal isOpen={isOpen} onRequestClose={closeModal}>
      <ModalBody>
        {boardData && (
          <>
            {/* display the variant(title) of the modal */}
            <p className="text-lg font-bold">{modalVariant}</p>
            <div className="py-6">
              <div>
                <label htmlFor="boardName" className="text-sm">
                  Board Name
                </label>
                <div className="pt-2">
                  <input
                    id="boardName"
                    className={`${
                      isBoardNameEmpty ? "border-red-500" : "border-stone-200"
                    } border w-full p-2 rounded text-sm cursor-pointer focus:outline-none`}
                    placeholder="Name"
                    value={boardData.name}
                    onChange={handleBoardNameChange}
                  />
                </div>
                {/* display this error if the board name is empty */}
                {isBoardNameEmpty ? (
                  <p className="text-xs text-red-500">
                    Board name cannot be empty
                  </p>
                ) : (
                  ""
                )}
              </div>

              <div className="mt-6">
                <label htmlFor="" className="text-sm">
                  Board Column
                </label>
                {boardData &&
                  boardData.columns.map(
                    (column: { name: string, id: string }, index: number) => {
                      let { name, id } = column;
                      return (
                        <div key={id} className="pt-2">
                          <div className="flex items-center space-x-2">
                            <input
                              className={`${
                                emptyColumnIndex === index
                                  ? "border-red-500"
                                  : "border-stone-200"
                              } border border-stone-200 focus:outline-none text-sm cursor-pointer w-full p-2 rounded`}
                              placeholder="e.g Doing"
                              onChange={(e) => handleColumnNameChange(index)(e)}
                              value={name!}
                            />
                            <div>
                              <FaTimes
                                onClick={() => handleDeleteColumn(index)}
                              />
                            </div>
                          </div>
                          {/* display this error if the board name is empty */}
                          {emptyColumnIndex === index ? (
                            <p className="text-xs text-red-500">
                              Column name cannot be empty
                            </p>
                          ) : (
                            ""
                          )}
                        </div>
                      );
                    }
                  )}
                <div className="mt-3">
                  <button
                    type="button"
                    onClick={handleAddNewColumn}
                    className="bg-stone-200 rounded-3xl py-2 w-full text-sm font-bold"
                  >
                    <p>+ Add New Column</p>
                  </button>
                </div>
              </div>
              <div className="pt-6">
                <button
                  type="submit"
                  onClick={(e: React.FormEvent<HTMLButtonElement>) => {
                    // function to run depending on the variant of the modals
                    isVariantAdd
                      ? handleAddNewBoardToDb(e)
                      : handleEditBoardToDb(e);
                  }}
                  className="bg-blue-500 rounded-3xl py-2 w-full text-sm font-bold"
                >
                  {/* text to display depending on the variant of the modal */}
                  <p>
                    {isLoading
                      ? "Loading"
                      : `${isVariantAdd ? "Create New Board" : "Save Changes"}`}
                  </p>
                </button>
              </div>
            </div>
          </>
        )}
      </ModalBody>
    </Modal>
  );
In the above GIF, we introduced a "Marketing" board with "Todo" and "Doing" columns to our app. You can also see the real-time update of the boards in the sidebar.
Likewise, you can perform edits on a board:

Here, a new column, "After," was added to the "Roadmap" board.
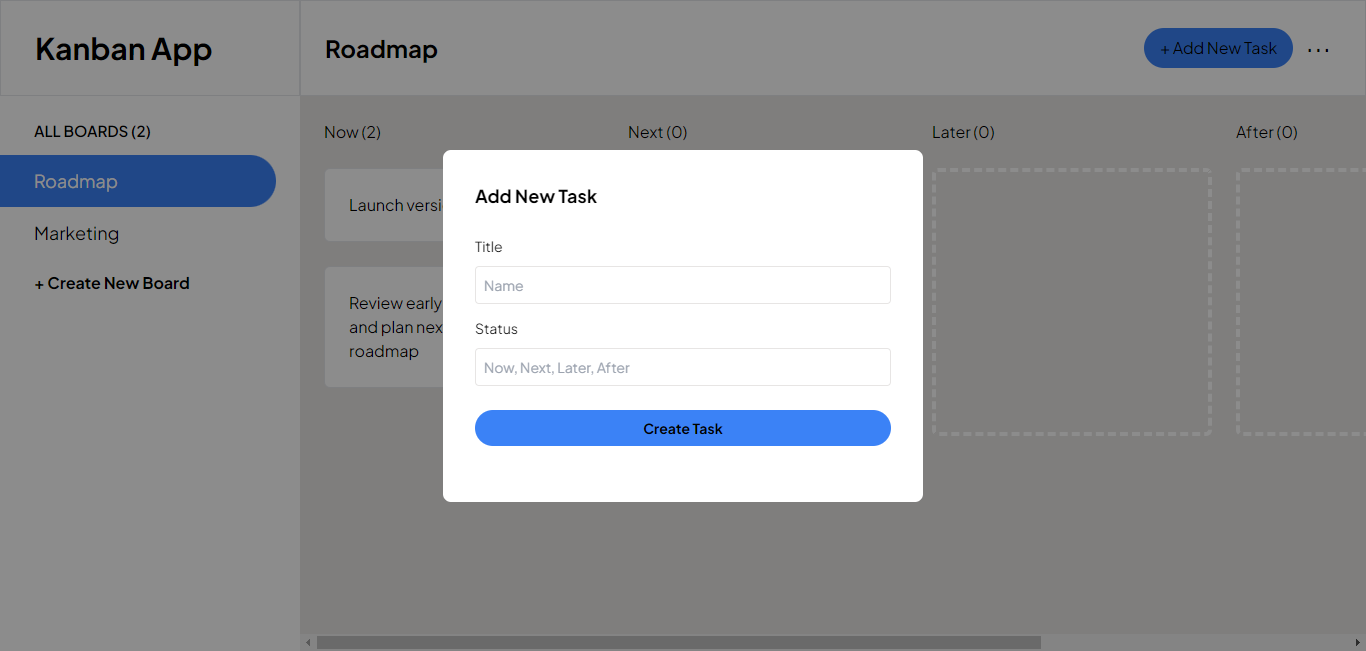
In the upcoming section, we will implement the "Add new task" and "Edit task" functionalities.
How to add and edit tasks
Once you've completed this section, the "Add New Task" modal should resemble the following:
Similarly, for the "Edit Task" modal:
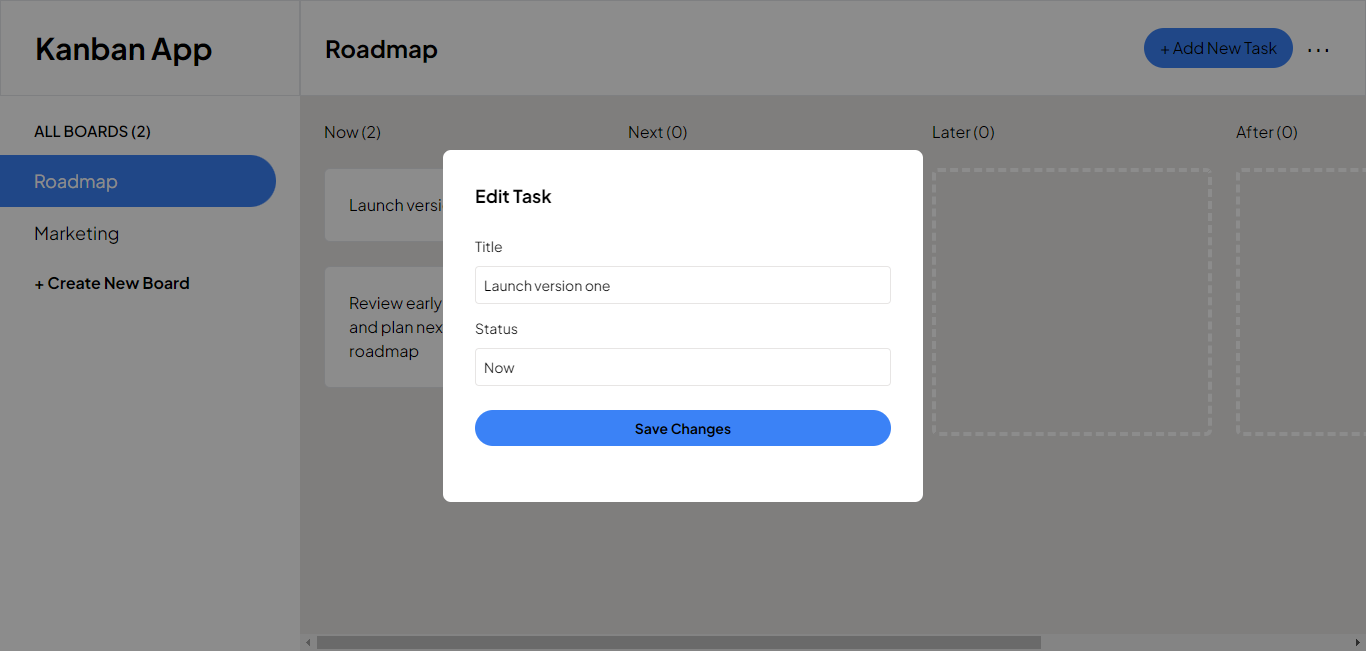
You'll see that these modals share similarities, so we will implement them using the same approach employed in the previous section.
We'll start by updating the initialState object in our appSlice to manage the state of the "Add and Edit tasks" modal.
   const initialState = {
   //add and edit tasks modal state
   isAddAndEditTaskModal: { isOpen: false, variant: "", title: "", index: -1, name: ""},
   };
The keys title and index will respectively store the title and index of the task being edited, while the name key will retrieve the name of the task's column. We'll explore how to utilize this information to edit a task in the upcoming steps.
Next, include the following functions in the reducers object. These will be the functions that will be called to open and close the modal:
    // Open the Add and Edit task modal with a specified variant (add or edit), title, description, status
    openAddAndEditTaskModal: (state, { payload }) => {
      state.isAddAndEditTaskModal.isOpen = true;
      state.isAddAndEditTaskModal.variant = payload.variant;
      state.isAddAndEditTaskModal.title = payload.title;
      state.isAddAndEditTaskModal.index = payload.index;
     state.isAddAndEditTaskModal.name = payload.name;
    },
    // Close the Add and Edit task modal
    closeAddAndEditTaskModal: (state) => {
      state.isAddAndEditTaskModal.isOpen = false;
      state.isAddAndEditTaskModal.variant = "";
      state.isAddAndEditTaskModal.title = "";
      state.isAddAndEditTaskModal.index = "";
      state.isAddAndEditTaskModal.name = "";
    },
Lastly, include the newly implemented functions and the selector functions in the exports:
   export const {
   openAddAndEditTaskModal,
   closeAddAndEditTaskModal,
   //rest of the imports
   } = features.actions;

   // Selector function to retrieve isOpen state value
   export const getAddAndEditTaskModalValue = (state: RootState) => state.features.isAddAndEditTaskModal.isOpen;
   // Selector function to retrieve variant state value
   export const getAddAndEditTaskModalVariantValue = (state: RootState) => state.features.isAddAndEditTaskModal.variant;
   // Selector function to retrieve title state value
   export const getAddAndEditTaskModalTitleValue = (state: RootState) => state.features.isAddAndEditTaskModal.title;
   // Selector function to retrieve index state value
   export const getAddAndEditTaskModalIndexValue = (state: RootState) => state.features.isAddAndEditTaskModal.index;
   // Selector function to retrieve name state value
   export const getAddAndEditTaskModalNameValue = (state: RootState) => state.features.isAddAndEditTaskModal.name;
   //rest of the imports
Now, we'll implement the onClick functions that enable users to interact with the modal and perform task-related actions. These functions will allow users to open the "Add new task" modal from the navbar and the "Edit task" modal by clicking the edit icon within individual task cards.
In the components/Navbar, include the openAddAndEditTaskModal among the imported functions from the appSlice:
import { setCurrentBoardName, getCurrentBoardName, openAddAndEditTaskModal } from '../../redux/features/appSlice'
Then, modify the "+Add new task" button to incorporate an onClick function that triggers the "Add new task" modal:
    <button
     type='button'
     onClick={() => dispatch(openAddAndEditTaskModal({variant: 'Add New Task'}))}
     className="bg-blue-500 text-black px-4 py-2 flex rounded-3xl items-center space-x-2">
         <p>+ Add New Task</p>
    </button>
Next, navigate to the BoardTasks component, where we will also implement the trigger for the "Edit task" modal.
Here, include the openAddAndEditTaskModal function among the imported functions from the appSlice:
import { openAddAndEditBoardModal, openAddAndEditTaskModal } from "@/components/redux/features/appSlice";
Then, update the <MdEdit/> React icon to incorporate the onClick function that triggers the "Edit Task" modal:
    <MdEdit
    onClick={() =>
    dispatch(
      openAddAndEditTaskModal({
        variant: "Edit Task", title, index, name
      }),
    )
   }
   className="text-lg cursor-pointer"
   />;
Next, we'll create the Add and Edit Board modal component, also integrating its functionalities.
As depicted in the modal images presented at the start of this section, within the "Add New Task" modal, the title field is intended for the task's title a user wishes to add, and the status field should exclusively contain the accurate names of the columns. Any attempt to input a column name that doesn't exist will result in an error.
In the "Edit Task" modal, the title and status fields will display the current title and status of a task. Altering the title will update the task's title while modifying the status will relocate it to the desired column.
To begin, within your src/app/components directory, create a file named AddAndEditTaskModal.tsx, and firstly, insert the provided code to make the necessary imports, type definitions, and initial data for the add task modal:
 "use client";

import { useEffect, useState } from "react";
import { Modal, ModalBody } from "./Modal";
import { useAppDispatch, useAppSelector } from "@/components/redux/hooks";
import {
  getAddAndEditTaskModalValue,
  getAddAndEditTaskModalVariantValue,
  getAddAndEditTaskModalTitle,
  closeAddAndEditTaskModal,
  getCurrentBoardName,
  getAddAndEditTaskModalIndex,
  getAddAndEditTaskModalName,
} from "@/components/redux/features/appSlice";
import {
  useFetchDataFromDbQuery,
  useUpdateBoardToDbMutation,
} from "@/components/redux/services/apiSlice";
import { id } from '../utils/data'

interface ITaskData {
  id: string,
  title: string;
  status: string;
}
// initial task data for the add task modal
let initialTaskData: ITaskData = {
  id: id(),
  title: "",
  status: "",
};

export default function AddOrEditTaskModal() {
//variable declarations, functions, JSX
}
Next, go to the AddAndEditTaskModal function and paste the following code into it to declare variables and state values. The comments provided explain the future use of each of the declarations.
  let { data } = useFetchDataFromDbQuery();
  let [updateBoardToDb, { isLoading }] = useUpdateBoardToDbMutation();
  const [taskData, setTaskData] = useState<ITaskData>();
  const [isTaskTitleEmpty, setIsTaskTitleEmpty] = useState<boolean>();
  const [isTaskStatusEmpty, setIsTaskStatusEmpty] = useState<boolean>();
  const [statusExists, setStatusExists] = useState<boolean>(true);
  const [columnNames, setColumnNames] = useState<[]>();
  const dispatch = useAppDispatch();
  const isModalOpen = useAppSelector(getAddAndEditTaskModalValue);
  const modalVariant = useAppSelector(getAddAndEditTaskModalVariantValue);
  const isVariantAdd = modalVariant === "Add New Task";
  const closeModal = () => dispatch(closeAddAndEditTaskModal());
  const currentBoardTitle = useAppSelector(getCurrentBoardName);
  // get task title, index and name from redux store
  const currentTaskTitle = useAppSelector(getAddAndEditTaskModalTitle);
  const currentTaskIndex = useAppSelector(getAddAndEditTaskModalIndex);
  const initialTaskColumn = useAppSelector(getAddAndEditTaskModalName);
Here, we’ll implement functions responsible for the modal functionality. Just below the variable definitions above, paste the following functions:
  // Effect to set initial data for the modal based on the variant
  useEffect(() => {
    if (data) {
      const activeBoard = data[0].boards.find(
        (board: { name: string }) => board.name === currentBoardTitle
      );
      if (activeBoard) {
        const { columns } = activeBoard;
        const columnNames = columns.map(
          (column: { name: string }) => column.name
        );

        if (columnNames) {
          setColumnNames(columnNames);
        }

        if (isVariantAdd) {
          setTaskData(initialTaskData);
        }

        else {
          const activeTask = columns
            .map((column: { tasks: [] }) => column.tasks)
            .flat()
            .find((task: { title: string }) => task.title === currentTaskTitle);
          setTaskData(activeTask);
        }
      }
    }
  }, [data, modalVariant]);

  // Effect to clear error messages after a certain time
  useEffect(() => {
    const timeoutId = setTimeout(() => {
      setIsTaskStatusEmpty(false);
      setIsTaskStatusEmpty(false);
      setStatusExists(true);
    }, 3000);
    return () => clearTimeout(timeoutId);
  }, [isTaskStatusEmpty, isTaskTitleEmpty, statusExists]);

  // Handler for task title change
  const handleTaskTitleChange = (e: React.ChangeEvent<HTMLInputElement>) => {
    if (taskData) {
      const newTitle = { ...taskData, title: e.target.value };
      setTaskData(newTitle);
    }
  };

  // Handler for task status change
  const handleTaskStatusChange = (e: React.ChangeEvent<HTMLInputElement>) => {
    if (taskData) {
      const newTitle = { ...taskData, status: e.target.value };
      setTaskData(newTitle);
    }
  };

  // Handler to add new task to the db
  const handleAddNewTaskToDb = (e: React.FormEvent<HTMLButtonElement>) => {

    e.preventDefault();
    const { title, status } = taskData!;

    if (!title) {
      setIsTaskTitleEmpty(true);
    }

    if (!status) {
      setIsTaskStatusEmpty(true);
    }

    // check if the status input exists among the existing columns
    const doesStatusExists = columnNames?.some(
      (column) => column === taskData?.status
    );

    if (!doesStatusExists) {
      setStatusExists(false);
    }

    // if all conditions are met
    if (title && status && doesStatusExists) {
      if (data) {
        const [boards] = data;
        const boardsCopy = [...boards.boards];
        const activeBoard = boardsCopy.find(
          (board: { name: string }) => board.name === currentBoardTitle
        );
        const activeBoardIndex = boardsCopy.findIndex(
          (board: { name: string }) => board.name === currentBoardTitle
        );
        const { columns } = activeBoard;
        // find the column in the board to update
        const getStatusColumn = columns?.find(
          (column: { name: string }) => column.name === status
        );
        const getStatusColumnIndex = columns?.findIndex(
          (column: { name: string }) => column.name === status
        );
        // desctructure tasks in a column. "Now" for example.
        const { tasks } = getStatusColumn;
        const addNewTask = [...tasks, { id: id(), title, status }]; //add new task
        const updatedStatusColumn = { ...getStatusColumn, tasks: addNewTask };
        //update the columns in a board
        const columnsCopy = [...columns];
        columnsCopy[getStatusColumnIndex] = updatedStatusColumn;
        const updatedBoard = {
          ...boards.boards[activeBoardIndex],
          columns: columnsCopy,
        };
        //update the board in the db
        boardsCopy[activeBoardIndex] = updatedBoard;
        updateBoardToDb(boardsCopy);
      }
    }
  };

  const handleEditTaskToDb = (e: React.FormEvent<HTMLButtonElement>) => {
    e.preventDefault();
    const { title, status } = taskData!;
    if (!title) {
      setIsTaskTitleEmpty(true);
    }
    if (!status) {
      setIsTaskStatusEmpty(true);
    }
    // check if the status input exists among the existing status
    const doesStatusExists = columnNames?.some(
      (column) => column === taskData?.status
    );
    if (!doesStatusExists) {
      setStatusExists(false);
    }
    if (title && status && doesStatusExists) {
      if (data) {
        const [boards] = data;
        const boardsCopy = [...boards.boards];
        const activeBoard = boardsCopy.find(
          (board: { name: string }) => board.name === currentBoardTitle
        );
        const activeBoardIndex = boardsCopy.findIndex(
          (board: { name: string }) => board.name === currentBoardTitle
        );
        const { columns } = activeBoard;
        const getStatusColumnIndex = columns?.findIndex(
          (column: { name: string }) => column.name === status
        );

        // Check if the task status to edit is equal to the column.name
        if (status === initialTaskColumn) {
          const updatedStatusColumn = {
            ...columns[getStatusColumnIndex],
            tasks: columns[getStatusColumnIndex]?.tasks?.map(
              (task: any, index: number) => {
                if (index === currentTaskIndex) {
                  return { title, status };
                }
                return task;
              }
            ),
          };
          const columnsCopy = [...columns];
          columnsCopy[getStatusColumnIndex] = updatedStatusColumn;
          const updatedBoard = {
            ...boards.boards[activeBoardIndex],
            columns: columnsCopy,
          };
          //update the board in the db
          boardsCopy[activeBoardIndex] = updatedBoard;
          updateBoardToDb(boardsCopy);
        } else {
          // Find the column with the name in the task status and append the edited task
          const getStatusColumn = columns?.find(
            (column: { name: string }) => column.name === status
          );
          // delete task from previous column
          const getPrevStatusColumn = columns?.find(
            (column: { name: string }) => column.name === initialTaskColumn
          );
          const getPrevStatusColumnIndex = columns?.findIndex(
            (column: { name: string }) => column.name === initialTaskColumn
          );
          //update the previous column of the task
          const updatedPrevStatusColumn = {
            ...getPrevStatusColumn,
            tasks: getPrevStatusColumn?.tasks.filter(
              (_task: [], index: number) => index !== currentTaskIndex
            ),
          };
          // update the new column of the task
          const updatedStatusColumn = {
            ...getStatusColumn,
            tasks: [...getStatusColumn?.tasks, { title, status }],
          };
          const columnsCopy = [...columns];
          columnsCopy[getStatusColumnIndex] = updatedStatusColumn;
          columnsCopy[getPrevStatusColumnIndex] = updatedPrevStatusColumn;
          const updatedBoard = {
            ...boards.boards[activeBoardIndex],
            columns: columnsCopy,
          };
          //update the board in the db
          boardsCopy[activeBoardIndex] = updatedBoard;
          updateBoardToDb(boardsCopy);
        }
      }
    }
  };
Finally, in this component, paste the code below to implement the JSX of the modal:
return (
    <Modal isOpen={isModalOpen} onRequestClose={closeModal}>
      <ModalBody>
        <p className="font-bold text-lg">{modalVariant}</p>
        <div className="py-6">
          <div>
            <label htmlFor="title" className="text-sm">
              Title
            </label>
            <div className="pt-2">
              <input
                id="title"
                className={`${
                  isTaskTitleEmpty ? "border-red-500" : "border-stone-200"
                } border w-full p-2 rounded text-sm cursor-pointer focus:outline-none`}
                placeholder="Name"
                value={taskData?.title}
                onChange={handleTaskTitleChange}
              />
            </div>
            {isTaskTitleEmpty ? (
              <p className="text-xs text-red-500">Task title cannot be empty</p>
            ) : (
              ""
            )}
          </div>

          <div className="mt-3">
            <label htmlFor="status" className="text-sm">
              Status
            </label>
            <div className="pt-2">
              <input
                id="status"
                className={`${
                  isTaskStatusEmpty || !statusExists
                    ? "border-red-500"
                    : "border-stone-200"
                } border w-full p-2 rounded text-sm cursor-pointer focus:outline-none`}
                placeholder={columnNames?.join(", ")}
                value={taskData?.status}
                onChange={handleTaskStatusChange}
              />
            </div>
            {isTaskStatusEmpty ? (
              <p className="text-xs text-red-500">
                Task status cannot be empty
              </p>
            ) : !statusExists ? (
              <p className="text-xs text-red-500">Column does not exist</p>
            ) : (
              ""
            )}
          </div>
          <div className="pt-6">
            <button
              type="submit"
              onClick={(e: React.FormEvent<HTMLButtonElement>) => {
                // function to run depending on the variant of the modals
                isVariantAdd ? handleAddNewTaskToDb(e) : handleEditTaskToDb(e);
              }}
              className="bg-blue-500 rounded-3xl py-2 w-full text-sm font-bold"
            >
              <p>
                {isLoading
                  ? "Loading"
                  : `${isVariantAdd ? "Create Task" : "Save Changes"}`}
              </p>
            </button>
          </div>
        </div>
      </ModalBody>
    </Modal>
  );
Lastly, import and render the component in your src/app/page.tsx file as seen below:
   //rest of the imports
   import AddAndEditTaskModal from "./components/AddAndEditTaskModal";
     //rest of the code
     return (
    <main className="flex h-full">
      <Sidebar />
      <BoardTasks />
      <AddAndEditBoardModal />
      <AddAndEditTaskModal/>  //render here
    </main>
    );
With this functionality, you can effortlessly add tasks to any desired columns. For instance, let's add a new task titled "Buy tomatoes" to the "Next" column:
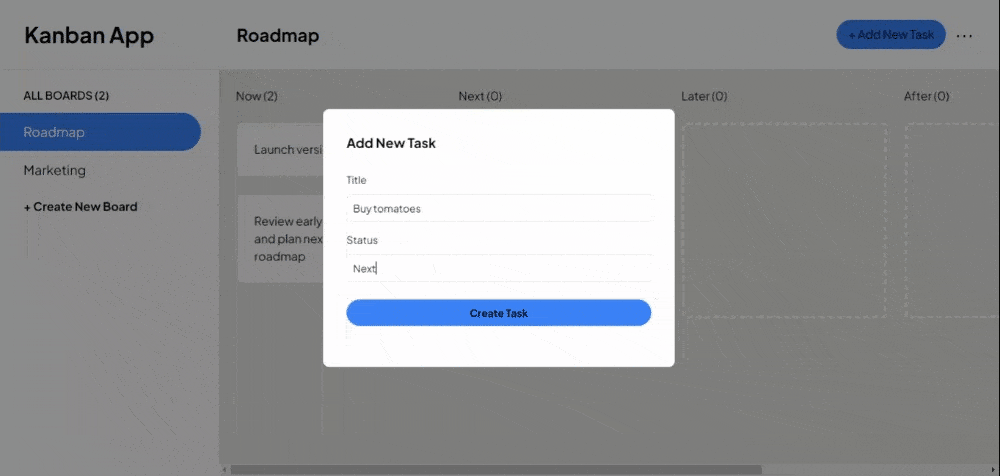
Likewise, we'll illustrate the task-editing feature by changing the column of "Launch version two" from "Now" to "Later":
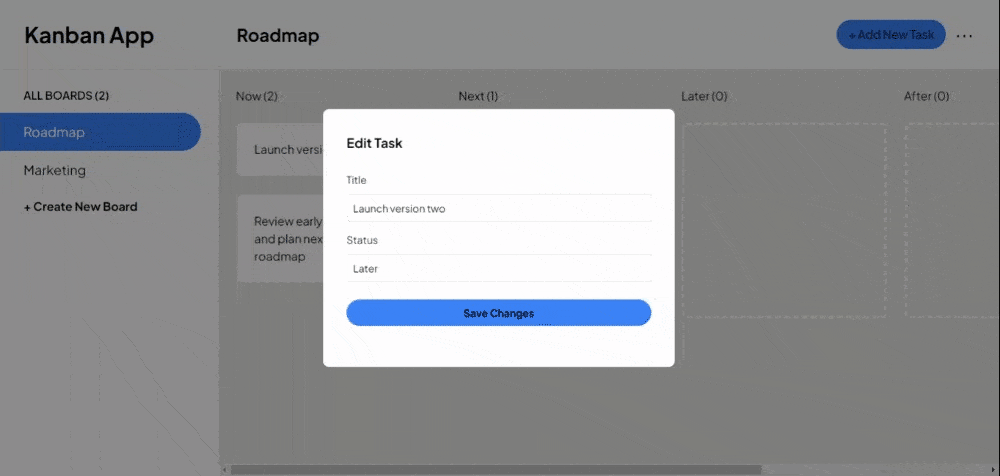
Finally, in the next section, we'll implement the delete functionalities for both boards and tasks.
How to delete boards and tasks
By the end of this section, the "Delete Board" modal should look like this:
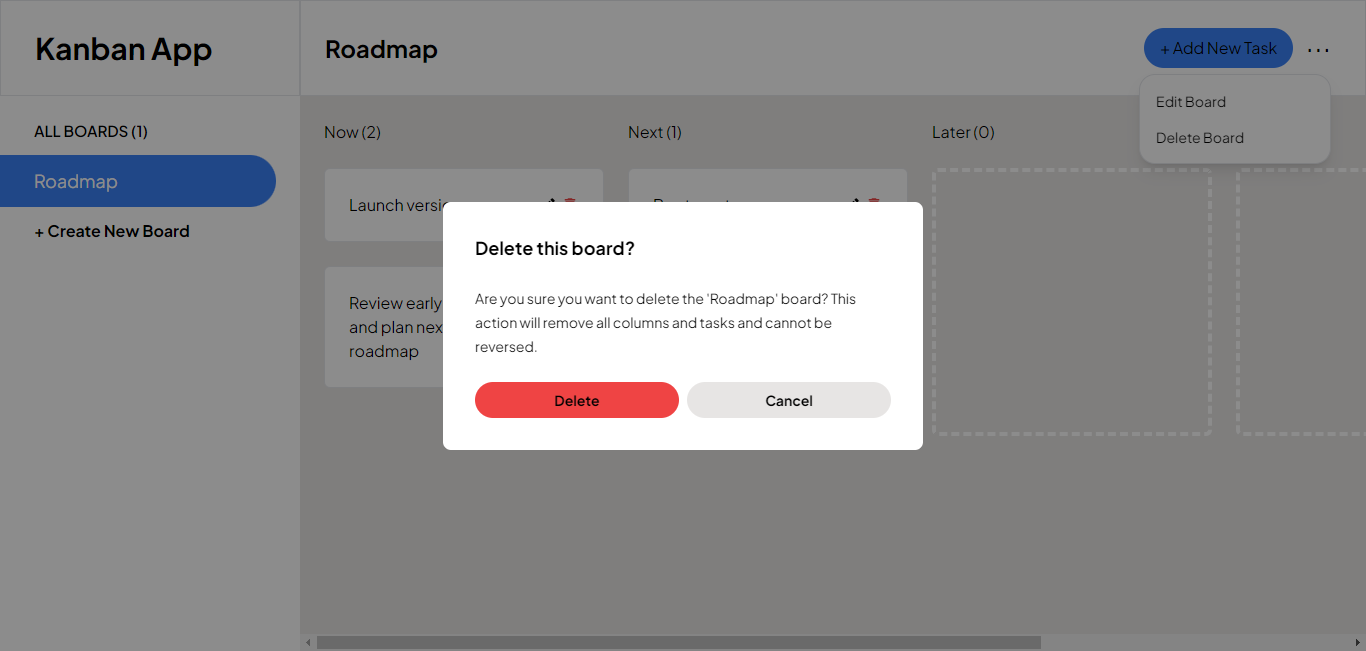
Likewise, the "Delete Task" modal:
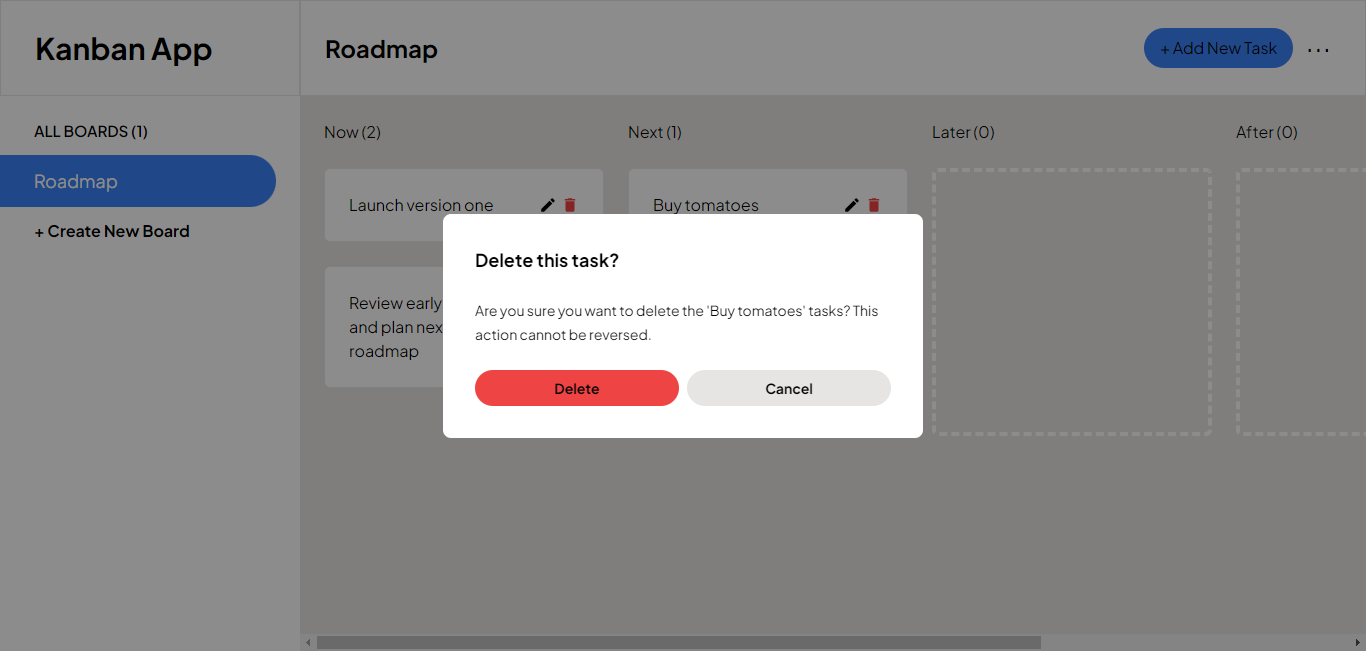
As you can see, these modals share similarities, so we will use the same methodology as we did for the previous modal implementations.
To begin, let's update the initialState object in our appSlice to manage the state of the "Delete Board and Tasks" modal. Integrate the isDeleteBoardAndTaskModal state into the initialState object as illustrated below:
    const initialState = {
      //rest of the state
      isDeleteBoardAndTaskModal: { isOpen: false, variant: "",  title:'', status: "", index: -1 },
Next, include the following functions in the reducers object. These functions will be invoked to open and close the modal:
    // Open the delete board and task modal with a specified variant (delete board or task)
   openDeleteBoardAndTaskModal: (state, { payload }) => {
      state.isDeleteBoardAndTaskModal.isOpen = true;
      state.isDeleteBoardAndTaskModal.variant = payload.variant;
      state.isDeleteBoardAndTaskModal.title = payload.title;
      state.isDeleteBoardAndTaskModal.status = payload.status;
      state.isDeleteBoardAndTaskModal.index = payload.index;
    },
   // Close the delete board and task modal
   closeDeleteBoardAndTaskModal: (state) => {
      state.isDeleteBoardAndTaskModal.isOpen = false;
      state.isDeleteBoardAndTaskModal.variant = "";
      state.isDeleteBoardAndTaskModal.title = "";
      state.isDeleteBoardAndTaskModal.status = "";
      state.isDeleteBoardAndTaskModal.index = -1;
    },
Lastly, include the newly implemented functions and the selector functions in the exports:
 export const {
    openDeleteBoardAndTaskModal,
    closeDeleteBoardAndTaskModal,
   } = features.actions;

   // Delete task and board
   export const getDeleteBoardAndTaskModalValue = (state: RootState) => state.features.isDeleteBoardAndTaskModal.isOpen;
   // Selector function to retrieve variant state value
   export const getDeleteBoardAndTaskModalVariantValue = (state: RootState) => state.features.isDeleteBoardAndTaskModal.variant;
   // Selector function to retrieve title state value
   export const getDeleteBoardAndTaskModalTitle = (state: RootState) => state.features.isDeleteBoardAndTaskModal.title;
   // Selector function to retrieve status state value
   export const getDeleteBoardAndTaskModalStatus = (state: RootState) => state.features.isDeleteBoardAndTaskModal.status;
   // Selector function to retrieve index state value
   export const getDeleteBoardAndTaskModalIndex = (state: RootState) => state.features.isDeleteBoardAndTaskModal.index;
Following that, we'll implement the onClick functions to enable users to interact with the modal and execute delete-related actions. These functions will permit users to open the "Delete board" modal from the dropdown in the navbar and the "Delete task" modal by clicking the delete icon within individual task cards.
In the components/Dropdown.tsx file, add the openDeleteBoardAndTaskModal function to the list of imported functions from the appSlice:
import { openDeleteBoardAndTaskModal } from '@/components/redux/features/appSlice';
Then adjust the "Delete board" button to incorporate the onClick function to open the modal. This action will trigger the “Delete board” modal:
      <div className="hover:bg-gray-300">
         <button
            onClick={() => dispatch(openDeleteBoardAndTaskModal({variant: "Delete this board?"}))}
            className="text-sm px-4 py-2">
            Delete Board
         </button>
      </div>
Move on to the BoardTasks component, and similarly, include the function for deleting tasks and boards among the imports from the appSlice:
      import {
         //other imports
         openDeleteBoardAndTaskModal
      } from "@/components/redux/features/appSlice";
Adjust the delete React icon to include the onClick function to open the modal:
      <MdDelete
         onClick={() =>
            dispatch(
               openDeleteBoardAndTaskModal({
                  variant: "Delete this Task?",
                  status,
                  index,
               }),
            )
         }
         className="text-lg cursor-pointer text-red-500"
      />;
Now we'll start building the markup for the delete board and tasks modal, coupled with the implementation of its functionalities.
In your app/components folder, create a file named DeleteBoardAndTask modal and paste the provided code inside of it:
   import { Modal, ModalBody } from "./Modal";
   import { useAppDispatch, useAppSelector } from "@/components/redux/hooks";
   import {
   closeDeleteBoardAndTaskModal,
   getDeleteBoardAndTaskModalValue,
   getDeleteBoardAndTaskModalVariantValue,
   getDeleteBoardAndTaskModalTitle,
   getDeleteBoardAndTaskModalIndex,
   getDeleteBoardAndTaskModalStatus,
   getCurrentBoardName,
   } from "@/components/redux/features/appSlice";
   import {
   useFetchDataFromDbQuery,
   useUpdateBoardToDbMutation,
   } from "@/components/redux/services/apiSlice";

   export default function DeleteBoardAndTaskModal() {
     //variable declarations, functions, JSX
   }
Next, go to the DeleteBoardAndTaskModal function and paste the following code into it to declare variables and state values. The comments provided explain the future use of each of the declarations.
   const dispatch = useAppDispatch();
   const isModalOpen = useAppSelector(getDeleteBoardAndTaskModalValue);
   const closeModal = () => dispatch(closeDeleteBoardAndTaskModal());
   const currentBoardName = useAppSelector(getCurrentBoardName);
   const modalVariant = useAppSelector(getDeleteBoardAndTaskModalVariantValue);
   const taskTitle = useAppSelector(getDeleteBoardAndTaskModalTitle);
   const taskIndex = useAppSelector(getDeleteBoardAndTaskModalIndex);
   const taskStatus = useAppSelector(getDeleteBoardAndTaskModalStatus);
   let { data } = useFetchDataFromDbQuery();
   const [updateBoardToDb, { isLoading }] = useUpdateBoardToDbMutation();
Here, we’ll implement the function responsible for the modal functionality. Just below the variable definitions above, paste the following function:
   const handleDelete = (e: React.FormEvent<HTMLButtonElement>) => {
    e.preventDefault();
    if (data) {
      if (modalVariant === "Delete this board?") {
        // Implement the logic for deleting the board
        if (currentBoardName) {
          //  Assuming data is available, you need to handle the logic to update the data
          const [boards] = data;
          const updatedBoards = boards.boards.filter(
            (board: { name: string }) => board.name !== currentBoardName
          );
          updateBoardToDb(updatedBoards);
        }
      } else {
        // Implement the logic for deleting a task
        if (taskIndex !== undefined && taskStatus && currentBoardName) {
          const [boards] = data;
          //  Handle the logic to update the tasks
          const updatedBoards = boards.boards.map(
            (board: {
              name: string;
              columns: [{ name: string; tasks: [] }];
            }) => {
            // check the board active board
              if (board.name === currentBoardName) {
                // loop through the columns of the board to find the column in which the task to edit is
                const updatedColumns = board.columns.map((column) => {
                  if (column.name === taskStatus) {
                    // delete the the task
                    const updatedTasks = column.tasks.filter(
                      (_, index: number) => index !== taskIndex
                    );
                    return { ...column, tasks: updatedTasks };
                  }
                  return column;
                });
                return { ...board, columns: updatedColumns };
              }
              return board;
            }
          );
          updateBoardToDb(updatedBoards);
        }
      }
    }
   };
Finally, in this component, paste the code below to implement the JSX of the modal:
   return (
    <Modal isOpen={isModalOpen} onRequestClose={closeModal}>
      <ModalBody>
        <p className="text-red font-bold text-lg">{modalVariant}</p>
        <div className="pt-6">
          <p className="text-sm text-medium-grey leading-6">
            {modalVariant === "Delete this board?"
              ? `Are you sure you want to delete the '${currentBoardName}' board? This action will remove all columns
                and tasks and cannot be reversed.`
              : `Are you sure you want to delete the '${taskTitle}' tasks? This action cannot be reversed.`}
          </p>
        </div>
        <div className="pt-6 flex space-x-2">
          <div className="w-1/2">
            <button
              type="submit"
              onClick={(e: React.FormEvent<HTMLButtonElement>) =>
                handleDelete(e)
              }
              className="bg-red-500 rounded-3xl py-2 w-full text-sm font-bold"
            >
              {" "}
              {isLoading ? "Loading" : "Delete"}
            </button>
          </div>
          <div className="w-1/2">
            <button
              onClick={closeModal}
              className="bg-stone-200 rounded-3xl py-2 w-full text-sm font-bold"
            >
              Cancel
            </button>
          </div>
        </div>
      </ModalBody>
    </Modal>
   );
   }
After making this update, import the component in the page.tsx and render it as seen below:
     //rest of the imports
     import DeleteBoardOrTaskModal from "./components/DeleteBoardAndTaskModal";
     //rest of the code
       return (
    <main className="flex h-full">
      <Sidebar />
      <BoardTasks />
      <AddAndEditBoardModal />
      <AddAndEditTaskModal/>
      <DeleteBoardAndTaskModal/>
    </main>
    );
After rendering the component, you can now delete a board. As an example, we’ll delete the “Marketing” board we previously created:
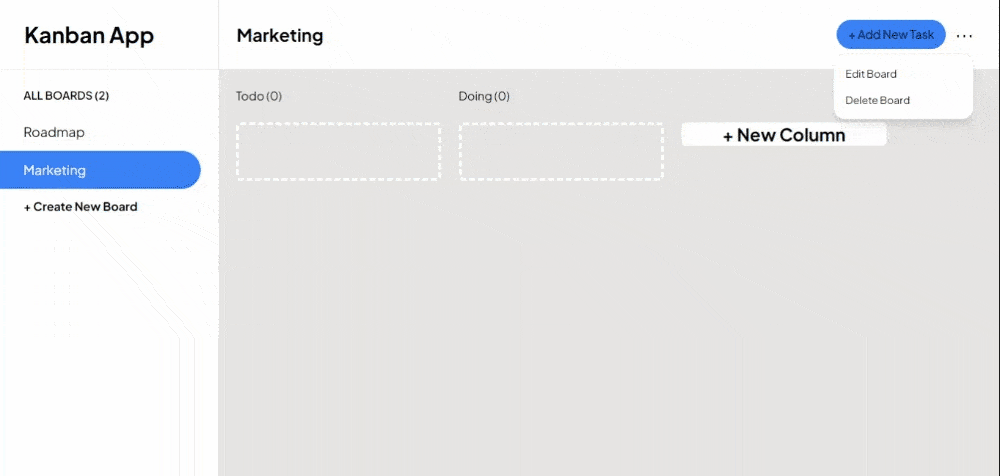
Likewise, you can delete a task:
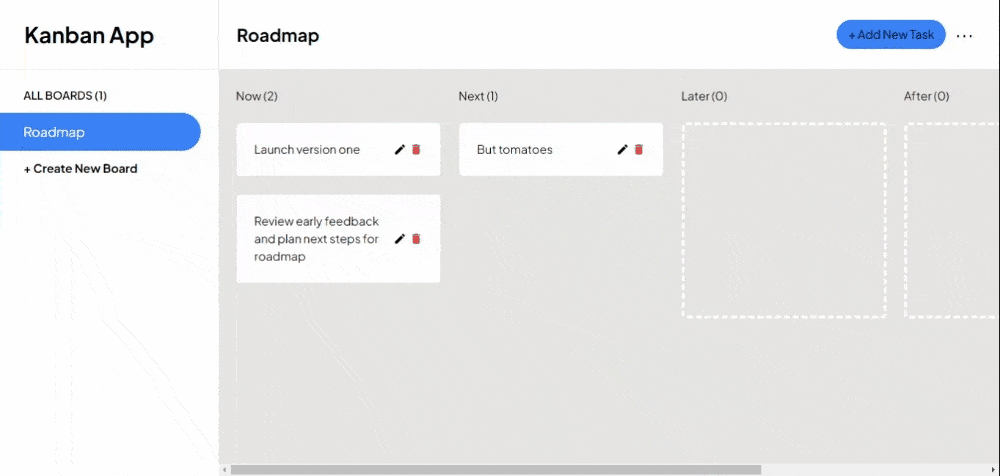
In the next section, we’ll explore the implementation of the drag and drop functionality with the react-beautiful-dnd library.
How to Implement Drag and Drop Functionality
At the end of this section, you should be able to move tasks between columns and across columns.
To begin, install the react-beautiful-dnd library with the following command:
npm i react-beautiful-dnd
It’s worth noting that the react-beautiful-dnd library does not work inside the StrictMode wrapper which is enabled by default in the app router. So we have to create a custom hook which will enable us use the react-beautiful-dnd library safely with StrictMode.
Create a file named StrictModeDroppable.tsx inside your src/app/components folder and paste the provided code below inside of it:
import { useEffect, useState } from "react";
import { Droppable, DroppableProps } from "react-beautiful-dnd";

export const StrictModeDroppable = ({ children, ...props }: DroppableProps) => {
  const [enabled, setEnabled] = useState(false);

  useEffect(() => {
    const animation = requestAnimationFrame(() => setEnabled(true));

    return () => {
      cancelAnimationFrame(animation);
      setEnabled(false);
    };
  }, []);

  if (!enabled) {
    return null;
  }

  return <Droppable {...props}>{children}</Droppable>;
};
This way, we have made it compatible with StrictMode, allowing us to safely implement the drag and drop feature.
Next, navigate to the BoardTasks.tsx component and update it with the code below:
Firstly, import needed components from the react-beautiful-dnd library and also from our custom StrictModeDroppable.tsx component:
//import useRef hook
import { useEffect, useState, useRef } from "react";
import { DragDropContext, Draggable } from "react-beautiful-dnd";
// import Droppable from the custom hook
import { StrictModeDroppable as Droppable } from "./StrictModeDroppable";
After updating the imports, go to the BoardTasks function and include the following functions:
// check if it’s the first render
const initialRender = useRef(true);


  const handleDragEnd = async ({ destination, source }: any) => {
    // Check if the destination is not null (i.e., it was dropped in a valid droppable)
    if (!destination) return;


    // get a deep nested copy of the columns state
    const newColumns = columns.map((column) => ({
      ...column,
      tasks: [...column.tasks], // Create a new array for tasks
    }));


    // Find the source and destination columns based on their droppableIds
    const sourceColumnIndex = newColumns.findIndex(
      (col) => col.id === source.droppableId
    );
    const destinationColumnIndex = newColumns.findIndex(
      (col) => col.id === destination.droppableId
    );


    // Task that was dragged
    const itemMoved = newColumns[sourceColumnIndex]?.tasks[source.index];


    // Remove from its source
    newColumns[sourceColumnIndex].tasks.splice(source.index, 1);


    // Insert into its destination
    newColumns[destinationColumnIndex].tasks.splice(
      destination.index,
      0,
      itemMoved
    );


    // Update the state
    setColumns(newColumns);
  };


  useEffect(() => {
    // Check if it's the initial render, to avoid sending the data to the backend on mount
    if (!initialRender.current) {
      // Update the backend with the new order
      try {
        if (data) {
          const [boards] = data;
          const boardsCopy = [...boards.boards];
          const activeBoardIndex = boardsCopy.findIndex(
            (board: { name: string }) => board.name === currentBoardTitle
          );
          const updatedBoard = {
            ...boards.boards[activeBoardIndex],
            columns,
          };
          boardsCopy[activeBoardIndex] = updatedBoard;
          updateBoardToDb(boardsCopy);
        }
      } catch (error) {
        // Handle error
        console.error("Error updating board:", error);
      }
    } else {
      // Set initial render to false after the first render
      initialRender.current = false;
    }
  }, [columns]);
So far here, we implemented a function which will be triggered after a task has been dragged. After each trigger of this function, the columns data is being updated and sent to the Cloud Firestore via the useEffect hook. I added some more comments in the code to help you understand better.
Finally, update the JSX in the return statement as seen below:
 return (
    <div className="overflow-x-auto overflow-y-auto w-full p-6 bg-stone-200">
      {/* If data has not been fetched successfully, display a loading state, else display the column of tasks */}
      {isLoading ? (
        <p className="text-3xl w-full text-center font-bold">
          Loading tasks...
        </p>
      ) : (
        <>
          {/* If columns of tasks isn't empty: display the tasks, else display the prompt to add a new column */}
          {columns.length > 0 ? (
            <DragDropContext onDragEnd={handleDragEnd}>
              <div className="flex space-x-6">
                {columns.map((column, index) => {
                  const { id, name } = column;
                  return (
                    <div key={id} className="w-[17.5rem] shrink-0">
                      <p className="text-black">{`${column.name} (${
                        column.tasks ? column.tasks?.length : 0
                      })`}</p>
                      <Droppable droppableId={id}>
                        {(provided) => (
                          <div
                            ref={provided.innerRef}
                            {...provided.droppableProps}
                            className="h-full"
                          >
                            {column.tasks &&
                              // Display the tasks if there are tasks in the column, if not, display an empty column
                              (column.tasks.length > 0 ? (
                                column.tasks.map((task, index) => {
                                  const { id, title, status } = task;
                                  return (
                                    <Draggable
                                      key={id}
                                      draggableId={id}
                                      index={index}
                                    >
                                      {(provided) => (
                                        <div
                                          ref={provided.innerRef}
                                          {...provided.draggableProps}
                                          {...provided.dragHandleProps}
                                          className="bg-white p-6 rounded-md mt-6 flex items-center justify-between border"
                                        >
                                          <p>{task.title}</p>
                                          <div className="flex items-center space-x-1">
                                            <MdEdit
                                              onClick={() =>
                                                dispatch(
                                                  openAddAndEditTaskModal({
                                                    variant: "Edit Task",
                                                    title,
                                                    index,
                                                    name,
                                                  })
                                                )
                                              }
                                              className="text-lg cursor-pointer"
                                            />
                                            <MdDelete
                                              onClick={() =>
                                                dispatch(
                                                  openDeleteBoardAndTaskModal({
                                                    variant:
                                                      "Delete this task?",
                                                    title,
                                                    status,
                                                    index,
                                                  })
                                                )
                                              }
                                              className="text-lg cursor-pointer text-red-500"
                                            />
                                          </div>
                                        </div>
                                      )}
                                    </Draggable>
                                  );
                                })
                              ) : (
                                <div className="mt-6 h-full rounded-md border-dashed border-4 border-white" />
                              ))}
                            {provided.placeholder}
                          </div>
                        )}
                      </Droppable>
                    </div>
                  );
                })}
                {/* If the number of columns of tasks is less than 7, display an option to add more columns */}
                {columns.length < 7 ? (
                  <div
                    onClick={() =>
                      dispatch(openAddAndEditBoardModal("Edit Board"))
                    }
                    className="rounded-md bg-white w-[17.5rem] mt-12 shrink-0 flex justify-center items-center"
                  >
                    <p className="cursor-pointer font-bold text-black text-2xl">
                      + New Column
                    </p>
                  </div>
                ) : (
                  ""
                )}
              </div>
            </DragDropContext>
          ) : (
            <div className="w-full h-full flex justify-center items-center">
              <div className="flex flex-col items-center">
                <p className="text-black text-sm">
                  This board is empty. Create a new column to get started.
                </p>
                <button className="bg-blue-500 text-black px-4 py-2 flex mt-6 rounded-3xl items-center space-x-2">
                  <p>+ Add New Column</p>
                </button>
              </div>
            </div>
          )}
        </>
      )}
    </div>
  );
In the code snippet above, we wrapped DragDropContext around the columns of tasks with its onDragEnd attribute, which accepts the handleDragEnd function, which will be triggered after a task has been dragged.
Don’t forget that after each trigger of this function, the columns data is being updated and sent to the Cloud Firestore via the useEffect hook.
Each column of task is also wrapped around the Droppable component. This signifies that this is a location you can drop a task. It also accepts a droppableId attribute which we passed the id of each column to it.
Each task card is also wrapped around the Draggable component, this makes them draggable within and among columns.
With these changes, we have easily implemented the drag and drop feature for our app:

Conclusion
This tutorial guided you through implementing authentication using the next-auth library, setting up a Redux store, and integrating Firebase with its RTK Query in Next.js applications.
You also learned to implement CRUD operations in a Kanban task management app, and looked into form validations with JavaScript.
And finally, we covered the implementation of drag-and-drop functionality using the react-beautiful-dnd library.
Across the tutorial, we also leveraged existing libraries to streamline development rather than building everything from scratch.
If you want to see all the code, you can visit the project's GitHub repository here. Feel free to fork the project and open a PR if you feel the need for any improvements. If you’d also like to play around with the live site, you can find it here.
If you'd also like to explore this project with more advanced features, like dark mode, sleeker UI design, and better functionalities, visit it here.