
By Tom Chant
Chatbots are transforming the way we interact online. Thanks to the OpenAI API, crafting intelligent, context-aware chatbots is now well within the reach of any budding web developer.
In this tutorial, I will teach you everything you need to know to build your own chatbot using the GPT-4 API.
For a deeper dive into the OpenAI API, I have created a 4.5 hour course, "Build AI Apps with ChatGPT, DALL-E, and GPT-4", which you can find on FreeCodeCamp’s YouTube Channel and Scrimba.
Table of Contents
- The app we're building
- Prerequisites
- The HTML and CSS for the app
- How to store the API key
- How to import the API key to index.js
- How to install the OpenAI dependency
- How to use the OpenAI dependency
- The flow of this app
- An array to store the conversation
- How to handle the user's input
- Time for the AI
- How to implement the typewriter effect
- Conclusion
The App We’re Building
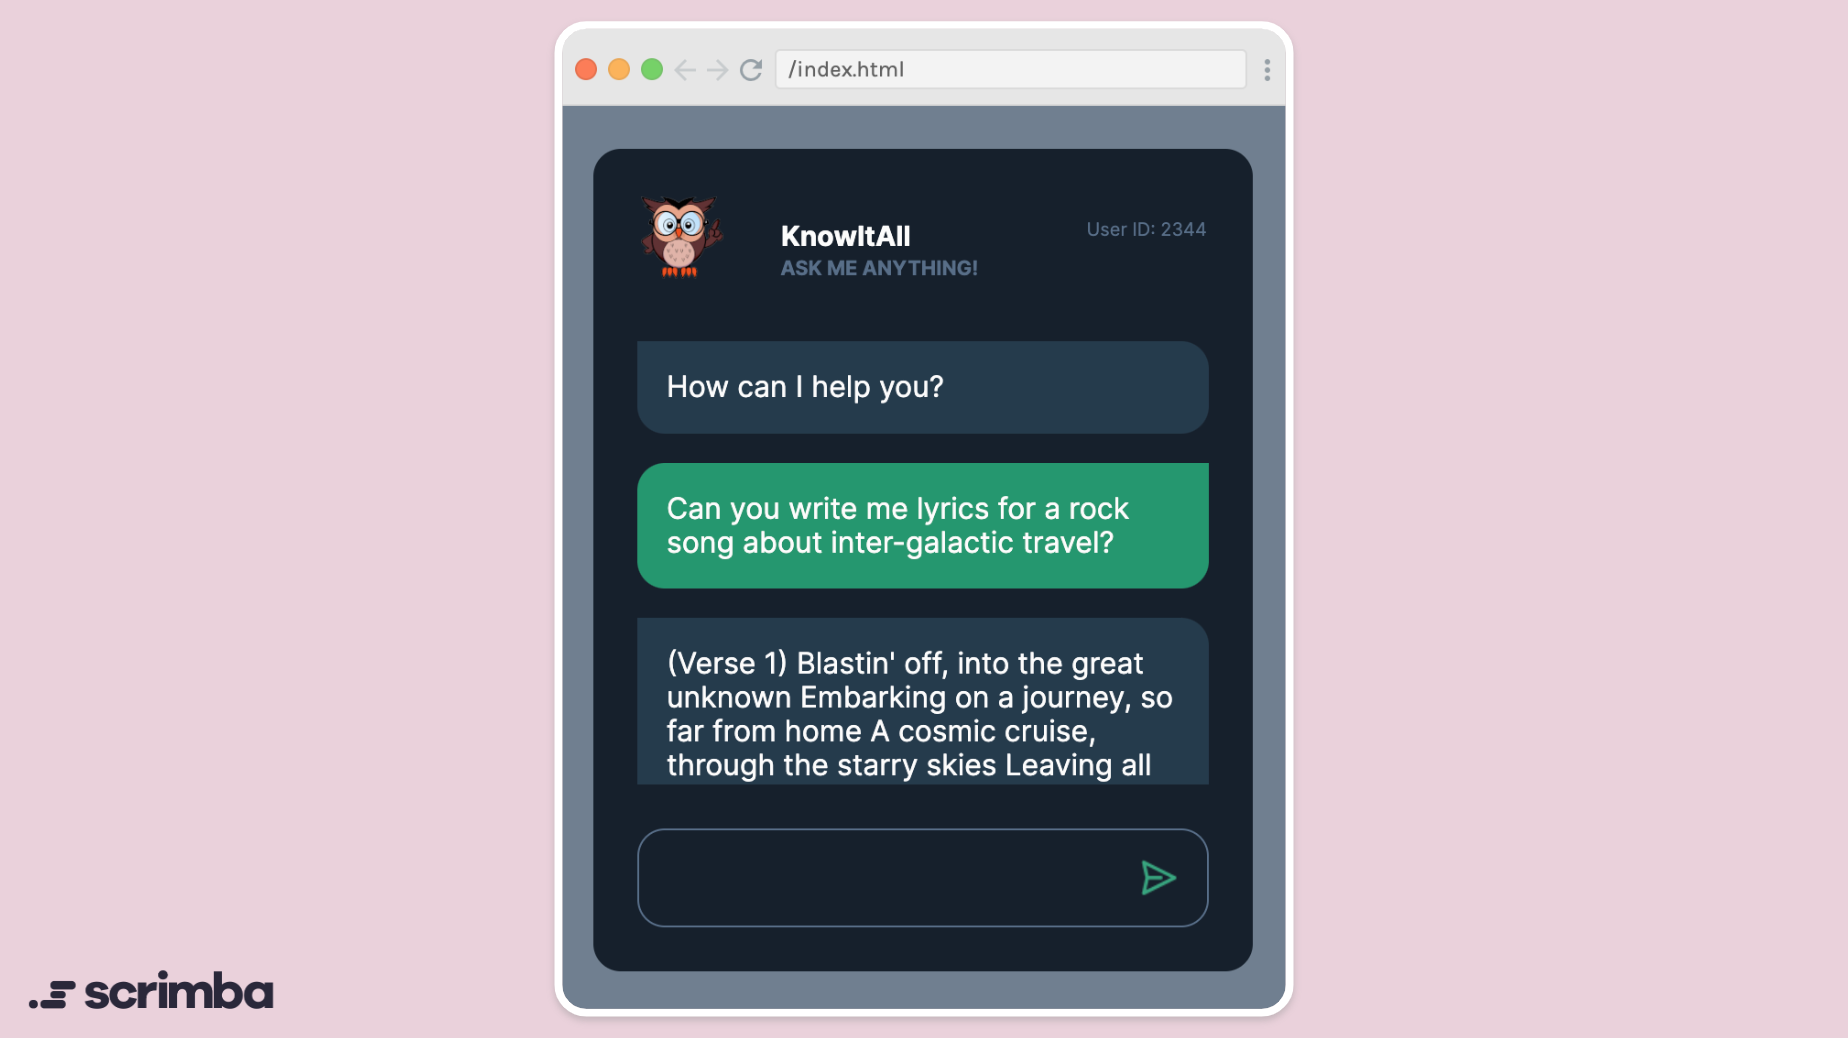 Screenshot of the app you'll build
Meet KnowItAll, a ChatBot with extraordinary conversational powers. You can ask it questions, have it create content, correct language, suggest edits, or translate. It can even write code upon request.
Prerequisites
In this tutorial you will be using HTML, CSS and vanilla JavaScript. A basic understanding of JavaScript is enough – you don’t need to be super advanced.
You’ll also need a free OpenAI account, which you can get here. The complimentary credits you get on signing up should be more than enough to complete this tutorial. As you go through the sign-up process, be sure to copy and paste your API key somewhere safe, as you will need it soon.
This tutorial uses the GPT-4 model. At time of writing, there is a waiting list for GPT-4 (you can join it here). But don’t worry if you haven’t got access to it yet, the GPT-3.5-turbo model is fully compatible with everything we do in this tutorial, and it is available to all now.
And if you don’t know what an OpenAI model is, don’t worry, we will be talking more about them in just a moment.
OK, let’s get down to some code!
The HTML and CSS for the App
Before we dive into the JavaScript and AI components, we need to establish the HTML and CSS foundations of this app. Below, I’ve embedded a Scrim, which is an interactive code editor/screencast. In this scrim, you can:
- Browse the HTML and CSS used in this project
- Click on PREVIEW to see the project in a mini browser
- Watch a walkthrough explanation of the HTML and CSS and pause anytime to play with the code.
And if you want to run this code locally, you can click the gear icon (⚙️) bottom right and select Download as zip. You will get a zipped folder with all of the HTML, CSS and the image assets. You can unzip that folder and open it in VS Code or whichever dev environment you favour.
Click here for a full-screen version of this scrim.
I want to draw your attention to lines 22-24 of index.html which contain a hard-coded speech bubble from the chatbot to get the conversation started:
<div class="speech speech-ai">
    How can I help you?
</div>
As you can see from the screenshot near the top of this article, each conversation starts with the chatbot asking How can I help you? Note the two CSS classes speech and speech-ai, which style the speech bubble.
Apart from that, there’s nothing particularly unusual going on with this HTML and CSS and we won’t be referring to it much in this tutorial. But do take a moment to either go through it or watch the walkthrough before moving on.
How to Store the API Key
As the OpenAI API is central to this project, you need to store the OpenAI API key in the app.
⚠️ Remember – your API key is vulnerable in this front-end only project. When you run this app in a browser, your API key will be visible in dev tools, under the network tab. That means you should only run this project locally.
If you’d like to deploy this project so you can share it and include it in your portfolio, in the third section of the full YouTube/Scrimba course I show how you can use Netlify Serverless Functions to keep the API key safely hidden when deploying.
Ok, with that warning out of the way, let’s move forward. In your project folder, create a new file called env.js to hold your API key.
Inside env.js set up a const process which will hold an object with a single property env. This will store your API key in a key/value pair, where the key is OPENAI_API_KEY and the value is the API key itself. (Please note, the API key in the code below is not real!)
export const process = {
    env: {
        OPENAI_API_KEY: "sk-123456789123456789123456789123456789123456789123"
    }
}
Here’s an updated scrim showing all of the project code so far:
How to Import the API Key to index.js
Next, at the top of index.js, import your API key from env.js with this import statement.
import { process } from '/env.js'
This is a named import which means you include the name of the entity you are importing in curly braces. Now, the entire process object will be available in index.js.
As you are using JavaScript from more than one file, you need to tell the browser to expect modular JavaScript. So add type=”module” to the script tag in index.html.
<script src="index.js" type="module"></script>
And just to check you haven’t made any typos that cause you bugs down the line, log out process from within index.js.
import { process } from '/env.js'

console.log(process)
//{env: {OPENAI_API_KEY: "sk-123456789123456789123456789123456789123456789123"}}
Here’s a scrim with the code so far:
How to Install the OpenAI Dependency
You can access the OpenAI API with a regular fetch request, but it’s much easier to use the OpenAI dependency. If you’re working locally you can add it using NPM:
$ npm install openai
Or if you are working in Scrimba, hover your cursor over DEPENDENCIES and click on the three dot icon which appears.
 The three dot menu adjacent to dependencies
From the dropdown, select Add module.
 Dropdown menu with 'add module' option
This will bring up a dialogue box. Type in openai, click ADD, and Scrimba will do the rest.
 The Add NPM package dialogue box
You will then see the OpenAI dependency listed in the sidebar.
Whether you’re working locally or in Scrimba, you now have the OpenAI dependency installed.
How to Use the OpenAI Dependency
You need to import two constructors from the dependency. They are needed to configure the app to use the API. They are Configuration and OpenAIApi and you can import them by adding the following line of code to index.js:
import { Configuration, OpenAIApi } from 'openai'
To interact with the API you need to set up your own configuration (note the lowercase ‘c’) object using the Configuration constructor.
const configuration = new Configuration()
Next, pass it an object with a key/value pair. The key will be apiKey and the value will be our API key which you have imported from process and can access with process.env.OPENAI_API_KEY.
const configuration = new Configuration({
    apiKey: process.env.OPENAI_API_KEY
})
Then, you need to pass configuration to the OpenAIApi constructor. Save this new instance of OpenAIApi to a const openai (note the lowercase ‘o’).
const openai = new OpenAIApi(configuration)
And to check it’s working, log out openai.
console.log(openai)
//OpenAIApi$1 {basePath: "<https://api.openai.com/v1>", configuration: {apiKey: "sk-12345678912345678912345678...", baseOptions: {headers: {User-Agent: "OpenAI/NodeJS/3.2.1", Authorization: "Bearer sk-1234567891234567891..."}}}}
Here’s a scrim with all the code so far:
Remember you can click the gear icon (⚙️) to download all of the code in one zipped folder.
Now that you have finished setting up the OpenAI API dependency, you can proceed to its usage. But before you continue writing more code, let's take a moment to envision how this chatbot will work.
The Flow of this App
One major challenge when working with OpenAI models is that they don't retain the queries or replies from previous interactions. In fact, they have no memory of their past conversations with you at all. This can lead to disjointed and confusing conversations like this:
Human: Who was the first person to walk on the moon?
AI: Neil Armstrong.
Human: How old was he at the time?
AI: How old was who?
Human: ???
Therefore, to create a chatbot capable of engaging in a coherent conversation, we need to provide the OpenAI model with a form of memory.
Fortunately, there is a straightforward way of doing that: we include the entire conversation as it currently stands with each API call. This allows the API to utilise the conversation's context when forming completions to better understand the questions it is being asked.
So the app works like this:
 The user types a question into the input field and hits send.
The hard-coded message How can I help you? is displayed. The user types in a question or a request and hits enter or presses the send button.
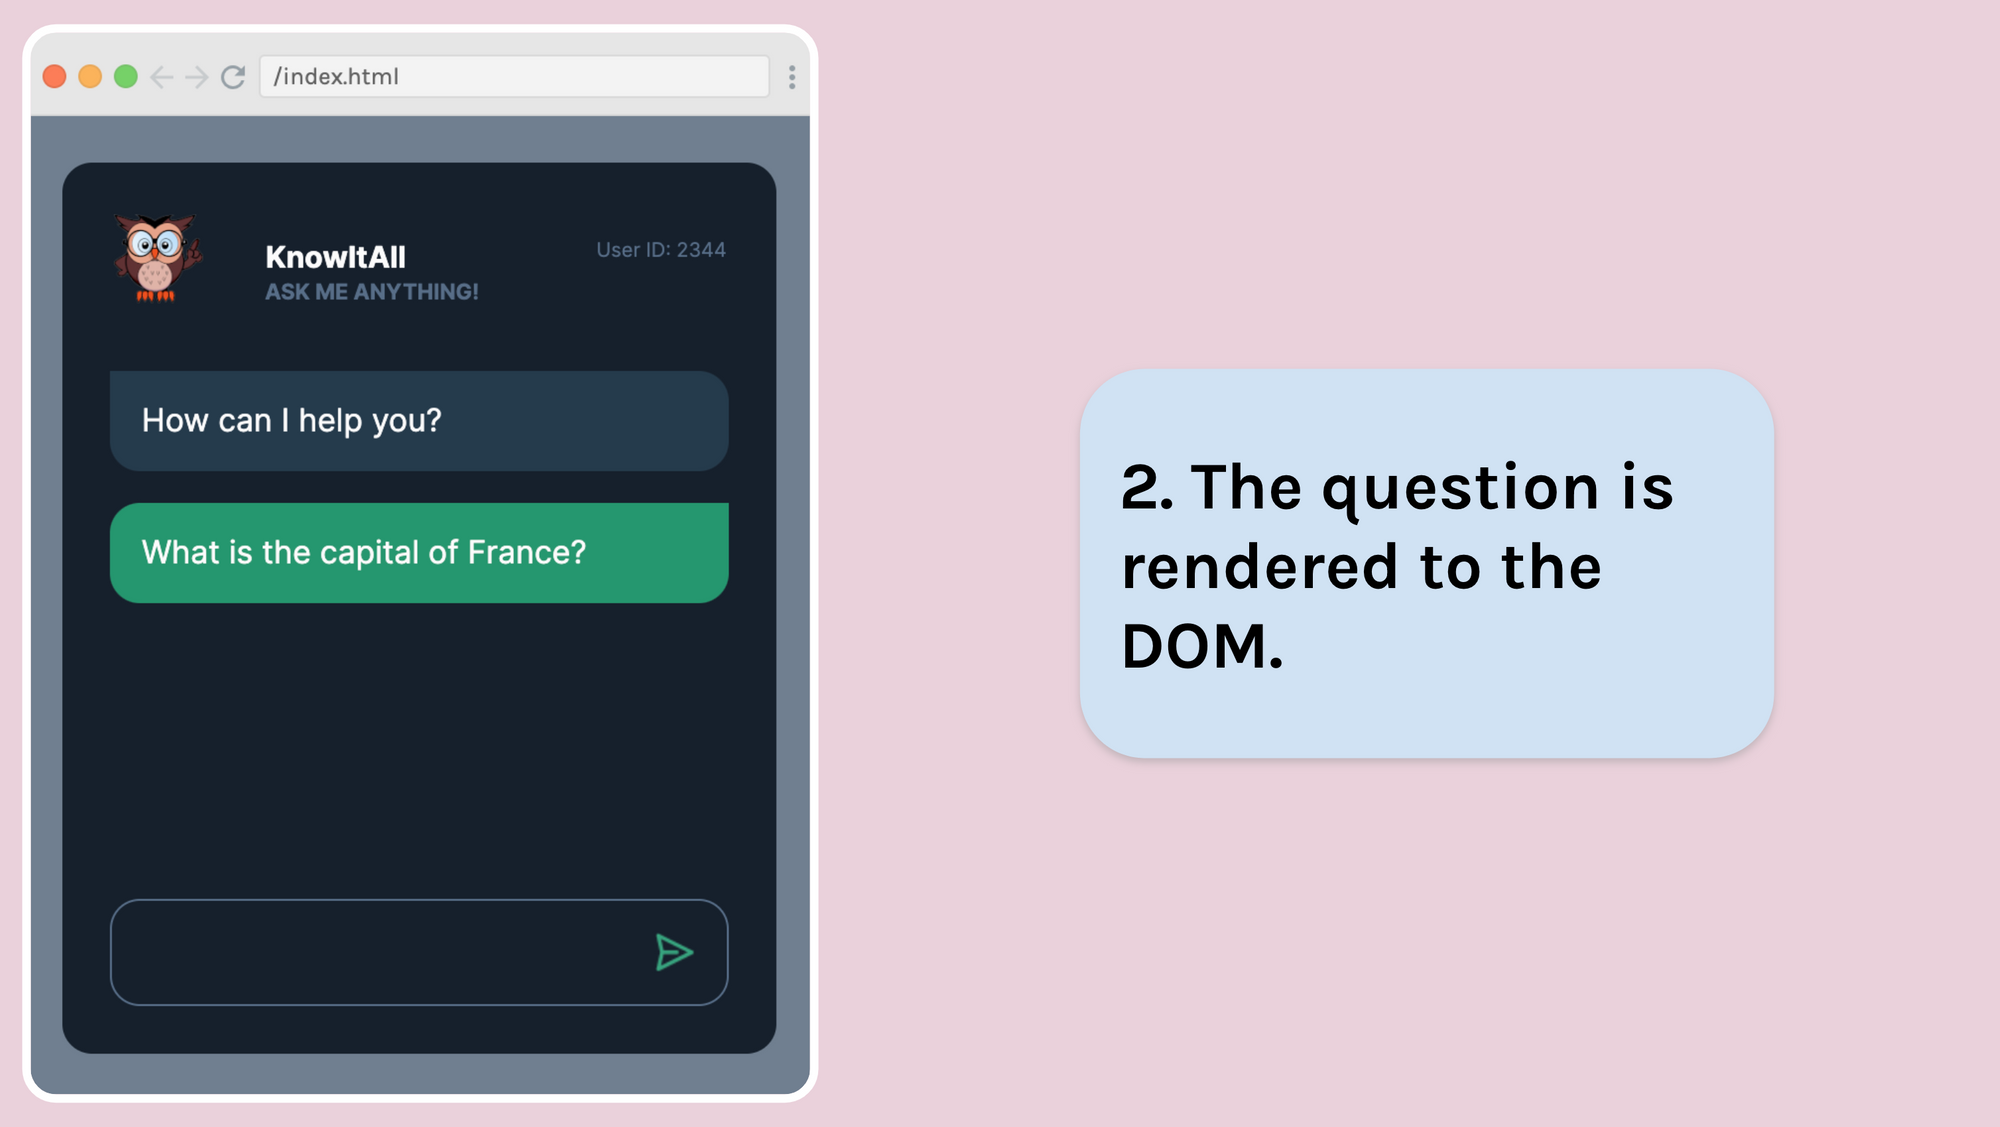 The question is rendered to the DOM.
The question is rendered to the DOM in a green speech bubble and the input is cleared.
 The question is stored in an array. This array is the single source of truth for the conversation.
The question is stored in an array. This is the array that will hold the entire conversation and acts as a single source of truth. This allows the app to have a "memory" of the conversation so it can understand requests and contextualise its responses.
 The array is sent to the OpenAI API.
The array is sent off to the API. As the conversation grows, this array will hold more and more elements.
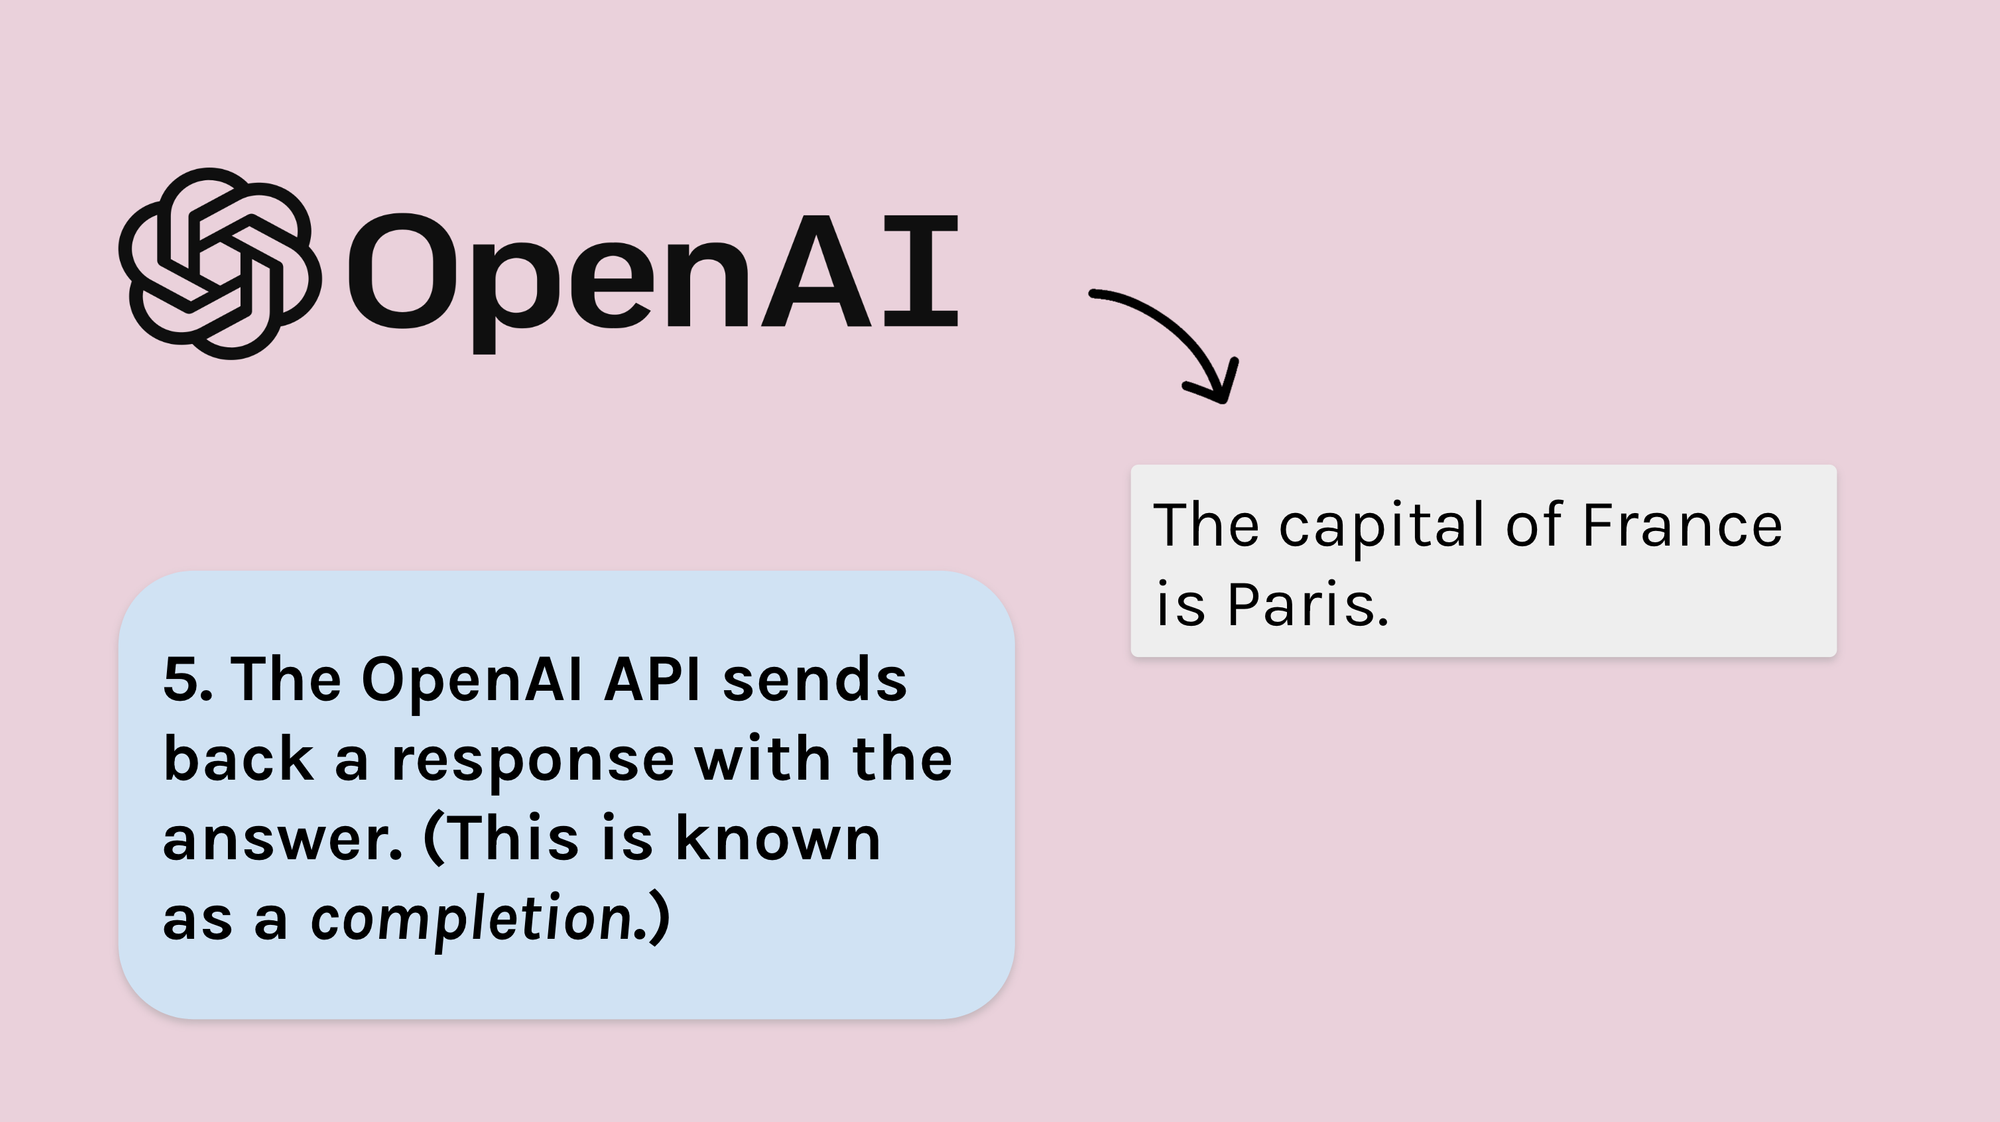 The OpenAI API sends back a response with the answer. (This is known as a completion.)
The OpenAI API sends back a response. Within that response is the actual language generated by the AI model. This is called the completion.
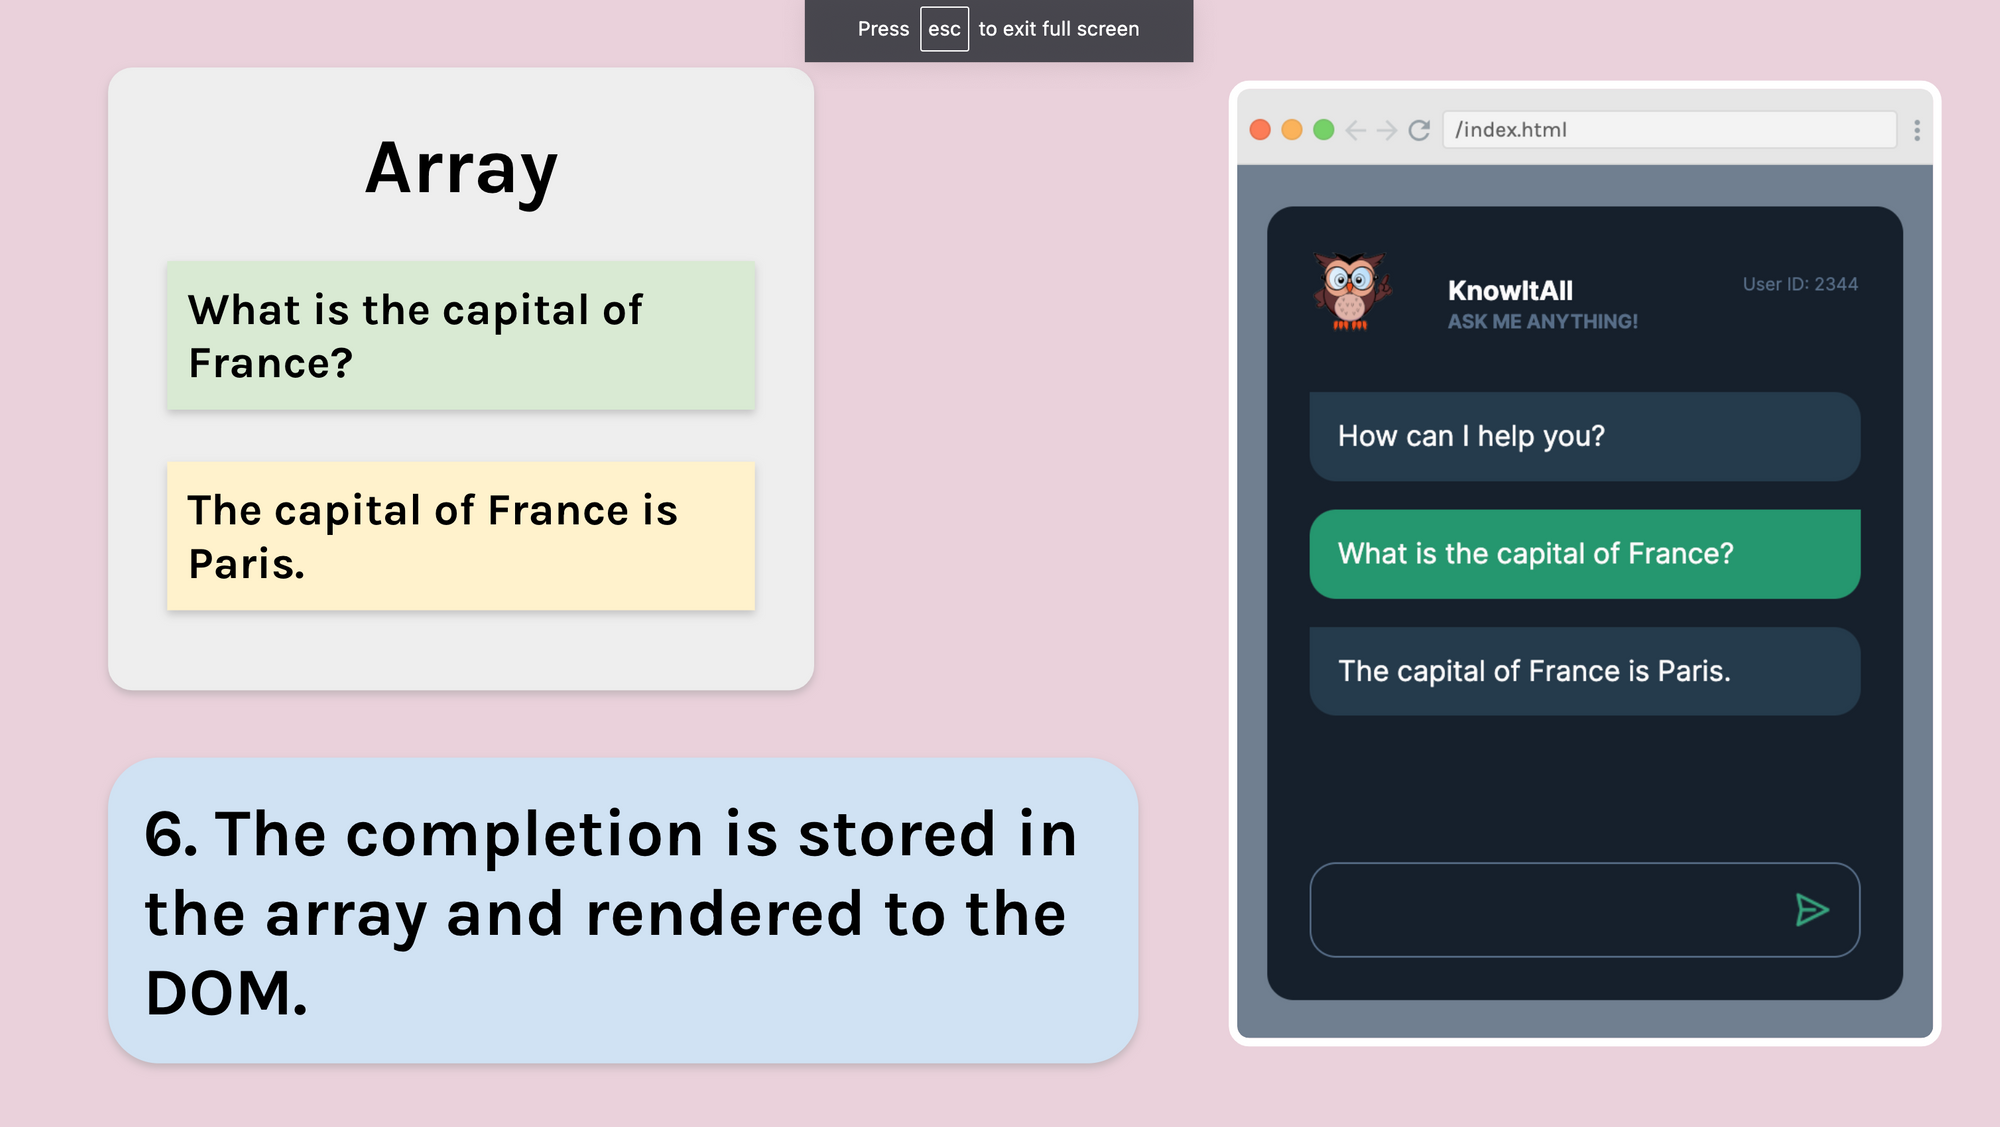 The completion is stored in the array and rendered to the DOM.
The completion is added to the array holding the conversation so that it can be used to contextualise any future requests to the API. The completion is also rendered to the DOM so the user can see it.
 The user continues the conversation.
The user now continues the conversation. And whatever they type in is rendered to the DOM.
 The user’s input is added to the conversation array and the entire array is sent off to the API.
❗️Step 8 is particularly important because here the question How many people live there? does not mention Paris, so the API can only answer correctly if it is getting the context of the conversation from the array we are sending with each request.
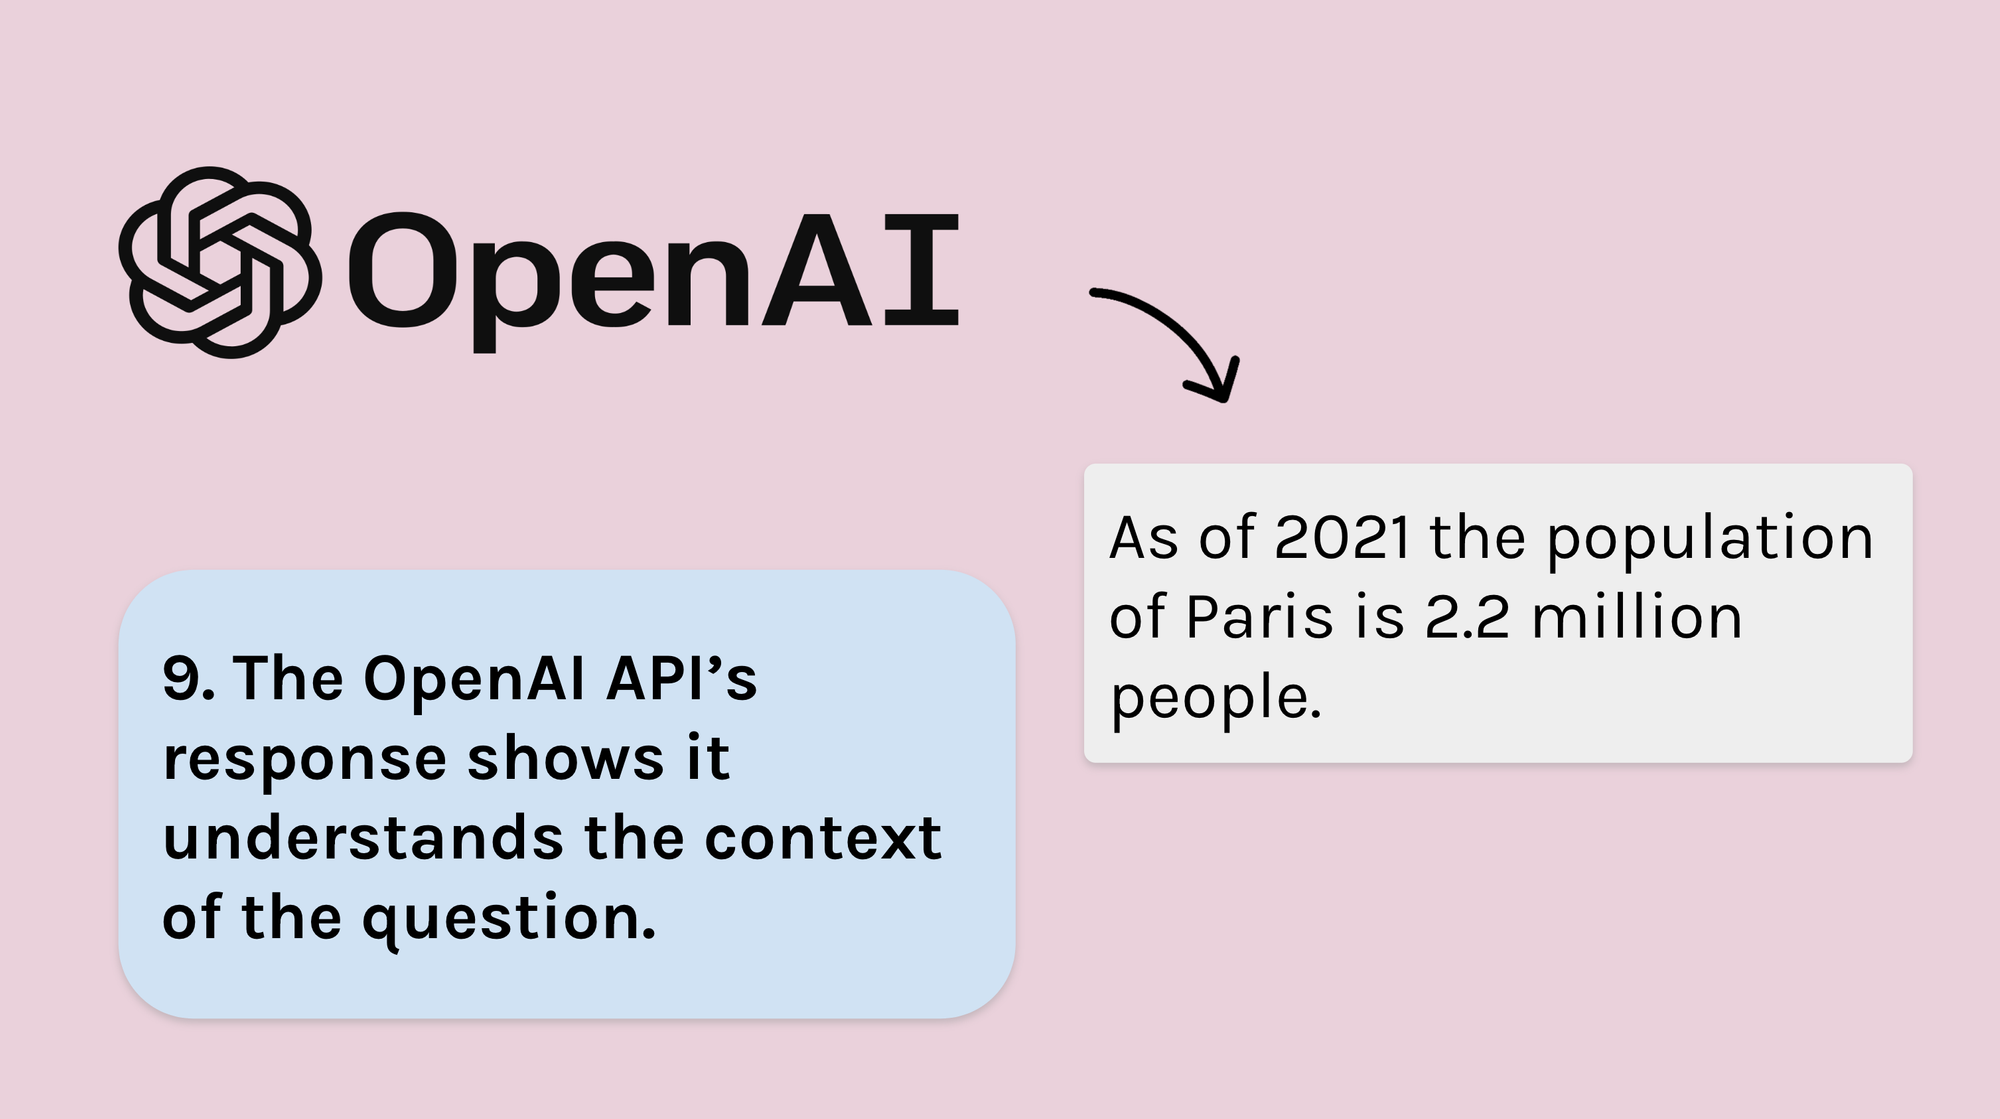 The OpenAI API’s response shows it understands the context of the question.
From its response, we can see that the API does have the context of the conversation from the array – it knew we were talking about Paris even though Paris was not mentioned in the question How many people live there? So now we can be sure that we will be able to have a logical, flowing conversation with the chatbot.
Now you have an overview of how the app is going to work, let’s get into the nuts and bolts of the AI.
An Array to Store the Conversation
As mentioned previously, the OpenAI API needs to be provided with the conversation as it exists at that time with each API call. The conversation should be structured as an array of objects, with each object following a specific format.
First, set up an array and call it conversationArr.
const conversationArr = []
Each element in this array will be an object with two key/value pairs. The first key will be role and the second key will be content. This structure will be consistent for all objects stored in the array throughout the project.
The first object in the array will contain instructions for the chatbot. This object, known as the instruction object, allows you to control the chatbot's personality and provide behavioural instructions, specify response length, and more.
The instruction object’s role property should contain the string ‘system' and the content should hold your instruction in a string.
Here are a few example instructions:
‘You are a useful assistant'
‘You reply in French'
‘You translate whatever I say into Spanish'
‘You are a useful assistant that gives long, detailed answers'
So conversationArr with the instruction object looks like this.
const conversationArr = [
    {
        role: 'system',
        content: 'You are a useful assistant.' // this is the instruction
    }
]
And as the instruction object won’t change, let’s hard code it and put it in index.js.
So far, our code looks like this:
Before we move on, let’s look at the other two types of Object that you will be storing in conversationArr. And just to be clear, you won’t be hard-coding these in index.js now, but adding them programmatically as needed.
When the user submits some text, that text will be stored in an object in conversationArr and it will look like this, with the role being ‘user' and the content being the text the user has submitted.
{
    role: 'user',
    content: 'What is the capital of France?' // your question
}
And the API’s response will also be stored in an Object. Here the role will be ‘assistant' and the content will be the completion text, for example:
{
    role: 'assistant',
    content: 'The capital of France is Paris.' // the completion
}
All of the objects that end up in conversationArr as it grows will follow this same pattern, with role and content properties.
So now let’s deal with what happens when the user types in some text and presses the submit button.
How to Handle the User’s Input
Your next task is to take the user’s input and render it to the DOM. The div that holds the conversation in index.html has the id of chatbot-conversation. So in index.js take control of that div and save it to a const chatbotConversation.
const chatbotConversation = document.getElementById('chatbot-conversation')
And now you need to hook up an event listener which fires when a user submits some text. Another quick look at index.html confirms that the button is inside a form element:
<form id="form" class="chatbot-input-container">
    <input name="user-input" type="text" id="user-input" required>
        <button id="submit-btn" class="submit-btn">
            <img
            src="images/send-btn-icon.png"
            class="send-btn-icon"
            >
    </button>
</form>
So clicking on the button or hitting enter will trigger a submit event. That’s what you need the event listener to listen out for. And as you want to prevent the browser reloading with a query string in the URL, you need to add e.preventDefault().
document.addEventListener('submit', (e) => {
    e.preventDefault()
})
Rendering the User’s Message
When a user submits a message, you need to render it. There are five stages to that process:
- Take control of the text input field, which has the id
user-input. - Use
createElementto create a new div. - Add the CSS classes the div needs:
speechwhich is the generic speech bubble class, andspeech-humanwhich applies styles that differentiate the human speech bubble from the AI speech bubble. - Append that speech bubble to
chatbotConversation. - Set the speech bubble’s
textContentto the user’s input, which you can get fromuserInput.value.
document.addEventListener('submit', (e) => {
    e.preventDefault()
    // 1. take control of the text input field
    const userInput = document.getElementById('user-input')
    // 2. create the new element
    const newSpeechBubble = document.createElement('div')
    // 3. give it CSS classes
    newSpeechBubble.classList.add('speech', 'speech-human')
    // 4. append the speech bubble to the conversation
    chatbotConversation.appendChild(newSpeechBubble)
    // 5. add the user's inputted text to the speech bubble
    newSpeechBubble.textContent = userInput.value
})
Updating conversationArr with the User's Input
Having rendered the message to the DOM, you now need to push an object to conversationArr in the format we looked at previously. This object will have a role of ‘user’ and the content property will hold whatever the user has typed in the text input.
document.addEventListener('submit', (e) => {
    e.preventDefault()

    const userInput = document.getElementById('user-input')
    const newSpeechBubble = document.createElement('div')
    newSpeechBubble.classList.add('speech', 'speech-human')
    chatbotConversation.appendChild(newSpeechBubble)
    newSpeechBubble.textContent = userInput.value

    // push object to conversationArr
    conversationArr.push({
        role: 'user',
        content: userInput.value
    })

})
Clearing the input field and scrolling to the Bottom
There are two final jobs this event listener’s function needs to do.
Firstly, let’s clear the text input by setting it to an empty string. And secondly, let’s scroll the conversation to the bottom so the user doesn’t have to manually scroll down. You could use the scrollIntoView method to do that, but because I coded this for a mini browser and scrollIntoView was causing problems, I used a slightly different technique as shown below:
document.addEventListener('submit', (e) => {
    e.preventDefault()

    const userInput = document.getElementById('user-input')
    const newSpeechBubble = document.createElement('div')
    newSpeechBubble.classList.add('speech', 'speech-human')
    chatbotConversation.appendChild(newSpeechBubble)
    newSpeechBubble.textContent = userInput.value

    conversationArr.push({
        role: 'user',
        content: userInput.value
    })

    // empty the text input
    userInput.value = ''
    // scroll the conversation to the bottom
    chatbotConversation.scrollTop = chatbotConversation.scrollHeight
})
So our code so far looks like this:
Now, if you ask the question What is the capital of France? and log out conversationArr from within the event listener’s function, you get this:
console.log(conversationArr)
//[{role: "system", content: "You are a useful assistant."}, {role: "user", content: "What is the capital of France?"}]
Time for the AI
It’s time to use the OpenAI API to actually generate some text. The dependency makes it a really easy API to use – you just need three pieces of information.
- An endpoint
- A model
- Our conversation in an array
You’ve already set up conversationArr to deal with number 3 on that list, but before you make a request to the API, let’s look at 1 and 2 in more detail.
Endpoints
The OpenAI API has various endpoints available. Which one you use depends on what you want the AI to do (generate language, generate code, create images from text prompts, and so on).
For this chatbot, we will be using the chat/completion endpoint, which at the time of writing is the most advanced endpoint for natural language generation in the OpenAI stable.
Models
The model (sometimes called the engine) is what actually creates the language. Our model for this project is GPT-4. GPT-4 is on limited release via a waiting list at present, so if you can’t access it right now, you can use GPT-3.5-turbo instead. All code in this project works with both models, and GPT-3.5-turbo is also highly capable.
OK, let’s make a call to the API.
The fetchReply Function
We need a function to take on the job of making a request to the API. Let's call this function fetchReply. The basics of the function look like this:
async function fetchReply(){
    const response = await openai.createChatCompletion()
}
Inside the body of the function, we’ve got a const response and we’ve awaited a call to the chat/completion endpoint which you can reach by taking the instance of the OpenAiAPI constructor you stored in the const openai earlier and calling the createChatCompletion method on it. (createChatCompletion is an OpenAI API method that gives us access to the chat/completion endpoint. For more info, check the OpenAI API docs.)
Because the dependency is making a fetch request, you need to use the await keyword and make this an async function.
Next, you need to pass createChatCompletion an object, and that object needs two properties: model and messages.
Model
Our model is GPT-4. You can specify this by putting it in a string in lowercase in a key/value pair: model: 'gpt-4'. This is where you could also use model: ’gpt-3.5-turbo' if you don’t have access to GPT-4 yet.
Messages
The messages property just needs to hold our conversation, which you have stored as an array of objects in the const conversationArr.
For now, log out the response. So the finished code looks like this:
async function fetchReply(){
    const response = await openai.createChatCompletion({
        model: 'gpt-4', // or 'gpt-3.5-turbo'
        messages: conversationArr,
    })
    console.log(response)
}
Now, call fetchReply from within the event listener’s function.
document.addEventListener('submit', (e) => {
    e.preventDefault()
    const userInput = document.getElementById('user-input')
    conversationArr.push({
        role: 'user',
        content: userInput.value
    })
    const newSpeechBubble = document.createElement('div')
    newSpeechBubble.classList.add('speech', 'speech-human')
    chatbotConversation.appendChild(newSpeechBubble)
    newSpeechBubble.textContent = userInput.value
    userInput.value = ''
    chatbotConversation.scrollTop = chatbotConversation.scrollHeight
    console.log(conversationArr)

    // call fetch reply to trigger the API call
    fetchReply()
})
 Chatbot with question from the user.
And when you type in What is the capital of France? and hit send, you get back this massive object: (Feel free to scroll through it, but don't be intimidated!)
{data: {id: "chatcmpl-7MuziItZYyiFpPG2KHQawd19rD54U", object: "chat.completion", created: 1685696658, model: "gpt-4-0314", usage: {prompt_tokens: 28, completion_tokens: 36, total_tokens: 64}, choices: [{message: {role: "assistant", content: "The capital of France is Paris."}, finish_reason: "stop", index: 0}]}, status: 200, statusText: "", headers: {cache-control: "no-cache, must-revalidate", content-type: "application/json"}, config: {transitional: {silentJSONParsing: true, forcedJSONParsing: true, clarifyTimeoutError: false}, adapter: xhrAdapter(e), transformRequest: [transformRequest(e,t)], transformResponse: [transformResponse(e)], timeout: 0, xsrfCookieName: "XSRF-TOKEN", xsrfHeaderName: "X-XSRF-TOKEN", maxContentLength: -1, maxBodyLength: -1, validateStatus: validateStatus(e), headers: {Accept: "application/json, text/plain, */*", Content-Type: "application/json", User-Agent: "OpenAI/NodeJS/3.2.1", Authorization: "Bearer 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"}, method: "post", data: "{"model":"gpt-4","messages":[{"role":"system","content":"You are a highly knowledgeable assistant that is always happy to help."},{"role":"user","content":"What is the capital of france?"}]}", url: "https://api.openai.com/v1/chat/completions"}, request: XMLHttpRequest {}}
There’s lots of useful info here, but we need to focus in on this one part, which I have formatted for readability:
choices: [
    {
        message: {
            role: "assistant",
            content: "The capital of France is Paris."
        },
        finish_reason: "stop", index: 0
    }
]
This is where we can see the completion: The capital of France is Paris. And that is what you need to render to the DOM in a speech bubble. And you can use dot and bracket notation to get to that text.
Let’s log that out.
console.log(response.data.choices[0].message.content)
//The capital of France is Paris.
But before you render anything, remember you also need to include each piece of dialogue in conversationArr. And the format that you need for that is an object with two key/value pairs where one key is role and has the value ’assistant’, and the other is content and holds the completion as its value.
And that object is exactly what is given to you in response.data.choices[0].message – yes, the object that you need to add to conversationArr is actually provided to you by the API!
You can adjust the above console.log to prove it:
console.log(response.data.choices[0].message)
//{role: "assistant", content: "The capital of France is Paris."}
Now you can go ahead and make fetchReply push this object to conversationArr.
And let’s log out conversationArr to check that it works:
async function fetchReply(){
    const response = await openai.createChatCompletion({
        model: 'gpt-4',
        messages: conversationArr,
    })
    conversationArr.push(response.data.choices[0].message)
    console.log(conversationArr)
}

// [{role: "system", content: "You are a useful assistant."}, {role: "user", content: "What is the capital of France?"}, {role: "assistant", content: "The capital of France is Paris."}]
The project code should now look like this:
Now all that’s left to do is render out the completion.
How to Implement the Typewriter Effect
The last task is to make our chatBot type out its response. There are thousands of ways you could do this, and it is possible to do it only with CSS. We are going to do it with JavaScript.
Create a function called renderTypewriterText. This function will take in a parameter which will be the text string you get from the response.
The renderTypewriterText function needs to create a new speech bubble element, give it CSS classes, and append it to chatbotConversation. This is almost the same code as you used before for the user’s input, but note here that you will also need to give the speech bubble the blinking-cursor class, which uses a CSS animation to create a cursor effect while the text is being rendered. See index.css lines 151 onwards in the above scrim for the CSS.
function renderTypewriterText(text) {
    const newSpeechBubble = document.createElement('div')
    newSpeechBubble.classList.add('speech', 'speech-ai', 'blinking-cursor')
    chatbotConversation.appendChild(newSpeechBubble)
}
Now add some logic to render each character one by one:
function renderTypewriterText(text) {
    const newSpeechBubble = document.createElement('div')
    newSpeechBubble.classList.add('speech', 'speech-ai', 'blinking-cursor')
    chatbotConversation.appendChild(newSpeechBubble)

    // render each character one by one
    let i = 0
    const interval = setInterval(() => {
        newSpeechBubble.textContent += text.slice(i-1, i)
        if (text.length === i) {
            clearInterval(interval)
            newSpeechBubble.classList.remove('blinking-cursor')
        }
        i++
        chatbotConversation.scrollTop = chatbotConversation.scrollHeight
    }, 50)
}
That’s quite a jumble of JavaScript, so let’s work through it step by step.
let i = 0: This initialises a variableiwith a value of 0. It will be used to keep track of the current index of thetextstring.const interval = setInterval(() => { ... }, 50): This creates an interval that repeatedly executes the arrow function every 50 milliseconds. The arrow function contains the code that will be executed at each interval.newSpeechBubble.textContent += text.slice(i-1, i): This line appends a portion of thetextstring to the content of thenewSpeechBubbleelement. It uses theslicemethod to extract a single character from thetextstring based on the current value ofi.if (text.length === i) { ... }: This condition checks if the entiretextstring has been appended to the speech bubble. If the length of thetextstring is equal toi, it means that all characters have been appended.clearInterval(interval): This line clears the interval, stopping the execution of the function.newSpeechBubble.classList.remove('blinking-cursor'): This removes the CSS class'blinking-cursor'from thenewSpeechBubbleelement. It removes the blinking cursor effect once the entiretextstring has been displayed. You only want the blinking cursor while the typewriter is running.i++: This increments the value ofiby 1, moving to the next character in thetextstring for the next interval execution.chatbotConversation.scrollTop = chatbotConversation.scrollHeight: This scrolls the conversation container to the bottom, ensuring that the new content is always visible.
To finish wiring this up, call renderTypewriterText from inside fetchReply, remembering to pass in the text completion that comes back from the API.
async function fetchReply(){
    const response = await openai.createChatCompletion({
        model: 'gpt-4',
        messages: conversationArr,
    })
    conversationArr.push(response.data.choices[0].message)

    // call renderTypewriterText passing in the completion
    renderTypewriterText(response.data.choices[0].message.content)
}
And you are done!
 The finished app with a conversation between a user and the AI chatbot
We now have a fully working chatbot using the GPT-4 API and you can continue the conversation for as long as you want!
Well, that’s not quite true. There is a theoretical limit to how long the conversation can be, but you would have to carrying on chatting for a long time to reach it. We talk about that more in the full course. Also, it's important to note that at some point, you may hit your credit limit.
Here’s the finished code. And as before, you can hit the gear icon ⚙️ and download it.
Conclusion
Congratulations on successfully building your own chatbot using the GPT-4 API! With GPT-4, you've unlocked a world of possibilities in natural language processing and conversation generation.
As you continue on your AI journey, remember to stay curious, keep learning, and explore the evolving field of artificial intelligence. Share your creations, collaborate with others, and be part of the AI community. Happy coding!
Always feel free to reach out to me on Twitter. I am @tpchant.