
By Waldek Mastykarz
If you're a web developer and work with an organization that uses Microsoft 365, or you build applications that you sell to customers, I've got great news for you: you can use your existing skills to build applications that integrate with Microsoft 365.
What's Microsoft 365?
Microsoft 365 is a set of applications, like Microsoft Teams, Outlook, Word, or SharePoint, that organizations use for work. Every day, millions of people use Microsoft 365 to chat, meet, send emails, create documents, and more.
But Microsoft 365 isn't just a set of apps. It's also a platform that enables developers, like yourself, to build applications. These apps can tap into data and insights stored on Microsoft 365 and bring them into people's workflows.
You Can Build your First Microsoft 365 App in Under 10 minutes
Following is a short tutorial that'll show you how to build a simple single-page app that integrates with Microsoft 365. The app will let users sign in with their Microsoft 365 account, and see their profile information.
 Microsoft 365 application
It doesn't seem like much, but while building this simple app, you'll learn the basics of building Microsoft 365 apps.
What you'll need
- Node.js LTS (at the time of writing this article, it's 16.17.1)
- a Microsoft 365 developer tenant. You can get one for free from Microsoft 365 developer program, and it'll give you access to all Microsoft 365 APIs you need to build your apps, along with some demo data to get started
- 10 minutes of your time
Ready? Let's go!
Register your Application on the Microsoft Cloud
Create a folder for your application, where you'll store all app files. Open a terminal and change the working directory to that folder.
In the terminal, run the following command:
npx -p @pnp/cli-microsoft365 -- m365 login --authType browser
In your web browser, sign in with your newly created Microsoft 365 developer account:
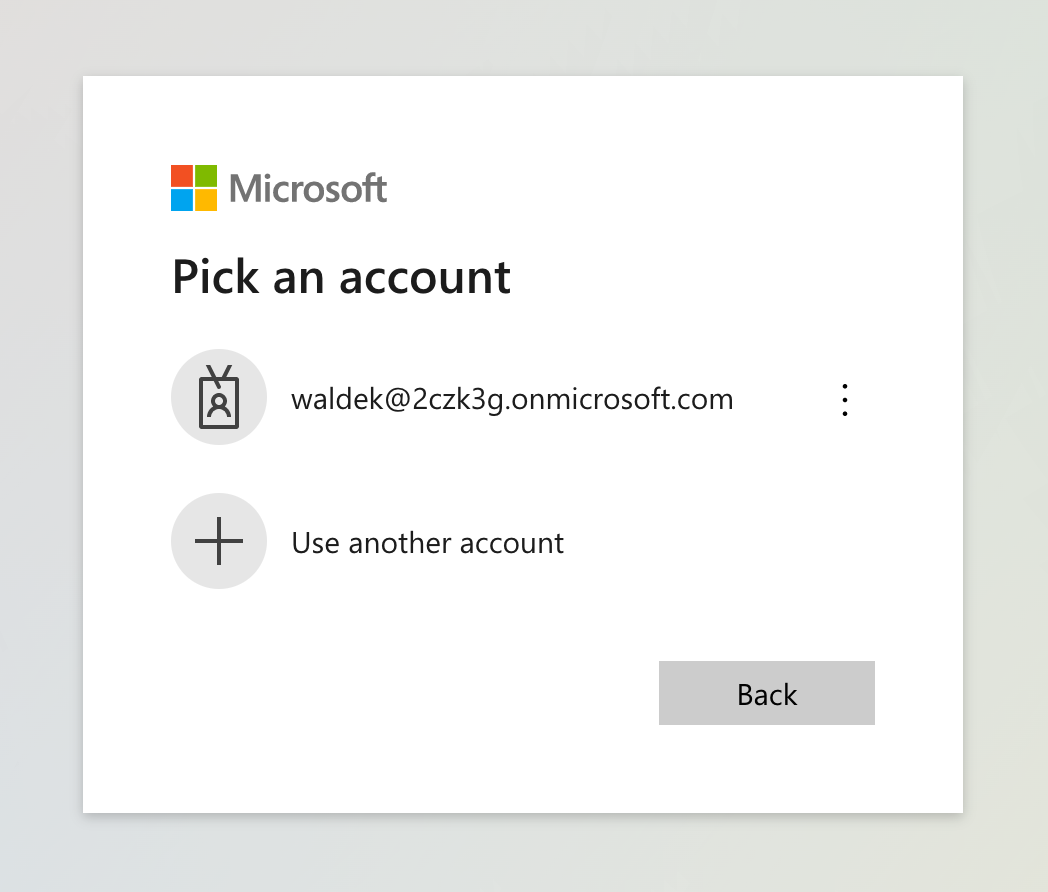 Sign into your Microsoft 365 developer account
Next, back in the terminal, run the following command:
appId=$(npx -p @pnp/cli-microsoft365 -- m365 aad app add --name "Hello world" --multitenant --redirectUris "http://localhost,http://localhost/index.html" --platform spa --query "appId" -o text)
With these two commands, you've used the CLI for Microsoft 365 to sign in to Microsoft 365 and register your new app on the Microsoft Cloud.
Every app that integrates with Microsoft 365 must be registered and provide information such as the application's name and type (platform). For single-page apps, you also need to specify the application's URL, which is used to ensure that users are signing in to the right app.
Next, write the ID of the newly created app to a file that you'll reference in your app. In the terminal, run:
echo "const appId = '$appId';" > env.js
Create your App
Open your app folder in your code editor. Create a new file named index.html and paste the following code:
<html>
<head>
  // TODO #1: add libraries
</head>
<body>
  <h1>Hello Microsoft 365</h1>
  <div id="auth"></div>
  <pre></pre>
  <script>
    // TODO #2: add app code
  </script>
</body>
</html>
This code is a simple HTML page with two placeholders: one for the libraries that you'll use to build your app, and another for the app's code. It also contains a div where you'll show the login/logout button and a pre element where you'll show the user's profile information.
Add Libraries
Replace the TODO #1 comment with the following code:
  <script src="https://alcdn.msauth.net/browser/2.28.3/js/msal-browser.min.js"></script>
  <script src="https://cdn.jsdelivr.net/npm/@microsoft/microsoft-graph-client/lib/graph-js-sdk.js"></script>
  <script src="https://cdn.jsdelivr.net/npm/@microsoft/microsoft-graph-client/lib/graph-client-msalBrowserAuthProvider.js"></script>
  <script src="./env.js"></script>
To build this app you'll use a few libraries:
- MSAL.js which helps you handle signing users in with their Microsoft 365 account
- Microsoft Graph JavaScript SDK which simplifies calling Microsoft Graph – the API to access data and insights on Microsoft 365
- MSAL Browser Auth Provider which integrates MSAL.js with the Microsoft Graph JS SDK
- the previously created
env.jsfile with the ID of your app
Using these libraries will help you build your app faster, and you won't have to worry about the details of how to sign users in, get an access token, or properly handle API errors.
Sign Users In with their Microsoft 365 Account
Replace the TODO #2 comment with the following code:
    (() => {
      // TODO #3: create MSAL client

      // TODO #5: handle login/logout

      // TODO #6: create Microsoft Graph client

      // TODO #7: get Microsoft 365 user profile

      function render() {
        // TODO #4: render UI
      }

      render();
    })();
This code is an immediately invoked function expression (IIFE) that encapsulates the app's code and runs when the app loads. It also contains several placeholders for the code that you'll write in the next steps.
Replace the TODO #3 comment with the following code:
      const msalConfig = {
        auth: {
          clientId: appId
        }
      };
      const msalClient = new msal.PublicClientApplication(msalConfig);
In this fragment, you're creating a new configuration object for the MSAL.js library which includes a reference to the ID of the app you created earlier.
Next, you pass this object to the PublicClientApplication constructor to create a new instance of the MSAL client, which you'll use to sign users into your app with their Microsoft 365 account.
Right now, the app shows an empty page. Let's change that by replacing the TODO #4 comment with the following code:
        msalClient
          .handleRedirectPromise()
          .then(response => {
            const accounts = msalClient.getAllAccounts();

            if (accounts.length === 0) {
              document.querySelector('#auth').innerHTML = '<button>Login</button>';
              document.querySelector('#auth button').addEventListener('click', login);
              document.querySelector('pre').innerHTML = '';
            }
            else {
              document.querySelector('#auth').innerHTML = '<button>Logout</button>';
              document.querySelector('#auth button').addEventListener('click', logout);
              // TODO #8: show user profile
            }
          });
When signing users in with their Microsoft 365 account, you'll redirect them to the Microsoft 365 sign-in page. When they sign in, they'll be redirected back to your app.
The handleRedirectPromise function will handle processing the information that Microsoft 365 sends to your app. When users come to your app and haven't signed in yet, the handleRedirectPromise function will resolve with a null response.
After handling the redirect, you check using MSAL if there are any users signed in to your app. If there are none (accounts.length === 0 ), you show the login button. If there are users signed in, you show the logout button. Later, you'll add the code to show the user's profile information.
Both, the login and the logout button are missing their click handlers, so let's add them by replacing TODO #5 with the following code:
      function login(e) {
        e.preventDefault();
        msalClient.loginRedirect();
      }

      function logout(e) {
        e.preventDefault();
        msalClient.logoutRedirect();
      }
In both cases, you're using MSAL to sign users in and out by redirecting them to the Microsoft 365 login/logout page.
At this stage, your app should let you sign in and out using your Microsoft 365 account. To verify that everything is working as intended, save your changes, and in the terminal run:
npx lite-server
In your web browser, navigate to http://localhost:3000 and sign in to your app. You should see the following screen:
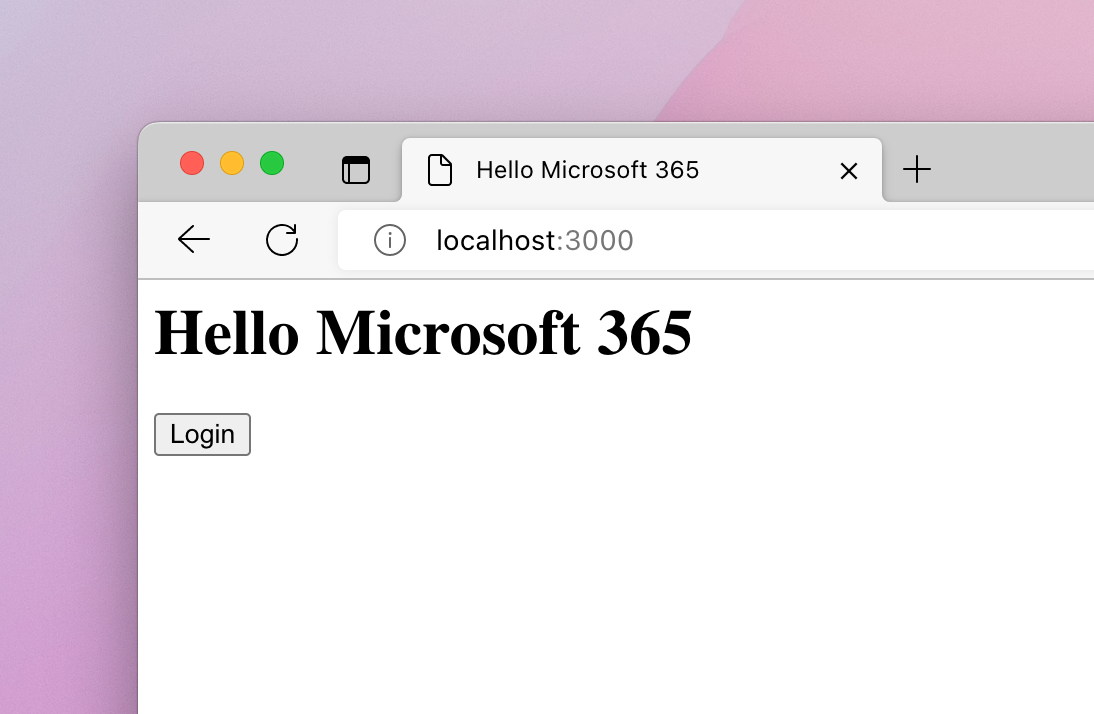 After signing into your app
When you click the login button, you will be asked to sign in with your Microsoft 365 account. Then, when you click the logout button, you will be signed out from Microsoft 365 and the app.
This concludes the first part of building the app, and you're ready to start retrieving data from Microsoft 365 using Microsoft Graph.
Show Microsoft 365 User Profile
Now that your app supports signing in and out with Microsoft 365 accounts, the next step is to add the code to retrieve the user's profile information from Microsoft 365.
Replace the TODO #6 comment with the following code:
      function getGraphClient(account) {
        const authProvider = new MSGraphAuthCodeMSALBrowserAuthProvider.AuthCodeMSALBrowserAuthenticationProvider(msalClient, {
          account,
          scopes: ['user.read'],
          interactionType: msal.InteractionType.Redirect,
        });

        return MicrosoftGraph.Client.initWithMiddleware({ authProvider });
      }
This function takes as an argument the Microsoft 365 account that has been used to sign in to the app and uses it to create a Microsoft Graph client that you'll use to call Microsoft Graph APIs and get data from Microsoft 365.
Next, let's replace the TODO #7 comment with the following code:
      function loadUserProfile(graphClient) {
        graphClient
          .api('/me')
          .get()
          .then(res => {
            document.querySelector('pre').innerHTML = JSON.stringify(res, null, 2);
          });
      }
This function takes as an argument an instance of the Microsoft Graph client as returned by the Microsoft Graph JavaScript SDK and uses it to call the Microsoft Graph API.
In this case, you're calling the /me Microsoft Graph API which returns profile information for the currently signed-in user. The retrieved data is then displayed in the pre element on the page.
The final piece is to tie it all together and call both functions after the user signs in to the app. Replace the TODO #8 comment with the following code:
              const graphClient = getGraphClient(accounts[0]);
              loadUserProfile(graphClient);
That's it! When you save your changes and go back to the browser, you'll see it automatically refreshed in the background, and you're prompted to grant the app access to your profile information.
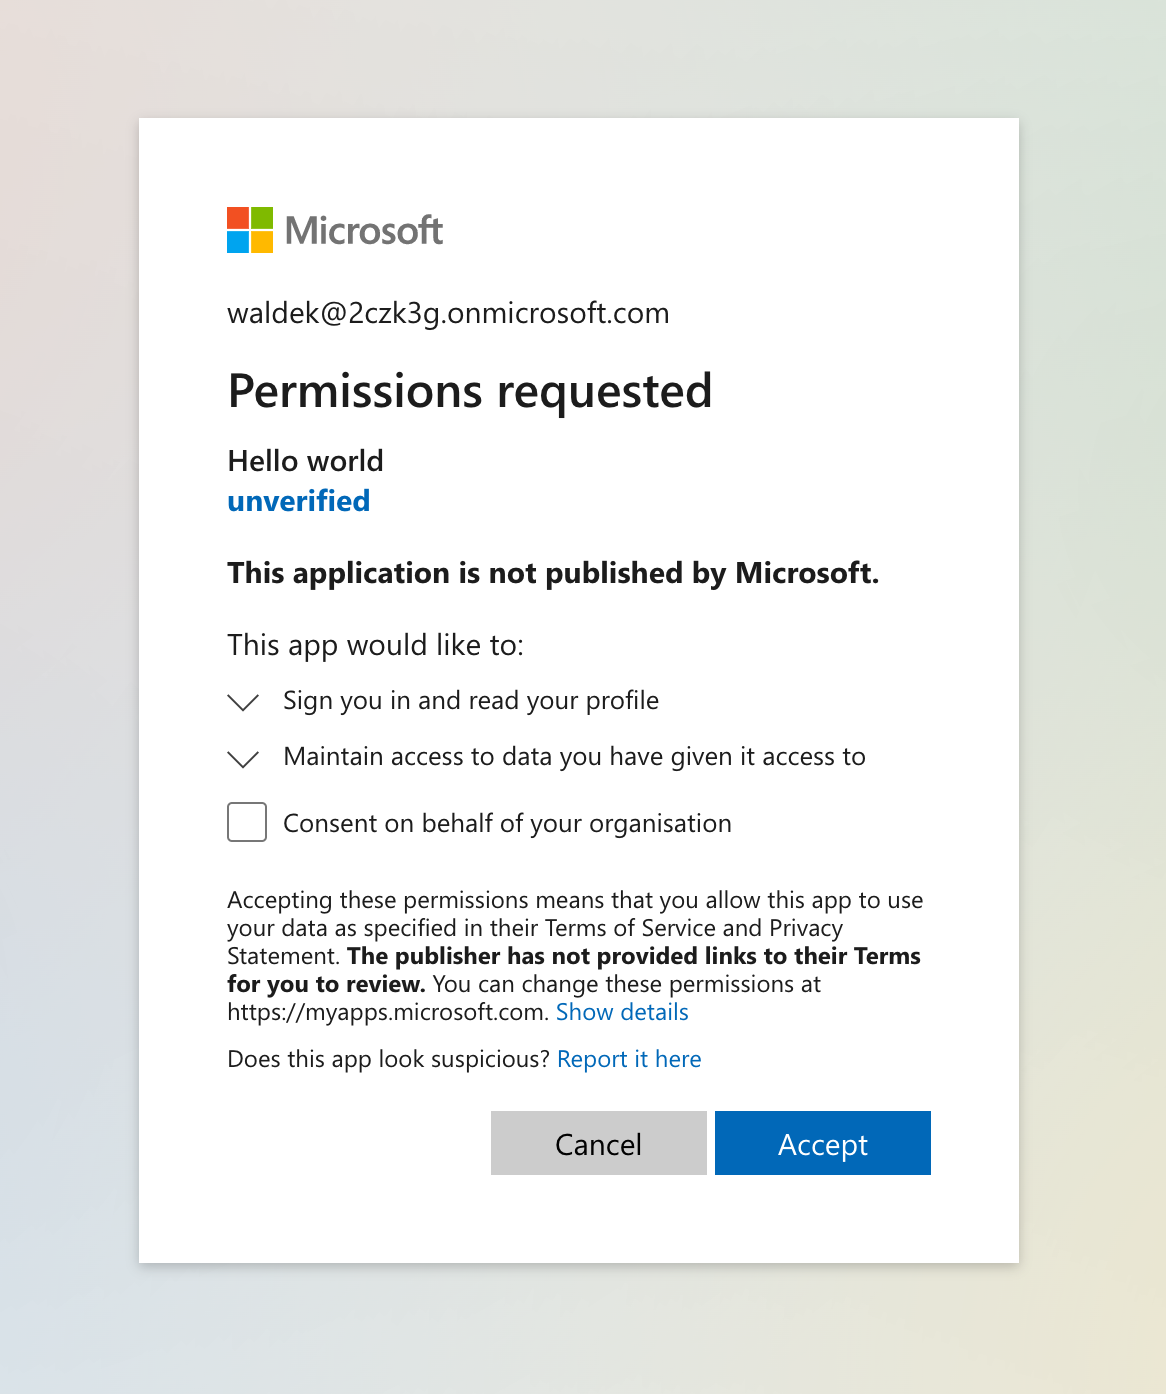 Setting permissions on the app
After your grant access, by clicking the Accept button, you'll see the profile information displayed in the pre element on the page.
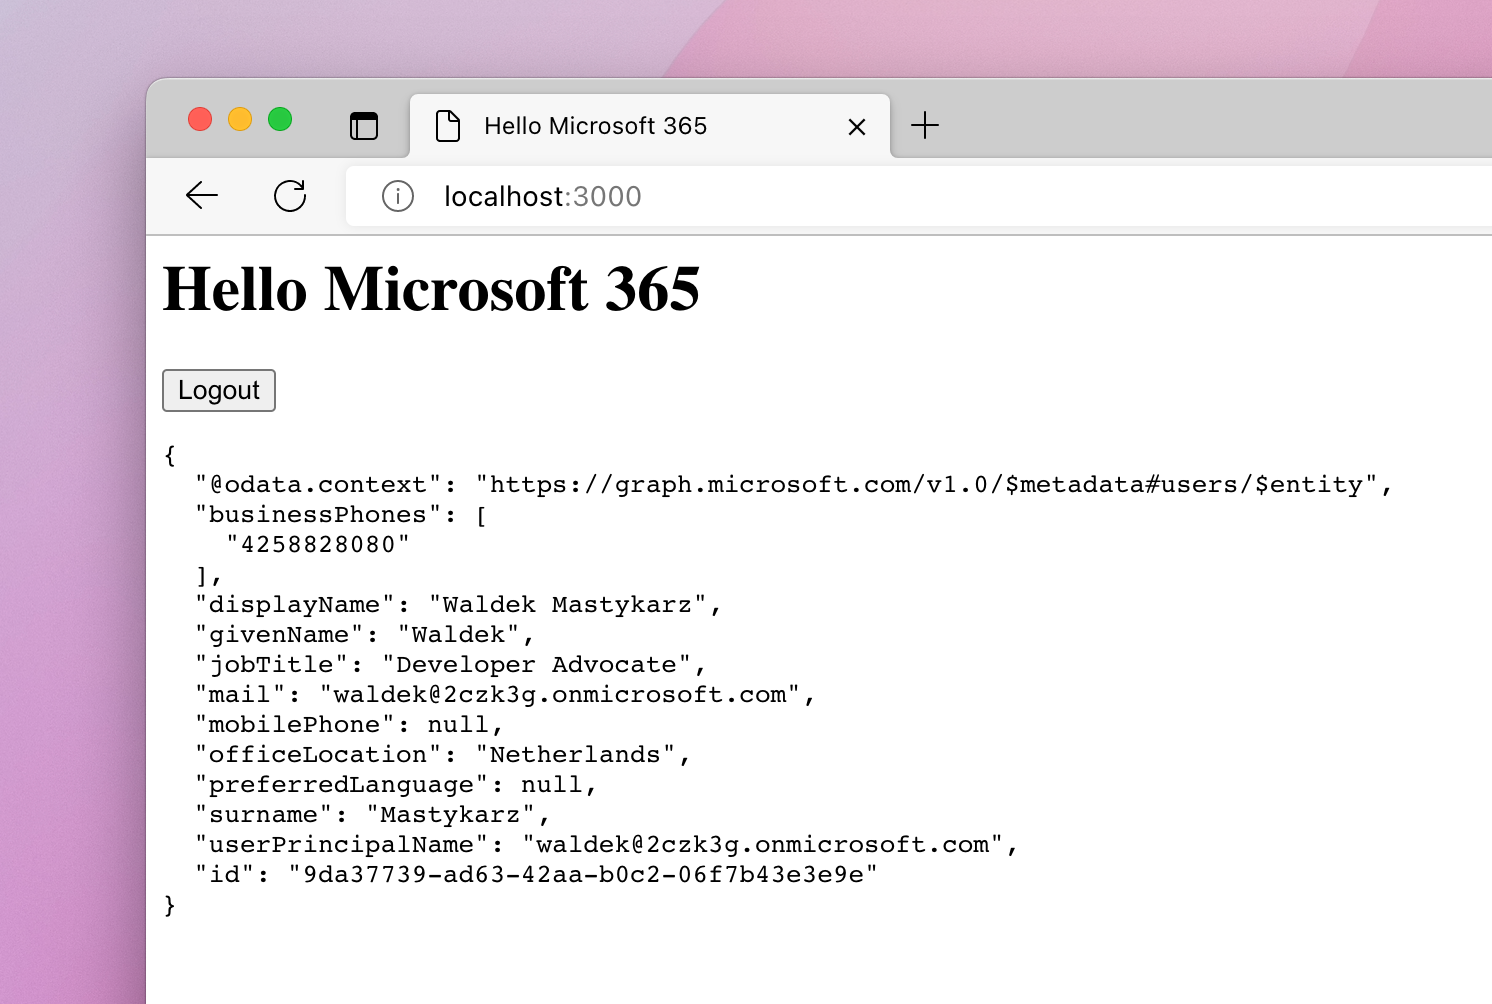 Profile information
Congratulations! You've just built your first app connected to Microsoft 365.
This is just the beginning
You've just built your first app on Microsoft 365: a single-page app connected to Microsoft 365 that shows the Microsoft 365 profile of the current user. This app is a simple example to show you how to get started building apps on Microsoft 365.
There's a lot more data and insights stored in Microsoft 365 that your apps can access, and there are many types of apps that you can build. The best part is that you can use the same techniques that you've learned in the last 10 minutes to build them.
You've just built a Microsoft 365 app using JavaScript, but you can build apps on Microsoft 365 using any programming language. One thing that all Microsoft 365 apps have got in common is that they bring in data and insights from Microsoft 365 helping people work together.
Curious to learn more? See what other developers and Microsoft partners are building on Microsoft 365. And if you want to learn further, check out the Microsoft Graph Fundamentals learning path. And please, don't hesitate to reach out if you have any questions.