

I love working with GitHub Actions. They're easy to use yet so powerful. I'm especially excited when I see how creative people are when using them to automate different tasks.
I want you to have that same power. That's why I'm going to show you how to create your first custom JavaScript action in just few steps.
Let's dig in.
What is a GitHub Action?
First, we need to establish the distinction between "GitHub Actions" and an "Action". The former is the product's name and the latter is custom code that you can include in a workflow job as a step to accomplish a task.
For example, an action can publish your code to a package manager like npm or yarn. It can also integrate with an SMS service provider to alert you when an urgent issue is created in your repo. Or it can turn on your coffee machine when you create a new pull request.
The possibilities are endless for what you can do!
What are the components of GitHub Actions?
Before we get started writing code, it's important for us to understand the building blocks of GitHub Actions.
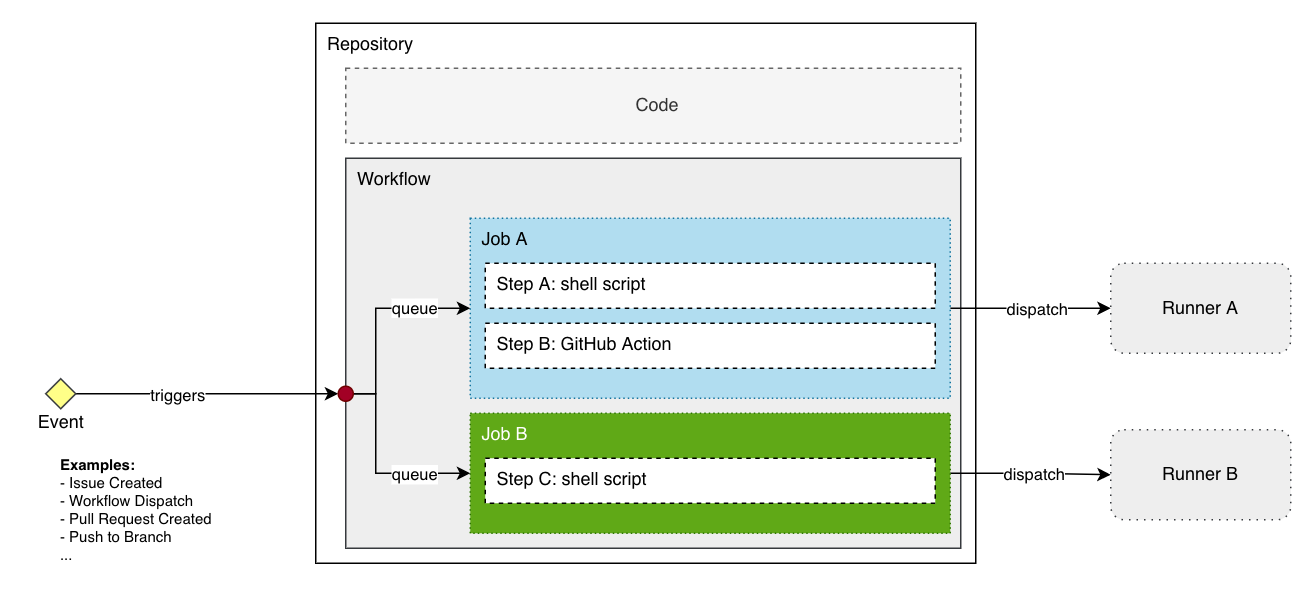
Let's break down this diagram, starting from the left and going right:
- Event: This is the event that triggers the action. It represents an activity in the repository that will trigger a workflow run.
- Workflow: This is the workflow that is run when the event occurs.
- Job: A set of steps that are run in sequence to accomplish a task. Each job runs on its own runner.
- Step: A step is either a shell script, or an action that will be run on the runner assigned for the job the step is part of.
- Runner: A runner is a virtual machine (or any computer with a supported operating system) that runs the steps in a job.
This is very well explained in GitHub's extensive docs, and you can read more about the components here.
When do I need to create an Action?
Since each step can be either a shell script or an action, how do we decide which option to choose?
If you answer "yes" to any of the below questions, then you're better off creating an Action:
- Will other people benefit from the action you're creating and actually reuse it?
- Do you need to build complex logic that cannot be written in a shell script?
- Are you going to be using any third-party libraries?
- Do you need to make API calls to a third-party service?
- Do you have the ability to maintain this code and release fixes or updates?
- Do you need to be able to run this action on different operating systems?
- Are you proficient in JavaScript but not Bash or PowerShell?
- Do you want to learn how to make one?
Let's create our Action
We're going to build an Action that will create a comment whenever a pull request is opened on our repository and add labels depending on the file types changed. The comment will contain a summary of the changes introduced in the pull request.
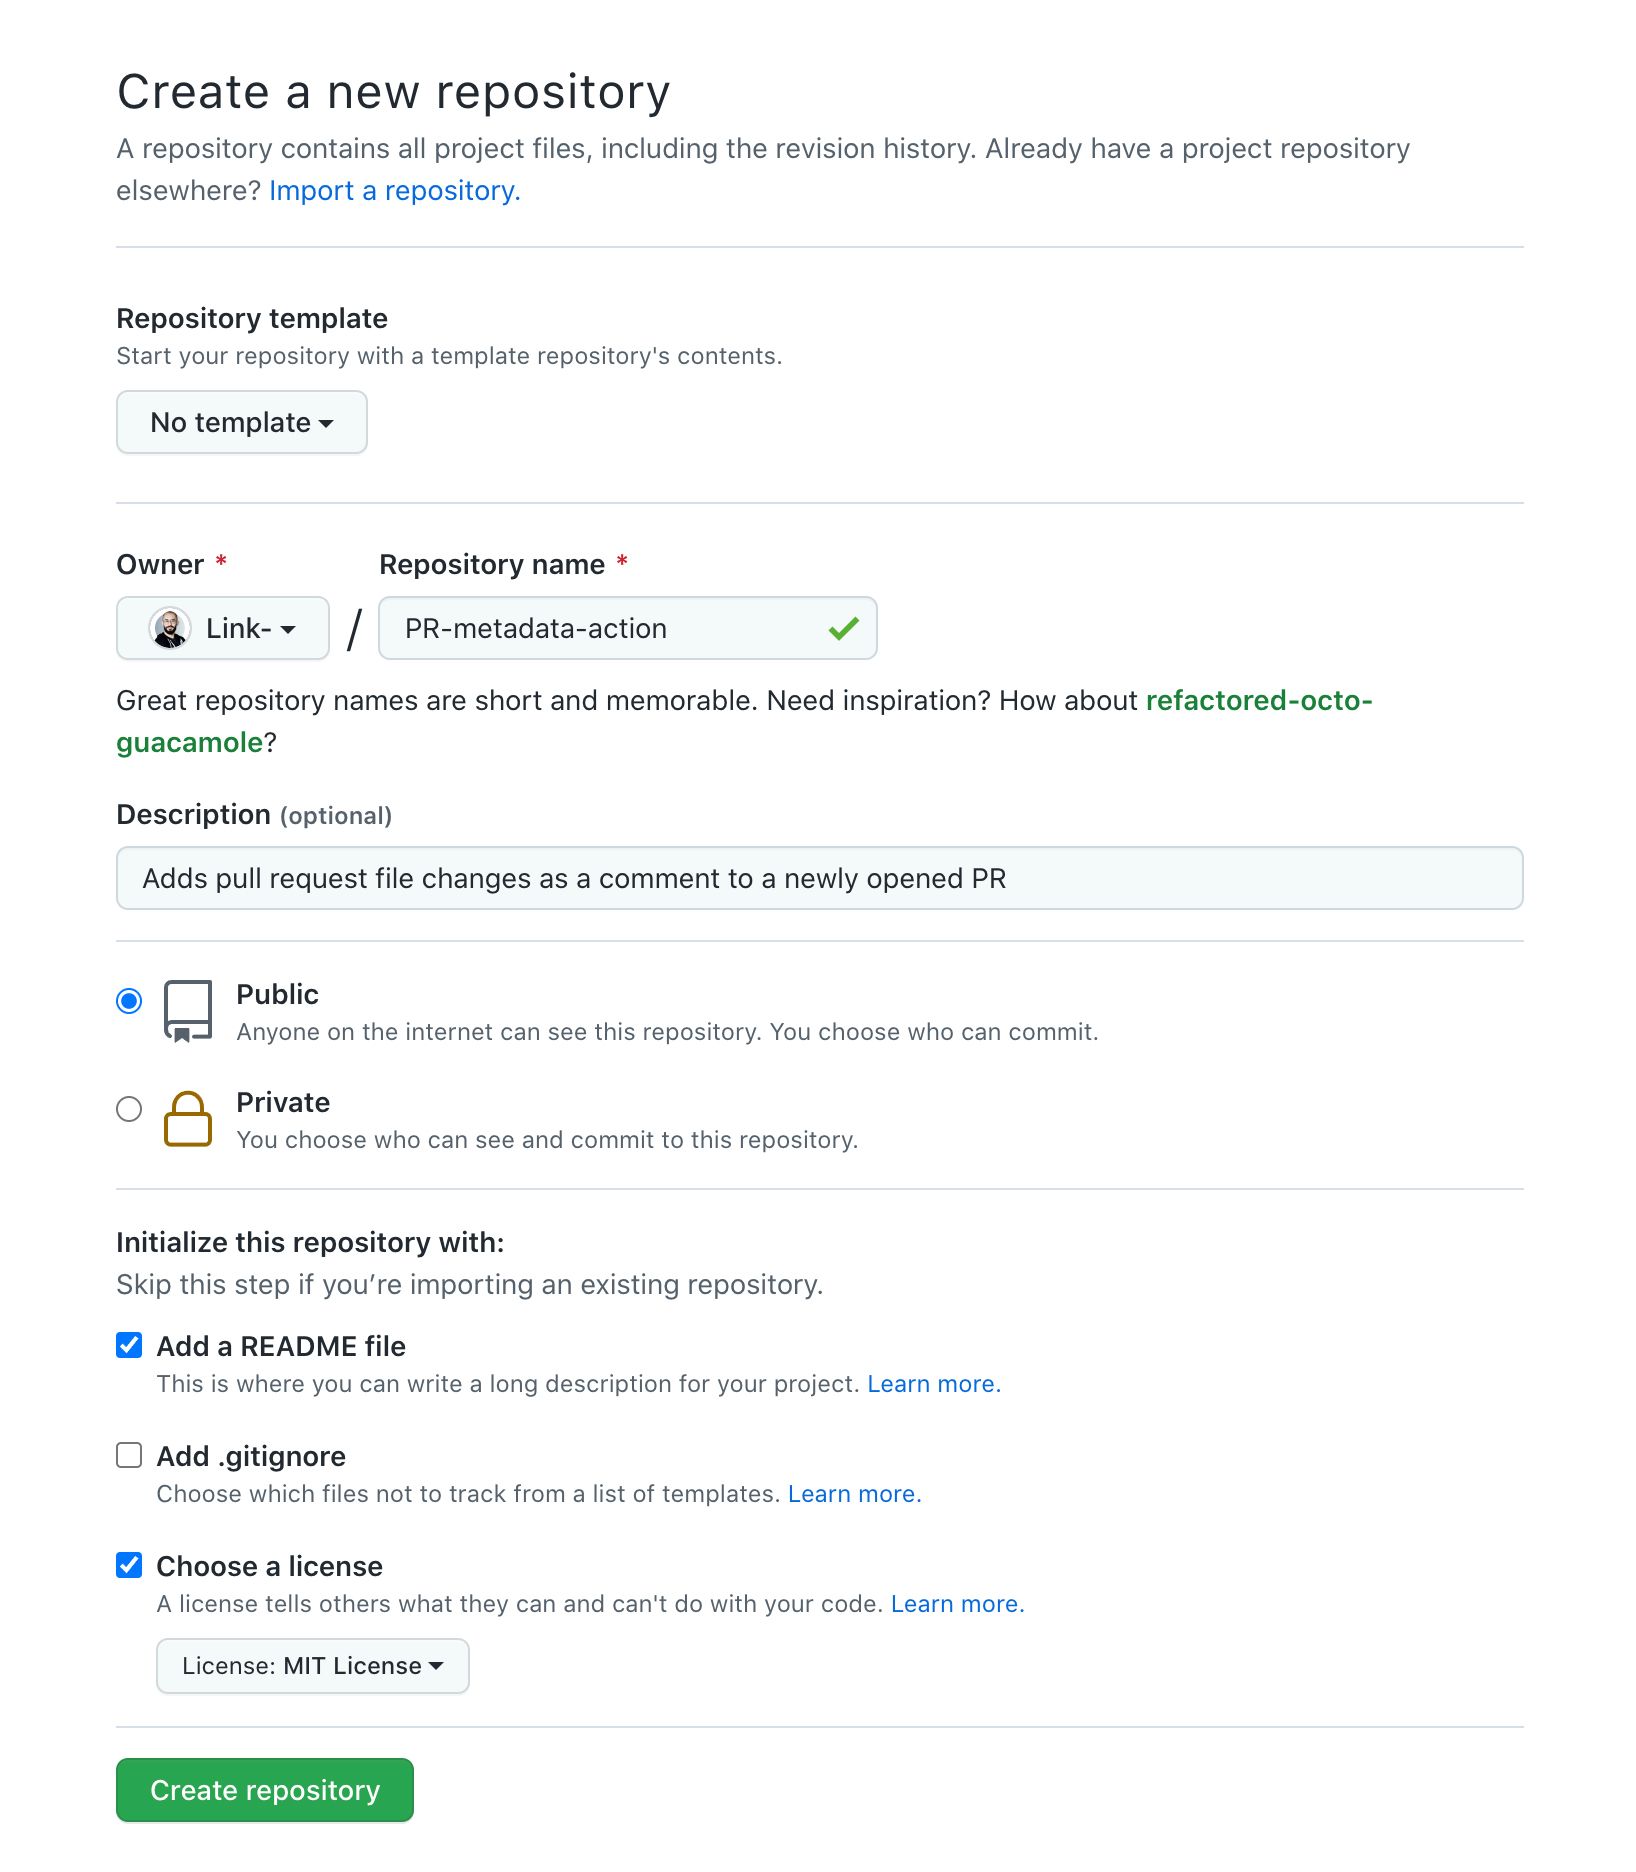
1. Create an empty public repository
Let's start by creating an empty GitHub repository called: PR-metadata-action. This will be the repository that we will use to store our Action.
It has to be public, otherwise we won't be able to use it in our workflows.
2. Clone the repository locally and initialize a Node project
Go to the folder where you wish to store the Action's repository. Then let's clone the repository on our machine:
$ git clone git@github.com:Link-/PR-metadata-action.git
Cloning into 'PR-metadata-action'...
remote: Enumerating objects: 4, done.
remote: Counting objects: 100% (4/4), done.
remote: Compressing objects: 100% (4/4), done.
Receiving objects: 100% (4/4), done.
remote: Total 4 (delta 0), reused 0 (delta 0), pack-reused 0
Inside our newly created repository's folder, let's initialize a new Node.js project:
$ cd PR-metadata-action/
$ npm init -y
Wrote to /Users/link-/PR-metadata-action/package.json:

{
  "name": "pr-metadata-action",
  "version": "1.0.0",
  "description": "Adds pull request file changes as a comment to a newly opened PR",
  "main": "index.js",
  "scripts": {
    "test": "echo \"Error: no test specified\" && exit 1"
  },
  "repository": {
    "type": "git",
    "url": "git+https://github.com/Link-/PR-metadata-action.git"
  },
  "keywords": [],
  "author": "",
  "license": "ISC",
  "bugs": {
    "url": "https://github.com/Link-/PR-metadata-action/issues"
  },
  "homepage": "https://github.com/Link-/PR-metadata-action#readme"
}
3. Create an Action metadata file
Let's create action.yml. This file is very important, as it will define the interface of our Action:
- inputs: the parameters containing data that the action expects to use during runtime
- outputs: data that an action sets after it's done. We're not going to have an output for our action this time.
- runs: specifies the execution runtime of the action, which will be node16 in this case
Read more about the metadata file syntax.
name: 'PR Metadata Action'
description: 'Adds pull request file changes as a comment to a newly opened PR'
inputs:
  owner:
    description: 'The owner of the repository'
    required: true
  repo:
    description: 'The name of the repository'
    required: true
  pr_number:
    description: 'The number of the pull request'
    required: true
  token:
    description: 'The token to use to access the GitHub API'
    required: true
runs:
  using: 'node16'
  main: 'index.js'
4. Add Actions toolkit packages
GitHub has created an open source software development toolkit (SDK) that will make your life much easier when creating actions.
The 2 main packages we will be using today are:
@actions/core: this package contains the core functionality of the Action, such as the
contextobject that contains the information about the current run, theinputsobject that contains the parameters of the action, and theoutputsobject that will contain the data that the action sets after it's done.@actions/github: this package contains the GitHub API REST client that we will use to interact with the GitHub API.
$ npm install @actions/core
added 3 packages, and audited 4 packages in 1s

found 0 vulnerabilities

$ npm install @actions/github
added 21 packages, and audited 25 packages in 1s

found 0 vulnerabilities
Our folder structure should look like this now:
/Users/link-/PR-metadata-action
├── LICENSE
├── README.md
├── action.yml
├── node_modules
├── package-lock.json
└── package.json

1 directory, 6 files
5. Write the Action
Creating a .gitignore file is important at this stage to avoid pushing unnecessary files to the repository.
A great tool I frequently use is: https://www.toptal.com/developers/gitignore
My .gitignore file is:
https://www.toptal.com/developers/gitignore/api/visualstudiocode,macos,node
Create one that is specific to your environment and project.
We're finally ready to create our index.js file. This is where all the logic of our action will be. We can definitely have a more complex structure, but for now one file will do.
I've commented all the code below so that you know what's happening step by step.
const core = require('@actions/core');
const github = require('@actions/github');

const main = async () => {
  try {
    /**
     * We need to fetch all the inputs that were provided to our action
     * and store them in variables for us to use.
     **/
    const owner = core.getInput('owner', { required: true });
    const repo = core.getInput('repo', { required: true });
    const pr_number = core.getInput('pr_number', { required: true });
    const token = core.getInput('token', { required: true });

    /**
     * Now we need to create an instance of Octokit which will use to call
     * GitHub's REST API endpoints.
     * We will pass the token as an argument to the constructor. This token
     * will be used to authenticate our requests.
     * You can find all the information about how to use Octokit here:
     * https://octokit.github.io/rest.js/v18
     **/
    const octokit = new github.getOctokit(token);

    /**
     * We need to fetch the list of files that were changes in the Pull Request
     * and store them in a variable.
     * We use octokit.paginate() to automatically loop over all the pages of the
     * results.
     * Reference: https://octokit.github.io/rest.js/v18#pulls-list-files
     */
    const { data: changedFiles } = await octokit.rest.pulls.listFiles({
      owner,
      repo,
      pull_number: pr_number,
    });


    /**
     * Contains the sum of all the additions, deletions, and changes
     * in all the files in the Pull Request.
     **/
    let diffData = {
      additions: 0,
      deletions: 0,
      changes: 0
    };

    // Reference for how to use Array.reduce():
    // https://developer.mozilla.org/en-US/docs/Web/JavaScript/Reference/Global_Objects/Array/Reduce
    diffData = changedFiles.reduce((acc, file) => {
      acc.additions += file.additions;
      acc.deletions += file.deletions;
      acc.changes += file.changes;
      return acc;
    }, diffData);

    /**
     * Loop over all the files changed in the PR and add labels according
     * to files types.
     **/
    for (const file of changedFiles) {
      /**
       * Add labels according to file types.
       */
      const fileExtension = file.filename.split('.').pop();
      switch(fileExtension) {
        case 'md':
          await octokit.rest.issues.addLabels({
            owner,
            repo,
            issue_number: pr_number,
            labels: ['markdown'],
          });
        case 'js':
          await octokit.rest.issues.addLabels({
            owner,
            repo,
            issue_number: pr_number,
            labels: ['javascript'],
          });
        case 'yml':
          await octokit.rest.issues.addLabels({
            owner,
            repo,
            issue_number: pr_number,
            labels: ['yaml'],
          });
        case 'yaml':
          await octokit.rest.issues.addLabels({
            owner,
            repo,
            issue_number: pr_number,
            labels: ['yaml'],
          });
      }
    }

    /**
     * Create a comment on the PR with the information we compiled from the
     * list of changed files.
     */
    await octokit.rest.issues.createComment({
      owner,
      repo,
      issue_number: pr_number,
      body: `
        Pull Request #${pr_number} has been updated with: \n
        - ${diffData.changes} changes \n
        - ${diffData.additions} additions \n
        - ${diffData.deletions} deletions \n
      `
    });

  } catch (error) {
    core.setFailed(error.message);
  }
}

// Call the main function to run the action
main();
6. Push our Action files to GitHub
Let's stage, commit, and push our files to the main branch upstream:
$ git status
On branch main
Your branch is up to date with 'origin/main'.

Untracked files:
  (use "git add <file>..." to include in what will be committed)
 .gitignore
 action.yml
 index.js
 package-lock.json
 package.json

nothing added to commit but untracked files present (use "git add" to track)
Let's add all the files to be staged:
$ git add .
Now we can commit our changes:
$ git commit -m "Add main action structure"
[main 1fc5d18] Add main action structure
 5 files changed, 686 insertions(+)
 create mode 100644 .gitignore
 create mode 100644 action.yml
 create mode 100644 index.js
 create mode 100644 package-lock.json
 create mode 100644 package.json
And push our changes:
$ git push origin main
Enumerating objects: 8, done.
Counting objects: 100% (8/8), done.
Delta compression using up to 16 threads
Compressing objects: 100% (7/7), done.
Writing objects: 100% (7/7), 5.82 KiB | 5.82 MiB/s, done.
Total 7 (delta 0), reused 0 (delta 0), pack-reused 0
To github.com:Link-/PR-metadata-action.git
   457fee2..1fc5d18  main -> main
7. How to test our Action
In order for us to be able to test our action, we need to create a bundle. If you noticed in the previous step, we did not push our node_modules folder which contains the packages we used in building our index.js file.
Our action will not run without those packages! To fix this we can use a nice tool called ncc. It will help us create one file that includes our code and all the packages we need to run our action.
Let's start by installing ncc:
$ npm install @vercel/ncc

added 1 package, and audited 26 packages in 5s

found 0 vulnerabilities
Compiling our JavaScript is as simple as running:
$ ncc build index.js -o dist
ncc: Version 0.22.1
ncc: Compiling file index.js
530kB  dist/index.js
530kB  [845ms] - ncc 0.22.1
This will create a new directory called dist and create a file called index.js that contains our code and all the packages we need to run our action.
Now we need to make sure our action.yml file contains the correct runs section. You need to replace:
runs:
  using: 'node16'
  main: 'index.js'
with:
runs:
  using: 'node16'
  main: 'dist/index.js'
Let's push our changes one more time upstream (to our GitHub repository). Make sure our dist/ folder is not in the .gitignore file:
$ git status
$ git add .
$ git commit -m "Add compiled action"
[main adfc4f0] Add compiled action
 4 files changed, 8505 insertions(+), 3 deletions(-)
 create mode 100644 dist/index.js
$ git push origin main
We're finally ready to create our workflow! Create a new workflow in the same or in any other repository (public or private doesn't matter) as follows:
mkdir -p .github/workflows
touch .github/workflows/pr-metadata.yaml
Copy the following workflow into our pr-metadata.yaml file:
name: PR metadata annotation

on:
  pull_request:
    types: [opened, reopened, synchronize]

jobs:

  annotate-pr:
    runs-on: ubuntu-latest
    name: Annotates pull request with metadata
    steps:
      - name: Annotate PR
        uses: link-/PR-metadata-action@main
        with:
          owner: ${{ github.repository_owner }}
          repo: ${{ github.event.repository.name }}
          pr_number: ${{ github.event.number }}
          token: ${{ secrets.GITHUB_TOKEN }}
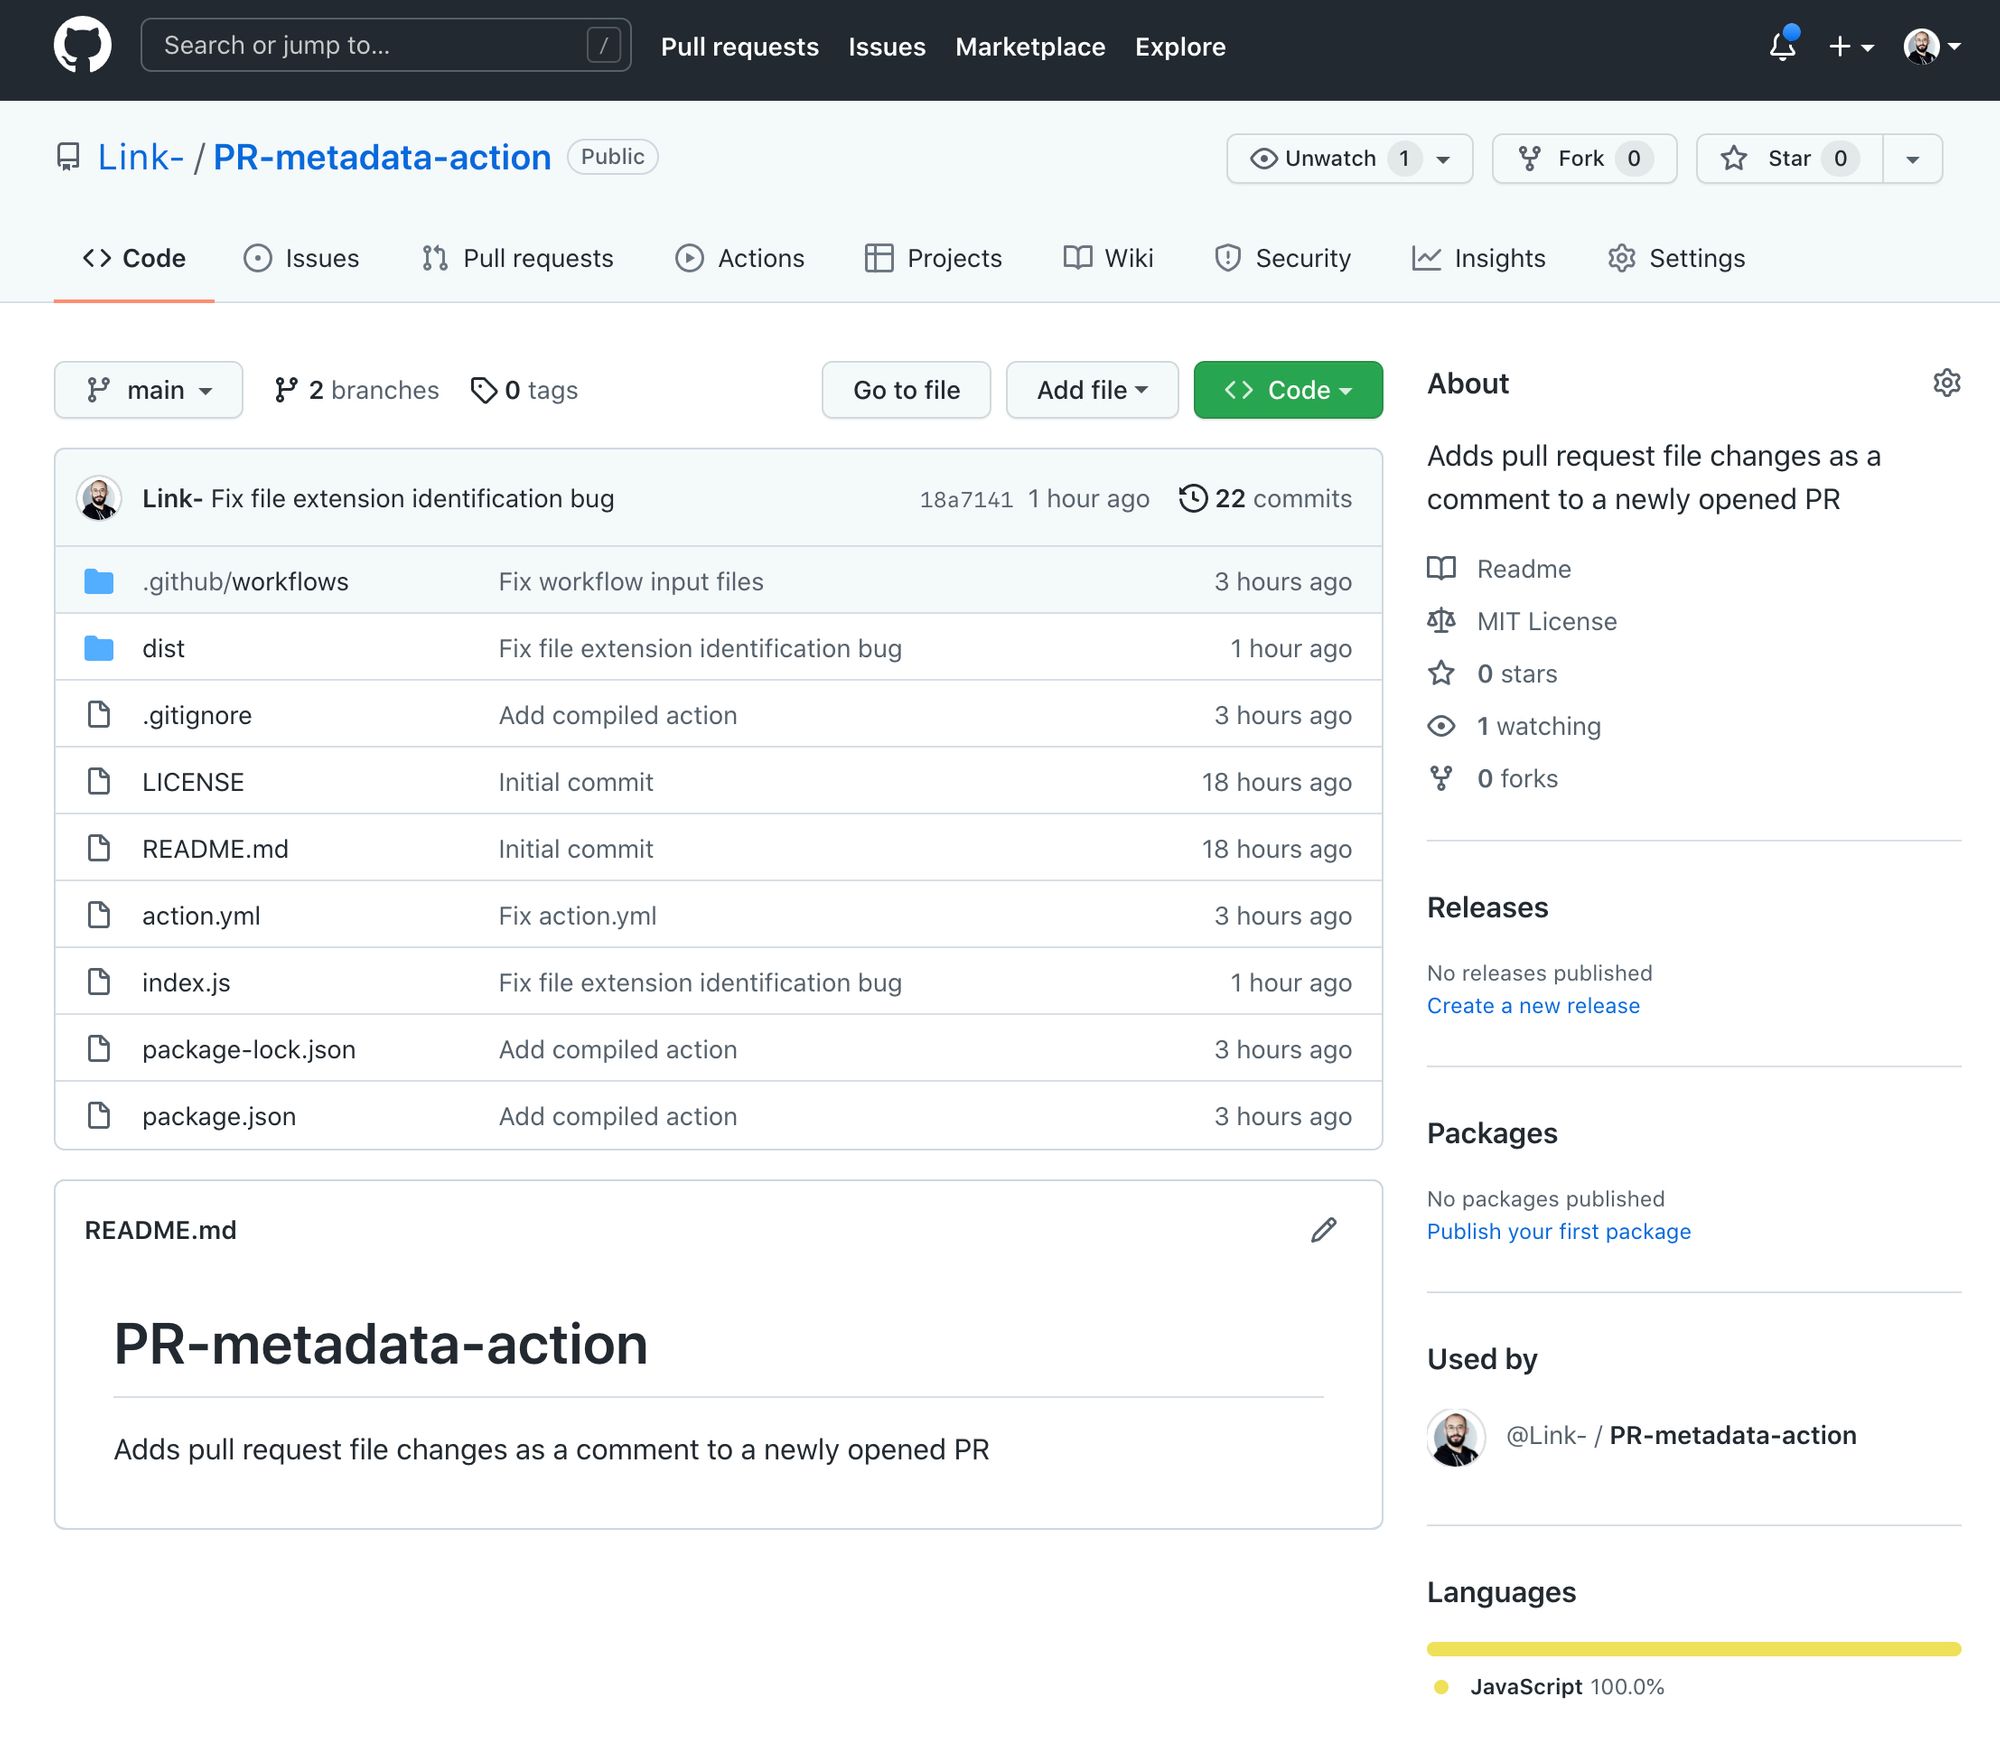
When you're done with all these steps, our repository should look like this:
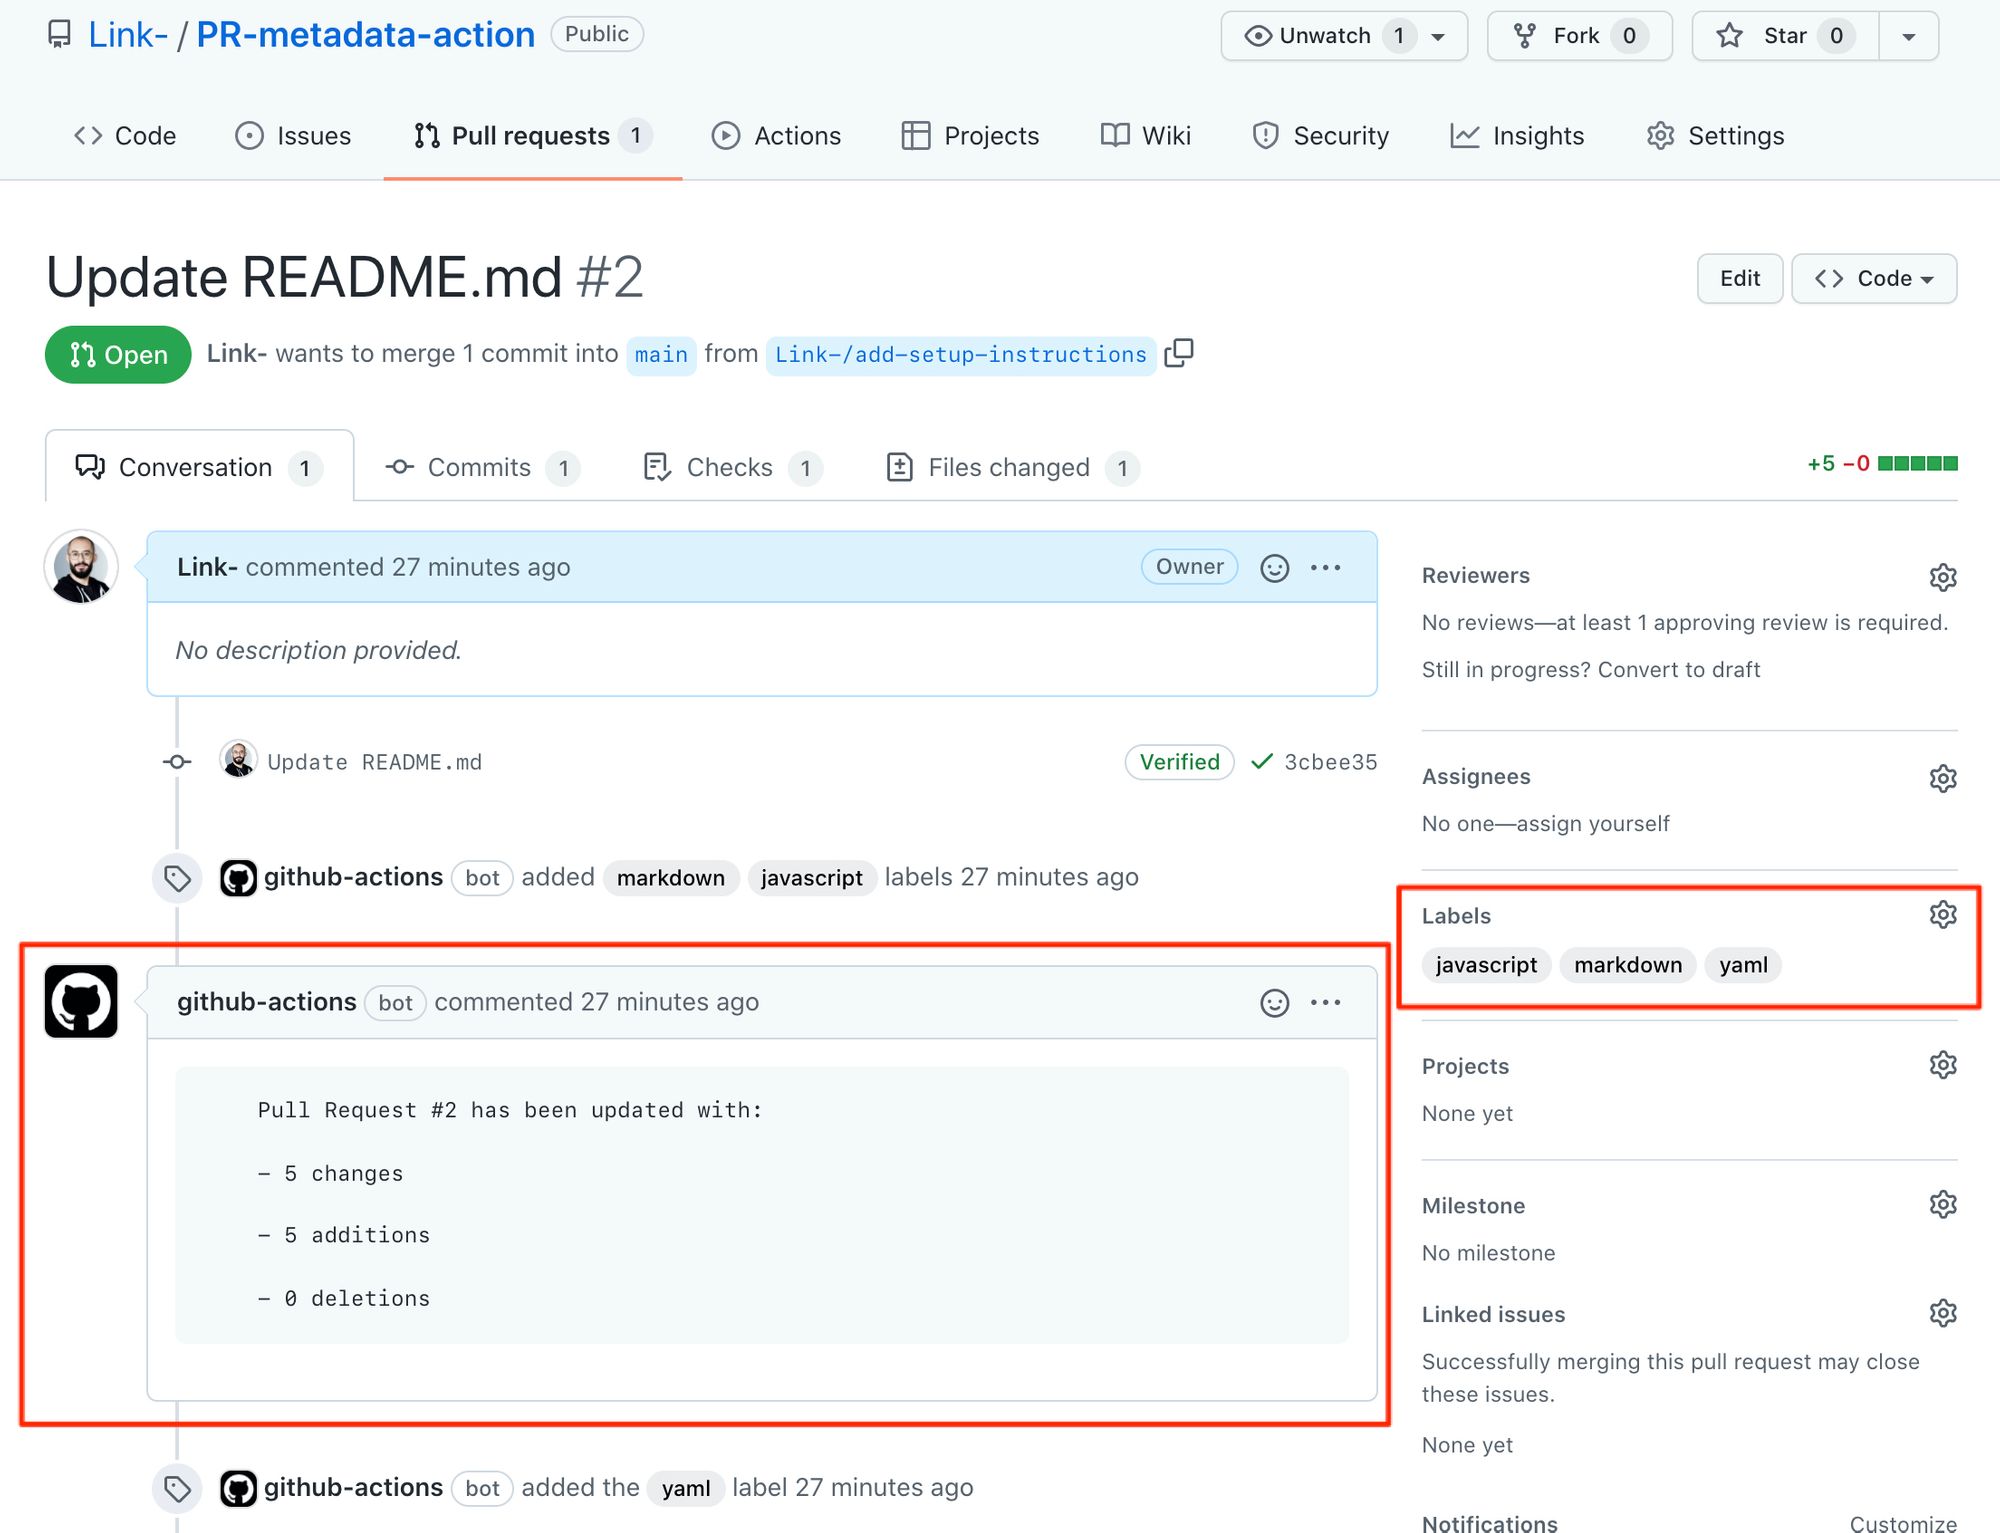
In order for us to test this workflow, we need to make a change in our repository and create a Pull Request (PR). We can do this by editing the README.md file directly on GitHub:
GitHub Actions Best Practices
Lastly I want to share with you some best practices when creating custom Actions:
Adopt the single responsibility principle. Make sure your actions do one thing only. It'll make your code easier to maintain and easier to test.
Think well about your action's interface (inputs and outputs). Keep your interfaces simple and clear by reducing the number of optional inputs.
We didn't do it in this tutorial, but you need to validate your action's inputs! The majority of security projects could be eliminated by validating inputs.
Make sure your action is idempotent, meaning, if you run the action multiple times in a sequence the outcome should always be the same. In our case, the action should execute and post a comment and add the labels, or it should exit gracefully.
Read and follow the security hardening best practices documented in these GitHub Docs.
Do not create a new action if you're not able to maintain it. Search for similar actions in the marketplace and use them instead.
Conclusion
For this tutorial, we created a custom action that comments a summary of changes in a Pull Request and adds labels for the file types that were modified.
You should be able to reuse these steps to create more complex actions that can do so much more!
I'm in the process of creating a thorough DevOps course using GitHub Actions. If you're looking for more in-depth information on how you can use Actions for Continuous Integration, Continuous Delivery, or gitOps (among many other topics), keep an eye on these videos:
Happy Coding!