

You may already understand how important a good VPN can be for maintaining the security and privacy of your mobile communications.
Whether you need to use your phone for banking over a public airport or coffee shop WiFi connection, or you're worried about the wrong people listening in on your online interactions, the tunneled encryption a good VPN gives you can be invaluable.
The trick, however, is finding a VPN that really is "good" – and one that's both convenient and affordable.
There are plenty of commercial VPN services out there, and configuring one of those for your phone or laptop is usually simple enough.
But such services come with two potential down-sides: they're often expensive, with payments averaging around $10 monthly, and you can never be quite 100% sure that they aren't (accidentally or on purpose) leaking or misusing your data.
Also, cheaper VPNs often limit your data use and the number of devices you can connect.
If you like watching video versions of tutorials to supplement your learning, feel free to follow along here:
What WireGuard Delivers
But if you happen to have a cloud-based Linux server running anyway, building a WireGuard VPN can be a simple and free way to add some serious, compromise-free security and privacy to your life.
If you plan to limit the VPN to just devices owned by you and a few friends, you'll probably never even notice any extra resource load on your server. Even if you had to fire up and pay for a dedicated AWS EC2 t2.micro reserved instance, the annual costs should still come out significantly cheaper than most commercial VPNs. And, as a bonus, you'll get complete control over your data.
Right now I'm going to show you how all that would work using the open source WireGuard software on an Ubuntu Linux server.
Why WireGuard? Because it's really easy to use, is designed to be particularly attack resistant, and it's so good at what it does that it was recently incorporated into the Linux kernel itself.
The actual work to make this happen really will take only five minutes - or less. Having said that, planning things out, troubleshooting for unexpected problems and, if necessary, launching a new server might add significant time to the project.
How to Set Up Your Environment
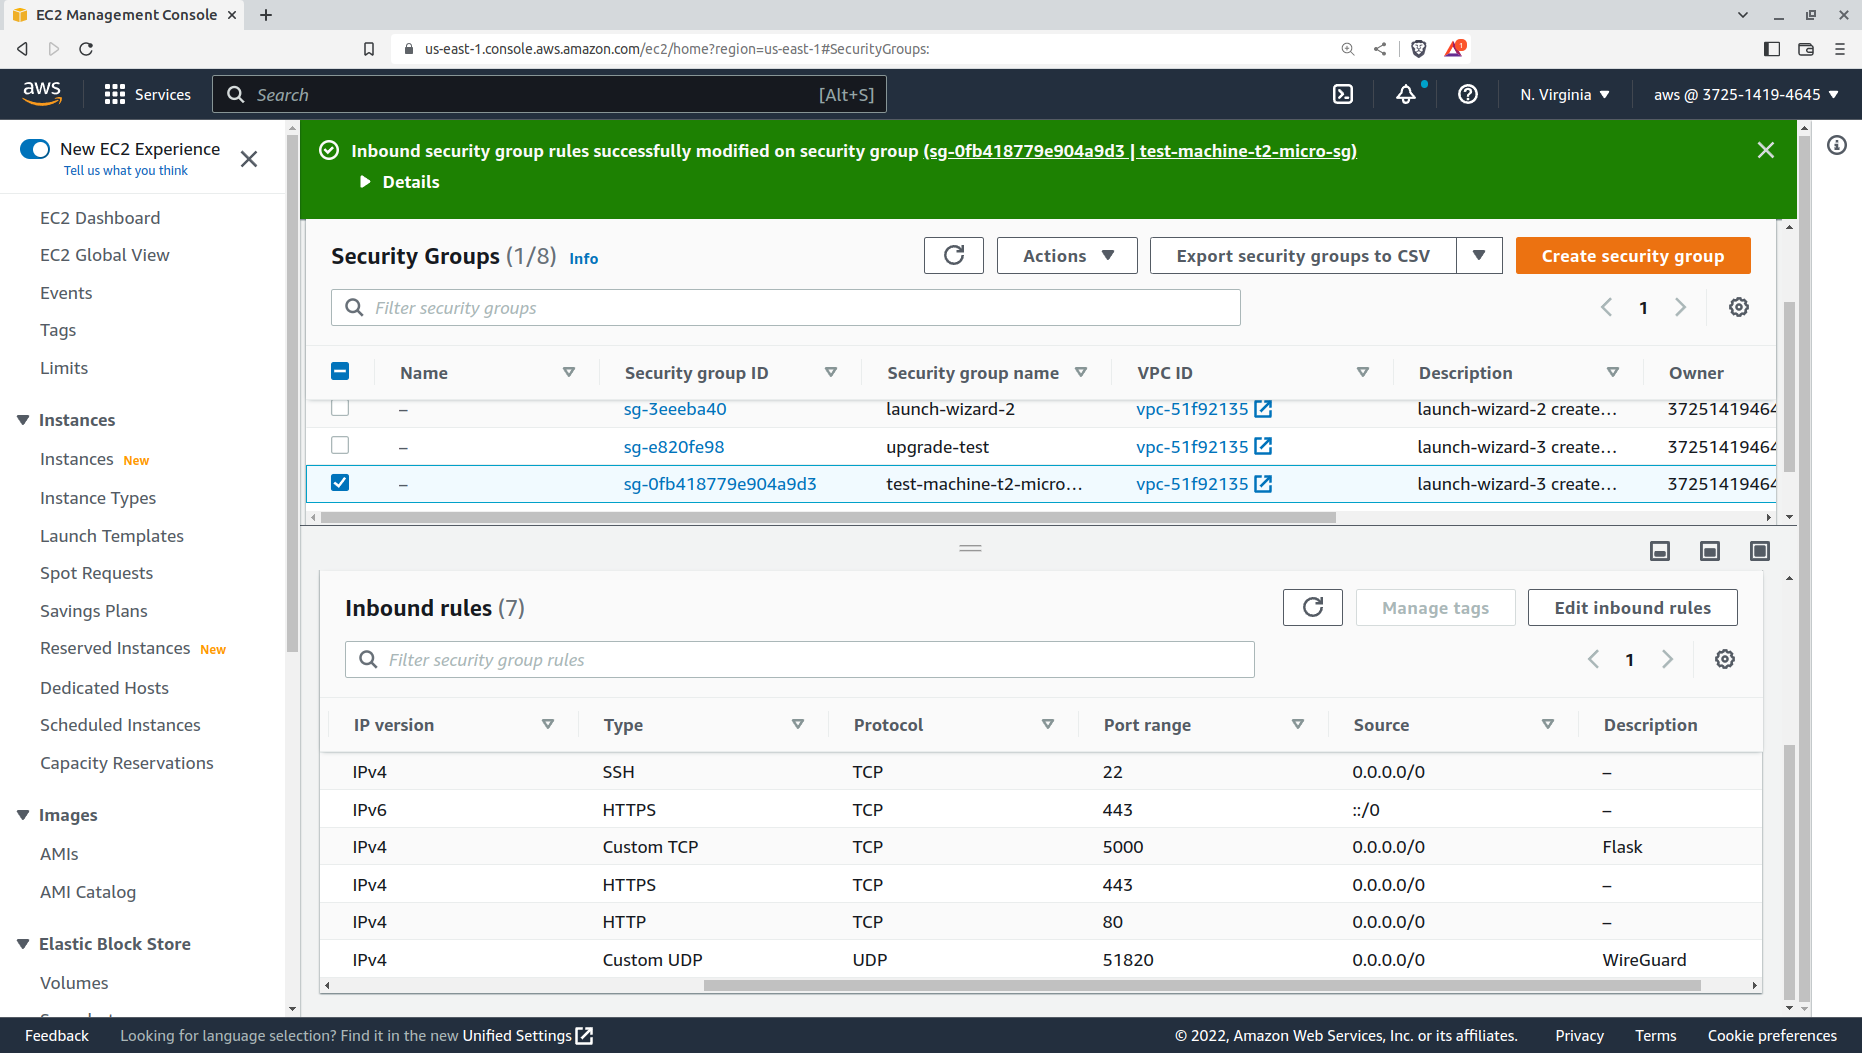
First off, you'll need to open the UDP port 51820 in whatever firewall you're using. Here's how that would look for the security group associated with an AWS EC2 instance:
Now, on the Linux server, using a sudo shell, we'll begin by installing the WireGuard and resolvconf packages.
Technically, we probably won't need resolvconf here, but since that's what you'd need if you wanted to set up a Linux machine as a WireGuard client I thought I'd throw that in here, too.
apt install wireguard resolvconf
How to Generate Encryption Keys
The wg genkey command generates a new private encryption key and saves it as a file in the /etc/wireguard directory. This directory was automatically created when we installed WireGuard.
The chmod command sets the appropriate restrictive permissions for that private key file.
Like everything in Linux, there are other ways to get this done, but just make sure you do it right.
wg genkey | sudo tee /etc/wireguard/private.key
chmod go= /etc/wireguard/private.key
Next, we'll use the value of our private key to generate a matching public key – which will also be saved to the /etc/wireguard directory. The goal is to add the server's public key to the WireGuard configuration on all the client devices we'll be using, and then to add those clients' public keys to the server configuration here.
Private keys should never leave the machines for which they're created – and should always be carefully protected.
cat /etc/wireguard/private.key | wg pubkey | sudo tee
How to Configure the WireGuard Server
We're now ready to create a server configuration file. Following convention, I'll name the file wg0.conf, but you can give it any name you'd like. You can also have multiple configurations (with different filenames) existing at the same time.
Here's what our configuration will look like:
[Interface]
Address = 10.5.5.1/24
ListenPort = 51820
# Use your own private key, from /etc/wireguard/privatekey
PrivateKey = your_key

[Peer]
# Workstation public key
PublicKey = your_key
# VPN client's IP address in the VPN
AllowedIPs = 10.5.5.2/32

[Peer]
# laptop public key
PublicKey = your_key
# VPN client's IP address in the VPN
AllowedIPs = 10.5.5.3/32
Notice that this file has three sections: an Interface, and two peers. The Interface section defines the private NAT network address that our server will use. That's the private address the clients will connect to – after first requesting access through the server's public IP address, of course.
You don't have to follow my addressing, as long as you use a valid private IP range that doesn't overlap on any network blocks being used by either your server or client.
Matching the UDP security group rule I set up earlier in AWS, I'm defining the ListenPort as 51820. But I could choose a different address to add a tiny bit more security if I want.
Finally, I would paste the server's Private Key as the value of PrivateKey so WireGuard will be able to authenticate incoming client requests.
The first peer section contains nothing more than the public key and assigned private IP address of one client. The second peer section does the same for a second client machine.
Getting those public keys from the client is the most manual task involved in this whole setup. But, since this is your own VPN, you can usually find a way to copy and paste directly into your server configuration so you don't need to painfully type the whole thing in.
That should be everything. I'll use the wg-quick command to bring the VPN to life. up tells WireGuard to read the wg0.conf configuration we just made and use it to build a new VPN interface.
wg-quick up wg0
Running wg will show us that it worked. Finally, I'll run systemctl enable to tell Linux to load this WireGuard interface automatically each time the server reboots.
systemctl enable wg-quick@wg0
How to Configure WireGuard Clients
That's all we'll need from the server end of things. Getting your client device set up with WireGuard is either going to be much easier or more or less the same.
What does that mean? Well, if you're working with Windows, macOS, Android or iOS, then there are links to GUI apps available from this wireguard.com/install page. Those apps will generate key pairs for you. You'll only need to enter the server's IP address or domain and its public key. You'll then take the client's public key and add it to the server wg0.conf file the way I showed you earlier.
However, if it's a Linux PC or laptop client you want to add, then it's a bit more complicated. You'll basically follow all the steps you saw for the server configuration, including the key generation. You'll even create a configuration file named wg0-conf (if that's the name you like). But here's how that config file should look:
[Interface]
# The address your computer will use on the VPN
Address = 10.5.5.2/32
DNS = 8.8.8.8
# Load your privatekey from file
PostUp = wg set %i private-key /etc/wireguard/privatekey
# Also ping the vpn server to ensure the tunnel is initialized
PostUp = ping -c1 10.47.47.1
[Peer]
# VPN server's wireguard public key
PublicKey = your_key
# Public IP address of your VPN server (USE YOURS!)
Endpoint = 54.160.21.183:51820
# 10.0.0.0/24 is the VPN subnet
AllowedIPs = 10.47.47.0/24
# PersistentKeepalive = 25
The Interface section represents the client machine this time, while the Peer section down below refers to the server. Let's begin with Interface. The private IP address should match the address you give this particular client in the configuration on the server.
If you need your client to by-pass a local DNS server, you can specify a custom DNS server here. This one is the one provided by Google.
Instead of hard-coding your local private key into your configuration file the way we did on the server, you could tell WireGuard to read the privatekey file whenever it loads. This is probably a bit of a security best-practice – and we could just as easily have done it on the server, too. Finally, the configuration script will test our connection with the PostUp ping command.
The Peer – or server – configuration requires the server's public key, which is added here.
The Endpoint is where you tell WireGuard where to find the server. Nothing will work without this one! That would require the server's public IP – or it's domain name – followed by the port you've chosen. Again, 51820 is the WireGuard default.
Finally, the AllowedIPs setting defines the network address range you'll be using, and the optional PersistentKeepalive value can prevent dropped connections.
You launch WireGuard on the client exactly the same why you did on the server, using wg-quick up wg0. Again, though, all those steps will only be necessary for Linux clients. You can use the apps for other platforms.
Wrapping Up
So that's that. Just as I said, a working VPN in around five minute's work. You've now got one less excuse for protecting your online privacy and securing your communications.
For more technology goodness, please do subscribe to my YouTube channel and, when you've got a moment, check out the many Linux, security, data analytics, and AWS books and courses available through my bootstrap-it.com website.