

Kubernetes is a container orchestration platform that helps you manage containers at scale.
I recently passed my certified Kubernetes administrator exam, and I would like to share my learning experience and resources with you.
Should You Get Kubernetes Certified?
There are mixed opinions in the tech industry about the importance of certifications. Some people argue that the certificates you have doesn't matter – it's all about your real-world knowledge.
But not everyone has the chance to work with real-world projects. And certification questions are based on real-world scenarios. So if you haven't had an opportunity to work with Kubernetes much in practice, you can learn from this exam and apply your learnings on actual projects.
On the other hand, if you're already working with Kubernetes, taking the exam is an excellent chance to test your knowledge and learn more about its internal workings.
For example, you might have beren working with AWS for quite some time, but you haven't touched AWS costing, or haven't been following best practices. The certification covers every aspect of Kubernetes, so you will learn how you can reduce your cost or follow best practices.
In this study guide, I will not explain Kubernetes architecture or Kubernetes objects (Pods, Deployments, Services, Config, Secrets, and so on) in detail. If you want to dig into those topics, here are some helpful Kubernetes learning resources:
What is the Certified Kubernates Administor?
The CKA is a product of the Cloud Native Computing Foundation (CNCF). It launched this certification collaboration with the Linux Foundation. Other certifications offered by CNCFcf are:
- Kubernetes and Cloud Native Associate (KCNA)
- Certified Kubernetes Application Developer (CKAD)
- Certified Kubernetes Security Specialist (CKS)
As per the CNCF foundation,
"The purpose of the Certified Kubernetes Administrator (CKA) program is to provide assurance that CKAs have the skills, knowledge, and competency to perform the responsibilities of Kubernetes administrators."
Here's what we'll cover in this study guide:
- Exam Details
- Exam Tips
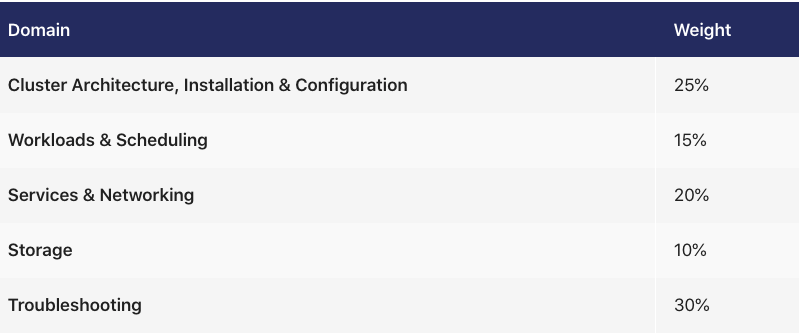
- Exam Modules
- Cluster Architecture, Installation, and Configuration
- Workloads and Scheduling
- Services and Networking
- Storage
- Troubleshooting
Alright, let's dive in.
Certified Kubernetes Administrator Exam Details
Here's some helpful information to get you started preparing and planning for the exam.
First, keep in mind that this is an online proctored exam, which means you can take it from your home or office. There are no exam centers.
Exam fees are $375, but the Linux foundation offers discount vouchers from time to time. Keep watching this space to find them.
The CKA exam is a problem-based exam, and you'll solve those problems right in command line or by writing manifesto files.
It is a 2 hours exam, and you need solve 17 questions. A passing score is 66%. Each question will have different weights, like 4%, 5%, 7%, 13% and so on.
Some questions will have two parts. If you just get the first part correct, those points for the correct part will still be added to your score.
The CKA exam is an open-book exam. You have access to the below resources:
- https://kubernetes.io/docs/
- https://github.com/kubernetes
- https://kubernetes.io/blog/
If you don't pass on your first try, you get one retake.
The CKA certification is valid for three years.
Certified Kubernetes Administrator Exam Tips
To get you started, here's a handy kubectl cheat sheet you can use during the exam.
You can create an alias for it so that you don't need to type the full command. For example, if you create an alias like "alias k=kubectl," you can type "k" instead of "kubectl."
During the exam, avoid creating Kubernetes resources using YAML files, as this takes too much time. Instead, use an imperative command to create resources.
For example, to ceate a pod use this command:
kubectl run nginx --image=nginx
If you still want to create a resource using YAML files, use dry-run=client.
Make sure you study the basis of curl and systemctl, as they'll show up on the exam.
Finally, there are around 6 or 8 different clusters setup for the exam. Make sure you switch contexts before solving the problem. The context switch command will be provided at the start of each question.
Certified Kubernetes Administrator Exam Modules
There are five modules in the exam:
- Cluster Architecture, Installation, and Configuration
- Workloads and Scheduling
- Services and Networking
- Storage
- Troubleshooting
We'll look at each of them in a bit more detail, and cover some other important and related info along the way.
Impertive vs Declarative statements
You need to know the difference between imperative and declarative statements so you can decide when to use each of them.
Deploying the Kubernetes resource imperatively means running kubectl commands, for example, kubectl run nginx --image=nginx. Deploying declaratively means writing manifests using YAML, for example kubectl apply -f https://k8s.io/examples/pods/pod-nginx-required-affinity.yaml.
Deploying resources using the imperative method helps during the exam and saves you time.
Cluster Architecture, Installation & Configuration Module
You can expect 25% of questions on the exam to come from this section. If you want to get a good score on this section, make sure you review these topics thoroughly.
This module mostly focuses on authentication, upgrading your cluster version, backing up Kubernetes data, and setting up a cluster using kubeadm.
Role-based access control (RBAC)
Understanding role-based access control (RBAC) is essential. RBAC restricts access to computers or networks based on the individual's role. Roles include policies or rules defining who can do what within the Kubernetes cluster.
Here's a relevant section on ClusterRole and CluserRole Binding you can check out.
Example questions will be like this:
Create a new service account named "sa" in the development namespace. Create a cluster role called "pod-reader," having permission to get pod and list pods. "sa" should be able to get pod and list pods.
So how would you tackle a question like this?
First, you need to create a namespace called "development" and create a service called "sa" in the development workspace:
kubectl create namespace development
kubecrl create serviceaccount sa -n development
kubectl create clusterrole pod-reader --verb=get,list,watch --resource=pods
kubectl create clusterrolebinding pod-reader --clusterrole=pod-reader --serviceaccount=development:sa
You can test if the sa is allowed to read pods using the below command:
kubectl auth can-i list pods --development target --as system:serviceaccount:development:sa
How to install and configure a Kubernetes cluster using kubeadm
Kubeadm automates the installation and configuration of Kubernetes components like Control Manager, API server, and KubeDNS.
If you have time, I highly recommend building a Kubernetes cluster using the Kubernetes the Hard Way guide designed by Kelsey Hightower.
If you don't have time to go through the complete guide, from the exam point of view just study certification location and Kubernetes Config Path.
How to Upgrade Your Kubernetes Cluster Version
It's very likely you will get this question, as it is specifically mentioned in the exam syllabus.
Below are steps to upgrade the cluster version from 1.22.21 to 1.22.22. You might be also asked to upgrade Kubelet and Kube proxy versions too.
- Check the current version of cluster, kubeadm, and kubelet:
kubectl get nodes -o wide
kubeadm version
kubectl version
- Upgrade the control plane nodes first:
apt-get update && apt-get install -y kubeadm=1.2.22-00
- Verify the upgrade plan. Use the below command to see if the cluster can be upgraded:
kubeadm upgrade plan
- Apply the upgraded version:
sudo kubeadm upgrade apply v1.22.0
Once the command finishes, you should be able to see "upgrade/successful SUCCESS! Your cluster was upgraded to "v1.22.0". Enjoy!"
- Prepare the node for maintenance by marking it unschedulable and evicting the workloads:
kubectl drain node01 --ignore-daemonsets
- Next upgrade the kubelet and kubectl:
apt-get update && apt-get install -y kubelet=1.22.0-00 kubectl=1.22.0-00
- At last restart the kubelet and check if the desired version was upgraded:
sudo systemctl daemon-reload
sudo systemctl restart kubelet
kubectl get nodes -o wide
kubeadm version
kubectl version
- Bring the node back online by marking it schedulable:
kubectl uncordon node01
How to Backup and Restore an ETCD Cluster
ETCD is a consistent, distributed key-value store that provides a reliable way to store data that a distributed system or cluster of machines needs to be accessed.
Kubernetes uses etcd to keep all its config and data. You can think of it as a database of Kubernetes. When you run "kubectl get pods", the results are fetched from etcd. In the exam the certification name and path are provided
- Login to the master node and run the below command to backup the etcd:
etcdctl snapshot save /tmp/etcd-backup.db --cacert /etc/kubernetes/pki/etcd/ca.crt --cert /etc/kubernetes/pki/etcd/server.crt --key /etc/kubernetes/pki/etcd/server.key
- Test your backup file:
ETCDCTL_API=3 etcdctl --write-out=table snapshot status snapshotdb
- Restore etcd from a backup file:
ETCDCTL_API=3 etcdctl snapshot restore tmp/etcd-backup.db --data-dir /var/lib/etcd-backup --cacert /etc/kubernetes/pki/etcd/ca.crt --cert /etc/kubernetes/pki/etcd/server.crt --key /etc/kubernetes/pki/etcd/server.key
Workloads & Scheduling Module
In this section you will get questions about deploying a Kubernetes application, creating daemonsets, scaling the application, configuring health checks, multi-container pods, and using config maps and secrets in a pod.
How to deploy an application and expose the app using a service
Example questions for deploying an app and creating a service might look like this:
Create a deployment as follows: Name: nginx Exposed via a service nginx using CluserIP Ensure that the service & pod are accessible within the cluster
- Manifesto file for creating deployment:
apiVersion: apps/v1
kind: Deployment
metadata:
name: nginx-deployment
labels:
  app: nginx
spec:
replicas: 3
selector:
  matchLabels:
    app: nginx
template:
  metadata:
    labels:
      app: nginx
  spec:
    containers:
    - name: nginx
      image: nginx:1.14.2
      ports:
      - containerPort: 80
Run kubectl get deployments to check if the Deployment was created. If the deployment is sucessfull "Ready" should show 3/3. Ready displays how many replicas of the application are available to your users.
If you need to expose your application outside the cluster or inside the cluster, you need to create a service. There are different options available to expose your application as per your needs.
- ClusterIP: Exposes application within cluster. For example exposing a database to a backend application.
- NodePort: Exposes application outside the cluster using node ip. For exmaple exposing your frontend application to the outside world.
- LoadBalancer: Exposes application outside the cluster using a load balancer.
How about an example of exposing your application using ClusterIP (within the cluster). You can create a service using the below manifesto file:
apiVersion: v1
kind: Service
metadata:
  name: nginx-service
spec:
  selector:
    app: nginx
  type: ClusterIP
  ports:
  - protocol: TCP
    port: 80
    targetPort: 8080
You can use "kubectl get service" to see the IP address of the service.
Here's an example of exposing your application using NodePort (outside the cluster). You can create a service using the below manifesto file:
apiVersion: v1
kind: Service
metadata:
  name: nginx-service
spec:
  selector:
    app: nginx
  type: NodePort
  ports:
  - protocol: TCP
    port: 80
    targetPort: 8080
You can use "kubectl get service" to see the IP address of the node.
Another sample question will be like this:
Schedule the pod on a node labeled with distype=ssd
Here you can use node-selector like this:
apiVersion: v1
kind: Pod
metadata:
  name: nginx
  labels:
    env: test
spec:
  containers:
  - name: nginx
    image: nginx
  nodeSelector:
    disktype: ssd
How to scale and update the deployments
If you need to scale the deployment after creating it, you can use the below command.
kubectl scale deployment/nginx-deployment --replicas=6
You can update the image of the existing deployment using the below command:
kubectl set image deployment/nginx-deployment nginx=nginx:1.8
How to configure healthcecks for your application
Once your application is deployed, you need to make sure that the app is running successfully. If an application crashes, you need to know how you can kill the container and bring in the new one.
Health checks help to achieve this use case. There the three different types of health checks you can perform:
- Readiness Probe: Kubernates uses readiness probes to know when a container is ready to start accepting traffic.
- Liveness Probe: Kubernates uses liveness probes to check when to restart a container. Once the application is deployed succesfully, if it crashes in between, a liveness probe will detect and restart the application.
- Startup Probe: Kubernates uses startup probes to know when a container application has started.
Example of configuring a livenss probe:
kubectl apply -f https://k8s.io/examples/pods/probe/exec-liveness.yaml
Example of configuring a readines probe:
apiVersion: v1
kind: Pod
metadata:
  labels:
    test: liveness
  name: liveness-exec
spec:
  containers:
  - name: liveness
    image: k8s.gcr.io/busybox
    args:
    - /bin/sh
    - -c
    - touch /tmp/healthy; sleep 30; rm -rf /tmp/healthy; sleep 600
    livenessProbe:
      exec:
        command:
        - cat
        - /tmp/healthy
      initialDelaySeconds: 5
      periodSeconds: 5
MultiContainer pod/sidecar containers
The primary purpose of a multi-container pod is to support a co-located helper container for the main program.
The standard logging method for containerized applications is writing to standard output and standard error streams.
There might be use cases where you also need to access these logs after a container crashes. For example, your NGINX designed for serving the web page is not suitable for shipping the logs to a centralized logging solution.
You can set up a sidecar container that specialises in log shipping. The sidecar container is designed as a logging agent, which is configured to pick up logs from an application container.
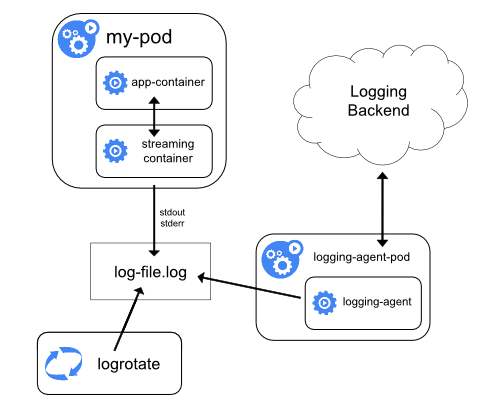
Example questions about this topic will be like this:
Create a Pod with the main container NGINX, which outputs logs to shared volume, and configure the sidecar container to stream those logs. Verify both containers are running.
apiVersion: v1
kind: Pod
metadata:
  name: nginx-server
spec:
  volumes:
    - name: shared-logs
      emptyDir: {}

  containers:
    - name: nginx
      image: nginx
      volumeMounts:
        - name: shared-logs
          mountPath: /var/log/nginx

    - name: sidecar-container
      image: busybox
      command: ["sh","-c","while true; do cat /var/log/nginx/access.log /var/log/nginx/error.log; sleep 30; done"]
      volumeMounts:
        - name: shared-logs
          mountPath: /var/log/nginx
How to configure a pod to use a ConfigMap
ConfigMaps store data in key-value format. A possible usecase of ConfigMaps is keeping application code and configuration separate.
ConfigMaps are designed to store non-confidential data such as environment variables or properties of a game or application. If you want to store sensitive data, use secrets.
ConfigMaps help create separate config files for each environment (development, staging, prod).
You can create ConfigMaps from files, directories, and literal values. Pods can consume ConfigMaps as environment variables, command-line arguments, or as configuration files in a volume.
Example questions will be like this:
Create a ConfigMap called cfg-data with values var1=val1,var2=val2 and create a busybox pod with volume config-volume, which reads data from this ConfigMap cfg-volume and put it on the path /etc/cfg
kubectl create configmap cfg-data --from-literal=key1=val1 --from-literal=key2=val2 --from-literal=key3=val3
kubectl create -f https://github.com/nitheesh86/cka/blob/main/deployments-services/configmap.yml
How to configure a pod to use secrets
Secrets in Kubernetes can be used to store sensitive data such as passwords and tokens. Secrets are similar to ConfigMaps but are specifically designed to hold sensitive data. Pods can use secrets as an environment variable or as files in a volume.
- Example questions about secrets will be like this:
Create a secret named "db-secret" in namespace database. The secret should contain db_user=root and pass=1234. Mount it as ready only into the pod named "mysql-db" as an enviournment variable.
kubectl create namespace database
kubectl -n secret create secret generic db-secret --from-literal=username=db_user --from-literal=db_pass=1234 -n database
https://github.com/nitheesh86/cka/blob/main/deployments-services/mysql-secret.yml
Services and Networking Module
In this section you will get questions about creating networking polices, creating ingress controllers, and exposing apps through services (already covered in above)
How to creating networking policies
In Kubernetes, by default, communication between all pods is allowed. If you need to isolate pods, you need to apply a network policy.
Example questions about netowrking policies will be like this:
Allow traffic from production namespace only:
kind: NetworkPolicy
apiVersion: networking.k8s.io/v1
metadata:
  name: allow-traffic-from-namespace
spec:
  podSelector:
    matchLabels:
  ingress:
  - from:
    - namespaceSelector:
        matchLabels:
          purpose: production
This policy will allow traffic to all pods from the production namespace.
How to create an ingress resource
An ingress controller is a type of load balancer. It accepts traffic from outside the cluster and loads the balance to pods. We can also configure rules like redirections.
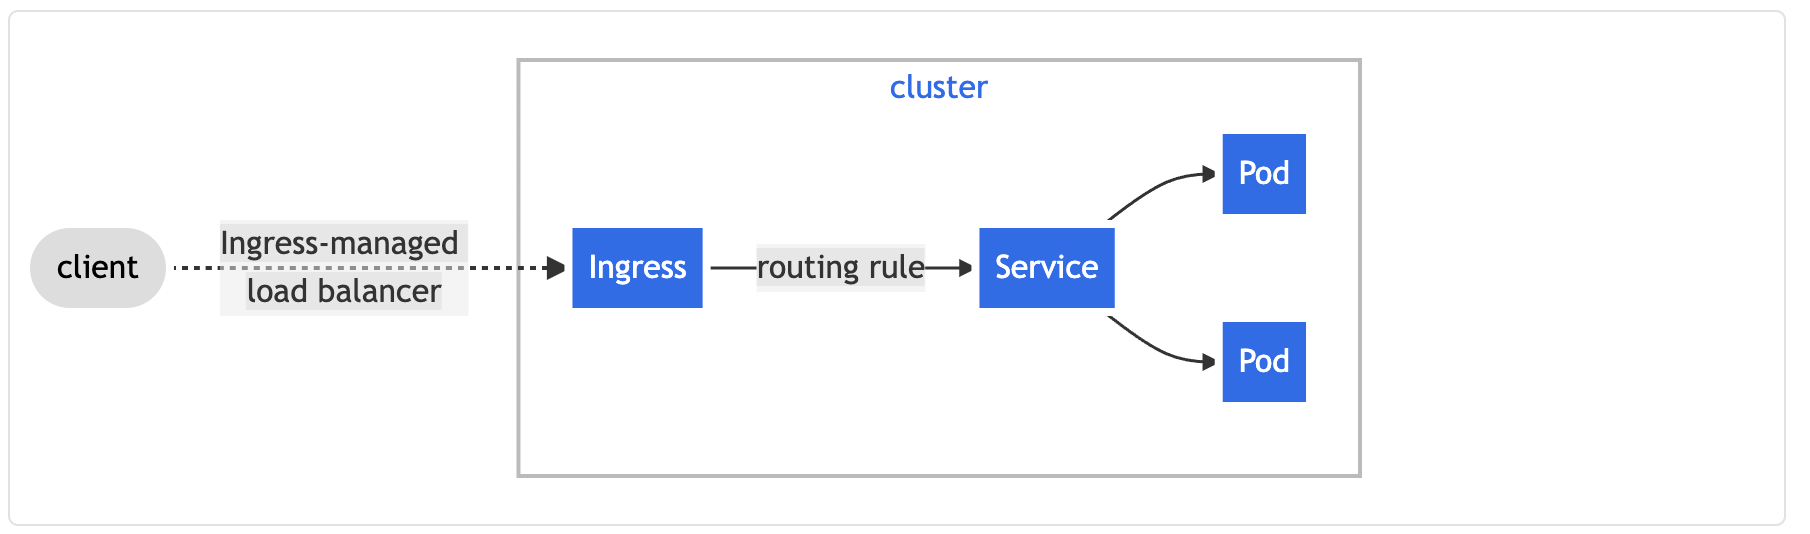
- How to create an ingress using NGINX ingress controller:
apiVersion: networking.k8s.io/v1
kind: Ingress
metadata:
  name: nginx-ngress
  annotations:
    nginx.ingress.kubernetes.io/rewrite-target: /
spec:
  rules:
  - http:
      paths:
      - path: /example
        pathType: Prefix
        backend:
          service:
            name: nginx-service
            port:
              number: 80
Storage Module
This section is all about creating persistence volume, persistence volume claims, and mounting into to a pod. It's helpful to study a lot about persistence and persistence volume.
A PersistentVolume (PV) is a storage in the cluster that has been provisioned by a stroage administrator or dynamically provisioned using Storage Classes like AWSElasticBlockStore, AzureDisk, and so on.
A PersistentVolumeClaim (PVC) is a request for storage by a user or Pod.
Example questions will be like this:
Create an NGINX Pod and mount index.html as PersistentVolume.
- ssh into the node and create a /mnt/data directory and then create an index.html file:
sudo mkdir /mnt/data
sudo sh -c "echo 'Hello from Kubernetes storage' > /mnt/data/index.htm
- Create PersistentVolume and PersistentVolume Claim:
apiVersion: v1
kind: PersistentVolume
metadata:
  name: task-pv-volume
  labels:
    type: local
spec:
  storageClassName: manual
  capacity:
    storage: 10Gi
  accessModes:
    - ReadWriteOnce
  hostPath:
    path: "/mnt/data"
apiVersion: v1
kind: PersistentVolumeClaim
metadata:
  name: task-pv-claim
spec:
  storageClassName: manual
  accessModes:
    - ReadWriteOnce
  resources:
    requests:
      storage: 3Gi
- Now, the config pod uses the PersistentVolume Claim
apiVersion: v1
kind: Pod
metadata:
  name: task-pv-pod
spec:
  volumes:
    - name: task-pv-storage
      persistentVolumeClaim:
        claimName: task-pv-claim
  containers:
    - name: task-pv-container
      image: nginx
      ports:
        - containerPort: 80
          name: "http-server"
      volumeMounts:
        - mountPath: "/usr/share/nginx/html"
          name: task-pv-storage
Also, in the exam, you might be asked to expand PersistentVolume. Some storage classes support resizing the volume—for example, AWS-EBS, GCE-PD, Azure Disk, Azure File, Glusterfs.
If the storage class is not enabled, you need to set it to "allowVolumeExpansion: true."
Get the storage class name you want to expand with "kubectl get storage classes". Then edit the YAML file.
apiVersion: storage.k8s.io/v1
kind: StorageClass
metadata:
  name: standard
parameters:
  type: pd-standard
provisioner: kubernetes.io/gce-pd
allowVolumeExpansion: true
reclaimPolicy: Delete
Then edit PVC to request more space:
kubectl edit pvc myclaim and update request parameter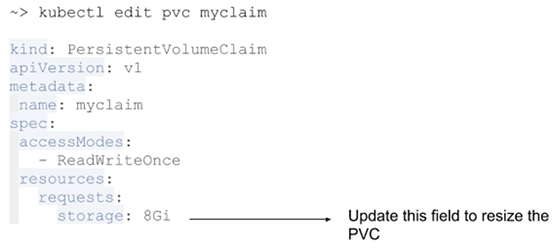
Once PVC is updated, you need to replace the pod to change to effect. You can check the new size by "kubectl get pvc. myclaim".
Troubleshooting Module
This part covers 30% of the exam. You can expect questions about how to troubleshoot nodes.
Example questions will be like this:
One of the worker nodes in cluster is not in a ready state. Troubleshoot the node and bring it online.
To Troubleshoot a worker node, you need to know what components are running. Worker nodes consist of kubelet and kube-proxy. Typically, one of these services will have issues.
First, check if the service is running and try restarting. If restarting the service is not working, check the logs.
- var/log/kubelet.log - Kubelet, responsible for running containers on the node
- /var/log/kube-proxy.log - Kube Proxy, responsible for service load balancing
You can refer to the below link for a detailed trooubleshooting guide:
https://kubernetes.io/docs/tasks/debug-application-cluster/debug-cluster/
How to Verify Your Answers on the Exam
It is very important verify your answers on the exam questions. Here are the ways to verify your answers:
Check your pods
After you create a pod, make sure it's in the ready state with the command kubectl get pod nginx.
If your pods are not in a ready state, run kubectl desribe pod nginx to see the events. You can also check the pod logs by running kubectllogs nginx.
Check deployment status
Once you create a deployment you can get the deployment status by running kubectl get deployments nginx-deployment.
If your depoyment is in pending state you can view events by running kubectl deployment deployment nginx-deployment.
Verify services
You can verify that your service endpoints are working by launching helper pods with the image "busybox".
You can ssh into the helper pod with the command kubectl exec --stdin --tty busybox -- /bin/bash and then query the endpoint curl http://ipaddress/.
You can get the service endpoint by running kubectl get svc my-service. Here's a reference where you can study more about logging into the container.
And that's it!
Good luck studying for the exam! I hope this guide helps you prepare and pass.
These are the main sources and references I used to study and to write this article:
- https://kubernetes.io/
- https://www.cncf.io/
- https://github.com/ahmetb/kubernetes-network-policy-recipes
- https://www.katacoda.com/courses/kubernetes
- https://jenciso.github.io/personal/manage-tls-certificates-for-kubernetes-users
Thank you for reading, and happy learning.