
By Igor Petrov
The past few months have been super busy time: I’ve worked on development for different e-commerce projects, joined a startup, and co-organized another one — all while preparing for an ultra-marathon.
It so happened that I was working on some e-commerce projects that were in need of shipping features. These projects were already bootstrapped by someone else (not written by me from scratch) and they had the Shippo shipping service integrated into them. So this is how I met Shippo and started to work with it.
I don’t know if Shippo is the only option for shipping features in web apps, but it’s quite popular and has a pretty good and simple API. In this article, we will uncover several common tasks you may need to solve with this service, along with Ruby.
Beginning with Shippo
What you need first is to have a Shippo account and shippo gem bundled for your project:
gem 'shippo', git: 'https://github.com/goshippo/shippo-ruby-client'
Next, you need to configure it with the API token you should have (Shippo gives you test or live tokens). Just put this in config/initializers/shippo.rb:
Shippo::api_token = ENV['shippo_api_token']
For working with ENV , you might use something like dotenv or figaro or Heroku.
Validating addresses
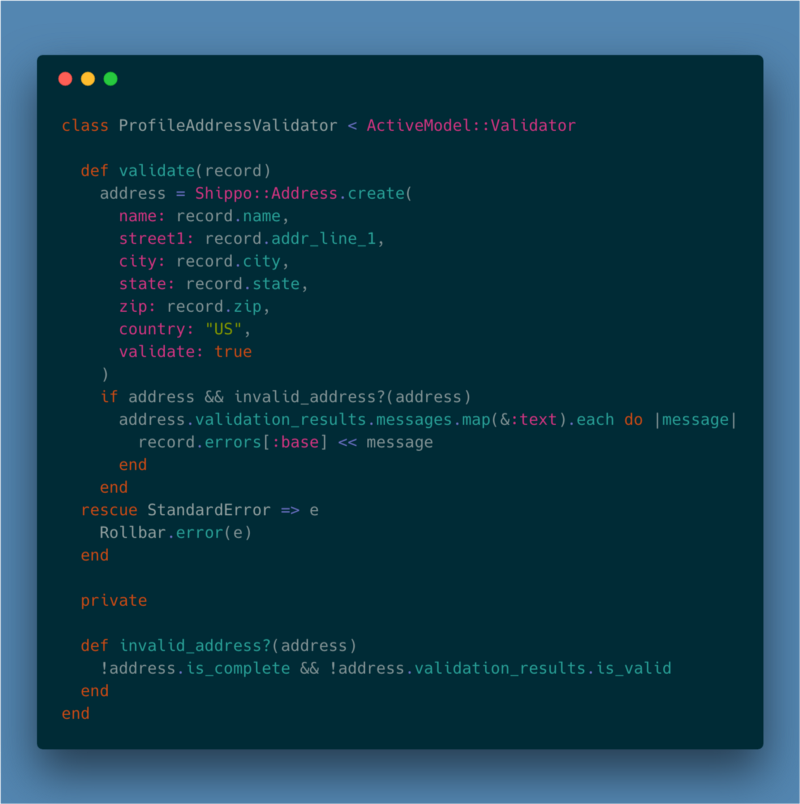
One cool feature Shippo has is allowing you to validate addresses. Let’s say you have address fields in your app’s users profiles, and you need to validate during sign up if the user’s address is correct. I came to a custom validator solution:
class Profile < ApplicationRecord validates_with ProfileAddressValidatorend
And the validator code utilizing Shippo::Address API will look like this:
Creating a shipment/fetching rates
The next popular task is to create a shipment in two steps. First, you are going to fetch shipping rates from different carriers (that you have set up in Shippo) and show them to your users so they can choose one. Second, based on the user’s choice, you’ll create a transaction (shipping label).
You may also offer a user interface for editing parcel sizes or just allow them to choose from pre-defined parcels/boxes.
Our first step might look like this:
Shippo::Shipment.create( address_from: @address_from, address_to: ADDRESS_TO, parcels: parcels, async: false)
In case you’re wrapping this into a service object, @address_from is something you want to pass into it. It should be like this (the same Hash for ADDRESS_TO which might be a constant, in case your users only send to one address):
{ :name => 'Apple', :street1 => 'One Apple Park Way', :city => 'Cupertino', :state => 'CA', :zip => '95014', :country => 'US', :phone => '+1 (408) 996–1010', :email => 'tim@apple.com' }
And finally, parcels is an array of such structures:
{ length: 10, # or something coming from params width: 10, height: 10, distance_unit: :in, weight: 3, mass_unit: :lb,}
After passing all these data and calling Shippo::Shipment.create you should get a shipment object which contains a rates attribute ( shipment.rates ).
Create shipping label (transaction) based on selected rate
We have a rate selected by the user, and we instantiated it (let’s say in a controller) in @selected_shipping_rate. Now just do this:
transaction = Shippo::Transaction.create( rate: @selected_shipping_rate['object_id'], label_file_type: "PDF", metadata: @ticket.token.to_s, # pass any additional data if needed async: false)
You should confirm whether it was successful or not by checking transaction["status"] . It should be SUCCESS or something from the available statuses. You may also be interested in transaction["tracking_number"] and transaction["label_url"] (the URL of the shipping label PDF file).
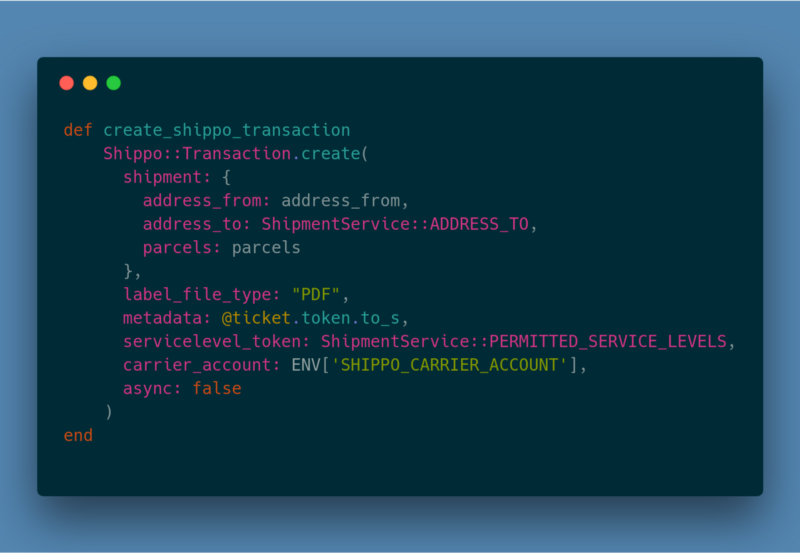
Single call label creation
You might want to create a shipping label with a single Shippo API call. Well, you can do this! In this case, you’ll use a concrete shipping carrier, like FedEx.
So this API call looks like a combination of two calls we did previously: carrier_account is a Carrier object id — you can get it with https://goshippo.com/docs/reference/rb#carrier-accounts-list — and servicelevel_token is a corresponding token from this service levels enum:
Carriers settings
For working carriers, you need to pass all the required data. This depends on the concrete shipping provider. Shippo has very good description page about what’s needed. For example, for setting up FedEx you need to get from them at least the meter number and account number.
One tricky thing about FedEx: their test server is not very stable (and that fact was confirmed by Shippo support). So, sometimes you’ll be able to create shipments and request rates, but sometimes you’ll get this response: “FedEx API did not respond. Please try again in a few minutes.”
Tracking shipments
And finally, you might want to be like a “big brother” who is watching your shipments :-) Then you need to start tracking shipments so you’ll know when they have actually been sent and delivered.
Shippo has a Shippo::Track API for such a purpose, and webhooks that you can receive via HTTP. First, you should register that you’re going to track some shipment.
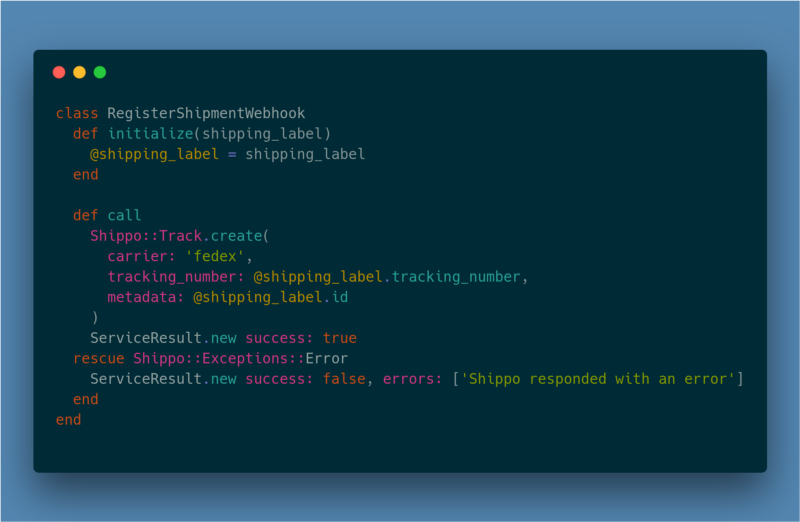
@shipping_label is our own object that we store in the database: we saved it after the successful Shippo transaction (shipping label) creation.
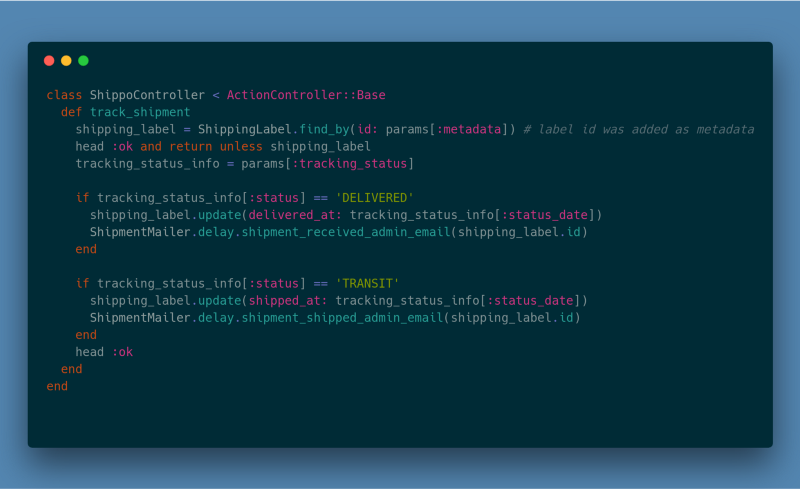
Second, you need to have a webhooks handler: in terms of Rails, you need to add a route and a controller.
Shippo will then send you data about tracking status updates, so you can then update the status information in the database and have everything in sync.
# Shippo webhook in routes.rbpost '/shippo_webhook' => 'shippo#track_shipment'
Don’t forget to test this in development with your favorite development tunneling tool like ngrok or localtunnel . And of course, you need to login to your Shippo account and specify the URL that will receive webhooks and what types of webhooks they are.
Conclusion
Shippo is a great solution for pretty much anything when you need some shipping capabilities in your app. That’s why I would choose it for my next project.
If there’s something competitive on the market, let me know in comments. I’d love to hear about something really cool for shipping tasks.
If you liked this post, please click on ✋ to spread the word.