
Hello Everyone! Deploying a web application is a challenging task (at least for me), especially when it comes to keeping it updated. It can take up a lot of time and energy if it has to be deployed manually every time you make a change.
But I recently discovered a way to automate the deployment process for Next.js apps using AWS CodeDeploy and CodePipeline. It made my life so much easier, and I'm excited to share it with you.
In this tutorial, I'll guide you through the process of setting up auto-deployment for your Next.js app using the AWS services CodePipeline and CodeDeploy. By the end of it, you'll be able to save a lot of time by deploying your app automatically every time you push the code.
Let's get started!
Table of Contents:
- Prerequisites
- How to Deploy the Next.js App to AWS EC2
- How to Run the Next.js App in Production Mode
- How to Run a Next.js App Forever When the Console is Closed
- What is CodeDeploy?
- How to Setup Auto-Deployment using CodePipeline and CodeDeploy
- How to Attach the IAM Role to EC2
- How to Create the CodePipeline
- Conclusion
Prerequisites
- EC2 machine running Ubuntu
- Very basic knowledge of EC2 and IAM AWS Services
How to Deploy the Next.js App to AWS EC2
To start simple, let's manually deploy the sample Next.js boilerplate app "hello-world" to EC2. The steps are almost the same for all Next.js applications.
Login to EC2
Login to the EC2 machine which you've created using the below command:
ssh -i /path/key-pair-name.pem instance-user-name@instance-IP-address
When you try to log into EC2, this is the common error that most people will encounter (I got it, too):
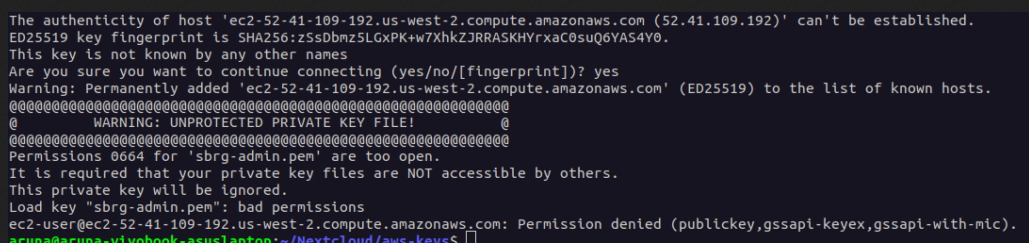 Permissions 0664 for
 .pem file is too open error
This error describes that the .pem file should be read-protected. Only the root user should be able to read it. So, you have to set the file permission to 400. Run the following command to achieve that:
chmod 400 key-pair-name.pem
EC2 by default comes with no software installed. Once you've logged into EC2, install NodeJS. There's an excellent article published by Digital Ocean and I use it every time I have to install Node on the server.
I have uploaded the boilerplate repo to Github. You can clone the repo by running the following command:
git clone https://github.com/5minslearn/deploy_nextjs_app.git
Navigate to the project and install the dependencies by running the below commands.
A quick note here. I'm a big fan of yarn for its lightning-fast dependency management. But I see most people use npm to manage their dependencies. If you like to use npm, you can replace yarn install with npm install in the below commands.
If you like to go with yarn, install yarn by following this tutorial first.
cd deploy_nextjs_app
yarn install
Let's run the application:
yarn dev
Hit "http://ec2-public-ip-address:3000/" on your browser and you should be able to see the following page:
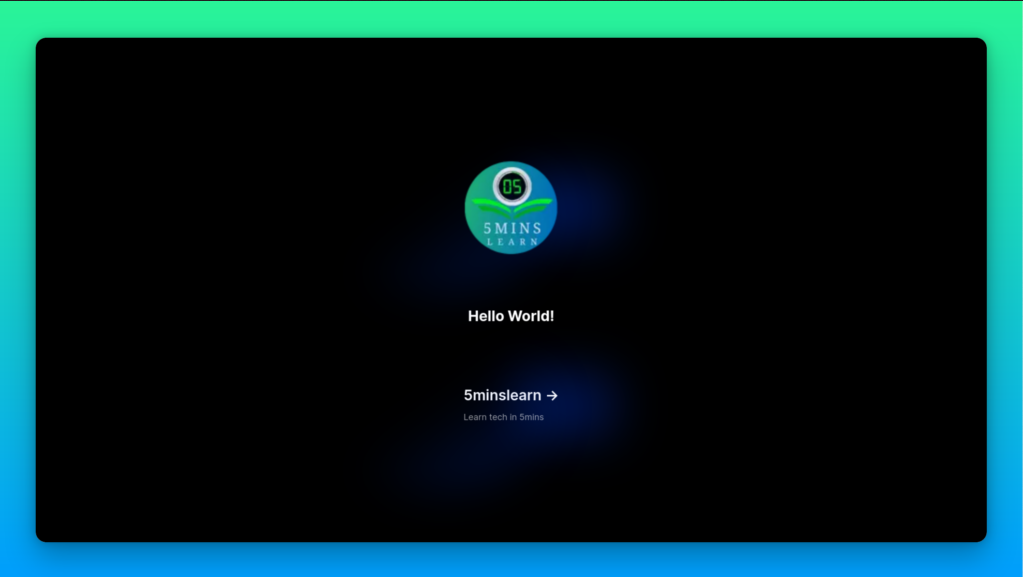 Next.js Hello World App
There's another common issue that most people face here which we'll look at next.
How to fix the timeout error (EC2)
"Oh, My God! My site is loading for a long time and finally, it's throwing a timeout error. What could be the issue? Where did I made mistake?"
If this happens to you, then you can follow the below steps to fix it.
This issue basically occurs if your server does not expose port 3000. Remember, by default Next apps will be running on port 3000. But, you have to allow port 3000 from the Security Group of your EC2 console to access from your browser.
Login to your AWS console, select your EC2 instance, and then select the Security Group option. Click on the "Edit inbound rules" button. Add port 3000 to the list as shown in the below screenshot. Then hit the "Save rules" button.
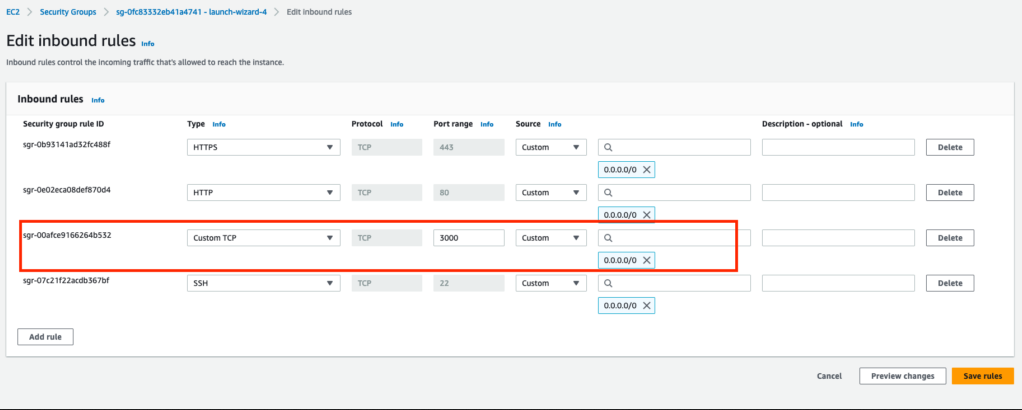 Adding port 3000 to a security group
Visit the link "http://ec2-public-ip-address:3000/", and you'll be amazed to see that your page loads like magic.
So far, we've just run our app in development mode and verified that it's working.
How to Run the Next.js App in Production Mode
To deploy the app in Production Mode, you have to build your app first. Run yarn build to build the app and yarn start to start the app in production mode.
yarn build
yarn start
Hit "http://ec2-public-ip-address:3000/" again and this time you'll see that your app loads faster than before.
Apps running in Production mode will always be faster when compared to the ones running in Development mode. This is because Production apps will be optimized for performance.
How to Run a Next.js App Forever When the Console is Closed
So, you have your app running now. But you might notice that it's blocking you from closing your terminal and exiting from server connection. If you do so, your site will be down. That's where PM2 comes to play.
Basically, PM2 is a process manager that helps keep Node applications alive all the time. It runs in the background managing Node applications for you.
Install PM2 using the following command:
sudo yarn global add pm2
After PM2 installation, run the below command to run and manage your app in the background:
pm2 start yarn --name [name-of-your-app] -- start -p [port-number]
Replace [name-of-your-app] with your app name and [port-number] with 3000. Here's an example command,
pm2 start yarn --name next_hello_world_app -- start -p 3000
Hit "http://ec2-public-ip-address:3000/" and you'll again be amazed to see your app up and running.
It's always a best practice to save the PM2 process. When you reboot your instance, your PM2 instances will be lost. In order to restore it to its old state, you have to save the PM2 process. Here's the command for that:
pm2 save
Here's the command to restore your PM2 instances on reboot (don't execute this now, we'll come back to this shortly):
pm2 resurrect
We have successfully deployed the Next.js app manually. But remember, every time you make a code change and want to see the changes on your site, you have to login into EC2, pull the latest changes, build the app, and restart the app.
This will consume a lot of time and I'm too lazy to do it. So let's automate this in the next step!
Before setting up automatic deployment you have to know how CodeDeploy works.
What is CodeDeploy?
CodeDeploy lets you deploy your application automatically to any number of EC2 instances. We need to prepare two items before beginning this process:
- CodeDeploy Agent must be installed in the EC2 instance. We use this to continuously poll CodeDeploy and deploy if any new changes are available.
- A file called
appspec.ymlmust be present in the root folder. This file describes the steps to be followed for the deployment.
There is awesome documentation by AWS to help you install CodeDeploy Agent. Please follow each and every step to install CodeDeploy Agent on your EC2 machine.
To verify that CodeDeploy agent is installed, run the below command. If you see active (running), Kudos to you! CodeDeploy was installed successfully.
sudo service codedeploy-agent status
 CodeDeploy Agent running status
Now let's create the appspec.yml file. I've written the deployment instructions in the deploy.sh file. It's enough to run this file in the appspec.yml file. If you want to learn more about appspec.yml, check out the AWS official documentation.
Create a file called appspec.yml and add the following contents:
version: 0.0
os: linux
hooks:
  ApplicationStart:
    - location: deploy.sh
      timeout: 300
      runas: ubuntu
I hope you understand the instructions in the above file. If not, here's a super simple explanation. I'm advising the CodeDeploy Agent that I'm running a Linux OS in my instance and instructing it to run the deploy.sh file as ubuntu user with the timeout set to 300 seconds.
Here's my deploy.sh file:
#!/bin/bash
cd /path/to/project/on/EC2
git pull origin master
yarn install &&
yarn build &&
pm2 restart [name]
This file contains instructions to navigate to the project folder on EC2, pull the latest code from source control, install dependencies, build the project, and restart the project instance.
This file is already available in the repo. No action for you here. Now it's time to set up automatic deployment.
How to Setup Auto-Deployment using CodePipeline and CodeDeploy
Two IAM roles have to be created to set up auto-deployment. Some complications will begin from here. To make things simple, I've attached screenshots with the appropriate items highlighted with red boxes.
Create an IAM Role for CodeDeploy
You have to create this role to deploy the code every time you push.
Navigate to IAM in the AWS Console by searching for "IAM" in the search bar at the top. Click Roles on the left pane and Click the "Create role" button at the top right.
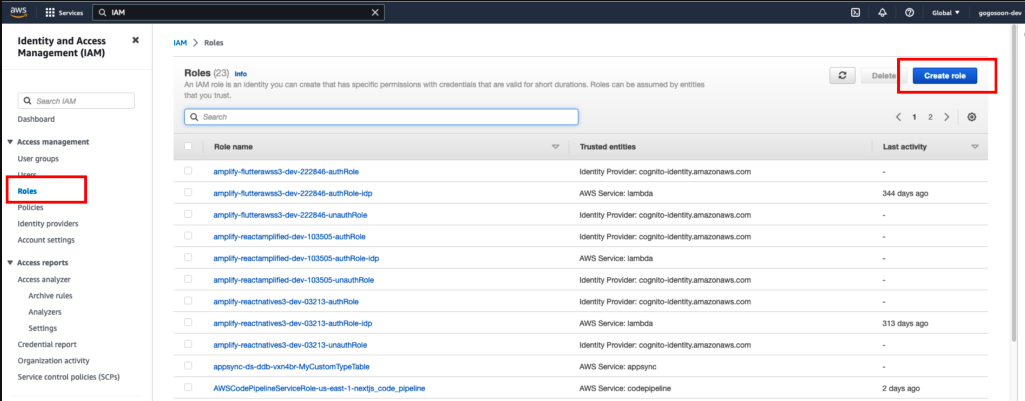 Create IAM role
Choose AWS service in Trusted entity types and choose CodeDeploy in the Use cases section and proceed to the next step.
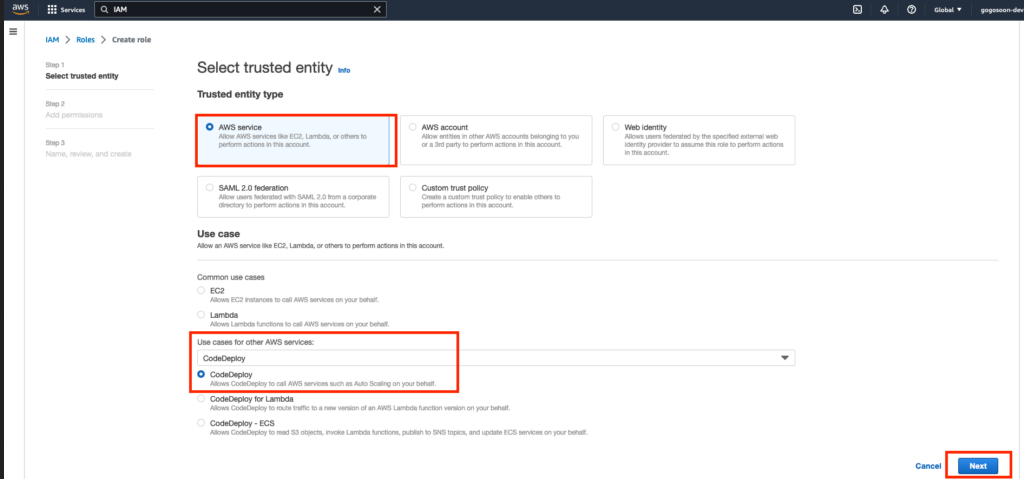 IAM role for CodeDeploy
Now, you can see that the AWSCodeDeployRole policy is the only policy available, and it'll be chosen by default in this (Permissions) step. Let's proceed to the next section. No action for you here.
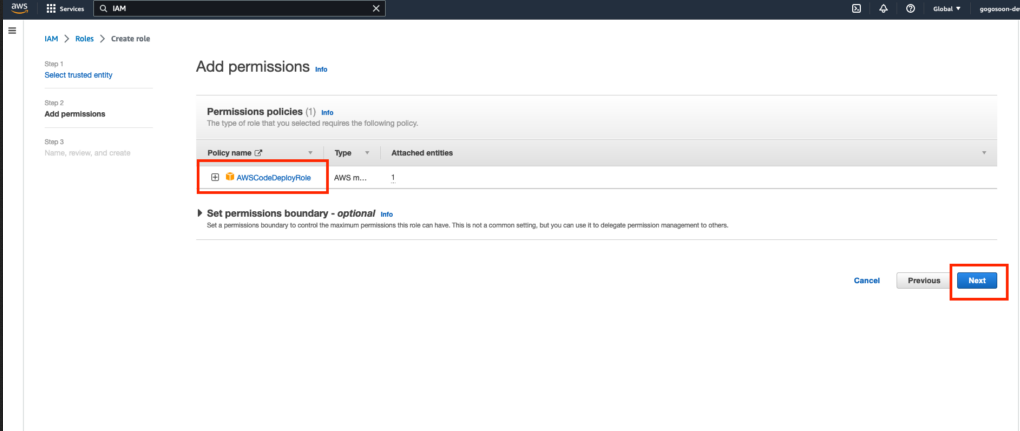 AWSCodeDeploy Permission
Enter a name for your IAM role. You should choose a meaningful name to identify this in the future. I'm calling it service-role-for-code-deploy. Review the permission in the JSON and click the Create role button at the bottom.
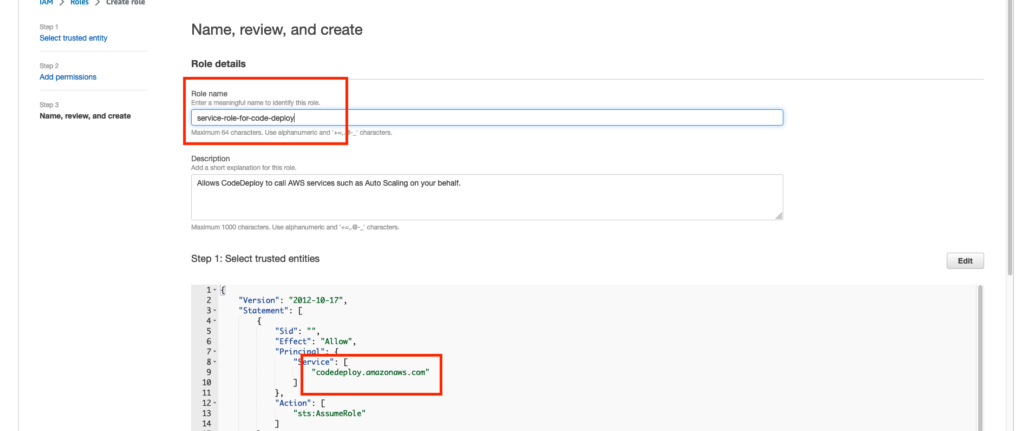 AWSCodeDeploy Permission Review
Create an IAM role for EC2
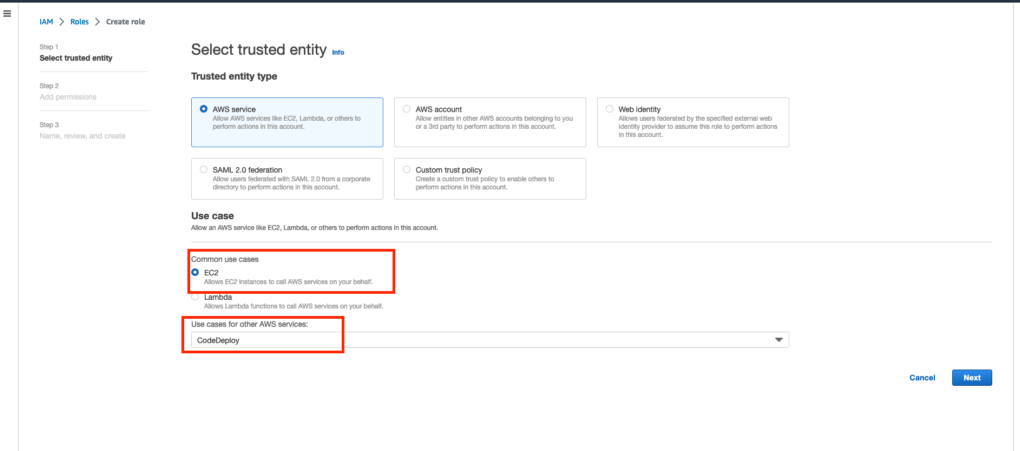
Let's create the next role. This role is for EC2. Choose AWS service in the Trusted entity type, EC2 in the Common use cases section, and choose CodeDeploy in Use cases for other AWS services. Click Next to proceed to the next section.
 IAM role for EC2
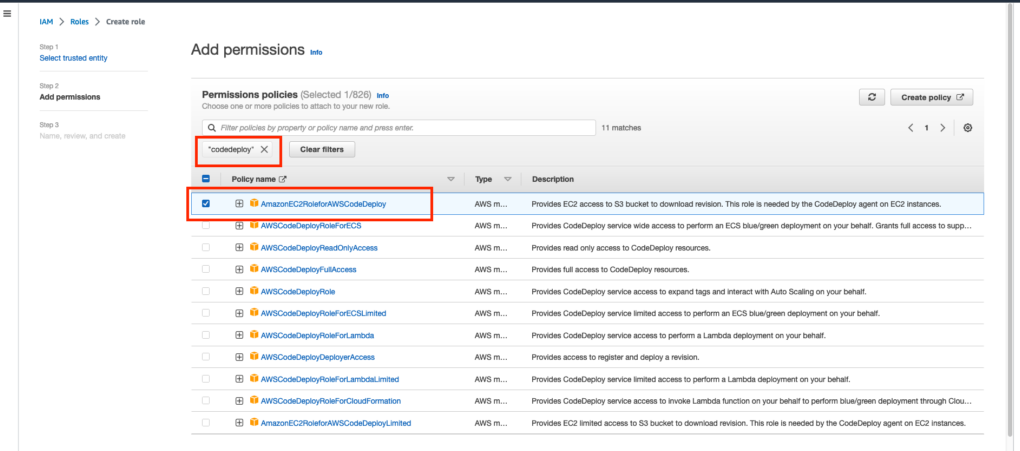
There are a lot of policies available for EC2 and CodeDeploy. In the Add permissions section, search for codedeploy (No space between code and deploy) and select "AmazonEC2RoleForCodeDeploy" and proceed to the next step.
 Adding AmazonEC2RoleForCodeDeploy permission
No change in this step. Review and give a meaningful name (I'm naming it as "code-deploy-role-for-ec2") for your role and click "Create role" button.
How to Attach the IAM Role to EC2
Once the IAM role for EC2 is created, we have to attach it to the EC2 instance.
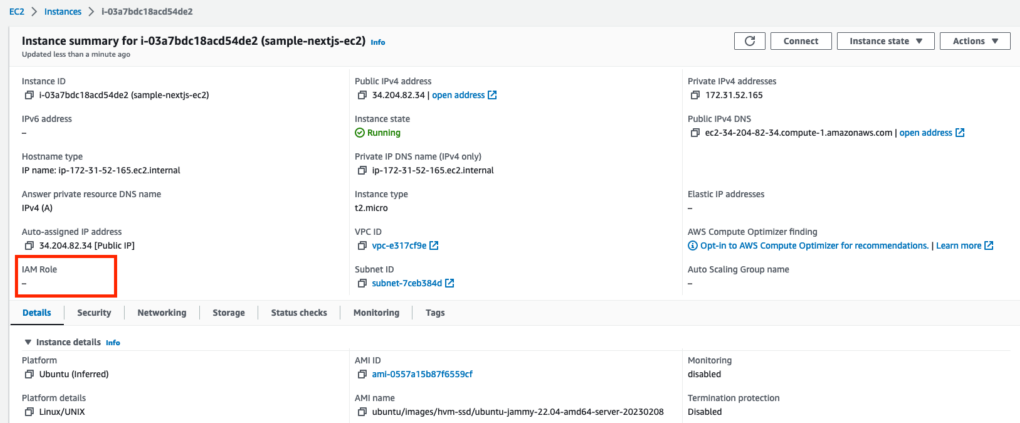 EC2 instance before attaching the IAM role
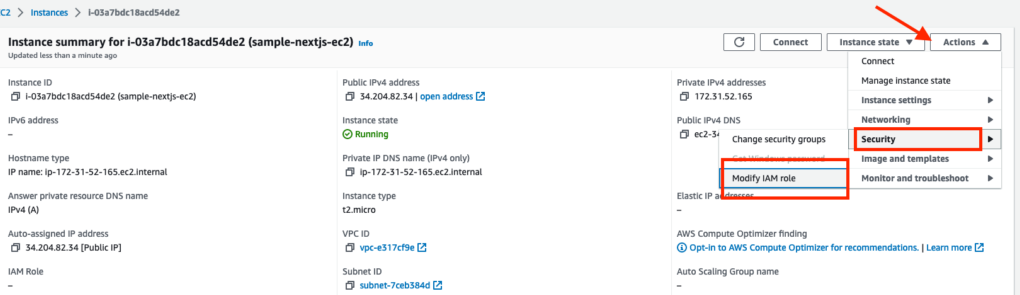
To attach the IAM role to the EC2 instance, open your EC2 instance, click on the "Actions" button on the top right, and select "Security" in the drop-down. Then select "Modify IAM role".
 Modify IAM role for EC2 instance
Select the IAM role which you created last (code-deploy-role-for-ec2) and click the "Update IAM role" button. Reboot the EC2 for the changes to take effect.
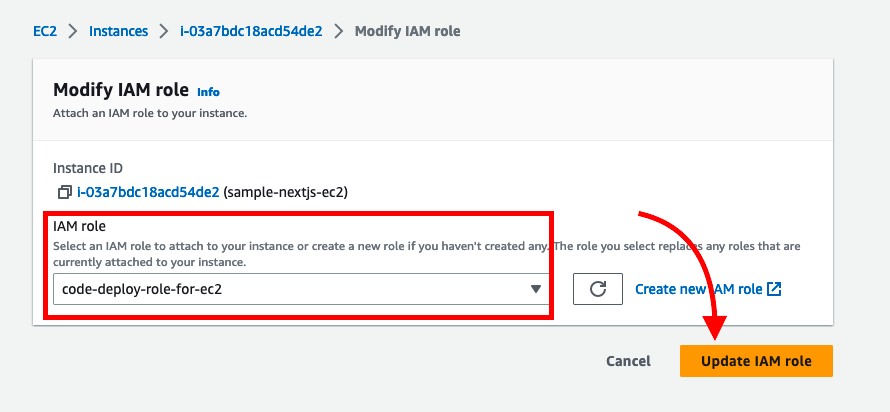 Update IAM role for EC2 instance
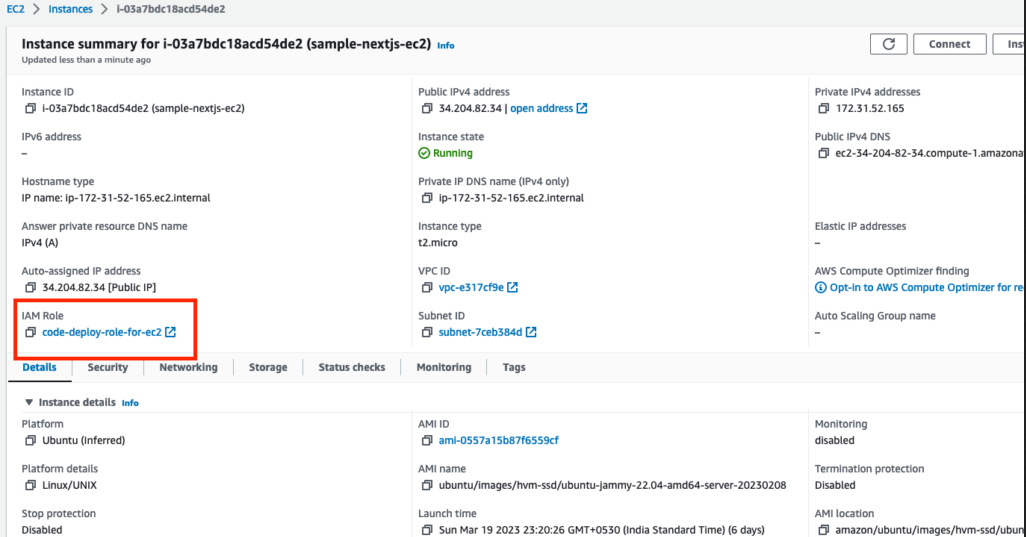 EC2 instance after attaching IAM role
After rebooting the EC2, login to EC2 with SSH and run the pm2 resurrect command to restore the PM2 processes. Failing to do this may land you at "PM2 Process or Namespace not found error" while running automatic deployment.
 PM2 process restore
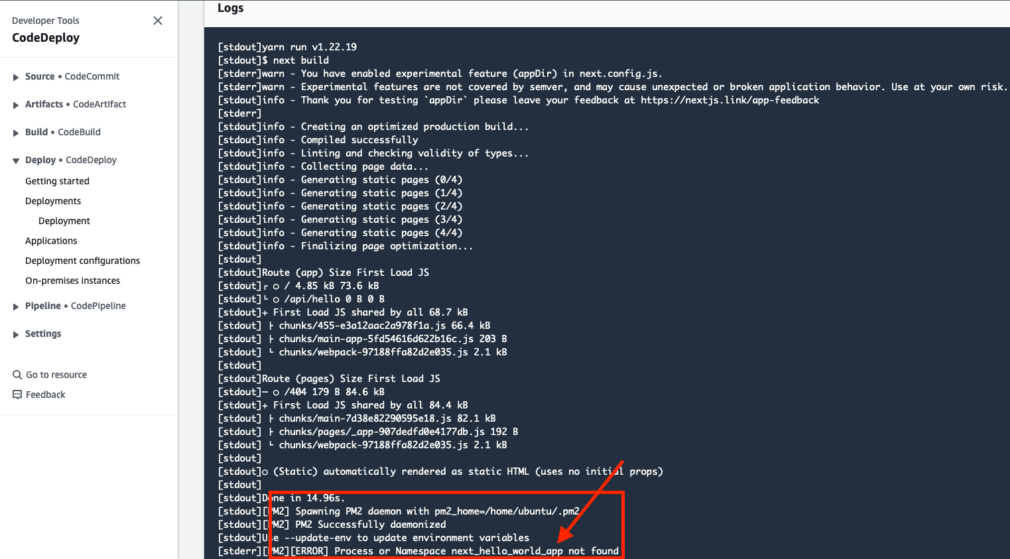 PM2 process or namespace not found an error
How to Create the CodeDeploy Application
In the AWS Console, search "CodeDeploy" in the search bar at the top. Select "Applications" in the left pane. Click on the "Create application" button on the top right.
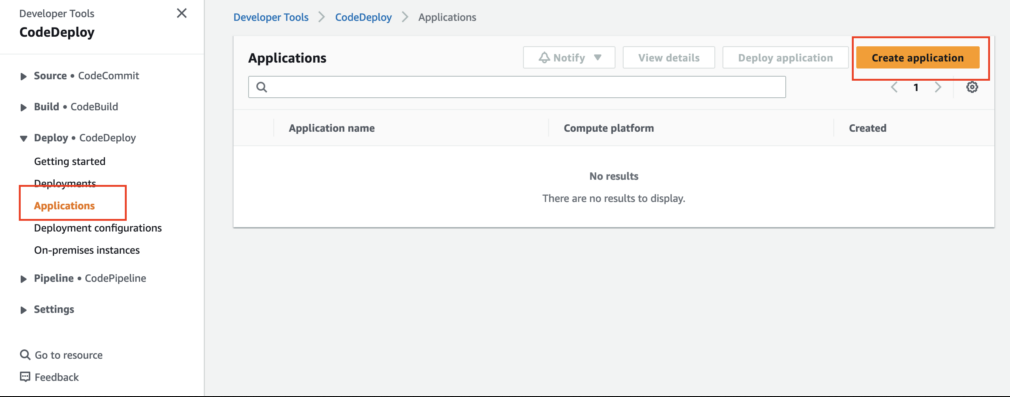 Navigate to CodeDeploy in AWS Console
Enter the Application name, choose the "EC2/On-premises" compute platform, and click the "Create application" button.
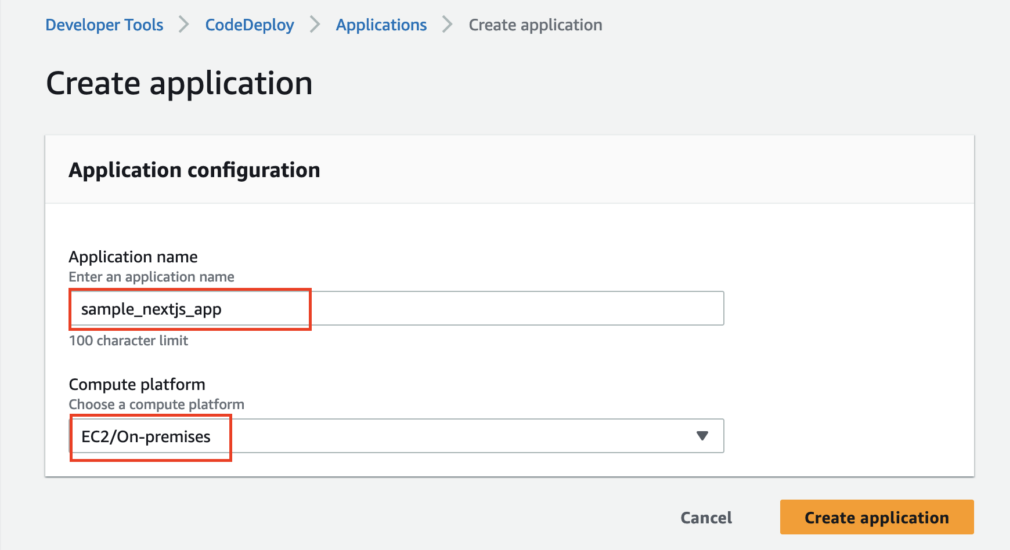 Create CodeDeploy application
Once it's done, you'll automatically be redirected to the Deployment groups section. We have to create a deployment group. Click on the "Create deployment group" button.
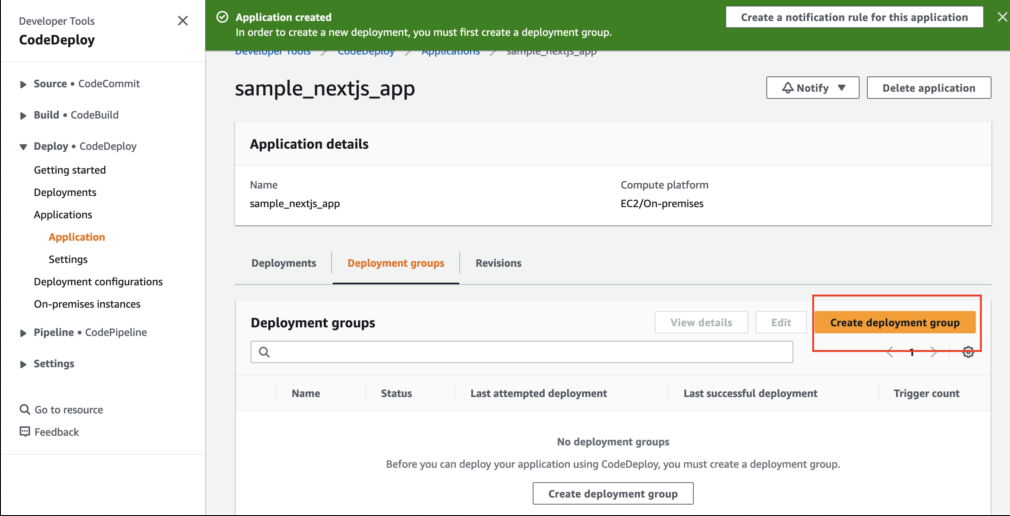 Create CodeDeploy Deployment group
Enter the deployment group name, select the service role (1st created role) you created, and select the deployment type as in-place:
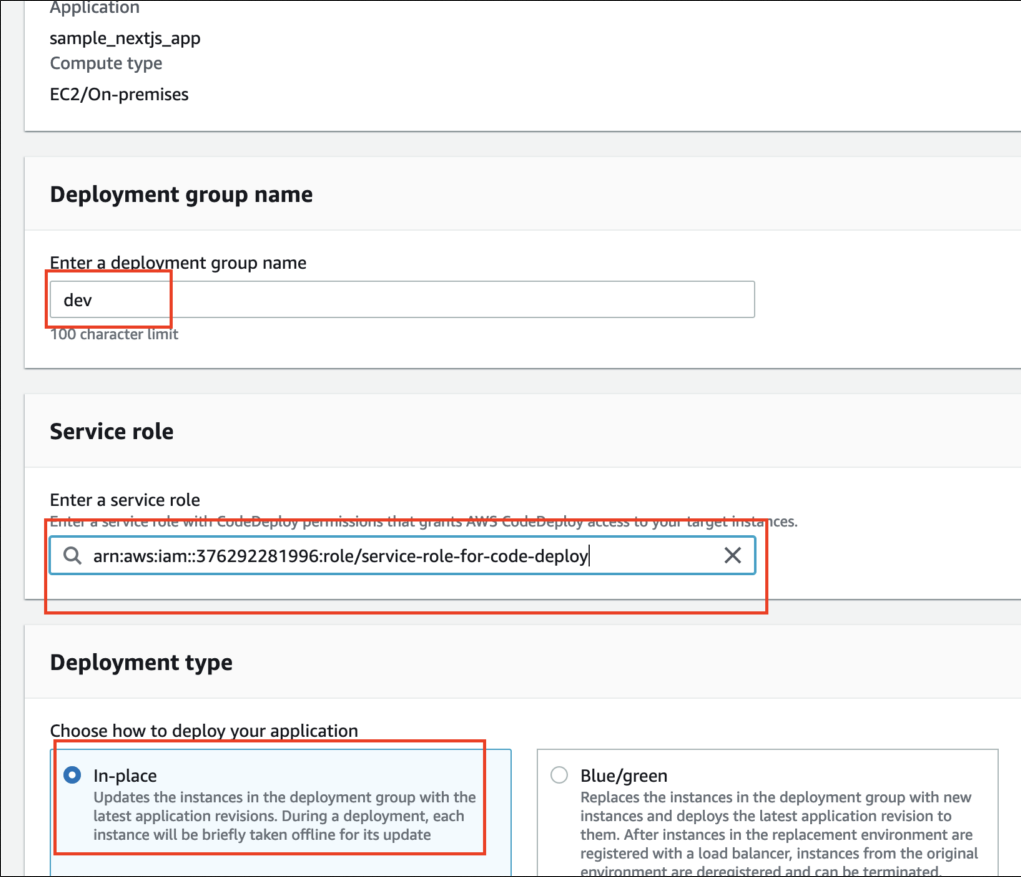 Create CodeDeploy Deployment group
In the Environment configuration section, select "Amazon EC2 instances" and select the key as Name. Enter your EC2 instance name in the value.
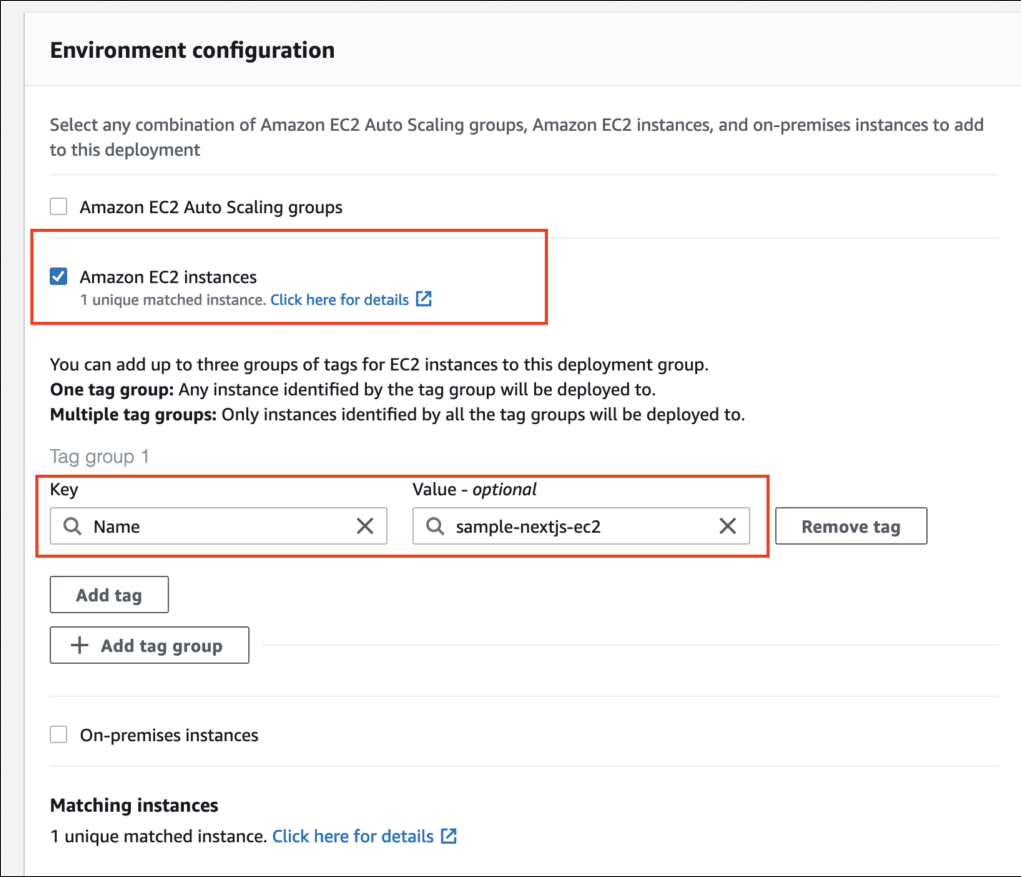 Code Deployment Group Environment configuration
In the Agent configuration section, select Never, as we installed CodeDeployAgent already. Select "CodeDeployDefault.AllAtOnce" in the Deployment settings section. Leave the "Enable load balancing" checkbox unchecked. Finally, click the "Create a deployment group" button.
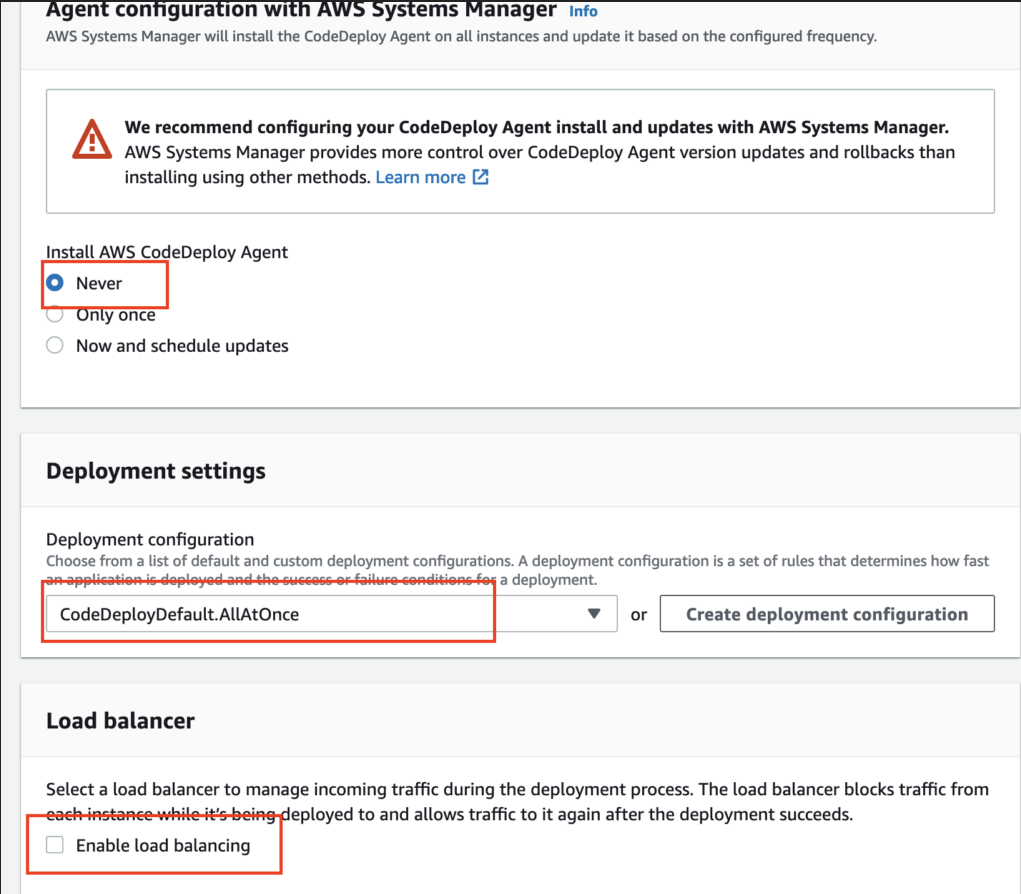 CodeDeploy deployment group configurations
How to Create the CodePipeline
AWS CodePipeline helps you to automate your release pipelines for fast and reliable application and infrastructure updates. Now it's time to create our CodePipeline. In the AWS Console, search for "CodePipeline" in the search bar.
Select "Pipelines" in the left pane and click on "Create pipeline" button.
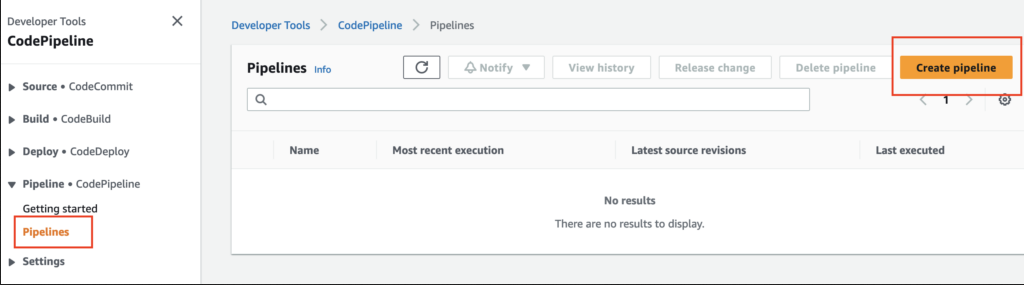 Create CodePipeline
Enter the Pipeline name, and Role name. Remember, we created roles for EC2 and CodeDeploy, but not for CodePipeline. AWS by default creates it from here.
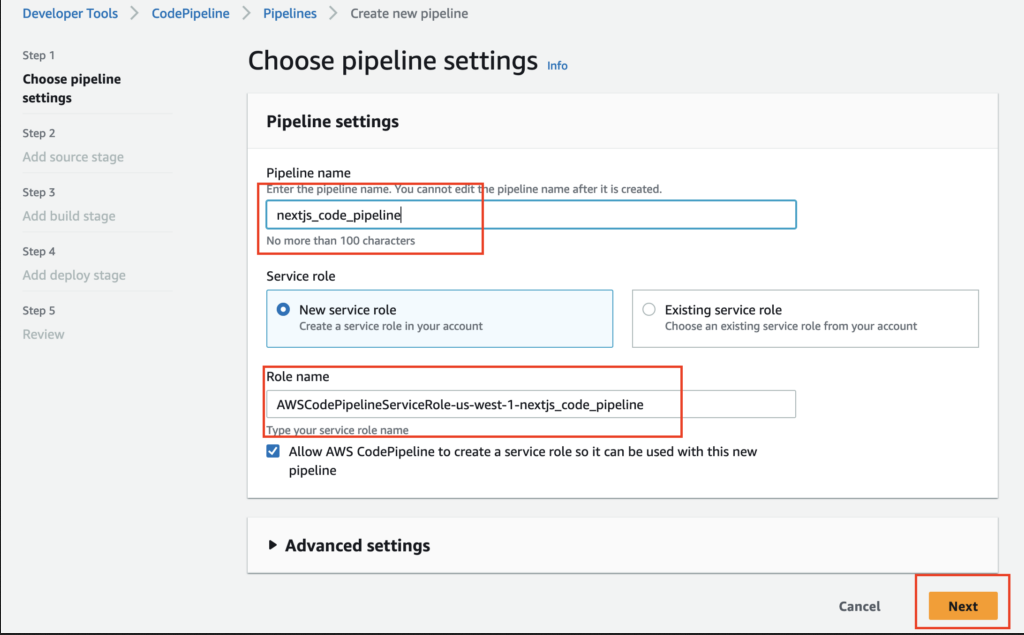 CodePipeline settings
Add Source Stage
In this step, we have to connect our repo with CodePipeline to deploy the changes immediately after the code is pushed.
We'll be using GitHub as our source. Choose GitHub (version 2) in the source provider, and click on the "Connect to GitHub" button. This will open up a new pop-up window. Click on the "Connect to GitHub" button.
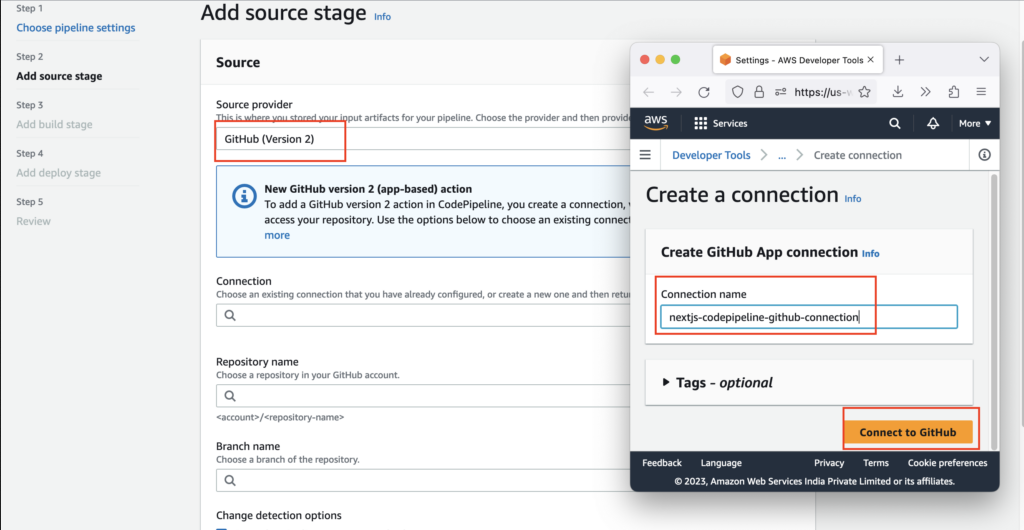 CodePipeline adding source stage
This will take you to the GitHub authorization page where you have to sign into your GitHub account. Click on the "Install a new app" button.
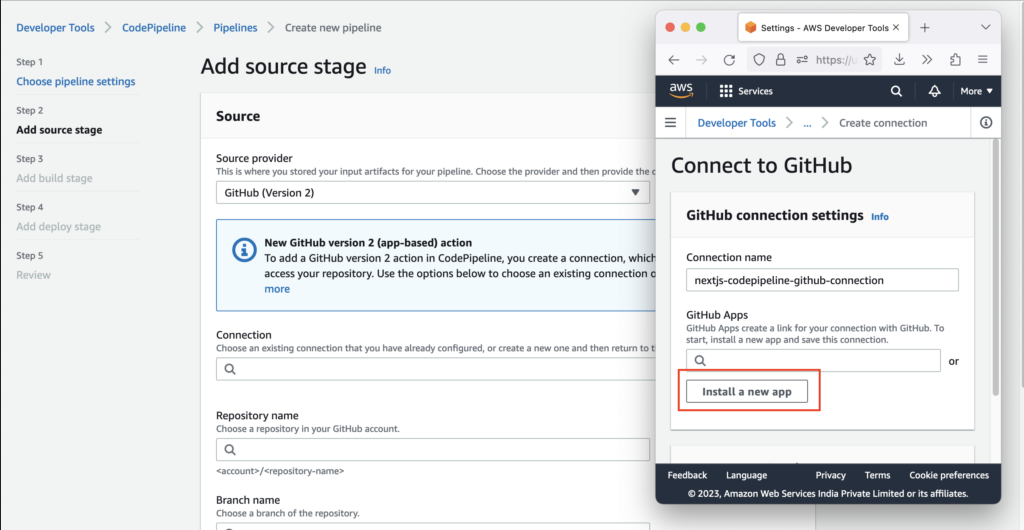 CodePipeline Github Authorization
Choose "Only select repositories" and choose your repository below that.
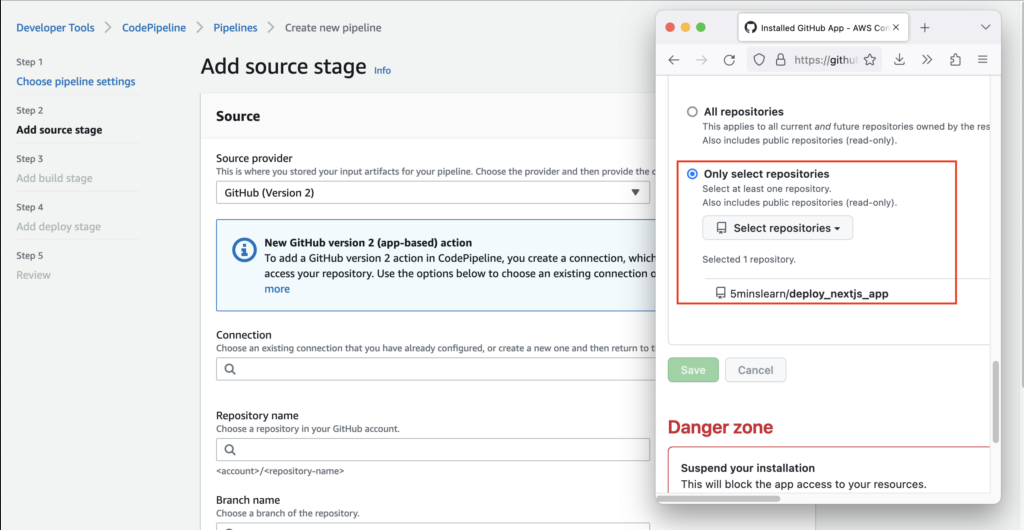 Installing AWS connector for GitHub
Once installed, it will prompt you for the password. Click the "Connect" button once you're done with your authentication.
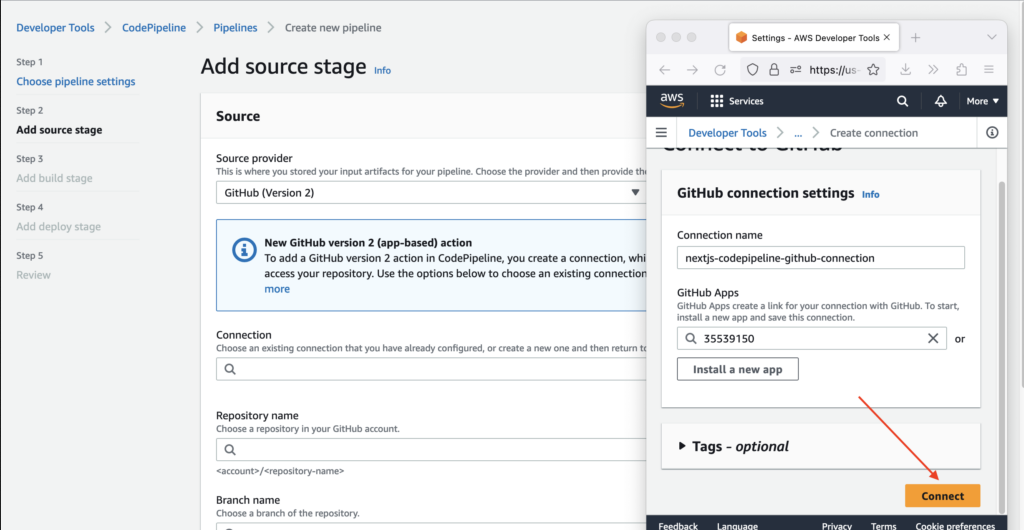 Connecting GitHub to AWS
After connecting to GitHub, select the Repository name and branch name. To start the CodePipline on code change, it's important to select the check box "Start the pipeline on source code change" – otherwise auto deployment will not happen. For "Output and artifact format", select "CodePipeline default" and click the "Next" button.
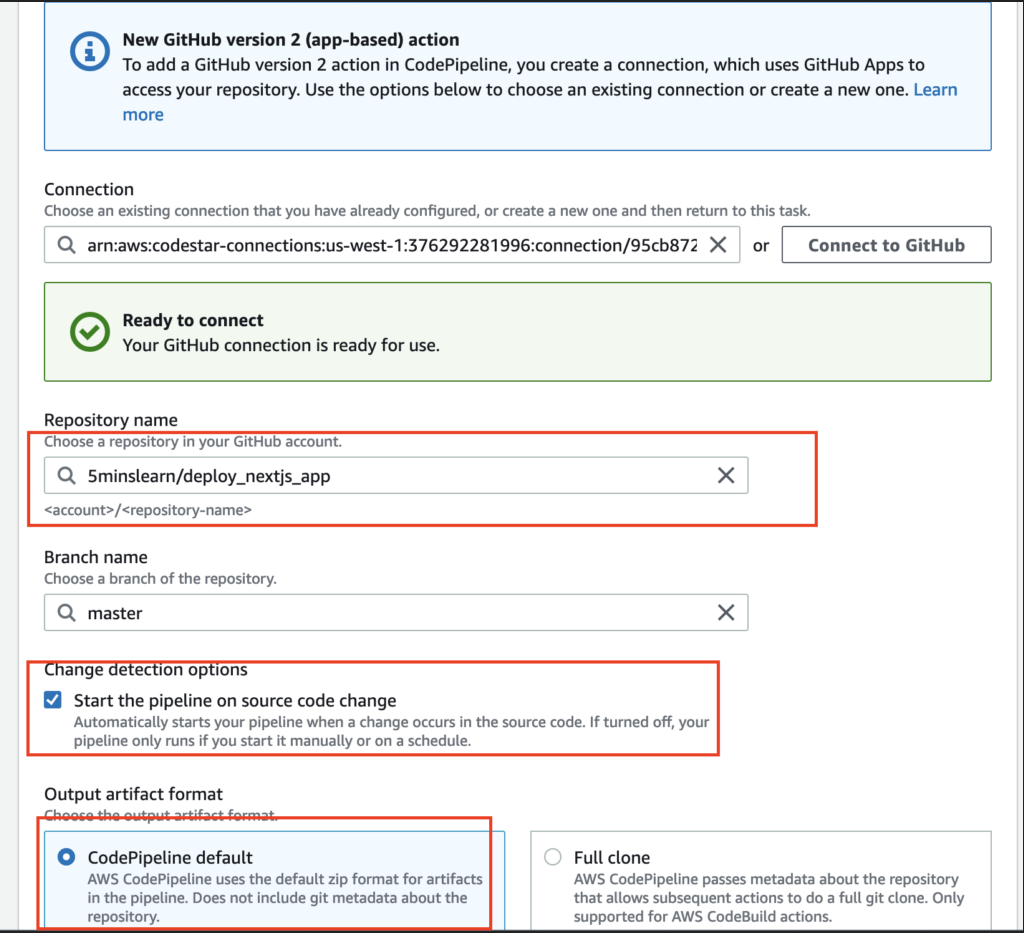 CodePipeline - Select source code repo
The next step is to add the build stage, but since we're deploying a simple app we don't need a build stage. Enterprise companies prefer to build their app using AWS CodeBuild service. Let's keep things simple and simply skip the build stage.
If you want me to write about CodeBuild let me know, I will try to cover it in my upcoming tutorials.
Add Deploy Stage
In the deployment stage step, choose "AWS CodeDeploy" for the "Deploy provider" and select the region where you created the above CodeDeploy application. Then select the "Application name" and "Deployment group" that we created in the previous steps and click the "Next" button.
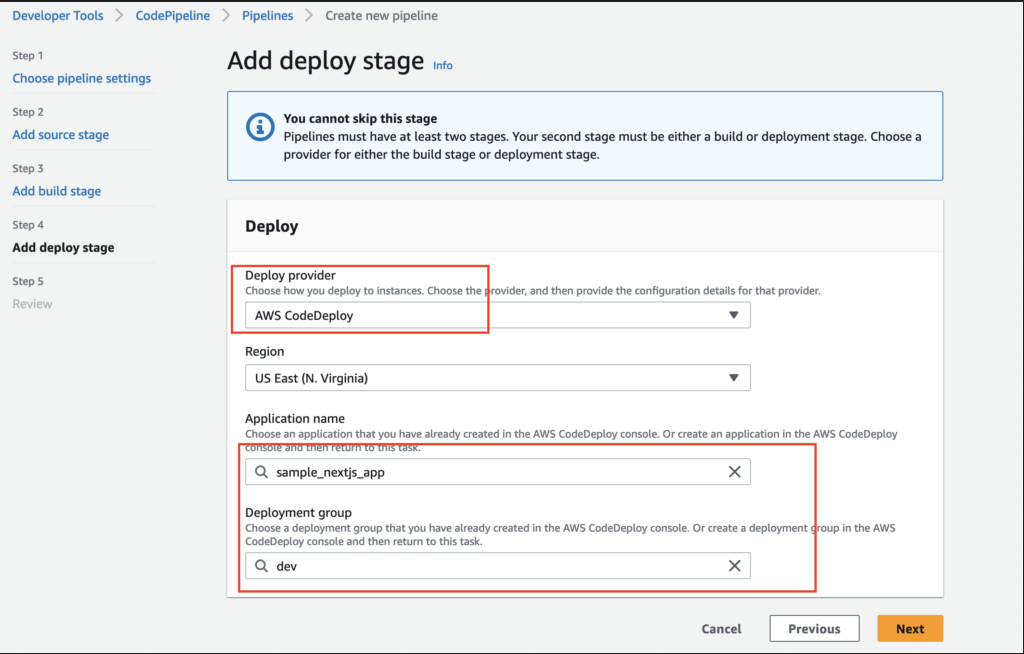 CodePipleine - Adding Deployment stage
The last step is "Review". Review everything carefully and click on the "Create pipeline" button. Once the pipeline is created it will start the deployment process. If you followed all the above steps, the pipeline should read "Succeeded" on your very first build.
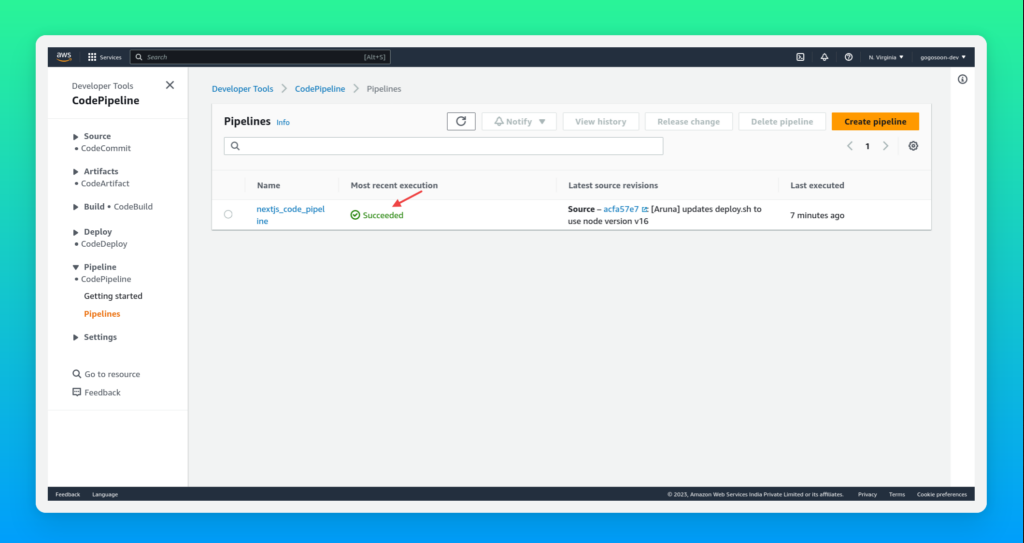 Pipeline Succeeded
How to Verify Auto-Deployment
Now let's verify if the Auto-deployment works properly. This is the Home page of our project:
 Next.js Hello World App
Let's change the text from "Hello World" to "Welcome to 5minslearn" and push the code to GitHub.
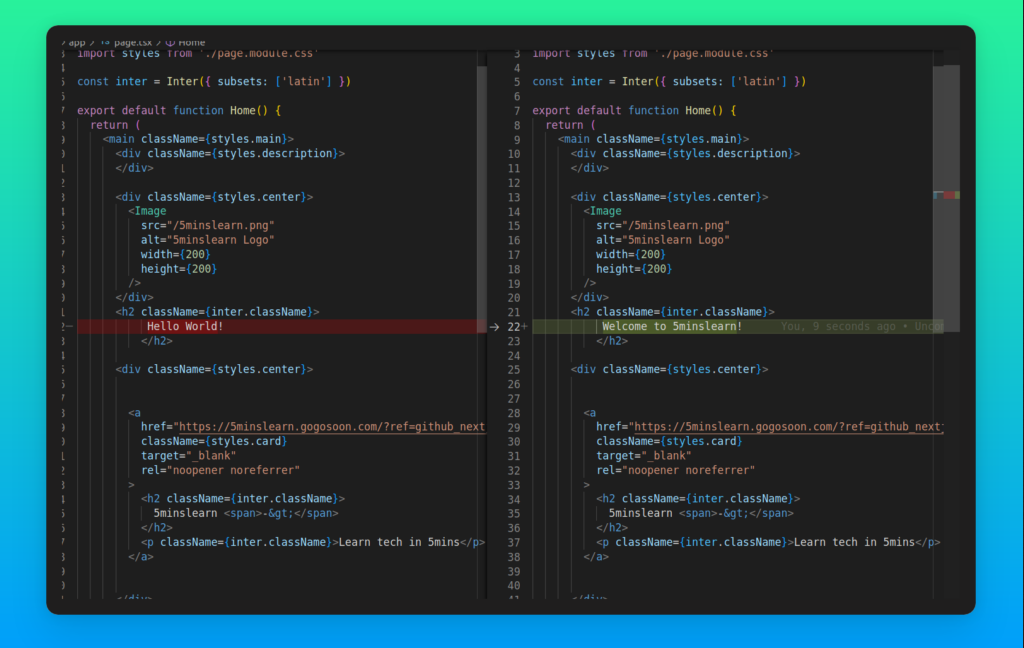 Git code diff
Here we go! The CodePipeline has triggered automatically and the changes were successfully deployed.
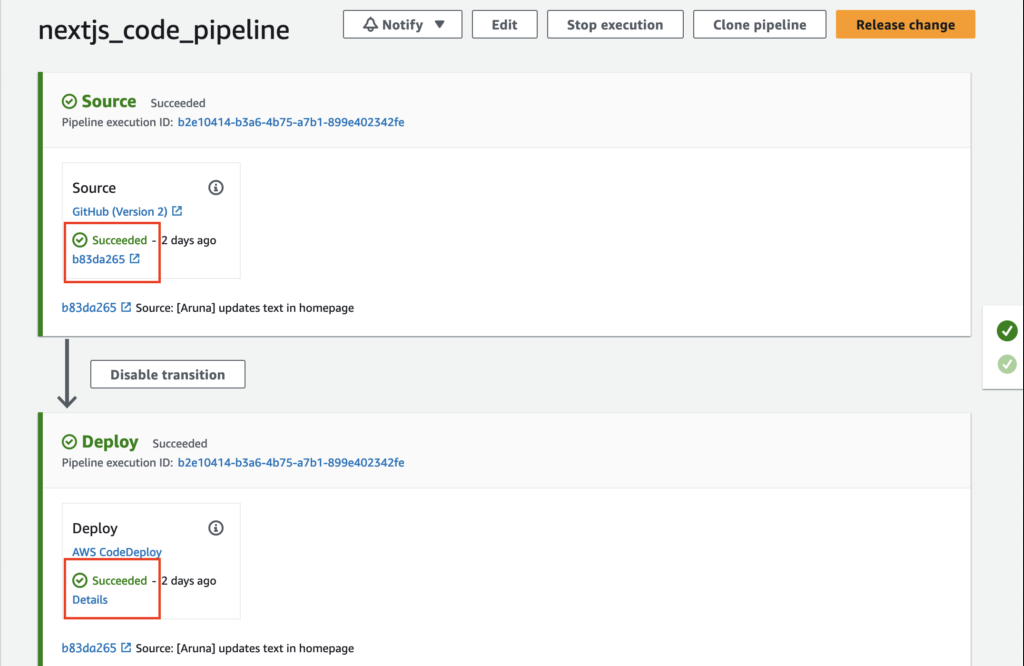 CodeDeploy getting triggered automatically on code changes in Git
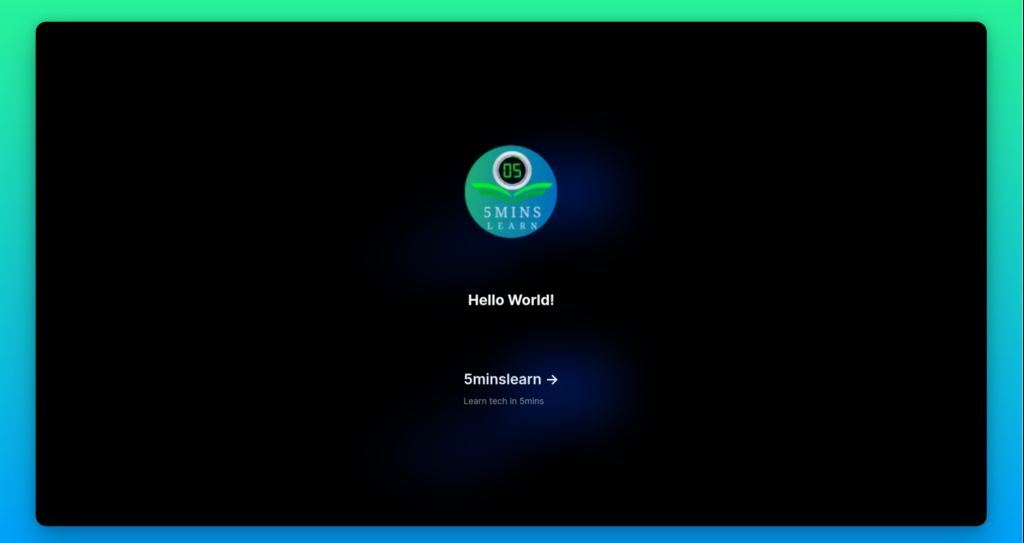
Now head to "http://ec2-public-ip-address:3000/", you will see the below page:
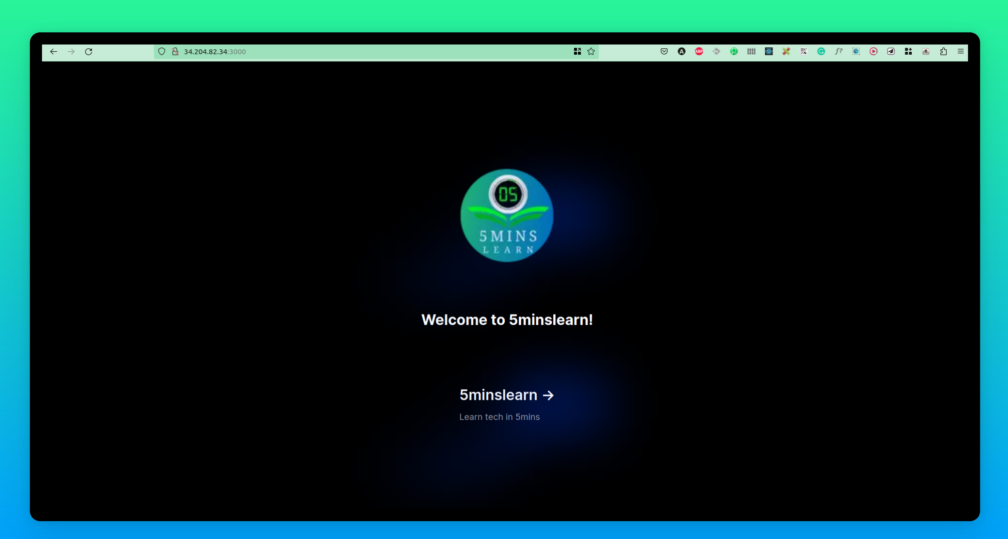 Next.js App after auto deployment
Congrats! 🎉 We successfully completed setting up auto-deployment for a Next.js app.
Conclusion
In this article, we learned how to deploy Next.js manually on EC2 and set up auto-deployment using AWS services such as CodeDeploy and CodePipeline.
Hope you enjoyed reading this article! If you are stuck at any point feel free to drop your queries to my email. I'll be happy to help you!
If you wish to learn more about AWS, subscribe to my newsletter (https://5minslearn.gogosoon.com/) and follow me on social media.