

This is an article on how I created an AI chess engine, starting completely from scratch to building my very own AI chess engine.
Because creating an AI chess engine from scratch is a relatively complex task, this will be a long article, but stay tuned, as the product you will end up with will be a cool project to showcase!
Prerequisites
This article will explain most concepts in detail. However, there are some recommended prerequisites to follow the tutorial. You should be familiar with the following:
- Python
- How to use the terminal
- Jupyter Notebook
- Fundamental AI concepts
- Chess rules
I will also use the following tools:
- Python
- Different Python packages
- Stockfish
Table of Contents
- Part 1 : How to Generate a Dataset
- Part 2 : How to Encode data
- Part 3: How to Train the AI model
- Conclusion
Part 1: How to Generate a Dataset
In this part, I will use Stockfish to generate a large dataset of moves from different positions. This data can then be used later on to train the chess AI.
How to download Stockfish
The most important component of my chess engine is Stockfish, so I will therefore show you how to install it.
Go to the Stockfish website download page and download the version for you. I am using Windows myself, so I chose the Windows (faster) version:
 Press the download button marked in red if you have a Windows PC
After downloading, extract the zip file to whatever location on your PC you want your chess engine to be. Remember where you place it as you need the path for the next step.
How to incorporate Stockfish with Python
Now you also need to incorporate the engine into Python. You could manually do this, but I found it easier to use the Python Stockfish package as it has all the functions you need.
First install the package from pip (preferably in your virtual environment):
pip install stockfish
You can then import it using the following command:
from stockfish import Stockfish
stockfish = Stockfish(path=r"C:\Users\eivin\Documents\ownProgrammingProjects18062023\ChessEngine\stockfish\stockfish\stockfish-windows-2022-x86-64-avx2")
Note that you need to give your own path to the Stockfish executable file:
 The stockfish executable file is the second file from the bottom
You can copy the file path from the folder structure, or if you are on Windows 11 you can press ctrl + shift + c to automatically copy the file path.
Great! Now you have Stockfish available in Python!
How to generate a dataset
Now you need a dataset so you can train the AI chess engine! You can do this by making Stockfish play games and remembering each position and the moves you could take from there.
Those moves will be along the best possible moves, considering Stockfish is a strong chess engine.
First, install a chess package and NumPy (there are plenty to choose from, but I will be using the one below).
Enter each line (individually) in the terminal:
pip install chess
pip install numpy
Then import packages (remember to also import Stockfish as shown earlier in this article):
import chess
import random
from pprint import pprint
import numpy as np
import os
import glob
import time
You also need some helper functions here:
#helper functions:
def checkEndCondition(board):
 if (board.is_checkmate() or board.is_stalemate() or board.is_insufficient_material() or board.can_claim_threefold_repetition() or board.can_claim_fifty_moves() or board.can_claim_draw()):
  return True
 return False

#save
def findNextIdx():
 files = (glob.glob(r"C:\Users\eivin\Documents\ownProgrammingProjects18062023\ChessEngine\data\*.npy"))
 if (len(files) == 0):
  return 1 #if no files, return 1
 highestIdx = 0
 for f in files:
  file = f
  currIdx = file.split("movesAndPositions")[-1].split(".npy")[0]
  highestIdx = max(highestIdx, int(currIdx))

 return int(highestIdx)+1

def saveData(moves, positions):
 moves = np.array(moves).reshape(-1, 1)
 positions = np.array(positions).reshape(-1,1)
 movesAndPositions = np.concatenate((moves, positions), axis = 1)
 nextIdx = findNextIdx()
 np.save(f"data/movesAndPositions{nextIdx}.npy", movesAndPositions)
 print("Saved successfully")

def runGame(numMoves, filename = "movesAndPositions1.npy"):
 """run a game you stored"""
 testing = np.load(f"data/{filename}")
 moves = testing[:, 0]
 if (numMoves > len(moves)):
  print("Must enter a lower number of moves than maximum game length. Game length here is: ", len(moves))
  return

 testBoard = chess.Board()

 for i in range(numMoves):
  move = moves[i]
  testBoard.push_san(move)
 return testBoard
Remember to change the file path in the findNextIdx function, as this is personal for your computer.
Create a data folder within the folder you are coding, and copy the path (but still keep the *.npy at the end)
The checkEndCondition function uses functions from the Chess pip package to check if the game is to be ended.
The saveData function saves a game to npy files which is a highly optimized way of storing arrays.
The function uses the findNextIdx function to save to a new file (remember here to create a new folder called data to store all data in).
Finally, the runGame function makes it so you can run a game that you saved to check the positions after numMoves number of moves.
Then you can finally get to the function that mines the chess games:
def mineGames(numGames : int):
 """mines numGames games of moves"""
 MAX_MOVES = 500 #don't continue games after this number

 for i in range(numGames):
  currentGameMoves = []
  currentGamePositions = []
  board = chess.Board()
  stockfish.set_position([])

  for i in range(MAX_MOVES):
   #randomly choose from those 3 moves
   moves = stockfish.get_top_moves(3)
   #if less than 3 moves available, choose first one, if none available, exit
   if (len(moves) == 0):
    print("game is over")
    break
   elif (len(moves) == 1):
    move = moves[0]["Move"]
   elif (len(moves) == 2):
    move = random.choices(moves, weights=(80, 20), k=1)[0]["Move"]
   else:
    move = random.choices(moves, weights=(80, 15, 5), k=1)[0]["Move"]

   currentGamePositions.append(stockfish.get_fen_position())
   board.push_san(move)
   currentGameMoves.append(move)
   stockfish.set_position(currentGameMoves)
   if (checkEndCondition(board)):
    print("game is over")
    break
  saveData(currentGameMoves, currentGamePositions)
Here you first set a max limit so a game does not last infinitely long.
Then, you run the number of games you want to run and make sure both Stockfish and the Chess pip package are reset to the starting position.
Next, you get the top 3 moves suggested by Stockfish and choose one of them to play (80 % change for the best move, 15 % change for the second best move, 5 % change for the third best move). The reason you are not always choosing the best move is for the move selection to be more stochastic.
Then, you choose a move (making sure no error occurs even if there are less than three possible moves), save the board position using FEN (a way of encoding a chess position), as well as the move done from that position.
If the game is done, you break the loop and store all positions and the moves made from those positions. If the game is not done, you continue making moves until the game is over.
You can then mine one game with:
mineGames(1)
Remember to create a data folder here, as this is where I store the games!
How to review a mined game
Run the mineGames function to mine one game using the following command:
mineGames(1)
You can access this game with a helper function shown earlier using the following command:
testBoard = runGame(12, "movesAndPositions1.npy")
testBoard
Assuming there have been 12 moves in the game, you will then see something like this:
 Output from printing board position after 12 moves. (Note that the last line with just testBoard is printed, since in a Jupyter notebook, a variable is printed if it is written alone at the bottom of a cell).
And that’s it, you can now mine as many games as you would like.
It is going to take some time, and there are potentials for optimizing this mining process, such as parallelizing the game simulations (since each game is completely separate from the other).
For the full code from part 1, you can check out the full code on my GitHub.
Part 2 : How to Encode Data
In this part, you will encode chess moves and positions in the same way DeepMind did with AlphaZero!
I will use the data you gathered in part 1 of this series.
As a reminder, you installed Stockfish and made sure you could access it on the computer. You then made it play games against itself, while you stored all moves and positions.
You now have a supervised learning problem, since the input is the current position, and the label (the correct move from the positions) is the move that Stockfish decided was the best.
How to install and import packages
First, you need to install and import all required packages, some of which you may already have if you followed part 1 of this series.
All imports are below – remember to only input one line at a time when installing via pip:
pip install numpy
pip install gym-chess
pip install chess
Additionally, you need to make a small change in one of the files in the gym-chess package since np.int was used, which is now deprecated.
In the file with the relative path (from the virtual environment) venv\Lib\site-packages\gym_chess\alphazero\board_encoding.py where venv is the name of my virtual environment, you have to search for "np.int" and replace them with "int".
If you don't, you will see an error message stating that np.int is deprecated.
I also had to restart VS Code after replacing "np.int" with "int", to make it work.
All imports you need are below:
import numpy as np
import gym
import chess
import os
import gym.spaces
from gym_chess.alphazero.move_encoding import utils, queenmoves, knightmoves, underpromotions
from typing import List
And then you also need to create the gym environment to encode and decode moves:
env = gym.make('ChessAlphaZero-v0')
How to encode board positions and moves
Encoding is an important element within AI, as it allows us to represent problems in a readable way for the AI.
Instead of an image of a chess board, or a string representing a chess move like "d2d4", you instead represent this using arrays (lists of numbers).
Finding out how to do this manually is quite challenging, but luckily for us, the gym-chess Python package has already solved this problem for us.
I am not going to go into more details on how they encoded it, but you can see using the code below that a position is represented with an (8,8,119) shaped array, and all possible moves are given with a (4672) array (1 column with 4672 values).
If you want to read more about this, you can check out the AlphaZero paper, though this is quite a complicated paper to fully understand.
#code to print action and state space
env = gym.make('ChessAlphaZero-v0')
env.reset()
print(env.observation_space)
print(env.action_space)
Which outputs:
 Output from printing state (first line) and action space (second line)
You can also check out the encoding of a move. From string notation to encoded notation. Make sure to reset the environment as it may give an error if you do not:
#first set the environment and make sure to reset the positions
env = gym.make('ChessAlphaZero-v0')
env.reset()

#encoding the move e2 to e4
move = chess.Move.from_uci('e2e4')
print(env.encode(move))
# -> outputs: 877

#decoding the encoded move 877
print(env.decode(877))
# -> outputs: Move.from_uci('e2e4')
With this, you can now have functions to encode the moves and positions you stored from part 1 where you generated a dataset.
How to create functions for encoding moves
These functions are copied from the Gym-Chess package, but with small tweaks so it is not dependent on a class.
I manually changed these functions so that it was easier to encode. I would not worry too much about understanding these functions fully, as they are quite complicated.
Just know that they are a way of making sure moves that humans understand, are converted to a way that computers can understand.
#fixing encoding funcs from openai

def encodeKnight(move: chess.Move):
    _NUM_TYPES: int = 8

    #: Starting point of knight moves in last dimension of 8 x 8 x 73 action array.
    _TYPE_OFFSET: int = 56

    #: Set of possible directions for a knight move, encoded as
    #: (delta rank, delta square).
    _DIRECTIONS = utils.IndexedTuple(
        (+2, +1),
        (+1, +2),
        (-1, +2),
        (-2, +1),
        (-2, -1),
        (-1, -2),
        (+1, -2),
        (+2, -1),
    )

    from_rank, from_file, to_rank, to_file = utils.unpack(move)

    delta = (to_rank - from_rank, to_file - from_file)
    is_knight_move = delta in _DIRECTIONS

    if not is_knight_move:
        return None

    knight_move_type = _DIRECTIONS.index(delta)
    move_type = _TYPE_OFFSET + knight_move_type

    action = np.ravel_multi_index(
        multi_index=((from_rank, from_file, move_type)),
        dims=(8, 8, 73)
    )

    return action

def encodeQueen(move: chess.Move):
    _NUM_TYPES: int = 56 # = 8 directions * 7 squares max. distance
    _DIRECTIONS = utils.IndexedTuple(
        (+1,  0),
        (+1, +1),
        ( 0, +1),
        (-1, +1),
        (-1,  0),
        (-1, -1),
        ( 0, -1),
        (+1, -1),
    )

    from_rank, from_file, to_rank, to_file = utils.unpack(move)

    delta = (to_rank - from_rank, to_file - from_file)

    is_horizontal = delta[0] == 0
    is_vertical = delta[1] == 0
    is_diagonal = abs(delta[0]) == abs(delta[1])
    is_queen_move_promotion = move.promotion in (chess.QUEEN, None)

    is_queen_move = (
        (is_horizontal or is_vertical or is_diagonal)
            and is_queen_move_promotion
    )

    if not is_queen_move:
        return None

    direction = tuple(np.sign(delta))
    distance = np.max(np.abs(delta))

    direction_idx = _DIRECTIONS.index(direction)
    distance_idx = distance - 1

    move_type = np.ravel_multi_index(
        multi_index=([direction_idx, distance_idx]),
        dims=(8,7)
    )

    action = np.ravel_multi_index(
        multi_index=((from_rank, from_file, move_type)),
        dims=(8, 8, 73)
    )

    return action

def encodeUnder(move):
    _NUM_TYPES: int = 9 # = 3 directions * 3 piece types (see below)
    _TYPE_OFFSET: int = 64
    _DIRECTIONS = utils.IndexedTuple(
        -1,
        0,
        +1,
    )
    _PROMOTIONS = utils.IndexedTuple(
        chess.KNIGHT,
        chess.BISHOP,
        chess.ROOK,
    )

    from_rank, from_file, to_rank, to_file = utils.unpack(move)

    is_underpromotion = (
        move.promotion in _PROMOTIONS
        and from_rank == 6
        and to_rank == 7
    )

    if not is_underpromotion:
        return None

    delta_file = to_file - from_file

    direction_idx = _DIRECTIONS.index(delta_file)
    promotion_idx = _PROMOTIONS.index(move.promotion)

    underpromotion_type = np.ravel_multi_index(
        multi_index=([direction_idx, promotion_idx]),
        dims=(3,3)
    )

    move_type = _TYPE_OFFSET + underpromotion_type

    action = np.ravel_multi_index(
        multi_index=((from_rank, from_file, move_type)),
        dims=(8, 8, 73)
    )

    return action

def encodeMove(move: str, board) -> int:
    move = chess.Move.from_uci(move)
    if board.turn == chess.BLACK:
        move = utils.rotate(move)

    action = encodeQueen(move)

    if action is None:
        action = encodeKnight(move)

    if action is None:
        action = encodeUnder(move)

    if action is None:
        raise ValueError(f"{move} is not a valid move")

    return action
So now you can give in a move as a string (for example: "e2e4" for the move from e2 to e4), and it outputs a number (the encoded version of the move).
How to create a function for encoding positions
Encoding the positions is a bit more difficult. I took a function from the gym-chess package ("encodeBoard") since I had some issues using the package directly. The function I copied is below:
def encodeBoard(board: chess.Board) -> np.array:
 """Converts a board to numpy array representation."""

 array = np.zeros((8, 8, 14), dtype=int)

 for square, piece in board.piece_map().items():
  rank, file = chess.square_rank(square), chess.square_file(square)
  piece_type, color = piece.piece_type, piece.color

  # The first six planes encode the pieces of the active player,
  # the following six those of the active player's opponent. Since
  # this class always stores boards oriented towards the white player,
  # White is considered to be the active player here.
  offset = 0 if color == chess.WHITE else 6

  # Chess enumerates piece types beginning with one, which you have
  # to account for
  idx = piece_type - 1

  array[rank, file, idx + offset] = 1

 # Repetition counters
 array[:, :, 12] = board.is_repetition(2)
 array[:, :, 13] = board.is_repetition(3)

 return array

def encodeBoardFromFen(fen: str) -> np.array:
 board = chess.Board(fen)
 return encodeBoard(board)
I also added the encodeBoardFromFen function, since the copied function required a chess board represented using the Python Chess package, so I first convert from FEN-notation (a way of encoding chess positions to a string – you cannot use this as you need the encoding to be in numbers) to a chess board given in that package.
Then you have all you need to encode all your files.
How to automate encoding for all raw data files
Now that you can encode moves and positions, you will automate this process for all files in your folder that you generated from part 1 of this series. This involves finding all files in which you have to encode the data and saving these to new files.
Note that from part 1 I changed the folder structure slightly.
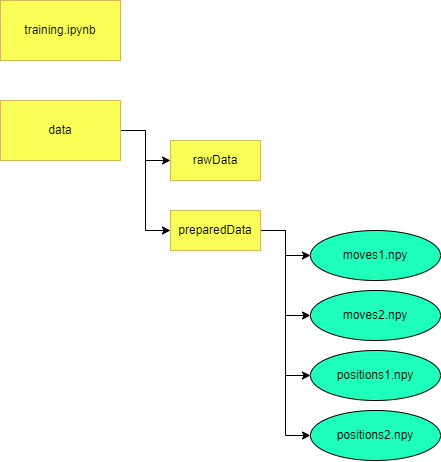
I now have a parent Data folder, and within this folder, I have the rawData, which is the moves in string format and positions in FEN-format (from part 1).
I also have the preparedData folder under the data folder, where the encoded moves and positions will be stored.
Note that the encoded moves and positions will be stored in separate files since the encodings have different dimensions.
 Folder structure for the data. Make sure to have two folders called preparedData and rawData within the Data folder. The Data folder is on the same level as your notebook files.
#function to encode all moves and positions from rawData folder
def encodeAllMovesAndPositions():
    board = chess.Board() #this is used to change whose turn it is so that the encoding works
    board.turn = False #set turn to black first, changed on first run

    #find all files in folder:
    files = os.listdir('data/rawData')
    for idx, f in enumerate(files):
        movesAndPositions = np.load(f'data/rawData/{f}', allow_pickle=True)
        moves = movesAndPositions[:,0]
        positions = movesAndPositions[:,1]
        encodedMoves = []
        encodedPositions = []

        for i in range(len(moves)):
            board.turn = (not board.turn) #swap turns
            try:
                encodedMoves.append(encodeMove(moves[i], board))
                encodedPositions.append(encodeBoardFromFen(positions[i]))
            except:
                try:
                    board.turn = (not board.turn) #change turn, since you  skip moves sometimes, you  might need to change turn
                    encodedMoves.append(encodeMove(moves[i], board))
                    encodedPositions.append(encodeBoardFromFen(positions[i]))
                except:
                    print(f'error in file: {f}')
                    print("Turn: ", board.turn)
                    print(moves[i])
                    print(positions[i])
                    print(i)
                    break

        np.save(f'data/preparedData/moves{idx}', np.array(encodedMoves))
        np.save(f'data/preparedData/positions{idx}', np.array(encodedPositions))

encodeAllMovesAndPositions()

#NOTE: shape of files:
#moves: (number of moves in gamew)
#positions: (number of moves in game, 8, 8, 14) (number of moves in game is including both black and white moves)
I first create the environment and reset it.
Then, I open all raw data files made from part 1 and encode this. I also do it in a try/catch statement, as I sometimes see errors with move encodings.
The first except statement is for if a move is skipped (so the program thinks it’s the wrong turn). If this happens, the encoding will not work, so the except statement changes the turn and tries again. This is not the most optimal code, but the encoding is a minor part of the total runtime to creating an AI chess engine, and it is therefore acceptable.
Make sure you have the correct folder structure and have created all the different folders. If not, you will receive an error.
You have now encoded your chess board and moves. If you want to, you can check out the full code from this part on my GitHub.
Part 3: How to Train the AI model
This is the third and last part in the for creating your own AI chess engine!
In part 1 you learned how to create a dataset, and in part 2 you looked at encoding the dataset so that it could be used for an AI.
You will now use this encoded dataset to train your own AI using PyTorch!
How to import packages
As always, you have all the imports that will be used in the tutorial. Most are straightforward, but you need to install PyTorch, which I recommend installing using this website.
Here you can scroll down a bit, where you see some options for which build and operating system you are on.
After selecting the options that apply to you, you will get some code you can paste into the terminal to install PyTorch.
You can see the options I chose in the image below, but in general, I recommend using the stable build and choosing your own operating system.
Then, select what package you are most used to (Conda or pip is probably the easiest as you can just paste it into the terminal).
Select CUDA 11.7/11.8 (does not matter which one), and install using the given command at the bottom.
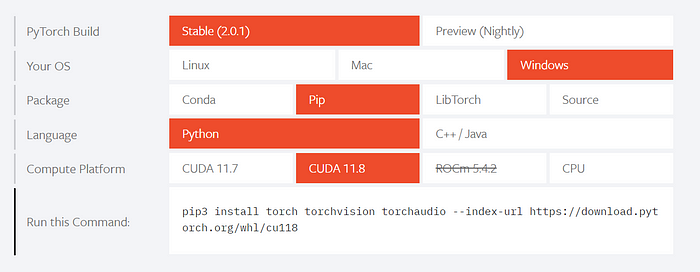 My selections when installing PyTorch.
You can then import all your packages with the code below:
import numpy as np
import torch
import torch.nn as nn
import torch.functional as F
import torchvision
import torchvision.transforms as transforms
from torch.utils.tensorboard import SummaryWriter
from datetime import datetime
import gym
import gym_chess
import os
import chess
from tqdm import tqdm
from gym_chess.alphazero.move_encoding import utils
from pathlib import Path
from typing import Optional
How to Install CUDA
This is an optional step, that allows you to utilize your GPU to train your model much faster. It is not required, but will save you some time when training your AI.
The way you install CUDA varies depending on your operating system, but I am using Windows and followed this tutorial.
If you are on MacOS or Linux, then you can find a tutorial by googling: “installing CUDA Mac/Linux”.
To check if you have CUDA available (your GPU is available), you can use this code:
#check if cuda available
torch.cuda.is_available()
Which outputs True if your GPU is available. If you do not have a GPU available however, do not worry, the only downside here is training the model takes longer, which is not that big of a deal when doing hobby projects like this one.
How to create encoding methods
I then define some helper methods for encoding and decoding from the Python Gym-Chess package.
I had to make some modifications to the package, to make it work. Most of the code is copied from the package, with just a few small tweaks making the code not dependent on a class and so forth.
Note that you do not have to understand all the code below, as the way Deepmind encodes all moves in chess is complicated.
#helper methods:

#decoding moves from idx to uci notation
def _decodeKnight(action: int) -> Optional[chess.Move]:
    _NUM_TYPES: int = 8

    #: Starting point of knight moves in last dimension of 8 x 8 x 73 action array.
    _TYPE_OFFSET: int = 56

    #: Set of possible directions for a knight move, encoded as
    #: (delta rank, delta square).
    _DIRECTIONS = utils.IndexedTuple(
        (+2, +1),
        (+1, +2),
        (-1, +2),
        (-2, +1),
        (-2, -1),
        (-1, -2),
        (+1, -2),
        (+2, -1),
    )

    from_rank, from_file, move_type = np.unravel_index(action, (8, 8, 73))

    is_knight_move = (
        _TYPE_OFFSET <= move_type
        and move_type < _TYPE_OFFSET + _NUM_TYPES
    )

    if not is_knight_move:
        return None

    knight_move_type = move_type - _TYPE_OFFSET

    delta_rank, delta_file = _DIRECTIONS[knight_move_type]

    to_rank = from_rank + delta_rank
    to_file = from_file + delta_file

    move = utils.pack(from_rank, from_file, to_rank, to_file)
    return move

def _decodeQueen(action: int) -> Optional[chess.Move]:

    _NUM_TYPES: int = 56 # = 8 directions * 7 squares max. distance

    #: Set of possible directions for a queen move, encoded as
    #: (delta rank, delta square).
    _DIRECTIONS = utils.IndexedTuple(
        (+1,  0),
        (+1, +1),
        ( 0, +1),
        (-1, +1),
        (-1,  0),
        (-1, -1),
        ( 0, -1),
        (+1, -1),
    )
    from_rank, from_file, move_type = np.unravel_index(action, (8, 8, 73))

    is_queen_move = move_type < _NUM_TYPES

    if not is_queen_move:
        return None

    direction_idx, distance_idx = np.unravel_index(
        indices=move_type,
        shape=(8,7)
    )

    direction = _DIRECTIONS[direction_idx]
    distance = distance_idx + 1

    delta_rank = direction[0] * distance
    delta_file = direction[1] * distance

    to_rank = from_rank + delta_rank
    to_file = from_file + delta_file

    move = utils.pack(from_rank, from_file, to_rank, to_file)
    return move

def _decodeUnderPromotion(action):
    _NUM_TYPES: int = 9 # = 3 directions * 3 piece types (see below)

    #: Starting point of underpromotions in last dimension of 8 x 8 x 73 action
    #: array.
    _TYPE_OFFSET: int = 64

    #: Set of possibel directions for an underpromotion, encoded as file delta.
    _DIRECTIONS = utils.IndexedTuple(
        -1,
        0,
        +1,
    )

    #: Set of possibel piece types for an underpromotion (promoting to a queen
    #: is implicitly encoded by the corresponding queen move).
    _PROMOTIONS = utils.IndexedTuple(
        chess.KNIGHT,
        chess.BISHOP,
        chess.ROOK,
    )

    from_rank, from_file, move_type = np.unravel_index(action, (8, 8, 73))

    is_underpromotion = (
        _TYPE_OFFSET <= move_type
        and move_type < _TYPE_OFFSET + _NUM_TYPES
    )

    if not is_underpromotion:
        return None

    underpromotion_type = move_type - _TYPE_OFFSET

    direction_idx, promotion_idx = np.unravel_index(
        indices=underpromotion_type,
        shape=(3,3)
    )

    direction = _DIRECTIONS[direction_idx]
    promotion = _PROMOTIONS[promotion_idx]

    to_rank = from_rank + 1
    to_file = from_file + direction

    move = utils.pack(from_rank, from_file, to_rank, to_file)
    move.promotion = promotion

    return move

#primary decoding function, the ones above are just helper functions
def decodeMove(action: int, board) -> chess.Move:
        move = _decodeQueen(action)
        is_queen_move = move is not None

        if not move:
            move = _decodeKnight(action)

        if not move:
            move = _decodeUnderPromotion(action)

        if not move:
            raise ValueError(f"{action} is not a valid action")

        # Actions encode moves from the perspective of the current player. If
        # this is the black player, the move must be reoriented.
        turn = board.turn

        if turn == False: #black to move
            move = utils.rotate(move)

        # Moving a pawn to the opponent's home rank with a queen move
        # is automatically assumed to be queen underpromotion. However,
        # since queenmoves has no reference to the board and can thus not
        # determine whether the moved piece is a pawn, you have to add this
        # information manually here
        if is_queen_move:
            to_rank = chess.square_rank(move.to_square)
            is_promoting_move = (
                (to_rank == 7 and turn == True) or
                (to_rank == 0 and turn == False)
            )

            piece = board.piece_at(move.from_square)
            if piece is None: #NOTE I added this, not entirely sure if it's correct
                return None
            is_pawn = piece.piece_type == chess.PAWN

            if is_pawn and is_promoting_move:
                move.promotion = chess.QUEEN

        return move

def encodeBoard(board: chess.Board) -> np.array:
 """Converts a board to numpy array representation."""

 array = np.zeros((8, 8, 14), dtype=int)

 for square, piece in board.piece_map().items():
  rank, file = chess.square_rank(square), chess.square_file(square)
  piece_type, color = piece.piece_type, piece.color

  # The first six planes encode the pieces of the active player,
  # the following six those of the active player's opponent. Since
  # this class always stores boards oriented towards the white player,
  # White is considered to be the active player here.
  offset = 0 if color == chess.WHITE else 6

  # Chess enumerates piece types beginning with one, which you have
  # to account for
  idx = piece_type - 1

  array[rank, file, idx + offset] = 1

 # Repetition counters
 array[:, :, 12] = board.is_repetition(2)
 array[:, :, 13] = board.is_repetition(3)

 return array
How to load the data
In part 1, you mined some chess games, and then in part 2, you encoded it so that it could be used to train a model.
You now load this data in PyTorch data loader objects, so it’s available for the model to train on. In case you have not done part 1 or 2 of this tutorial, you can find some ready-made training files in this Google Drive folder.
First, define some hyperparameters:
FRACTION_OF_DATA = 1
BATCH_SIZE = 4
The FRACTION_OF_DATA variable, is there just in case you want to train the model fast and do not want to train it on the full dataset. Make sure this value is > 0 and ≤ 1.
The BATCH_SIZE variable decides the batch size the model trains on. In general, a higher batch size means the model can train faster, but your batch size is limited by the power of your GPU.
I recommend testing with a low batch size of 4 and then trying to increase it and see if training still works as it should. If you get a memory error of some sort, try decreasing the batch size again.
You then load the data with the code below. Make sure your folder structure and file naming is correct here. You should have an initial data folder in the same place where your code is.
Then inside this data folder, you should have a preparedData folder, that contains the files you want to train on. These files have to be named moves{i}.npy and positions{i}.npy, where i is the index of the file. If you encoded the files as I did earlier, everything should be correct.
 The folder structure. Yellow are folders, and turquoise are files.
#dataset

#loading training data

allMoves = []
allBoards = []

files = os.listdir('data/preparedData')
numOfEach = len(files) // 2 # half are moves, other half are positions

for i in range(numOfEach):
    try:
        moves = np.load(f"data/preparedData/moves{i}.npy", allow_pickle=True)
        boards = np.load(f"data/preparedData/positions{i}.npy", allow_pickle=True)
        if (len(moves) != len(boards)):
            print("ERROR ON i = ", i, len(moves), len(boards))
        allMoves.extend(moves)
        allBoards.extend(boards)
    except:
        print("error: could not load ", i, ", but is still going")

allMoves = np.array(allMoves)[:(int(len(allMoves) * FRACTION_OF_DATA))]
allBoards = np.array(allBoards)[:(int(len(allBoards) * FRACTION_OF_DATA))]
assert len(allMoves) == len(allBoards), "MUST BE OF SAME LENGTH"

#flatten out boards
# allBoards = allBoards.reshape(allBoards.shape[0], -1)

trainDataIdx = int(len(allMoves) * 0.8)

#NOTE transfer all data to GPU if available
device = torch.device("cuda:0" if torch.cuda.is_available() else "cpu")
allBoards = torch.from_numpy(np.asarray(allBoards)).to(device)
allMoves = torch.from_numpy(np.asarray(allMoves)).to(device)

training_set = torch.utils.data.TensorDataset(allBoards[:trainDataIdx], allMoves[:trainDataIdx])
test_set = torch.utils.data.TensorDataset(allBoards[trainDataIdx:], allMoves[trainDataIdx:])
# Create data loaders for your datasets; shuffle for training, not for validation

training_loader = torch.utils.data.DataLoader(training_set, batch_size=BATCH_SIZE, shuffle=True)
validation_loader = torch.utils.data.DataLoader(test_set, batch_size=BATCH_SIZE, shuffle=False)
How to define the deep learning model
You can then define the model architecture:
class Model(torch.nn.Module):

    def __init__(self):
        super(Model, self).__init__()
        self.INPUT_SIZE = 896
        # self.INPUT_SIZE = 7*7*13 #NOTE changing input size for using cnns
        self.OUTPUT_SIZE = 4672 # = number of unique moves (action space)

        #can try to add CNN and pooling here (calculations taking into account spacial features)

        #input shape for sample is (8,8,14), flattened to 1d array of size 896
        # self.cnn1 = nn.Conv3d(4,4,(2,2,4), padding=(0,0,1))
        self.activation = torch.nn.ReLU()
        self.linear1 = torch.nn.Linear(self.INPUT_SIZE, 1000)
        self.linear2 = torch.nn.Linear(1000, 1000)
        self.linear3 = torch.nn.Linear(1000, 1000)
        self.linear4 = torch.nn.Linear(1000, 200)
        self.linear5 = torch.nn.Linear(200, self.OUTPUT_SIZE)
        self.softmax = torch.nn.Softmax(1) #use softmax as prob for each move, dim 1 as dim 0 is the batch dimension

    def forward(self, x): #x.shape = (batch size, 896)
        x = x.to(torch.float32)
        # x = self.cnn1(x) #for using cnns
        x = x.reshape(x.shape[0], -1)
        x = self.linear1(x)
        x = self.activation(x)
        x = self.linear2(x)
        x = self.activation(x)
        x = self.linear3(x)
        x = self.activation(x)
        x = self.linear4(x)
        x = self.activation(x)
        x = self.linear5(x)
        # x = self.softmax(x) #do not use softmax since you are using cross entropy loss
        return x

    def predict(self, board : chess.Board):
        """takes in a chess board and returns a chess.move object. NOTE: this function should definitely be written better, but it works for now"""
        with torch.no_grad():
            encodedBoard = encodeBoard(board)
            encodedBoard = encodedBoard.reshape(1, -1)
            encodedBoard = torch.from_numpy(encodedBoard)
            res = self.forward(encodedBoard)
            probs = self.softmax(res)

            probs = probs.numpy()[0] #do not want tensor anymore, 0 since it is a 2d array with 1 row

            #verify that move is legal and can be decoded before returning
            while len(probs) > 0: #try max 100 times, if not throw an error
                moveIdx = probs.argmax()
                try: #TODO should not have try here, but was a bug with idx 499 if it is black to move
                    uciMove = decodeMove(moveIdx, board)
                    if (uciMove is None): #could not decode
                        probs = np.delete(probs, moveIdx)
                        continue
                    move = chess.Move.from_uci(str(uciMove))
                    if (move in board.legal_moves): #if legal, return, else: loop continues after deleting the move
                        return move
                except:
                    pass
                probs = np.delete(probs, moveIdx) #TODO probably better way to do this, but it is not too time critical as it is only for predictions
                                             #remove the move so its not chosen again next iteration

            #TODO can return random move here as well!
            return None #if no legal moves found, return None
You are free to change the architecture however you like.
Here, I have just chosen some simple parameters that worked decently, though there is room for improvement. Some examples of changes you can make are:
- Add PyTorch CNN modules (remember to not flatten the array before adding these)
- Change the activation functions in hidden layers. I am now using ReLU, but this could be changed to for example Sigmoid or Tanh, which you can read more about here.
- Change the number of hidden layers. When changing this, you must remember to add an activation function between each layer in the
forward()function. - Change the number of neurons in each hidden layer. If you are going to change the number of neurons, you must remember the rule that the number of neurons out in layer n, should be the neurons in, in layer n+1. So for example, linear1 takes in 1000 neurons, and outputs 2000 neurons. Then linear2 must take in 2000 neurons. You can then freely choose the number of output neurons on linear2, but the amount must match the number of input neurons in linear 3, and so on. The input to layer 1 and the output from the last layer however are set with the parameters
INPUT_SIZE, andOUTPUT_SIZE.
In addition to the model architecture and forward functions, which are obligatory when creating a deep model, I also defined a predict() function, to make it easier to give a chess position to the model, and then it outputs the move it recommends.
How to train the model
When you have all the required data and the model is defined, you can begin training the model. First, you define a function to train one epoch and save the best model:
#helper functions for training
def train_one_epoch(model, optimizer, loss_fn, epoch_index, tb_writer):
    running_loss = 0.
    last_loss = 0.

    # Here, you use enumerate(training_loader) instead of
    # iter(training_loader) so that you can track the batch
    # index and do some intra-epoch reporting
    for i, data in enumerate(training_loader):

        # Every data instance is an input + label pair
        inputs, labels = data

        # Zero your gradients for every batch!
        optimizer.zero_grad()

        # Make predictions for this batch
        outputs = model(inputs)

        # Compute the loss and its gradients
        loss = loss_fn(outputs, labels)
        loss.backward()

        # Adjust learning weights
        optimizer.step()

        # Gather data and report
        running_loss += loss.item()
        if i % 1000 == 999:
            last_loss = running_loss / 1000 # loss per batch
            # print('  batch {} loss: {}'.format(i + 1, last_loss))
            tb_x = epoch_index * len(training_loader) + i + 1
            tb_writer.add_scalar('Loss/train', last_loss, tb_x)
            running_loss = 0.

    return last_loss

#the 3 functions below help store the best model you have created yet
def createBestModelFile():
    #first find best model if it exists:
    folderPath = Path('./savedModels')
    if (not folderPath.exists()):
        os.mkdir(folderPath)

    path = Path('./savedModels/bestModel.txt')

    if (not path.exists()):
        #create the files
        f = open(path, "w")
        f.write("10000000") #set to high number so it is overwritten with better loss
        f.write("\ntestPath")
        f.close()

def saveBestModel(vloss, pathToBestModel):
    f = open("./savedModels/bestModel.txt", "w")
    f.write(str(vloss.item()))
    f.write("\n")
    f.write(pathToBestModel)
    print("NEW BEST MODEL FOUND WITH LOSS:", vloss)

def retrieveBestModelInfo():
    f = open('./savedModels/bestModel.txt', "r")
    bestLoss = float(f.readline())
    bestModelPath = f.readline()
    f.close()
    return bestLoss, bestModelPath
Note that this function is essentially copied from the PyTorch docs, with a slight change by importing the model, optimizer, and loss function as function parameters.
You then define the hyperparameters like below. Note that this is something you can tune, to further improve your model.
#hyperparameters
EPOCHS = 60
LEARNING_RATE = 0.001
MOMENTUM = 0.9
Run the training with the code below:
#run training

createBestModelFile()

bestLoss, bestModelPath = retrieveBestModelInfo()

timestamp = datetime.now().strftime('%Y%m%d_%H%M%S')
writer = SummaryWriter('runs/fashion_trainer_{}'.format(timestamp))
epoch_number = 0

model = Model()
loss_fn = torch.nn.CrossEntropyLoss()
optimizer = torch.optim.SGD(model.parameters(), lr=LEARNING_RATE, momentum=MOMENTUM)
device = torch.device("cuda:0" if torch.cuda.is_available() else "cpu")
model.to(device)

best_vloss = 1_000_000.

for epoch in tqdm(range(EPOCHS)):
    if (epoch_number % 5 == 0):
        print('EPOCH {}:'.format(epoch_number + 1))

    # Make sure gradient tracking is on, and do a pass over the data
    model.train(True)
    avg_loss = train_one_epoch(model, optimizer, loss_fn, epoch_number, writer)

    running_vloss = 0.0
    # Set the model to evaluation mode, disabling dropout and using population
    # statistics for batch normalization.

    model.eval()

    # Disable gradient computation and reduce memory consumption.
    with torch.no_grad():
        for i, vdata in enumerate(validation_loader):
            vinputs, vlabels = vdata
            voutputs = model(vinputs)

            vloss = loss_fn(voutputs, vlabels)
            running_vloss += vloss

    avg_vloss = running_vloss / (i + 1)

    #only print every 5 epochs
    if epoch_number % 5 == 0:
        print('LOSS train {} valid {}'.format(avg_loss, avg_vloss))

    # Log the running loss averaged per batch
    # for both training and validation
    writer.add_scalars('Training vs. Validation Loss',
                    { 'Training' : avg_loss, 'Validation' : avg_vloss },
                    epoch_number + 1)
    writer.flush()

    # Track best performance, and save the model's state
    if avg_vloss < best_vloss:
        best_vloss = avg_vloss

        if (bestLoss > best_vloss): #if better than previous best loss from all models created, save it
            model_path = 'savedModels/model_{}_{}'.format(timestamp, epoch_number)
            torch.save(model.state_dict(), model_path)
            saveBestModel(best_vloss, model_path)

    epoch_number += 1

print("\n\nBEST VALIDATION LOSS FOR ALL MODELS: ", bestLoss)
This code is also heavily inspired by the PyTorch docs.
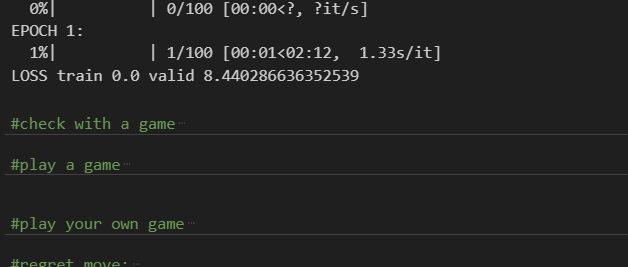
Depending on the number of layers in your model, the number of neurons in the layers, the number of epochs, if you are using GPU or not, and several other factors, your time to train the model can take anywhere from seconds, to several hours.
As you can see below, the estimated time to train my model here was about 2 minutes.
 Video of the model training. Recorded using [LICEcap](https://www.cockos.com/licecap/" rel="noopener ugc nofollow noopener noopener)
How to test your model
Testing your model is a vital part of checking if what you created works. I have implemented two ways of checking the model:
Yourself vs AI
The first way is to play yourself against the AI. Here you decide a move, then you let the AI decide the move, and so on. I recommend doing this in a notebook, so you can run different cells for different actions.
First, load a model that was saved from training. Here, I get the path to the file from the file created when running training, that stores the path to your best model. You can of course also manually change the path to the model you prefer to use.
saved_model = Model()

#load best model path from your file
f = open("./savedModels/bestModel.txt", "r")
bestLoss = float(f.readline())
model_path = f.readline()
f.close()

model.load_state_dict(torch.load(model_path))
Then, define the chess board:
#play your own game
board = chess.Board()
Then you can make a move by running the code in the cell below by changing the string in the first line. Make sure it is a legal move:
moveStr = "e2e4"
move = chess.Move.from_uci(moveStr)
board.push(move)
Then you can let the AI decide the next move with the cell below:
#make ai move:
aiMove = saved_model.predict(board)
board.push(aiMove)
board
This will also print the board state so you can decide your own move more easily:
 Printing the board state after the AI makes a move
Continue making every other move, let the AI play every other move, and see who wins!
If you want to regret a move, you can use:
#regret move:
board.pop()
Stockfish vs your AI
You can also automate the testing process, by setting Stockfish to a specific ELO, and letting your AI play against it:
First, load your model (make sure to change the model_path to your own model):
saved_model = Model()
model_path = "savedModels/model_20230702_150228_46" #TODO CHANGE THIS PATH
model.load_state_dict(torch.load(model_path))
Then import Stockfish, and set it to a specific ELO. Remember to change the path to the Stockfish engine to your own path where you have the Stockfish program):
# test elo  against stockfish
ELO_RATING = 500
from stockfish import Stockfish
#TODO CHANGE PATH BELOW
stockfish = Stockfish(path=r"C:\Users\eivin\Documents\ownProgrammingProjects18062023\ChessEngine\stockfish\stockfish\stockfish-windows-2022-x86-64-avx2")
stockfish.set_elo_rating(ELO_RATING)
A 100 ELO rating is quite bad, and something your engine will hopefully beat.
Then play the game with this script, which will run:
board = chess.Board()
allMoves = [] #list of strings for saving moves for setting pos for stockfish

MAX_NUMBER_OF_MOVES = 150
for i in range(MAX_NUMBER_OF_MOVES): #set a limit for the game

 #first my ai move
 try:
  move = saved_model.predict(board)
  board.push(move)
  allMoves.append(str(move)) #add so stockfish can see
 except:
  print("game over. You lost")
  break

 # #then get stockfish move
 stockfish.set_position(allMoves)
 stockfishMove = stockfish.get_best_move_time(3)
 allMoves.append(stockfishMove)
 stockfishMove = chess.Move.from_uci(stockfishMove)
 board.push(stockfishMove)

stockfish.reset_engine_parameters() #reset elo rating

board
Which will print the board position after the game is over.
 Position after your chess engine lost a game to Stockfish
Reflection on the performance of the chess engine
I tried training the model on about 100k positions and moves and discovered that the performance of the model still is not enough to beat a low-level (500 ELO) chess bot.
There could be several reasons for this. Chess is a highly complicated game, that probably requires a lot more moves and positions for a decent bot to be developed.
Furthermore, there are several elements of the bot you change potentially change to improve it. The architecture can be improved, for example by adding a CNN at the beginning of the forward function, so that the bot takes in spatial information.
You can also change the number of hidden layers in the fully connected layers, or the amount of neurons in each layer.
A safe way to further improve the model is to feed it more data, as you have access to an infinite amount of data by using the mining code in this article.
Additionally, I think this shows that an imitation learning chess engine either needs a lot of data or training a chess engine solely from imitation learning might not be an optimal idea.
Still, imitation learning can be used as part of a chess engine, for example, if you also implement traditional searching methods, and add imitation learning on top of it.
Conclusion
Congrats! You have now made your own AI chess engine from scratch, and I hope you learned something along the way. You can constantly make this engine better if you want to improve it, and make sure it beats better and better competition.
If you want to full code, check out my GitHub.
This tutorial was originally written part by part on my Medium, you can check out each part here:
- Part 1: Generating the dataset
- Part 2: Encoding with the AlphaZero method
- Part 3: Training the model
If you are interested and want to learn more about similar topics, you can find me on: