
By Adeel Imran
I am a JavaScript/Node developer who secretly likes (actually, loves and adores) Deno. I have been a huge fan of Deno ever since it was announced and I've been wanting to play with it.
This tutorial focuses on creating a set of REST APIs for a Todo application. Keep in mind that I did not touch on the database here – I will cover that in another article.
At any point if you feel lost or want to check a reference, here is the entire source code of this tutorial: Chapter 1: Oak.
 _Photo by [Unsplash](https://unsplash.com/@bernardtheclerk?utm_source=ghost&utm_medium=referral&utm_campaign=api-credit">Bernard de Clerk / <a href="https://unsplash.com/?utm_source=ghost&utm_medium=referral&utmcampaign=api-credit)
Things we will cover
- Create a basic server
- Create 5 APIs (routes/controller)
- Create a middleware to log API requests as they are made in the console
- Create a not found (404) middleware when the user tries to access an unknown API
What will we need
- An installed version of Deno (don't worry I'll walk you through it)
- A tiny bit of knowledge of Typescript
- Would be awesome if you have worked with Node/Express before (don't worry if you haven't — this tutorial is very basic)
Let's get started
First things first let's install Deno. I am on a Mac computer so I am using brew. Simply open your terminal and type:
$ brew install deno
But if you are using a different operating system, just head over to deno.land installation. They have a lot of ways you can easily install it on your machine.
Once you have it installed, close the terminal, open a new one, and type:
$ deno --version
It should output something like this:
 running command "deno --version" to see which version of deno is installed
Awesome! With this we are almost done with 10% of this tutorial.
Let's move ahead and create the backend API for our Todo app.
Setting up the project
Before you move on, here is the entire source code of this tutorial: Chapter 1: Oak.
Let's get started:
- Create a new folder and call it chapter_1:oak (but you can call it anything you want)
- Once you create a folder simply
cdinto your new project. Create a file called server.ts and write the following code in it:
import { Application } from "https://deno.land/x/oak/mod.ts";

const app = new Application();
const port: number = 8080;

console.log('running on port ', port);
await app.listen({ port });
Let's run this file. Open your terminal and in your project root folder type:
$ deno run --allow-net server.ts
I will talk about what the --allow-net flag does, but for now just bear with me ?.
You should get something like this:

What we have done so far is create a server which listens on port 8080. It doesn't do much right now besides being able to run on port 8080.
If you have used JavaScript before, one thing you might have noticed is we are importing packages in a different way. We have to do something like:
import { Application } from "https://deno.land/x/oak/mod.ts";
When you run deno run ---allow-net <file_name> in your terminal, Deno will look at all your imports and install them locally in your machine if they are not there.
The first time you run this it will go to this URL https://deno.land/x/oak/mod.ts and install the oak package. Oak is basically a Deno framework for writing API's. It will put it somewhere locally in your cache.
In the next line we do this:
const app = new Application();
This creates a new instance of our application, and it will be the basis of everything as you progress further in this tutorial. You can add routes to the application instance, attach middleware like API logging, write a 404 not found, and so on.
Then we write:
const port: number = 8080;
// const port = 8080; // => can also be written like this
Both are the same and do the same thing. The only difference is writing const port: number = 8080 tells Typescript that port variable is of type number.
If you were to write const port: number = "8080", this would throw an error in your terminal, as port is of type number. But we are trying to assign it a string of value "8080".
If you want to learn more about different types of types (pun intended) check out this very easy and basic guide on Basic types by Typescript. Just give it a quick glance for 2-3 minutes and head back here.
And in the end we have:
console.log('running on port ', port);
await app.listen({ port });
We simply console here the port number and tell Deno to listen to the port, which is 8080.
It isn't doing much right now. Let's make it do something basic like show a JSON message in your browser when you go to http:localhost:8080.
Add the following to your server.ts file:
import { Application, Router } from "https://deno.land/x/oak/mod.ts";

const app = new Application();
const port: number = 8080;

const router = new Router();
router.get("/", ({ response }: { response: any }) => {
  response.body = {
    message: "hello world",
  };
});
app.use(router.routes());
app.use(router.allowedMethods());

console.log('running on port ', port);
await app.listen({ port });
The new thing added here is that we are now also importing Router along with Application from oak in line 1.
Next what we do is:
const router = new Router();
router.get("/", ({ response }: { response: any }) => {
  response.body = {
    message: "hello world",
  };
});
app.use(router.routes());
app.use(router.allowedMethods());
We create a new router instance by doing const router = new Router() and then we create a new route called / which is of type get.
Let's break this down:
router.get("/", ({ response }: { response: any }) => {
  response.body = {
    message: "hello world",
  };
});
router.get takes 2 parameters. The first is route which we have set to / and the second is function. The function itself takes an argument which is an object. What I am doing here is destructuring the object and getting only response.
Next I am type checking response similar to how I did const port: number = 8080;. All I am doing is { response }: { response: any } which is telling TypeScript here that the response which I have destructed can be of type any.
any helps you avoid type checking in TypeScript. You can read more about it here.
Then all I am doing is taking that response object and setting response.body.message = "hello world";.
response.body = {
  message: "hello world",
};
Last but not least, we just add these two lines:
app.use(router.routes());
app.use(router.allowedMethods());
This tells Deno to include all routes by our router (currently we only have one) and the next line tells Deno to allow all methods for this route(s) like GET, POST, PUT, DELETE.
And now we are done. ✅ Let's run this and see what we have:
$ deno run --allow-net server.ts
The ---allow-net property tells Deno that this app gives the user the permission to access its content via the port opened up.
Now open your favorite browser and go to http://localhost:8080. You will see something like this:
 Result of running localhost:8080 on your browser
Honestly the hardest part is done. Conceptually we are 60% there.
 Master Yoda approves
Awesome.
Just one last thing before we start with our Todo API. Let's replace:
console.log('running on port ', port);
await app.listen({ port });
with:
app.addEventListener("listen", ({ secure, hostname, port }) => {
  const protocol = secure ? "https://" : "http://";
  const url = `${protocol}${hostname ?? "localhost"}:${port}`;
  console.log(`Listening on: ${port}`);
});

await app.listen({ port });
The code we had before was not very accurate, because we were simply console logging a message and then waiting for the app to start listening on a port.
With the later version we wait for the app to start listening on port and we can listen by adding an event listener to our app instance with the following: app_.addEventListener_("listen", ({ secure, hostname, port }) => {}.
The first param is the event we want to listen for (which is listen ?) and then the second param is an object which we destruct to { secure, hostname, port }. Secure is a boolean, hostname is a string, and port is a number.
Now when we start our app, it will only console the message once the app actually starts listening on port.
We can just go one step ahead and make it more colorful. Let's add a new module to the top of the file in server.ts:
import { green, yellow } from "https://deno.land/std@0.53.0/fmt/colors.ts";
And then inside our event listener method we can replace:
console.log(`Listening on: ${port}`);
with:
console.log(`${yellow("Listening on:")} ${green(url)}`);
Now when we do:
$ deno run --allow-net server.ts
it will show this in our console:
 Cool, now we have a colourful console.
If you get stuck anywhere you can simply go to the source code of this tutorial here.
Let's create our Todo API's routes next.
- Create a new folder in your root folder called
routesand inside that folder create a file calledtodo.ts - At the same time in your root folder create a new folder called
controllersand inside that folder create a file calledtodo.ts
Let's first touch the controllers/todo.ts file:
export default {
  getAllTodos: () => {},
  createTodo: async () => {},
  getTodoById: () => {},
  updateTodoById: async () => {},
  deleteTodoById: () => {},
};
We are simply exporting an object here with some named functions which are empty (for now).
Next go inside your file routes/todo.ts and type this:
import { Router } from "https://deno.land/x/oak/mod.ts";

const router = new Router();
// controller
import todoController from "../controllers/todo.ts";

router
  .get("/todos", todoController.getAllTodos)
  .post("/todos", todoController.createTodo)
  .get("/todos/:id", todoController.getTodoById)
  .put("/todos/:id", todoController.updateTodoById)
  .delete("/todos/:id", todoController.deleteTodoById);

export default router;
This might look familiar to people who have worked with Node and Express.
All we are doing here is importing Route from oak and then setting up a new instance of Router by doing const router = new Router();.
Next we import our controllers by doing:
import todoController from "../controllers/todo.ts";
One thing to notice here in Deno is every time we import a local file in our Deno project we have to provide the file extension. This is because Deno doesn't know whether the file being imported is a .js or .ts file.
Moving forward we simply set all of our routes according to REST conventions:
router
  .get("/todos", todoController.getAllTodos)
  .post("/todos", todoController.createTodo)
  .get("/todos/:id", todoController.getTodoById)
  .put("/todos/:id", todoController.updateTodoById)
  .delete("/todos/:id", todoController.deleteTodoById);
The code above will translate to our API definition like this:
| TYPE | API ROUTE | |||
| GET | /todos | |||
| GET | /todos/:id | |||
| POST | /todos | |||
| PUT | /todos/:id | |||
| DELETE | /todos/:id |
and at the end we simply export our router by doing _export_ _default_ router;.
We are done with creating our routes structure. (Now, each route doesn't do anything because our controllers are empty, we will add functionality to them in a bit.)
Here's the last piece of the puzzle before we start adding functionality to each route controller. We need to attach this router to our app instance.
So head over to server.ts file and do the following:
- Add this to the very top:
// routes
import todoRouter from "./routes/todo.ts";
- Remove this piece of code:
const router = new Router();
router.get("/", ({ response }: { response: any }) => {
  response.body = {
    message: "hello world",
  };
});
app.use(router.routes());
app.use(router.allowedMethods());
- Replace it with:
app.use(todoRouter.routes());
app.use(todoRouter.allowedMethods());
This is it – we are done. Your server.ts file should look like this now:
import { Application } from "https://deno.land/x/oak/mod.ts";
import { green, yellow } from "https://deno.land/std@0.53.0/fmt/colors.ts";

// routes
import todoRouter from "./routes/todo.ts";

const app = new Application();
const port: number = 8080;

app.use(todoRouter.routes());
app.use(todoRouter.allowedMethods());

app.addEventListener("listen", ({ secure, hostname, port }) => {
  const protocol = secure ? "https://" : "http://";
  const url = `${protocol}${hostname ?? "localhost"}:${port}`;
  console.log(
    `${yellow("Listening on:")} ${green(url)}`,
  );
});

await app.listen({ port });
If you got stuck anywhere while following this, simple head over to the source code of this tutorial here.
Awesome, now we have our routes with no functionality at the moment. So let's add that functionality in our controllers.
But before we do that we have to create 2 more (tiny) files.
- In your root folder create a new folder called
interfacesand inside that folder create a file calledTodo.ts(make sure Todo is capitalized, as it won't give any syntax error here if you don't – these are just conventions.) - Also in your root folder create a new folder called
stubsand inside that folder create a file calledtodos.ts
Let's create an interface in our interfaces/Todo.ts file. Simply add the following code:
export default interface Todo {
  id: string,
  todo: string,
  isCompleted: boolean,
}
What is an interface?
One of the core things in TypeScript is checking the shape that value has. Similar to const port: number = 8080 or { response }: { response : any }, we can also type check an object.
In TypeScript, interfaces fill the role of naming these types, and are a powerful way of defining contracts within your code as well as contracts with code outside of your project.
Here is an another example of an interface:
// We have an interface
interface LabeledValue {
  label: string;
}

// the arg passed to this function labeledObj is
// of type LabeledValue (interface)
function printLabel(labeledObj: LabeledValue) {
  console.log(labeledObj.label);
}

let myObj = {label: "Size 10 Object"};
printLabel(myObj);
Hopefully this example gives you a bit more insight into interfaces. If you want more detailed information check out the docs on interfaces here.
Now that our interface is ready, let's mock some data (since we don't have an actual database for this tutorial).
Let's create a mock list of todos first in our stubs/todos.ts file. Simply add the following:
import { v4 } from "https://deno.land/std/uuid/mod.ts";
// interface
import Todo from '../interfaces/Todo.ts';

let todos: Todo[] = [
  {
    id: v4.generate(),
    todo: 'walk dog',
    isCompleted: true,
  },
  {
    id: v4.generate(),
    todo: 'eat food',
    isCompleted: false,
  },
];

export default todos;
- Two things to notice here: we add a new package and use its method
v4by doing_import_ { v4 } _from_ "https://deno.land/std/uuid/mod.ts";. Then every time we usev4.generate()it will create a new random string ofid.
The id can not be a number, only a string because in our Todo interface we have defined id as a string.
- The other thing to focus on here is
let _todos_: _Todo_[]= []. This basically tells Deno that our todos array is of typeTodo(which is awesome, our compiler now automagically knows that each item in our array can only have{**id**: _string_, **todo**: _string_ & **isCompleted**: _boolean_}it will not accept any other key).
If you want to learn more about interfaces in TypeScript check out this amazing detailed documentation on interfaces here.
Awesome. If you have come this far, give yourself a pat on the back. Good job everyone.
 The Rock appreciates all the effort you are doing
Let's work on our controllers
In your file controllers/todo.ts:
export default {
  getAllTodos: () => {},
  createTodo: async () => {},
  getTodoById: () => {},
  updateTodoById: async () => {},
  deleteTodoById: () => {},
};
Let's write the controller for getAllTodos:
// stubs
import todos from "../stubs/todos.ts";

export default {
  /**
   * @description Get all todos
   * @route GET /todos
   */
  getAllTodos: ({ response }: { response: any }) => {
    response.status = 200;
    response.body = {
      success: true,
      data: todos,
    };
  },
  createTodo: async () => {},
  getTodoById: () => {},
  updateTodoById: async () => {},
  deleteTodoById: () => {},
};
Before I begin on this block of code, let me explain that every controller has an argument – let's call it context.
So we can deconstruct _getAllTodos_: (context) => {} to:
getAllTodos: ({ request, response, params }) => {}
And since we are using typescript we have to add type checking to all of these variables:
getAllTodos: (
  { request, response, params }: {
    request: any,
    response: any,
    params: { id: string },
  },
) => {}
So we have added type checks to all 3 { request, response, params }
requestis what the user sends us (information like headers and JSON data)responseis what we send the user back in the API responseparamsis what we define in our router routes, that is:
.get("/todos/:id", ({ params}: { params: { id: string } }) => {})
So the :id in /todos/:id is the param. Params are a way to get information from the URL. In this example we know that we have an /:id . So when the user tries to access this API (that is, /todos/756) 756 is basically the :id param. Since it is in the URL we know it is of type string.
Now that we have our basic definitions defined let's get back to our todos controller:
// stubs
import todos from "../stubs/todos.ts";

export default {
  /**
   * @description Get all todos
   * @route GET /todos
   */
  getAllTodos: ({ response }: { response: any }) => {
    response.status = 200;
    response.body = {
      success: true,
      data: todos,
    };
  },
  createTodo: async () => {},
  getTodoById: () => {},
  updateTodoById: async () => {},
  deleteTodoById: () => {},
};
For getAllTodos we only need response . If you remember, response is what is needed to send data back to the user.
For people coming from a Node and Express background, one big thing that is different here is that we don't need to return the response object. Deno does this for us automatically.
All we have to do is set response.status which in this case is 200.
More on response statuses here.
The other thing we set is the response.body which in this case is an object:
{
  success: true,
  data: todos
}
I will go ahead and run my server:
$ deno run --allow-net server.ts
Revision: The
---allow-netproperty tells Deno that this app gives the user permission to access its content via the port opened up.
Once your server is running, you can access the GET /todos API. I am using postman which is a Google Chrome extension and can be downloaded here.
You can use whatever rest client you like. I like using postman because I think it is very easy.
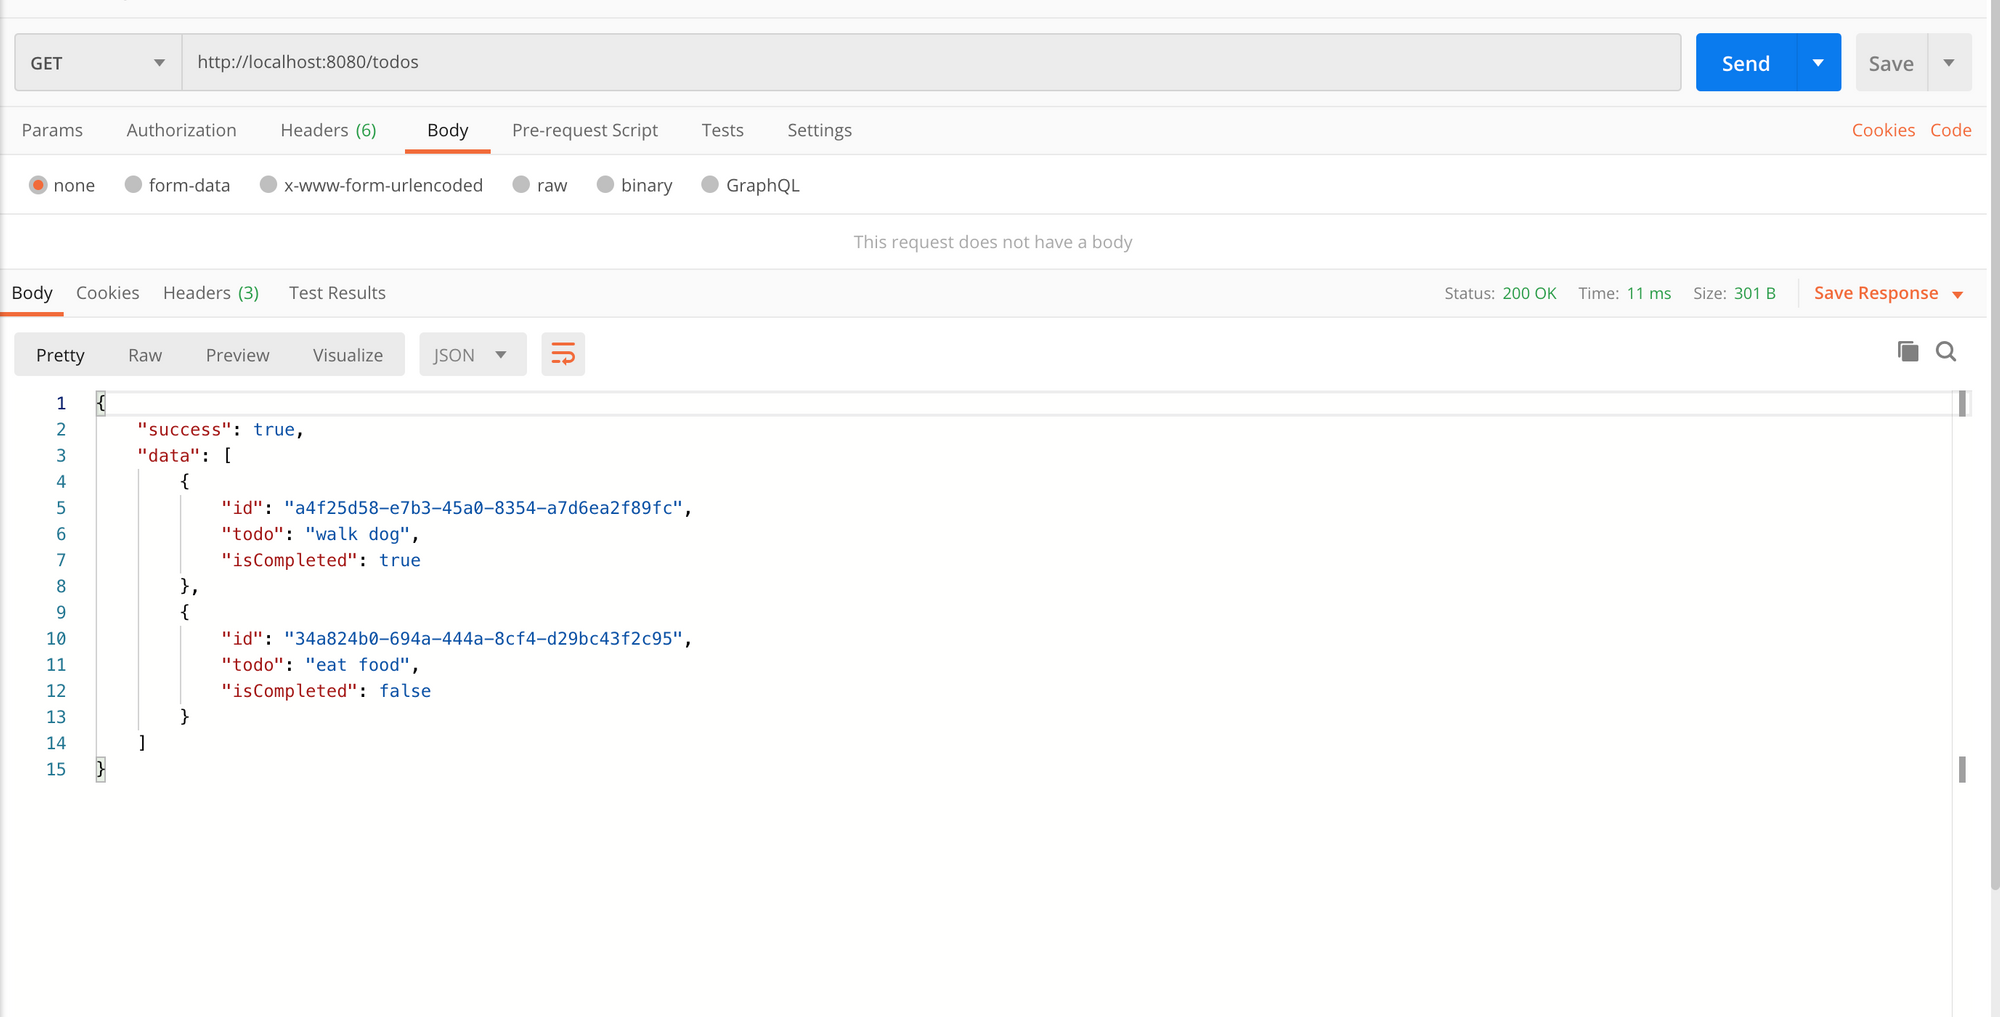
In Postman, open up a new tab. Set the request to type GET and in the URL bar type http://localhost:8080/todos. Hit Send and this is what you see:
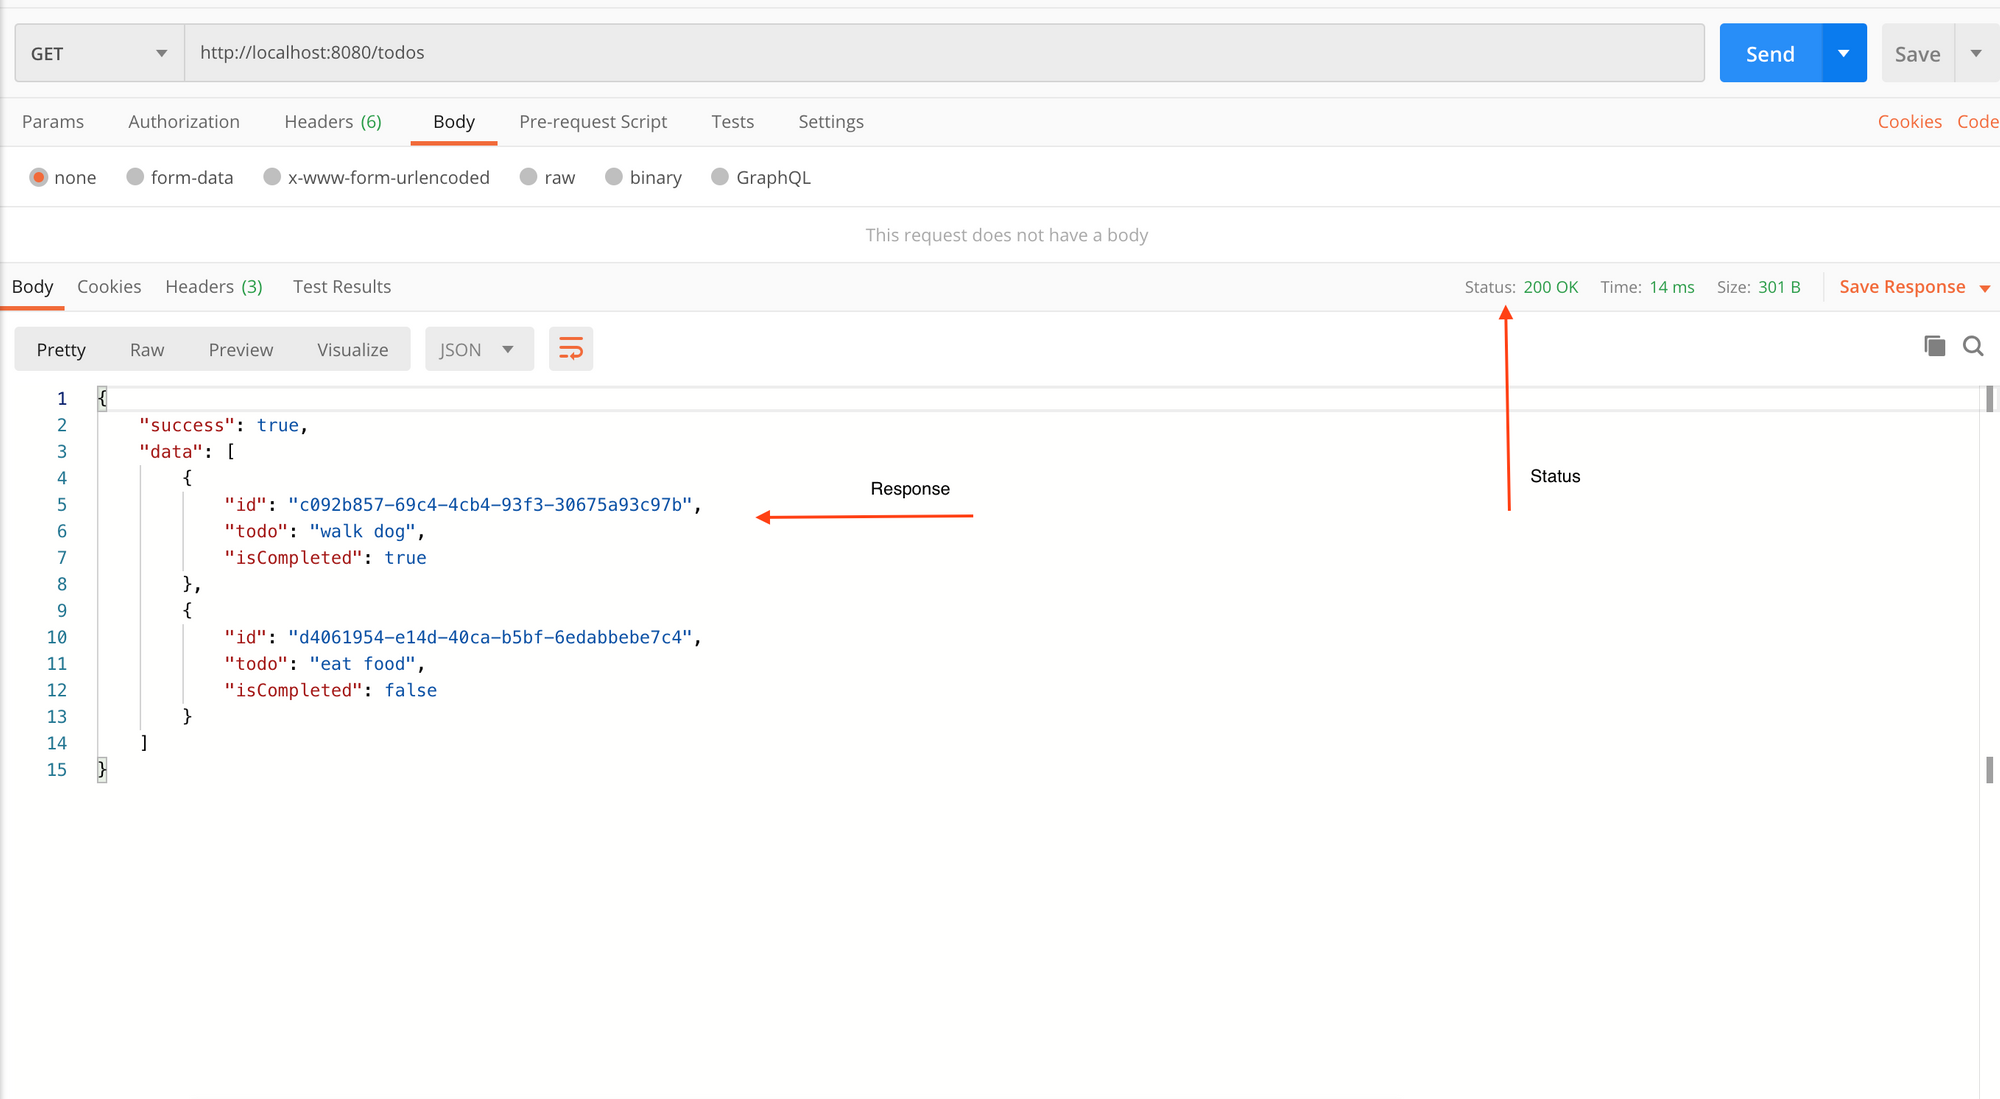 GET /todos API response
Cool! 1 API done, 4 more to go. ??
If you feel stuck anywhere just have sneak peak at the source code directly here.
Let's move on to our next controller:
import { v4 } from "https://deno.land/std/uuid/mod.ts";
// interfaces
import Todo from "../interfaces/Todo.ts";
// stubs
import todos from "../stubs/todos.ts";

export default {
  getAllTodos: () => {},
  /**
   * @description Add a new todo
   * @route POST /todos
   */
  createTodo: async (
    { request, response }: { request: any; response: any },
  ) => {
    const body = await request.body();
    if (!request.hasBody) {
      response.status = 400;
      response.body = {
        success: false,
        message: "No data provided",
      };
      return;
    }

    // if everything is fine then perform
    // operation and return todos with the
    // new data added.
    let newTodo: Todo = {
      id: v4.generate(),
      todo: body.value.todo,
      isCompleted: false,
    };
    let data = [...todos, newTodo];
    response.body = {
      success: true,
      data,
    };
  },
  getTodoById: () => {},
  updateTodoById: async () => {},
  deleteTodoById: () => {},
};
Since we are going to be adding a new Todo to our list, I have imported 2 modules in the controller file.
import { v4 } fromhttps://deno.land/std/uuid/mod.ts;this will be used to create a new unique one for the todo being createdimport Todo from "../interfaces/Todo.ts";this will be used to ensure that the new todo that is being created follows the same structure.
Our createTodo controller is async meaning there are some promises used inside the controller.
Let's break it into smaller parts:
const body = await request.body();
if (!request.hasBody) {
      response.status = 400;
      response.body = {
        success: false,
        message: "No data provided",
      };
      return;
}
First we get the content of the JSON body that the user has sent us. Then we use oak's built-in method called request.hasBody to check if the user has even sent any content. If not then we can do if (!request_._hasBody) {} inside this if block.
We set the status to 400 (400 means that the user did something they were not suppose to do) and the body is set to {success: false, message: "no data provided }. Then we simple add return; to ensure that no further code below is executed.
Next we do this:
// if everything is fine then perform
// operation and return todos with the
// new data added.
let newTodo: Todo = {
  id: v4.generate(),
  todo: body.value.todo,
  isCompleted: false,
};
let data = [...todos, newTodo];
response.body = {
  success: true,
  data,
};
We create a new todo by doing this:
let newTodo: Todo = {
  id: v4.generate(),
  todo: body.value.todo,
  isCompleted: false,
};
let newTodo: Todo = {} ensures that newTodo follows the same structure as the rest of the todos. We then assign a random id by using v4.generate(), set todo to body.value.todo and isCompleted to false.
The thing to notice here is all the data the user sends us we can access from body.value in oak.
Next we do the following:
let data = [...todos, newTodo];
response.body = {
  success: true,
  data,
};
Append the newTodo to our current list of todos and simply set the body to {success: true & data: data.
And we are done ✅ with this controller as well.
Let's restart our server:
$ deno run --allow-net server.ts
In my postman, I open up a new tab. Set the request to POST type and in the URL bar type http://localhost:8080/todos. Then hit Send and this is what you see:
 I send an empty request and get a 400 status error code along with an error message
Then I send some content in the body of the request payload and try again:
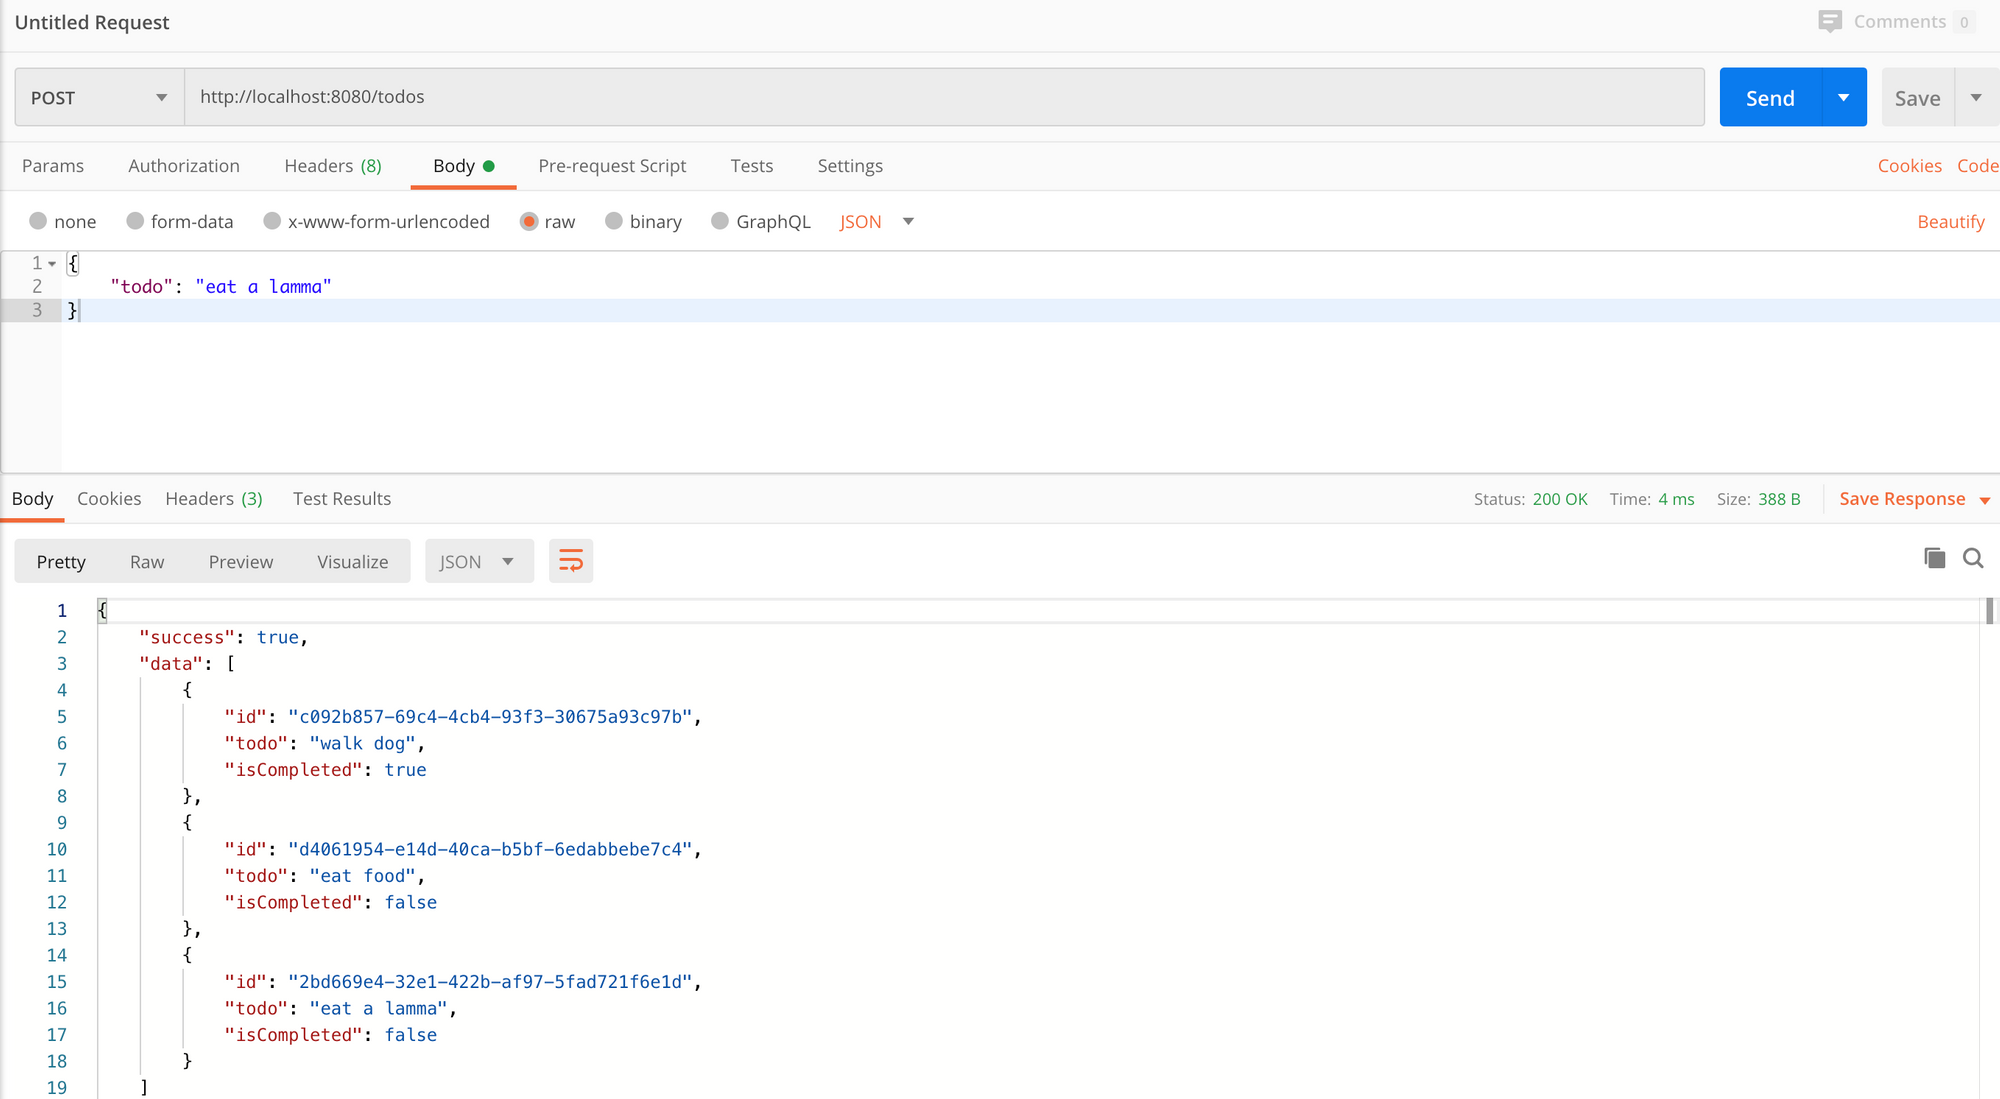 Awesome, POST /todos with body content { todo: "eat a lamma" } is success & we can see content appended to our current todo list
Cool, we can see that our API is working as expected.
Two APIs down, three more to go.
We are almost there. Most of the hard work is done. ☺️ ? ? ?
Let's move on to our third API:
import { v4 } from "https://deno.land/std/uuid/mod.ts";
// interfaces
import Todo from "../interfaces/Todo.ts";
// stubs
import todos from "../stubs/todos.ts";

export default {
  getAllTodos: () => {},
  createTodo: async () => {},
  /**
   * @description Get todo by id
   * @route GET todos/:id
   */
  getTodoById: (
    { params, response }: { params: { id: string }; response: any },
  ) => {
    const todo: Todo | undefined = todos.find((t) => {
      return t.id === params.id;
    });
    if (!todo) {
      response.status = 404;
      response.body = {
        success: false,
        message: "No todo found",
      };
      return;
    }

    // If todo is found
    response.status = 200;
    response.body = {
      success: true,
      data: todo,
    };
  },
  updateTodoById: async () => {},
  deleteTodoById: () => {},
};
Let's talk about our controller for GET todos/:id. This will get us a todo by ID.
Let's break this down into smaller parts and discuss it:
const todo: Todo | undefined = todos.find((t) => t.id === params.id);
if (!todo) {
  response.status = 404;
  response.body = {
    success: false,
    message: "No todo found",
  };
  return;
}
In the first part we set a new const todo and set its type to either Todo or undefined. So todo will either be an object with the Todo interface shape or it will be undefined – it can not be anything else.
We then _todos.find_((_t_) => t.id === params.id); use Array.find() to find the todo with the id provided in params.id. If it matches we get a Todo with shape todo, otherwise undefined.
If todo is undefined, it means that this if block will run:
if (!todo) {
  response.status = 404;
  response.body = {
    success: false,
    message: "No todo found",
  };
  return;
}
Here we simply set the status to 404 which means not found along with our standard failure response or { status, message }
Cool, right? ?
Next we simply do this:
// If todo is found
response.status = 200;
response.body = {
  success: true,
  data: todo,
};
Set a 200 success response and in our response body we set success: true & data: todo.
Let's run this in our postman.
Let's restart our server:
$ deno run --allow-net server.ts
In my postman, I open up a new tab. Set the request to GET type and in the URL bar type http://localhost:8080/todos/:id, then hit Send.
Since we are generating ID's randomly, first get all todos by hitting theget all todos API. Then from any todo get one of its ID to test this newly created API.
Every time you restart this Deno application, new ID's will be generated.
Let's go:
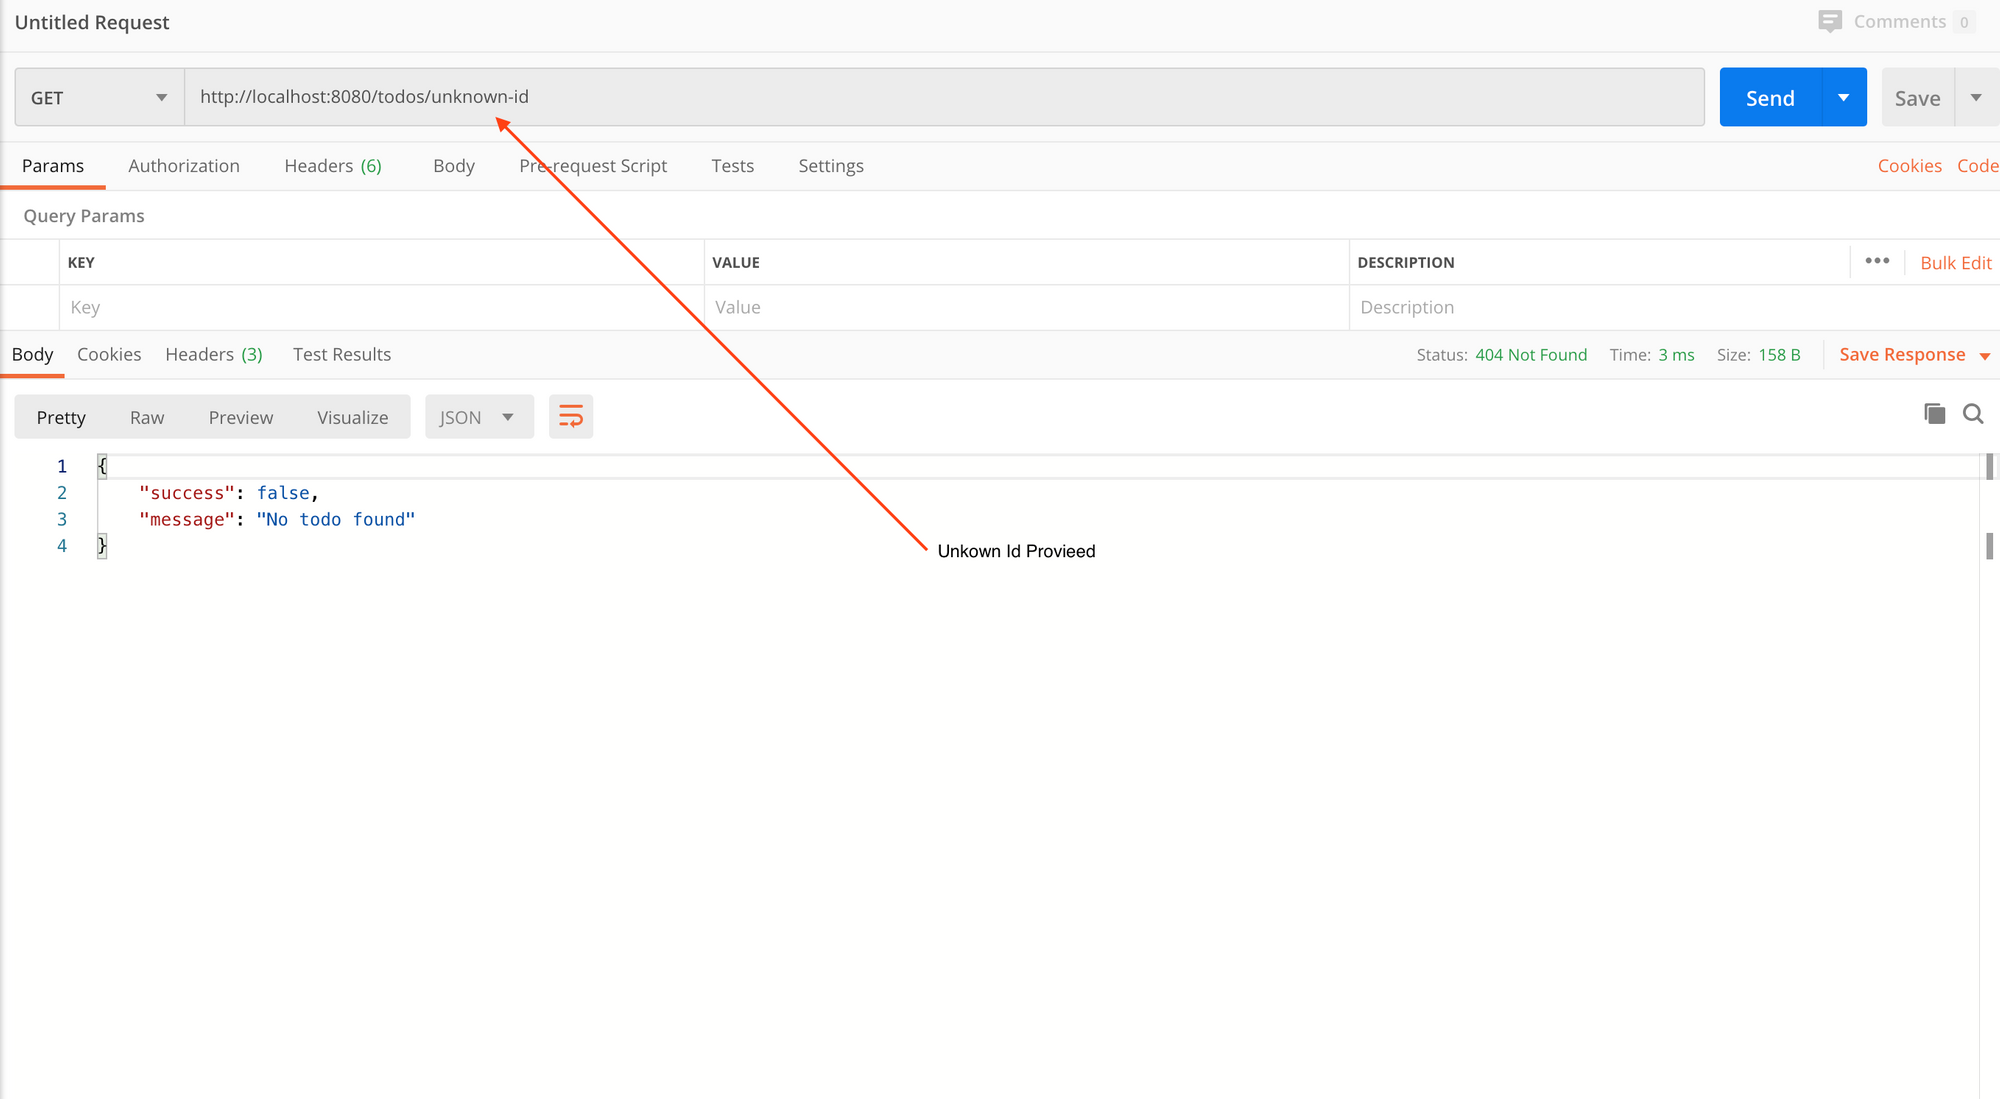 404 status, no record found case
 Provided it a known ID and it returned the todo associated with that ID along with status 200
If you need to reference the original source code of this tutorial go here.
Great, 3 APIs done, 2 more to go.
import { v4 } from "https://deno.land/std/uuid/mod.ts";
// interfaces
import Todo from "../interfaces/Todo.ts";
// stubs
import todos from "../stubs/todos.ts";

export default {
  getAllTodos: () => {},
  createTodo: async () => {},
  getTodoById: () => {},
  /**
   * @description Update todo by id
   * @route PUT todos/:id
   */
  updateTodoById: async (
    { params, request, response }: {
      params: { id: string },
      request: any,
      response: any,
    },
  ) => {
    const todo: Todo | undefined = todos.find((t) => t.id === params.id);
    if (!todo) {
      response.status = 404;
      response.body = {
        success: false,
        message: "No todo found",
      };
      return;
    }

    // if todo found then update todo
    const body = await request.body();
    const updatedData: { todo?: string; isCompleted?: boolean } = body.value;
    let newTodos = todos.map((t) => {
      return t.id === params.id ? { ...t, ...updatedData } : t;
    });
    response.status = 200;
    response.body = {
      success: true,
      data: newTodos,
    };
  },
  deleteTodoById: () => {},
};
Let's talk about our controller for PUT todos/:id. This will update a todo by ID.
Let's break this down into smaller bits:
const todo: Todo | undefined = todos.find((t) => t.id === params.id);
if (!todo) {
  response.status = 404;
  response.body = {
    success: false,
    message: "No todo found",
  };
  return;
}
This is something we did exactly the same with the previous controller as well, so I won't go into much detail here.
Pro tip here: You can if you want make this piece of code a generic code block and then use it in both controllers.
Next we do this:
// if todo found then update todo
const body = await request.body();
const updatedData: { todo?: string; isCompleted?: boolean } = body.value;
let newTodos = todos.map((t) => {
  return t.id === params.id ? { ...t, ...updatedData } : t;
});
response.status = 200;
response.body = {
  success: true,
  data: newTodos,
};
The piece of code I want to talk about here is the following:
const updatedData: { todo?: string; isCompleted?: boolean } = body.value;
let newTodos = todos.map((t) => {
  return t.id === params.id ? { ...t, ...updatedData } : t;
});
First we do const updatedData = body.value and then add type checking to updatedData like the following:
updatedData: { todo?: string; isCompleted?: boolean }
This piece of code is telling TS that updatedData is an object which can have/not have todo: string and also can have/not have isCompleted: boolean.
Then we simply map over all todos like this:
let newTodos = todos.map((t) => {
  return t.id === params.id ? { ...t, ...updatedData } : t;
});
And where params.id match with t.id we simply append everything to that object we get from the user.
We are done with this API as well.
Let's restart our server:
$ deno run --allow-net server.ts
Open up a new tab in Postman. Set the request to PUT and in the URL bar type in http://localhost:8080/todos/:id, then hit Send:
Since we are generating ID's randomly, first get all todos by hitting get all todos API. Then from any todo get one of its ID to test this newly created API.
Every time you restart this Deno application, new ID's will be generated.
 404 status returned and no todo found error message given
 Provided a known ID, updated todo content in body. It returned the updated todo along with all the other todos
This is amazing – four APIs done and just one more to go.
import { v4 } from "https://deno.land/std/uuid/mod.ts";
// interfaces
import Todo from "../interfaces/Todo.ts";
// stubs
import todos from "../stubs/todos.ts";

export default {
  getAllTodos: () => {},
  createTodo: async () => {},
  getTodoById: () => {},
  updateTodoById: async () => {},
  /**
   * @description Delete todo by id
   * @route DELETE todos/:id
   */
  deleteTodoById: (
    { params, response }: { params: { id: string }; response: any },
  ) => {
    const allTodos = todos.filter((t) => t.id !== params.id);

    // remove the todo w.r.t id and return
    // remaining todos
    response.status = 200;
    response.body = {
      success: true,
      data: allTodos,
    };
  },
};
Let's talk about our controller for Delete todos/:id this will delete a todo by ID.
We simply run a filter on all todos:
const allTodos = todos.filter((t) => t.id !== params.id);
Remove the todo.id that matches with params.id and return the rest.
Then we do this:
// remove the todo w.r.t id and return
// remaining todos
response.status = 200;
response.body = {
  success: true,
  data: allTodos,
};
Simply return all the todos left which do not have the same todo.id.
Let's restart our server:
$ deno run --allow-net server.ts
Open up a new tab in Postman. This time set the request to DELETE and in the URL bar type http://localhost:8080/todos/:id and hit Send.
Since we are generating ID's randomly, first get all todos by hitting get all todos API. Then from any todo get one of its ID to test this newly created API.
Every time you restart this Deno application, new ID's will be generated.

With this we are all done with all five APIs.

Now we only have two things remaining:
- Add a not found route middleware so that when the user tries to access an unknown route it gives an error.
- Add a logger API that consoles the response time it took to return data from one API endpoint.
Creating a route middleware for routes that aren't found
In your root folder create a new folder called middlewares. Inside that folder create a file called notFound.ts and inside this file add this code:
export default ({ response }: { response: any }) => {
  response.status = 404;
  response.body = {
    success: false,
    message: "404 - Not found.",
  };
};
Here we aren't doing anything new – it is very similar to our controllers structure. Just returning a status 404 (which means not found) along with a JSON object for { success, message }.
Next go in your server.ts file and add the following content:
- Add this import somewhere at the top:
// not found
import notFound from './middlewares/notFound.ts';
- And then just below your
app.use(todoRouter.allowedMethods())add this line like this:
app.use(todoRouter.routes());
app.use(todoRouter.allowedMethods());

// 404 page
app.use(notFound);
The order of execution is important here: every time we try to access an API end point it will first match/check routes from our todoRouter. If none are found, it will then execute app_.use_(notFound);.
Let's see if this works.
Restart the server:
$ deno run --allow-net server.ts
Open up a new tab in Postman. Set the request to GET and in the URL bar type http://localhost:8080/something-unknown, then hit Send.
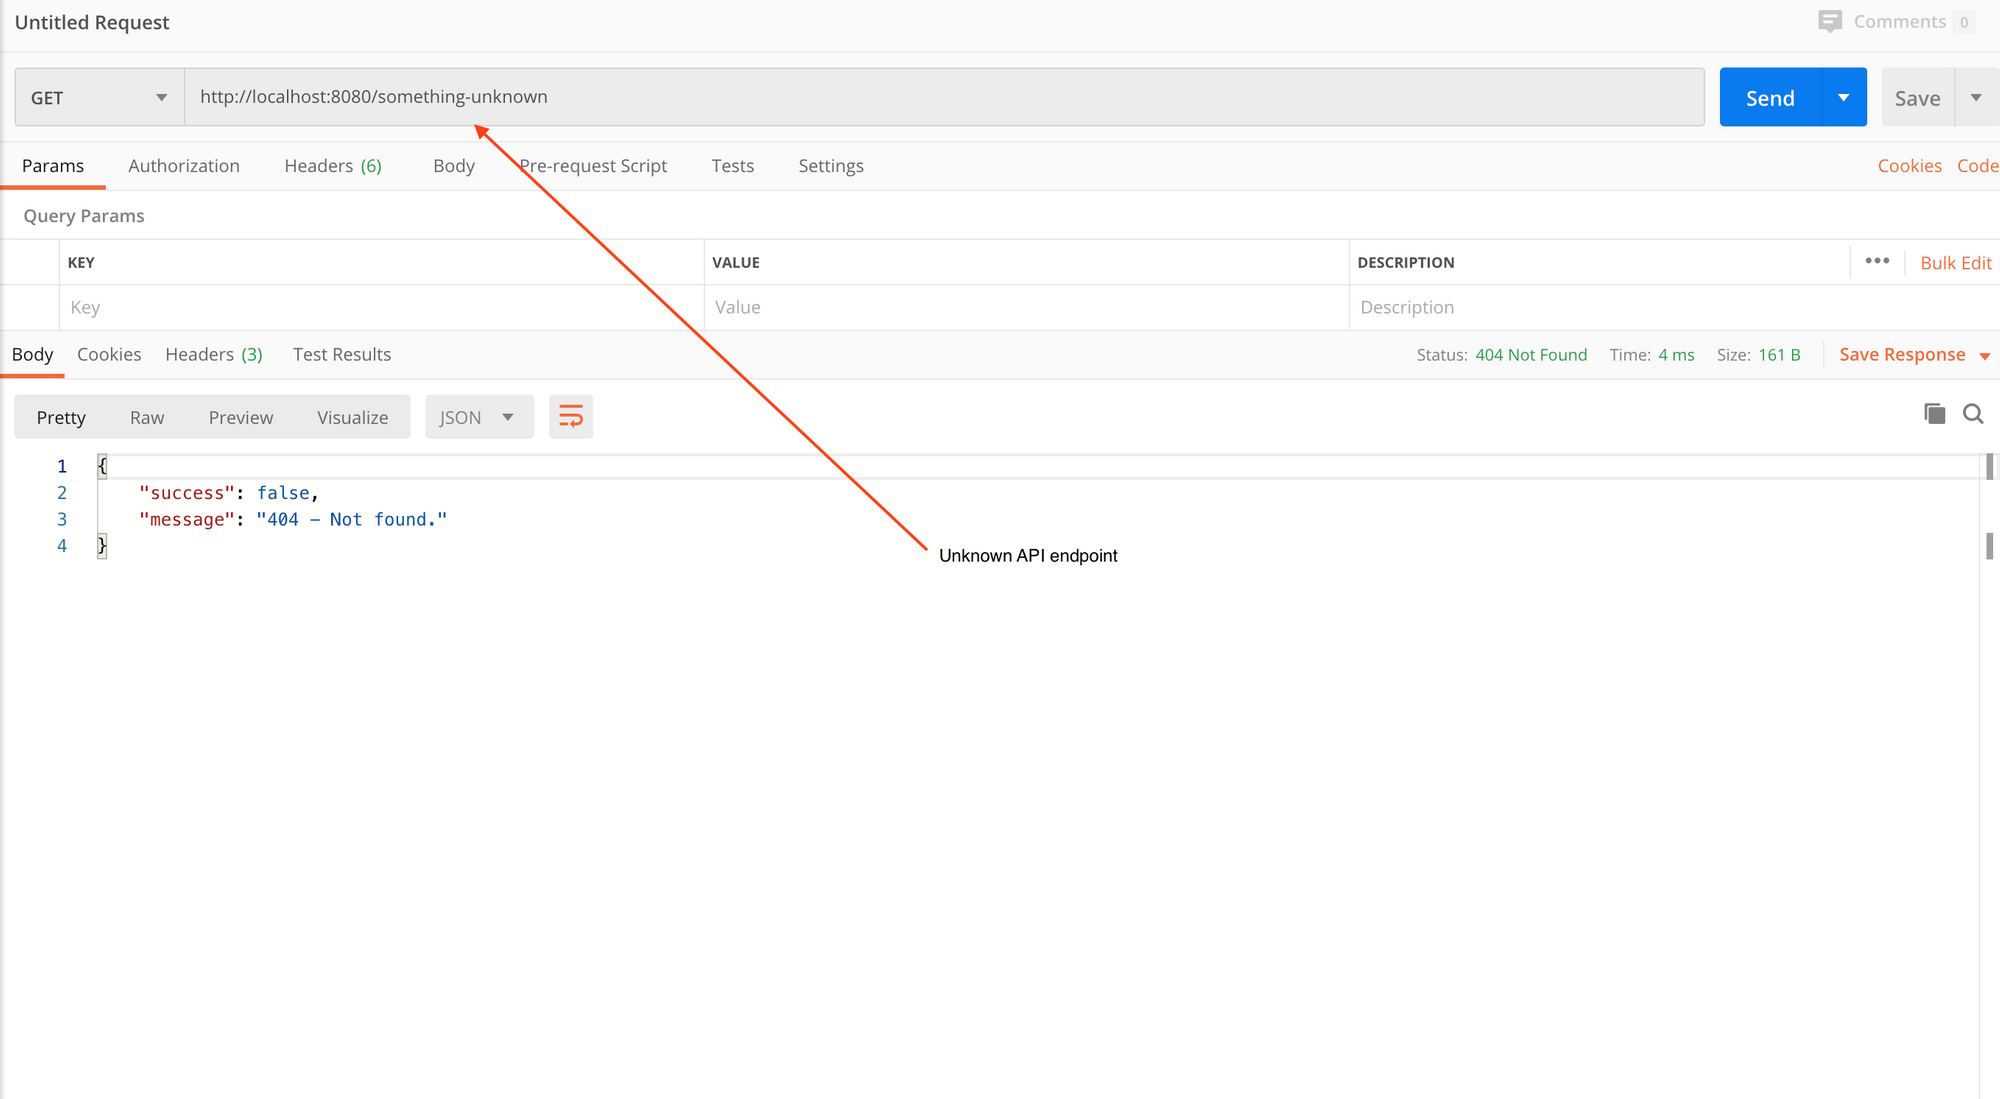
So we now have a route middleware that we put at the end of our routes in server.ts as app_.use_(notFound);. If no route matches this middleware it will execute and return a 404 status code (which means not found). Then we simply send a response message like always which is {success, message}.
Pro tip: We have decided that {success, message} is what we return in failed scenarios and {success, data} is what we return to user in success scenarios. So we can even make these to object/shapes as interfaces and add them to our project to ensure consistency and safe type checking.
Cool, now we are done with one of our middlewares – let's add the other middleware for logging our APIs in the console.
Reminder: If you get stuck anywhere you can use the source code here.
Logging APIs in console
In your middlewares folder create a new file called logger.ts and enter the following code:
import {
  green,
  cyan,
  white,
  bgRed,
} from "https://deno.land/std@0.53.0/fmt/colors.ts";

const X_RESPONSE_TIME: string = "X-Response-Time";

export default {
  logger: async (
    { response, request }: { response: any, request: any },
    next: Function,
  ) => {
    await next();
    const responseTime = response.headers.get(X_RESPONSE_TIME);
    console.log(`${green(request.method)} ${cyan(request.url.pathname)}`);
    console.log(`${bgRed(white(String(responseTime)))}`);
  },
  responseTime: async (
    { response }: { response: any },
    next: Function,
  ) => {
    const start = Date.now();
    await next();
    const ms: number = Date.now() - start;
    response.headers.set(X_RESPONSE_TIME, `${ms}ms`)
  },
};
In your server.ts file add this code:
- Import this somewhere at the top:
// logger
import logger from './middlewares/logger.ts';
- Just above your
todoRoutercode add these middlewares like this:
// order of execution is important;
app.use(logger.logger);
app.use(logger.responseTime);

app.use(todoRouter.routes());
app.use(todoRouter.allowedMethods());
Now let's discuss what we just did.
Let's talk about the logger.ts file and break it down into bits:
import {
  green,
  cyan,
  white,
  bgRed,
} from "https://deno.land/std@0.53.0/fmt/colors.ts";
I am importing some console colors and console background colors that I want to use in API logging.
This is similar to what we did in our eventListener in our server.ts file. We will use colors in our console to log API requests.
Next I set const X_RESPONSE_TIME: string = "X-Response-Time";. This is the header we will inject in our API requests as they come into our server. I am calling this X_RESPONSE_TIME and its value is X-Response-Time. I will demonstrate its usage in a bit.
Next we simply export an object like this:
export default {
    logger: async ({ response, request }, next) {}
    responseTime: async ({ response }, next) {}
};
And then we simply use it inside our server.ts file like this:
// order of execution is important;
app.use(logger.logger);
app.use(logger.responseTime);
Let's now discuss what is happening in our logger middleware code and discuss it execution style using next():
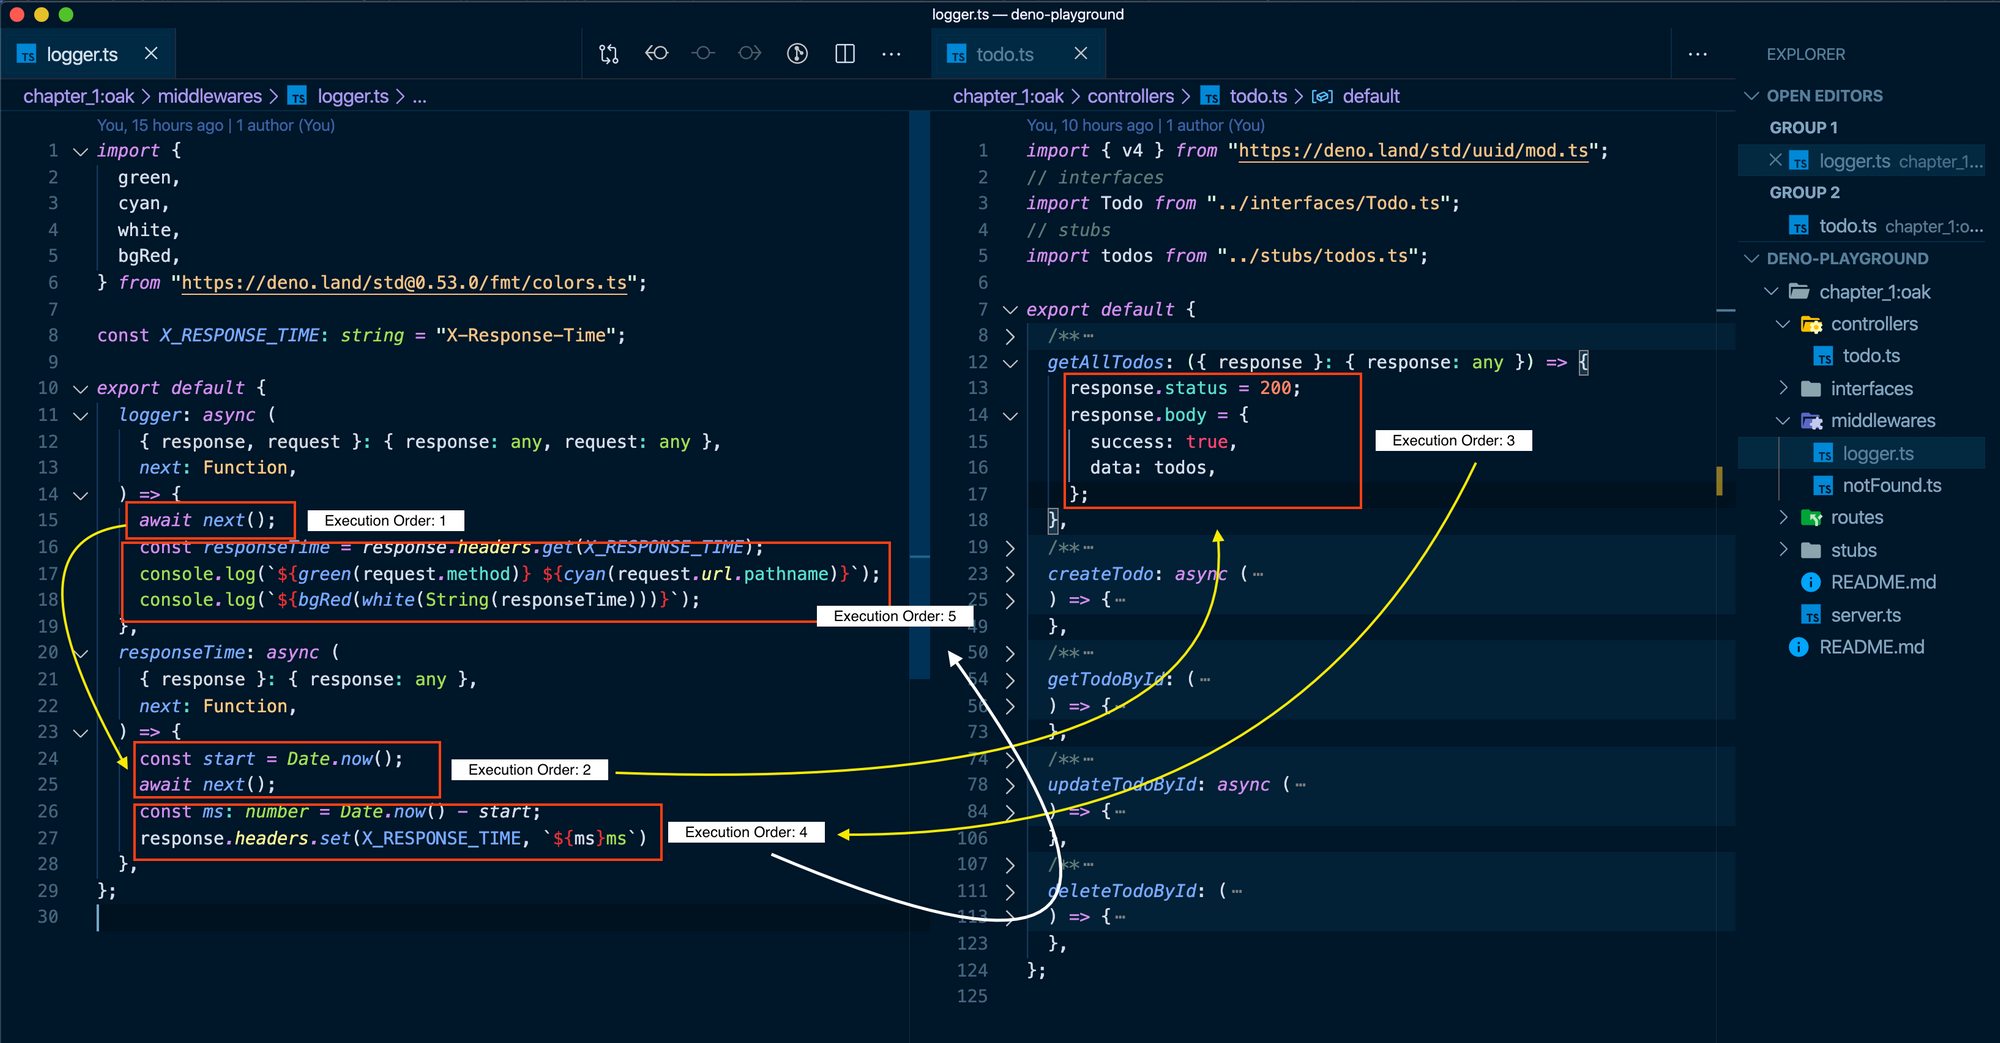
 Execution of order of logging middleware when GET /todos API is called.
The only difference here and in the controllers we had before is the use of the next() function. This functions helps us jump from one controller to the other as shown in the image below.
So in:
export default {
  logger: async (
    { response, request }: { response: any, request: any },
    next: Function,
  ) => {
    await next();
    const responseTime = response.headers.get(X_RESPONSE_TIME);
    console.log(`${green(request.method)} ${cyan(request.url.pathname)}`);
    console.log(`${bgRed(white(String(responseTime)))}`);
  },
  responseTime: async (
    { response }: { response: any },
    next: Function,
  ) => {
    const start = Date.now();
    await next();
    const ms: number = Date.now() - start;
    response.headers.set(X_RESPONSE_TIME, `${ms}ms`)
  },
};
Keep in mind that this is what we have in our server.ts file:
// order of execution is important;
app.use(logger.logger);
app.use(logger.responseTime);

app.use(todoRouter.routes());
app.use(todoRouter.allowedMethods());
The order of execution is as follows:
- logger.logger middleware
- logger.responseTime middleware
- todoRouter controller (whatever path is called by the user, for the purpose of explanation I am assuming that the user called
GET /todosAPI to get all todos.)
So it will first execute logger.logger middleware which is this:
logger: async (
    { response, request }: { response: any, request: any },
    next: Function,
  ) => {
    await next();
    const responseTime = response.headers.get(X_RESPONSE_TIME);
    console.log(`${green(request.method)} ${cyan(request.url.pathname)}`);
    console.log(`${bgRed(white(String(responseTime)))}`);
  },
It will come inside this function and immediately as it reads await next() it quickly jumps to the next middleware which is responseTime:
 Sharing the image above again for revision.
Inside responseTime, it only executes two lines which are (look at execution order 2 in image above):
const start = Date.now();
await next();
before jumping to the getAllTodos controller. Once it goes inside getAllTodos it will run the entire code inside that controller.
Since in that controller we are not using next() it will simply return the flow of logic back to responseTime controller. There it will run the following:
const ms: number = Date.now() - start;
response.headers.set(X_RESPONSE_TIME, `${ms}ms`)
Now keeping in perspective of the order of execution which is 2, 3, 4 (look at the image above).
This is what happens:
- We capture the data in
msby doingconststart=Date.now();. Then we immediately callnext()which goes togetAllTodoscontroller and runs the entire code. Then it comes back in theresponseTimecontroller. - We then subtract that
startdate with whatever the date is at that moment by doingconst _ms_: _number_ = _Date.now_()- start;ms. Here it will return a number which is basically the difference in milliseconds that will tell us all the time it took Deno to execute ourgetAllTodoscontroller.
Sharing the image once again for review:
- Next we simply set headers in our
responselike this:
response.headers.set(X_RESPONSE_TIME, `${ms}ms`)
Which just sets the header value X-Response-Time to the milliseconds it took Deno to execute our API.
- Then from execution order
4we move back to execution order5(have a look at the image above for reference).
Here we simply do:
const responseTime = response.headers.get(X_RESPONSE_TIME);
console.log(`${green(request.method)} ${cyan(request.url.pathname)}`);
console.log(`${bgRed(white(String(responseTime)))}`);
- We get the time we passed in the
X-Response-Time - Then we take that time and simply console it colourfully in the console.
request.method tells us the method used to call our API, that is GET, PUT etc while request.url.pathname will tell the API which path the user used i.e, /todos
Let's see if this works.
Restart the server:
$ deno run --allow-net server.ts
Open up a new tab in Postman. Set the request to GET, type in http://localhost:8080/todos, and hit Send.
Hit the API a couple of times in Postman. Then when you go back to the console, you should see something like this:
 API being logged in our console
This is it – we are done.
If you still feel stuck, take a look at the entire source code for this tutorial here: github.com/adeelibr/deno-playground/tree/master/chapter_1:oak
I hope that you found this article useful and that it was able to help you learn something today.
If you liked it, please do share it on social media. If you want to have a discussion about it, reach out to me on Twitter.