By Deborah Kurata
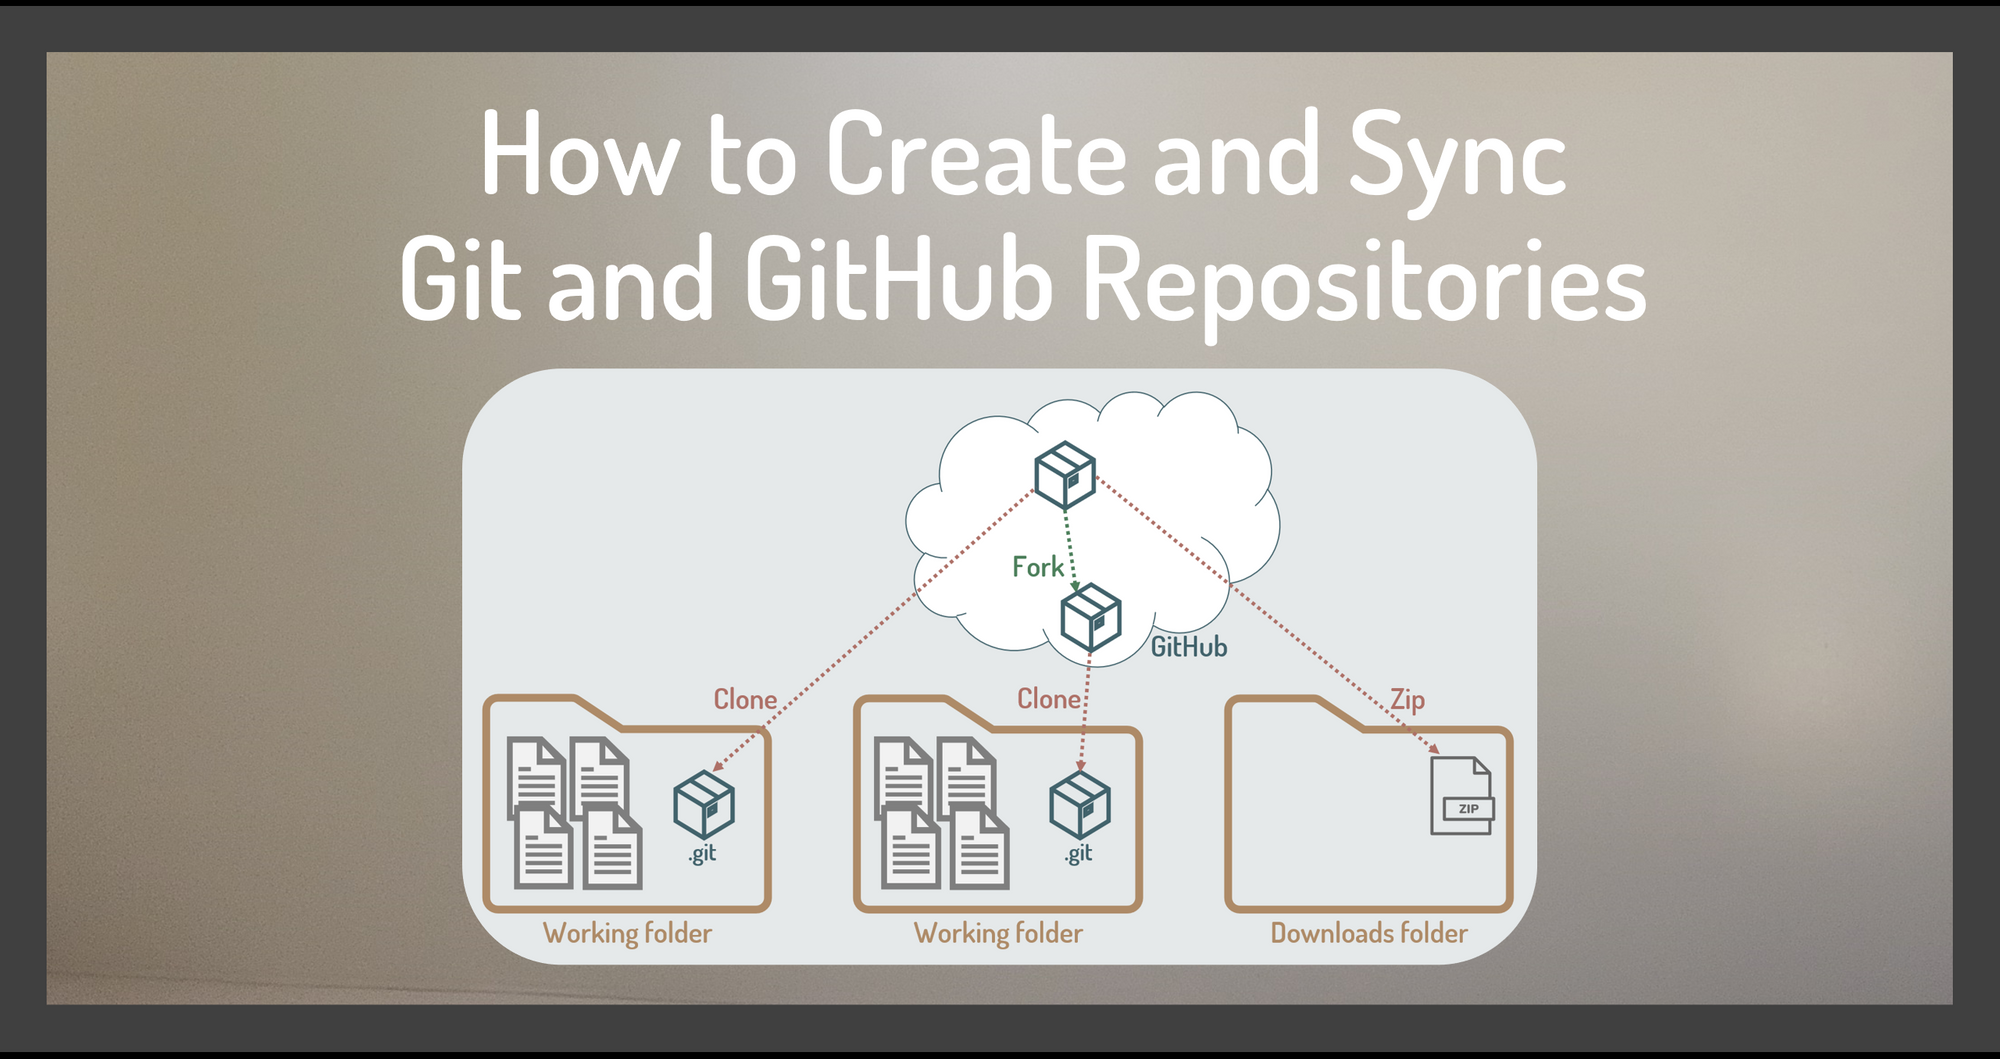
Working with Git and GitHub is often an essential part of your daily programming tasks. In many cases, you'll want both a local Git repository and a remote GitHub repository for a project.
- With the local repository, you work on your own copy of the project. You make and test changes independently before pushing those changes to the remote repository for others to review and merge.
- You use the remote repository for offsite storage and to share the project with others.
This tutorial walks through two scenarios:
- Local first: You create a local repository first and commit your code to that repository. At some later time, you create a remote repository. With the two repositories in place, you want to keep them in sync. This scenario is common if you've started a project on your own and later want to share that project.
- Remote first: In this scenario, there is an existing remote repository and you want to work with that code. You use that remote repository to create your local repository so you can make and test changes locally. With the two repositories in place, you want to keep them in sync. This scenario is common if you are working on a team or open source project that has an existing GitHub repository.
Here's what we'll cover in this tutorial:
- What Do Git, GitHub, and Repository Mean?
- How to Install Git and GitHub
- Scenario 1: Local First
- How to Create a Local Repository
- How to Commit Files to the Local Repository
- How to Create a Remote GitHub Repository
- How to Tell Git about GitHub
- How to Synchronize Local and Remote Repositories
- Scenario 2: Remote First
- How to Clone a Repository
- Wrapping Up
Let's start with a brief introduction to the terms we're using, then jump into our two scenarios.
What Do Git, GitHub, and Repository Mean?
A repository, or "repo" for short, stores and tracks the versions of your project files. As you make changes to those files, you commit (or copy) those files into the repository for safekeeping. The repository keeps a list of all your committed changes, called a commit history.
Git is a popular and widely used version control system for creating and working with repositories. It runs locally on your computer. You can download, install, and use Git on any platform without any cost or fees. With Git, you create a local repository in your project's working folder and Git stores the commit history for the files in that folder.
If you are new to Git, consider watching this video for an introduction:
GitHub is a website that hosts remote repositories on the internet. A basic GitHub account is also free. Use GitHub to create a remote repository for your project. With a remote repository, you can store your code offsite, collaborate with others, work on company or open-source projects, and show off your portfolio to potential employers.
If you are new to GitHub, consider watching this video for an introduction:
Before jumping into our scenarios, we need to install Git and create a GitHub account.
How to Install Git and GitHub
If you'd like to work through the examples presented in this tutorial, there are a few preparatory steps. But feel free to skip to the next section if you already have these tools installed or prefer to read this article without coding along.
First, install Git on your computer if you don't already have it. For step-by-step instructions on installing Git, see the second part of this video:
Next, create a GitHub account, if you don't already have one. This video provides step-by-step instructions on creating a GitHub account:
Lastly, create a working folder on your computer (I named mine recipes in my documents folder). Then create two simple text files in that folder: file1.txt and file2.txt. Even though we are using text files, the synchronization process covered in this article is the same with any type of code files.
Now we are ready to walk through our two scenarios: local first and remote first.
Scenario 1: Local First
Say that you want to build a recipes website (or maybe an app) for collecting and managing recipes. You create a local repository so you can easily track your changes to the project files.
You later decide that you also want a remote repository to keep a copy of your files offsite and to share the project with others. Once you have the remote repository, you want to keep your local repository in sync with that remote repository.
This scenario is shown in Figure 1:
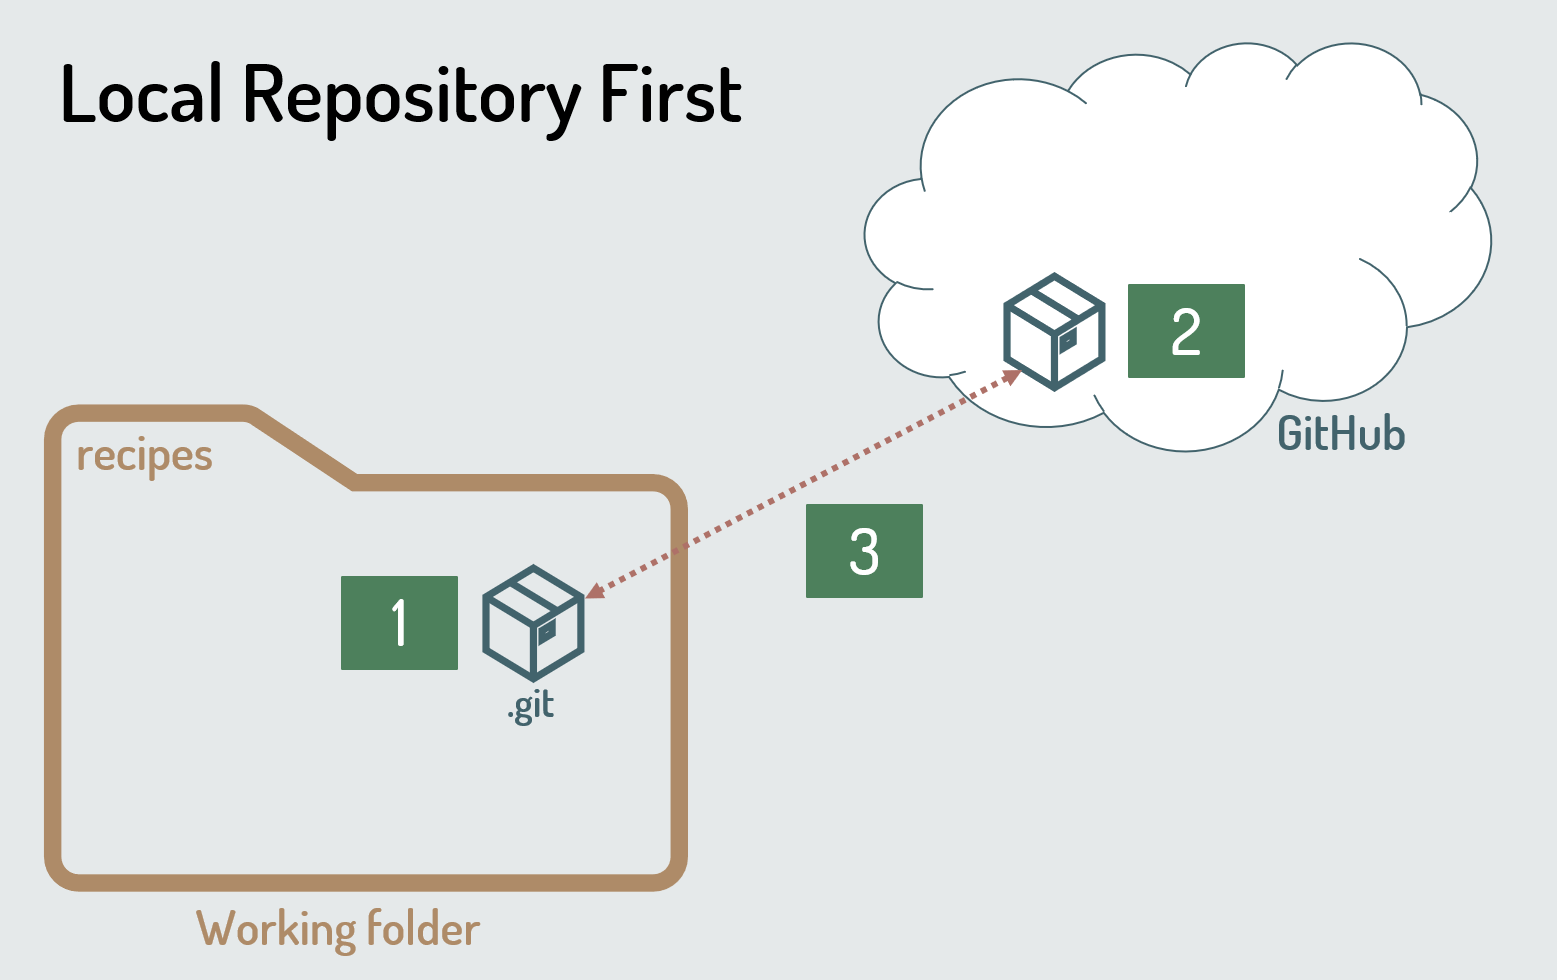 Figure 1. Creating a local repository first.
By the numbers on Figure 1:
- The local repository, depicted as a box, is created first.
- The remote repository is created with GitHub sometime later.
- The two repositories are kept in sync.
Let's walk through these steps in detail.
How to Create a Local Repository
We've already prepared a working folder and created two files that are the start of our project.
To create a local repository for that project, open your terminal or command prompt and navigate to that working folder.
Then initialize a new Git repository using the following command:
git init
This command initializes a new Git repository in the current folder. The initialization process creates a .git folder within the project folder that stores the files and data for the repository.
This .git folder may be hidden by default. In Mac's Finder, use Command + Shift + . (period) to make hidden folders and files appear. On Windows, use the File Explorer View tab and check Hidden items to display hidden folders and files.
We now have a local repository! Let's commit our two project files to that repository.
How to Commit Files to the Local Repository
Whenever we create new files, change existing files, or delete files, we commit those changes to our local repository. This ensures that the repository tracks the current status of our project.
Committing files to a local repository requires two steps:
- Stage
- Commit
First, add the files to the Git staging area:
git add .
We tell Git which files we want to include in that commit by adding them to a staging area. Staging allows us to selectively choose which changes to include in a commit.
Using the . (period) adds all of the files in the working folder (and its subfolders) to the staging area. If you only want to add specific files, you can list them instead.
Next, we commit the staged files to the local repository:
git commit -m "Initial commit"
This command commits the files in the Git staging area, to the local repository.
The -m option is for a commit message. Follow the -m with the message, in quotes. Be sure to define a clear message describing the changes you are committing.
For more information on defining great commit messages, see this video:
After these steps, the terminal appears as shown below:
 Figure 2. Creating a local repository, then staging and committing the project files.
The init command displays a status message telling us it created an empty Git repository.
The add command doesn't provide any output.
The commit command displays the branch we are on ( main in this example), the first few characters of the commit's id, and the commit message. It then lists the changed files. In this example, there were 2 files changed and both were insertions (new files).
The number after create mode indicates the file type and permissions. 100644 means that these are regular files, not folders, with owner read and write permissions.
With our local repository in place, it's time to create our remote repository.
How to Create a Remote GitHub Repository
Now we'll create a remote repository on GitHub using GitHub. Go to the GitHub website at www.github.com and log in. If you don't have a GitHub account, see the "How to Install Git and GitHub" section earlier in this tutorial for steps to create an account.
Check out this video to watch the process of creating a GitHub repository:
After you log in to GitHub, you are directed to your personal dashboard. Your GitHub personal dashboard provides information on your repositories and projects.
If this is your first time creating a repository in GitHub, it provides a Create Repository button to help you get started. If you've already been using GitHub, you'll see a New button instead.
In either case, clicking the button navigates to the Create a new repository page as shown in Figure 3.
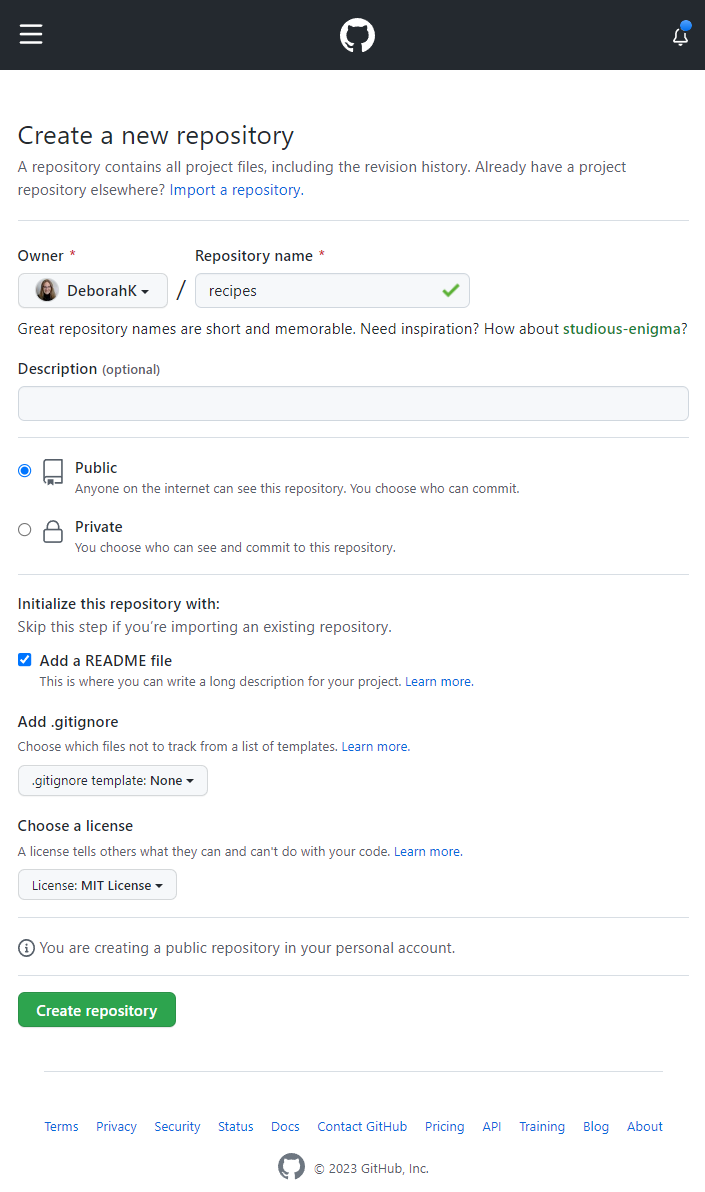 Figure 3. Create a new remote repository with GitHub.
Start by entering the repository name. A repository name should be short, but descriptive of your project. It must be unique within your GitHub account. GitHub checks that for you.
General conventions for repository names suggest using lower case. If there are multiple words, use dashes between the words, such as recipe-book.
I called my repository recipes. And the green arrow next to the name means that it's unique within this GitHub account.
Optionally, you can provide a description. This is where you can put more information about the repository, if desired.
Next, you have the option of creating a public or private repository. If you create a public repository, anyone on the internet can see it. But only collaborators that you pick can commit to it. So you don't have to worry about strangers changing your files. If you create a private repository, it's private except for your chosen collaborators.
Consider making your repos public to share your code with others, unless your code is proprietary.
You then have the option to create a readme file. A readme file gives those looking at a repository an idea of what that repository is for and instructions on using it. Check the box to add a readme file.
A .gitignore template helps you identify which files in your working folder you do not want to include in Git's version tracking. For an application, you don't want to include intermediate build files, for example, as they are often large and can easily be rebuilt from source files. For this simple project, we don't need a .gitignore template.
Choosing a license is next. A license lets other developers know what they can do with the code in your repo. For example, whether they could freely use the code for their own projects.
GitHub provides a website to help you make your decision. Click learn more under the Choose a license option to go to the GitHub documentation. On the documentation page, you'll find a choosealicense.com link for help in selecting which license makes sense for your project.
For my recipes repository, I'll make the license simple and permissive and pick an MIT license.
Close the documentation browser tab, go back to the GitHub tab, and select the desired license from the list.
Just above the Create repository button, GitHub provides a summary so you can double check the action you are about to perform. Then click Create repository.
It creates the repo as shown in Figure 4. Nice!
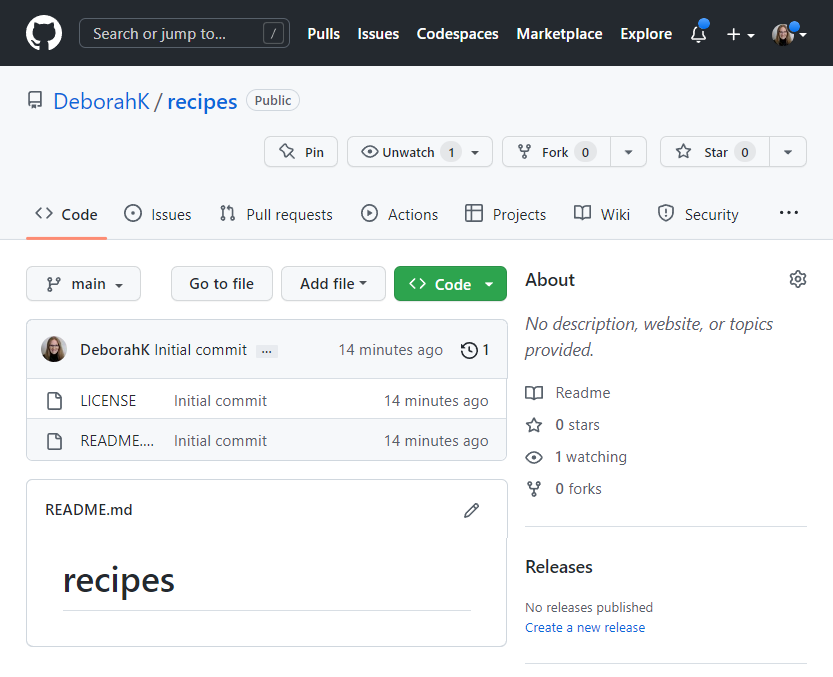 Figure 4. Our GitHub remote repository.
As you can see in Figure 4, GitHub automatically performed our first commit! That commit is a snapshot of the two files we told it to add to the repository: our license file and readme. It set a commit message of "Initial commit". And by default, GitHub displays the content of our readme file.
At this point, our local repository contains our two text files. And our remote repository contains our license and readme files. We want the two repositories to match.
How to Tell Git about GitHub
Before you can synchronize the local and remote repositories, you need to establish a connection between them. Basically, you need to tell your local repository where to find the remote repository.
We identify a remote repository by its URL. In Figure 4 above, notice the green Code button. Click that button to view details about the repository (Figure 5).
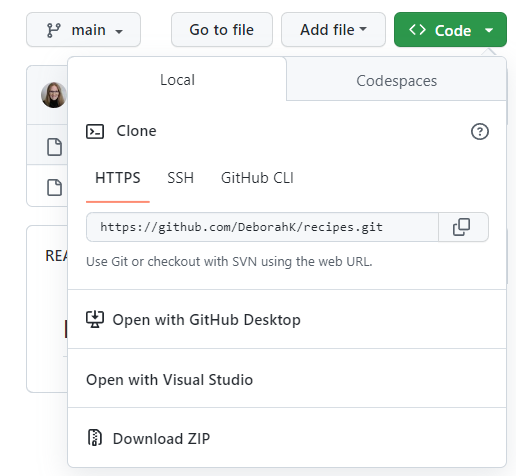 Figure 5. Finding the URL to the GitHub repository.
Ensure that the HTTPS tab is selected, and click the copy icon to copy the URL for this GitHub repository.
Back in the command window on your local machine, add the remote repository to the local repository. Then list the remotes to confirm that the remote was created.
git remote add recipes-gh https://github.com/DeborahK/recipes.git
git remote
The remote add command adds the remote repository at the provided URL. And it lets you assign a nickname for that repository so you don't have to type the URL when referring to the remote repository.
A common nickname for the remote repository is origin, but some find that name a bit confusing, especially if the remote repository was not the origin of the project. In that case, I sometimes use the name of the local repository with a -gh (for GitHub) as the remote repository nickname, so I can easily remember it. But feel free to use any name.
The remote command by itself displays the list of remotes that your local repository knows about. Here's what that looks like:
 Figure 6. Establishing a connection to the remote repository.
Our local Git repository now knows where to find its associated remote repository. The next step is to synchronize the repositories so their commit history matches.
How to Synchronize Local and Remote Repositories
To synchronize our local and remote repositories, we first fetch the change history from the remote repository and merge it into our local repository using the pull command. Then we push our local change history to the remote repository using the push command.
If you would prefer to sync repositories using VS Code, check out this video:
To pull from the remote repository and merge to our local repository using a Git command:
git pull recipes-gh main --allow-unrelated-histories

dir        // On windows
OR
ls        // On a mac
The pull command requires the nickname of the remote repository (recipes-gh) and the name of the branch. Since we haven't created any additional branches, we specify the primary branch (main).
The --allow-unrelated-histories flag is required the first time we pull because we want to merge two repositories that were created separately and don't currently share a related history.
After the first time, the git pull command doesn't require that flag:
git pull recipes-gh main
In either case, the pull command looks up the appropriate URL for the remote repository using the provided nickname ( recipes-gh ).
Then it fetches the commit history and other data from the specified branch ( main ) of the remote repository that is not in that branch of the local repository.
It merges that data into the local repository. If there are any conflicts, you'll need to manually resolve them before Git will merge the changes.
Lastly, it updates the local working folder with all files from the most recent commit.
Using the dir command on Windows, or the ls command on a Mac, we see that our local repository now has our original files plus the license and readme files from our remote repository as shown in Figure 7.
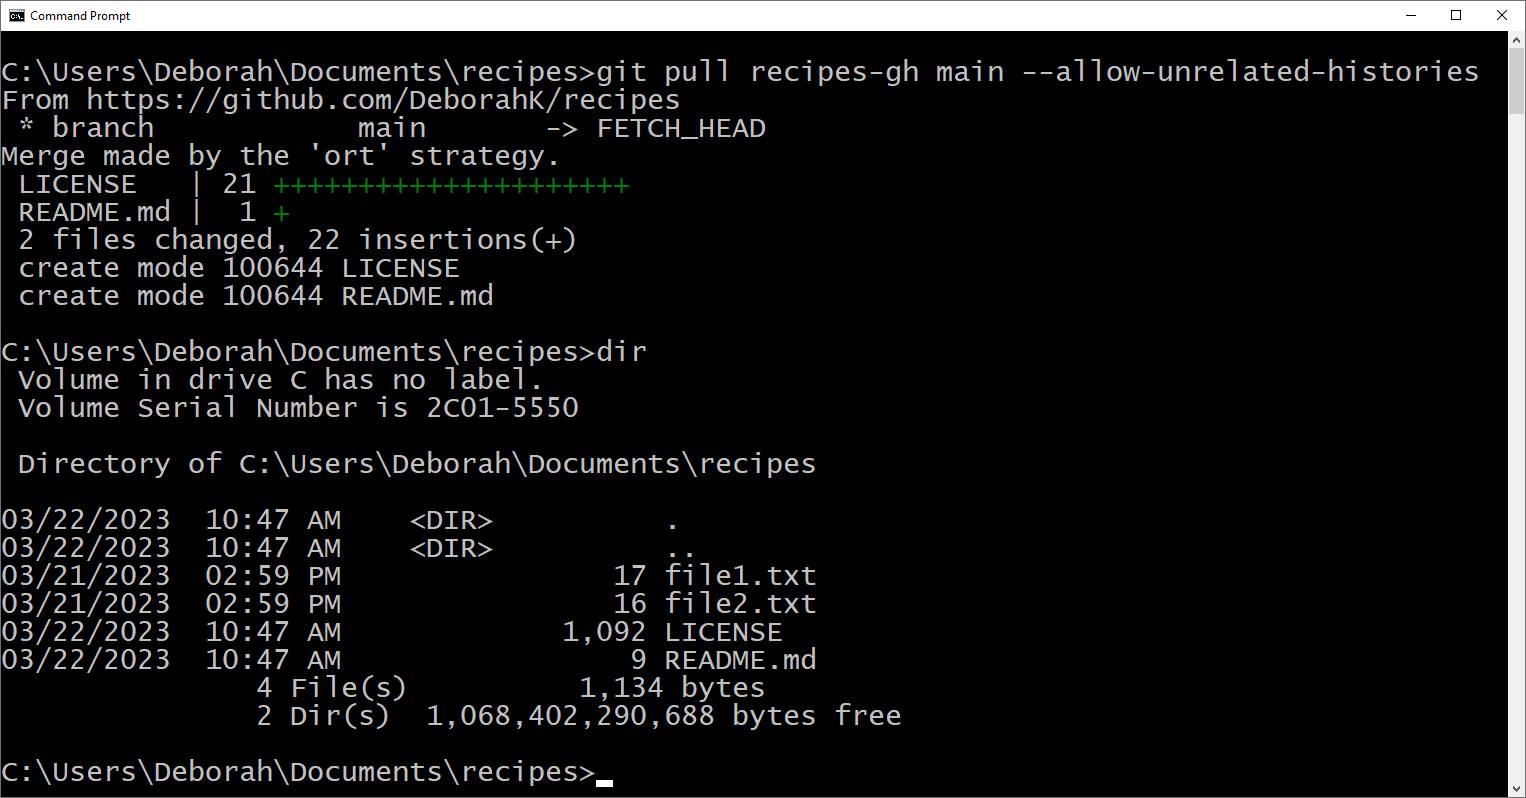 Figure 7. Pulling the change history from the remote repository.
Now our local repository contains all of the commit history from the remote repository.
Next, we push the change history from our local repository to our remote repository using the push command.
git push recipes-gh main
The push command requires the name of the remote repository (recipes-gh) and the name of the branch. Since we haven't created any additional branches, we specify the primary branch (main).
This command merges the local change history to the remote repository. If there are any conflicts, you'll need to manually resolve them before Git will merge the changes. See Figure 8 for the result:
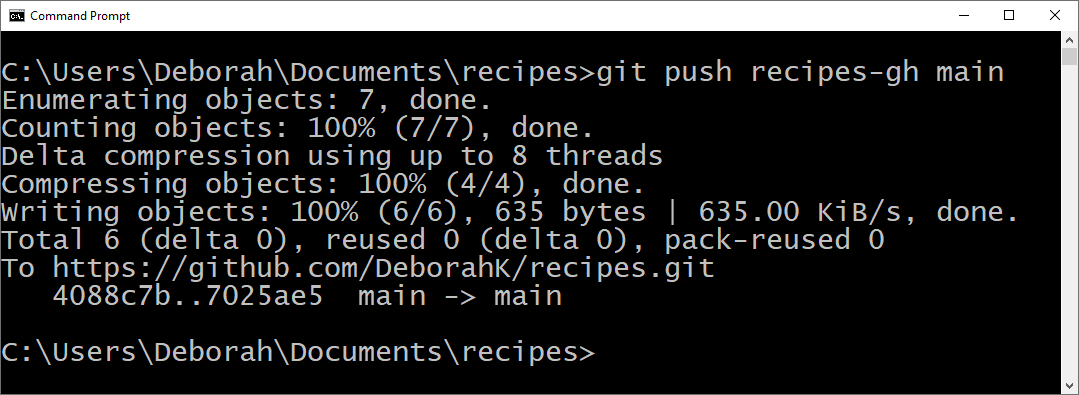 Figure 8. Pushing the local change history to the remote repository.
To confirm that our remote repository includes all of our files, view the remote repository on GitHub. In Figure 9, we see the files from our local repository are now in our remote repository and our repositories are in sync!
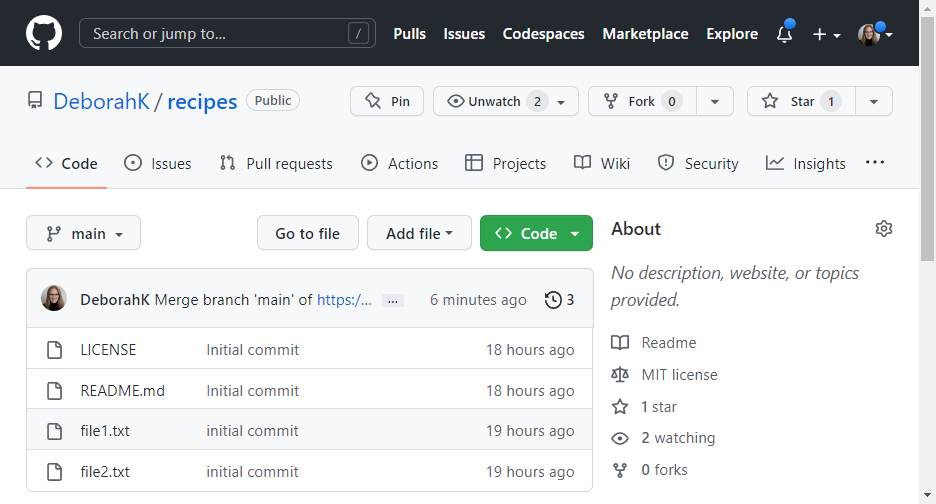 Figure 9. Our remote repository with the files from our local repository.
In summary, syncing your local and remote repositories involves pulling any changes from the remote repository to your local repository, resolving conflicts, and then pushing your local changes back to the remote repository.
That's it for the first scenario. We created a local repository from our existing files. Then we created a remote repository, set up a connection to that remote repository, and synchronized our files. Repeat the pull and push commands to sync the repositories as you work on your project.
Scenario 2: Remote First
For our second scenario, the remote repository already exists. This will be the case if you join a team that has existing code in GitHub. Or if you want to work on an open source project. Or if you found some code on GitHub that you'd like to use as a starting point for your project.
You want to create your local repository from an existing remote repository. There are three basic ways to get code from a remote repository, as shown in Figure 10.
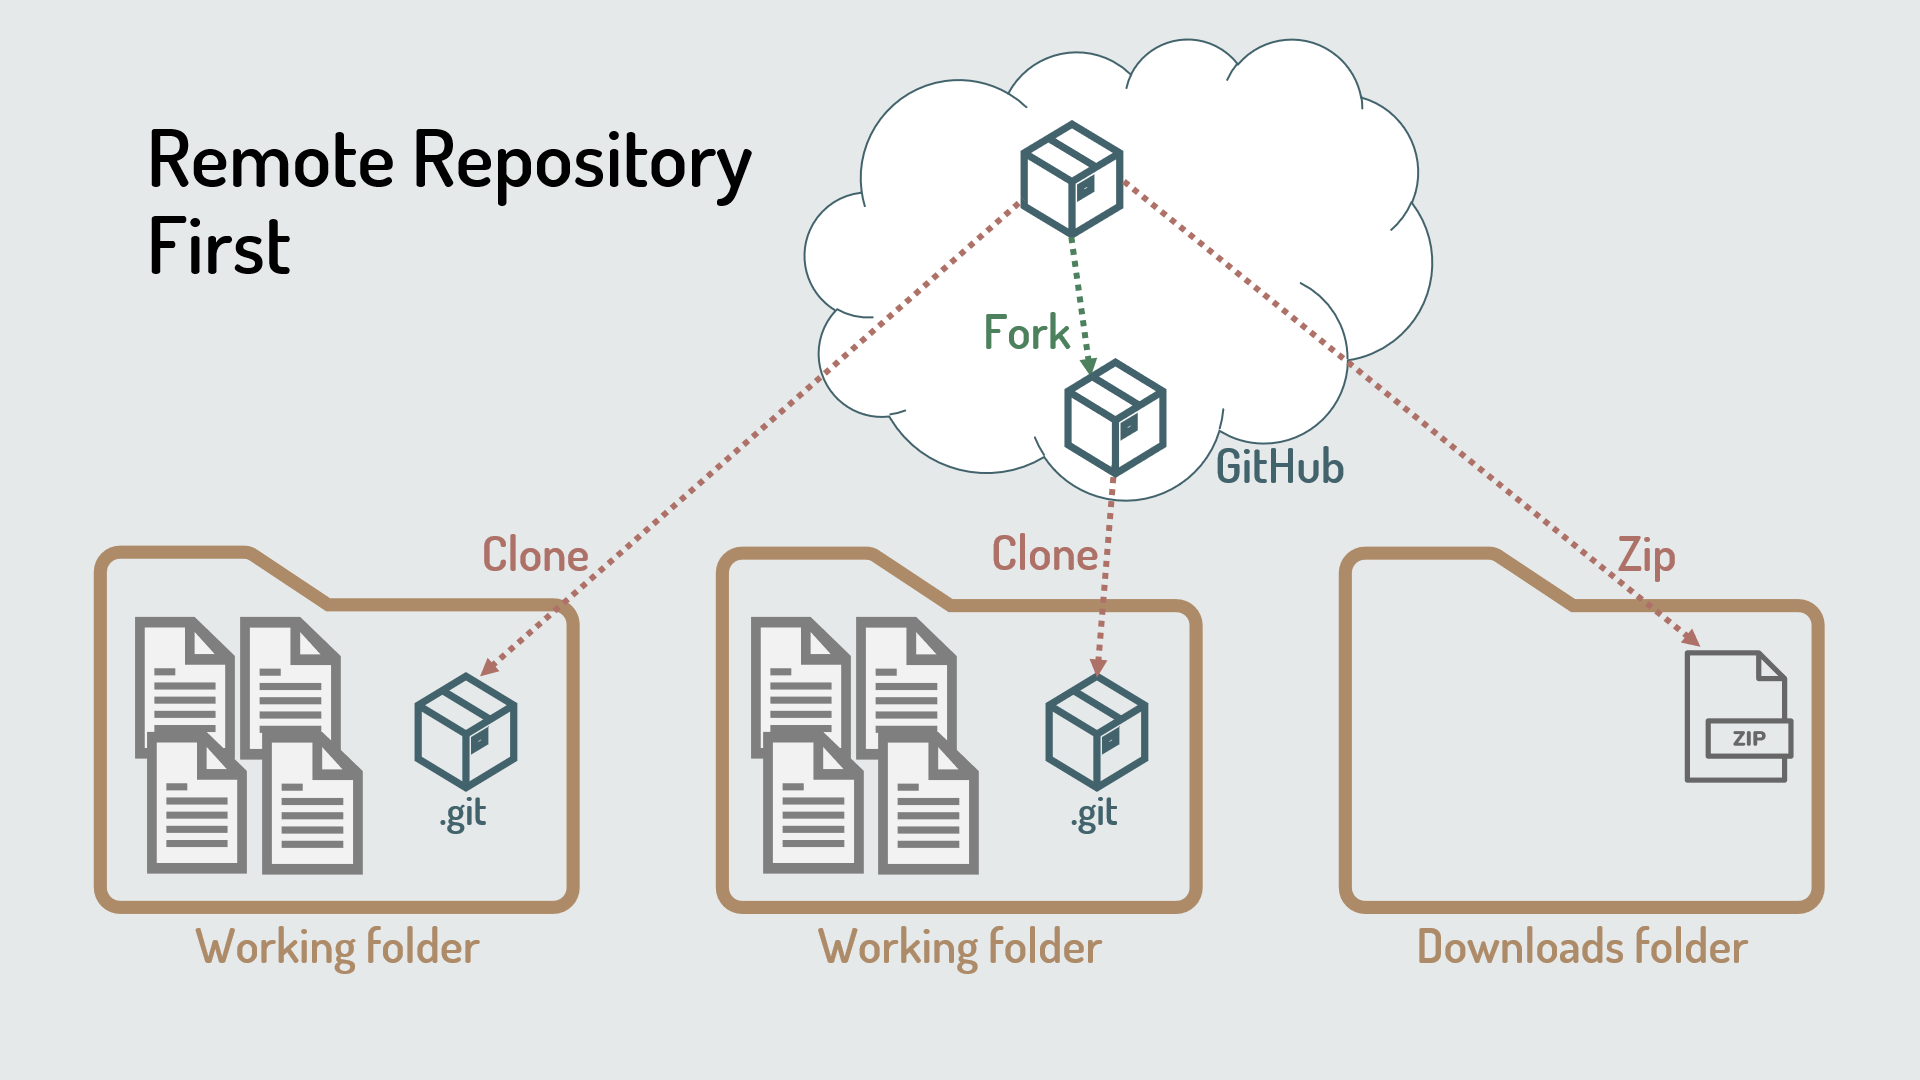 Figure 10. Getting code from a remote repository.
On the left side of Figure 10, we have one scenario: if you own or have access rights to modify the remote repository, you can clone the remote repository to create your local repository. You can then directly synchronize changes between the two repositories.
The second scenario is shown in the middle of Figure 10: if you don't own the remote repository or have access rights to modify it, use GitHub to fork the repository first. This creates a copy of the remote repository in your GitHub account. Then clone your copy to create your local repository.
This will be the case if you are working on an open source project or you want to use the code in someone else's repository as a starting point for your project.
The third scenario is shown on the right of Figure 10 – there is also the option to download a zip file of the code in the repository. This does not create a local repository. Use this option if you want to look at code from a GitHub repository, but don't plan on tracking changes to it.
To get set up for this scenario's example, you need a remote repository that does not currently have an associated local repository. You can use the recipes remote repository that you already created in the first scenario. If you'd rather use someone else's repository for this example, be sure to fork it first.
Once you have a remote repository, ensure there is no local repository associated with it. If you are using the recipes remote repository, delete the recipes folder from your local system. That deletes your local repository.
Now you are ready to create a new local repository from your remote repository on GitHub.
How to Clone a Repository
To create a local repository from a remote repository on GitHub, use the clone command.
If you'd rather clone a repository using the GitHub Desktop application, see this video:
To clone using a Git command, we first need the URL to the remote repository.
Navigate to GitHub, log in, and you'll see your personal dashboard. Locate the repository that you want to clone. Click the green Code button to view the details about the repository as shown earlier in Figure 5. Click the copy button next to the URL to copy it.
Next, open your terminal or command prompt on your computer. Navigate to the folder where you want to create the project's working folder. I'll navigate to my documents folder.
Then we are ready to clone that repository:
git clone https://github.com/DeborahK/recipes.git
The clone command requires the URL of the remote repository. We just copied that URL from GitHub, so paste it in as part of this command.
When the command is executed, it first creates the working folder for the repository using the remote repository name from the URL, which is recipes in this example. It then copies the commit history from the remote repository at the provided URL.
The cloning process also automatically links up the new local repository with the its remote repository. And it assigns the remote repository a nickname of origin. We can then reference the remote repository using that nickname instead of its URL.
Lastly, the cloning process copies all files from the most recent commit to the local working folder. You can then add, edit, or delete files in that working folder as you work locally on the project.
Navigate down to the new recipes folder. Then use the remote command to view the linked remote repository. And shown in Figure 11 that it is indeed nicknamed origin.
 Figure 11. Cloning a repository.
Notice the output of the clone operation in Figure 11. Git enumerates (or finds) 10 objects. We only have four files in the recipes remote repository. Then why is it finding 10 objects? That's because the clone process copies the entire commit history, not just the files.
Use the rev-list command with the --objects and --all flags to view the list of the objects.
git rev-list --objects --all
Figure 12 shows the output of that command:
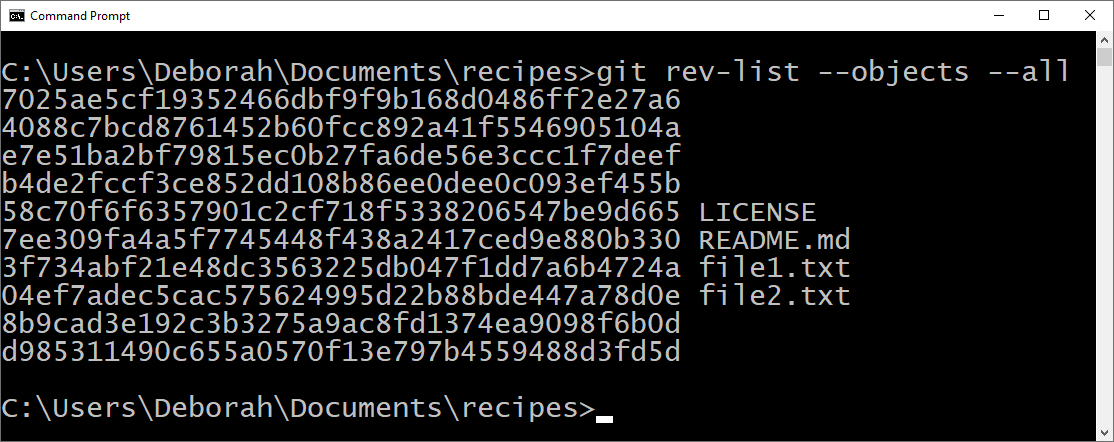 Figure 12. List of objects in the repository.
Each of the above objects are shown as a SHA, or Secure Hash Algorithm identifier. The SHA is used as an id to uniquely identify the objects in our repository.
The first three objects on this list (objects 1-3) are the three commits made to this repository. Looking at the list of commits in GitHub (Figure 13), each commit displays the first few characters of its SHA. These match up with the first three objects:
- The merge commit when we merged the two repositories.
- The
initial commitGitHub made to the remote repository creating theLICENSEandREADME.mdfiles. - The
initial commitwe made to the local repository committingfile1.txtandfile2.txt.
The middle objects in the list shown in Figure 12 (objects 5-8) are the four committed files.
The remaining three objects (objects 4, 9, 10) are tree objects. A tree object represents the state of a folder, including the files and sub-folders in that folder. It maintains the hierarchy of the folder.
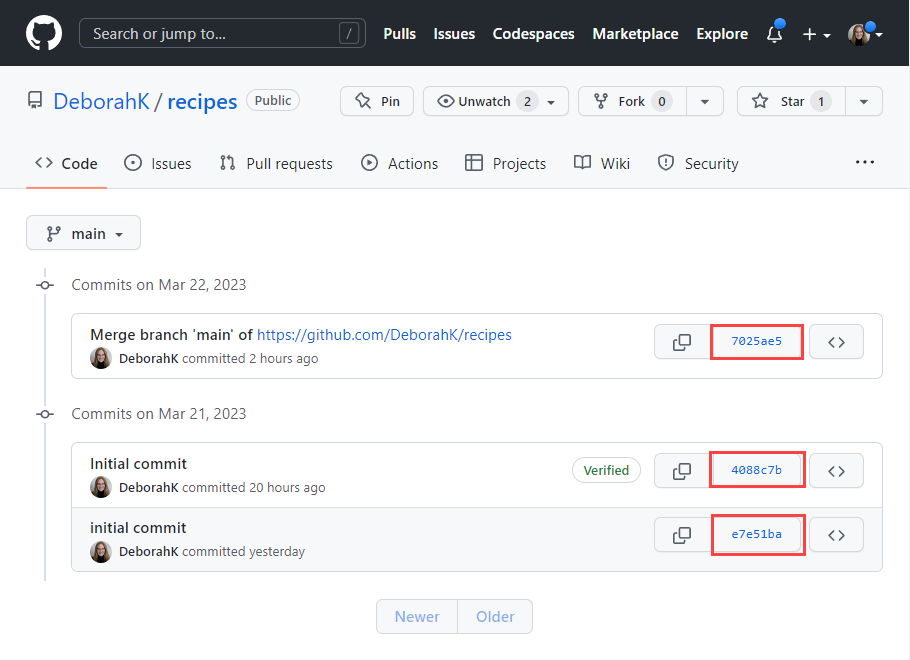 Figure 13. Commit history, each identified by the first few values of the SHA.
Using the dir command on Windows, or the ls command on the Mac, we see that our working folder now contains all of the files from our remote repository.
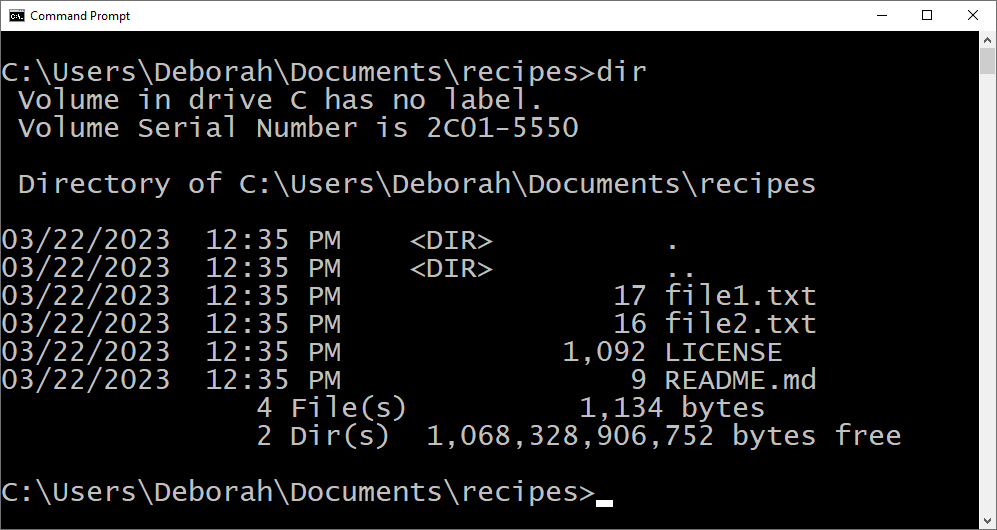 Figure 14. A directory of the files in our working folder.
Now that we've cloned the repository, our local and remote repositories match. To keep them in sync, we use pull and push as we saw in the "How to Synchronize Local and Remote Repositories" section earlier in this article.
Note that if you are working with a remote repository that you don't own, you may not have access to push your changes directly to the repository. Instead, you'll need to issue a pull request.
A pull request, or PR, tells the owners or other contributors that you've pushed changes and you're requesting that those changes be reviewed and pulled, or merged, into the remote repository.
See this video for more information on pull requests:
Wrapping Up
In the first scenario, we had existing code and created a local repository from that code. We then created a remote repository to keep a copy of the files offsite and share the project with others.
In the second scenario, we had an existing remote repository created in GitHub by our team or by an open source contributor. We then cloned that repository to create our local repository. That way we can work on our own copy of the project, and make and test changes independently before pushing those changes to the remote repository for others to review and merge.
Whether you create your local repository first, or your remote GitHub repository first, once you have both repositories in place you can keep them in sync with Git pull and push commands. Or by submitting pull requests, or PRs.
For more details on learning Git and GitHub, check out this course:
Gaining a firm understanding of local and remote repositories, and how to keep them in sync, is essential when working on your own code. It's even more important when working on a team or open source project.