
By Sameeha Rahman
Hey all! This is a post on an up and coming tech topic — Ionic! By the end of this post you would learn how to create a simple CRUD (Create, Read, Update and Delete) to-do list app, which is also connected to Firebase.
Hybrid Mobile Applications — What are they?
Simply put, they are mobile apps created by the easier to learn languages; HTML, CSS, and JavaScript. The beauty of developing a hybrid mobile app is the fact that they can be compiled to work with any platform. If you are lazy, like yours truly, you’ll find it easier to use one code to build many apps, instead of developing separate apps for each platform.
Ionic is one of the popular frameworks to make your own hybrid mobile app. It can be built into an Android, iOS, Windows phone, Progressive Web or Desktop application. And testing the app is so much easier since it can be live reloaded right onto your browser.
Step 1 — Setting it all up
Initially, sign up for an Ionic Pro account, here. That will make building and shipping the app easier. You might have to sign in sometime during the process of project creation.
To start coding your first Ionic App, there are a bunch of things you need;
- Node.js — This is pretty easy. Simply go to the Node.js website and download the ideal installer for you. We need the Node Package Manager, aptly named npm, to install all the dependencies for the many modules you would want to use in your app. If you develop on a Mac and have Homebrew installed, simply type in the command
brew install npmon the console. - TypeScript — TypeScript, a superset of JavaScript, is used instead of JS for the majority of the code. After installing Node.js, on the console, type in
npm install -g typescript. - Cordova — Cordova is a framework that builds the HTML, CSS and JS/TS code into an app. To install, type
npm install -g cordova - And finally, Ionic — Type in
npm install -g ionic.
Bonus — You can download all three in one go with this command too! npm install -g typescript cordova ionic.
Now that you have set up the environment, let's get this party started!! ??
Creating your first app
From within the console, move to the folder in which you want to store the app. My personal preference is to have a dedicated folder for all my Ionic projects in my Documents.
Then, type in ionic start . The console then prompts you for a name for the project, like so, Project name: Tasks.
It then prompts you to specify the type of application.
? Starter template: (Use arrow keys)
  tabs     | A starting project with a simple tabbed interface
> blank    | A blank starter project
  sidemenu | A starting project with a side menu with navigation in the content area
  super    | A starting project complete with pre-built pages, providers and best practices for Ionic development.
  tutorial | A tutorial based project that goes along with the Ionic documentation
  aws      | AWS Mobile Hub Starter
For now, let's make it a blank project, a to-do list with all CRUD functions in one page. It will then prompt you for permission to add the Android and iOS platforms.
? Integrate your new app with Cordova to target native iOS and Android? (y/N) y
It will proceed to download extra dependencies that will allow you to live reload the app in emulators and devices. Once the native SDK’s are downloaded you are prompted to add the Ionic Pro SDK, if you wish to do so.
? Install the free Ionic Pro SDK and connect your app? y
If you do pick yes, the console will then prompt you for your Ionic Pro email and password, set up at the beginning of this post.
? Email:
? Password:
Thereafter, you have the option to either link this app to an existing one, to create a new one entirely.
? What would you like to do? (Use arrow keys)
  Link an existing app on Ionic Pro
> Create a new app on Ionic Pro
The console then proceeds to ask your preferred git host, to store your repository. I prefer GitHub, as it’s something I’m more familiar with.
? Which git host would you like to use? (Use arrow keys)
> GitHub
  Ionic Pro
Depending on your choice above, if you picked GitHub as I have, you may require to open your browser to give your credentials and sign in. Once done, return back to the console. You then need to link this app to the repository or create a new one. If you don’t have a repository, go back to GitHub and create one now. Once the new repository is created, come back to the console and type y .
? Does the repository exist on GitHub? y
Afterward, pick the correct repository from the list displayed on the console. I will be using only the master branch for now and will go with the former option.
? Which would you like to do? (Use arrow keys)
> Link to master branch only
  Link to specific branches
And FINALLY, we’re done creating the app!! ??
But, If you picked Ionic Pro as a git host, pick the option to generate an SSH key pair.
? How would you like to connect to Ionic Pro? (Use arrow keys)
> Automatically setup new a SSH key pair for Ionic Pro
  Use an existing SSH key pair
  Skip for now
  Ignore this prompt forever
And we’re done here too! Now to have a look at the app
There are two different commands to view the app on the browser.
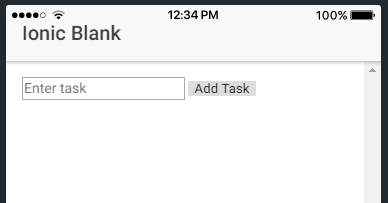
ionic serveionic serve -l
ionic serve displays the app in the view of a web application.
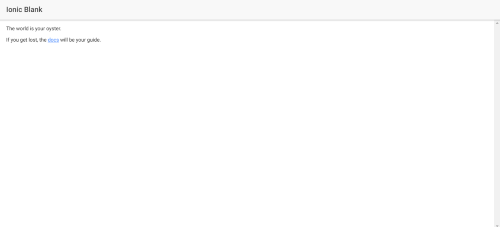 Web Application View
ionic serve -l displays the app in the many mobile device platforms. You will need to download it from within the console, when prompted, to get this view.
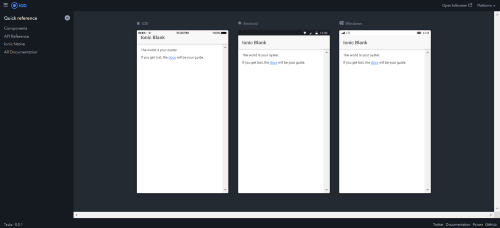 Mobile Platforms View
And that’s a wrap for today! We successfully created and linked an Ionic 4 app to a version control host.
The Project Structure
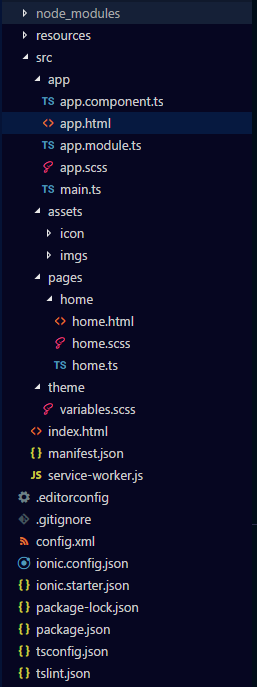 Folder directory
- app.module.ts — The entry point of the app. Any and all components, pages, modules, and providers need to be added to this file, as it keeps track and controls the many resources used by the app.
- app.components.ts — The first page that is loaded as the app starts running, with all the code you wish to execute first. Pages that you might wish the user to view first, like the login screen, are put in this component.
- app.html — The template of the app, where the other UI pages will mount onto.
- app.scss — The page that holds all the Sass variables and styles to be used globally within the app.
Let’s head on over to the main component that we will be amending for this application, home.
As seen above, the home component has three pages;
- home.html — The view/UI of the page is coded here, using HTML.
- home.scss — Any page-specific styling is to be added here, along with Sass variables to be used within the page.
- home.ts — The operational logic, in our case adding new tasks to the list, is coded in TypeScript here.
Step 2 - Implementing the CRUD operations
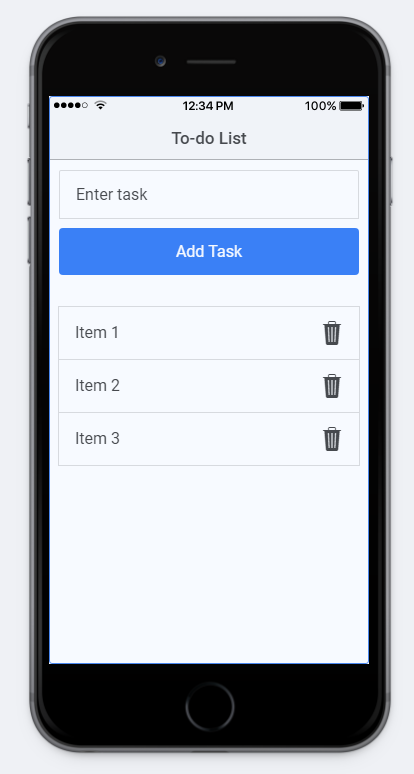 Wireframe of the app
What I hope to implement as seen above, is a very simple design; a text input to type the tasks, a button to add it to the list, a list view to view the items and finally a delete button to remove the items from the list. I might change up the design later.
Go ahead and open your editor. Let's take a quick run through all the pages and components found in the current directory.
Creating the UI for C and R
To begin, let’s tackle the UI first. When you open up home.html, this is the current code in the page.
<ion-header>
    <ion-navbar>
        <ion-title>Ionic Blank</ion-title>
    </ion-navbar>
</ion-header>
<ion-content padding>
    The world is your oyster.
    <p>If you get lost, the
        <a href="http://ionicframework.com/docs/v2">docs</a>
    will be your guide.
    </p>
</ion-content>
You can then remove everything within the <ion-content> tags. This is the body of the page and elements within those tags will be seen.
Now add an input tag in the body, so we can enter in the task, followed by a button, to call a method to add the task to the list.
<ion-content padding>
    <input type="text" placeholder="Enter task">
    <button>Add Task</button>
</ion-content>
 Boring and basic
Not pretty, right? Let’s add some styling now!
Ionic has a special input tag <ion-input> , that comes with some styling coded within it, so go ahead and switch boring old <input> to <ion-input> !
Ionic also comes with certain special classes which have styling, like the ion-button. I also want to have the button to the end of the input, and not right below. The final changes look like this;
<ion-content padding>
    <ion-item>
        <ion-input type="text" placeholder="Enter task" [(ngModel)]="taskName"/>
        <div class="item-note" item-end>
            <button ion-button>Add Task</button>
        </div>
    </ion-item>
</ion-content>
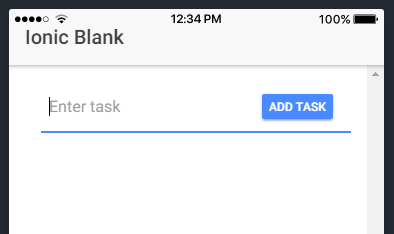 Seamless and sleek
So much better, right!? And all this without writing any CSS! Let’s have another look at the code above.
<ion-item> tag is normally used with the <ion-list> element. But, using this here, with the input within this element, gives it an added style on focus or use. Using the class item-note for a div element allows the button to be in line with the input tag. Doing so, gives a more seamless and sleek design, compared to the first one. Since Angular is also integrated into Ionic, we can use ngModel to easily link values in the views to that in the TypeScript files.
Ionic also comes with a built-in pack of icons, Ionicons. Its very simple to use, and a quick example would be substituting the Add task text with <ion-icon name="add"></ion-icon> . Find more on Ionicons, here.
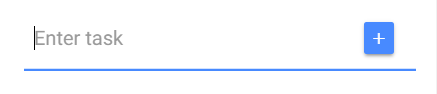 Final input tag
The final result! I’m quite happy with what it looks like now, but feel free to play around more with colors and styling.
Implementing create and read functionality
Now that the UI has been done, let's move on to giving this a function. It’s time to look at home.ts. You start off with code that looks like this;
import { Component } from '@angular/core';
import { NavController } from 'ionic-angular';

@Component({
    selector: 'page-home',
    templateUrl: 'home.html'
})

export class HomePage {
    constructor(public navCtrl: NavController) {  }
}
Let’s get a quick look at what we have here. You import any components or external modules, that you may need to use in this page at the very top. The next few lines describe the template to which the many functions you may write belong to and manipulate. And lastly, all the logic you may code. Any code you wish to execute before viewing or interacting with the page must be written within the constructor.
Since we will be adding new to-dos each time, we need a place to store it. The simplest way to do this is to initialize an array. If you have had experience with JavaScript previously, coding with TypeScript will be a piece of cake!
Let’s call our list taskList, but since we need the list to be accessed from more than one method of the code, we need to initialize it outside the constructor taskList = [];. Now to write code to handle the Add Task button click, let's call it addTask. All we need to do is capture the text in the input, and push it onto the array. Since we have used ngModel for the input tag, we can easily get the value inside it by using this.taskName. And adding values to an array is as easy as taskList.push(task). We also need to ensure that no empty string is being added to the list, so wrap the above statement in an if condition, checking if the taskName truly exists. The final home.ts code;
import { Component } from '@angular/core';
import { NavController } from 'ionic-angular';

@Component({
    selector: 'page-home',
    templateUrl: 'home.html'
})

export class HomePage {
    taskList = [];

    constructor(public navCtrl: NavController) {}

    addTask() {
        if (this.taskName.length > 0) {
            let task = this.taskName;
            this.taskList.push(task);
            this.taskName = "";
        }
    }
}
Note: Using the keyword
letin TypeScript is the equivalent of usingvar, for variable declaration.
Now we can begin adding new tasks!
But how do we know something is being added???
Easy Peasy, ?Squeezy! That’s what the R in CRUD is there for!
Run the code and have a look
Time to C(reate) a way for us to R(ead) what we type! (See what I did there?)?
Let’s roll back to the home.html. So far, we have put an input tag and a button to add tasks; now to put a list to view it. We now need to link the method addTask() to the button in the (click) property, so that a list item is added to the array with each click.
<ion-list> is a special Ionic element for list views. The <ion-item> tag is used within it to generate each item in said list. *ngFor is an easy method of showing all elements within a list, by setting a standard view for each list item.
The final home.html code;
<ion-header>
    <ion-navbar>
        <ion-title>To-do List</ion-title>
    </ion-navbar>
</ion-header>
<ion-content padding>
    <ion-item>
        <ion-input type="text" [(ngModel)]="taskName" placeholder="Enter task"/>
        <div class="item-note" item-end>
            <button ion-button (click)="addTask()"><ion-icon name="add"></ion-icon></button>
        </div>
    </ion-item>
    <div padding>
        <ion-list>
            <ion-item *ngFor="let todo of taskList">
                {{todo}}
            </ion-item>
        </ion-list>
    </div>
</ion-content>
The variable todo is a temporary store for the element in the current index of the for loop (ngFor) within the list taskList, as declared in the home.ts.
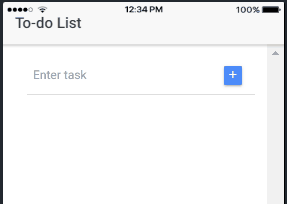
Ready to see our app so far?
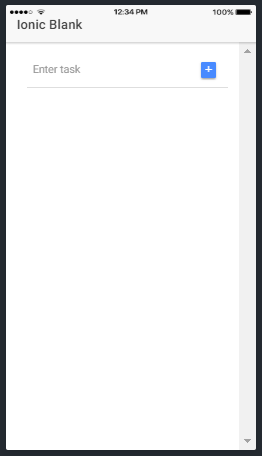
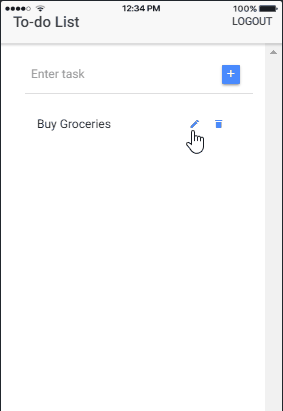
We did it!! It works!!????
But that was just Create and Read. Will still have to implement Update and Delete.
We will first begin with changing the GUI so that it can fit both the update and delete features. Thereafter move onto the TypeScript code, to show its functionality.
Change that look to include handlers for U and D
Whoops! Little forgetful ole me! I didn’t change the app name on the home page… ???
Go ahead and call it whatever you wish (I’ll be basic with ‘To-do List’).
The first step, to be done in the home.html, is to add the delete button to the left side of each list item. That’s easy! Reuse the very same code I used to include the addTask button next to the input in the <ion-item>, nesting this button within the div with the class item-note, but change that + into an ?️icon (don’t want to get confused now, do we?). Since this is a button, give the event handler the name deleteTask(). The button will also have another style class clear, which gives it a clear background. Since this button will be within the <ion-item> that is in the <ion-list>, it will be generated for all items in the list.
We need to add another button to the list to edit each task. Luckily more copying of code! Copy the whole button tag, but replace the icon ?️ to a ✏️ and the click handler to updateTask().
The code for each <ion-item> tag now looks like this
<ion-item *ngFor="let todo of taskList; let i = index">
    {{todo}}
    <div class="item-note" item-end>
        <button ion-button clear (click)="updateTask(i)">
            <ion-icon name="create"></ion-icon>
        </button>
        <button ion-button clear (click)="deleteTask(i)">
            <ion-icon name="trash"></ion-icon>
        </button>
    </div>
</ion-item>
The statement let i = index takes the index of the specific element in the list, so that we can pass it over to the method, so only the element to be deleted would be affected.
Pretty neat, huh??
I quite like it and it looks so much better than the wireframe I originally designed.
Implementing update and delete functionality
Now to add functionality to our ?️ and ✏️.
We need to create a new method within the home.ts called deleteTask(), as specified in home.html above. We pass the index of the array from within the ngFor loop, so we know the exact position of the task to be deleted. Hop on over to home.html, and pass the parameter i, which is the index of the element in the array, within the deleteTask method, like so deleteTask(i). As you have passed the index through to the home.ts, you simply need to use the splice() method on the array to remove the desired task, passing the index of the item to be removed as a parameter, like so this.taskList.splice(index, 1);.
The code for the deleteTask method is;
deleteTask(index){
    this.taskList.splice(index, 1);
}
Short and sweet! ? That’s all the coding we need to delete tasks!
Now to update, it will take a bit more typing (bear with me)!
My plan is to open up an alert asking the user to enter the update text of the task. To do that, we need to import the AlertController, a module found in ionic-angular. You import it using this line of code.
import { NavController, AlertController } from 'ionic-angular';
You then need to initialize it in the constructor, like so;
constructor(public navCtrl: NavController, public alertCtrl: AlertController)
You will then need to create an alert in the updateTask method to capture the new task name. To do so, you will need to pass the following into the create method of the AlertController;
- title — The title of the message.
- message — A longer message (if required).
- inputs — Input field with their name and placeholder (if any).
- buttons — Buttons along with their role or handler (if any).
The alert can be displayed afterward with the simple alert.present()command. I will be having two buttons, one is a cancel button, the second is to edit and the handler code will simply take the entered task and switch it with the previous value in the array. The code for the updateTask() method;
updateTask(index) {
    let alert = this.alertCtrl.create({
        title: 'Update Task?',
        message: 'Type in your new task to update.',
        inputs: [{ name: 'editTask', placeholder: 'Task' }],
        buttons: [{ text: 'Cancel', role: 'cancel' },
                  { text: 'Update', handler: data => {
                      this.taskList[index] = data.editTask; }
                  }
                 ]
    });
    alert.present();
}
It should all work perfectly now!
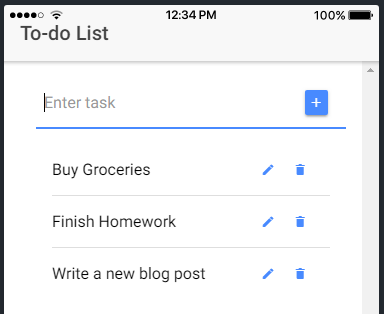
Want to see the final CRUD app?

And there you have it! ??
A fully operational CRUD to-do list, with minimal coding! That’s how easy Ionic can be.
I still believe we can make it a bit more user-friendly. Scroll down for more add-on functionality.
Bonus!! — Auto-focus
 Input without autofocus
Do you know what I find annoying? I need to click on the input each time I want to add a new task, even at the beginning. Why not auto-focus the input after clicking the button?
That’s exactly what we will do!
Auto-focus on Ionic is not as easy as it is in classic HTML/JavaScript interactions. You need to import an extra component called ViewChild. You can then easily connect the input from the view (home.html) to the controller (home.ts), and manipulate it as well. You import it, like so;
import { Component, ViewChild } from '@angular/core';
You can then connect the input tag to the component, outside the constructor, using this line of code,
@ViewChild('taskInput') input;
taskInput is the id of the input tag on the home.html page. Go ahead and add#taskInput to the input tag. The input tag can now directly be handled from within the TypeScript file.
Ionic comes with a few methods that can be invoked on certain app events, such as when a page loads onto the view, unloads and so on. These are called lifecycle events, and more about then can be found here. We can cause the app to auto-focus on the input from within the ionViewDidLoad(), by setting a timeout. The code would be;
ionViewDidLoad(){
    setTimeout(() => {
        this.input.setFocus();
    },350);
}
For the auto-focus to work after you add the line this.input.setFocus(); as the last statement in the addTask() handler. Lets head on out to see the changes we made!
 Input with autofocus
Now that’s what you call seamless…?
Step 3 - Integrating Firebase Authentication
Firebase has everything, from authorization to a database to file storage, one of the many reasons it’s a good choice to add to mobile apps. In this post, we will explore Firebase, create a project and make a handler component for Firebase in the app.
Setting up the Firebase console
But first step’s first, you need to create a project on the Firebase console. All you need is a Google account to access Firebase. So head on over here to get started. Add a new project and give it a name (I just called mine ‘Tasks’), agree to everything they ask and hit Create Project.
Now to set up the project to fit our needs.

All the areas of Firebase that we will be accessing will be found under Develop.
Namely;
- Authentication
- And Database.
Let’s have a look at Authentication.
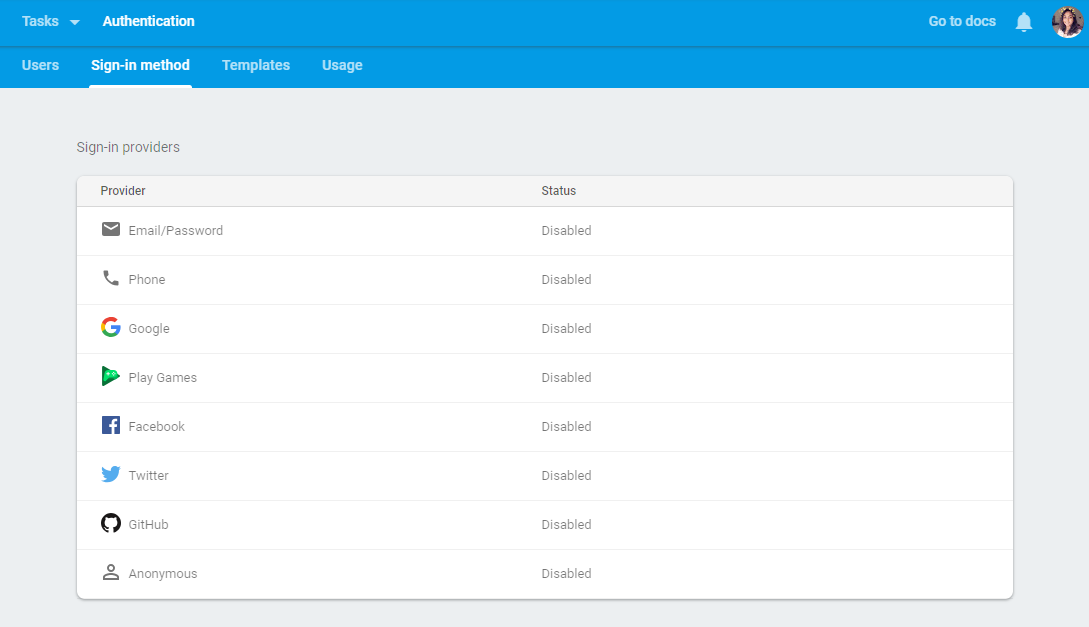
As you can see, all methods of authentication have been disabled. For now enable the very basic of types, Email/Password, so we can begin using it to register an account.
Under templates, the many email templates for verification of email address to forget password are can be found. If you wish, you can change a few of the details, like the project name to be displayed and the name of the sender.
Now, onward to the Database section. Firebase has two types of databases;
- Realtime Database — a NoSQL database, that looks like one big JSON Object.
- Cloud Firestore — A collection of documents, which are essentially JSON Objects.
Firestore is the better option as it has a better structure compared to the normal Realtime Database. In the Realtime Database, anybody can write data anywhere, if they have the reference to the database, greatly affecting all the data stored. And for that reason, I picked Firestore and created the database in test mode, so we can assess the database.
Firestore in test mode does allow anyone to read and write into it, so let’s make it that only users who have registered to the app have access to the database. To do so, switch allow read, write: if false; for allow read, write:if request.auth.uid!=null;. Only registered users have a unique uid, with which to distinguish them. Most often, the uid is used as the ID to the users' object. I will be implementing the same for this project.
Once the rules are changed, we need to create a collection, so all our user documents can be put into it. Since we cannot have a collection without at least one document, make a fake user. You can delete it from the dashboard later.
As we have set up the Firebase dashboard, let’s move on the integrating Firebase into the app.
Linking Firebase to the app
There is a special module AngularFire you can download using npm to incorporate Firebase into the Ionic app. To download, type npm install firebase angularfire2 --save.
To use this module, you need to import it into the app.module.ts page, like so
import { AngularFireModule } from 'angularfire2';
import { AngularFireAuthModule } from 'angularfire2/auth';
import { AngularFirestoreModule } from 'angularfire2/firestore';
We also need to add the necessary config data for the app to access and use the correct database. This can be found in the Project Overview section, ‘Add Firebase to your web app’. You are required to call the JSON object firebaseConfig and initialize it after the imports.
export const firebaseConfig = {
    apiKey: "#######################################",
    authDomain: "###########.firebaseapp.com",
    databaseURL: "https://###########.firebaseio.com",
    projectId: "###########",
    storageBucket: "###########.appspot.com",
    messagingSenderId: "############"
};
One last step! You need to include the imported modules above, into the import array of @NgModule that contains all the components used in the app, initializing the AngularFireModule as well with the config object above.
@NgModule({
    ...
    imports: [
        ...
        AngularFireModule.initializeApp(firebaseConfig),
        AngularFireAuthModule,
        AngularFirestoreModule
    ]
})
AngularFireAuthModule comes with many methods pertaining to authorization, like signup, sign in, forgot password, etc. All the methods we will be using will be found in the auth property of AngularFireAuth. The methods being used are;
signInWithEmailAndPassword()— LogincreateUserWithEmailAndPassword()— RegistersendPasswordResetEmail()— Reset PasswordsignOut()— Logout
Implementing all the authentication logic
We need to add a listener, to check if the user has logged in or not, and to display the correct response for either. We need to add the listener in the app.component.ts, as it’s the first page of the app that is loaded.
const authObserver = afAuth.authState.subscribe(user => {
    if (user) {
        this.rootPage = HomePage;
        authObserver.unsubscribe();
    } else {
        this.rootPage = LoginPage;
        authObserver.unsubscribe();
    }
});
Import the necessary other modules, like the HomePage, LoginPage, and AngularFireAuth.
Let’s start coding the Register page first.
First, to add a new page to the app. There are two ways to do this;
- Create a new folder within the pages folder inside src and create separate .scss, .ts and .html files.
- Or, be lazy (like me ?) and just type
ionic g page <name of page>in the console. All three files will be auto-generated!
Since we need to conduct many validations on the data entered in the login, register and forgot password pages, we need to utilize a form group to have a track of all the fields in the form and to add any and all validation to each field, such as checking if the email looks like an actual email, password lengths, the works. We’ll first design the view of the page. In register.html, the form tag looks like so;
<form [formGroup]="signupForm" (submit)="signupUser()" novalidate>
novalidate is used as the actual validation is being added in the .ts file to the form group signupForm.
Then copy the exact item tag that we have been using to add task names in the home page (but remove that button, id and [(ngModule)] this time!). Add a tag for the users’ full name, email, password and confirm password. The type of input tag for the latter two is password and email for the email tag. You will also need to add a formControlName to each input tag. Add in a button as well of the type submit, to submit the form. The body of your register page must now look like this;
<form [formGroup]="signupForm" (submit)="signupUser()" novalidate>
  <ion-item>
    <ion-input formControlName="firstName" type="text" placeholder="First Name"></ion-input>
  </ion-item>
  <ion-item>
    <ion-input formControlName="lastName" type="text" placeholder="Last Name"></ion-input>
  </ion-item>
  <ion-item>
    <ion-input formControlName="email" type="email" placeholder="Email"></ion-input>
  </ion-item>
  <ion-item>
    <ion-input formControlName="password" type="password" placeholder="Password"></ion-input>
  </ion-item>
  <ion-item>
    <ion-input formControlName="retype" type="password" placeholder="Confirm Password"></ion-input>
  </ion-item>
  <ion-grid>
    <ion-row>
      <ion-col style="text-align: center">
        <button ion-button center-all type="submit" [disabled]="!signupForm.valid">Create an Account</button>
      </ion-col>
    </ion-row>
  </ion-grid>
<form>
The Register button is disabled until the Lets now add validators to each input, in the register.ts page. We will need to import the following modules to the top of the page,
import { FormBuilder, FormGroup, Validators } from '@angular/forms';
initialize the form group outside of the constructor, so it can be accessed from anywhere in the component; public signupForm: FormGroup and initialize the form builder inside the parameters passed to the constructor, like so;
constructor(public navCtrl: NavController, public navParams: NavParams, public formBuilder: FormBuilder){}
Validators will be added to the form within the constructor like so;
this.signupForm = formBuilder.group({
  email: ['', Validators.compose([Validators.required])],
  password: ['', Validators.compose([Validators.minLength(6), Validators.required])],
  retype: ['', Validators.compose([Validators.minLength(6), Validators.required])],
  firstName: ['', Validators.compose([Validators.maxLength(30), Validators.pattern('[a-zA-Z ]*'), Validators.required])],
  lastName: ['', Validators.compose([Validators.maxLength(30), Validators.pattern('[a-zA-Z ]*'), Validators.required])]
});
Validators.compose creates a validation check for the value, according to the validations passed in its parameters. Most of these Validators are self-explanatory. The pattern Validator checks if the value fits a specific regex. But one question remains, how to validate if an email looks like an email? Apparently, we need to make one….
But don’t worry! It’s quite simple and the only logic to it is to see if it fits a certain regex.
We need to make a new folder ‘validators’ in the src folder and a file ‘email.ts’ within it. We will be declaring a static method to check the email. When validating the email, we send the formControl to the Validator, so in that case, we will need to import FormControl. Once the email is tested against the regex, we need to return a value to convey if the email is valid or not. The final code for the email validator is;
import { FormControl } from '@angular/forms';

export class EmailValidator {
  static isValid(control: FormControl) {
    const re = /^([a-zA-Z0-9_\-\.]+)@([a-zA-Z0-9_\-\.]+)\.([a-zA-Z]{2,5})$/.test(control.value);
    if (re) {
      return null;
    }
    return {
      "invalidEmail": true
    };
  }
}
Now import the EmailValidator into the register.ts and add it to the array within the Validators.compose method for the email input.
this.signupForm = formBuilder.group({
    email: ['', Validators.compose([Validators.required, EmailValidator.isValid])],
    ...
});
That’s it on the validation side.
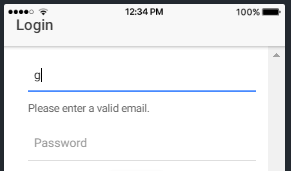
Another added feature you can do is show an error message right below the input, or even have the input tag turn red if the validation returns a false. The code for the error message;
<ion-item class="error-message" *ngIf="!signupForm.controls.email.valid  && signupForm.controls.email.dirty">
    <p>Please enter a valid email.</p>
</ion-item>
*ngIf allows you to display the error only if the validation is false. The errors should be put right below each tag, altering the message and input name (in the above example ‘email’) accordingly.
The code for a red input on validation error;
[class.invalid]="!signupForm.controls.email.valid && signupForm.controls.email.dirty"
Add this inside each input, again changing the inputs’ name accordingly.
Now to handle the button click!
Create the method signupUser(). We will be using the AngularFireAuth modules’ method createUserWithEmailAndPassword(). This returns a promise, that we need to capture and according to the result, handle either the sign in of the user or display an error message. To make it more user-friendly, also show a loading carousel to the user as signup takes place.
As the button is only enabled when the whole form is valid, we do not need to recheck on that fact. We will first check if the password and the retyped password are the same, and if they are, create the new user and add their information to the Firestore. If the two are different, display an error message in the alert, stating that they are different.
signupUser() {
  if (this.signupForm.value.password == this.signupForm.value.retype) {
    this.afAuth.auth.createUserWithEmailAndPassword(this.signupForm.value.email, this.signupForm.value.password)
      .then(() => {
        let userId = this.afAuth.auth.currentUser.uid;
        let userDoc = this.firestore.doc<any>('users/' + userId);
        userDoc.set({
          firstName: this.signupForm.value.firstName,
          lastName: this.signupForm.value.lastName,
          email: this.signupForm.value.email
        });
        this.navCtrl.setRoot(HomePage);
      }, (error) => {
        this.loading.dismiss().then(() => {
          let alert = this.alertCtrl.create({
            message: error.message,
            buttons: [{ text: "Ok", role: 'cancel' }]
          });
          alert.present();
        });
      });

    this.loading = this.loadingCtrl.create({
      dismissOnPageChange: true,
      content: "Signing up.."
    });
    this.loading.present();
  } else {
    let alert = this.alertCtrl.create({
      message: "The passwords do not match.",
      buttons: [{ text: "Ok", role: 'cancel' }]
    });
    alert.present();
  }
}
You will need to additionally import AlertController, Loading, LoadingController, AngularFirestore and HomePage.
loading needs to be declared outside the constructor, so that it can be accessed by all the methods. AlertController, LoadingController and AngularFirestore needs to be initialized in the constructor parameters.
And (finally) the register page is done!

Whew! ?? This is the longest post I’ve ever written. And there’s still more to go…..
But don’t worry! The rest is all just copy + paste.
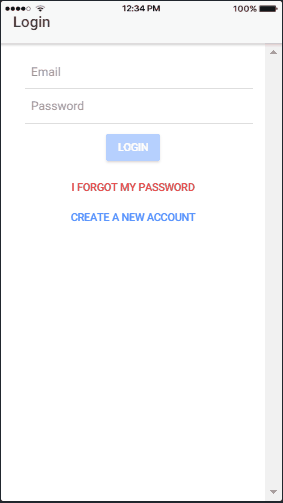
The next page to tackle is the Login page. Copy the entire Register page form to login.html, coz its time to make some changes for it to fit Login. Remove the first name, last name and retyped passwords’ input tags and error messages. On the form tag, change all instances of signupForm to loginForm.
Change the submit buttons’ text to ‘Login’ and the onSubmit method to loginUser(). Add two buttons as well, outside the form, to navigate to the register and reset password pages. The final body of login.html;
<form [formGroup]="loginForm" (submit)="loginUser()" novalidate>
  <ion-item>
    <ion-input formControlName="email" type="email" placeholder="Email" [class.invalid]="!loginForm.controls.email.valid && loginForm.controls.email.dirty"></ion-input>
  </ion-item>
  <ion-item class="error-message" *ngIf="!loginForm.controls.email.valid  && loginForm.controls.email.dirty">
    <p>Please enter a valid email.</p>
  </ion-item>
  <ion-item>
    <ion-input formControlName="password" type="password" placeholder="Password" [class.invalid]="!loginForm.controls.password.valid && loginForm.controls.password.dirty"></ion-input>
  </ion-item>
  <ion-item class="error-message" *ngIf="!loginForm.controls.password.valid  && loginForm.controls.password.dirty">
    <p>Your password must be more than 6 characters long</p>
  </ion-item>
  <ion-grid>
    <ion-row>
      <ion-col style="text-align: center">
        <button ion-button center-all type="submit" [disabled]="!loginForm.valid">Login</button>
      </ion-col>
    </ion-row>
  </ion-grid>
</form>
<button ion-button block clear color="danger" (click)="resetPwd()">
  I forgot my password
</button>
<button ion-button block clear (click)="createAccount()">
  Create a new account
</button>
There you have it! The UI is done.
The loginForm has the same Validators for the email and password fields. So, proceed to copy the same formBuilder, omitting the first name, last name and retyped password fields.
this.loginForm = formBuilder.group({
    email: ['', Validators.compose([Validators.required, EmailValidator.isValid])],
    password: ['', Validators.compose([Validators.minLength(6), Validators.required])]
});
The loginUser() method has similar code to that of the signupUser method. So copy that on to the login.ts as well. The change to be made, is to remove the password comparison and accessing the database.
loginUser() {
 this.afAuth.auth.signInWithEmailAndPassword(this.loginForm.value.email, this.loginForm.value.password).then(() => {
   this.navCtrl.setRoot(HomePage);
 }, (error) => {
   this.loading.dismiss().then(() => {
     let alert = this.alertCtrl.create({
       message: error.message,
       buttons: [{ text: "Ok", role: 'cancel' }]
     });
     alert.present();
   });
 });
 this.loading = this.loadingCtrl.create({
   dismissOnPageChange: true,
   content: "Logging in.."
 });
 this.loading.present();
}
You will need to import the exact extra modules to the login.ts as well, with the exception of the AngularFirestore, as you will not be accessing the database now.
Now to handle the buttons to the reset password and the registration page;
resetPwd() {
    this.navCtrl.push(ResetPasswordPage);
}

createAccount() {
    this.navCtrl.push(RegisterPage);
}
The pages work like a stack; you push the next page to the top of the stack and pop from the top as well.
Bear with me, we have one more page to go. Yay! More copy+paste!
For the reset password, we only require the email field, but still, need a form to validate the email entered. Much like for the Login page, copy the entire login.html form, remove all fields except the email input tag and error message, change all instances of loginForm to resetPwdForm. You are left with;
<form [formGroup]="resetPwdForm" (submit)="resetUserPwd()" novalidate>
  <ion-item>
    <ion-input formControlName="email" type="email" placeholder="Email" [class.invalid]="!resetPwdForm.controls.email.valid && resetPwdForm.controls.email.dirty"></ion-input>
  </ion-item>
  <ion-item class="error-message" *ngIf="!resetPwdForm.controls.email.valid  && resetPwdForm.controls.email.dirty">
    <p>Please enter a valid email.</p>
  </ion-item>
  <ion-grid>
    <ion-row>
      <ion-col style="text-align: center">
        <button ion-button center-all type="submit" color="danger" [disabled]="!resetPwdForm.valid">Reset Password</button>
      </ion-col>
    </ion-row>
  </ion-grid>
</form>
The same is to be done for the reset-password.ts file. The form builder looks like this;
this.resetPwdForm = formBuilder.group({
    email: ['', Validators.compose([Validators.required, EmailValidator.isValid])]
});
while the resetUserPwd() method looks like so;
resetUserPwd() {
 this.afAuth.auth.sendPasswordResetEmail(this.resetPwdForm.value.email).then((user) => {
   let alert = this.alertCtrl.create({
     message: "We just sent a link to reset your password to your email.",
     buttons: [{ text: "Ok", role: 'cancel',
       handler: () => {
         this.navCtrl.pop();
       }}]
   });
   alert.present();
 }, (error) => {
   let errorAlert = this.alertCtrl.create({
     message: error.message,
     buttons: [{ text: "Ok", role: 'cancel' }]
   });
   errorAlert.present();
 });
}
The handler code above pops the reset password page to show the login page once the request for the link is sent.
One last part (I’m so sorry! I’m tired too)…??
The logout button, the easiest and smallest code!
You need to put a button at the end of the header on the home page as shown below;
<ion-header>
    <ion-navbar>
        <ion-title>To-do List</ion-title>
        <ion-buttons end>
            <button ion-button (click)="logout()">Logout</button>
        </ion-buttons>
    </ion-navbar>
</ion-header>
The code to handle the logout in home.ts;
logout() {
    return this.afAuth.auth.signOut().then(authData => {
        this.app.getRootNav().setRoot(LoginPage);
    });
}
The code after the ‘then’ takes the user back to the login page.
And that’s it! Finally! ??
To allow the app to use these pages, you need to include them in the app.module.ts page, in both the declarations and entryComponents arrays, like so;
@NgModule({
    ...
    declarations: [
        ...
        LoginPage,
        RegisterPage,
        ResetPasswordPage
    ],
    ...
    entryComponents: [
        ...
        LoginPage,
        RegisterPage,
        ResetPasswordPage
    ]
})
Let’s have a look at all we have achieved so far.
 App with Authentication
And there you have it! ?? It’s not so easy on the eyes, but it is definitely functional.
As you can see, when a particular fields’ validation returns false, the input turns red, and the error message shows as well. The buttons stay disabled until all fields of the form are valid!
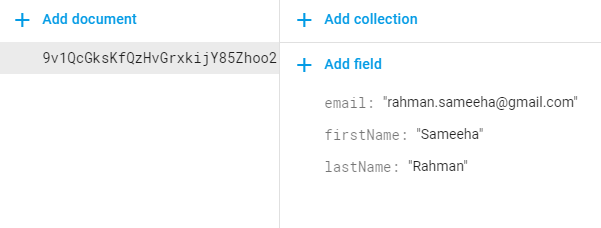
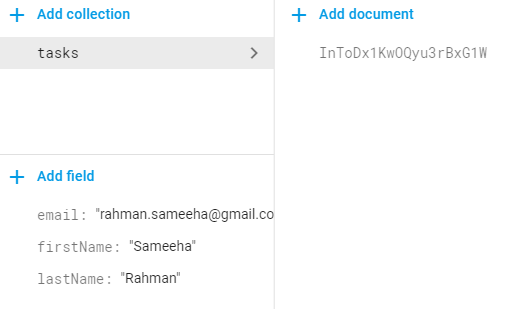
Below, the user object has also been stored in Firestore, with the current users’ uid as the key to the document. It all works!
 Firestore Document
Now that authentication and by extension user objects has been implemented, we now go on to syncing up the CRUD operations with Firebase Cloud Firestore.
Step 4 - Syncing CRUD actions with Cloud Firestore
The coding will be quite simple, as we have already integrated AngularFire into our app. The major changes will be made only to the back-end logic in the home.ts file, and one simple addition to the home.html to handle lists we get from Firestore.
The C in CRUD to Firestore
We’ll first start with adding functionality to the addTask() method. But first we need to import AngularFirestore to the home.ts and initialize it in the constructor, like so;
constructor(...public firestore: AngularFirestore) {}
As mentioned in the previous post, Firestore is not like its predecessor, it is not one big JSON structure. Instead, it works with something called documents. Each document is one uniquely JSON object that holds only one type of data, for example, the user object will only hold user data, such as their name, date of birth and other personal information, but not any other data.
Many documents of the same type make up a collection. And sometimes an object can have a collection of different objects inside it, and that’s what we are doing today; making a collection of task objects for each user.
If you can remember, in the previous post, we took the user’s uid, a unique ID that Firebase assigns all its users that sign up as the ID for the users’ JSON object. We will be requiring it heavily today as well, so the first thing to do is capture the uid from AngularFireAuth. As many methods will be using this value, it will be best to declare this variable outside the constructor, then initializing it inside ionViewDidLoad.
We put it in ionViewdidLoad(), because sometimes the user details from AngularFireAuth is not ready by the constructor. And since we will be accessing only that collection within the users' object, go ahead and grab that as well, similar to the register page. All this is added within the call to get the userId.
this.afAuth.authState.subscribe(user => {
    if (user) {
        this.userId = user.uid;
        this.fireStoreTaskList = this.firestore.doc<any>('users/' + this.userId).collection('tasks').valueChanges();
        this.fireStoreList = this.firestore.doc<any>('users/' + this.userId).collection('tasks');
    }
});
The reason why we have two lists is the fireStoreTaskList holds the list that we view, while the fireStoreList is the reference to the collection where we directly add the new tasks. The method valueChanges() returns an Observable List, which we can display in the view.
We can now use this reference anywhere in the page. Using it to add a task in the addTask method is very simple. There is a need to have a specific ID for each task, as we will require it when attempting to update the taskName, so we need to generate the ID and use the set() method of the firestore collection, to create a new task object, inside the if condition, replacing the previous code that pushes the task name into taskList.
let id = this.firestore.createId();
this.fireStoreList.doc(id).set({
    id: id,
    taskName: task
});
The R in CRUD in the App
Now to set up viewing the firestore list. The main part, getting the collection was done above. So the changes now need to be made to the home.html to view the fireStoreTaskList.
The first change is to be in the *ngFor, the name of the list. Since the list will be a response back by firebase, its asynchronous. The normal *ngFor, will cause errors. We need to add an async pipe as well, like so;
<ion-item *ngFor="let todo of fireStoreTaskList | async">
We no longer need to keep track of the index, as we will be using the task ID to either delete or update its value. And the second change is the value that we will view since todo will now be an object, we need to display todo.taskName, as that’s what we have named the task variable in the task object.
{{todo.taskName}}
And that’s it! Lets now have a look at both the app and Firestore, to see if it gets saved.
 Create and Read tasks
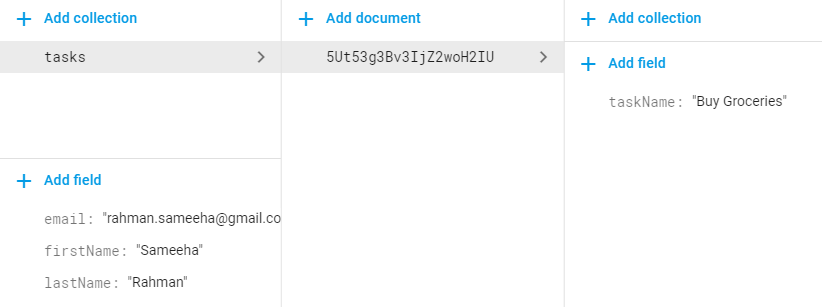 Newly created task
It’s got saved!
There’s nothing much to it for the C and R in CRUD. Now to update then delete.
The U in CRUD to Firestore
Luckily, AngularFirestore has its own update function, which, given the documents’ ID as well as the values to be updated, can be done in one single line. But first, a small change in the home.html file, to allow this to happen. As said earlier, you don’t need the index of the task in the list to update or delete, but instead the document ID, which we have simply stored in the variable id of a task object.
Our first order of business is to send the tasks’ id to the method from the button, like so;
<button ion-button clear (click)="updateTask(todo.id)">
Move over to home.ts and replace the code in the handler of the alert to;
this.fireStoreList.doc(index).update({ taskName: data.editTask });
We first create a reference to the specific object that the user wishes to update using the doc() method, then sending the relevant data we wish to update into the update() method.
Now to see this functionality in action!
 Update task name
 Updated task name
This one works too!
Now onto the last change, delete.
The D in CRUD to Firestore
Deleting is just as easy (or easier, really) than updating.
You will again, need to pass the tasks’ ID onto the delete button;
<button ion-button clear (click)=”deleteTask(todo.id)”>
Again like for update, AngularFirestore has a function delete(), that is run on the reference of the document to be deleted, like so;
this.fireStoreList.doc(index).delete();
And now to watch the last functionality….
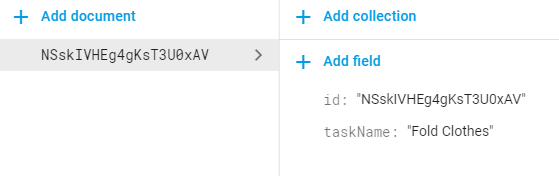
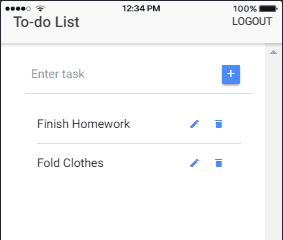 Delete task
 Task deleted in Firestore
This one is functional too!
As you can see, the ‘Fold Clothes’ task with an ID of ‘NSskIVHEg4gKsT3U0xAV’ is no longer there, as it has been successfully deleted
There you have it! Firebase integrated into all the CRUD operations.
Step 5 - Bonus content styling
This is a short checklist of basic things that weren’t covered in the previous posts;
- Custom styles ?
- Images ?️
- Custom fonts ?
Prettify the UI
Going through my app, I was able to see a few things I wanted to change.
Remember those little messages below the input fields in the login, register and reset password pages?
 Error message with underline
I just realized that, since they are essentially <ion-item>, they have a line at the bottom. Not that great.
Thankfully, it’s a simple fix! There’s a global property called no-lines, that you need to add to the <ion-item> like so;
<ion-item ... no-lines>
So go ahead and add this to all the error message <ion-item> tags.
 Error message without underline
Your error message now looks like this.
Let’s move on to colors!
If you snooped around the project structure, you would have seen a folder called theme. The variables.scss file within has a color variable with 5 set colors. Keep the colors light and dark as they are, as well as danger, as we are using it for the reset password button and page. I will be only changing the primary and secondary color. I normally use coolors.co to find complementary colors for all the projects I’ve ever done.
Disclaimer: Do not add more than those 5 colors to the object, as this causes multiple copies of components to be made for each of these colors. It will eventually add unwanted bulk to the project, as not all components with all colors are used. If you need to use more colors, add a new variable to hold only that color literal.
The colors I will be using are;
$colors: (
    primary:    #32B596,
    secondary:  #fff350,
    danger:     #f53d3d,
    light:      #f4f4f4,
    dark:       #222
);
The first place to splash some color is the top navbar.
 Boring…
Looked so bland right??
 Ooh la la!
Not any more.??
All you need to do is add the color primary to the ion-navbar tag, like so;
<ion-navbar color='primary'>
You can add the color property similarly to other components. Such as, give the delete icon the color stored in danger, or the add and logout button the color in secondary;
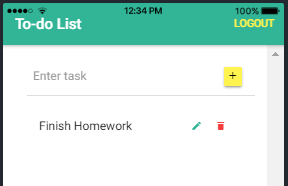 Adding colors everywhere!
I still hate the way that the logout button looks… To make it a proper button, simply add the property solid to the tag, like so;
<button ion-button solid color='secondary' (click)="logout()">Logout</button>
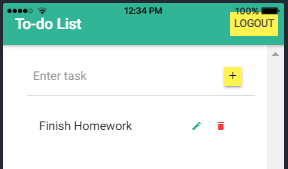 Buttons must look like buttons!
Another cool UI design I saw previously, had icons before each input tag on the login, register and reset password pages, so I decided to give that a try as well! It’s a pretty simple code, that you need to add within the <ion-item> tag but before the <ion-input> tag, like so;
<ion-item>
    <div class="item-note" item-start>
        <ion-icon name="at" color='primary'></ion-icon>
    </div>
    <ion-input formControlName="email" ...></ion-input>
</ion-item>
There is no icon that screams password, so I decided to use ? just like in the UI design I had a look at; and ? for the users’ names
![]() Input icons of the register page
Input icons of the register page
Adding images
A picture says a thousand words… But we have no need for such pictures…. ?No matter!
Adding pictures are not necessarily tough, but the path may get a bit confusing sometimes. You would assume that you need to add the actual path from the page to the image folder, which is ../../assets/imgs/imagename.png. The path you really need to add is the path from the app.html to the image in the image folder, and that path looks like assets/imgs/imagename.png.
Any and all images you wish to use needs to be added to the folder src/assets/imgs. You can then use the image as if this was HTML;
<img src="assets/imgs/imagename.png"/>
I want to add an image, kinda like a logo, to the login, register and reset password pages.
So that the image doesn’t exceed the page, we will also need to code some styling, and as this image will be in more than one page, we are required to write the styling in the app.scss page like so;
.imageTop {
    height: 200px;
    padding: 20px;
    margin: auto;
    display: block;
}
All you need to do now is simply add the class to the img tag, class='imageTop'.
Another image (or two) that you might want to change, is the splash page and app icon. You will first need to add either (or both) Android and iOS platforms, to use this feature. The command to add a platform is
ionic cordova platform add android
Or ios, if that’s your cup of ☕.
Ionic can easily generate different sized splash pages and icons according to different phones when you run the command ionic cordova resources in the terminal. You will need internet for this, as ionic uploads both images to be analyzed to generate the other splash pages and icons.
Before that you need to add both the images, named splash.png and icon.png to the resources folder. The sizes of both images should be 27322732 and 10241024 respectively, for the many splash pages and app icons to be generated.
That’s all for images!
Typography Rox(cks)!
First, find a font that speaks to you. The latest trends stick to sans serif fonts that are pretty easy to read. As pretty as many handwritten flowy fonts are, they are just a fail waiting to happen, like this one….
 I love ?too!
Or this one,
 Hope has never looked so bleak!
???
Jokes aside, I picked the font ‘Alegreya Sans’ to use for this app. It can be found, here.
Unpack all the fonts to the folder assets/fonts.
All you need to do now is add the code below to the variables.scss found in the src/theme folder.
@font-face {
    font-family: 'Alegreya Sans Regular';
    src: url("../assets/fonts/AlegreyaSans-Regular.otf");
}
$font-family-base: 'Alegreya Sans Regular';
$font-family-ios-base: 'Alegreya Sans Regular';
$font-family-md-base: 'Alegreya Sans Regular';
$font-family-wp-base: 'Alegreya Sans Regular';
The @font-face imports your font and gives it a name, so it can be used throughout the application.
The variable $font-family-base assigns the default font.
The app now looks like this;
 No one needs to see that password!
As you can only view the splash page and icon on a real device, I have brought in my trusty phone into the mix (Sadly it ain’t an Apple to fit with the rest of the gifs/pics).
And that’s it for this series!!!!!??
Find the repo for this post, here.
I hope you all had fun and learned a lot on this journey with me!
Thank you for the read, and see you soon!??