
By Tyler Hawkins
Webpack is a powerful bundler and dependency manager used by many enterprise-level companies as tooling for their front-end code.
Typically, webpack is configured when a project is first set up, and small tweaks are then made to the config files as needed from time to time. Because of this, many developers don’t have a lot of experience working with webpack.
In this hands-on tutorial, we’ll go through the basics of setting up your very own production-ready webpack config using webpack 4. We’ll discuss output management, asset management, dev and prod configs, Babel, minification, cache busting, and more.
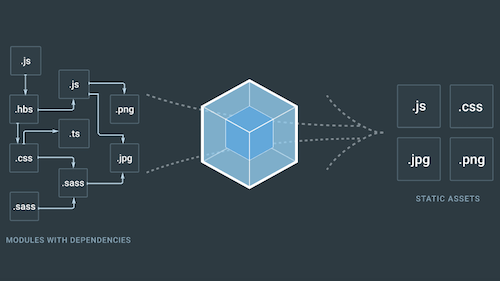 Webpack bundles your code
Let's get started!
Demo App
For the purposes of this demo, we'll be setting up a webpack config from scratch using webpack 4. Our app will just use vanilla JavaScript so that we don't get bogged down with any framework-specific details. The actual app code will be pretty small so that we can focus more on webpack.
If you'd like to follow along, all of the code in this article can be found in GitHub. The starting point is found here, and the finished result is found here.
Starting Point
To begin, we'll start out with just a few files in our project directory. The directory structure looks like this:
webpack-demo
 |_ src
    |_ index.js
 |_ .gitignore
 |_ index.html
 |_ package.json
 |_ README.md
 |_ yarn.lock
The index.html file is nice and simple, just a page header and a script tag:
<!doctype html>
<html>
  <head>
    <title>Webpack Training 1</title>
  </head>
  <body>
    <h1>Webpack Training 1</h1>
    <script src="./src/index.js"></script>
  </body>
</html>
The script tag references our ./src/index.js file, which has just a few lines of JavaScript in it that outputs the text, "Hello from webpack!":
const p = document.createElement('p')
p.textContent = 'Hello from webpack!'
document.body.append(p)
If you drag the index.html file into your browser, you should be able to view our simple web page:
 Demo app output 1 - hello from webpack
Install Dependencies
I've included webpack and webpack-cli as devDependencies in the package.json file.
To install those, run:
yarn install
Webpack Test Run
Webpack 4 is set up as a "zero config" tool, meaning that you can run it out of the box without doing any initial configuration. Now, for any real project you will need to do some configuration, but it's nice that you can at least do a quick sanity check to ensure that webpack is able to run without having to go through a bunch of initial configuration steps.
So, let's check it out. Run:
yarn webpack
You should now see a dist directory created in your project directory. And inside it you should see a main.js file, which is our minified code.
Great! Webpack appears to be working.
Reference the Output Code
OK, now that we have JavaScript code in our dist directory, let's have our index.html file reference that. Instead of the script tag looking like this:
<script src="./src/index.js"></script>
Let's change it to this:
<script src="./dist/main.js"></script>
Now, refresh the page in your browser, and you should still see the exact same output, only this time the "Hello from webpack!" text is being generated by the ./dist/main.js file now.
 Demo app output 2 - no changes
Create a Webpack Config File
Now that we have webpack installed and have gone through a quick sanity check exercise, let's create an actual webpack config file. Create a file called webpack.config.js and place the following code inside it:
const path = require('path')

module.exports = {
  entry: './src/index.js',
  output: {
    filename: 'main.js',
    path: path.resolve(__dirname, 'dist')
  }
}
The entry property tells webpack where our source code is located. It is the "entry point" for our app.
The output property tells webpack what to call the output file and which directory to place it in.
Simple enough, right?
Now let's create an npm script in our package.json file:
"scripts": {
  "build": "webpack --config=webpack.config.js"
}
Now we can run our build process with the command yarn build. Go ahead and run that command to verify you have things set up properly. You could even delete your dist directory prior to running the yarn build command to verify that the directory is being generated.
Change the Output File Name
Now, just for fun, let's change the output file name. To do this, we'll open up our webpack.config.js file and change the output property from this:
output: {
  filename: 'main.js',
  path: path.resolve(__dirname, 'dist')
}
To this:
output: {
  filename: 'tacos.js',
  path: path.resolve(__dirname, 'dist')
}
Now run yarn build again to generate the output. You should see a tacos.js file in your dist directory now.
But wait! We also see the old main.js file in our dist directory too! Wouldn't it be nice if webpack could delete the old unneeded output each time we do a new build?
There's got to be a plugin for that.
Webpack Plugins
 _Photo by [Unsplash](https://unsplash.com/@feelfarbig?utm_source=ghost&utm_medium=referral&utm_campaign=api-credit">Feelfarbig Magazine / <a href="https://unsplash.com/?utm_source=ghost&utm_medium=referral&utmcampaign=api-credit)
Webpack has a rich ecosystem of modules called "plugins", which are libraries that can modify and enhance the webpack build process. We'll explore a handful of helpful plugins as we continue to improve our webpack config throughout the rest of this article.
CleanWebpackPlugin
 _Photo by [Unsplash](https://unsplash.com/@honest?utm_source=ghost&utm_medium=referral&utm_campaign=api-credit">The Honest Company / <a href="https://unsplash.com/?utm_source=ghost&utm_medium=referral&utmcampaign=api-credit)
OK, back to our problem. It'd be nice if we could clean up the dist directory before each new build. There's a plugin for that!
We can use the CleanWebpackPlugin to help us here. First, we need to install it in our project:
yarn add --dev clean-webpack-plugin
To use it, we'll simply require the plugin in our webpack.config.js file and then include it in the plugins array in our config setup:
const path = require('path')
const { CleanWebpackPlugin } = require('clean-webpack-plugin')

module.exports = {
  entry: './src/index.js',
  output: {
    filename: 'main.js',
    path: path.resolve(__dirname, 'dist')
  },
  plugins: [
    new CleanWebpackPlugin()
  ]
}
Now run yarn build again, and you should see only a single output file in your dist directory. Problem solved!
HTMLWebpackPlugin
 _Photo by [Unsplash](https://unsplash.com/@rxspawn?utm_source=ghost&utm_medium=referral&utm_campaign=api-credit">Florian Olivo / <a href="https://unsplash.com/?utm_source=ghost&utm_medium=referral&utmcampaign=api-credit)
One other thing that's a little annoying with our setup is that any time we change the output file name in our webpack.config.js file, we also have to change that file name we reference in our script tag in our index.html file. Wouldn't it be nice if webpack could manage that for us?
There's a plugin for that! We can use the HTMLWebpackPlugin to help us manage our HTML file. Let's install it in our project now:
yarn add --dev html-webpack-plugin
Now let's move our index.html file inside our src directory so that it's a sibling to the index.js file.
webpack-demo
 |_ src
    |_ index.html
    |_ index.js
 |_ .gitignore
 |_ package.json
 |_ README.md
 |_ yarn.lock
We can also delete the script tag in our index.html file since we'll have webpack handle inserting the appropriate script tag for us. Delete that line so that your index.html file looks like this:
<!doctype html>
<html>
  <head>
    <title>Webpack Training 1</title>
  </head>
  <body>
    <h1>Webpack Training 1</h1>
  </body>
</html>
Now let's require this plugin in our webpack.config.js file and then include it in the plugins array in our config setup, just like we did for the first plugin:
const path = require('path')
const { CleanWebpackPlugin } = require('clean-webpack-plugin')
const HtmlWebpackPlugin = require('html-webpack-plugin')

module.exports = {
  entry: './src/index.js',
  output: {
    filename: 'main.js',
    path: path.resolve(__dirname, 'dist')
  },
  plugins: [
    new CleanWebpackPlugin(),
    new HtmlWebpackPlugin({
      filename: 'index.html',
      inject: true,
      template: path.resolve(__dirname, 'src', 'index.html'),
    }),
  ]
}
In those options for the HtmlWebpackPlugin, we specify the filename for what we'd like the output file to be called.
We specify for inject that we would like our JavaScript file to be injected into the body tag by setting the value to true.
And finally, for the template we supply the location of our index.html file in the src directory.
Sanity Check
 _Photo by [Unsplash](https://unsplash.com/@glenncarstenspeters?utm_source=ghost&utm_medium=referral&utm_campaign=api-credit">Glenn Carstens-Peters / <a href="https://unsplash.com/?utm_source=ghost&utm_medium=referral&utmcampaign=api-credit)
OK, let's make sure everything is still working properly. Run yarn build, and verify that you see two files in your dist directory: index.html and main.js.
If you look closely in your index.html file, you'll see the main.js file referenced.
Now, open the ./dist/index.html file in your browser to verify that your page loads correctly. If you followed these steps correctly, your page should still be working:
 Demo app output 3 - no changes
Create a Development Server
 _Photo by [Unsplash](https://unsplash.com/@tvick?utm_source=ghost&utm_medium=referral&utm_campaign=api-credit">Taylor Vick / <a href="https://unsplash.com/?utm_source=ghost&utm_medium=referral&utmcampaign=api-credit)
We've made some good improvements so far using the CleanWebpackPlugin and the HtmlWebpackPlugin. As we've made these changes, we've had to manually run the yarn build command each time to see new changes in our app. We've also just been viewing the file in our browser rather than viewing the content served from a server running locally. Let's improve our process by creating a development server.
To do this, we'll use webpack-dev-server. First, we'll need to install it:
yarn add --dev webpack-dev-server
Now, let's split up our single webpack.config.js file into two separate config files, one for production and one for development. We'll call the file for production webpack.config.prod.js and the file for development webpack.config.dev.js.
Development Webpack Config
Here's our development config file:
const path = require('path')
const { CleanWebpackPlugin } = require('clean-webpack-plugin')
const HtmlWebpackPlugin = require('html-webpack-plugin')

module.exports = {
  mode: 'development',
  devtool: 'inline-source-map',
  devServer: {
    contentBase: './dist',
  },
  entry: './src/index.js',
  output: {
    filename: 'main.js',
    path: path.resolve(__dirname, 'dist')
  },
  plugins: [
    new CleanWebpackPlugin(),
    new HtmlWebpackPlugin({
      filename: 'index.html',
      inject: true,
      template: path.resolve(__dirname, 'src', 'index.html'),
    }),
  ]
}
Note that we've specified the mode as development now, and we've specified that we would like an inline-source-map for our JavaScript files, meaning that a source map is included at the end of each JavaScript file. For our dev server, we've specified that our content will be found in the dist directory.
All the rest of the development config has stayed the same.
Production Webpack Config
Now, here's our production config file:
const path = require('path')
const { CleanWebpackPlugin } = require('clean-webpack-plugin')
const HtmlWebpackPlugin = require('html-webpack-plugin')

module.exports = {
  mode: 'production',
  devtool: 'source-map',
  entry: './src/index.js',
  output: {
    filename: 'main.js',
    path: path.resolve(__dirname, 'dist')
  },
  plugins: [
    new CleanWebpackPlugin(),
    new HtmlWebpackPlugin({
      filename: 'index.html',
      inject: true,
      template: path.resolve(__dirname, 'src', 'index.html'),
    }),
  ]
}
This file also looks very similar to our original config file. Here we've specified that the mode is production and that we would like the source-map option for source maps, which provides separate source map files for minified code.
Production and Development NPM Scripts
Finally, let's add a few more npm scripts in our package.json file so that we can work with our development and production webpack configs:
"scripts": {
  "build": "webpack --config=webpack.config.prod.js",
  "build-dev": "webpack --config=webpack.config.dev.js",
  "start": "webpack-dev-server --config=webpack.config.dev.js --open"
}
Now, let's try out each of these scripts.
Run yarn build to see the production build output. You should see that the main.js file in your dist directory is minified and that it has an accompanying main.js.map source map file.
Now run yarn build-dev to see the development build output. You should see the main.js file in your dist directory, but now note that it is not minified.
Lastly, run yarn start to start up the development server. This will open up the app on http://localhost:8080/. No more having to view the files directly by just pulling them into your browser! We now have a real live development server!
The output you see should still look the same as it always has:
 Demo app output 4 - no changes
Making Changes During Development
Now that we have a working dev server, let's experiment with making some simple changes to our ./src/index.js file. Instead of outputting "Hello from webpack!", let's change it to say "Hello from dev server!".
Save the file, and then see the page on your dev server automatically reload and update for you! That'll be a nice boost to your developer productivity.
 Demo app output 5 - hello from dev server
Don't Repeat Yourself (DRY)
 _Photo by [Unsplash](https://unsplash.com/@tobey_j?utm_source=ghost&utm_medium=referral&utm_campaign=api-credit">Tobias Jelskov / <a href="https://unsplash.com/?utm_source=ghost&utm_medium=referral&utmcampaign=api-credit)
Now that we have two separate webpack config files, one for development and one for production, you may have noticed that we have a lot of duplicated code between the two files.
Every developer out there has had the DRY principle drilled into their heads since day one: Don't repeat yourself. If you find yourself writing the same code in multiple places, it may be a good idea to turn that into shared code that can be written in one place and then used in multiple places. That way when you need to make changes, you only need to implement those changes in one place.
So, how can we clean up the duplication in our webpack config files? There's a plugin for that!
WebpackMerge
 Merge
Merge
We can use the webpack-merge plugin to manage shared code that multiple config files rely on. To do this, we'll first install the package:
yarn add --dev webpack-merge
Now we'll create a third webpack config file called webpack.config.common.js. This is where we'll keep our shared code. Right now, our development and production config files share the same entry point, output, and plugins. All that differs between the two files are the mode, source map, and dev server.
So, the contents of our webpack.config.common.js file will be:
const path = require('path')
const { CleanWebpackPlugin } = require('clean-webpack-plugin')
const HtmlWebpackPlugin = require('html-webpack-plugin')

module.exports = {
  entry: './src/index.js',
  output: {
    filename: 'main.js',
    path: path.resolve(__dirname, 'dist')
  },
  plugins: [
    new CleanWebpackPlugin(),
    new HtmlWebpackPlugin({
      filename: 'index.html',
      inject: true,
      template: path.resolve(__dirname, 'src', 'index.html'),
    }),
  ]
}
And now, we can merge this shared config object into our development config like this:
const merge = require('webpack-merge')
const commonConfig = require('./webpack.config.common')

module.exports = merge(commonConfig, {
  mode: 'development',
  devtool: 'inline-source-map',
  devServer: {
    contentBase: './dist',
  },
})
And we can merge the shared config object into our production config like this:
const merge = require('webpack-merge')
const commonConfig = require('./webpack.config.common')

module.exports = merge(commonConfig, {
  mode: 'production',
  devtool: 'source-map',
})
Look how much shorter and cleaner those two files look! Beautiful!
Styling Our App
 _Photo by [Unsplash](https://unsplash.com/@madebyvadim?utm_source=ghost&utm_medium=referral&utm_campaign=api-credit">Vadim Sherbakov / <a href="https://unsplash.com/?utm_source=ghost&utm_medium=referral&utmcampaign=api-credit)
Things are looking pretty good with our webpack configs so far. We have a working dev server and we've split out our code into development, production, and shared configuration files.
Let's start working on our actual app code now. The plain black and white page is a little boring to look at. Let's style it up!
In our src directory, let's create an index.css file and place the following lines of CSS inside it:
body {
  background: deeppink;
  color: white;
}
Then, in our ./src/index.js file, let's import that CSS file:
import './index.css'
Now, run yarn start to get our development server running again.
Oh no! We get an error!
ERROR in ./src/index.css 1:5
Module parse failed: Unexpected token (1:5)
You may need an appropriate loader to handle this file type, currently no loaders are configured to process this file. See https://webpack.js.org/concepts#loaders
> body {
|   background: deeppink;
|   color: white;
 @ ./src/index.js 1:0-20
What are these "loaders" it speaks of?
Webpack Loaders
 _Photo by [Unsplash](https://unsplash.com/@kevin_butz?utm_source=ghost&utm_medium=referral&utm_campaign=api-credit">Kevin Butz / <a href="https://unsplash.com/?utm_source=ghost&utm_medium=referral&utmcampaign=api-credit)
Earlier, we discussed webpack plugins, which let you extend the webpack build process. There is also an ecosystem of webpack "loaders", which help webpack know how to understand and load different file types. Out of the box, webpack understands how to handle our JavaScript files, but it doesn't know what to do with CSS files yet. Let's fix that.
StyleLoader and CSSLoader
There are two loaders in particular that will be helpful for us here: style-loader and css-loader. Let's get those included in our project and then discuss how they work.
To start, as always, we'll need to install those two dependencies:
yarn add --dev style-loader css-loader
Then we can add them to our webpack.config.common.js file in the module rules section down at the bottom:
const path = require('path')
const { CleanWebpackPlugin } = require('clean-webpack-plugin')
const HtmlWebpackPlugin = require('html-webpack-plugin')

module.exports = {
  entry: './src/index.js',
  output: {
    filename: 'main.js',
    path: path.resolve(__dirname, 'dist')
  },
  plugins: [
    new CleanWebpackPlugin(),
    new HtmlWebpackPlugin({
      filename: 'index.html',
      inject: true,
      template: path.resolve(__dirname, 'src', 'index.html'),
    }),
  ],
  module: {
    rules: [
      {
        test: /\.css$/,
        use: ['style-loader', 'css-loader']
      }
    ]
  }
}
This section sets up rules for webpack so it knows what to do with each file it encounters. The test property is a regular expression that webpack checks against the file name. In this case, we want to handle files with a .css extension.
Then, the use property tells webpack what loader or loaders to use to handle files matching the criteria. Note that the order here matters!
Webpack loaders are read from right to left. So first the css-loader will be applied, and then the style-loader will be applied.
Now, what do these loaders actually do for us?
css-loader interprets and resolves imported CSS files that you reference in your JavaScript. So in this case, css-loader helps make this line work:
import './index.css'
Next, style-loader injects the CSS into the DOM. By default, style-loader takes the CSS it encounters and adds it to the DOM inside a style tag.
Let's restart our dev server by killing the current process (if you still have it running) and then starting it again with yarn start. Now, in the web browser, you should see this on https://localhost:8080/:
 Demo app output 6 - adds pink and white colors
Oooh, so colorful!
A Note on Other Webpack Loaders
We won't cover loaders for other file types in this article, but be aware that there's a loader for everything imaginable! You can use file-loader or url-loader for loading images and other assets. You can use sass-loader to handle converting Sass/SCSS files to CSS before piping that output to css-loader and style-loader. Webpack can handle Less files too with less-loader if that's your preference.
The moral of the story is: For any given file type, there's a loader that can handle it.
BabelLoader
Ok, back to our demo app. We've written just a few lines of JavaScript so far. It'd be nice if we could write our JavaScript using new features that aren't well-supported in every browser yet. Babel is a JavaScript compiler that can turn ES6+ code into ES5 code.
And (you guessed it), there's a loader for that: babel-loader.
To set up babel-loader, we'll follow the instructions on their installation guide linked above.
First, we'll install our dependencies:
yarn add --dev babel-loader @babel/core
Next, we'll add a new rule to our module rules array in our webpack.config.common.js file:
const path = require('path')
const { CleanWebpackPlugin } = require('clean-webpack-plugin')
const HtmlWebpackPlugin = require('html-webpack-plugin')

module.exports = {
  entry: './src/index.js',
  output: {
    filename: 'main.js',
    path: path.resolve(__dirname, 'dist')
  },
  plugins: [
    new CleanWebpackPlugin(),
    new HtmlWebpackPlugin({
      filename: 'index.html',
      inject: true,
      template: path.resolve(__dirname, 'src', 'index.html'),
    }),
  ],
  module: {
    rules: [
      {
        test: /\.css$/,
        use: ['style-loader', 'css-loader']
      },
      {
        test: /\.(js|jsx)$/,
        exclude: /[\\/]node_modules[\\/]/,
        use: {
          loader: 'babel-loader',
        },
      },
    ]
  }
}
This will tell webpack that when it encounters .js or .jsx files to use Babel to transform the code. We use the exclude property to make sure Babel doesn't try to transform JavaScript files in our node_modules directory. Those are third-party dependencies that should already have been taken care of by their creators.
Next, we'll add one more dependency for a Babel preset:
yarn add --dev @babel/preset-env
And then we'll create a .babelrc file where we can do other Babel configuration as needed. We'll keep our file pretty simple and just specify the Babel preset that we want to use:
{
  "presets": ["@babel/preset-env"]
}
And finally, let's write some ES6 code in our ./src/index.js file:
import './index.css'

const p = document.createElement('p')
p.textContent = 'Hello from webpack!'
document.body.appendChild(p)

const p2 = document.createElement('p')
const numbers1 = [1, 2, 3, 4, 5, 6]
const numbers2 = [7, 8, 9, 10]
const numbers3 = [...numbers1, ...numbers2]
p2.textContent = numbers3.join(' ')
document.body.appendChild(p2)
This is a really trivial example, but we're using the spread operator here to concatenate two arrays.
Now, if we kill our running process and run yarn start again, we should see this in the browser:
 Demo app output 7 - adds numbers
Great! Everything is working nicely.
Temporarily Missing Styles
If you disable the cache in your browser and reload the page for our demo app, you may notice a slight blip in which the page appears with just the un-styled HTML, and then the page background turns pink and the text turns white as the styles are applied.
This behavior results from how style-loader works. As mentioned above, style-loader takes CSS and places it in a style tag in your HTML. Because of that, there's a brief period of time in which the style tag hasn't been appended yet!
Now, this is OK for a development environment, but we definitely wouldn't want this kind of behavior occurring in production. Let's fix that.
MiniCssExtractPlugin
Rather than injecting CSS into our HTML as style tags, we can use the MiniCssExtractPlugin to generate separate CSS files for us. We'll use this in our production config while still just using style-loader in our development config.
First, let's install the dependency in our project:
yarn add --dev mini-css-extract-plugin
Now in our webpack.config.common.js file let's remove the CSS rule since we'll be handling this differently in development and production. We're left with this in our shared config:
const path = require('path')
const { CleanWebpackPlugin } = require('clean-webpack-plugin')
const HtmlWebpackPlugin = require('html-webpack-plugin')

module.exports = {
  entry: './src/index.js',
  output: {
    filename: 'main.js',
    path: path.resolve(__dirname, 'dist')
  },
  plugins: [
    new CleanWebpackPlugin(),
    new HtmlWebpackPlugin({
      filename: 'index.html',
      inject: true,
      template: path.resolve(__dirname, 'src', 'index.html'),
    }),
  ],
  module: {
    rules: [
      {
        test: /\.(js|jsx)$/,
        exclude: /[\\/]node_modules[\\/]/,
        use: {
          loader: 'babel-loader',
        },
      },
    ]
  }
}
Now, in our webpack.config.dev.js file, let's add back in style-loader and css-loader that we just removed from our shared config:
const merge = require('webpack-merge')
const commonConfig = require('./webpack.config.common')

module.exports = merge(commonConfig, {
  mode: 'development',
  devtool: 'inline-source-map',
  devServer: {
    contentBase: './dist',
  },
  module: {
    rules: [
      {
        test: /\.css$/,
        use: ['style-loader', 'css-loader']
      },
    ]
  }
})
And finally, in our webpack.config.prod.js file, let's add in our new mini-css-extract-plugin:
const merge = require('webpack-merge')
const MiniCssExtractPlugin = require('mini-css-extract-plugin');
const commonConfig = require('./webpack.config.common')

module.exports = merge(commonConfig, {
  mode: 'production',
  devtool: 'source-map',
  module: {
    rules: [
      {
        test: /\.css$/,
        use: [
          MiniCssExtractPlugin.loader,
          'css-loader',
        ],
      },
    ],
  },
  plugins: [
    new MiniCssExtractPlugin({
      filename: '[name].[contenthash].css',
    }),
  ]
})
This one is a little different because it actually is both a plugin and a loader, so it goes in the module rules and in the plugins sections.
Also note that we use the square brackets in our file name to dynamically set the name to the original source file's name and also include the contenthash, which is a hash (an alphanumeric string) that represents the file's contents.
Now if you run yarn build this time to generate the production build, you should get some output in your terminal that looks like this:
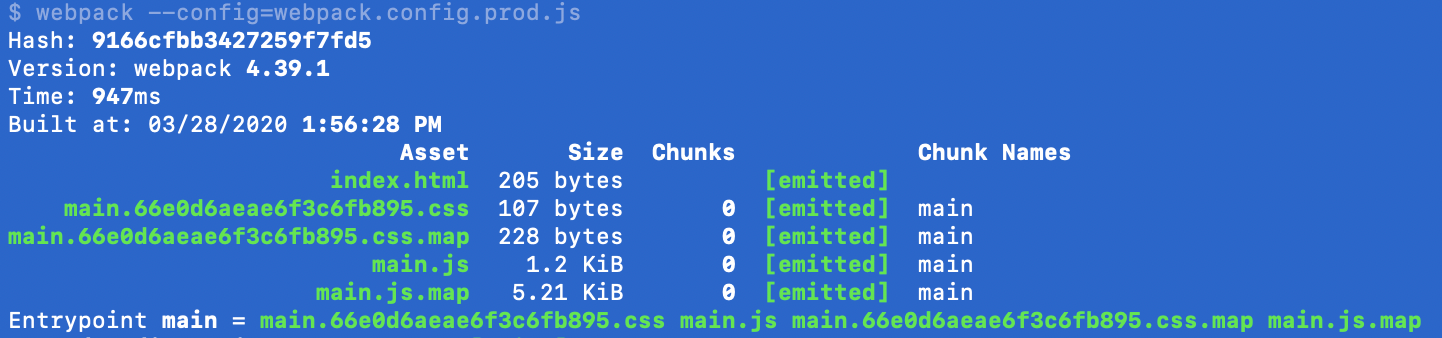 Webpack production build output
Note that it actually generates a CSS file now, and the content hash is included in the file name.
Alright, problem solved! No more blip when the page loads in production since we have the styles included as a link tag to an actual CSS file.
Cache Busting
Since we've included the content hash in the generated CSS file, now is a good time to talk about cache busting. Why, you ask, would we want the content hash included in our file names? To help the browser understand when a file has changed!
Your browser tries to be helpful by caching files it has seen before. For example, if you've visited a website, and your browser had to download assets like JavaScript, CSS, or image files, your browser may cache those files so that it doesn't have to request them from the server again.
This means that if you visit the site again, your browser can use the cached files instead of requesting them again, so you get a faster page load time and a better experience.
So, what's the problem here? Imagine if we had a file called main.js used in our app. Then, a user visits your app and their browser caches the main.js file.
Now, at some later point in time, you've released new code for your app. The contents of the main.js file have changed. But, when this same user visits your app again, the browser sees that it needs a main.js file, notes that it has a cached main.js file, and just uses the cached version. The user doesn't get your new code!
To solve this problem, a common practice is to include the content hash in each file's name. As discussed earlier, the content hash is a string representation of the file's contents. If the file's contents don't change, the content hash doesn't change. But, if the file's contents do change, then the content hash also changes.
Because the file name will now change when the code changes, the browser will download the new file since it won't have that specific file name in its cache.
Including the Content Hash
To include the content hash in our JavaScript file names, we'll modify just one line of code in our webpack.config.common.js file. This line:
filename: 'main.js'
Will change to this line:
filename: '[name].[contenthash].js'
So that the entire file looks like this:
const path = require('path')
const { CleanWebpackPlugin } = require('clean-webpack-plugin')
const HtmlWebpackPlugin = require('html-webpack-plugin')

module.exports = {
  entry: './src/index.js',
  output: {
    filename: '[name].[contenthash].js', // this line is the only difference
    path: path.resolve(__dirname, 'dist')
  },
  plugins: [
    new CleanWebpackPlugin(),
    new HtmlWebpackPlugin({
      filename: 'index.html',
      inject: true,
      template: path.resolve(__dirname, 'src', 'index.html'),
    }),
  ],
  module: {
    rules: [
      {
        test: /\.(js|jsx)$/,
        exclude: /[\\/]node_modules[\\/]/,
        use: {
          loader: 'babel-loader',
        },
      },
    ]
  }
}
Now if you run yarn build, you'll see that both your JavaScript and your CSS have content hashes included:
 Webpack production build output with content hashes included
If you run yarn build again and compare your new output to your old output, you'll notice that the content hashes are exactly the same both times.
But, if you edit your ./src/index.js file in any way and then run yarn build again, you'll get a new content hash because the content has changed! Try it!
Minifying CSS
Last but not least, we may want to minify our CSS. We're already minifying our JavaScript for the production build, but we're not minifying our CSS yet. Let's do that.
We can minimize our CSS by using the optimize-css-assets-webpack-plugin. Let's install that dependency now:
yarn add --dev optimize-css-assets-webpack-plugin
Now we can add that to an optimization section of our webpack.config.prod.js file:
const merge = require('webpack-merge')
const MiniCssExtractPlugin = require('mini-css-extract-plugin')
const OptimizeCssAssetsPlugin = require('optimize-css-assets-webpack-plugin')
const commonConfig = require('./webpack.config.common')

module.exports = merge(commonConfig, {
  mode: 'production',
  devtool: 'source-map',
  module: {
    rules: [
      {
        test: /\.css$/,
        use: [
          MiniCssExtractPlugin.loader,
          'css-loader',
        ],
      },
    ],
  },
  plugins: [
    new MiniCssExtractPlugin({
      filename: '[name].[contenthash].css',
    }),
  ],
  optimization: {
    minimizer: [
      new OptimizeCssAssetsPlugin({
        cssProcessorOptions: {
          map: {
            inline: false,
            annotation: true,
          },
        },
      }),
    ],
  },
})
Now if we run yarn build and then check out the contents of our dist directory, we can see that the resulting CSS is minified. Nice!
body{background:#ff1493;color:#fff}
/*# sourceMappingURL=main.66e0d6aeae6f3c6fb895.css.map */
But wait! If we look at our resulting JavaScript file, it's not minified! Hmmm. It was minified before, so what happened here?
The issue is that we're now manually configuring the optimization minimizer section of our webpack config. When that section isn't in the webpack config file, webpack defaults to using its own minimizer preferences, which includes minifying JavaScript when the mode is set to production.
Since we're now overriding those defaults by adding in our preferences for minifying CSS assets, we'll need to also explicitly include instructions for how we want webpack to minify JavaScript assets.
TerserWebpackPlugin
We can minify our JavaScript files using the TerserWebpackPlugin. Let's start by installing that dependency:
yarn add --dev terser-webpack-plugin
Then, in our webpack.config.prod.js file, let's add the terser-webpack-plugin to our optimization minimizer settings at the bottom of the file:
const merge = require('webpack-merge')
const MiniCssExtractPlugin = require('mini-css-extract-plugin')
const OptimizeCssAssetsPlugin = require('optimize-css-assets-webpack-plugin')
const TerserPlugin = require('terser-webpack-plugin')
const commonConfig = require('./webpack.config.common')

module.exports = merge(commonConfig, {
  mode: 'production',
  devtool: 'source-map',
  module: {
    rules: [
      {
        test: /\.css$/,
        use: [
          MiniCssExtractPlugin.loader,
          'css-loader',
        ],
      },
    ],
  },
  plugins: [
    new MiniCssExtractPlugin({
      filename: '[name].[contenthash].css',
    }),
  ],
  optimization: {
    minimizer: [
      new OptimizeCssAssetsPlugin({
        cssProcessorOptions: {
          map: {
            inline: false,
            annotation: true,
          },
        },
      }),
      new TerserPlugin({
        // Use multi-process parallel running to improve the build speed
        // Default number of concurrent runs: os.cpus().length - 1
        parallel: true,
        // Enable file caching
        cache: true,
        sourceMap: true,
      }),
    ],
  },
})
Now if we run yarn build and look at the output in the dist directory, we should see that both our CSS files and our JavaScript files are minified. There we go!
Wrapping Up
If you've followed along this far, I commend you!
 _Photo by [Unsplash](https://unsplash.com/@katya?utm_source=ghost&utm_medium=referral&utm_campaign=api-credit">Katya Austin / <a href="https://unsplash.com/?utm_source=ghost&utm_medium=referral&utmcampaign=api-credit)
Let's review what we've learned so far:
- Webpack is a build tool for asset bundling and dependency management.
- Webpack can be configured by a config file.
- Plugins modify and extend the webpack build process.
- Loaders instruct webpack how to handle different file types.
- The
clean-webpack-plugincan be used to remove old build artifacts from thedistdirectory. - The
html-webpack-pluginhelps manage the HTML file, including injecting JavaScript into the file viascripttags. webpack-dev-servercreates a dev server to make local development easier.- It's helpful to have separate webpack configs for development and production. You can share and merge config files using the
webpack-mergeplugin. - We can handle styling our app by including loaders like
css-loader,style-loader,sass-loader,less-loader, and themini-css-extract-plugin(which functions as both a plugin and a loader). - We can include new JavaScript syntax and features by using Babel and
babel-loader. - We can include content hashes in our file names to help with cache busting and managing new versions of our released code.
- We can minify our CSS with the
optimize-css-assets-webpack-plugin. - We can minify our JavaScript with the
terser-webpack-plugin.
What's Next?
 _Photo by [Unsplash](https://unsplash.com/@tomparkes?utm_source=ghost&utm_medium=referral&utm_campaign=api-credit">Tom Parkes / <a href="https://unsplash.com/?utm_source=ghost&utm_medium=referral&utmcampaign=api-credit)
Throughout this article, we've created a pretty respectable webpack config. All of these techniques we've discussed are industry standards and are common to use in enterprise-level projects.
But there's still more! Other advanced webpack topics include code splitting, lazy loading, tree shaking, and more!
If you're interested in exploring webpack more on your own, I'd highly recommend reading through the official webpack guides.
Again, all of the code we've gone through in this tutorial can be found in GitHub. The starting point is found here, and the finished result is found here.
Thanks for reading, and happy coding!