

In this tutorial, we will talk about an important CSS property – the overflow property.
It helps us control what happens when an element's content is too big to fit into an area. When this happens, it makes the content "overflow" into another area, either horizontally (X-axis) or vertically (Y-axis).
We will go over the following values of the overflow property and see how they work:
visiblehiddenscrollauto
How to use the visible value
This is the default value that the overflow property takes if none is specified. With this property, we can see our content clearly when it overflows into another area.
Consider the following examples:
<div>
      <p>
        Lorem ipsum dolor sit amet consectetur adipisicing elit. Error quas
        repellendus reprehenderit libero labore dolor omnis! Obcaecati ipsam est
        accusantium quis quos minus veniam eaque? Modi expedita mollitia et qui!
      </p>
</div>
body{
    background: black;
}

div{
    height: 200px;
    width: 200px;
    background: white;
}

p{
    color: green;
}
This is pretty basic. We've given our page a background color of black. We set the background color of our div element which acts as a container to be white. It has a height and width of 200px each. Then we made our paragraph's text color green.
Here's what that looks like:
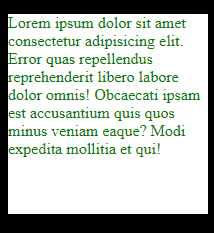
The text sits comfortably in the white container without crossing the container's border on both axis. But this isn't always the case.
You could be working on a project and then realize that a piece of text crosses the border. Something like this:
<div>
      <p>
        Lorem ipsum dolor sit amet consectetur adipisicing elit. Error quas
        repellendus reprehenderit libero labore dolor omnis! Obcaecati ipsam est
        accusantium quis quos minus veniam eaque? Modi expedita mollitia et qui!
        Lorem ipsum dolor sit amet consectetur adipisicing elit. Error quas
        repellendus reprehenderit libero labore dolor omnis! Obcaecati ipsam est
        accusantium quis quos minus veniam eaque? Modi expedita mollitia et qui!
        Lorem ipsum dolor sit amet consectetur adipisicing elit. Error quas
        repellendus reprehenderit libero labore dolor omnis! Obcaecati ipsam est
        accusantium quis quos minus veniam eaque? Modi expedita mollitia et qui!
      </p>
</div>
The CSS styles remain the same. Now have a look at what's happening with the container and the text:
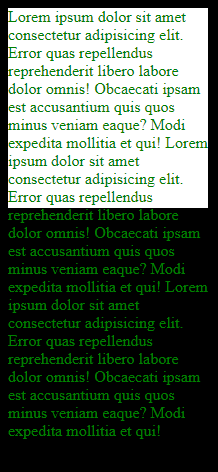
The text can't fit into the white container so it overflows and crosses the container's border. In a real life project, this would be even more annoying because you'd have this text overlapping other elements on the page.
We are able to see the text overflow into another area because the default value here is visible even though we did not specify that.
Let's go on and add that to our CSS so you can see the overflow property being applied:
body{
    background: black;
}

div{
    height: 200px;
    width: 200px;
    background: white;
    overflow: visible;
}

p{
    color: green;
}
We have added overflow: visible; to the div. The result remains the same – we would see our text overflow into another area.
In the coming section, we will see the various values that can help us control what happens when content overflows.
How to use the hidden value
With the hidden value, the part of the text that overflowed will be cut out – it will be "invisible". You don't have to worry about the space the overflow was occupying. Once the content has been cut out, it will no longer be in the area where it overflowed into.
We'll look at an example before talking about why this isn't the best solution. Let's add the hidden value:
body{
    background: black;
}

div{
    height: 200px;
    width: 200px;
    background: white;
    overflow: hidden;
}

p{
    color: green;
}
Here is what happens to the text in the container:
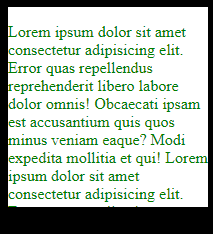
As you can see, we can no longer see that part of the text that crosses the container's border.
This solves the problem of having content in an area where it is not supposed to be, but it doesn't provide a way to access the content that was cut off. So we will tackle that in the next section.
How to use the scroll value
So we already know that the hidden value cuts the text out and hides it. But the scroll value also cuts the text and provides a scrollbar so we can scroll and see the part of the text that was cut off.
Let's have a look:
body{
    background: black;
}

div{
    height: 200px;
    width: 200px;
    background: white;
    overflow: scroll;
}

p{
    color: green;
}
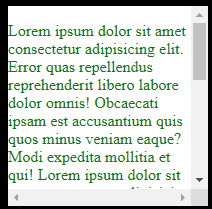
Now we have scrollbars on both axes. The horizontal scrollbar is irrelevant to us because we don't have content overflowing in that direction. We will fix this in the next section.
How to use the auto value
body{
    background: black;
}

div{
    height: 200px;
    width: 200px;
    background: white;
    overflow: auto;
}

p{
    color: green;
}
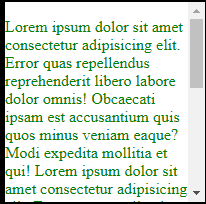
Now the scrollbar only appears vertically. The auto value detects where the overflow happens and adds a scrollbar in that direction.
No scrollbar was added horizontally because we don't have content overflow in that axis. Similarly, if we have no overflow on both axis, then no scrollbar will be added.
overflow-x and overflow-y properties
In the examples we used in the previous sections, we used the overflow property. This applies for both the horizontal and vertical axis. If you'd prefer to check for overflow separately, you can use these:
overflow-xspecifies what happens when content overflows horizontally (from left to right).overflow-yspecifies what happens when content overflows vertically (from top to bottom).
The same values – visible, hidden, scroll and auto – can be used here as well.
A quick example:
div {
  overflow-x: hidden; /* overflow is visible in x-axis */
  overflow-y: scroll; /* scrollbar is added when there is overflow in y-axis */
}
Conclusion
In this tutorial, we learned how to control the overflow of content on our pages. We saw the various values that we can assign to the overflow property and the different result these values produce.
Lastly, we learned how to apply the values of the overflow property on either the horizontal or vertical direction only.
Happy Coding!