
What is Tampermonkey?
Tampermonkey is a browser extension that lets you add custom scripts to websites, making them work or look the way you want. It's like giving websites a makeover or adding new features.
These scripts are called userscripts and you can make tampermonkey run those scripts when you visit a particular site.
How to Use Tampermonkey to Customize the User Experience of a Website
There are a lot of use cases for Tampermonkey. The most obvious one is adding your own custom styling. You can add custom css for a specific site and change up the appearance as you want. But as you can run a script, you can also manipulate the DOM elements.
I will list out of the things I have done to give you some ideas to what is possible.
- Increase readability by changing font properties.
- Remove ads on sites that don't allow an ad blocker.
- Declutter a site so that you can focus on the portion that you're interested in.
- Add keyboard shortcuts for repetitive tasks.
- Add buttons for custom actions.
- Automatically fill out form data.
Today you'll get a glimpse of what you can do with Tampermonkey by writing scripts that'll work on the freeCodeCamp /news site.
First we will see how to declutter for a more focused reading experience. Then we will attach copy buttons on the code snippets. And lastly, we'll automatically generate table of contents that you can access with a toggle button.
The source code is available on GitHub.
It's worth pointing out that any changes your script makes will only be available in your browser. So as long as you don't deal with any sensetive data on that site, you can go as wild as you want.
But be aware that some sites may have some policy in regards to using third party JavaScript and take disciplinary action if you violate that policy.
Prerequisites
As we will be modifying a website, basic knowledge of HTML, CSS, and JavaScript is required to go through this tutorial. Some experience with DOM manipulation would be great as well.
If you can effectively manipulate exisiting DOM elements, that will allow you to write Tampermonkey scripts to make yourself more productive on any website.
Table of Contents
- How to Install Tampermonkey
- How to Create a New Userscript
- How to Change a Button's Behaviour
- How to Implement Reader View for freeCodeCamp /news Articles
- How to Add Copy Buttons to the Code Snippets
- How to Auto-generate a Table of Contents
- Key Takeways
How to Install Tampermonkey
For Chrome, the extension is available on the chrome web store.
It's also available for Firefox, which you can install from Firefox Add-Ons.
For other browsers, you can visit the Tampermonkey Home Page. Currently, Chrome, Firefox, Edge, Safari and Opera are officially supported. But the one from Chrome web store works fine on Chromium-based browsers like Brave.
How to Create a New Userscript
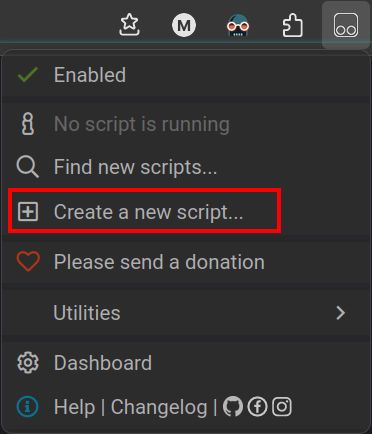
The easiest way to get started is using the create new script option from the toolbar.
You will be presented with something like this:
// ==UserScript==
// @name         New Userscript
// @namespace    http://tampermonkey.net/
// @version      0.1
// @description  try to take over the world!
// @author       You
// @match        https://www.freecodecamp.org/news/*
// @icon         https://www.google.com/s2/favicons?sz=64&domain=freecodecamp.org
// @grant        none
// ==/UserScript==

(function() {
    'use strict';

    // Your code here...
})();
The userscript header contains information about the script and other important parameters as well.
For now the relevant part is @match. This tells Tampermonkey for which sites to run the script. I have changed to match any article on the freeCodeCamp news site by using the "*" wildcard.
Test it out by putting something simple as alert("HI") on the function. Then navigate to any article on freecodecamp.org/news.
Lets do something interesting next. This will be a brief introduction to DOM manipulation.
Before writing code in the userscript, it's better to write out your code in the dev console first. Then, when you have working code, you can just paste it in the Tampermonkey script. This is how we will write all the scripts in this article as well.
How to Change a Button's Behaviour
At the end of each freeCodeCamp article there is a button that says "Tweet a thanks". You can see the onclick function of the button by using the element picker from the dev tools and clicking on that button.

Clicking on that button will open a new window in Twitter with some default text for a tweet like the following:
Thank you @twitter-username-of-author for writing this helpful article.

Title of Article
https://www.freecodecamp.org/news/slug-of-article
Let's say that you want to change up the default text to something like this:
This article is quite fascinating.

Title of Article by @twitter-username-of-author
https://www.freecodecamp.org/news/slug-of-article
The new text is static as you will chose it, but there are some variables here. You need to extract these 3 things:
- The link of the article.
- The Twitter username of the author.
- Title of the article.
Extracting the link is as location.href.
Now how to extract the Twitter username?
At first glance, you may think the name after the author image is the answer. But that's actually the author's name (which is not necessarily unique) – it's not their Twitter username. So, where would you start looking for it?
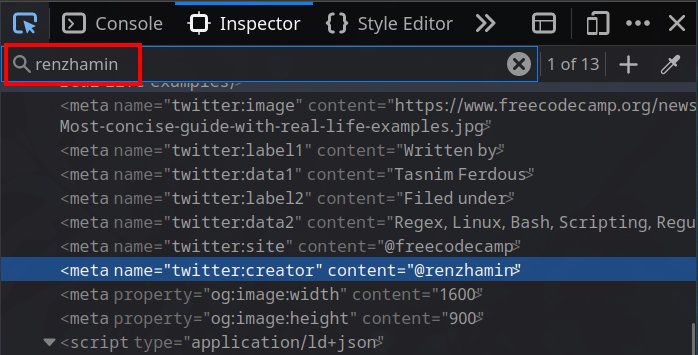
Since you can just click the button or inspect it, you already know the values of all these variables. So a good way to find the Twitter username would be just to search for it in the entire HTML document. As it is unique, there won't be many occurrences.
Open the dev tools and search for the Twitter username. You will find this tag:
<meta name="twitter:creator" content="@username" />
Which is not surprising, as most publishing sites put information such article title, tags, description, and author information in the meta tags for SEO purposes. But most of the time you can just find what you are looking for by using the inspection tool.
So how do we extract the "content" property of this meta tag? Considering that an article is written by only one author, there will always be only one meta tag with name "twitter:creator". So you can just use the querySelector.
const username = document.querySelector('meta[name="twitter:creator"]').content
Now on to extracting the title. If you have wandered around looking for the Twitter username, you will find that there is also a meta tag with name "twitter:title". But this time, the title is something that you can visually see and inspect. In most cases that's the easier way to go about it.
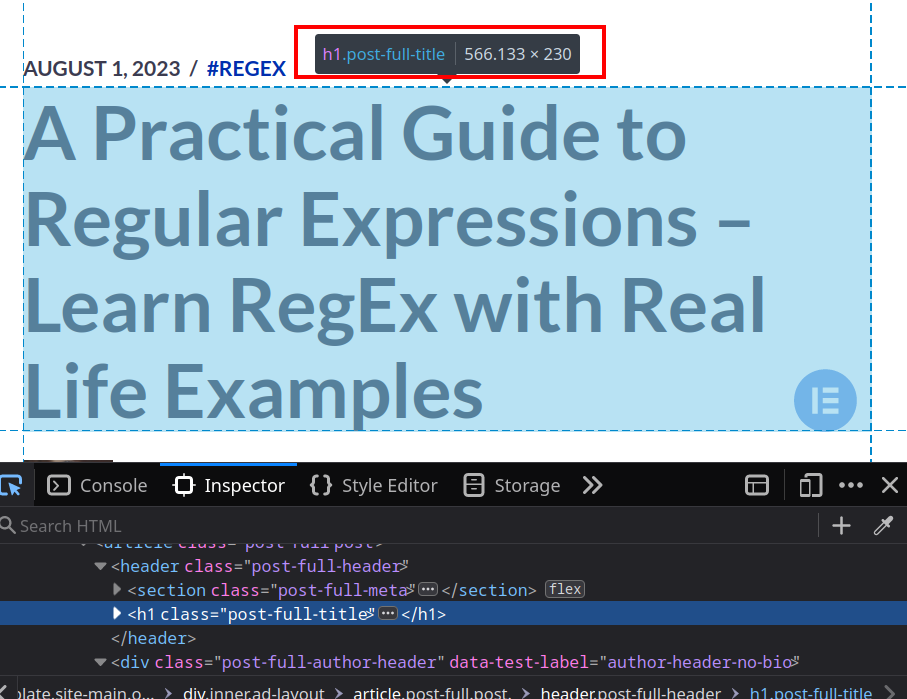
If you inspect on the article title above the cover image, you will see it's inside an h1 with the class "post-full-title". You can select this with the following:
const title = document.querySelector("h1.post-full-title").textContent
Now we have all the pieces we need to make the change. Inspect the target button and you will see it comes with an id of "tweet-btn". Now let's define our text.
const text = `This article is quite fascinating.

${title} by ${username}
${location.href}
`
Putting it all together by changing the button's onclick, here's what you should have:
function change_tweet_text() {
    document.getElementById("tweet-btn").onclick = () => {
        const username = document.querySelector(
            'meta[name="twitter:creator"]'
        ).content
        const title = document.querySelector("h1.post-full-title").textContent

        const text = `This article is quite fascinating.

${title} by ${username}
${location.href}
`

        const share_link = encodeURI(
            `https://twitter.com/intent/tweet?text=${text}`
        )

        window.open(share_link, "share-twitter", "width=550, height=235")

        return false
    }
}
Because the text contains newline characters, we have to convert it url-encoded format.
Paste the function inside the userscript and call it.
;(function () {
    change_tweet_text()
})()
Now reload the article page and click on the button to see if it's working as expected.
It is possible that it won't work as expected. Especially if the page takes a lot of time to load.
With this script, we are modifying a button which is a DOM element. But what if the element is not yet loaded? Then you will face unexpected results.
Tampermonkey provides the "// @run-at" header which you can specify to "document-end", but I've found that it still produces unexpected results sometimes.
The right way to mitigate it is to use the "load" event which is emitted when the whole page is loaded. So, we can refactor our driver function in the following way:
addEventListener("load", main)

function main() {
    change_tweet_text()
}
You can be extra careful and throw a delay as well:
addEventListener("load", setTimeout(main, 2000))
From now on, we will call all the functions in this main function which will run after the load event is fired.
Note that you could have achieved the same result using a regular expression. In that case, you could extract the variables from the button's onclick which contains the URL with the full text.
But extracting information from the tags is better because if one day the default tweet text changes, you would need the change the regex as well.
How to Implement Reader View for freeCodeCamp /news Articles
If you make your browser fullscreen, the top navigation bar still stays at the top – which is not the best reading experience. So, we want to hide everything except the main article body.
Let's start inspecting. You will see that, close to the "main" tag, there is an "article" tag with class "post". It contains all the text of the article including the heading and cover image.
This time, we will live-edit the CSS of the page. In Firefox, you can use the "Style Editor" tab in the dev tools. Click on the "+" icon and start testing out your CSS.
As of now, there is no built-in way to hide all elements except one (in our case article.post) using CSS. You might be tempted to use :not(article.post) but it won't work because if any ancestor of the element is hidden, then all the descendents will be hidden as well.
We can accomplish our goal by using the ":has" selector. :has(article.post) will select all the ancestors of article.post so we can select the inverse of it with :not(:has(article.post)).
But there's still a problem: the descendent of article.post is also ignored by this selector. We can bring them back by chaining another not –:not(article.post, article.post *). This will select everything that is not an article.post or a descendent of it.
This is the final CSS:
:not(:has(article.post)):not(article.post, article.post *) {
    display: none;
}
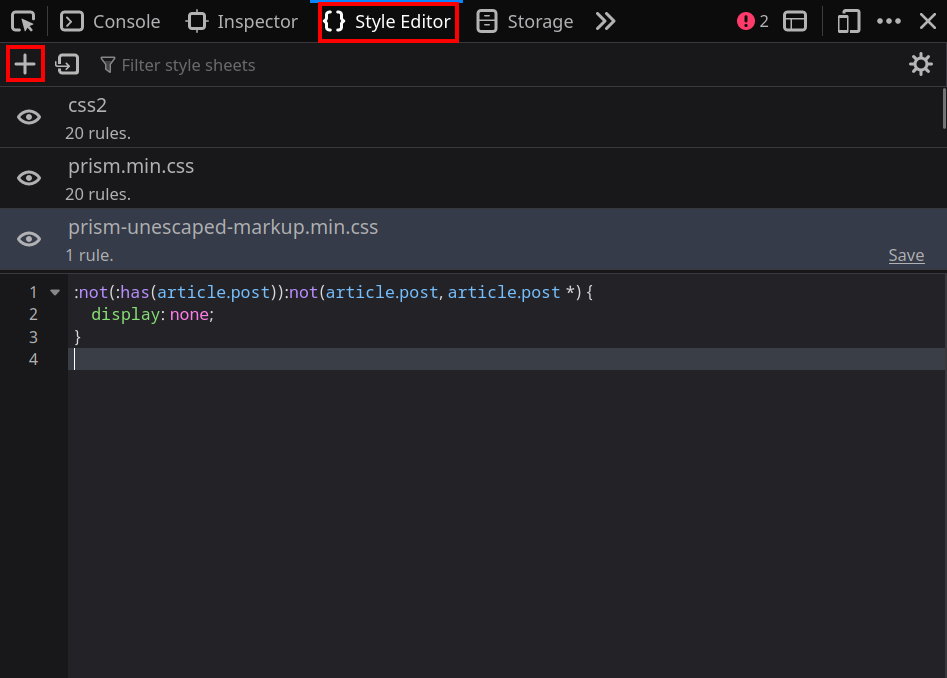
At the time of writing this, the ":has" selector is experimental in Firefox. But you can go to about:config and enable it by changing the value of layout.css.has-selector.enabled to true.
What if you want to use the navigation bar? It would be a shame to manually write the CSS and remove it when you don't want it, right? Especially now that you can do some scripting.
We will add a keyboard shortcut to the site that will make the browser fullscreen. We'll also apply that CSS and, upon exiting fullscreen, the CSS will be removed.
One of the exposed APIs of tampermonkey is GM_addStyle(css) for adding CSS. For this API to work, you need to include // @grant GM_addStyle to the userscript header and also remove // @grant none if you have that.
To create the shortcut, you will use a "keydown" event listener.
function add_declutter_toggle(key) {
    const css = `
        .declutter :not(:has(article.post)):not(article.post, article.post *) {
            display: none;
        }`

    GM_addStyle(css)

    document.addEventListener("keydown", (event) => {
        if (event.key === key) {
            if (document.fullscreen) {
                document.exitFullscreen()
                document.body.classList.remove("declutter")
            } else {
                document.body.classList.add("declutter")
                document.documentElement.requestFullscreen()
            }
        }
    })
}
We are applying the CSS to the elements with the class "declutter". By toggling the "declutter" on the body we are essentially toggling the CSS on the entire page.
Now, we just have to add the function call in our main function.
function main() {
    change_tweet_text()
    add_declutter_toggle("F")
}
Reload the page and you will see that pressing "F" will toggle fullscreen and also remove everything except article body when in the fullscreen state.
How to Add Copy Buttons to the Code Snippets
The first step is always identifying the correct selector. If you inspect any code snippet you will see that they're contained in <code> blocks and have a <pre> as a parent. So, to select all code snippets, the selector can be pre > code.
Now the question is where to place the button? For easy access, we want the button to be on top of the code snippet and aligned to the right. You may think, placing it between the <pre> tag and <code> tag
could work – but that will interfere with the content of the code snippet which is not ideal.
The ideal solution is wrapping the <pre> tag with a div and creating the structure as div > button > pre > code.
The copying is done by the clipboard API using the navigator.clipboard.writeText method. We will also apply some styling and let the reader know their copying was successful by changing the button text from "copy" to "copied" for a small duration of time.
function attach_code_copy_btn() {
    const css = `
        .copy-btn {
            float: right;
            margin-bottom: 5px;
            border-radius: 1rem;
            font-size: 0.8em;
            width: 7rem;
        }

        .pre-wrapper {
            width: 100%;
        }
    `
    GM_addStyle(css)

    const codes = document.querySelectorAll("pre > code")
    codes.forEach((code) => {
        const pre = code.parentElement
        const btn = document.createElement("button")
        btn.textContent = "copy"
        btn.classList.add("copy-btn")
        btn.addEventListener("click", () =>
            navigator.clipboard.writeText(code.textContent).then(() => {
                btn.textContent = "copied"
                setTimeout(() => (btn.textContent = "copy"), 2500)
            })
        )
        const div = document.createElement("div")
        div.classList.add("pre-wrapper")
        div.appendChild(btn)
        wrap(pre, div)
    })
}

function wrap(elem, wrapper) {
    elem.parentNode.insertBefore(wrapper, elem)
    wrapper.appendChild(elem)
}
The attach_code_copy_btn function finds all code snippets and wraps them around a div, adds classes to them, and attaches a button which will copy the code content on click.
Call the function just as before:
function main() {
    change_tweet_text()
    add_declutter_toggle("F")
    attach_code_copy_btn()
}
Heres some practice, try adding click event listeners to all <code> tags that are not inside a <pre> tag. On a mouse click on the <code> block the contents of the block will be copied.
How to Auto-generate a Table of Contents
freeCodeCamp is a great place for reading in-depth articles. The articles are well organized as well. Most authors use proper headings and provide a table of contents. But the ToC is not accessible on every part of the page.
If you want to jump somewhere you will have to go back to the ToC then click on your section of interest. And then there are shorter articles that don't provide a ToC at all.
That's where we can introduce a userscript that will automatically generate a table of contents which is accessible anywhere on the page. This improves the user experience when reading longer articles.
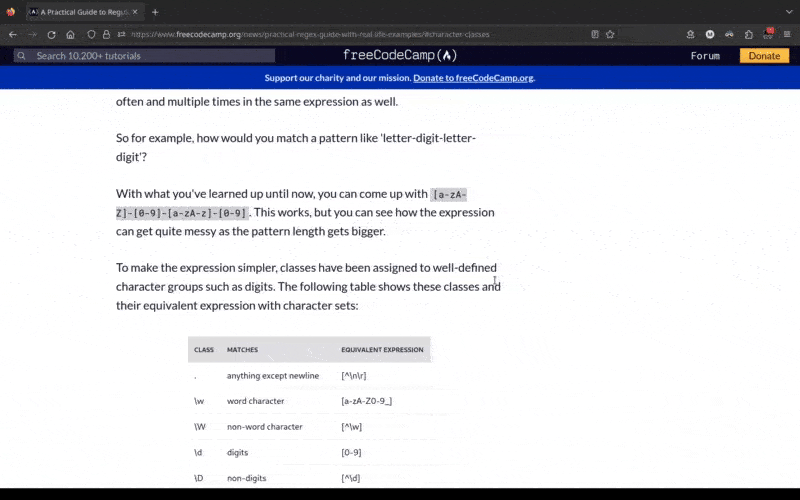
The first thing you should know is how a ToC works. A section in the ToC is just an anchor tag with an href value of #some-section. Here "some-section" can be the name property of an anchor tag of the target location (for example, <a name="some-section">) or if its used as an id on any element (for example, <h2 id="some-section">).
If you inspect on any heading tag, you will see that the id attribute is present. This is automatically inserted when the article page is built. So we can use that for our ToC.
This is a ToC generator function modified from a StackOverflow answer.
function generate_toc() {
    let toc = ""
    let level = 1

    let container = document.querySelector(".post-content")
    const regex = /<h([2-5])\s+id="([^"]+)">([^<]+)<\/h([2-5])>/gi
    const matches = [...container.innerHTML.matchAll(regex)]
    matches.forEach((match) => {
        if (match.length != 5) return
        const [_, openLevel, id, titleText, closeLevel] = match

        if (openLevel !== closeLevel) {
            return
        }

        if (openLevel > level) {
            toc += new Array(openLevel - level + 1).join("<ol>")
        } else if (openLevel < level) {
            toc += new Array(level - openLevel + 1).join("</li></ol>")
        } else {
            toc += new Array(level + 1).join("</li>")
        }

        level = parseInt(openLevel)

        if (!id) {
            id = titleText.replace(/ /g, "_")
        }
        toc += '<li><a href="#' + id + '">' + titleText + "</a></li>"
    })

    if (level) {
        toc += new Array(level + 1).join("</ol>")
    }

    return toc
}
We are using a regex to match h2, h3, h4, and h5 tags and creating an ordered list to display to ToC contents and returning the HTML of the whole ToC.
Now we will add this HTML to a div that will contain the ToC. That div will be wrapped inside a dialog component so that we can use a modal to easily show/hide the ToC. We will also add a button that will be used as the toggle.
function show_toc() {
    document.documentElement.style.overflow = "hidden"
    document.getElementById("toc-dialog").showModal()
}

function add_toc_toggle() {
    const dialog = document.createElement("dialog")
    dialog.setAttribute("id", "toc-dialog")
    const toc_div = document.createElement("div")
    toc_div.classList.add("toc-content")
    toc_div.innerHTML = "<h2>Table of Contents</h2>"
    dialog.appendChild(toc_div)

    const show_toc_btn = document.createElement("button")
    show_toc_btn.setAttribute("id", "toc-toggle")
    show_toc_btn.innerHTML =
        '<svg xmlns="http://www.w3.org/2000/svg" viewBox="0 0 512 512"><path d="M.361 256C.361 397 114 511 255 511C397 511 511 397 511 256C511 116 397 2.05 255 2.05C114 2.05 .361 116 .361 256zM192 150V363H149V150H192zM234 150H362V193H234V150zM362 235V278H234V235H362zM234 320H362V363H234V320z"></path></svg>'

    show_toc_btn.addEventListener("click", () => {
        show_toc()
    })

    // Click anywhere to close
    dialog.addEventListener("click", (event) => {
        document.documentElement.style.overflow = "auto"
        event.currentTarget.close()
    })

    dialog.addEventListener("close", (event) => {
        document.documentElement.style.overflow = "auto"
        event.currentTarget.close()
    })

    document.querySelector(".post-content").appendChild(dialog)
    document.querySelector(".post-content").appendChild(show_toc_btn)
}
Finally we will provide a driver function that will perform all the necessary tasks related to ToC generation. We will also add a keyboard shortcut to toggle the ToC.
function add_toc(toc_toggle_key) {
    const css = `
        .toc-content {
            margin: 0;
            padding: 0;
            max-width: 65vw;
        }

        @media (width <= 800px) {
            .toc-content {
                max-width: 100vw;
            }
        }

        .toc-content h2 {
            padding: 20px 30px;
        }

        .toc-content ol {
            counter-reset: item;
        }

        .toc-content li {
            display: flex;
            white-space: nowrap;
            gap: 5px;
        }

        .toc-content li:before {
            content: counters(item, ".") " ";
            counter-increment: item;
        }

        .toc-content a {
            text-decoration: none;
            white-space: normal;
            flex-grow: 1;
        }

        .toc-content li:hover {
            background: rgba(82, 142, 227, 0.3);
            cursor: pointer;
        }

#toc-toggle {
            background: transparent;
            position: fixed;
            bottom: 5%;
            right: 5%;
            width: 5rem;
        }

#toc-toggle svg {
            fill: rgb(82, 142, 227);
            scale: 1;
        }

#toc-toggle svg:hover {
            scale: 1.15;
        }

#toc-dialog {
            padding: 0;
            border: 0;
        }
`
    GM_addStyle(css)

    add_toc_toggle()
    document.querySelector(".toc-content").innerHTML += generate_toc()

    if (toc_toggle_key) {
        document.addEventListener("keydown", (event) => {
            if (event.key === toc_toggle_key) {
                show_toc()
            }
        })
    }
}
Now, just call the driver function in main.
function main() {
    change_tweet_text()
    add_declutter_toggle("F")
    attach_code_copy_btn()
    add_toc(";")
}
Now whenever, you read an article on freeCodeCamp, you can use the toggle button or a shortcut to view the ToC.
For practice, try making the toc sticky in the side (left/right). If you are on a wider screen, having the toc on the side will make the reading experience even better.
Key Takeways
You should never run arbitrary JavaScript on any occasion. That goes for Tampermonkey scripts as well.
I recommend going through every line of code before using a userscript. As you can already imagine, a userscript can drastically alter a website's appearance. If you are not careful enough, you might click a button that you expect to do one thing but it does something completely different, so always err on the side of caution.
When writing userscripts, keep these things in mind:
- Always test your code in the dev console first and take care of all edge cases.
- Prefer creating/manipulating DOM elements using built-in functions instead of modifying the innerHTML.
- If you find any unexpected behaviour, try throwing a long delay and checking if that resolves the issue.
You can read my other articles on my blog. Find me on Twitter LinkedIn.