By Rwitesh Bera
Since its introduction, the programming language Go (also known as Golang) has become increasingly popular. It is known for its simplicity and efficient performance, similar to that of a lower-level language such as C++.
While working with a database, schema migration is one of the most important tasks that developers do throughout the project lifecycle. In this article, I will explain what database migration is and how to manage it using go-migrate.
What is a Database Migration?
A database migration, also known as a schema migration, is a set of changes to be made to a structure of objects within a relational database.
It is a way to manage and implement incremental changes to the structure of data in a controlled, programmatic manner. These changes are often reversible, meaning they can be undone or rolled back if required.
The process of migration helps to change the database schema from its current state to a new desired state, whether it involves adding tables and columns, removing elements, splitting fields, or changing types and constraints.
By managing these changes in a programmatic way, it becomes easier to maintain consistency and accuracy in the database, as well as keep track of the history of modifications made to it.
Setup and Installation
migrate is a CLI tool that you can use to run migrations. You can easily install it on various operating systems such as Linux, Mac and Windows by using package managers like curl, brew, and scoop, respectively.
For more information on how to install and use the tool, you can refer to the official documentation.
To install the migrate CLI tool using scoop on Windows, you can follow these steps:
$ scoop install migrate
To install the migrate CLI tool using curl on Linux, you can follow these steps:
$ curl -L https://packagecloud.io/golang-migrate/migrate/gpgkey| apt-key add -
$ echo "deb https://packagecloud.io/golang-migrate/migrate/ubuntu/ $(lsb_release -sc) main" > /etc/apt/sources.list.d/migrate.list
$ apt-get update
$ apt-get install -y migrate
To install the migrate CLI tool using on Mac, you can follow these steps:
$ brew install golang-migrate
How to Create a New Migration
Create a directory like database/migration to store all the migration files.
 Source files structure in GoLand IDE
Next, create migration files using the following command:
$ migrate create -ext sql -dir database/migration/ -seq init_mg
 Terminal output displaying successful creation of migration
You use -seq to generate a sequential version and init_mg is the name of the migration.
 Source files structure in GoLand IDE
A migration typically consists of two distinct files, one for moving the database to a new state (referred to as "up") and another for reverting the changes made to the previous state (referred to as "down").
The "up" file is used to implement the desired changes to the database, while the "down" file is used to undo those changes and return the database to its previous state.
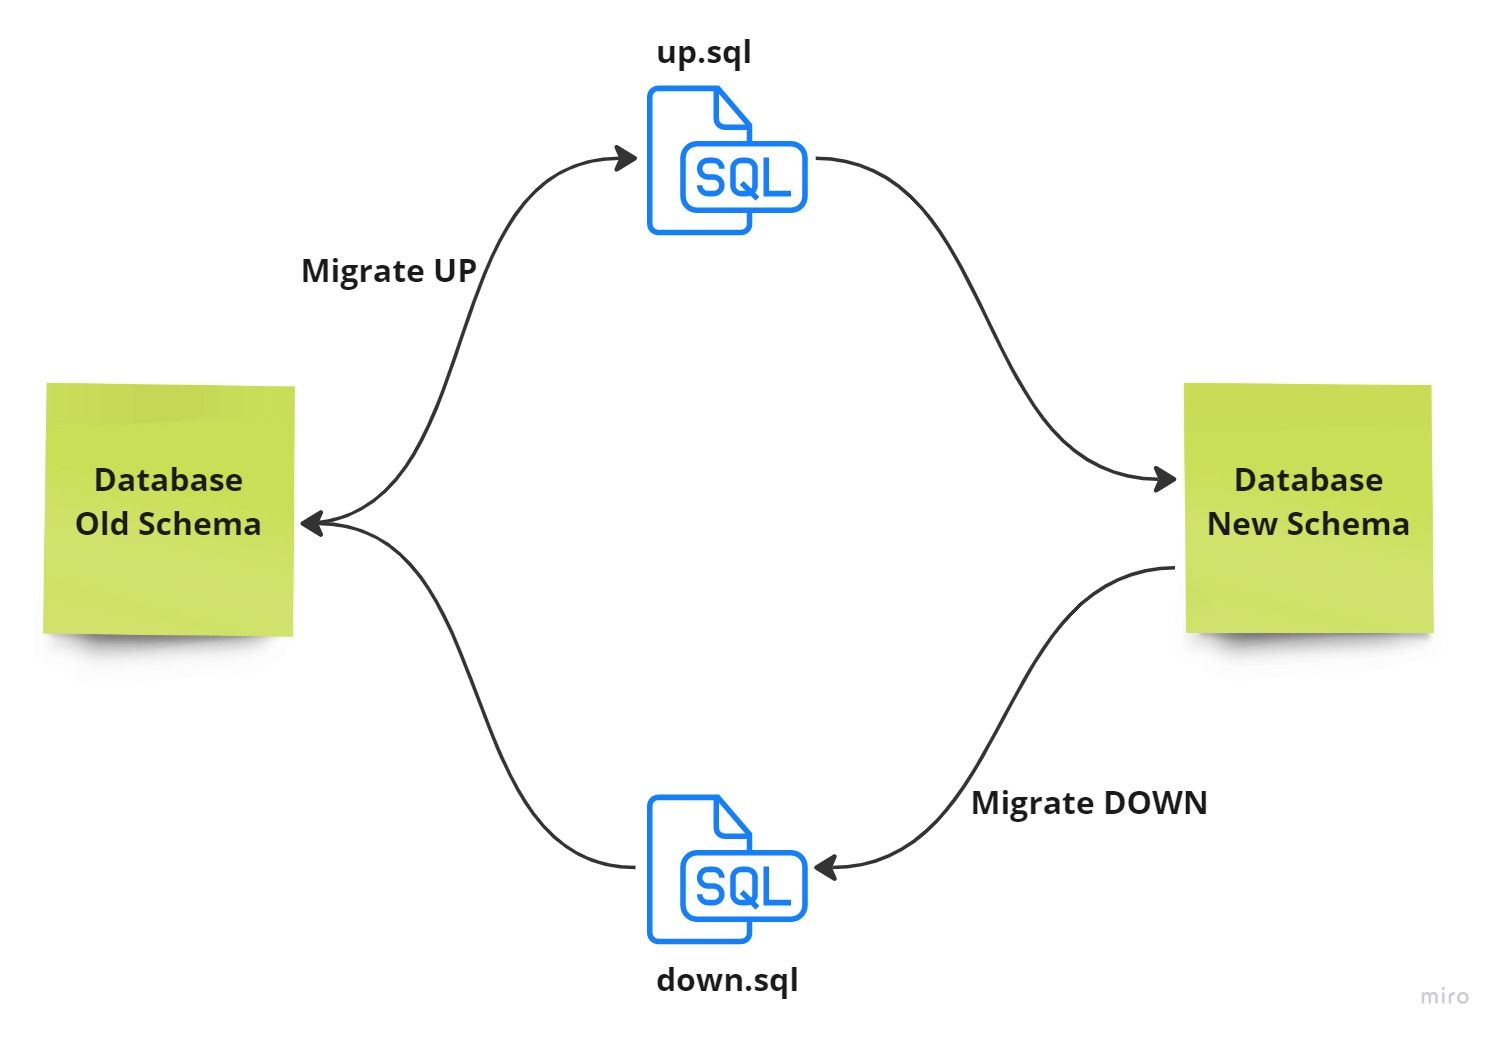 Flow of database migration
The format of those files for SQL are:
{version}_{title}.down.sql
{version}_{title}.up.sql
When you create migration files, they will be empty by default. To implement the changes you want, you will need to fill them with the appropriate SQL queries.
 SQL queries for migrating data
How to Run Migration Up
In order to execute the SQL statements in the migration files, migrate requires a valid connection to a Postgres database.
To accomplish this, you will need to provide a connection string in the proper format.
$ migrate -path database/migration/ -database "postgresql://username:secretkey@localhost:5432/database_name?sslmode=disable" -verbose up
Now in your Postgres shell, you can check newly created tables by using the following commands:
\d+

\d+ table_name DESCRIBE TABLE
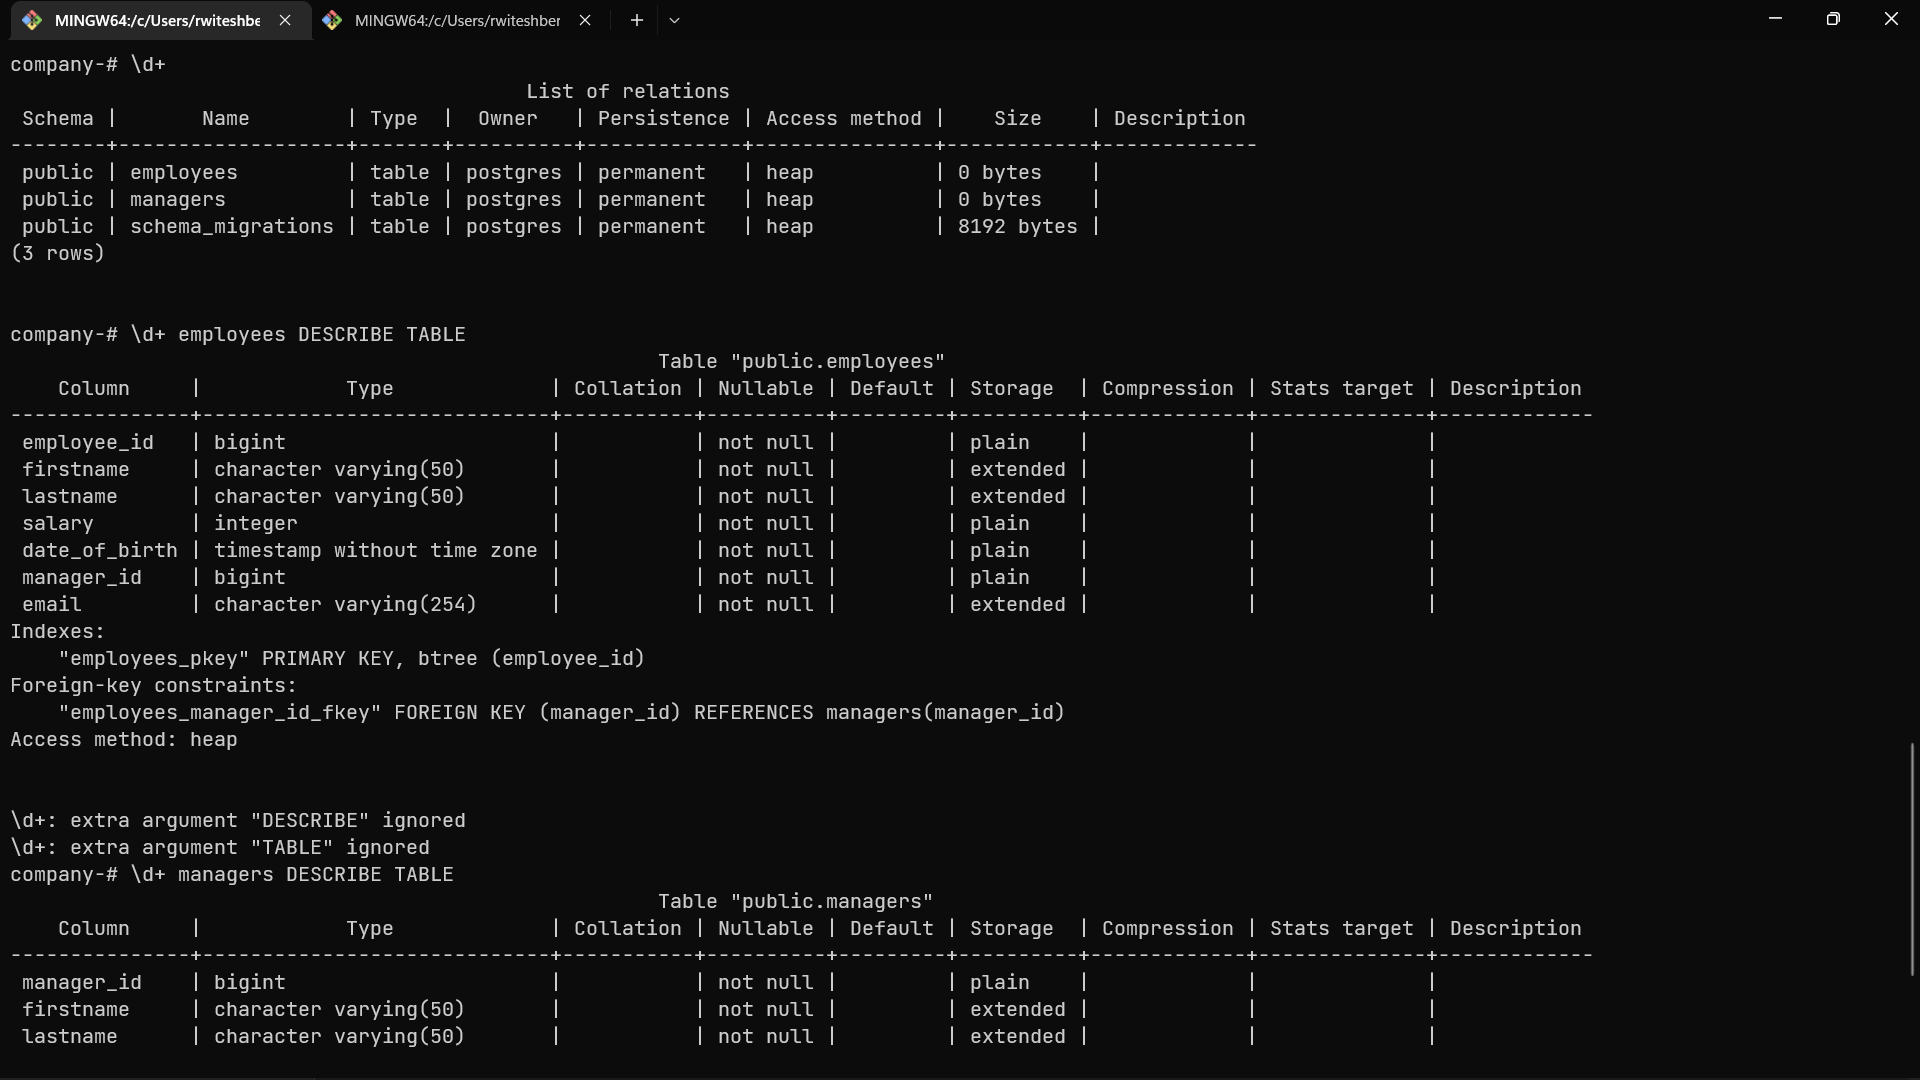 Displaying table data in Postgres
How to Rollback Migrations
If you want to revert back the migration, you can do that using the following down tag:
$ migrate -path database/migration/ -database "postgresql://username:secretkey@localhost:5432/database_name?sslmode=disable" -verbose down
It will delete the email column from both tables as mentioned in the 000002_init_mg.up.sql file.
Now, let's check the database and see if email has been deleted or not:
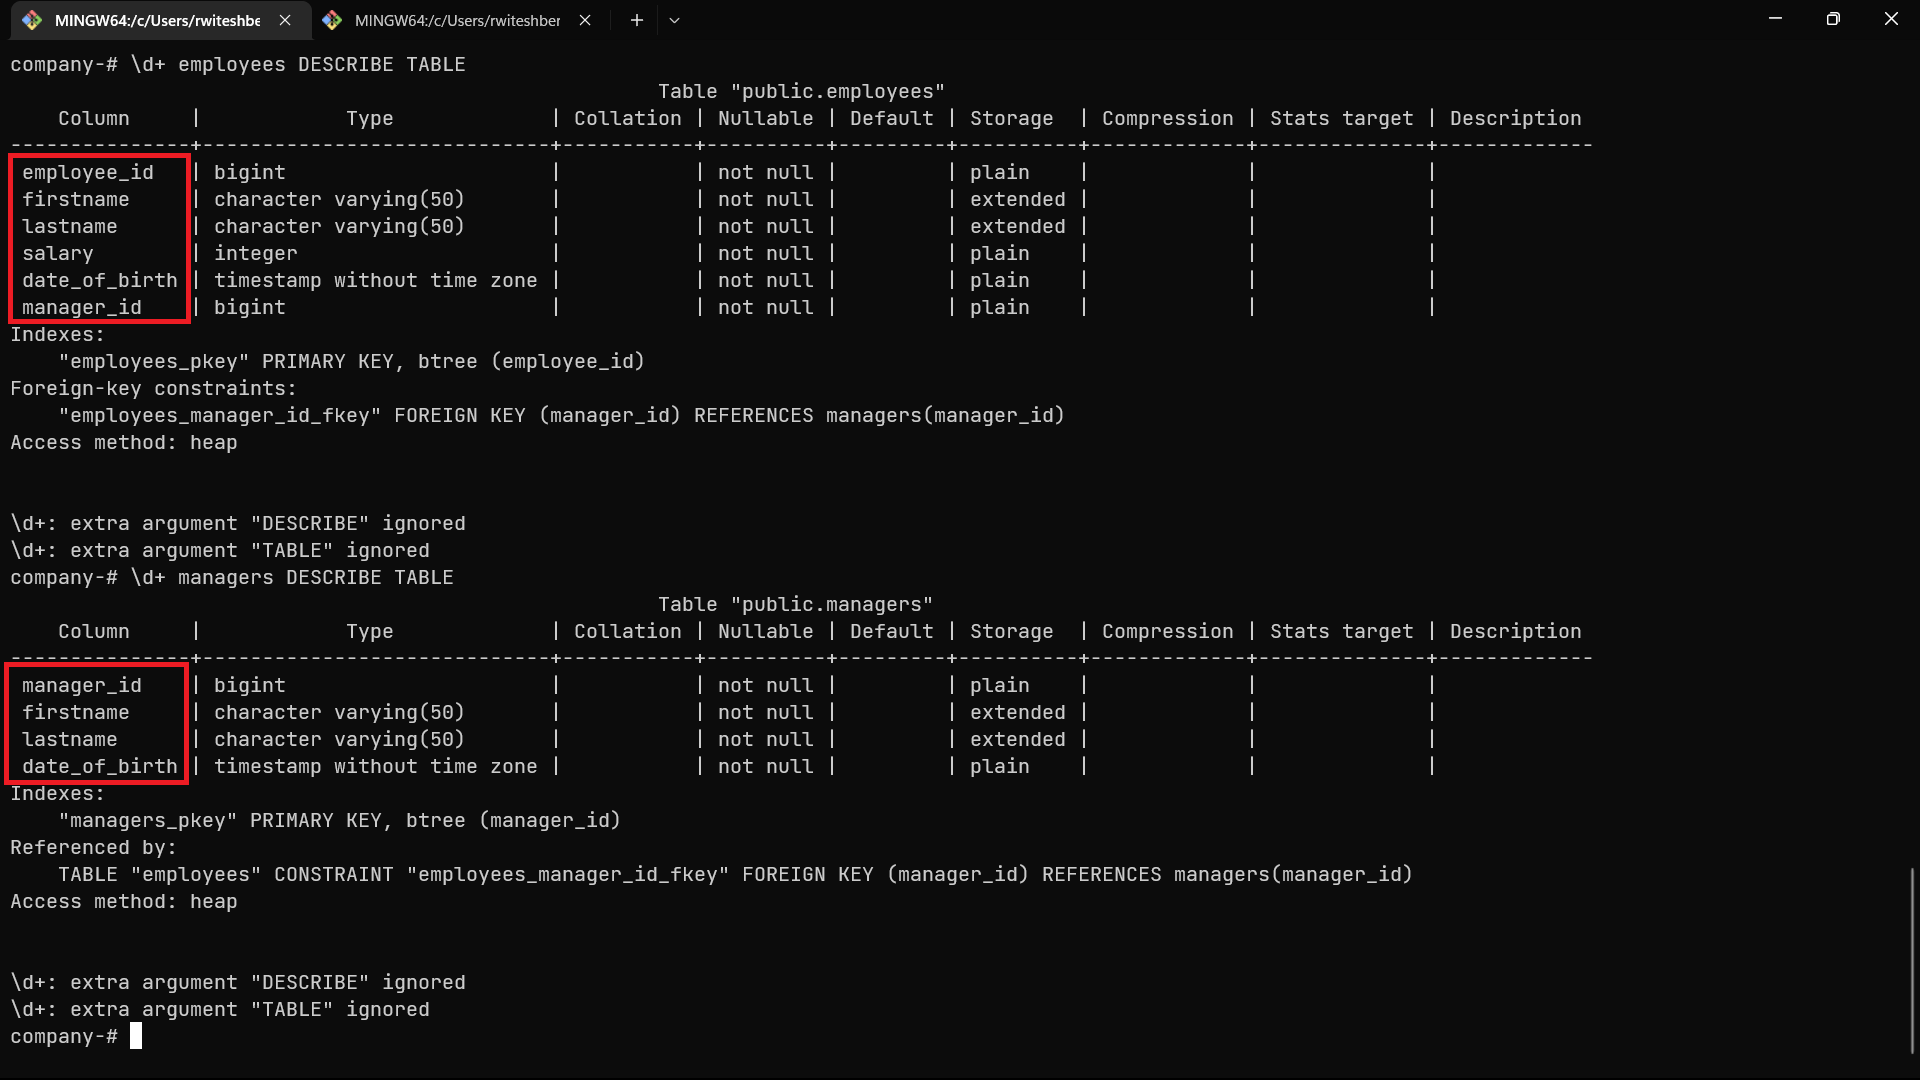 Displaying updated table data in Postgres
How to Resolve Migration Errors
If a migration contains an error and is executed, migrate will prevent any further migrations from being run on the same database.
An error message like Dirty database version 1. Fix and force version will be displayed, even after the error in the migration is fixed. This indicates that the database is "dirty" and needs to be investigated.
It is necessary to determine if the migration was applied partially or not at all. Once you've determined this, the database version should be forced to reflect its true state using the force command.
$ migrate -path database/migration/ -database "postgresql://username:secretkey@localhost:5432/database_name?sslmode=disable" force <VERSION>
How to Add Commands in a Makefile
migration_up: migrate -path database/migration/ -database "postgresql://username:secretkey@localhost:5432/database_name?sslmode=disable" -verbose up

migration_down: migrate -path database/migration/ -database "postgresql://username:secretkey@localhost:5432/database_name?sslmode=disable" -verbose down

migration_fix: migrate -path database/migration/ -database "postgresql://username:secretkey@localhost:5432/database_name?sslmode=disable" force VERSION
Now, you can run $ make migration_up for 'up', $ make migration_down for 'down', and $ make migration_fix to fix the migration issue.
Before running the makefile, ensure that the correct version number is included in the migration_fix command.
Conclusion
Migration systems typically generate files that can be shared across developers and multiple teams. They can also be applied to multiple databases and maintained in version control.
Keeping a record of changes to the database makes it possible to track the history of modifications made to it. This way, the database schema and the application's understanding of that structure can evolve together.
That concludes our discussion on database migration. I hope you found the information to be useful and informative.
If you enjoyed reading this article, please consider sharing it with your colleagues and friends on social media. Additionally, please follow me on Twitter for more updates on technology and coding. Thank you for reading!