
By Simeon Kostadinov
When first starting a new software project, you normally choose a certain programming language, a specific framework and libraries. Then you begin coding. After 2 - 3 months you end up with a nicely working single application.
But, as the project grows and more functionalities are added, you quickly realize the disadvantages of a centralized system. Difficult to maintain and unscalable are some of the reasons which will make you search for a better solution. Here is where Microservices come in help.
What are Microservices?
Microservices are independently built systems, each running in their own process and often communicating with REST API. Representing different parts of your application, they are separately deployable and each part can be written in any language.
You can easily see how, by dealing with the problems of a monolithic system, Microservices have become a requirement for any state-of-the-art software.
I strongly recommend reading Microservices (by James Lewis) and On Monoliths and Microservices if you want to understand more in depth what are the key concepts in this architectural style.
What are you going to build?
This article will walk you through the process of implementing a Microservice using Google Cloud Platform.
Imagine you’re developing an application that accepts a text input from a user and determine the category of the key words within the input.
We’ll use an example to illustrate the functionality of the App. Consider the sample text below from the GCP Cloud Natural Language API website:
“Google, headquartered in Mountain View, unveiled the new Android phone at the Consumer Electronic Show. Sundar Pichai said in his keynote that users love their new Android phones.”
Our web App would accept the text above as input, and return the category that the key words belong to, as in the figure below:
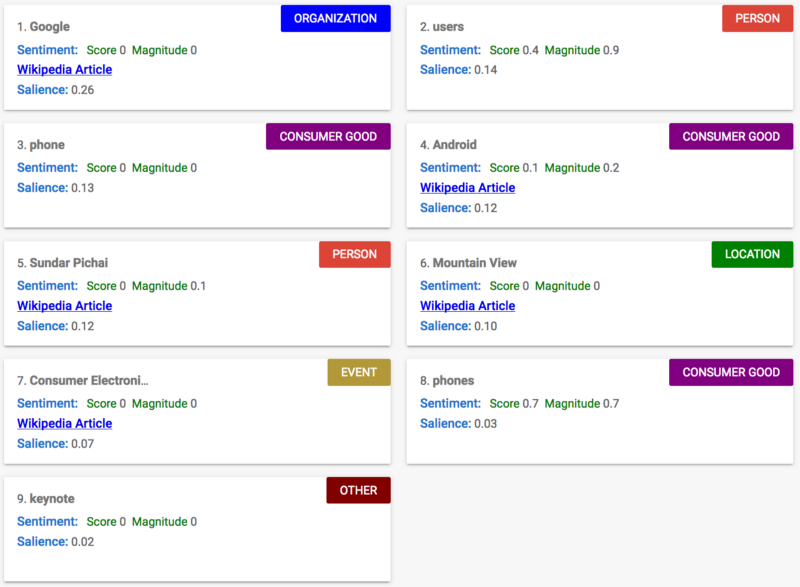 _Source: [GCP Cloud Natural Language API website](https://cloud.google.com/natural-language/" rel="noopener" target="blank" title=")
This feature is quite likeable and people use it hundreds of times each day. Now, if you’re going to offer this functionality as a service that receives a high amount of daily traffic, you want to respond with a stable and reliable system.
That’s why we’ll build a lightweight Flask App, hosted on Google App Engine. Integrating it with Google Cloud Pub/Sub will help us handle all the asynchronous requests we receive and help us assure that users don’t wait too long for a response.
Create and deploy the application
Let’s first start with the Flask app (you can also choose Django, Node.js, Go or anything used to build server-side applications). If you’re not very familiar with developing a Flask App, this Flask Series can show you step-by-step how to set up an application.
For the purpose of this tutorial we will use this simple example:
This embed is from an external site and no longer seems to be available
First you need to install the dependencies pip install Flask gunicorn. You will be using **gunicorn** to run the application on Google App Engine. For local access you can run python text.py in the console and find the app on port 8080.
To deploy the app to Google App Engine, you need to take these steps:
- Create a project (follow the ‘Before you begin’ instructions from the documentation). Save the project id for later.
- Create
app.yamlfile (shown below), which is used by the Google App Engine to recognize the application. - Run
gcloud app deployin the console.
The app.yaml file looks like this:
This embed is from an external site and no longer seems to be available
Line 3 is important, where you use **gunicorn** to tell Google App Engine to run the application **app** from a file called text.py (the Flask app). You can learn more about the .yaml file structure here. After deployment you should be able to access your project from https://[YOUR_PROJECT_ID].appspot.com.
When building production ready applications, you often want to test your code before pushing it live. One way to do this is to run your App within a server locally. A better approach is to have a development version of the app which can be tested not only from your local machine but also from a hosted environment. You can use Google App Engine versions for this.
Just deploy your App with gcloud app deploy -v textdev (for development) or gcloud app deploy -v textprod (for production).
Then navigate to https://textdev.[YOUR_PROJECT_ID].appspot.com or https://textprod.[YOUR_PROJECT_ID].appspot.com to access the specific version.
Scale to infinity
So far so good. You have a working application, hosted on the Google Cloud Platform. Now you need to add Google Cloud Pub/Sub and Google Natural Language API.
But first, let’s explain the architecture.
Once a request is received, the Flask app will publish a message with the text to a topic (created below). Then a subscriber (Python script) will pull this message and apply the Google Natural Language API to each text. Finally, the result will be saved to a database.
For multiple requests, the app asynchronously publishes them to the topic and the subscriber starts executing the first one. When ready, it picks the second one and so on.
Now you need to modify text.py file:
This embed is from an external site and no longer seems to be available
The code on line 15 and 16 creates the publisher. On line 18 it publishes a message containing the user email and text input.
You only need to fill in the project_id and topic_id (line 6 and 7).
Since the project_id was used earlier, just add it here.
For the topic_id you need to do the following:
- Enable Google Cloud Pub/Sub API
- Go to the Pub/Sub page of your project
- Create a topic and a subscription
- Use the topic name as your
topic_id - Keep the subscription name for later.
You will need it as yoursubscription_id
Wonderful! Now you have a working publisher.
Let’s jump into setting up the subscriber. There are two files that need to be created: worker.py and startup-script.sh.
The worker.py looks like this:
This embed is from an external site and no longer seems to be available
The file is slightly larger but we will examine it step-by-step, starting from the bottom.
When the file is executed, the code on line 44 runs main(). This function sets the subscriber with your project_id and subscription_id and assigns a callback to it.
The callback (initialized on line 7) is going to receive all messages and perform the required task (to determine the category of a text). If you follow the code from the callback, you can easily see how the Google Natural Language API is being used.
The interesting line is 11 where message.ack() acknowledges the current message. You can see this is as if the worker is saying: “I am done with this message and ready to handle the next one”.
Now, you need to implement startup-script.sh.
This is a shell script with several commands:
This embed is from an external site and no longer seems to be available
Before explaining the code above, I need to clarify the process.
Basically, Google Cloud Compute Engine gives you the ability to scale an application by providing as many virtual machines (VM) as needed to run several workers simultaneously.
You just need to add the code for the worker, which you already have, and set the configurations of the VM. Together with the worker.py, you also need to add a startup-script.sh which will run every time a new VM boots up.
New VM instances are booted up to prevent delay in responses when a high number of messages is received.
For a deeper and more technical explanation of this process check out the documentation.
Now, let me walk you through the script:
- Line 1: means that the script should always be run with bash, rather than another shell.
- Lines 2 and 3: creates and enters into a new directory where all of the files will be stored.
- Line 4: copies the
worker.pyfile from Google Cloud Storage into the VM (I will explain how to upload your files to the storage below). - Line 5: here you need to specify a JSON string of your key so that Google can verify your credentials. In order to get this string you need to create a service account. Select
**Furnish a new private key**and for**Key type**useJSON. A file will be downloaded to your computer. Copy the content and turn it into a JSON string (usingJSON.stringify(key_in_json_format)in a browser console). Paste it instead ofSERVICE_ACCOUNT_KEY. - Line 6: exports the key as an environment variable which will be used by the Google APIs to verify your credentials.
- Lines 7 - 12: sets up configurations and installs the python libraries.
- Line 15: runs the worker.
Now you need to upload worker.py and startup-script.sh to your storage and set up the VM. To upload the files just go here and create a new bucket with the same name as your project id. Create a folder called workers and upload the scripts inside. Make sure to change the worker.py to a ‘Public link’ and edit the permissions of the _startup-script.sh_ to have your service account as an owner.
Configurations and testing
The final step is to set up the configurations of the VM and test the system. Just follow the ‘Create an instance template’ instructions from the documentation and you are good to go!
Once the VM boots up, you can try sending requests to your application and examine how it reacts by checking the logs.
Final thoughts
Going through Google’s documentation may help you a lot. Also check out this tutorial - you may find it useful while implementing some of the steps above.
I want to express my gratefulness to Logan Allen for helping me better understand this process. I hope you find it useful.
Leave any questions or suggestions in the comment section.