
Deep learning is bringing revolutionary changes to many disciplines. It is also becoming more accessible to domain experts and AI enthusiasts with the advent of libraries like TensorFlow, PyTorch, and now fast.ai.
fast.ai's mission is to democratize deep learning. It is a research institute dedicated to helping everyone – from a beginner level coder to a proficient deep learning practitioner – achieve world-class results with state-of-the-art models and techniques from the latest research in the field.
This blog post will walk you through the process of developing a dog classifier using fast.ai. The goal is to learn how easy it is to get started with deep learning models and to be able to achieve near-perfect results with a limited amount of data using pre-trained models.
Prerequisite
The only prerequisite to get started is that you know how to code in Python and that you are familiar with high school math.
What You’ll Learn
Importing the libraries and setting up the notebook
Collecting Imagery Data using Microsoft Azure
Converting downloaded data into DataLoader objects
Data Augmentation
Cleaning Data using Model Training
Exporting the Trained Model
Building an Application out of your Jupyter Notebook
So let's get started.
How to Import the Libraries and Set Up the Notebook
Before we get down to building our model, we need to import the required libraries and utility function from the set of notebooks called fastbook. It's been developed to cover the introduction to Deep Learning using fast.ai and PyTorch.
Let’s install the fastbook package to set up the notebook:
!pip install -Uqq fastbook
import fastbook
fastbook.setup_book()
Then, let’s import all the functions and classes from the fastbook package and fast.ai vision widgets API:
from fastbook import *
from fastai.vision.widgets import *
How to Collect Imagery Data using Microsoft Azure
For most types of projects, you can find the data online from various data repositories and websites. To develop a Dog Classifier, we need to have images of dogs. There are many images of dogs available on the internet.
To download these images, we’ll use the Bing Image Search API provided by Microsoft Azure. So, sign up for a free account on Microsoft Azure and you’ll get $200 worth of credits.
Go to your portal and create a new Cognitive Service resource using this quickstart. Enable the Bing Image Search API. Then, from the Keys and Endpoint option in the left panel, copy the keys to your resource.

With the retrieved keys, set these keys to the environment as follows:
key = os.environ.get('AZURE_SEARCH_KEY', '<YOUR_KEY>')
Now, fastbook comes with utility functions like search_images_bing that returns URLs corresponding to your search query. You can learn about such functions using the help function:
help(fastbook)

You can check the search_image_bing function in this help guide. The function accepts a key to your resource that you’ve defined above and the search query, and we can access the URLs of the search results using the attrgot method:
results = search_images_bing(key, 'german shepherd dogs')
images = results.attrgot('content_url')
len(images)
We have 150 URLs of images of German Shepherd dogs:

Now, we can download these images using the download_url function. But let’s first define the type of dogs that we want.
For this tutorial, I’m going to work with three types of dogs: German Shepherds, black dogs, and Labradors.
So, let’s define a list of dog types:
dog_types = ['german shepherd', 'black', 'labrador']
path = Path('dogs')
You’ll then need to define the path where your images will be downloaded along with the semantic names of the folder for each class of dog.
if not path.exists():
    path.mkdir()
    for t in dog_types:
        dest = (path/t)
        print(dest)
        dest.mkdir(exist_ok=True)
        results = search_images_bing(key, '{} dog'.format(t))
        download_images(dest, urls=results.attrgot('content_url'))
This will create a “dogs” directory which further contains 3 directories for each type of dog image.
After that, we pass the search query (which is the dog_type) and the key to the search function, followed by the download function to download all the URLs from the search results in their respective destination (dest) directories.
We can check the images downloaded to a path using the get_image_file function:
files = get_image_files(path)
files

How to Verify Images
You can also check for the number of corrupt files/images in the files:
corrupt = verify_images(files)
corrupt

##output: (#0) []
You can remove all the corrupt files (if any) by mapping the unlink method to the list of corrupt files: corrupt.map(Path.unlink);
That’s it, we have 379 dog images ready with us to train and validate our model.
How to Convert Downloaded Data into DataLoader Objects
Now, we need a mechanism to provide data to our model. fast.ai has this concept of DataLoaders that stores multiple DataLoader objects passed to it and makes them available as a training and validation set.
Now, to convert the downloaded data into a DataLoader object, we have to provide four things:
What kinds of data we are working with
How to get the list of items
How to label these items
How to create the validation set
Now, to create these DataLoaders objects along with the information mentioned above, fast.ai offers a flexible system called the data block API_._ We can specify all the details of the DataLoader creation using the arguments and an array of transformation methods that the API offers:
dogs = DataBlock(
                  blocks=(ImageBlock, CategoryBlock),
                  get_items=get_image_files,
                  splitter=RandomSplitter(valid_pct=0.2, seed=41),
                  get_y=parent_label,
                  item_tfms=Resize(128)
                  )
Here, we have a bunch of arguments that we should understand:
blocks — this specifies the feature variables (images) and the target variable (a category for each image)
get_items — retrieves the underlying items (which are images in our case) and we have a
**get_image_files**function that returns a list of all of the images in that path.splitter — splits the data as per the provided method. We are using a random split with 20% of the data reserved for the validation set and specified the seed to get the same split on every run.
get_y — the target variable is referred to as y. To create the labels, we are using the
**parent_label**function which gets the name of the folder where the file resides as its label.item_tfms — we have images of different sizes and this causes a problem because we always send a batch of files to the model instead of a single file. Therefore we need to preprocess these images by resizing them to a standard and then group them in a tensor to pass through the model. We are using the
**Resize**transformation here.
Now, we have the DataBlock object which needs to be converted to a DataLoader by providing the path to the dataset:
dls = dogs.dataloaders(path)
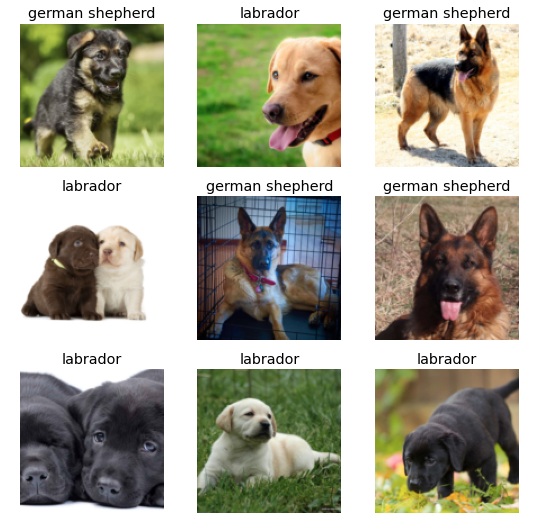
We can then check for the images in the dataloader object using the show_batch method:
dls.valid.show_batch()
Data Augmentation
We can add transformations to these images to create random variations of the input images, such that they appear different but still represent the same facts.
We can rotate, warp, flip, or change the brightness/contrast of the images to create these variations. We also have a standard set of augmentations encapsulated in the aug_transforms function that works pretty well for the majority of computer vision datasets.
We can now apply these transformations to an entire batch of images as all the images are of the same size (224 pixels, standard for image classification problems) using the following:
##adding item transformations
dogs = dogs.new(
        item_tfms=RandomResizedCrop(224, min_scale=0.5),
        batch_tfms=aug_transforms(mult=2)
        )
dls = dogs.dataloaders(path)
dls.train.show_batch(max_n=8, nrows=2, unique=True)

Model Training and Data Cleaning
It’s time to train the model with this limited number of images. fast.ai offers many architectures to use which makes it very easy to use transfer learning.
We can create a convolutional neural network (CNN) model using the pre-trained models that work for most of the applications/datasets.
We are going to use ResNet architecture, as it is both fast and accurate for many datasets and problems. The 18 in the **resnet18** represents the number of layers in the neural network.
We also pass the metric to measure the quality of the model’s predictions using the validation set from the dataloader. We are using error_rate which tells us how frequently the model is making incorrect predictions:
model = cnn_learner(dls, resnet18, metrics=error_rate)
model.fine_tune(4)
The fine_tune method is analogous to the fit() method in other ML libraries. Now, to train the model, we need to specify the number of times (epochs) we want to train the model on each image.
Here, we are training for only 4 epochs:

We can also visualize the predictions and compare them with the actual labels using the confusion matrix:
interp = ClassificationInterpretation.from_learner(learn)
interp.plot_confusion_matrix()

As you can see, we only have five incorrect predictions. Let’s check for the top losses, that is the images with the highest loss in the dataset:interp.plot_top_losses (6, nrows=3):

You can see that the model got confused between black and labrador. Thus, we can specify these images to be in a particular category using the ImageClassifierCleaner class.
Pass the model to the class and it will open up a widget with an intuitive GUI for data cleaning. We can change the labels of training and validation set images and view the highest-loss images.

After adding each image to their respective correct class, we have to move them to their right directory using:
for idx,cat in cleaner.change():
    shutil.move(str(cleaner.fns[idx]), str(path/cat).split('.')[0] +"_fixed.jpg")
How to Export the Trained Model
After a couple of rounds of hyperparameter tuning, and once you’re happy with your model, you need to save it so that you can deploy it on a server to be used in production.
While saving a model, we have the model architecture and the trained parameters that are of value to us. fast.ai offers the export() method to save the model in a pickle file with the extension .pkl.
model.export()
path = Path()
path.ls(file_exts='.pkl')
We can then load the model and make inferences by passing an image to the loaded model:
model_inf = load_learner(path/'export.pkl')
Use this loaded model to make inferences:
model_inf.predict('dogs/labrador/00000000.jpg')

We can check the labels from the models dataloader vocabulary:
model_inf.dls.vocab

How to Build an Application out of your Jupyter Notebook
The next step is to create an application that we can share with our friends, colleagues, recruiters, and others.
To create an application, we need to add interactive elements so that we can try and test the application’s features. We also need to make it available on the web as a webpage, which includes deploying it via some framework like Flask or simply using Voila.
You can use Voila to convert this Jupyter Notebook into a standalone app. I have not covered it here but you can go through my blog/video which covers the whole process.
Deploying your Model
I’ve covered deploying an ML model in my post here. But if you want another easy and free way of deploying your Voila application, you can use Binder.
Follow these steps to deploy the application on Binder:
Add your notebook to a GitHub repository.
Insert the URL of that repo into Binder’s URL field.
Change the file drop-down to instead select the URL.
In the “URL to open” field, enter
/voila/render/<_name>_.ipynbClick the clipboard button at the bottom right to copy the URL and paste it somewhere safe.
Click Launch.
And there you go, your dog classifier is live!
If you prefer to watch me going through all of these steps, here’s the video version of this blog:
Data Science with Harshit
With this channel, I am planning to roll out a couple of series covering the entire data science space. Here is why you should be subscribing to the channel:
These series would cover all the required/demanded quality tutorials on each of the topics and subtopics like Python fundamentals for Data Science.
Explained Mathematics and derivations of why we do what we do in ML and Deep Learning.
Podcasts with Data Scientists and Engineers at Google, Microsoft, Amazon, etc, and CEOs of big data-driven companies.
Projects and instructions to implement the topics learned so far. Learn about new certifications, Bootcamp, and resources to crack those certifications like this TensorFlow Developer Certificate Exam by Google.
If this tutorial was helpful, you should check out my data science and machine learning courses on Wiplane Academy. They are comprehensive yet compact and helps you build a solid foundation of work to showcase.