
Server-Side Request Forgery (SSRF) has been a consistent issue in application security and is among the OWASP Top 10 vulnerabilities.
In this walkthrough, you'll first learn what Server-Side Request Forgery is and how it differs from Client-Side Request Forgery. We will create a sample application to gain a better understanding of how Server-Side Request Forgery attacks work, and explore various methods to safeguard our application against SSRF vulnerabilities.
Table of Contents:
Prerequisites
Node and Express: We'll create a JavaScript sample application using the Express framework. A basic understanding of the framework would be helpful. You will need the Node Runtime Environment to execute the scripts.
Postman Client: To make an API request and to exploit the vulnerability, you will need a tool to make HTTP Requests. You may use your web browser's "Edit and Send" feature under the Networks tab, but since not all browsers allow this, it's best to use a tool like Postman which provides a better UI to observe responses.
What is Server-Side Request Forgery?
Server-Side Request Forgery, or SSRF, is a security vulnerability that allows malicious actors to manipulate the server into making unintended requests on behalf of the server itself.
SSRF provides a window for such malicious actors to make requests "from" the server when they should be making requests "to" the server.
To appreciate what this means, let's look at a normal request execution using the sequence diagrams below:
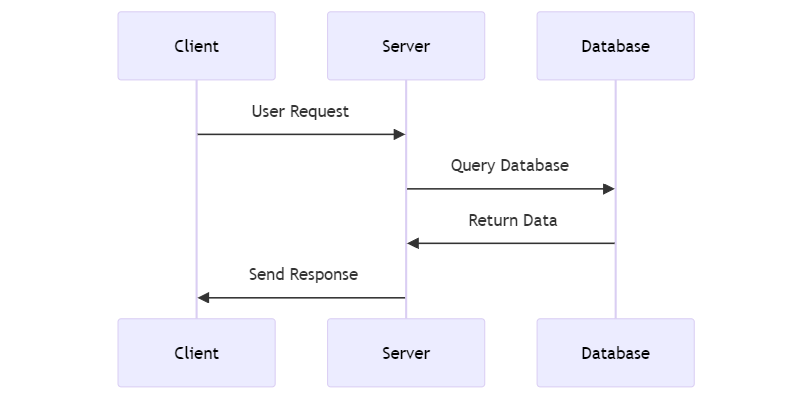
UML Sequence Diagram for normal request execution
In a typical scenario, a server processes incoming requests from clients. Users or external systems initiate these requests, and the server responds accordingly. This is a standard client-server interaction where the server acts upon the requests it receives.
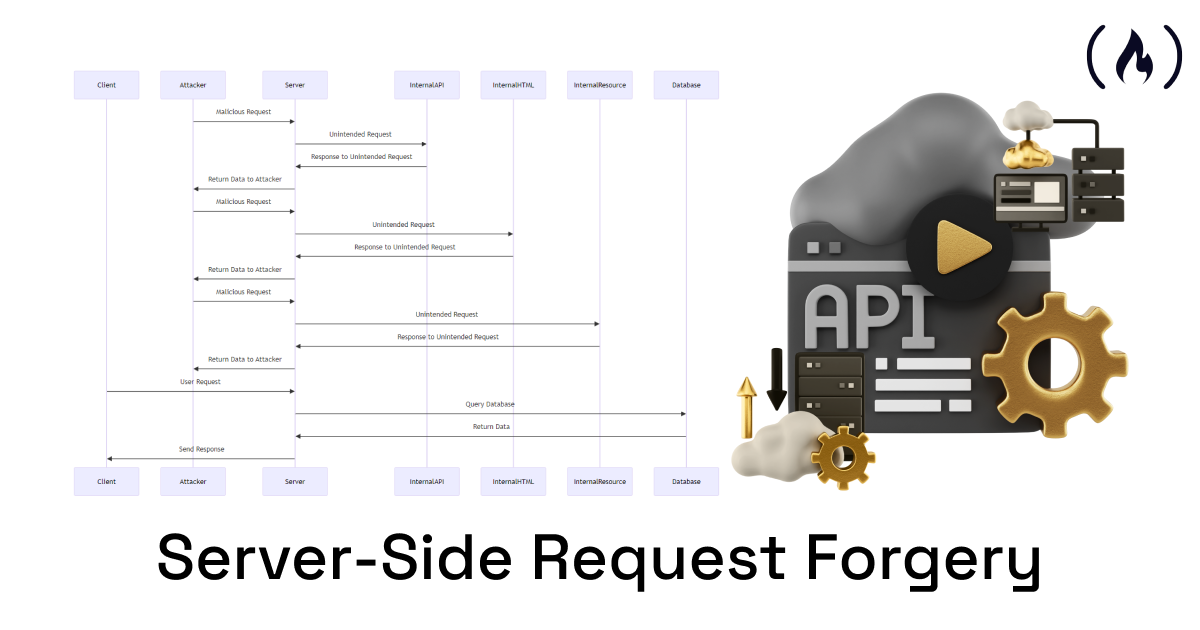
Now let's look at what SSRF looks like:

UML Sequence Diagram for SSRF attacks
In applications vulnerable to SSRF, attackers exploit the server's ability to make HTTP requests to resources that should not be directly accessible from the public internet. These resources may include internal protected resources, APIs, websites, or databases that can only be accessed from the server.
Attackers achieve this by tricking the server into making unintended requests to various destinations, including internal APIs, internal HTML pages, and internal databases.
How Does SSRF Differ from CSRF?
SSRF is an attack where an attacker can make the server perform requests on their behalf. This involves manipulating the server to make requests to internal resources, which can result in unauthorized actions or information disclosure.
On the other hand, in CSRF, or Client-Side Request Forgery, the attacker tricks a user's browser into making unintended requests to a specific web application for which the user is already authenticated. This means that actions are performed on behalf of the user without their consent.
Backend Developers must be aware of SSRF to make secure applications. In contrast, front-end developers must be mindful of and implement client-side security measures to prevent CSRF attacks.
Identifying Code Smells
SSRF attacks often occur when web applications improperly mishandle user-controlled input, leading to network requests based on inadequately sanitized user input. Processing un-sanitized URLs in API requests is a common entry point for SSRF attacks.
Another common giveaway to identifying SSRF vulnerabilities in your applications is to check for instances where XML parsing occurs without adequate validation of external entities. Applications that fail to validate and secure their XML parsers properly may inadvertently expose themselves to SSRF risks.
In this walkthrough, you will make a server that takes a URL and uses it to make network requests without proper validation and sanitization. You will then see ways to mitigate this issue.
Understanding the Pain Points
To better understand the issue of SSRF attacks, lets create a sample application using Express and JavaScript. Below is a Mermaid Sequence Diagram where we explain what the code base does:
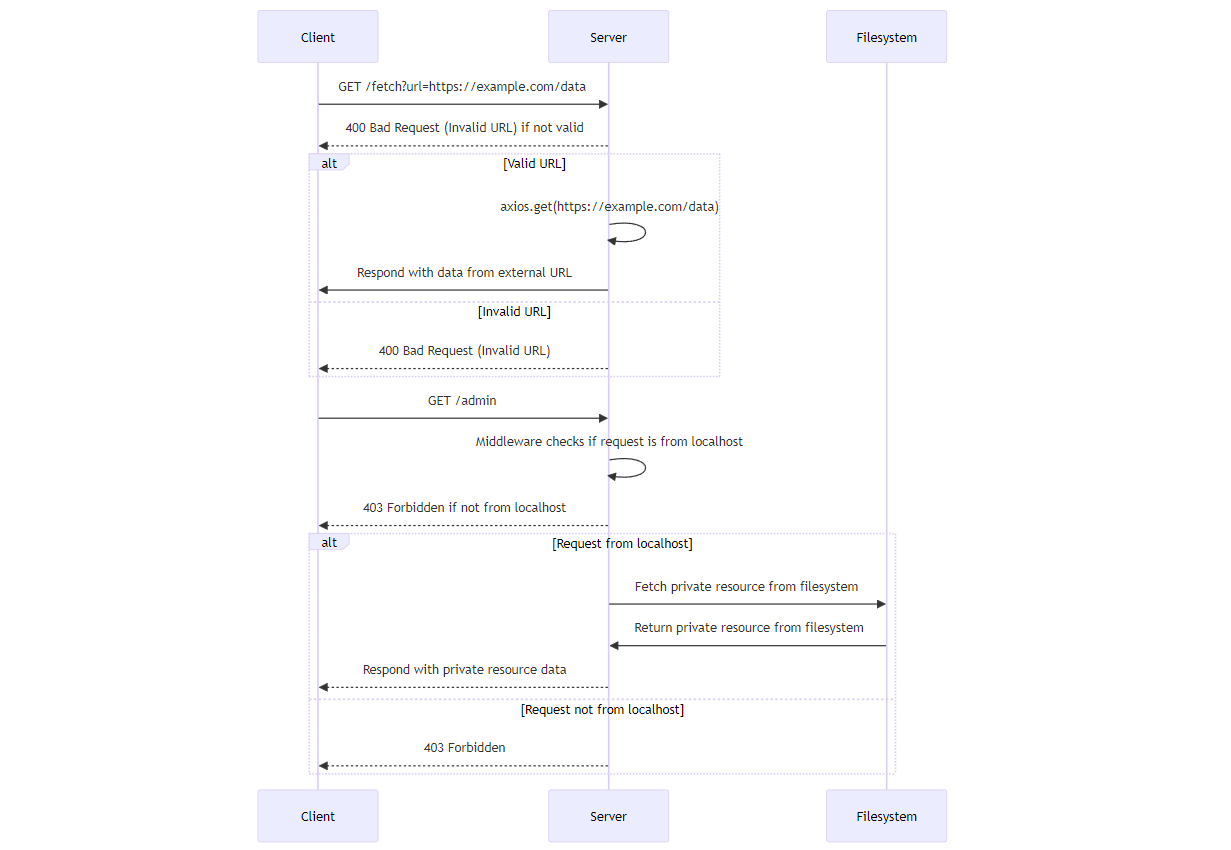
UML Sequence Diagram for the sample application
We will create an Express app with two endpoints — /fetch, a GET request designed to fetch content from a specified URL, and /admin, another GET request, which is an internal API within the organization that accesses an internally protected resource.
We will discover a security vulnerability associated with Server-Side Request Forgery (SSRF) in implementing the first GET request.
We will also create another helper function at the /uploads endpoint to allow our clients to fetch and view their recently uploaded content.
Project Setup
To get started, let's quickly set up our repository and install all the required packages. In the root of your workspace, install Express and Axios using the following command:
npm init -y | npm i axios express
Executing this command will create a package.json file with default settings and install the specified packages.
To simulate the internal protected resource, let's create a data.json in the root of your workspace:
{
    "name": "Hamdaan Ali Quatil",
    "password": "violinblackeye"
}
Now, create a file called app.js in the root of your repository. Here, we will define all of our endpoints. Import all required packages like this:
const express = require('express');
const axios = require('axios');
const fs = require('fs').promises;
We use the fs (File System) module to interact with the local file system. Within the Express application, we use fs.promises to read the contents of a file. The fetchPrivateResource function asynchronously reads the contents of the data.json file, which is an internal resource.
Let's create an instance of the Express app to handle HTTP requests and define the fetchPrivateResource method. In the sample application, only the admin should be able to fetch this internal resource, but you will observe how a malicious actor can access this using an SSRF attack.
const app = express();
const port = 3000;

// Function to fetch private resource
const fetchPrivateResource = async () => {
  try {
    const content = await fs.readFile('data.json', 'utf-8');
    return content;
  } catch (error) {
    console.error('Error reading private resource:', error.message);
    throw error;
  }
};
The Fetch Endpoint
Now, let's define our first endpoint, /fetch which expects a query parameter url containing the target URL. Upon receiving a request, the server uses the Axios library to make a GET request to the specified URL.
app.get("/fetch", async (req, res) => {
  const url = req.query.url;

  try {
    const response = await axios.get(url);
    const responseData = JSON.stringify(response.data);

    const filename = path.basename(url);
    const textFilePath = path.join(__dirname, "uploads", "upload-data.txt");

    await fs.writeFile(textFilePath, responseData, "utf-8");

    res.send("Upload Successful");
  } catch (error) {
    console.error("Error:", error.message);
    res.status(500).send("Internal Server Error");
  }
});
The axios.get method is used to perform the HTTP GET request, and the response data is then converted to a JSON string. The resulting string is written to a text file named upload-data.txt in the uploads folder of the server. Finally, a success message or an error message is sent back to the client, depending on the outcome of the operation.
The Uploads Endpoint
With that done, let's create an endpoint to allow users to access and verify their uploaded files. The server will check if the requested file exists, and if so, it sends the file to the client. When a file cannot be found, the server returns a 404 error.
app.get("/uploads/:filename", async (req, res) => {
  const filename = req.params.filename;
  const filePath = path.join(__dirname, "uploads", filename);
  console.log(filePath);

  try {
    // Check if file exists
    await fs.access(filePath);

    // If file exists, send it to the client
    res.sendFile(filePath);

  } catch (error) {
    res.status(404).send("File not found: " + error);
  }
});
The Admin Endpoint
Now, we need to make an internal API – the /admin route – which is intentionally shielded from public access. The objective is to ensure this API is only accessible from localhost or the local machine (127.0.0.1).
We can do this by implementing a middleware that acts as a protective barrier, permitting requests to proceed to the /admin route only if they originate from the local host.
The middleware checks whether the req.hostname property, which represents the hostname specified in the HTTP request, matches localhost or 127.0.0.1. If the request is from a different host, the middleware responds with a 403 Forbidden status, thereby restricting access.
// middleware to protect admin API
app.use('/admin', async (req, res, next) => {
  const isLocalhost = req.hostname === 'localhost' || req.hostname === '127.0.0.1';

  if (isLocalhost) {
    next();
  } else {
    res.status(403).send('Forbidden');
  }
});

// Route to access the admin API
app.get('/admin', async (req, res) => {
  try {
    const content = await fetchPrivateResource();
    res.send(content);
  } catch (error) {
    res.status(500).send('Internal Server Error');
  }
});
Once all routes are configured, we start the server using the app.listen method, and it begins listening on port 3000 for incoming requests.
app.listen(port, () => {
  console.log(`Server is running on http://localhost:${port}`);
});
With our app.js now set up to process incoming requests, let's run the sample application using nodemon:
npm i -D nodemon | nodemon app.js
The server has started on the port 3000. Now, we are ready to test our sample application and look for code smells that may lead to SSRF attacks. You may find the complete code here — GitHub Gist | HamdaanAliQuatil.
How to Exploit the Vulnerability
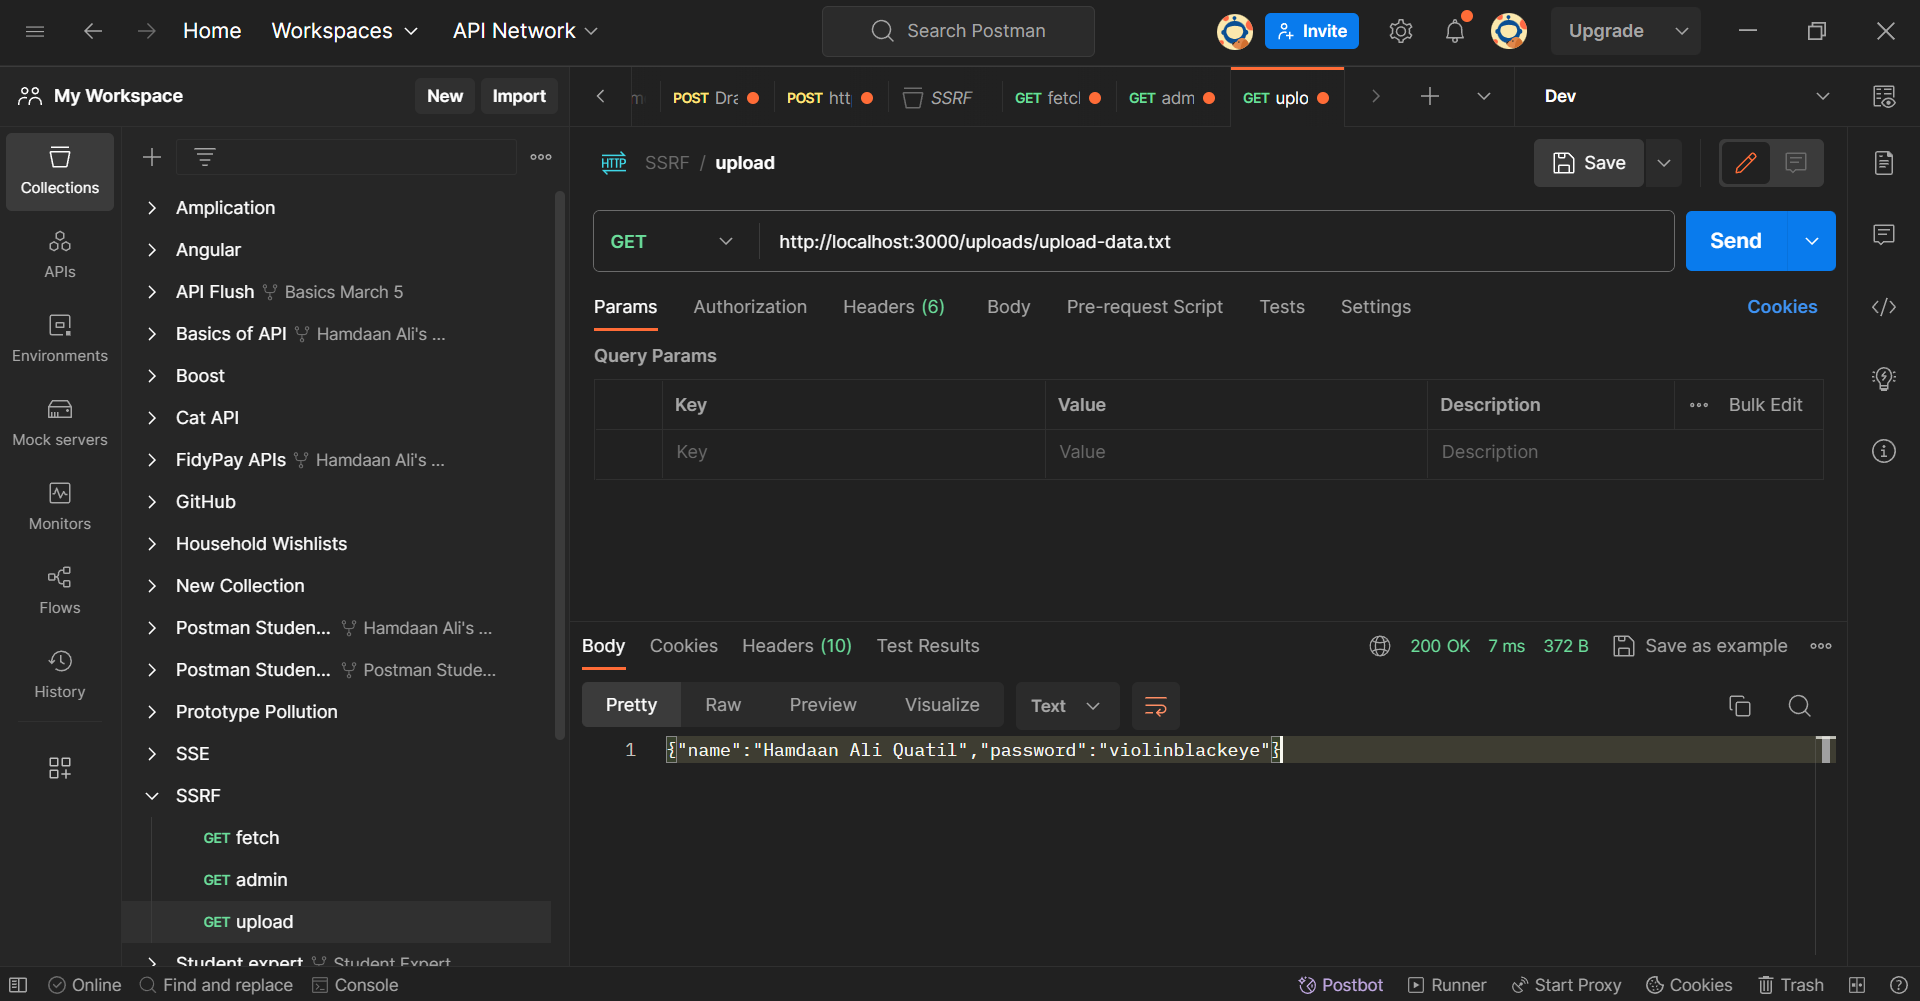
Let's try to make a GET request to the fetch API. We are simulating the process of uploading a text file using the URL to the file. In this demonstration, we will fetch the contents of an example file and save it on our servers. Here is the link to the text file.
Open your Postman Client and execute a GET request with the URL http://localhost:3000/fetch?url=https://example-files.online-convert.com/document/txt/example.txt. We are adding the link to the file as a Query Parameter in the /fetch endpoint. When you hit send, you will see a response "Upload Successful".
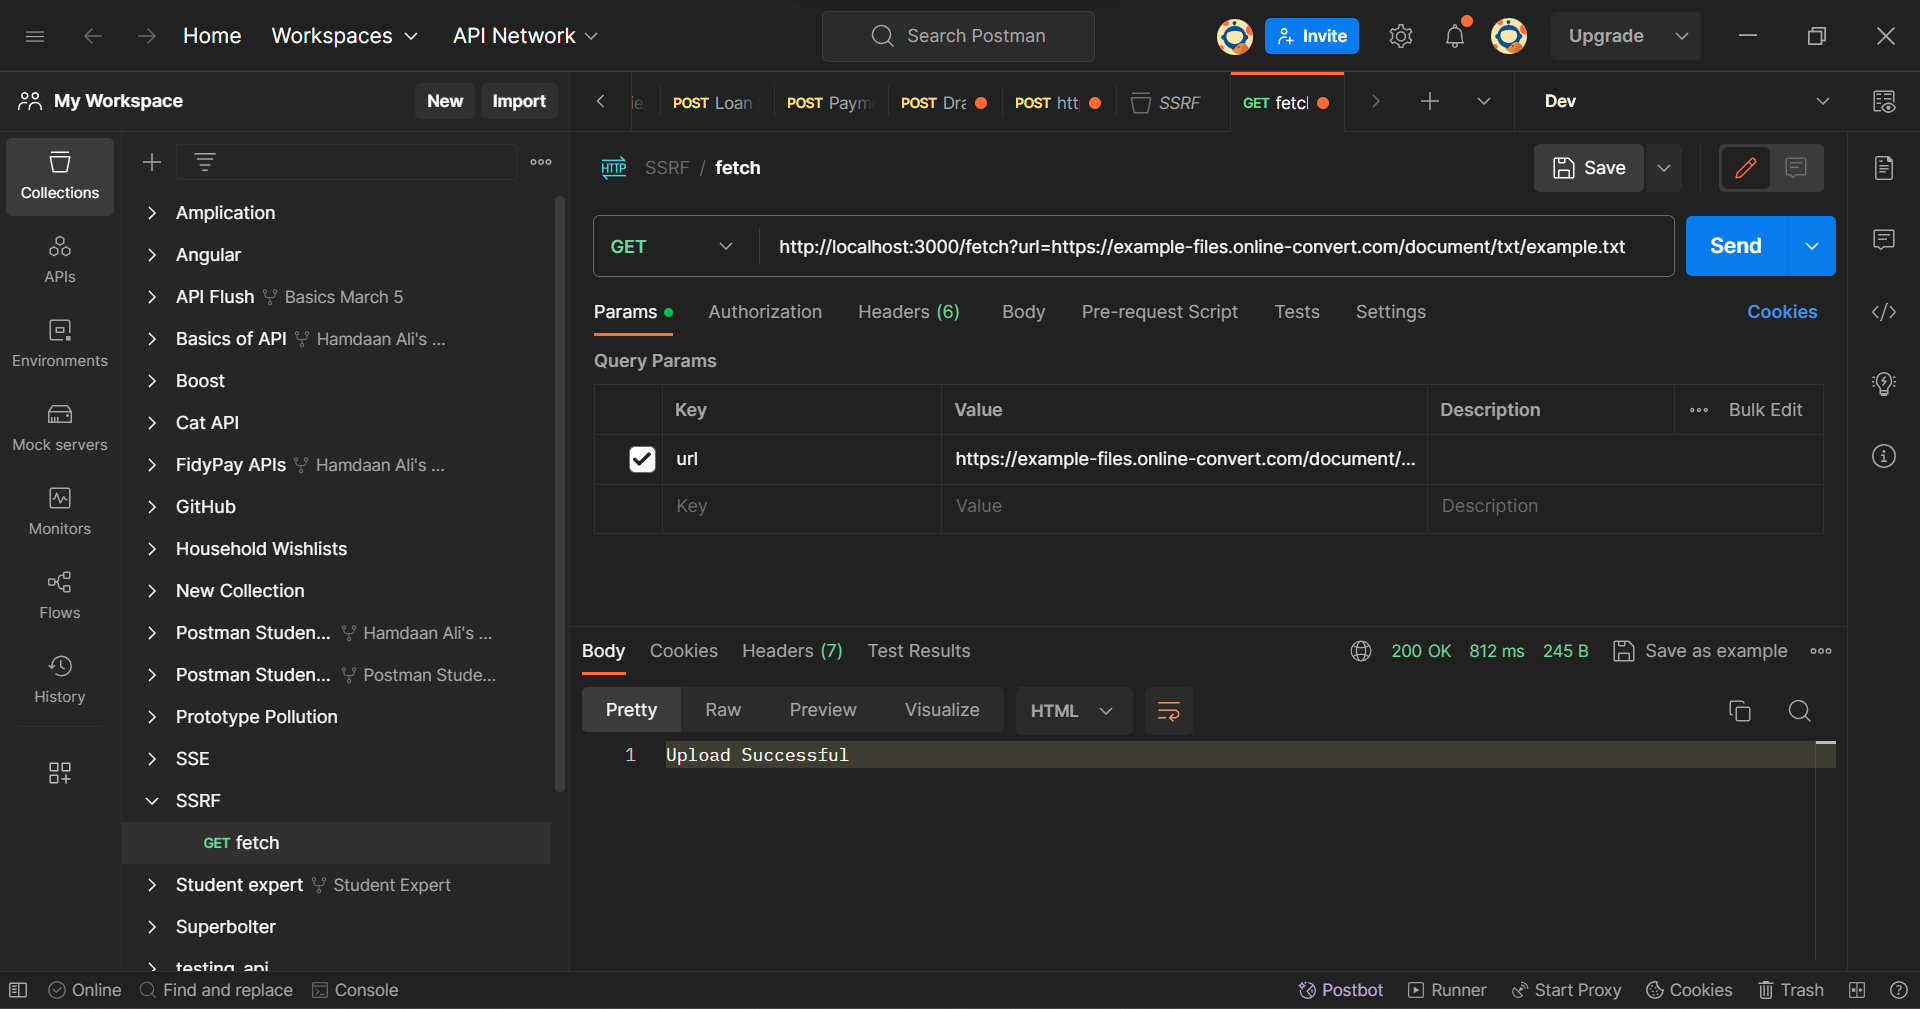
Postman Client: Fetch Endpoint
You'll see that your repository now has a newly created file in the uploads directory. Clients can now access their uploaded information using the /uploads API endpoint to view their files.
Postman Client: Uploads Endpoint
Now, let's send a malicious request by changing our Query param to http://120.0.07/admin in the same request to the /fetch endpoint. The updated URL will now look like this: http://localhost:3000/fetch?url=http://127.0.0.1:3000/admin.
In the Query parameter, 127.0.0.1 is a Loopback Address. A loopback address is a reserved IP address used to establish network connections with the same host (the local machine) for testing and communication within the device.
The malicious actor is attempting is to make a request to the server's /admin route from the server itself using the loopback address. This simulates an internal resource access scenario.
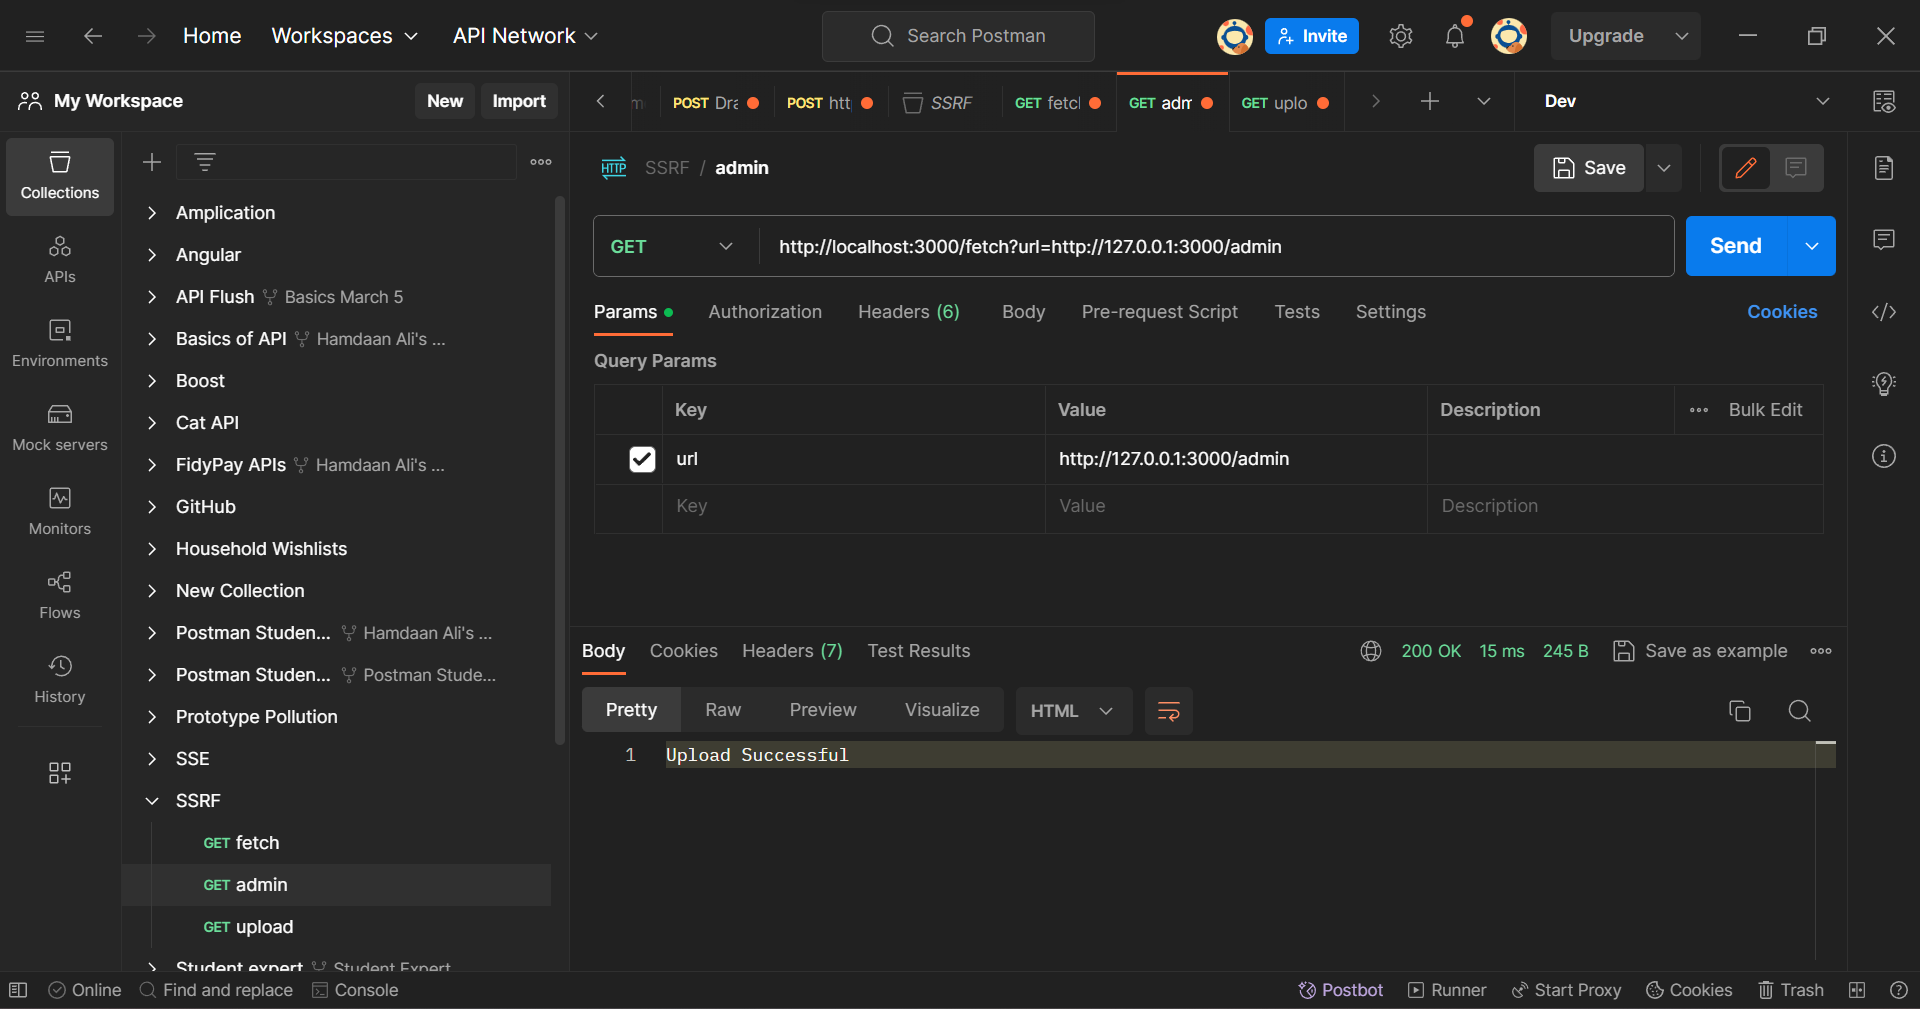
Postman Client: Admin Endpoint
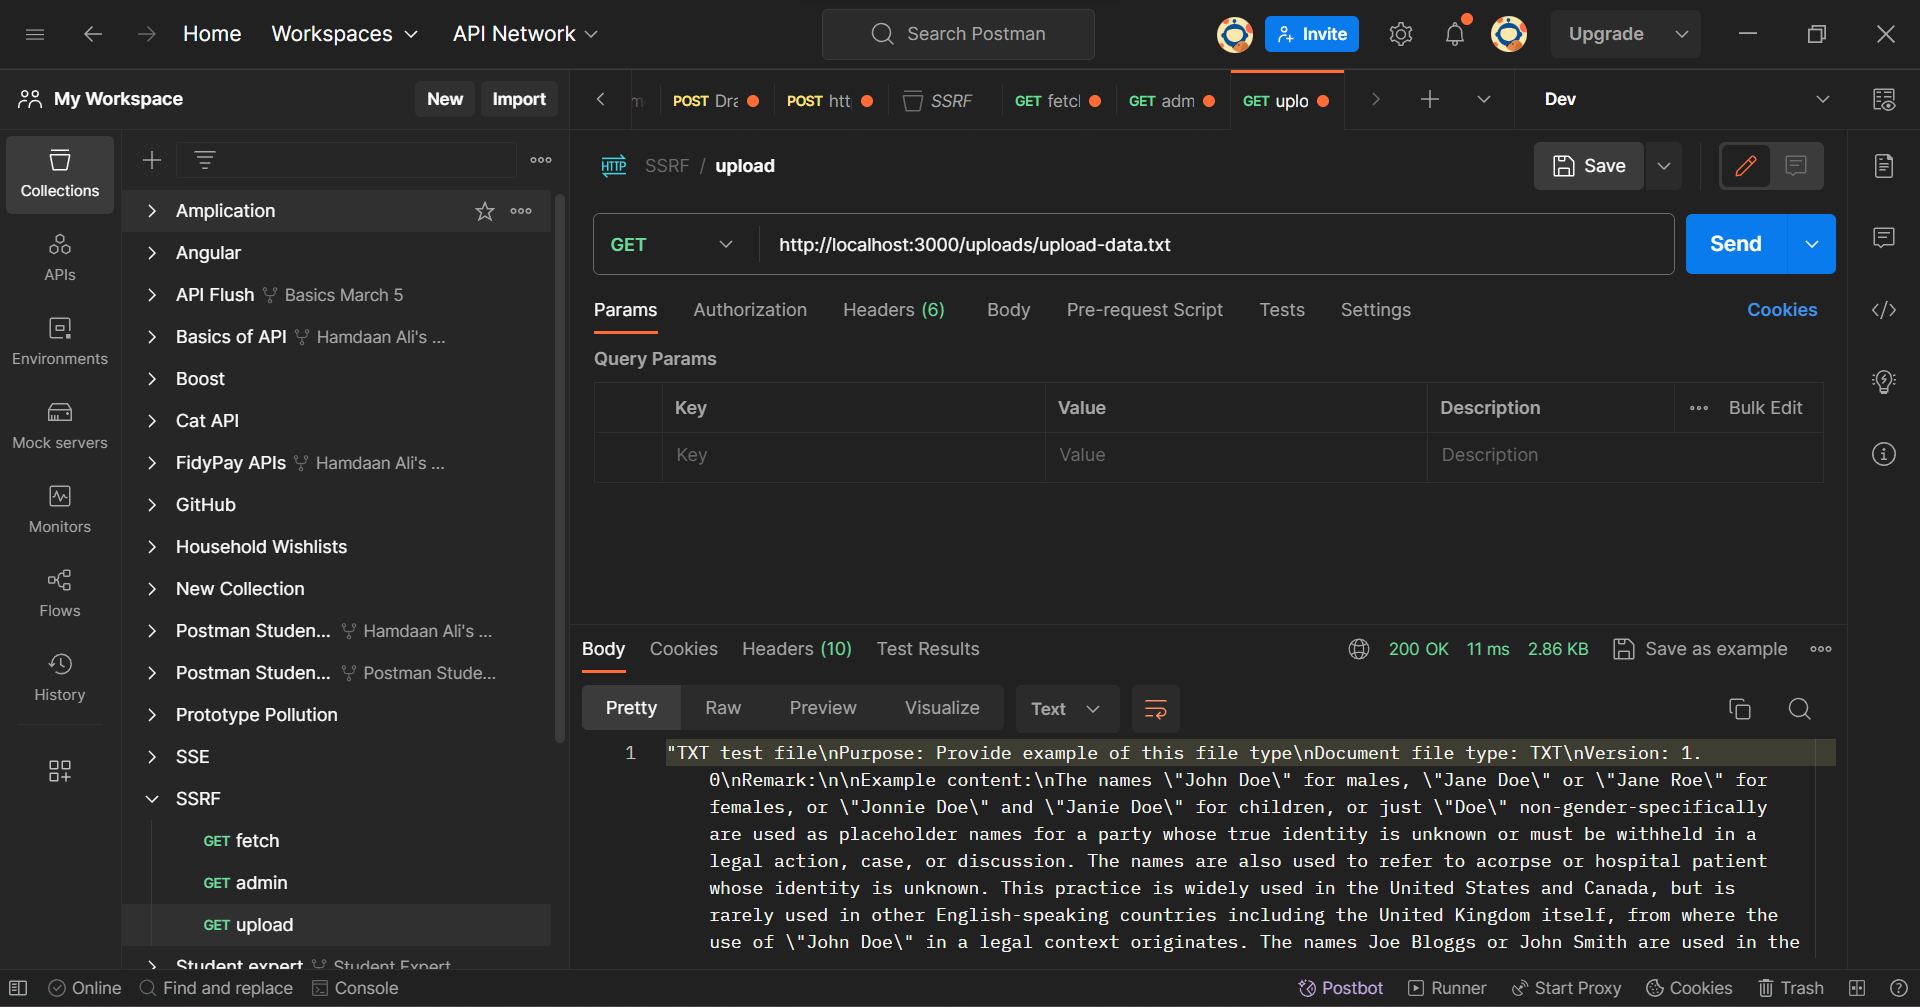
You'll notice that an "Upload Successful" message comes as a response to this request. Now try accessing your uploaded file again using the GET request at the /upload endpoint.
Postman Client: Uploads Endpoint
You'll see that the contents of the uploaded file have been altered. This alteration highlights a successful SSRF (Server-Side Request Forgery) attack, where a malicious actor took advantage of the server's capability to initiate internal requests.
The file, which initially contained specific data, has now been tampered with. This showcases the potential for unauthorized access and manipulation of sensitive information through SSRF exploits.
How to Defend Against SSRF Attacks
Now, let’s see the ways in which we can fix our application's vulnerability to SSRF. The most intuitive solution that comes to your mind could be to never allow a client to enter a URL. This is certainly the most powerful defense. The server should create a URL it needs.
But many times, allowing URLs in your business logic becomes an absolute necessity. In such cases, our goal is to prevent the attack or at least reduce the risk if an attack occurs.
If you really must allow a URL as it is, here are some precautionary steps you can take:
Sanitization and Validation
As with most vulnerabilities, a pain-point in SSRF attacks is the use of untrusted data. Always treat any data coming from the client side as untrusted.
Sanitizing and validating the client-supplied data should go a long way to defend against SSRF attacks. A very intuitive validation is to restrict any URL containing localhost or the loopback address.
Let's create a helper function isValidUrl and call it in the function for the /fetch endpoint.
function isValidUrl(url) {
  // Restrict URLs to HTTP only. This blocks FTP and other protocols
  const validUrlRegex = /^http:\/\/\S+$/;

  if (!validUrlRegex.test(url)) {
    return false;
  }

  try {
    const parsedUrl = new URL(url);

    // Check if the host is localhost or a loopback IP address
    const isLocalhost = parsedUrl.hostname === 'localhost';
    const isLocalIP = /^127\.\d+\.\d+\.\d+$/g.test(parsedUrl.hostname);

    return !(isLocalhost || isLocalIP);
  } catch (error) {
    return false;
  }
}
Your updated function for /fetch endpoint should look like this:
app.get("/fetch", async (req, res) => {
  const url = req.query.url;

  if (!isValidUrl(url)) {
    res.status(400).send("Loopback URLs are not allowed");
    return;
  }

  try {
    ...
    res.send("Upload Successful");
  } catch (error) {
    ...
  }
});
Now, go back to the Postman Client and resend the malicious request. You will observe that previously uploaded file is not tampered and you receive "Loopback URLs are not allowed" in the response.
Whitelisting via an Allow List
You may create a positive allow list to only allow certain trusted IP Addresses, URL Schema, and Port. Let's implement an allow list and improve our isValidUrl function:
const whitelist = ["boost.com", "boost.in", "trustedDomain3.com"];
const allowedPorts = ['80', '443'];
Now use your declared whitelist in the isValidUrl function:
function isValidUrl(url) {
  try {
    const parsedUrl = new URL(url);

    if (!whitelist.includes(parsedUrl.hostname)) {
      return false;
    }

    if (!allowedPorts.includes(parsedUrl.port)) {
      return false;
    }

    return true;
  } catch (error) {
    return false;
  }
}
Notice how we've removed the need for regex. This brings us to another mitigation technique that you must avoid:
Don't Use a Deny List
You must never mitigate SSRF vulnerabilities using a deny list or regex. Restricting the use of IP Addresses is not straightforward. To understand why we must avoid a deny list, look at the following example.
A Loopback Address is typically represented using 127.0.0.1 . Its quite easy to spot this address and reject it. But a problem arises when a malicious request is sent using any other forms of this Loopback address that also points to the local machine. For example, 127.1, ::1, localhost ,::ffff:7f00:1 all point to the local machine.
A regular expression to spot all such variations is much more complex. Malicious actors can easily bypass a deny list by passing an octal representation of decimal encoding of the IP address.
Enforce a URL Scheme
In absence of this measure, a client might send requests that use any protocols other than the intended ones. To replace our validUrlRegex, we will use a allowedSchemes list. We will restrict our application to only process requests when the protocols are either https: or http. Not allowing any requests with protocols file: and ftp: will safe-guard our sample application.
const allowedSchemes = ['http:', 'https:'];
The updated isValidUrl function will look like this:
function isValidUrl(url) {
  try {
    const parsedUrl = new URL(url);

    if (!whitelist.includes(parsedUrl.hostname)) {
      return false;
    }

    if (!allowedPorts.includes(parsedUrl.port)) {
      return false;
    }

    if (!allowedSchemes.includes(parsedUrl.protocol)) {
      return false;
    }

    return true;
  } catch (error) {
    return false;
  }
}
Disable Redirects
Redirects are a mechanism used by web applications to forward a user's browser from one URL to another. If a server follows redirects automatically, an attacker could exploit this behavior to make the server inadvertently access internal resources, leading to data exposure or unauthorized actions.
To restrict redirects in Axios, pass in an Axios Configuration object in the second parameter:
const response = await axios.get(url, { maxRedirects: 0 });
To learn more about Axios Config, check this guide: Axios | Request Config.
Send Filtered Data to the Client
Avoid sending raw response bodies directly from your server to the client. Ensure that the responses reaching the client are carefully curated and conform to expected formats.
By implementing this practice, you shield your application from potential security vulnerabilities associated with exposing unfiltered or sensitive information. Always validate, filter, and format responses to align with your application's anticipated data structures.
Wrapping Up
And there you have it: by implementing a few well-established methodologies and best practices, you can effectively detect and mitigate SSRF attacks in your applications and create secure APIs as developers.
Find the complete code snippets here — GitHub Gist | HamdaanAliQuatil.
You may find me on X (formerly Twitter) - Hamdaan Ali Quatil.