
In today's ever-changing technology landscape, companies are looking for reliable and scalable ways to run and manage software. And containers have transformed the way we deliver software.
Container orchestration platforms have made it possible to deploy and manage containerised applications. Kubernetes is one such platform that has been a game-changer for developers who are dealing with the challenges of application deployments.
Kubernetes has made it so much easier to manage and scale deployments according to your needs. In this tutorial, I am going to help you understand the simplicity of Kubernetes, so get ready.
We'll first take a Node application and package it using Docker. Then, I'll show you how to use Kubernetes – from setting up the cluster and creating deployments and services to scaling the application. Make sure you stay till the end to get the maximum value. It's going to be great.
You can find the full code in this GitHub Repo.
I'll start with a note on container orchestration.
Container Orchestration
Containers offer an efficient and isolated environment for your application. But as your application grows, so does the container count.
Juggling containers in production can quickly turn into a headache, especially if you are using microservices. Faster deployments, monitoring, scaling, networking, and load balancing suddenly become daunting tasks.
That's where container orchestration comes in. It automates these challenges and ensures that containers are operating smoothly. It simplifies the deployment and scaling processes, thus streamlining your workflow.
Adding to that, orchestration takes the stage in networking and facilitating communication between containers across multiple hosts. Want to expose your containers to the outside world? Orchestration makes it effortless.
How to Prepare a Packaged Application
Your first task is to set up a Node application and package it into a Docker image. For this, you need to have Node.js installed in your system. If not, then follow this guide on installing Node on Mac and Windows.
You do not need to be familiar with either Node.js or JavaScript to go through this tutorial. Just follow the steps mentioned below. The main focus of this post is Kubernetes.
Set Up the Node Application
To set up your Node app, create a folder called sample-node-application and navigate inside it. Run the command npm init and enter each field value accordingly with the entrypoint as server.js.
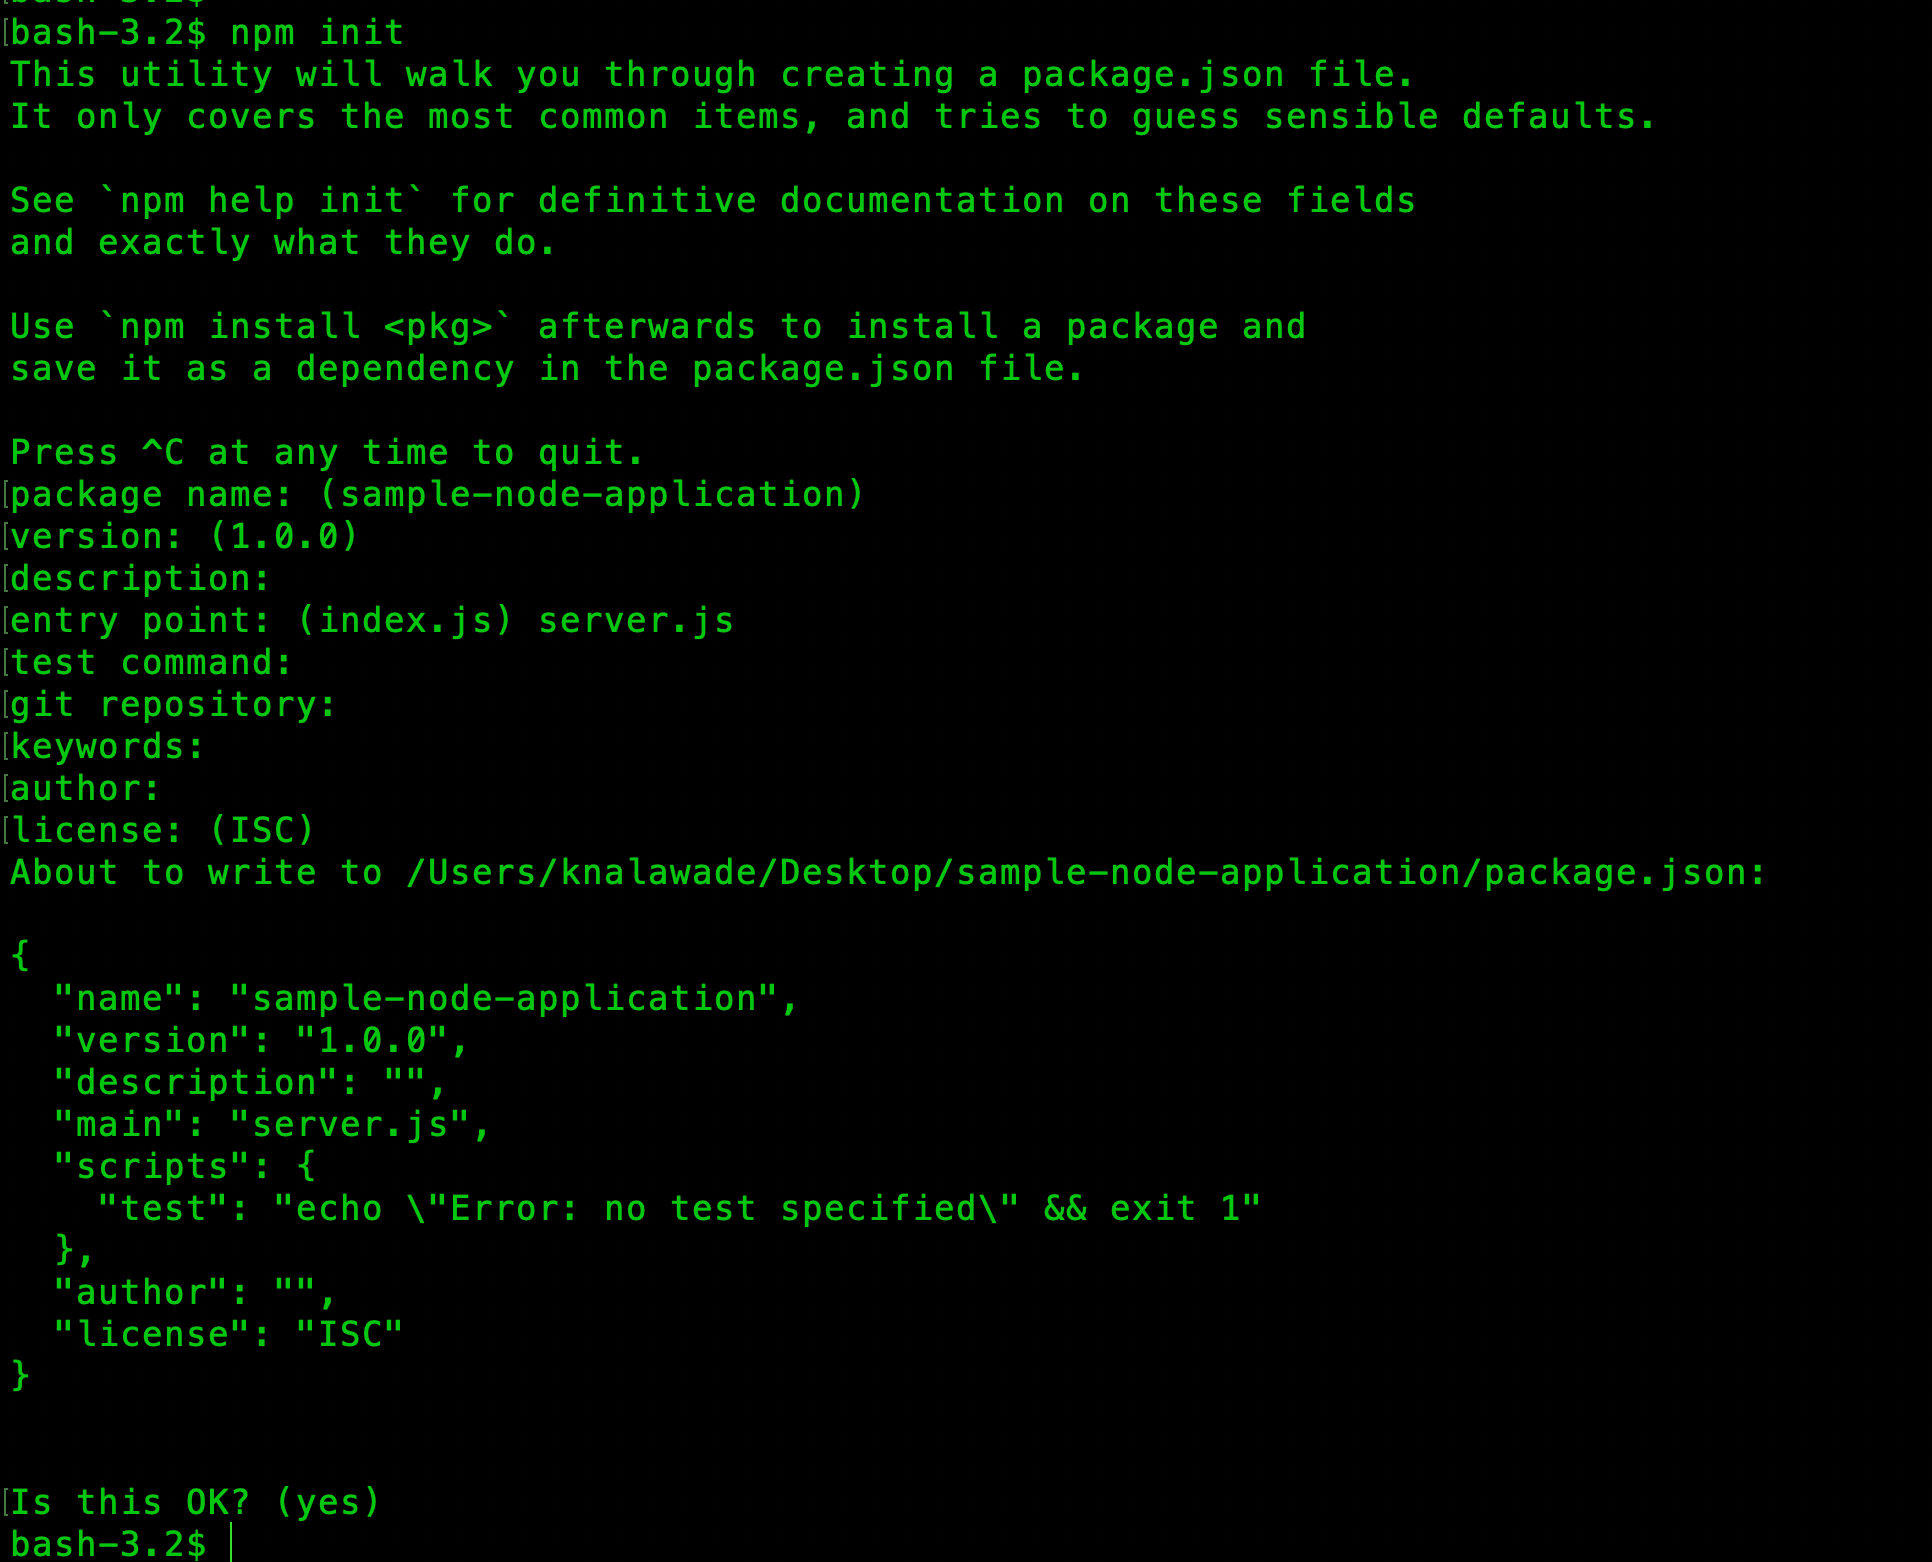
npm init command
A package.json file will be created that specifies the necessary dependencies your application needs. Create a file server.js, this will contain your APIs.
const express = require("express");
const data = require("./data.json")

const app = express();

app.get("/", (req, res) => {
    res.send("Hello, Welcome to the Node App")
})

app.get("/data", (req, res) => {
    res.json(data)
})


app.listen(8000, () => {
    console.log("App is running")
});
Create a separate data.json file and add some mock data to it. You can generate mock data from Mockaroo.
Run the node server command to check if the app is running.
Build a Docker Image
Before building the image, check if you have Docker installed in your system. If not, then refer to the installation guides for different operating systems. Run docker --version to confirm that Docker is installed.
This is how our Dockerfile will look:
FROM node:18-alpine

WORKDIR /sample-node-app

COPY server.js /sample-node-app/
COPY package.json /sample-node-app/
COPY data.json /sample-node-app/

RUN npm install

CMD ["node", "server"]
Run the following command to build the Docker image:
docker build -t node-image .
Check if your image was created with the docker images command. Now, push this image to Docker Hub. Go to Docker Hub and sign in. If you do not have an account, then go ahead and register for one.
Once you are in, create a repository named node-image and make it public. Now, back to your terminal, run docker login and enter your username and password. Then, tag the image with your username.
docker image tag react-example-image <username>/node-image
Push this image to Docker Hub with the following command:
docker push <username>/node-image
Your image will be pushed to Docker Hub.
Here, I have explained the image creation steps briefly. If you want a more detailed explanation, then you can read my tutorial on How to Dockerize a React Application.
Before diving into the next steps, let's first understand what Kubernetes is, why it is needed, and few key concepts.
What is Kubernetes and Why Do You Need It?
Kubernetes (abbreviated as K8s) is an open-source container orchestration platform. Orchestration is all about automating deployments, scaling, and managing containers.
Kubernetes uses a declarative approach, where you define the desired state of your applications in a YAML file. Then, Kubernetes will work towards achieving that state and ensure that the state is maintained.
It enables close collaboration between development and operations teams, also helping enable efficient DevOps practices.
Problems that Kubernetes Helps Solve
Traditionally, multiple applications used to be deployed on physical servers. This presented a few problems.
If one application ends up taking more space than anticipated, then the other applications would not get enough resources. Also, scaling was difficult and expensive for organizations.
Then came VMs. They allowed better resource utilization than physical systems and also made scalability easier and cheaper. But containers provide a much more lightweight solution than VMs.
To run and manage these containers, we need Kubernetes to provide the necessary automation with the following features:
Service Discovery and Load Balancing allow applications to communicate with each other no matter where they are running.
Automated Scaling enables Kubernetes to auto-scale the number of containers depending on the configurations provided.
With Self Healing, Kubernetes can restart any containers that stopped running or failed to run.
Kubernetes allows Mounting a Storage to your deployment automatically.
Automated Rollouts: Kubernetes follows a declarative mechanism to achieve and maintain the desired state of the application.
Secret and Config Management: You can add configs and secrets to deployments so your application can use whatever configuration it needs based on the environment it is deployed in (dev or prod).
If you want to know more about Kubernetes and its components, visit the docs.
Key Kubernetes Concepts
Following are the key concepts that you'll need to know to effectively use Kubernetes in your projcts.
What are Pods?
A pod is a single deployment unit in Kubernetes containing one or more containers. Pods are responsible for running your application's containers in the Kubernetes cluster. It is a single instance of a running application.
You can create a pod using simple YAML configuration. Usually, you do not need to create them explicitly. Instead, you can use the Deployment configuration to create a pod. We'll see how to do that shortly.
Even though a pod can run multiple containers, it is common practice to run a single container in a pod. Read more about pods here.
How Do Deployments Work?
Kubernetes aims to maintain the desired state of the application at all times. A Deployment describes the desired state through YAML configuration.
A deployment configuration is used to decide the number of replicas of your pods, modify the pod configuration, rollback to a previous state, scale up/down your application and more.
When you create a deployment, it will create the pods that run the containers you specified. Once you create a deployment configuration, you do not need to create a separate configuration file for pods. You'll understand more in the hands-on part.
Read more about deployments here.
What are Services?
Let's say you have multiple applications deployed as pods. These applications may need to communicate with each other. Each pod has its unique ip address, so they can simply use the same ip address to communicate, right? Actually, this presents a few problems.
Pods have a relatively shorter lifespan. If any issue comes up and the pod is terminated, Kubernetes springs up a new pod as it needs to maintain the desired state of the deployment.
This new pod would have a different IP address. But the other pods are still using the old pod's IP to communicate. So, this new pod would not be discoverable unless all other pods update the IP to which they are communicating.
This is where services come in. Services help expose groups of pods over a network by adding a layer of abstraction. This abstraction provides a stable endpoint for the pods to communicate with each other.
Read more about services here.
Let's look at one last concept, the Kubernetes Cluster. I know it feels like a lot of theory, but don't worry, the hands-on part is coming.
The Kubernetes Cluster
A K8s cluster is a group of machines (or nodes) that run and manage your applications. The cluster consists of worker nodes and a control plane that controls and manages these workers.
The control plane makes several decisions like scheduling, starting up a new pod, etc. It consists of the following components:
api-server: Exposes the Kubernetes API
etcd: Key-value store for cluster data
scheduler: Watches for newly created pods and assigns a worker node to run them.
controller-manager: Runs a control loop that watches the state of the cluster through the api-server and if necessary, moves the current state to the desired state.
Worker Nodes are responsible for running and maintaining the pods. Each worker node consists of the following components:
kubelet: Makes sure the containers are healthy and running in the Pod.
kube-proxy: Network proxy that runs on each node and allows communication with the worker node from inside and outside the cluster.
container-runtime: Responsible for running containers
That's it for the main concepts – let's dive into the hands-on part.
How to Deploy to a Kubernetes Cluster
So far, we have created a Docker image of the Node application and pushed it to the Docker Hub. The image can be accessed from anywhere.
How let's see how you can take this application and run it in a Kubernetes Cluster.
Installation
Let's install the Kubernetes command line utility, kubectl. You will find the guides for installation on Linux, Mac and Windows here.
After following the steps mentioned, run the following command to check if kubectl was installed:
kubectl version --client
Set Up the Kubernetes Cluster
To deploy your application, you need to set up a Kubernetes Cluster that will run your pods and services. There are lot of clusters provided by multiple cloud providers like Google, Amazon and Microsoft. For this application, we will use Minikube.
Minikube is a tool that lets your run a single-node K8s cluster on your computer. It is a personal playground for trying out Kubernetes in your system.
Refer to this guide for setting up minikube on Mac or Windows. Check if Minikube was installed by running the minikube version command.
Run the minikube start command to start a local Kubernetes cluster.
Write the YAML Configurations
Now, let's write our deployment and service configurations in YAML files.
First, let's see how to create the deployment config, step by step.
apiVersion: apps/v1
kind: Deployment
metadata:
  name: sample-node-app
  namespace: default
apiVersion: Specifies the API version of the resource,kind: Defines the type of resource, which is a Deployment.metadata: Contains metadata about the deployment. Here, we have specified the name of the deployment and set the namespace to default.
spec:
  replicas: 2
  selector:
    matchLabels:
      app: sample-node-app
  template:
    metadata:
      labels:
        app: sample-node-app
    spec:
      containers:
      - name: sample-node-app
        image: kunalmac25/node-image
        imagePullPolicy: Always
        ports:
        - containerPort: 8000
spec: Describes the desired state of the deployment.replicas: Specifies the desired number of replicas (instances) of the application to run, which is 1 in this case.The
selectorandmatchLabelsfields specify labels that the deployment can identify the pods with.template: Defines a template for your pod. You can specify some metadata under the fieldmetadata. Mention the label with which the pod should be identified.specfield undertemplatedescribes the desired state of the pod, including the list of containers.For each container, you can specify the name, the image it should pull from, and the port to which it is exposed.
imagePullPolicyspecifies the image pull policy. Here, I have usedAlways(always pull the latest image from the registry).
These are the contents of the deployment.yaml file. Now, let's write our service.yaml.
apiVersion: v1
kind: Service
metadata:
  name: node-service
  namespace: default
Similar to the deployment, start with the API version and some metadata about the service.
spec:
  type: LoadBalancer
  selector:
    app: sample-node-app
  ports:
    - port: 80
      targetPort: 8000
Here,
specfield describes the desired state of the Service which is of typeLoadBalancer.selector: Specifies the label that identifies with the pod the service should direct traffic to.ports: Specifies the list of ports that the service should expose.port: Specifies the port that the service listens on. External traffic will come to this port, while thetargetPortspecifies the port on the pods that the service should forward traffic to. In our case, the incoming traffic on the service's port 80 will be sent to the pods on port 8000.
Create the Pod, Deployment, and Service
Use kubectl apply to apply the above configurations and create the pods, deployment, and service.
kubectl apply -f deployment.yaml
kubectl apply -f service.yaml
Alternatively, you can also put both these configs in a single manifest.yaml file and run the apply command just once.
kubectl apply -f manifest.yaml
Check your pods, deployments, and services using the kubectl get commands.

Pods, Deployments, and Services
Make sure you have executed the minikube start command before applying any files, as you need to start a cluster to run your pods.
You can see from the above output that both the replicas of the pod are running fine. If it shows 0/2 under READY, that means there was some issue while creating the container. You should check if your application is working properly before deploying again.
You can also check the pod logs with the kubectl logs command.
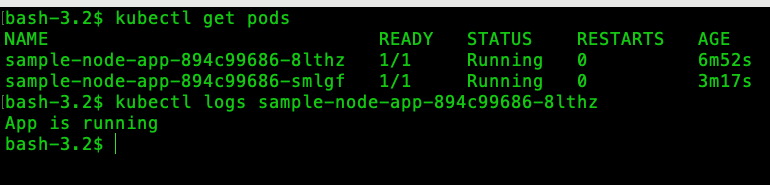
Pod logs
Minikube also provides a dashboard that shows all your pods, deployments, and services as a web UI. Run the minikube dashboard command and your browser will spring up the dashboard.
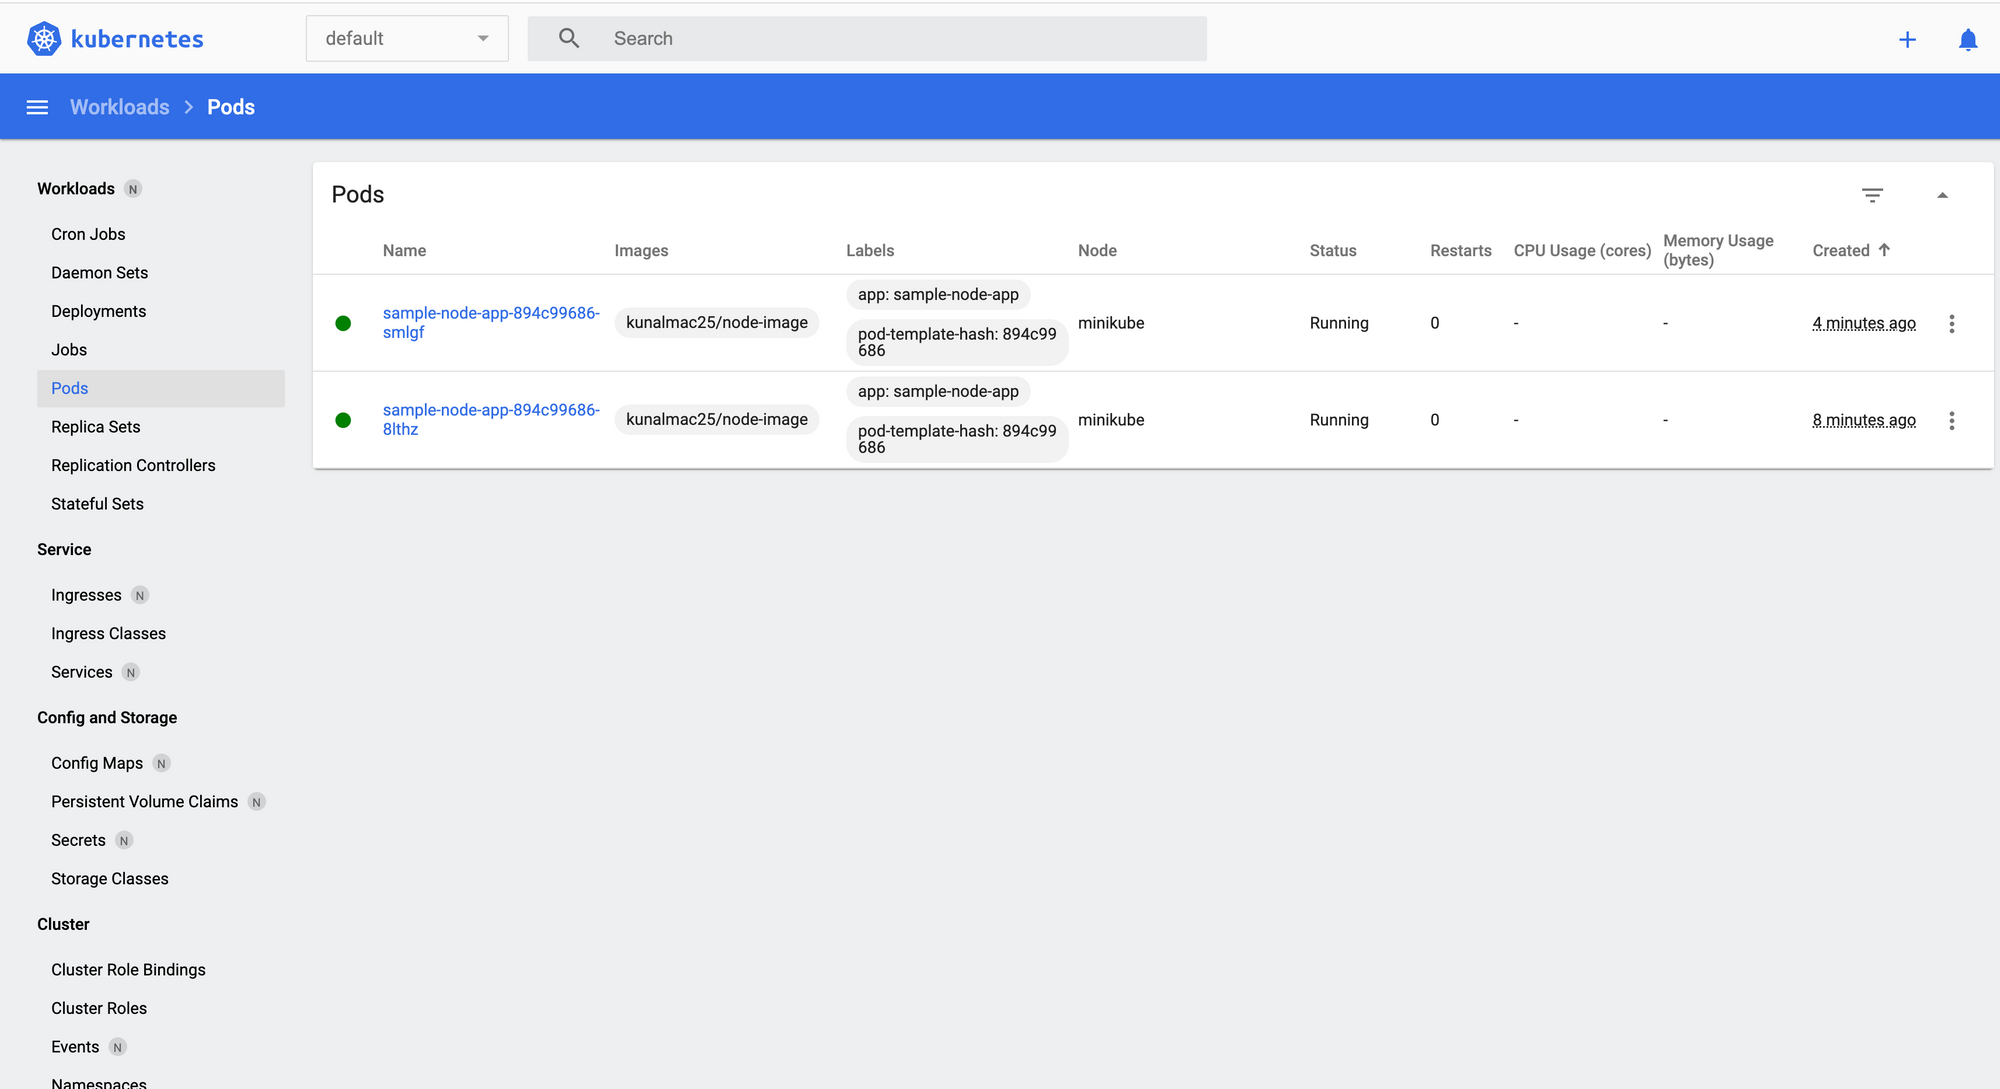
Minikube Dashboard
Access Your Application
To access your service in the Minikube cluster, run the following command to get the endpoint at which your LoadBalancer service is exposed:
minikube service <service-name> --url
Open the same endpoint in a browser or access it via Postman.
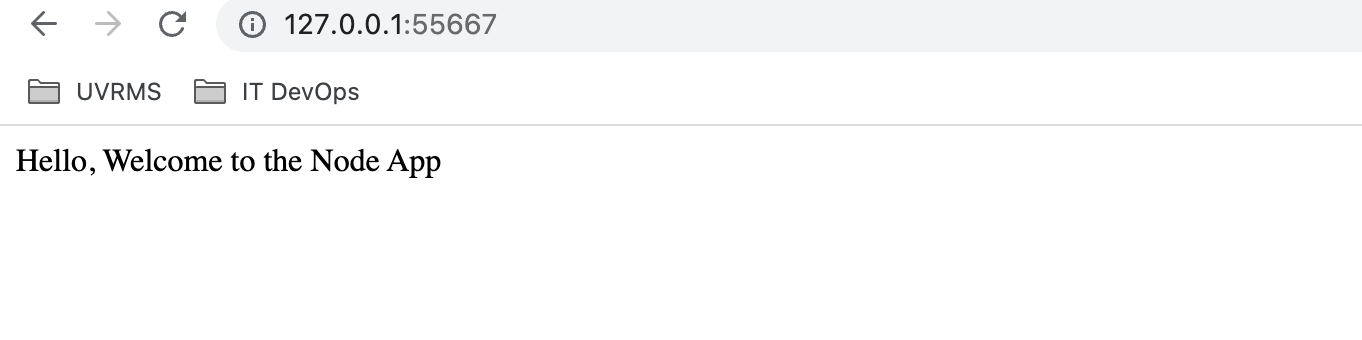
Endpoint Accessible on the Browser
You can also use localhost instead of the IP address, as they are the same.
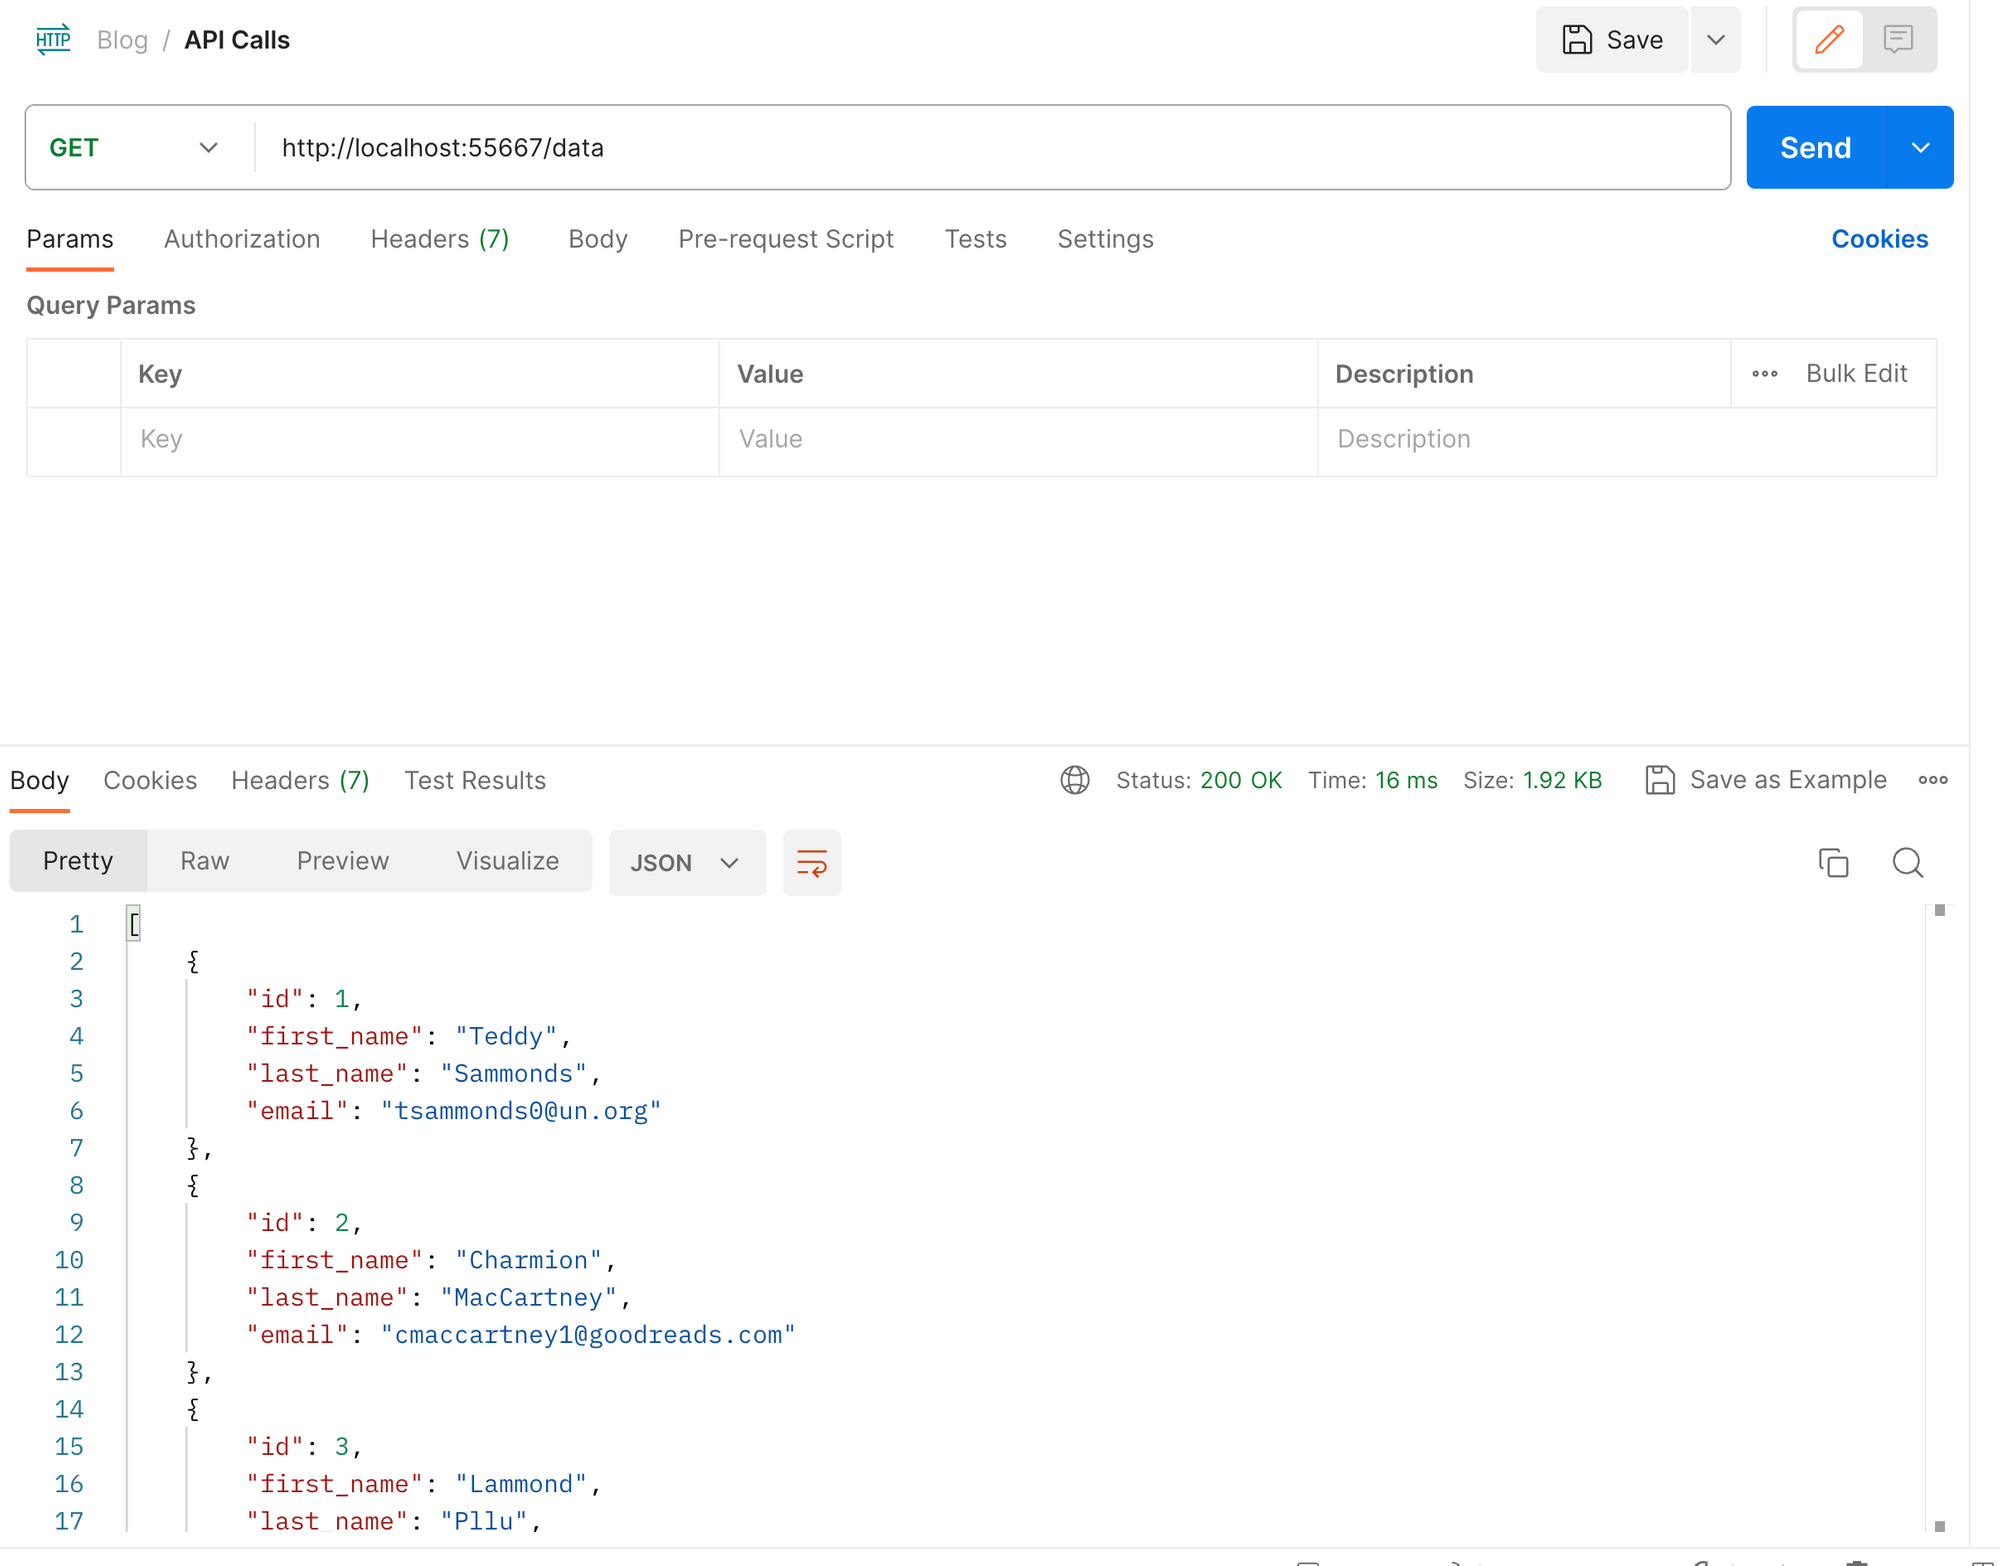
API Accessible via Postman
Scaling Your Application
Your application is up and running. With increasing demand, you may need to scale up your application to ensure optimal performance.
To scale up your application, increase the number of replicas of your deployment by running the following command:
kubectl scale deployment <deployment-name> --replicas=<desired-number>
Specify the desired number of replicas and it will scale up your pods.
kubectl scale deployment sample-node-app --replicas=4
After running the above command, run kubectl get deployments to see that the number of replicas has gone up.

Increased Number of Replicas
Alternatively, you can modify the Deployment YAML file by changing the number of replicas and running the kubectl apply command again.
If you no longer need a large number of pods and want to scale down your application, just run the same command and specify a smaller number of replicas.
kubectl scale deployment sample-node-app --replicas=2
A Word About Cloud Providers
So far you have created a Docker image and deployed it into a local Kubernetes cluster. We used Minikube for this purpose. But if you want to distribute your application to the outside world, you need to use cloud providers.
There are many options available such as AWS, Azure, GCP, VMware Tanzu, and others. These platforms provide a lot of services like Cluster Management, Scaling, Networking and Storage, CI/CD Integration, and so on.
These platforms combine the capabilities of Kubernetes with the strengths of their own cloud systems. Each product comes with its own services and pricing plans, so choose whichever one fits in with your requirements and budget.
In a rapidly evolving cloud landscape, it is important to understand what each cloud provider offers and make informed decisions that align with your organisations requirements and goals.
Conclusion
Kubernetes is a popular container orchestration platform and is very easy to use. Having a strong grasp on its concepts helps you leverage this platform for your application.
In this tutorial, my objective was to provide a comprehensive, step by step guide on deploying your application to a Kubernetes cluster. I also set out to establish a foundation on some key concepts of Kubernetes that include pods, deployments, services and the cluster itself.
I started with a simple Node app and packaged it into a Docker image. Once you were clear with the key concepts, I gave detailed steps right from installation and setting up the Kubernetes cluster to deploying your application as pods and exposing them through services.
Kubernetes is slowly taking over the cloud landscape and it is here to stay. I hope I was able to make Kubernetes easy for you. This will surely help you deploy your applications to any Kubernetes cluster, not just the ones I mentioned.
If you are unable to understand the content or find the explanation unsatisfactory, let me know. New ideas are always appreciated! Feel free to connect with me on Twitter. Till then, goodbye!