
By Linda Ikechukwu
One of the core principles of software development involves maintaining development/production parity. But this is not always the case for developers working on localhost.
To review, dev/prod parity refers to keeping development, staging, and production environments as similar as possible to avoid encountering undetected bugs. A lack of dev/prod parity can lead to bugs that occur in one environment but that cannot be replicated and debugged in others.
So for example, if your production website runs on HTTPS, your'd want your local development site to also run on HTTPS.
 "It works on my computer..." comic. Image Source
Why You Should Enable HTTPS on Your Localhost
You may be thinking, "doesn't localhost behave just like https? Isn't that why some APIs that don't work on a deployed HTTP site will work on http://localhost?"
Well, yes. For a large number of use cases, http://localhost/<yourportnumber> is just fine and behaves like an HTTPS site. But there are some cases in which it doesn't. Here are some examples of such cases:
Debugging mixed content errors: Mixed content errors occur when all the content on a page is not retrieved over HTTPS.
For example, if you use a JavaScript library from an HTTP-based CDN, everything might work as expected when you're working on localhost. But in your HTTPS-based production environment, things might be different.
On an HTTPS page, any requests to load JavaScript from an HTTP URL will be blocked by browsers. Because your local environment runs on localhost, you may be unable to spot this bug.
Testing third-party libraries or APIs that require HTTPS (for example OAuth or Instagram’s API) on local.
Or setting and testing secure cookies across browsers during local development: Securecookies are set only on HTTPS, but not on http://localhostfor all browsers.
There are other cases, as this is not an exhaustive list. But to avoid cases where things will break on http://localhost, or it won't quite behave like your production site, just use HTTPS for local development.
Now, to enable HTTPS for your local environment, you need to provision a TLS certificate for it. Let’s talk about that.
The Relationship Between HTTPS and TLS Certificates
If you already know about TLS certificates and how they enable HTTPS, or you’re solution-focused and would like to jump into action, you can skip this section and go to the next.
But if you’d like to get some background info on why TLS certificates are the key, read on.
What is HTTPS?
HTTPS is a secure extension of HTTP, the communication protocol used to deliver web pages over the internet.
HTTPS is essentially HTTP with an added layer of security provided by the Transport Layer Security (TLS) protocol. While HTTP handles the transportation of data over the internet, TLS encrypts that data to ensure its security, giving rise to HTTPS.
What is TLS?
The TLS encryption of data transfer is based upon the transmission of a TLS certificate from the web server to a client, usually the browser.
Here is how it works: when you enter a HTTPS URL that you want to visit, your browser attempts to establish a HTTPS connection with the web server hosting the file needed to serve the web page. To do that, a TLS handshake is performed.
The goal of the TLS handshake is for the browser and the web server to agree on a shared symmetric cryptographic key to be used for encrypting and decrypting messages exchanged between them. But this symmetric key needs to be exchanged in a secure manner.
Symmetric keys are a preferred cryptographic key type for encryption because they're faster to run (in the web, speed is everything). But they're riskier because there's no way to ensure or verify that a bad actor does not intercept a symmetric key in transit and claim it. Also, there's no way to verify that only the intended recipient gets the key.
This is the problem asymmetric keys come in to solve. Asymmetric keys are used to securely transmit a symmetric key between the client and server.
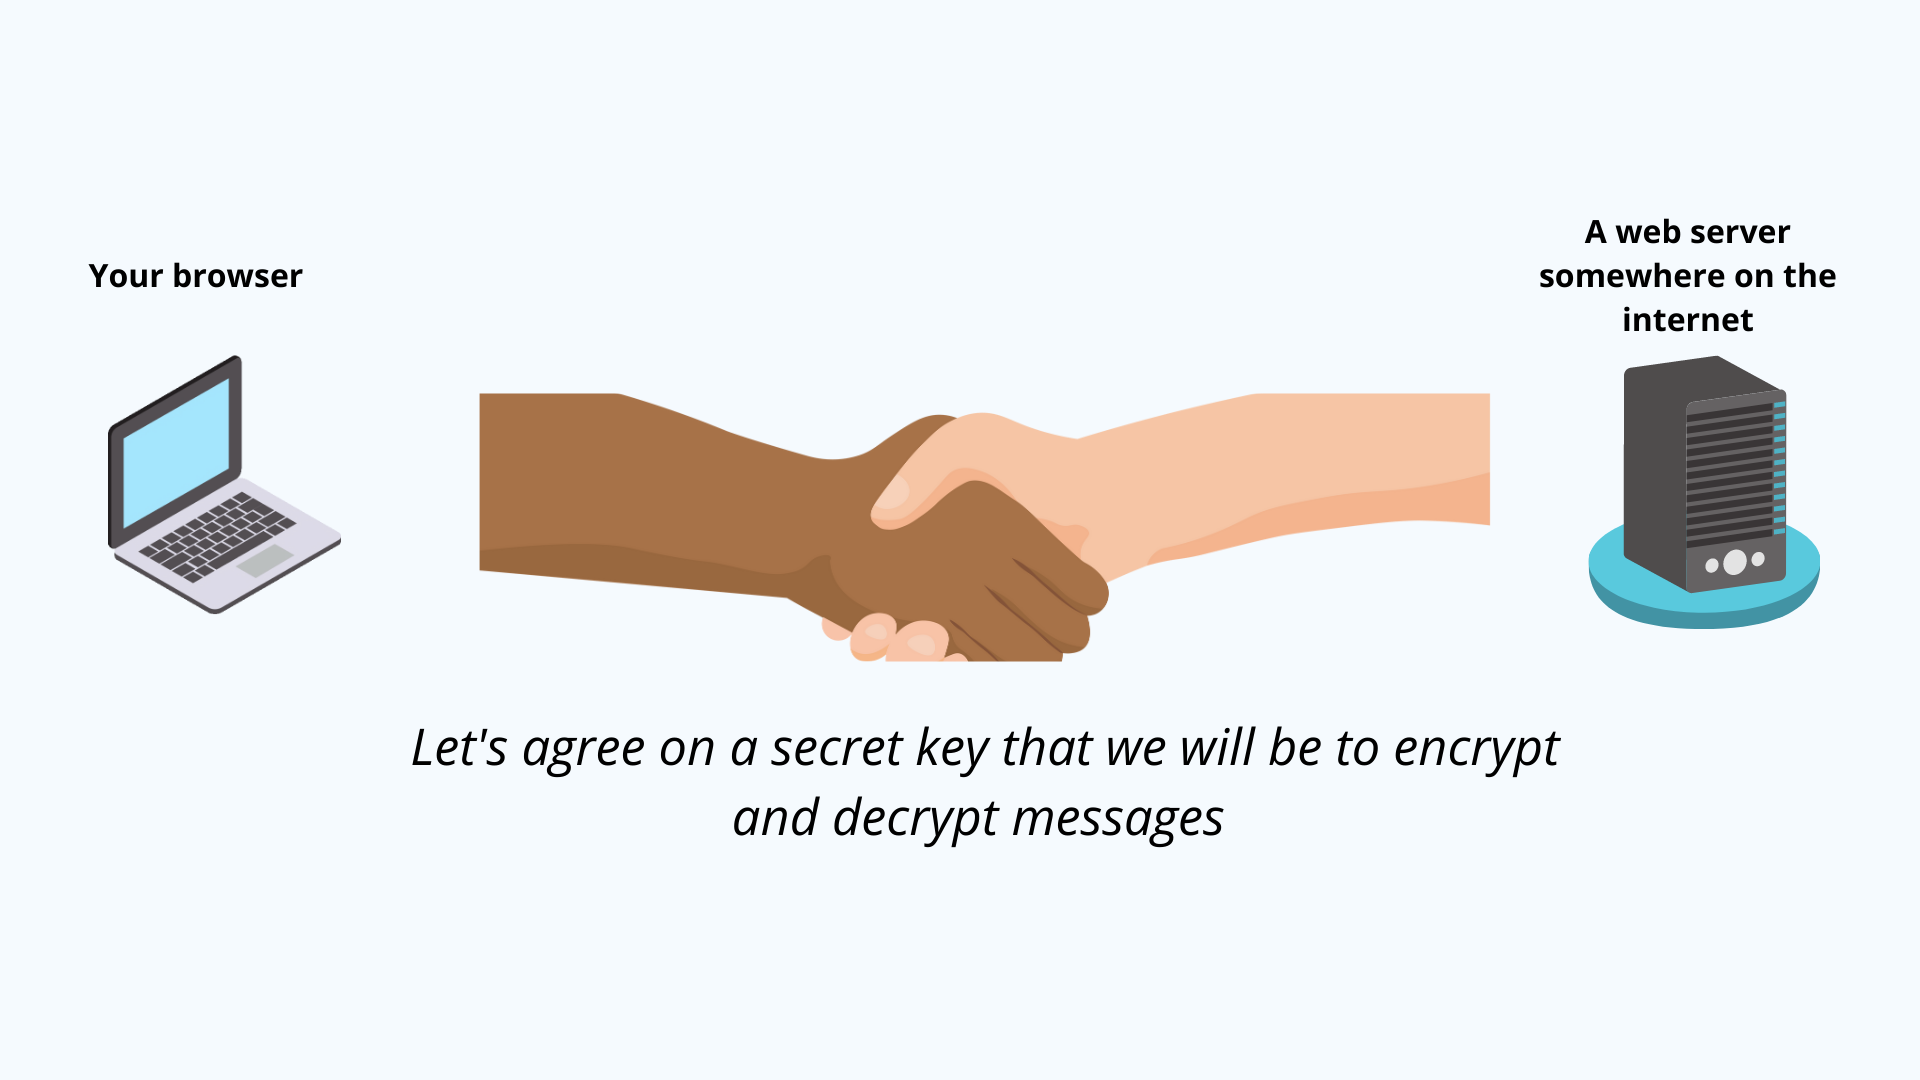 Illustration depicting secure communication between browser and web server
How do asymmetric keys work?
Asymmetric keys employ a pair of keys: a public key and a private key. When exchanging data, the sender uses the public key to encrypt messages, and the recipient uses their private key (which is kept private and never shared) to decrypt the message. Since the private key is kept secret, this ensures that only the intended recipient can decrypt the message.
For instance, if a server wants to securely receive a symmetric key from a browser, it creates a pair of asymmetric keys and shares the public key with the browser. The browser uses the public key to encrypt the symmetric key and send the encrypted message to the server. The server then uses its private key (which is only known to the server) to decrypt the message.
This is how asymmetric keys ensure that only the intended receiver with the corresponding private key receives the symmetric key.
But how does the web server get its public key into the browser's hands, and how can the browser be sure that the public key it received actually belongs to the web server? They can place it in a file or document, and that's what TLS certificates are for.
A TLS certificate a data file hosted in a website's origin server and contains the server’s public key, along with related information which identifies the web server.
Now, what about the problem of trust? This is where the second component of the game, which are certificate authorities, come into play.
What is a certificate authority?
A certificate authority (CA) is an entity that is trusted by both a client and server. Its primary role is to responsibly issue TLS certificates.
CAs serve as guarantors or referees. For example, if Mr. A wants to make a transaction with Mr. B, but they have no prior relationship, Mr. C, who Mr. B trusts, can vouch for Mr. B.
In this scenario, Mr. C plays the role of the CA, helping to establish trust between the client and server. TLS certificates must be signed by certificate authorities to solves the problem of trust.
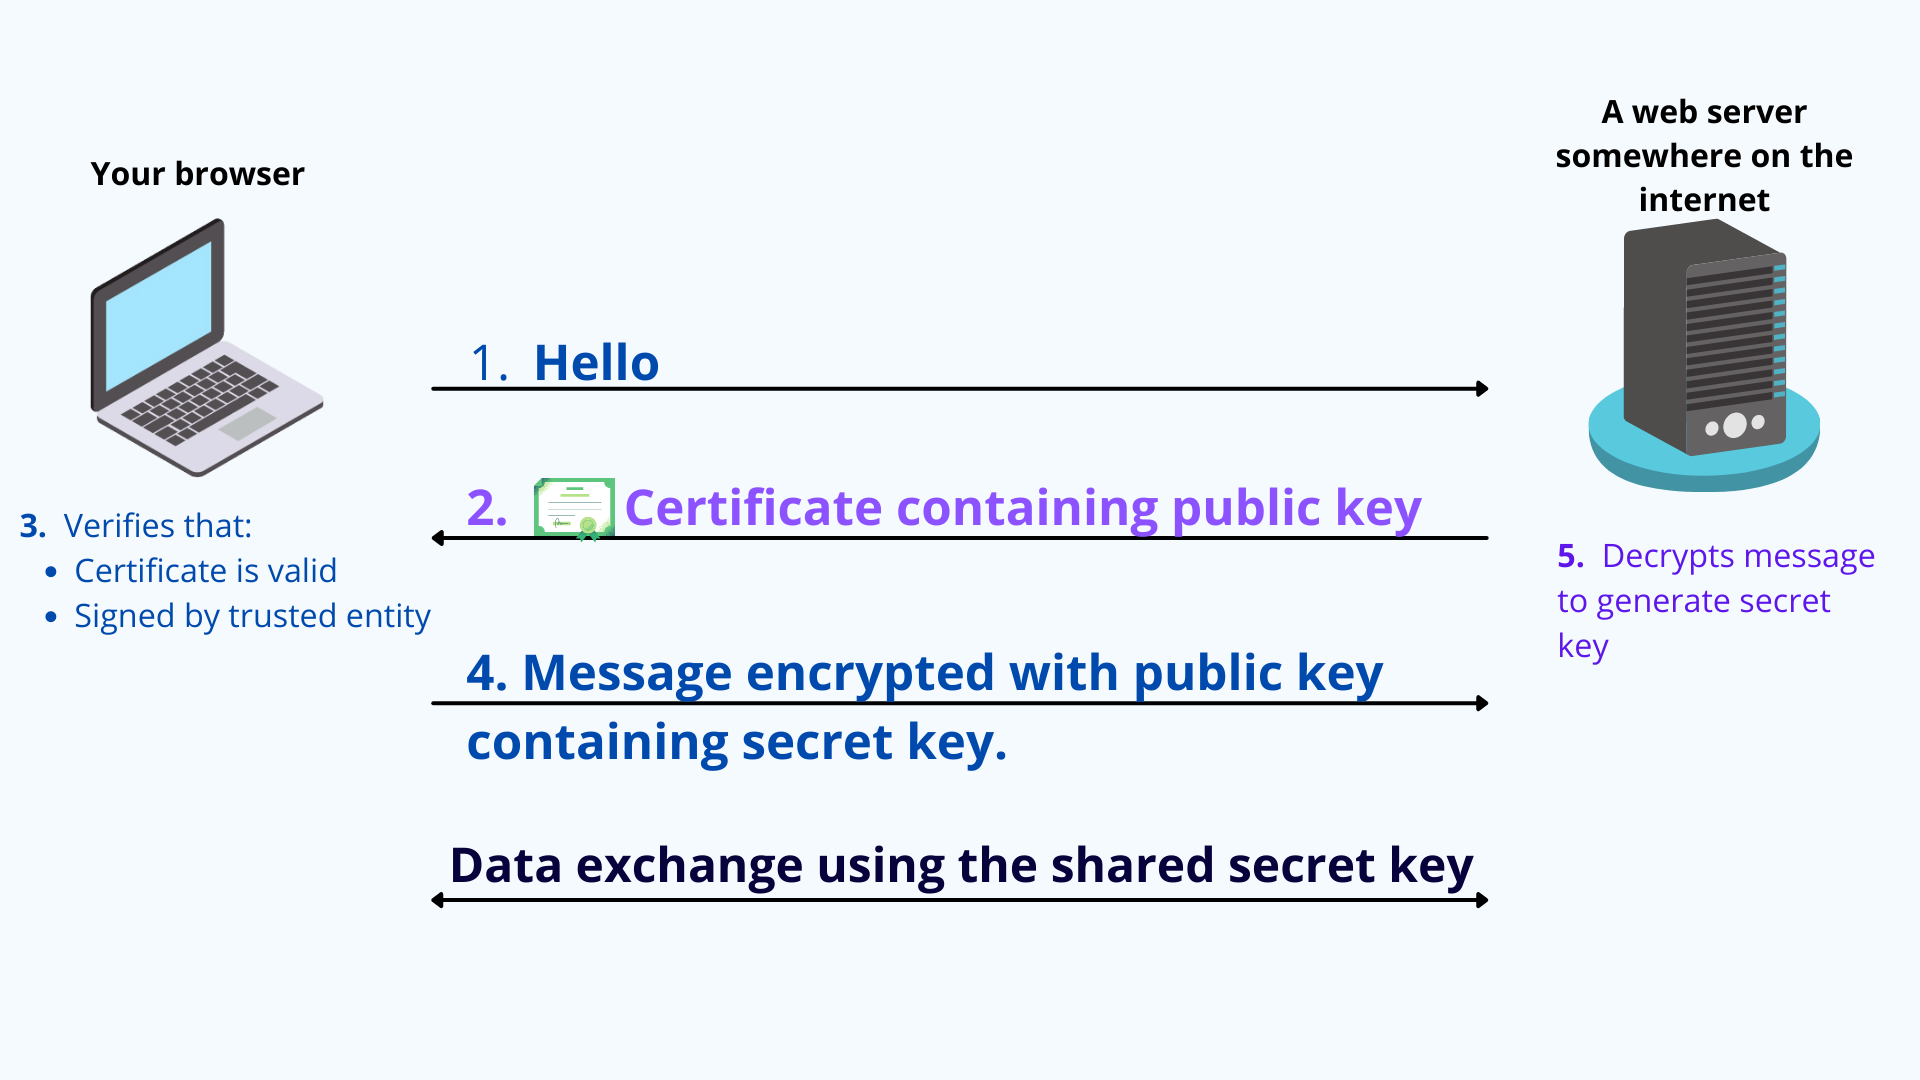 Illustration showing how a certificate authority works
So a TLS certificate is a file containing a web server's public key, signed by a certificate authority to attest that the public key contained in the certificate is indeed the public key of the web server.
During the TLS handshake, the client and server use the public and private keys to exchange randomly generated data. This random data is used to create new shared symmetric keys for encryption, called session keys. And that's how HTTPS comes about.
Ok, that's enough cryptography for today. Now that you understand the basics of certificates, let's take a look at how to obtain a TLS certificate for your [localhost](<http://localhost>) server.
How to Get a TLS Certificate for Your Localhost Server
Now that you understand the role certificates play in enabling HTTPS, it's clear what we need to do to enable HTTPS for our local web server: we need to obtain a TLS certificate from a certificate authority trusted by browsers and clients on our device.
Operating systems and browsers come with a predefined list of publicly trusted CAs such as Let's Encrypt. To see the list of trusted certificate authorities on your system root trust store, if you're on a Mac, search for 'keychain access'.
But these CAs are prohibited from issuing certificates to domains on private TLDs like localhost for various reasons.
It's possible to create a self-signed TLS certificate without a CA. In this case, you'll be signing your certificate yourself and attesting to the fact that your public key is your public key.
With self-signed certificates, there's no outside authority to verify that the origin server is who it claims to be.
Browsers don't consider self-signed certificates trustworthy and may still mark sites with them as "not secure," despite the https:// URL. This is what happens with the Gatsby https flag.
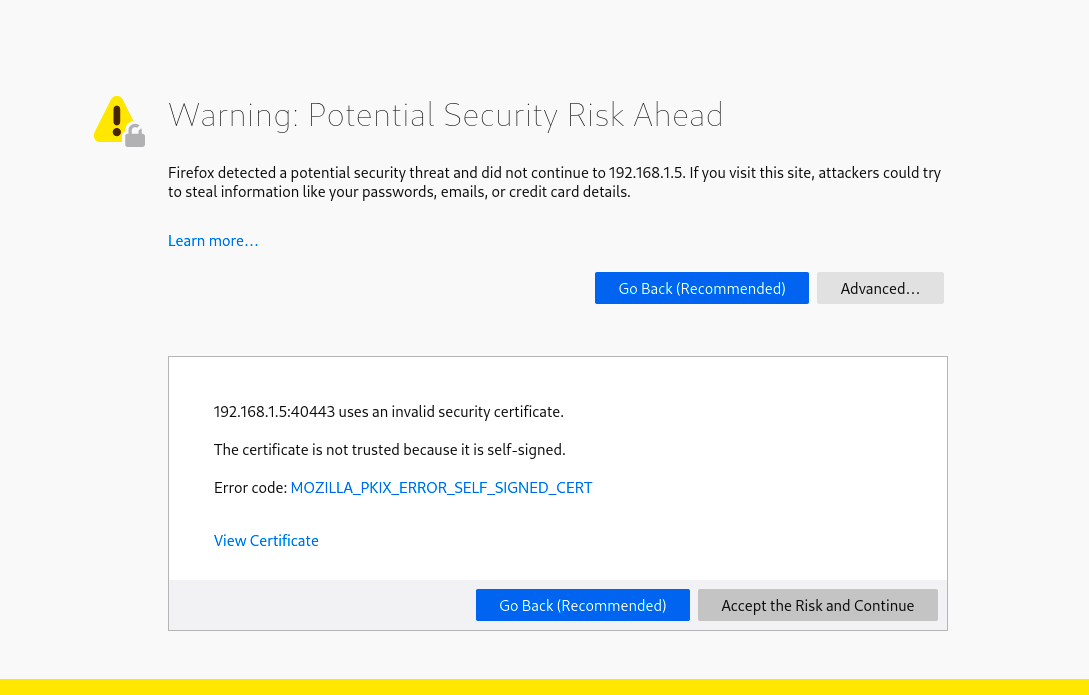 Self signed certificate error on Firefox browser.
What you need do is:
- Create your own local certificate authority
- Get your system/environment to trust it
- Use the CA to issue a TLS certificate for your local web server
- Install the certificate on your web server
This may sound like a lot, yeah? The good news is that it's actually super easy and fast to do using an open-source project known as step-ca.
How to Use step-ca to Provision a TLS Certificate for Your Local Node.js Server
step-ca is an open-source certificate authority for private and internal networks.
To get started, follow these steps:
First, open your terminal. Run brew install step if you’re on a Mac to install step-ca and and accompanying CLI tool, step-cli.
step-cli is a CLI tool that is useful for interfacing and communicating with step-ca. If you’re on Windows or Linux, you can find installation instructions in the documentation.
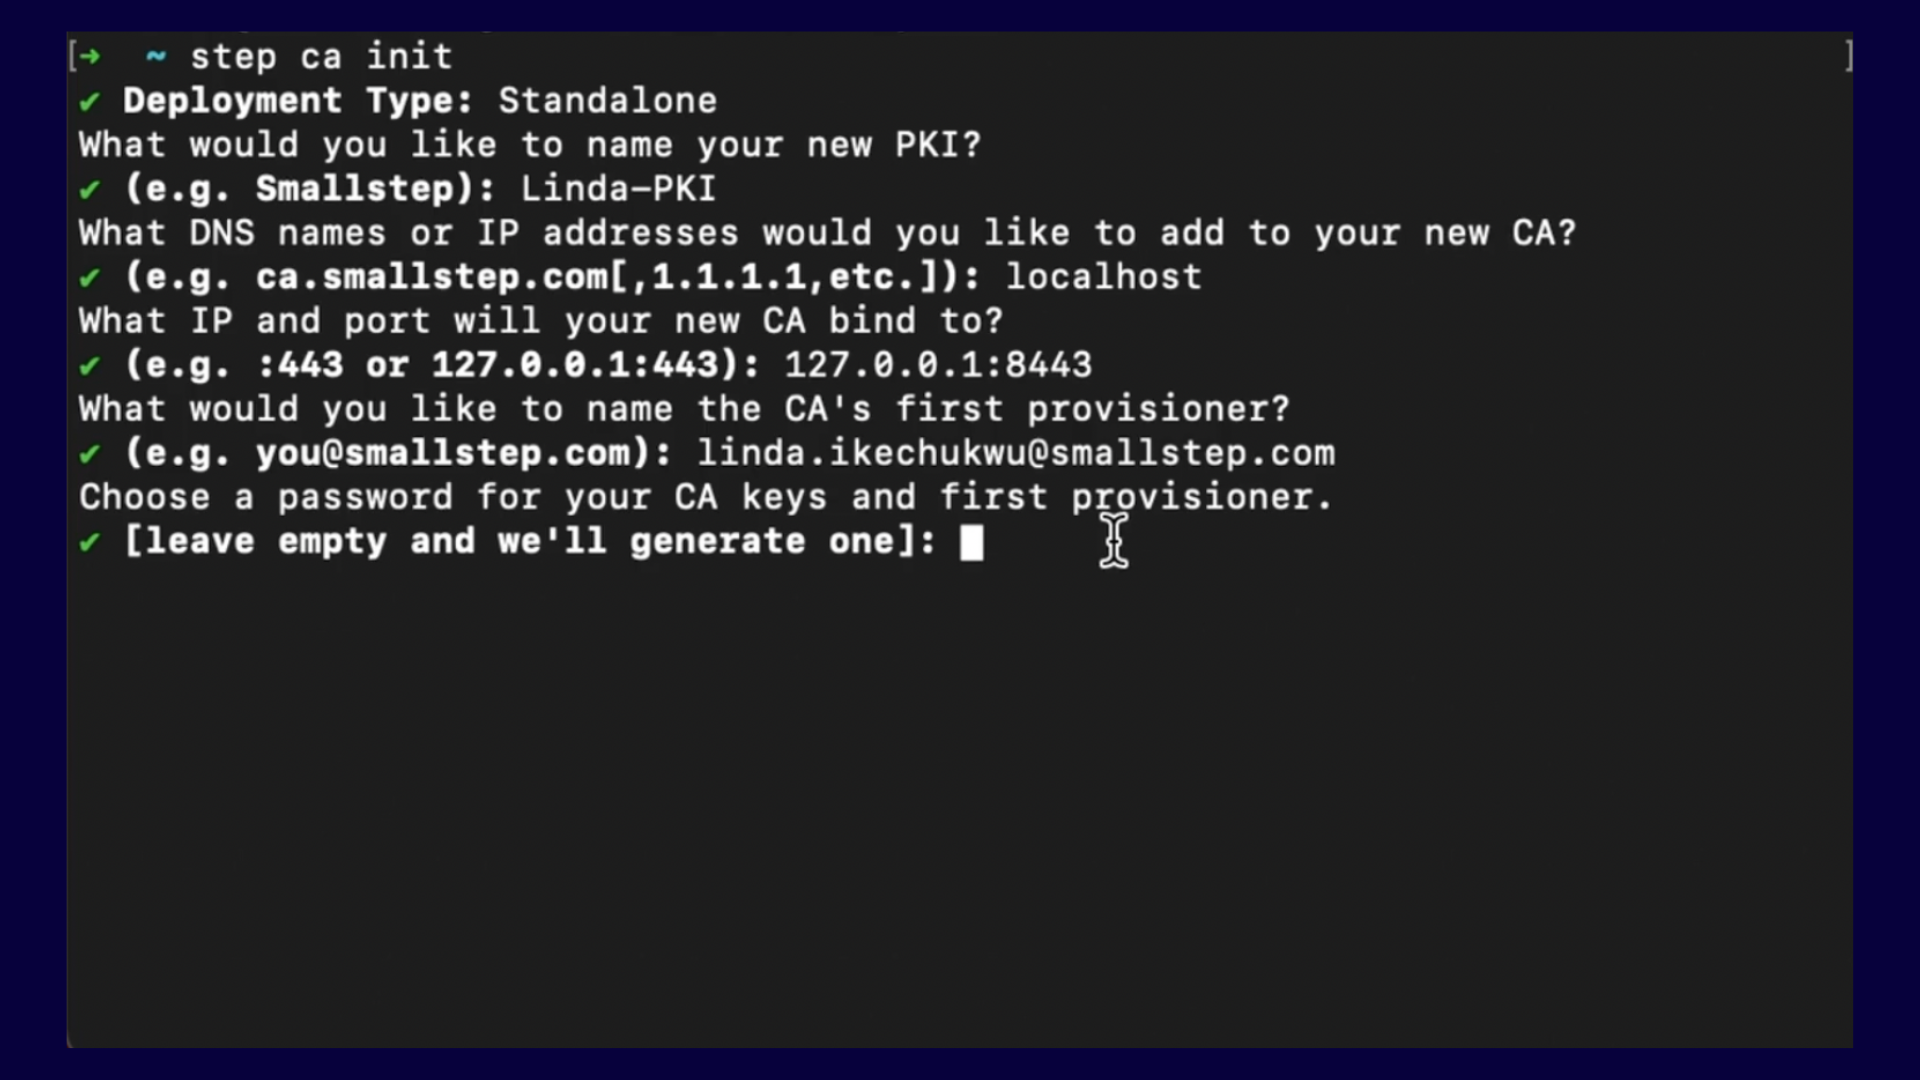
Next, run step-init. This command creates and initialises a step-ca certificate authority server on your local machine.
Then, you’ll be prompted to select a few options as shown in the image below:
 Screenshot of
 step-ca setup options
Let's go over them one by one:
- Deployment Type: Same as image above, go with ‘Standalone’ because you’re running the
step-caoption yourself. - What would you like to name your PKI: Change ‘Linda-PKI’ to whatever you want yours to be called.
- What DNS or IP addresses would you like to add to your new CA: This asks you to specify domain names or IP addresses you would enable your CA issue certificates to. Since this is for localhost, enter ‘localhost’.
- What IP and port would you like to bind your CA to: Asks you to specify a port that the CA server would run on.
- What would you like to name your provisioner: For the
step-caecosystem, a provisioner is a person or entity authorised to initiate certificate issuance operations with a CA. Think f it as entering as using your email as your username to register on a platform. - Choose a password for your CA keys and first provisioner: This is the password that will be used to authorise certificate issuance requests. Take note of your password as it will come in handy in the next steps.
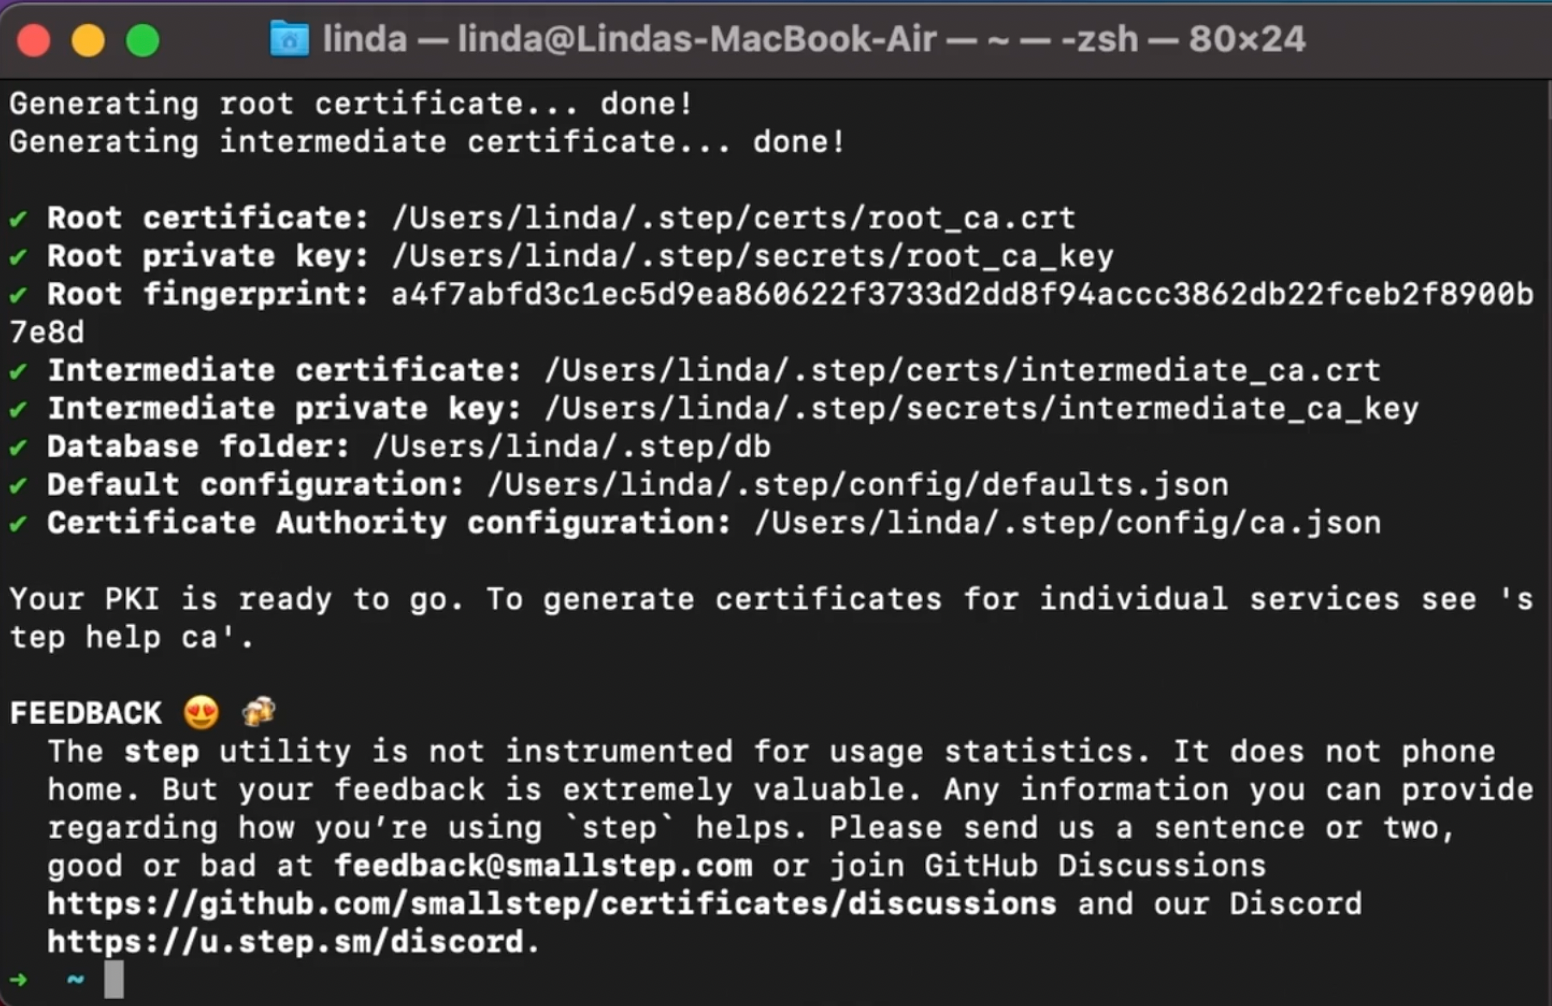
After you’ve filled out all the options, you’ll get a screen like below, showing that your CA and other necessary elements have been created and ready to go.
 Screenshot of
 step-ca success screen
Now, run step certificate install` to install the CA root certificate file into your system trust store. Replacewith your own file path from the previous step. From my example, mine would be`.
Remember how I mentioned that your certificate authority must be trusted by your browsers, and that all OS and browsers come pre-installed with trusted certificate authorities? This step adds your just-created certificate authority to that list.
After running this command, you’ll get a screen like below:
 Screenshot of
 step-ca root certificate installation success screen
Next, run step-ca` to start the the CA server. In my examplewould be/Users/linda/.step/config/ca.json` from the third step. You’ll get a screen informing you that your CA is now running at the port you specified in the third step.
Use your CA to create a new cert and private key for your localhost server/project. Run step ca certificate <subject> <crt-file> <key-file> on your project server where:
subjectis the domain name or ip address of server you’re getting a cert for,crt-fileis filename to write the certificate to, andkey-fileis file to write the private key to.
For my example, my command was step ca certificate localhost server.crt server.key
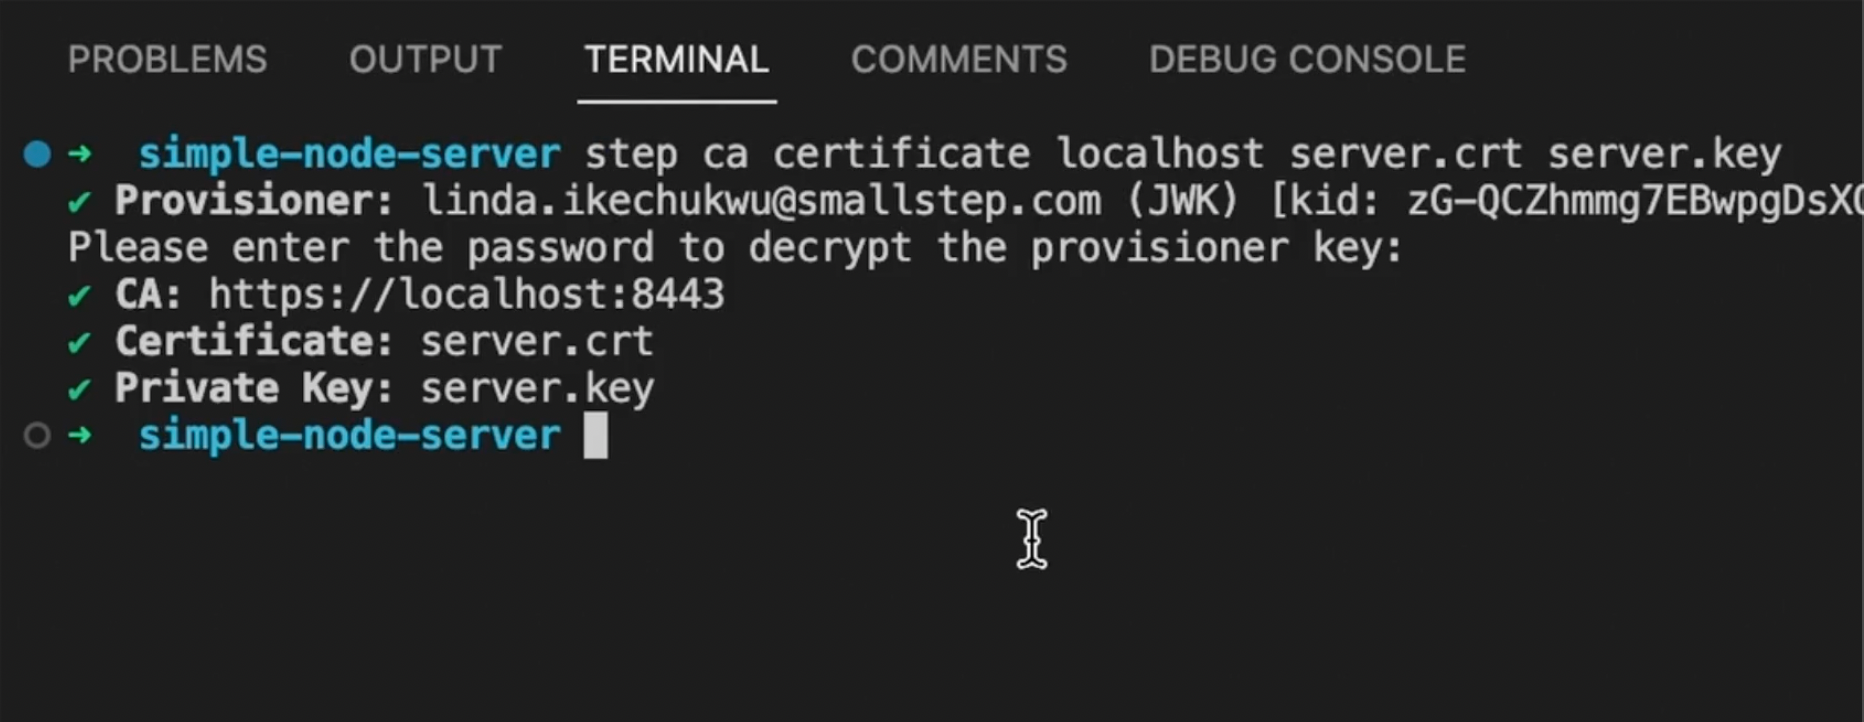 Screenshot of success screen for step-ca certificate and private key creation step
You'll notice that a server.crt and server.key files will be created in your project.
Finally, reference the server.crt and server.key files in the Node.js https.createServer() method for the cert and key properties, respectively, in your index.js file. This instructs the resulting Node.js server to use the certificate and private key during a TLS handshake to enable HTTPS.
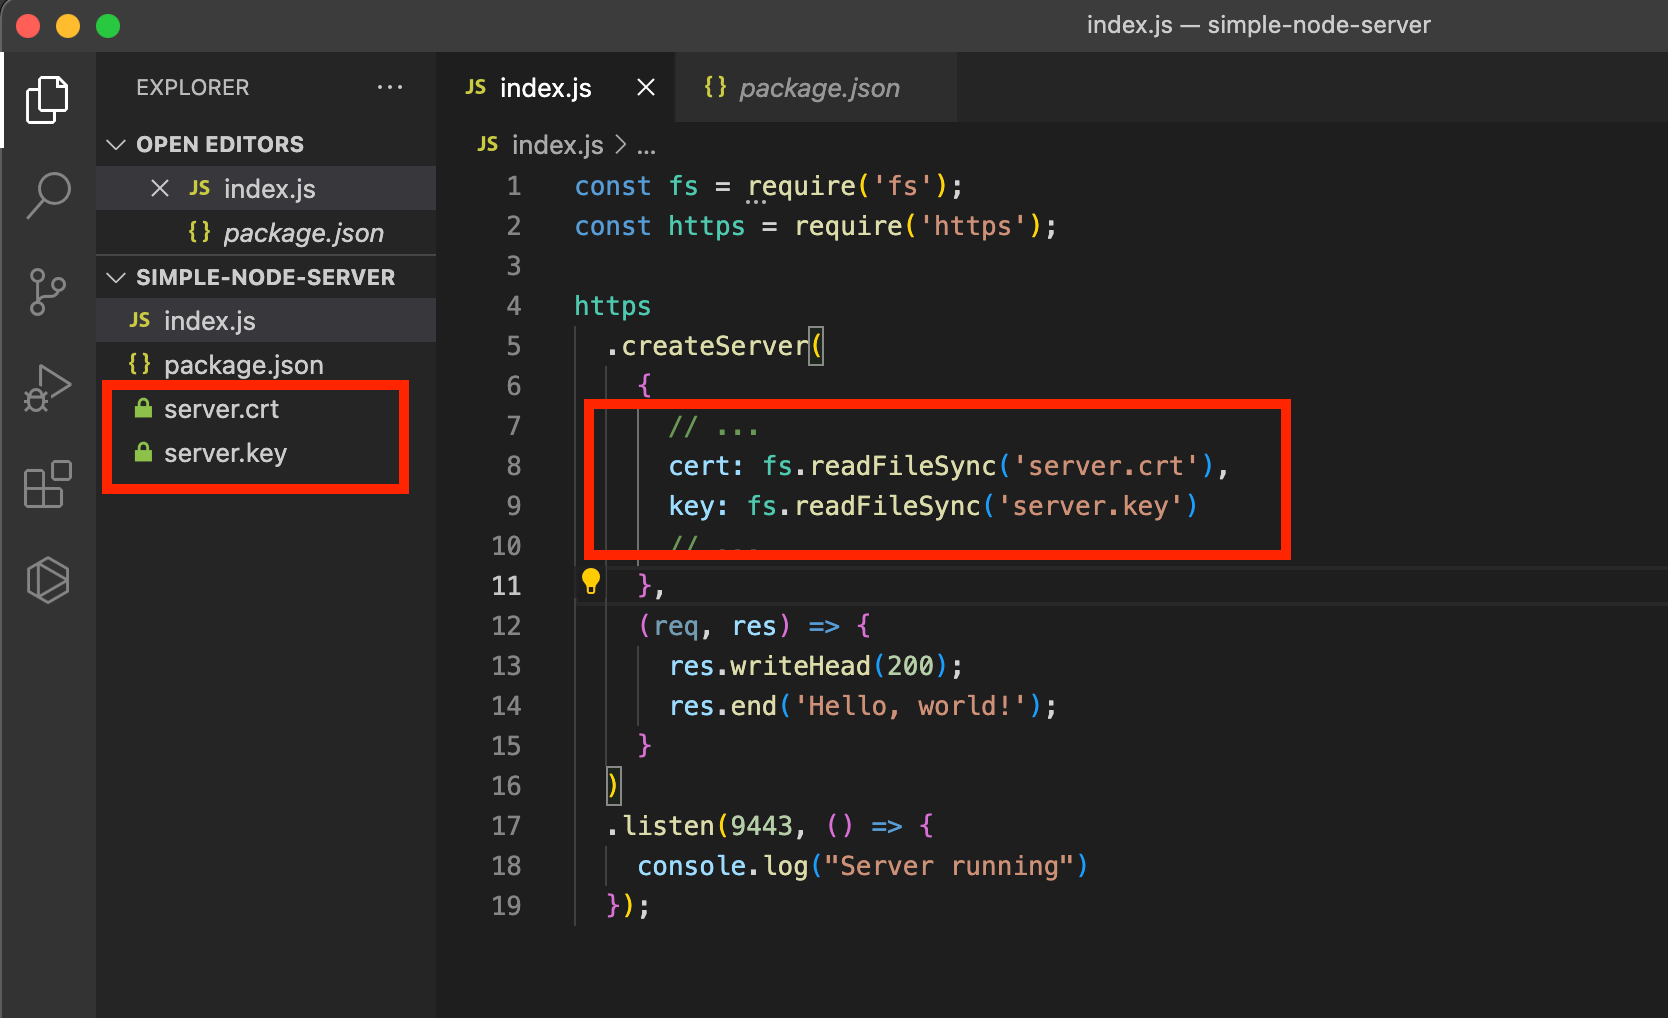 Screenshot of server.crt and server.key files referenced in https.createServer function in my node.js demo project
Stop and restart your Node.js server, then navigate to your localhost URL. Your localhost should now be running on HTTPS, like below (notice the padloock sign):
 Screenshot of my node.js localhost server now running on HTTPS!
Sweet!!
Last Words and Bonus Points
If you have followed this tutorial, you have successfully issued a certificate for your local Node.js project. You can use the same certificate authority (CA) to issue certificates for other projects running on different ports by following the same process.
It is important to note that by default, these certificates are only valid for one day. You have two options to extend their lifetime: either extend it when creating the certificate, using the --not-before and --not-after flag (see documentation), or run a daemon to periodically renew the certificate.
If your certificate has already expired, you can renew it manually by following the steps below:
- Restart your
step-cainstance incase the process has been closed (that is, you’ve closed the terminal somehow). Runstep-ca <file-path-to-ca.json>. - Run
step ca provisioner update linda.ikechukwu@smallstep.com --allow-renewal-after-expirywhere linda.ikechukwu@smallstep.com should be your provisioner name. - Kill the CA server process and restart it.
- Then run the renew command
step ca renew server.crt server.key
Happy building!