
By Scott Domes
Are you curious about React and haven’t had the chance to learn it? Or maybe you’ve tried tutorials in the past, but struggled to master the core concepts? Or maybe you’ve learned the basics, but want to consolidate your knowledge? Either way, this article is for you.
We’re going to build a simple React music player, layering on new React concepts as we go.
Here’s what we’ll cover:
- What is a React component?
- ReactDOM rendering
- Class vs functional components
- JSX
- State
- Event handling
- Asynchronous setState
- Props
- Refs
That’s just about everything you need to build and maintain a React application. But we’re going to introduce it piece-by-piece.
Setup
Here’s the situation: a small start-up has reached out to you for your help. They’ve created a page for users to upload music and have it visualized in glowing colour. But they need you to do the hard part—AKA to make it work.
To get going, make a new project directory and add the following three files.
Make sure you’re using an up-to-date version of Chrome with this tutorial, otherwise the animations in the code above won’t work.
Thanks to Steven Fabre for the play button CSS and Justin Windle for visualization code (you can view the original here).
Open up index.html in both a code editor and your browser, and let’s get started!
What is React?
React is a way to build user interfaces. It is only concerned with what you see on the front-end. React makes user interfaces very easy to build by cutting each page into pieces. We call these pieces components.
Here is an example of cutting a page into components:
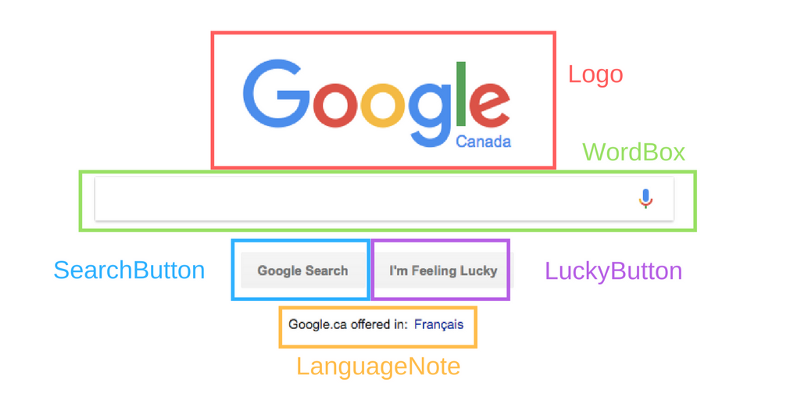
Each section highlighted above is considered a component. But what does this mean for a developer?
What is a React Component?
A React component is a bit of code that represents a piece of the page. Each component is a JavaScript function that returns a piece of code that represents a piece of a web page.
To build a page, we call these functions in a certain order, put together the result, and show it to the user.
Let’s write a component inside the <script> tag in index.html with the type of “text/babel”:
<script type="text/babel"> function OurFirstComponent() { return ( // Code that represents the UI element goes here ); }</script>
When we call the OurFirstcomponent() function, we will get back a piece of the page.
You can also write functions like this:
const OurFirstComponent = () => { return ( // Stuff to make this component goes here );}
React uses a language called JSX that looks like HTML but works inside JavaScript, which HTML usually doesn’t do.
You can add plain HTML to this section to make it appear on the UI:
<script type="text/babel"> function OurFirstComponent() { return ( <h1>Hello, I am a React Component!</h1> ); }</script>
When we call the OurFirstComponent() function, we get back a bit of JSX. We can use something called ReactDOM to put it on the page.
<script type="text/babel"> function OurFirstComponent() { return ( <h1>Hello, I am a React Component!</h1> ); }
const placeWeWantToPutComponent = document.getElementById('hook'); ReactDOM.render(OurFirstComponent(), placeWeWantToPutComponent);</script>
Now our <h1> tag will be put inside the element with the ID of hook. It should look like this when you refresh your browser:

We can also write our component in JSX like so:
ReactDOM.render(<OurFirstComponent />, placeWeWantToPutComponent);
This is standard — invoke your components like you are writing HTML.
Putting Components Together
We can put React components inside other components.
<script type="text/babel"> function OurFirstComponent() { return ( <h1>I am the child!</h1> ); }
function Container() { return ( <div> <h1>I am the parent!</h1> <OurFirstComponent /> </div> ); }
const placeWeWantToPutComponent = document.getElementById('hook'); ReactDOM.render(<Container />, placeWeWantToPutComponent);</script>

This is how we build our page out of pieces of React — by nesting components inside of each other.
Class Components
So far, we’ve been writing components as functions. These are called functional components.
But you can write components another way, as JavaScript classes. These are called class components.
class Container extends React.Component { render() { return ( <div> <h1>I am the parent!</h1> <OurFirstComponent /> </div> ); }}
const placeWeWantToPutComponent = document.getElementById('hook');ReactDOM.render(<Container />, placeWeWantToPutComponent);
Class components must have a function called render(). The render function returns the JSX of the component. They can be used the same way as functional components, like this:<AClassComponent />.
You should use functional components over class components because they’re easier to read, unless you need component state (more on that soon).
JavaScript in JSX
You can put JavaScript variables inside of your JSX like this:
class Container extends React.Component { render() { const greeting = 'I am a string!'; return ( <div> <h1>{ greeting }</h1> <OurFirstComponent /> </div> ); }}
Now the ‘I am a string!’ will be inside the h1.
You can also do more difficult stuff, like call a function:
class Container extends React.Component { render() { const addNumbers = (num1, num2) => { return num1 + num2; }; return ( <div> <h1>The sum is: { addNumbers(1, 2) }</h1> <OurFirstComponent /> </div> ); }}

JSX Gotchas
Rename OurFirstComponent() to PlayButton. We want it to return the following:
<a href="#" title="Play video" class="play" />
But there’s a problem: class is a keyword in JavaScript, so we can’t use it. So how do we give our <;a> a class of play?
Use a property called className instead:
<script type="text/babel"> function PlayButton() { return <a href="#" title="Play video" className="play" />; }
class Container extends React.Component { render() { return ( <div> <PlayButton /> </div> ); } }
const placeWeWantToPutComponent = document.getElementById('hook'); ReactDOM.render(<Container />, placeWeWantToPutComponent);</script>
What Is This Component Doing?
Class components can store information about their current situation. This information is called state, which is stored in a JavaScript object.
In the code below, we have an object representing our components state. It has a key of isMusicPlaying which has a value of false. This object is assigned to this.state in the constructor method, which is called when the class is first used.
class Container extends React.Component { constructor(props) { super(props); this.state = { isMusicPlaying: false }; } render() { return ( <div> <PlayButton /> </div> ); }}
A constructor method of a React component always needs to call super(props) before anything else.
Okay, so what do we do with state? Why does it exist?
Changing Our React Component Based On State
State is way to update our UI based on events.
In this tutorial, we will use state to change the play button from paused to playing based on the user clicking the play button.
When the user clicks on the button, the state will update, which will then update the UI.
Here’s how we get started. We can look at the component state with this.state. In the following code, we look at the state and use it to decide what text to present to the user.
class Container extends React.Component { constructor(props) { super(props); this.state = { isMusicPlaying: false }; }
render() { const status = this.state.isMusicPlaying ? 'Playing' : 'Not playing'; return ( <div> <h1>{ status }</h1> <PlayButton /> </div> ); }}
In the render function, this is always referring to the component it is within.

But that’s not very useful unless we have a way to change this.state.isMusicPlaying.
When Stuff Happens to Our Component
The user can interact with our components by clicking on the play button. We want to react (ha… ha…) to those events.
We do that through functions that take care of events. We call these event handlers.
class Container extends React.Component { constructor(props) { super(props); this.state = { isMusicPlaying: false }; }
handleClick(event) { // Do something about the click };
render() { let status = this.state.isMusicPlaying ? 'Playing :)' : 'Not playing :('; return ( <div> <h1 onClick={this.handleClick.bind(this)}>{ status }</h1> <PlayButton /> </div> ); }}
When the user clicks on the h1, our component will make the handleClick function run. The function gets the event object as the argument, which means it can use it if it wanted to.
We use the .bind method on handleClick to make sure this refers to the whole component, rather than just the h1.
What This Component Should Be Doing
When we change the state of our component, it will call the render function again.
We can change state with this.setState(), if we give it a new object representing the new state.
Our component on the page will always represent its current state. React does that for us.
handleClick() { if (this.state.isMusicPlaying) { this.setState({ isMusicPlaying: false }); } else { this.setState({ isMusicPlaying: true }); } };
But clicking an h1 isn’t as good as clicking our actual play button. Let’s make that work.
Talking Between Components
Your components can talk to each other. Let’s try it.
We can tell PlayButton whether or not the music is playing using something called props. Props are information shared from a parent component to a child component.
Props in JSX look the same as HTML properties.
We give PlayButton a prop called isMusicPlaying, which is the same as the isMusicPlaying in this.state.
class Container extends React.Component { constructor(props) { super(props); this.state = { isMusicPlaying: false }; }
handleClick() { if (this.state.isMusicPlaying) { this.setState({ isMusicPlaying: false }); } else { this.setState({ isMusicPlaying: true }); } };
render() { return ( <div> <PlayButton isMusicPlaying={this.state.isMusicPlaying} /> </div> ); }}
When the state of Container changes, PlayButton prop will change too, and the PlayButton function will be called again. That means our component will update on the screen.
Inside PlayButton, we can react to the change, because PlayButton gets the props as an argument:
function PlayButton(props) { const className = props.isMusicPlaying ? 'play active' : 'play'; return <a href="#" title="Play video" className={className} />;}
If we change our state to this.state = { isMusicPlaying: true }; and reload the page, you should see the pause button:

Events as Props
Your props don’t have to be just information. They can be functions.
function PlayButton(props) { const className = props.isMusicPlaying ? 'play active' : 'play'; return <;a onClick={props.onClick} href="#" title="Play video" className={className} />;}
class Container extends React.Component { constructor(props) { super(props); this.state = { isMusicPlaying: false }; }
handleClick() { if (this.state.isMusicPlaying) { this.setState({ isMusicPlaying: false }); } else { this.setState({ isMusicPlaying: true }); } };
render() { return ( <div> <PlayButton onClick={this.handleClick.bind(this)} isMusicPlaying={this.state.isMusicPlaying} /> </div> ); }}
Now, when we click on the PlayButton, it’ll change the state of Container, which will change the props of PlayButton, which will cause it to update on the page.
The Bad Thing About setState
setState is bad because it doesn’t do stuff right away. React waits a bit to see if there are more changes to make, then it does the state changes.
That means you don’t know for sure what your state will be when you call setState.
So you shouldn’t do this:
handleClick() { this.setState({ isMusicPlaying: !this.state.isMusicPlaying });};
If you are changing your state based on the old state, you need to do things differently.
You need to give setState a function, not an object. This function gets the old state as an argument, and returns an object that is the new state.
It looks like this:
handleClick() { this.setState(prevState => { return { isMusicPlaying: !prevState.isMusicPlaying }; });};
It is more difficult, but only needed when you are using the old state to make the new state. If not, you can just give setState an object.
What Are Refs?
Let’s make some music happen.
First, we add an <audio> tag:
class Container extends React.Component { constructor(props) { super(props); this.state = { isMusicPlaying: false }; }
handleClick() { this.setState(prevState => { return { isMusicPlaying: !prevState.isMusicPlaying }; }); };
render() { return ( <div> <PlayButton onClick={this.handleClick.bind(this)} isMusicPlaying={this.state.isMusicPlaying} /> <audio id="audio" /> </div> ); }}
We need a way to get that <audio> tag and call either play() or pause() on it. We could do it with document.getElementById('audio').play() but there’s a better React way.
We give it a prop called ref, which gets called with the <audio> element as the first argument. It takes that <audio> element and assigns it to this.audio.
<audio id="audio" ref={(audioTag) => { this.audio = audioTag }} />
This function will be called every time the Container renders, which means this.audio will always be up to date, and equal the <audio> tag.
We then can play and pause the music:
handleClick() { if (this.state.isMusicPlaying) { this.audio.pause(); } else { this.audio.play(); } this.setState(prevState => { return { isMusicPlaying: !prevState.isMusicPlaying }; });};
Upload a music file (preferably an mp3 file) using the Choose files button and hit play, and watch it go!
Moving Outside of Index.html
As you might have guessed, our React shouldn’t live forever inside a <script>tag.
React takes a lot of build configuration. Fortunately, tools like Create React App take care of all that for you.
Install it to create your own React project. Follow their brief tutorial and start editing the JavaScript inside the src directory, applying all the React knowledge you learned here!
Congratulations!
You can now make React things.
Next, check out a couple of articles for more information. One is about React best practices, the other about a useful part of React called lifecycle methods.
If you learned something from this article, please click those clappin’ hands, and share it with your friends.