
Welcome to the world of FastAPI, a sleek and high-performance web framework for constructing Python APIs. Don't worry if you're new to API programming – we'll start at the beginning.
An API (Application Programming Interface) connects several software programs allowing them to converse and exchange information. APIs are essential in modern software development as they are an application's backend architecture.
After reading this quick start guide, you will be able to develop a course administration API using FastAPI and MongoDB. The best part is that you will not only be writing APIs but also testing and containerizing the app.
In this walkthrough project, we'll create a Python backend system using FastAPI, a fast web framework, and a MongoDB database for course information storage and retrieval.
The system will allow users to access course details, view chapters, rate individual chapters, and aggregate ratings.
The project is designed for Python developers with basic programming knowledge and some NoSQL knowledge. Familiarity with MongoDB, Docker, and PyTest is not required since I will be highlighting everything you need to know for the scope of this project.
What We'll Build
Here's what we are going to be building:
FastAPI Backend: It will serve as the interface for handling API requests and responses. FastAPI is chosen for its ease of use, performance, and intuitive design.
MongoDB Database: A NoSQL database to store course information. MongoDB's flexible schema allows us to store data in JSON-like documents, making it suitable for this project.
Course Information: Users will be able to view various course details, such as course name, description, instructor, etc.
Chapter Details: The system will provide information about the chapters in a course, including chapter names, descriptions, and any other relevant data.
Chapter Rating: Users will have the ability to rate individual chapters. We will implement functionality to record and retrieve chapter ratings.
Course Aggregated Rating: The system will calculate and display the aggregated rating for each course based on the ratings of its chapters.
This walkthrough shows how to set up a development environment, build a FastAPI backend, integrate MongoDB, define API endpoints, add chapter rating functionality, and compute aggregate course ratings. It covers fundamental project concepts as well as Python, MongoDB, and NoSQL databases.
By the end, this useful backend system will manage chapter details, course information, and user ratings, serving as the basis for a complex and rewarding project.
The goal is to create a system that processes course-related queries. The course information must then be retrieved from MongoDB depending on the request. Lastly, this answer data must be returned in a standard format (JSON).
We'll begin with a script that reads the course information from courses.json. This data will be stored in the MongoDB instance. Once the data has been loaded, our API code may connect to this database to allow for simple data retrieval.
The interesting aspect is creating several endpoints with FastAPI. Our API will be able to:
Fetch a list of all courses
Show a comprehensive course overview
List detailed information about certain chapters
Record user scores for each chapter.
Additionally, for each course, we will aggregate all reviews, providing visitors with relevant information regarding course popularity and quality.
This tutorial focuses on building a scalable, efficient, and user-friendly API. Once we've tested everything, we'll containerize the application using Docker. This will greatly simplify deployment, maintenance, and installation.
Table of Contents
Here are the sections of this tutorial:
API Methods
HTTP (Hypertext Transfer Protocol) methods specify the action to be taken on a resource. The following are the most often used API development methods:
GET: Requests information from a server. When a client submits a GET request, it is requesting data from the server.
POST: Sends data to the server for processing. When a client submits a POST request, it is often delivering data to the server to create or update a resource.
PUT: Updates server data. When a client submits a PUT request, the resource indicated in the request is updated.
DELETE: A client sending a DELETE request is asking for the removal of the specified resource.
Client and Server
The client is often a front-end application that sends requests to the server, such as a web browser or a mobile app. The server, on the other hand, is the back-end application in charge of processing client requests and responding appropriately.
A request is a communication delivered by the client to the server that specifies the intended action and any required data. The HTTP method, URL (Uniform Resource Locator), headers, and, in the case of POST or PUT requests, the data payload are all part of a request.
After the server gets the request, it processes it and returns a response. The response is the message given back to the client by the server that contains the requested data or the outcome of the activity.
A response generally comprises an HTTP status code indicating the success or failure of the request, as well as any data sent back to the client by the server.
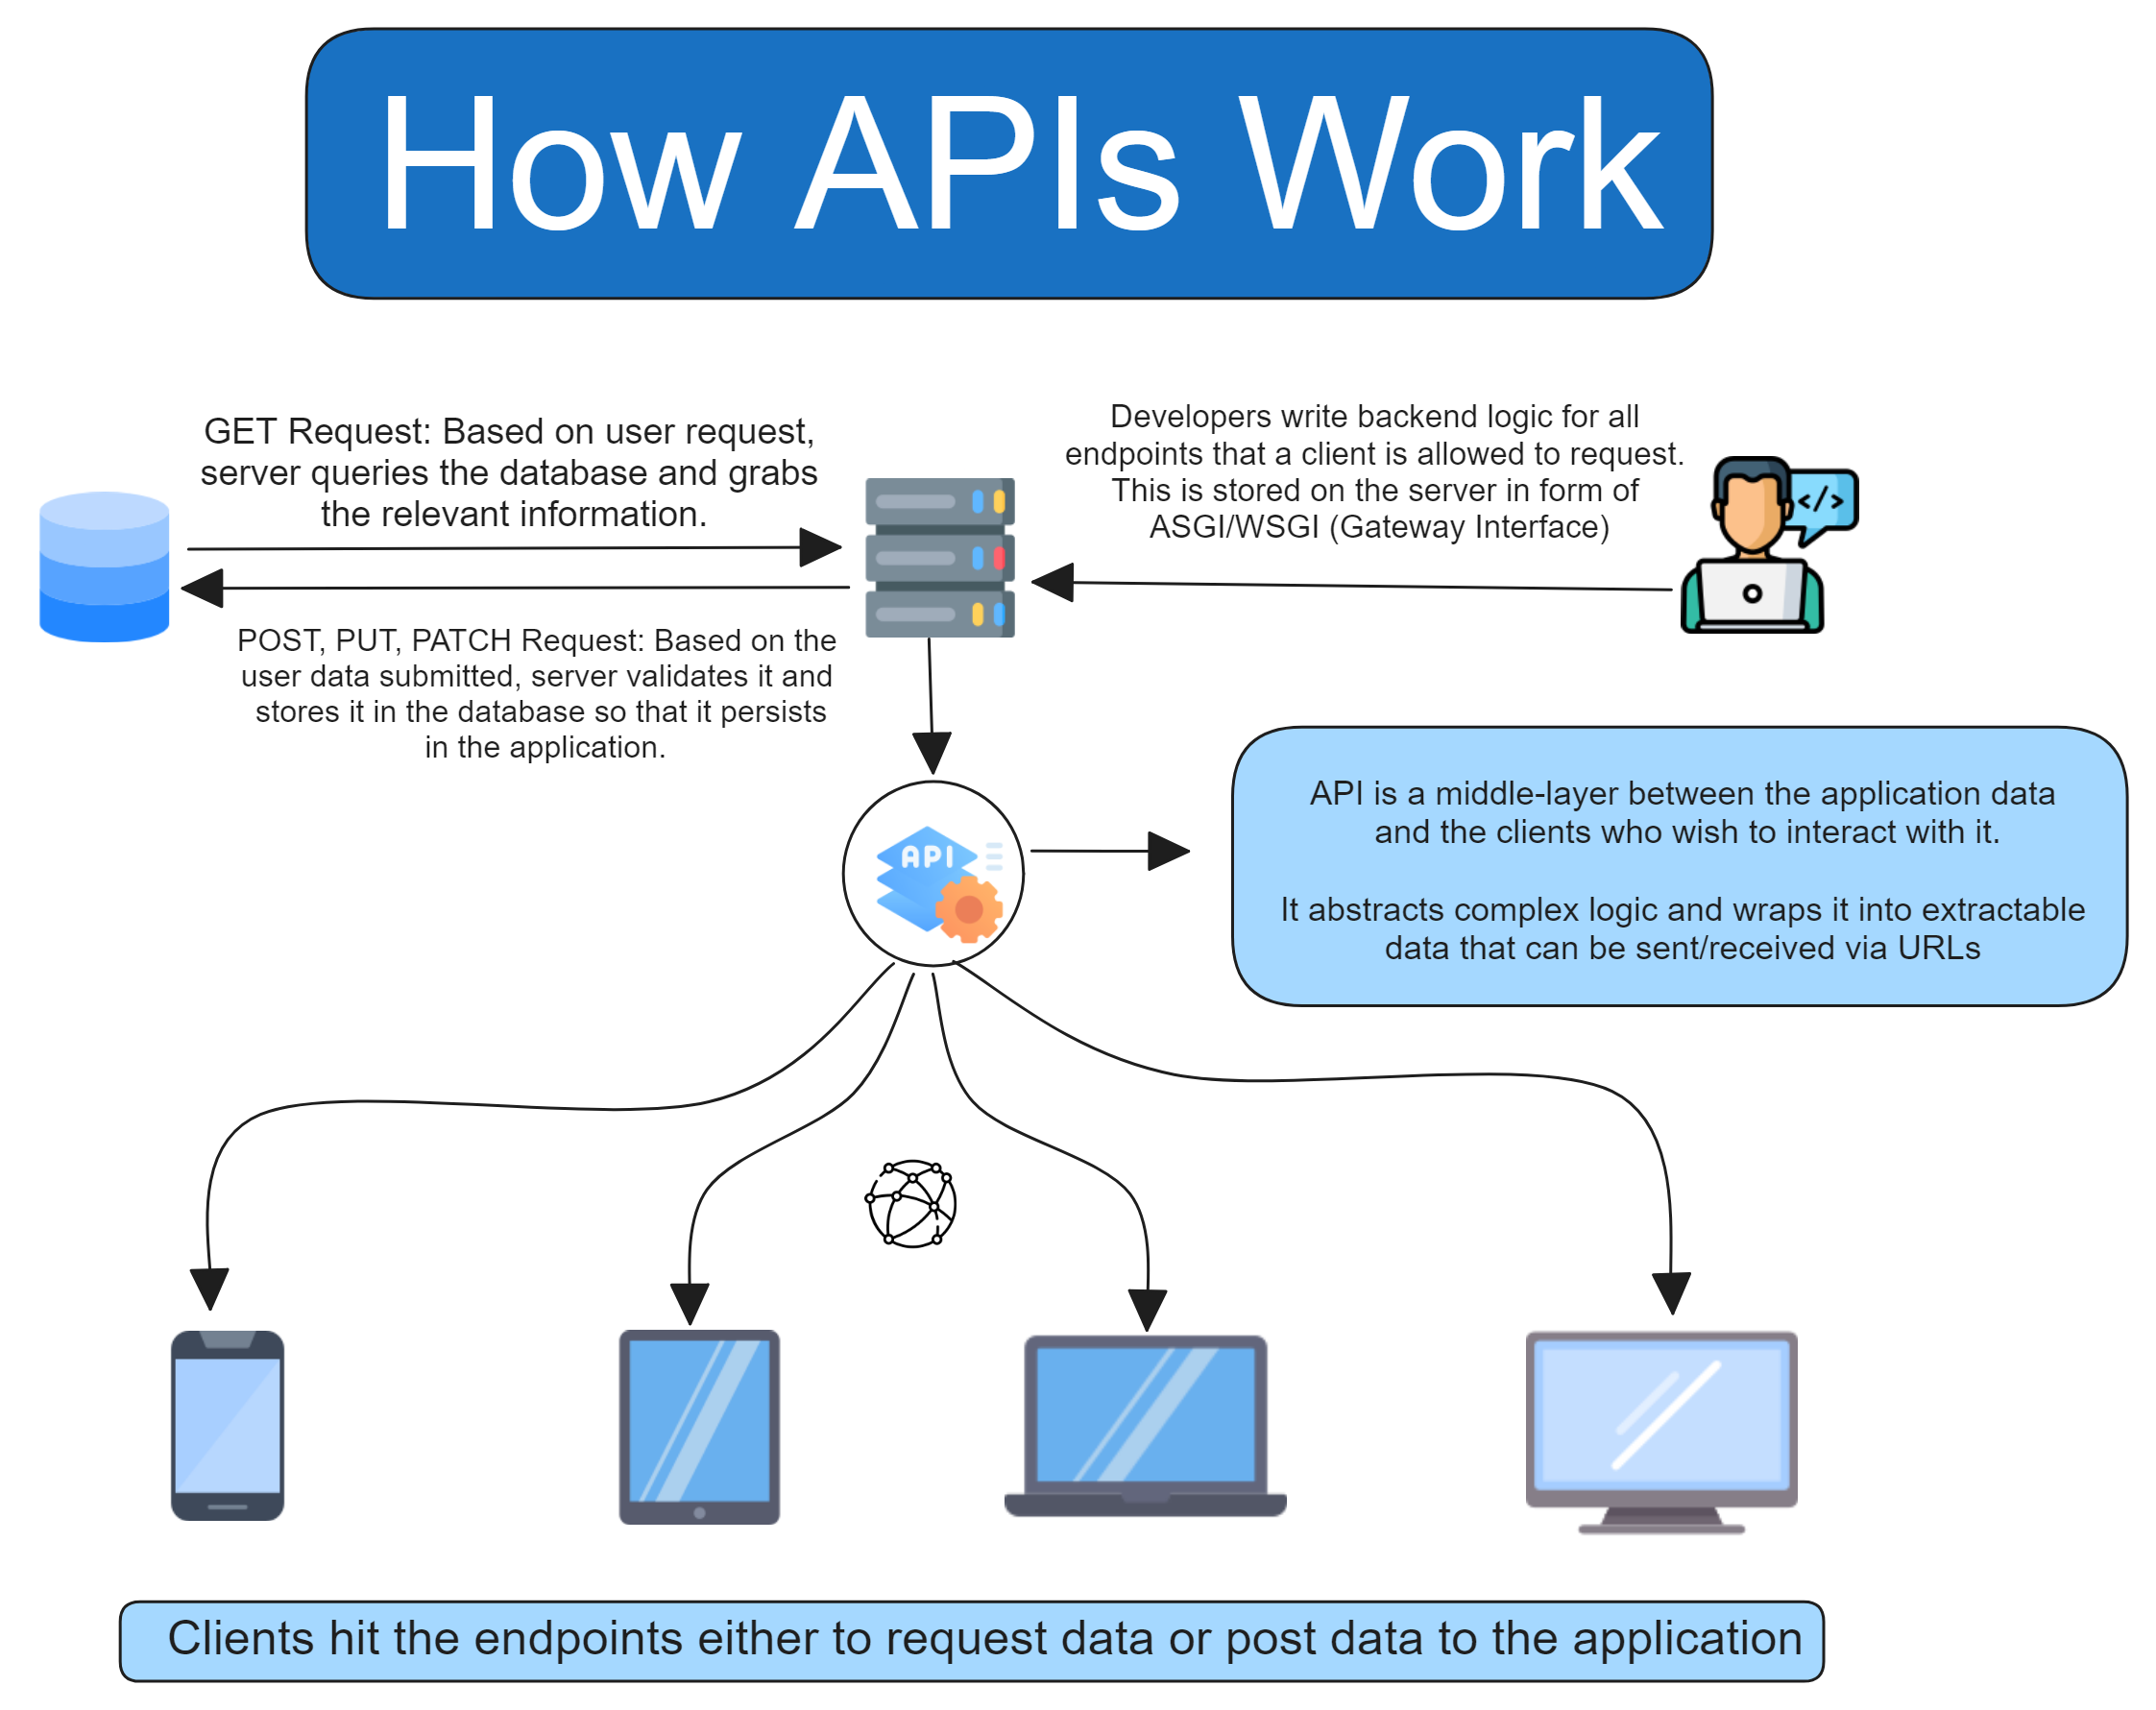
Diagram showing how APIs work
How to Set Up the MongoDB Database
MongoDB is a type of NoSQL database. It is non-relational and saves information as collections and documents.
Install MongoDB for your operating system from the official website.
Now run the mongosh command for your terminal to verify if the installation was successful.
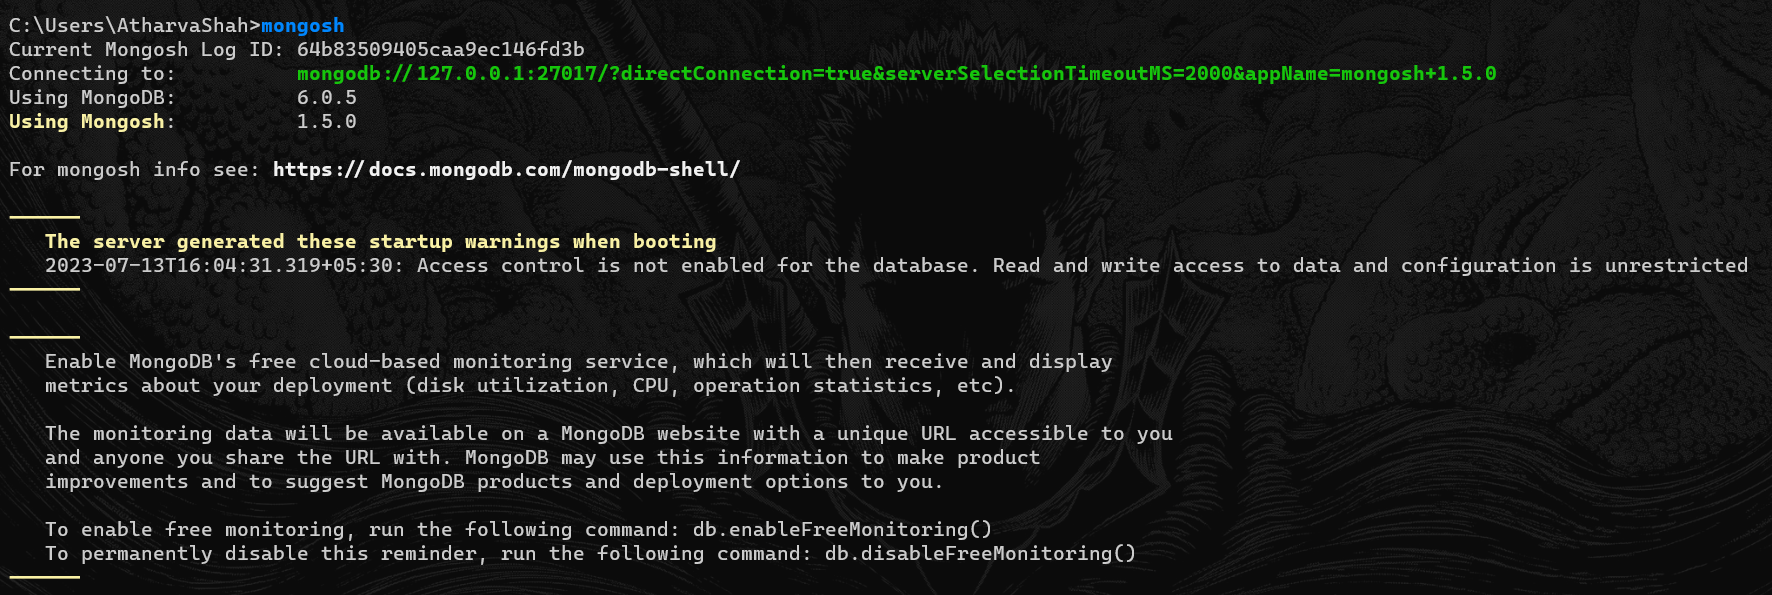
Running the mongosh command should yield this output
Connect to the MongoDB server with MongoDB Compass. I recommend that you set up MongoDB by specifying settings such as port number, storage engine, authentication, and so forth.

Create a new MongoDB connection
Now that the connection is established, the next step is to create a database or a "document". Call this database "courses". It will be empty for you currently. In just a minute we'll insert the documents using a Python script.
How to Parse and Insert Course Data into MongoDB
You could insert records one by one, but it is best to use a JSON file to simplify that process. Download this file courses.json from GitHub. All course information is present in it (as a list of courses).
Specifically, each course has the following structure:
name: The title of the course.
date: Creation date as a UNIX timestamp.
description: The description of the course.
domain: List of the course domain(s).
chapters: List of the course chapters. Each chapter has a title name and content text.
You will need a few Python packages for this project.
BSON- Binary serialization format that is used in MongoDB for efficient data storage and retrieval. It comes bundled with PyMongo.FastAPI- Web framework for creating Python APIs that offer high performance, automatic validation, interactive documentation, and support for async operations.PyMongo- Official MongoDB driver for Python. It serves as a high-level API for integrating MongoDB within Python.Uvicorn- Primary ASGI server that improves application performance. It is responsible for server startup.Starlette- ASGI framework that powers FastAPI and allows rapid prototyping development.Pydantic- Integrated data validation and parsing library. We need it to create interactive API documentation while automatically validating incoming request data and enforcing data type rules.
Get them installed via the pip commands like so:
pip install fastapi pymongo uvicorn starlette pydantic
Now, let's write a Python script to insert all this course data into the database so that we can start building API routes. Spin up your IDE, create a file called script.py, and make sure it is in the same directory as the courses.json file.
"""
Script to parse course information from courses.json, create the appropriate databases and
collection(s) on a local instance of MongoDB, create the appropriate indices (for efficient retrieval)
and finally add the course data on the collection(s).
"""

import pymongo
import json

# Connect to MongoDB
client = pymongo.MongoClient("mongodb://localhost:27017/")
db = client["courses"]
collection = db["courses"]

# Read courses from courses.json
with open("courses.json", "r") as f:
    courses = json.load(f)

# Create index for efficient retrieval
collection.create_index("name")

# add rating field to each course
for course in courses:
    course['rating'] = {'total': 0, 'count': 0}

# add rating field to each chapter
for course in courses:
    for chapter in course['chapters']:
        chapter['rating'] = {'total': 0, 'count': 0}

# Add courses to collection
for course in courses:
    collection.insert_one(course)

# Close MongoDB connection
client.close()
This script populates a MongoDB database with the course information from the JSON file.
It begins by connecting to the local MongoDB instance. It reads course data from a file called courses.json and creates a new field for course ratings. It then develops an index to speed up data retrieval. Lastly, the course data is added to the MongoDB collection.
It's a straightforward script for managing course data in a database. On running the script, all records from the courses.json should have been inserted into the courses DB. Switch to MongoDB Compass to verify it.

You should be able to see the JSON items in your courses database after running the python script
How to Design the FastAPI Endpoints
These API endpoints provide an efficient way to manage course information, retrieve course details, and allow user interactions for rating chapters.
I recommend designing the API endpoints first along with the HTTP request type before writing the code. This acts as a good reference and provides clarity during the coding process.
| Endpoint | Request Type | Description |
| /courses | GET | Get a list of all available courses with sorting options. |
Options: Sort by title (ascending), date (descending), or total course rating (descending).
Optional filtering based on domain is supported. | | /courses/{course_id} | GET | Get the overview of a specific course identified by course_id. | | /courses/{course_id}/{chapter_id} | GET | Get information about a specific chapter within a course. | | /courses/{course_id}/{chapter_id} | POST | Rate a specific chapter within a course.
Options: Positive rating (1), negative rating (-1).
The ratings are aggregated for each course. |
Okay, time to dive into the API code. Create a brand new Python file and call it main.py:
import contextlib
from fastapi import FastAPI, HTTPException, Query
from pymongo import MongoClient
from bson import ObjectId
from fastapi.encoders import jsonable_encoder

app = FastAPI()
client = MongoClient('mongodb://localhost:27017/')
db = client['courses']
The code imports essential modules and creates an active instance of the FastAPI class named app. It also establishes a connection to the local MongoDB database using the PyMongo library and the db variable now stores the connection reference to the courses document.
Let's go over each of these endpoints in more detail now.
The Get All Courses Endpoint (/courses – GET)
This endpoint allows you to retrieve a list of all available courses. You can sort the courses based on different criteria, such as alphabetical order (based on the course title in ascending order), date (in descending order), or total course rating (in descending order). Also, we'll allow users to filter the courses based on their domain.
@app.get('/courses')
def get_courses(sort_by: str = 'date', domain: str = None):
    # set the rating.total and rating.count to all the courses based on the sum of the chapters rating
    for course in db.courses.find():
        total = 0
        count = 0
        for chapter in course['chapters']:
            with contextlib.suppress(KeyError):
                total += chapter['rating']['total']
                count += chapter['rating']['count']
        db.courses.update_one({'_id': course['_id']}, {'$set': {'rating': {'total': total, 'count': count}}})


    # sort_by == 'date' [DESCENDING]
    if sort_by == 'date':
        sort_field = 'date'
        sort_order = -1

    # sort_by == 'rating' [DESCENDING]
    elif sort_by == 'rating':
        sort_field = 'rating.total'
        sort_order = -1

    # sort_by == 'alphabetical' [ASCENDING]
    else:
        sort_field = 'name'
        sort_order = 1

    query = {}
    if domain:
        query['domain'] = domain


    courses = db.courses.find(query, {'name': 1, 'date': 1, 'description': 1, 'domain':1,'rating':1,'_id': 0}).sort(sort_field, sort_order)
    return list(courses)
This code defines an endpoint in the FastAPI application to retrieve a list of all available courses. The endpoint can be accessed using an HTTP GET request to the '/courses' URL.
The @app.get() decorator is attached to the get_course function and it takes care of this.
When a request is made to this endpoint, the code first calculates the total course rating by summing up the ratings of all the chapters in each course. It then updates the rating field of each course in the MongoDB database with the computed total and count of ratings.
Next, the code determines the sorting mode based on the sort_by query parameter. If sort_by is set to date, the courses will be sorted by their creation date in descending order. If it is set to rating, the courses will be sorted by their total rating in descending order. Otherwise, the courses will be sorted alphabetically by their names in ascending order.
If the optional domain query parameter is provided, the code will filter the courses based on the specified domain.
Finally, the code queries the MongoDB database to retrieve the relevant course information, including the course name, creation date, description, domain, and rating. The courses are sorted according to the selected sorting mode and returned as a list.
That was the code explanation, but what about the actual API response? Run the command below in your terminal from the current working directory:
uvicorn main:app --reload
Uvicorn is an ASGI webserver. You can interact with API endpoints right on your local machine without any external server. On running the above command you should see a success message stating that the server has started.
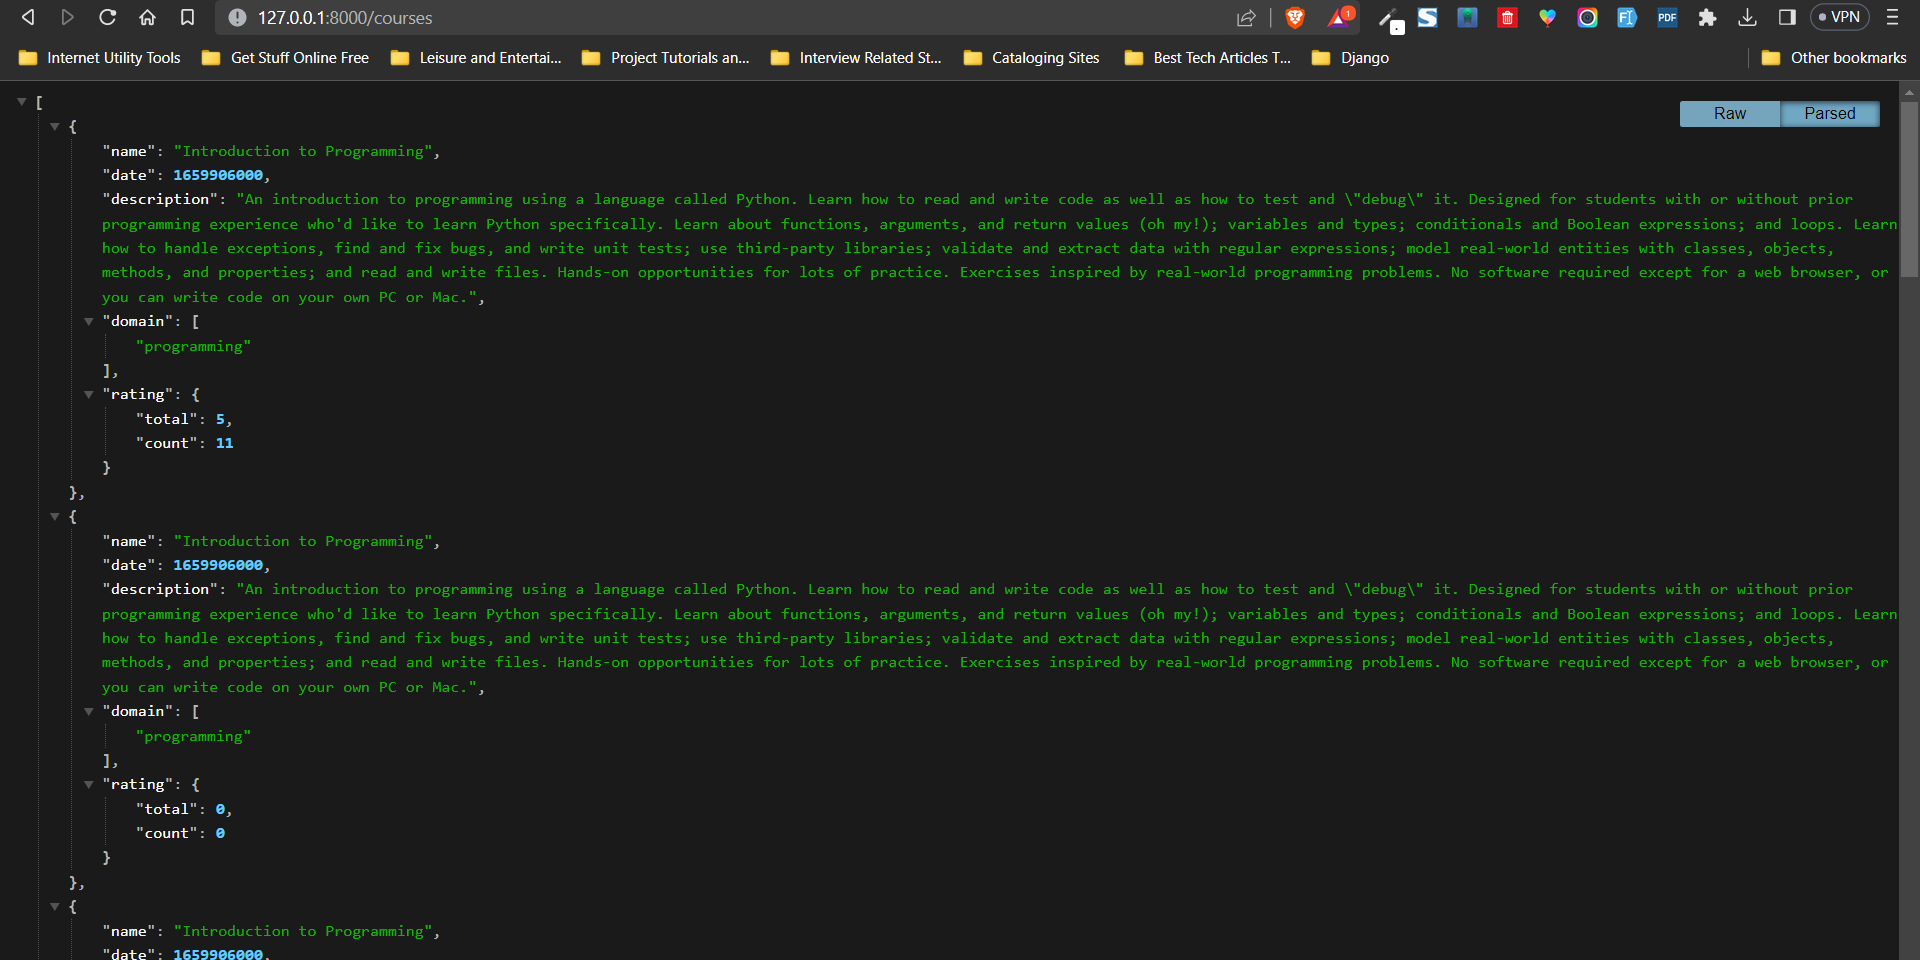
Fire up your browser and enter http://127.0.0.1:8000/courses in the URL bar. The output that you will see will be the JSON response directly from the server.
Verify that the first object contains the following:
{
"name": "Introduction to Programming",
"date": 1659906000,
"description": "An introduction to programming using a language called Python. Learn how to read and write code as well as how to test and \"debug\" it. Designed for students with or without prior programming experience who'd like to learn Python specifically. Learn about functions, arguments, and return values (oh my!); variables and types; conditionals and Boolean expressions; and loops. Learn how to handle exceptions, find and fix bugs, and write unit tests; use third-party libraries; validate and extract data with regular expressions; model real-world entities with classes, objects, methods, and properties; and read and write files. Hands-on opportunities for lots of practice. Exercises inspired by real-world programming problems. No software required except for a web browser, or you can write code on your own PC or Mac.",
"domain": [
    "programming"
    ],
"rating": {
    "total": 6,
    "count": 12
    }
}
Guess what? It is a list of all the courses that we stored in our database. Your front-end application may now iterate over all these items and present them in a fancy way to the user. That is the power of APIs.
The Rating for the entire course will be updated as per the aggregated sum of chapters as mentioned in the assignment document.
At this point, if you wish to see the documentation for your API do so by navigating to the http://127.0.0.1:8000/docs endpoint. This navigable API comes prepackages with FastAPI. How cool is that?

FastAPI docs for all your API endpoints
Don't like the plain old look of the docs? Fret not, there is also a /redoc endpoint with a slightly fancier interface. Just navigate to [http://127.0.0.1:8000/](http://127.0.0.1:8000/docs)redoc and you will be greeted with this screen.
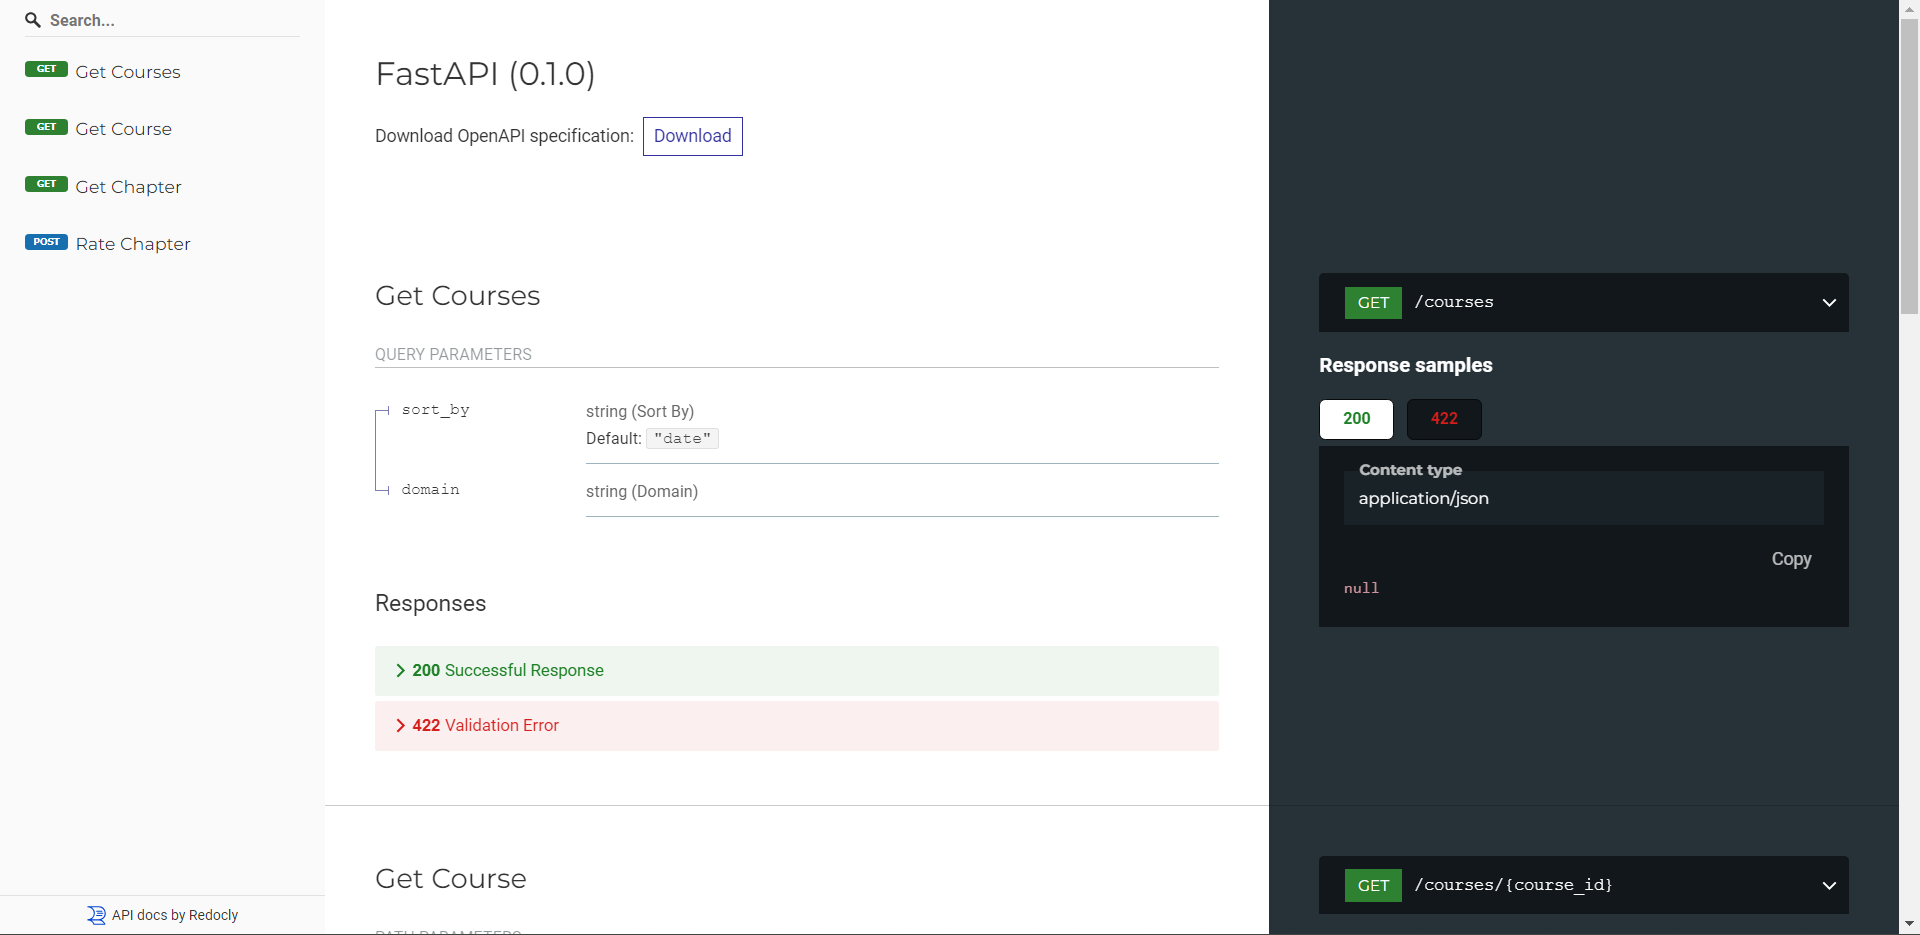
FastAPI alternate redoc interface with search and download options
The Get Course Overview Endpoint (/courses/{course_id} – GET)
You'll use this endpoint to get an overview of a specific course. Simply provide the course_id in the URL, and the API will return detailed information about that particular course.
@app.get('/courses/{course_id}')
def get_course(course_id: str):
    course = db.courses.find_one({'_id': ObjectId(course_id)}, {'_id': 0, 'chapters': 0})
    if not course:
        raise HTTPException(status_code=404, detail='Course not found')
    try:
        course['rating'] = course['rating']['total']
    except KeyError:
        course['rating'] = 'Not rated yet'

    return course
This code snippet searches the MongoDB database for the course with the specified course_ id and extracts the course information while leaving out the chapters field.
If it cannot find the course, it throws an HTTPException with the status code 404. If it finds it, it tries to access the rating field and replaces it with its 'total' value to display the total rating. If not, the rating box is set to Not rated yet.
Finally, without the chapters field, it returns the JSON response of the course information, including the total rating.

Single Course Overview Endpoint Response
Get Specific Chapter Information Endpoint (/courses/{course_id}/{chapter_id} – GET)
Hitting this endpoint returns specific information about a chapter within a course. By specifying both the course_id and the chapter_id in the URL, you can access the details of that particular chapter.
@app.get('/courses/{course_id}/{chapter_id}')
def get_chapter(course_id: str, chapter_id: str):
    course = db.courses.find_one({'_id': ObjectId(course_id)}, {'_id': 0, })
    if not course:
        raise HTTPException(status_code=404, detail='Course not found')
    chapters = course.get('chapters', [])
    try:
        chapter = chapters[int(chapter_id)]
    except (ValueError, IndexError) as e:
        raise HTTPException(status_code=404, detail='Chapter not found') from e
    return chapter
As you might expect, course_id is the course identity, and chapter id is the chapter identifier inside that course.
When a request is made to this endpoint, the code first searches the MongoDB database for the course with the specified course id, ignoring the _id column in the response.
If the course with the supplied course_id cannot be found in the database, the code throws an HTTPException with the status code 404, indicating that the course could not be located.
The code then uses the GET function to retrieve the list of chapters for the course, setting the default value to an empty list if the 'chapters' field does not exist.
Using the chapter_id provided in the request, the code then attempts to retrieve the exact chapter within the list of chapters. If the chapter id is not a valid integer or is out of range for the list of chapters, the code throws an HTTPException with the status code 404. This indicates that it could not locate the chapter.
If it locates the chapter, the response contains information on the individual chapter within the course.

Chapter Detail Endpoint
Rate Chapter Endpoint (/courses/{course_id}/{chapter_id} – POST)
This endpoint allows users to rate individual chapters within a course. You can provide a rating of 1 for a positive review or -1 for a negative review. The API aggregates all the ratings for each course, providing valuable feedback for future improvements.
Up until now, we've mostly seen GET requests. But now let's see how you can send data to the server, validate it, and insert it in the application database.
@app.post('/courses/{course_id}/{chapter_id}')
def rate_chapter(course_id: str, chapter_id: str, rating: int = Query(..., gt=-2, lt=2)):
    course = db.courses.find_one({'_id': ObjectId(course_id)}, {'_id': 0, })
    if not course:
        raise HTTPException(status_code=404, detail='Course not found')
    chapters = course.get('chapters', [])
    try:
        chapter = chapters[int(chapter_id)]
    except (ValueError, IndexError) as e:
        raise HTTPException(status_code=404, detail='Chapter not found') from e
    try:
        chapter['rating']['total'] += rating
        chapter['rating']['count'] += 1
    except KeyError:
        chapter['rating'] = {'total': rating, 'count': 1}
    db.courses.update_one({'_id': ObjectId(course_id)}, {'$set': {'chapters': chapters}})
    return chapter
We have put in place an endpoint for users to rate each chapter within a course using an HTTP POST request to the /courses/course_id/chapter_id URL. Users can provide a rating value of 1 for a positive rating or -1 for a negative rating. The code queries the MongoDB database to find the course with the specified course_id, excluding the _id field.
If it doesn't find the course, it raises an HTTP exception with a status code of 404. The code retrieves the list of chapters, setting the default value to an empty list.
If the chapter_id is not a valid integer or is out of range, it raises an HTTPException with a status code of 404. If the chapter is found, the code updates its rating by incrementing the total rating value with the provided rating and incrementing the count value.
If the chapter does not have an existing rating field, it creates one and initializes it with the provided rating and a count of 1. The updated rating is then updated in the database, and the updated chapter is returned as the response, providing feedback to the user about their rating for that chapter.

POST Request to add a rating to a chapter
To make a POST request, open the docs and click on the request highlighted in the above image. Then, click on "Try it out", fill in the post data, and press the Execute button right below. This sends the POST data to the server which is then validated.
If all the submitted data is as expected, the server accepts and shows the 200 status code meaning that the operation was successful. The submitted data is now in the MongoDB document.
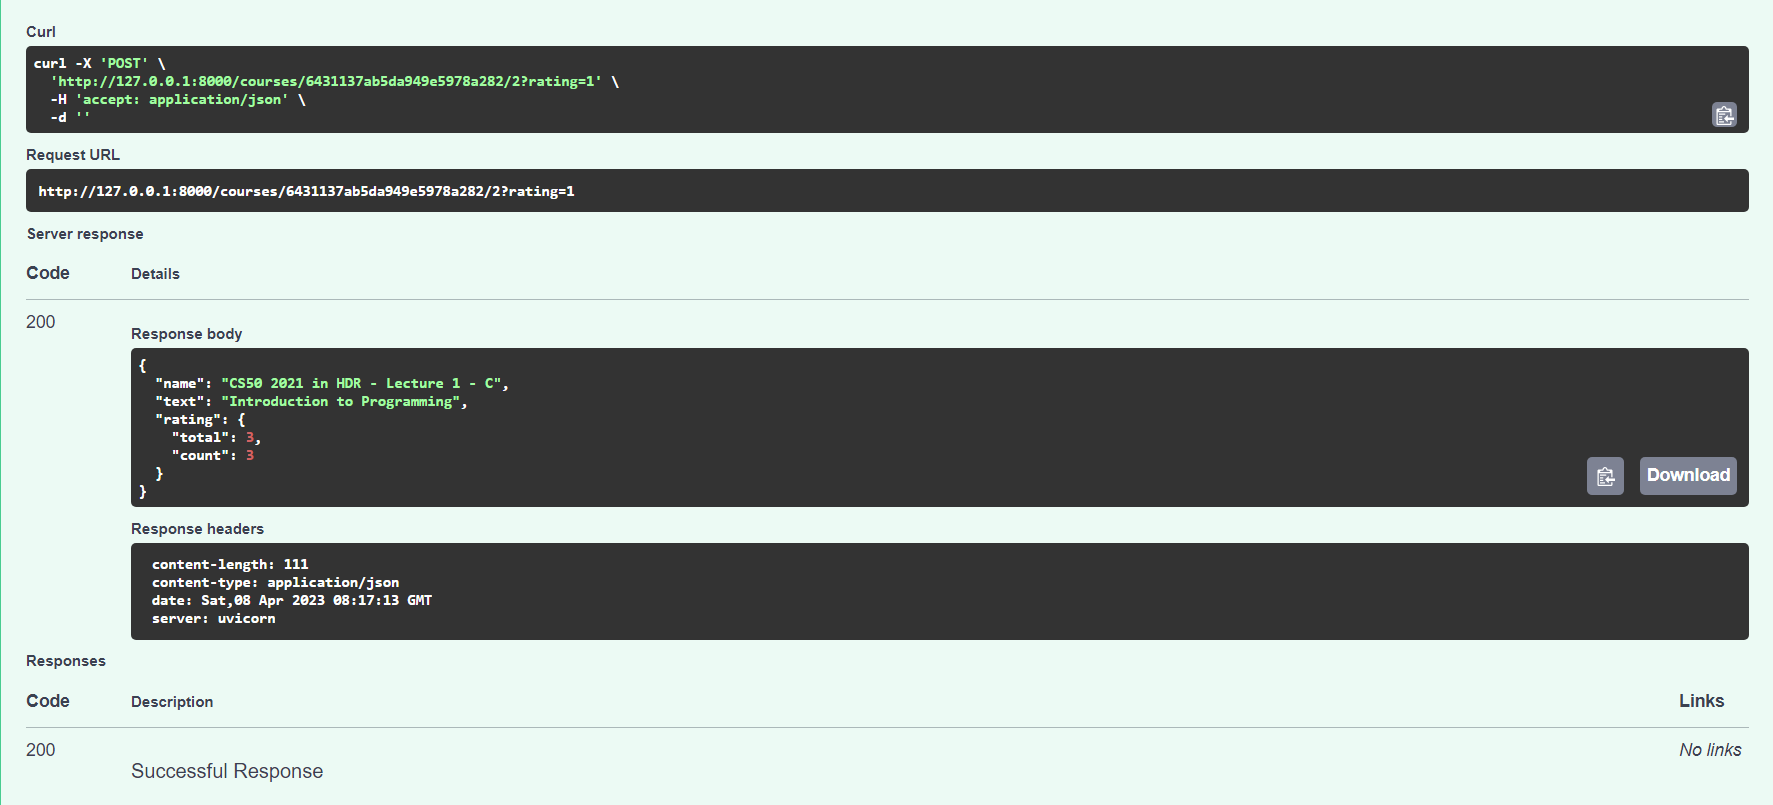
Post Request Success
That's a wrap on the API development part.
Automated API Endpoint Testing with PyTest
As the complexity of modern web applications increases, so does the number of API endpoints and their interactions.
In a dynamic e-commerce web app, there could be hundreds of endpoints, each supporting multiple HTTP request methods. And these endpoints might be intricately interconnected.
Ensuring the proper functioning of all these endpoints after each development iteration becomes a formidable task for developers and QA teams. Here is where automated testing comes to the rescue.
Create a file test_app.py in the same directory as courses.json and main.py:
from fastapi.testclient import TestClient
from pymongo import MongoClient
from bson import ObjectId
import pytest
from main import app

client = TestClient(app)
mongo_client = MongoClient('mongodb://localhost:27017/')
db = mongo_client['courses']
That sets up an automated testing environment.
FastAPI Test Client simulates HTTP requests to the web app. With this, you can pretend to be a user, sending requests to your app and getting responses back, just like a real user would.
We're using MongoDB Connection for course data storage, with MongoClient enabling interaction and data updates during tests.
Test Database is a separate database for testing. It will not affect the actual course documents.
With this configuration, you can now create test functions that send requests to your FastAPI app using the TestClient. You will interact with your MongoDB database during these tests, but don't worry—this is just the test database, so nothing important will be harmed.
How to Test the "Get Courses List" Endpoint
These test functions use TestClient to interact with the "/courses" endpoint of the FastAPI application. They check if the endpoint behaves as expected when different parameters, such as sorting and filtering by domain, are provided.
The tests verify the status codes, data presence, sorting order, and domain filtering in the API responses, ensuring the functionality of the course endpoint is correct and reliable.
def test_get_courses_no_params():
    response = client.get("/courses")
    assert response.status_code == 200

def test_get_courses_sort_by_alphabetical():
    response = client.get("/courses?sort_by=alphabetical")
    assert response.status_code == 200
    courses = response.json()
    assert len(courses) > 0
    assert sorted(courses, key=lambda x: x['name']) == courses


def test_get_courses_sort_by_date():
    response = client.get("/courses?sort_by=date")
    assert response.status_code == 200
    courses = response.json()
    assert len(courses) > 0
    assert sorted(courses, key=lambda x: x['date'], reverse=True) == courses

def test_get_courses_sort_by_rating():
    response = client.get("/courses?sort_by=rating")
    assert response.status_code == 200
    courses = response.json()
    assert len(courses) > 0
    assert sorted(courses, key=lambda x: x['rating']['total'], reverse=True) == courses

def test_get_courses_filter_by_domain():
    response = client.get("/courses?domain=mathematics")
    assert response.status_code == 200
    courses = response.json()
    assert len(courses) > 0
    assert all([c['domain'][0] == 'mathematics' for c in courses])

def test_get_courses_filter_by_domain_and_sort_by_alphabetical():
    response = client.get("/courses?domain=mathematics&sort_by=alphabetical")
    assert response.status_code == 200
    courses = response.json()
    assert len(courses) > 0
    assert all([c['domain'][0] == 'mathematics' for c in courses])
    assert sorted(courses, key=lambda x: x['name']) == courses

def test_get_courses_filter_by_domain_and_sort_by_date():
    response = client.get("/courses?domain=mathematics&sort_by=date")
    assert response.status_code == 200
    courses = response.json()
    assert len(courses) > 0
    assert all([c['domain'][0] == 'mathematics' for c in courses])
    assert sorted(courses, key=lambda x: x['date'], reverse=True) == courses
Pay attention to the assert statements. The expected results are checked against actual results and it returns a True or False Boolean based on the this comparison. The objective is to get all the tests to pass by equalizing these values.
How to Test the "Get Single Course Info" Endpoint
The tests use TestClient to send queries to FastAPI's "/courses/course id" endpoint, retrieving course data from the MongoDB database using the db.courses.find_one function. Comparing API response data to database data can help you determine if the endpoint handles existing and non-existent course IDs.
def test_get_course_by_id_exists():
    response = client.get("/courses/6431137ab5da949e5978a281")
    assert response.status_code == 200
    course = response.json()
    # get the course from the database
    course_db = db.courses.find_one({'_id': ObjectId('6431137ab5da949e5978a281')})
    # get the name of the course from the database
    name_db = course_db['name']
    # get the name of the course from the response
    name_response = course['name']
    # compare the two
    assert name_db == name_response


def test_get_course_by_id_not_exists():
    response = client.get("/courses/6431137ab5da949e5978a280")
    assert response.status_code == 404
    assert response.json() == {'detail': 'Course not found'}
How to Test the "Get Course Chapter Info" Endpoint
The tests anticipate the FastAPI application's "/courses/course id/chapter number" endpoint to provide chapter information for a certain course ID and number when they use the TestClient to make the request.
We use assertions to determine if the answer includes the anticipated data or gives a "Not Found" response for a non-existent chapter. It validates that the correct API chapter was retrieved and handles existing and non-existent chapters.
def test_get_chapter_info():
    response = client.get("/courses/6431137ab5da949e5978a281/1")
    assert response.status_code == 200
    chapter = response.json()
    assert chapter['name'] == 'Big Picture of Calculus'
    assert chapter['text'] == 'Highlights of Calculus'


def test_get_chapter_info_not_exists():
    response = client.get("/courses/6431137ab5da949e5978a281/990")
    assert response.status_code == 404
    assert response.json() == {'detail': 'Chapter not found'}
How to Test the "Post Course Rating" Endpoint
To test the rating capability, the test function specifies the course ID, chapter ID, and rating variables. It uses the TestClient's post method to submit a POST request to the "/courses/course id/chapter id" API, providing the course ID and chapter number in the URL and passing the rating variable as a query parameter.
FastAPI mimics a user's activity to rate a certain chapter of a course. The response is successful with a 200 status code. JSON content is validated for "name" and "rating" keys, as well as "total" and "count" keys. The total rating and rating count are greater than 0, indicating users have rated the chapter.
def test_rate_chapter():
    course_id = "6431137ab5da949e5978a281"
    chapter_id = "1"
    rating = 1

    response = client.post(f"/courses/{course_id}/{chapter_id}?rating={rating}")

    assert response.status_code == 200

    # Check if the response body has the expected structure
    assert "name" in response.json()
    assert "rating" in response.json()
    assert "total" in response.json()["rating"]
    assert "count" in response.json()["rating"]

    assert response.json()["rating"]["total"] > 0
    assert response.json()["rating"]["count"] > 0

def test_rate_chapter_not_exists():
    response = client.post("/courses/6431137ab5da949e5978a281/990/rate", json={"rating": 1})
    assert response.status_code == 404
    assert response.json() == {'detail': 'Not Found'}
This verification makes sure that the rating addition endpoint works as intended, with the API returning the correct success code and expected information about the chapter, including its name and updated rating details.
By running the pytest command, all the test functions in the test_app.py file will be executed, and you'll get feedback on whether the endpoints are functioning as expected or if any errors or regressions have occurred. This allows developers and QA teams to catch issues early in the development cycle and maintain the application's reliability and stability.
As you can see in the image below, all the tests are passing. Good job! As you keep on adding more features and endpoints to the app, keep adding the associated tests in order to validate correctness. This is called Test Driven Development (TDD).

Running API Tests with Pytest
Running the Pytest command shows the output as illustrated in the image above. It says that 13 tests pasts. This means that all our endpoints are functional and return the expected responses.
By detecting regressions, integrating components, resolving errors, doing load and performance tests, and testing for security, endpoint testing verifies that an application's essential operations are right. All potential weaknesses and vulnerabilities are noted and tagged for inspection.
Pytest helps you make sure that API endpoints work well together, and also helps you deal with failures and edge cases. It can manage numerous concurrent large requests in practical situations.
How to Containerize the Application with Docker
You can put your application and all of its dependencies together into a single unit called a container. This is called containerization. It separates the application from the underlying system, which maintains consistency across different operating systems.
Docker is a modern containerization technology that makes it easier to create, distribute, and execute containers. It enables developers to consistently and reproducibly build, ship, and execute apps without building from source.
Get Docker installed from here: https://www.docker.com/get-started.
Dockerizing Python programs helps you make sure that they run consistently across multiple computers, eliminating compatibility difficulties. It containerizes the software, its dependencies, and customizations, making it portable.
In the same directory as other files, make a new file called Dockerfile. Note that it does not require any extension.
# Use an official Python runtime as a parent image
FROM python:3.9-slim-buster

# Set the working directory to /app
WORKDIR /app

# Copy the current directory contents into the container at /code
WORKDIR /app

COPY ./requirements.txt /app/requirements.txt

# Install any needed packages specified in requirements.txt
RUN pip install --no-cache-dir --upgrade -r /app/requirements.txt

COPY . /app

# Run app.py when the container launches
CMD ["uvicorn", "main:app", "--host", "0.0.0.0", "--port", "80"]
Starting with the official Python 3.9 thin image, the Dockerfile defines the image's blueprint.
It changes the working directory to /app, which is where the application code will be stored. This projects requirements are listed in the requirements.txt file, which was put into the container.
The RUN command uses pip to install Python requirements. COPY moves the app's code from the host to the container's /app directory. CMD provides the command that will be executed when the container starts.
In this case, it runs "uvicorn main:app" (the main.py FastAPI app) with host set to 0.0.0.0 and port 80.
How to Run the Docker Container
Build the Docker image in the same directory as the Dockerfile using: **docker build -t my_python_app .**
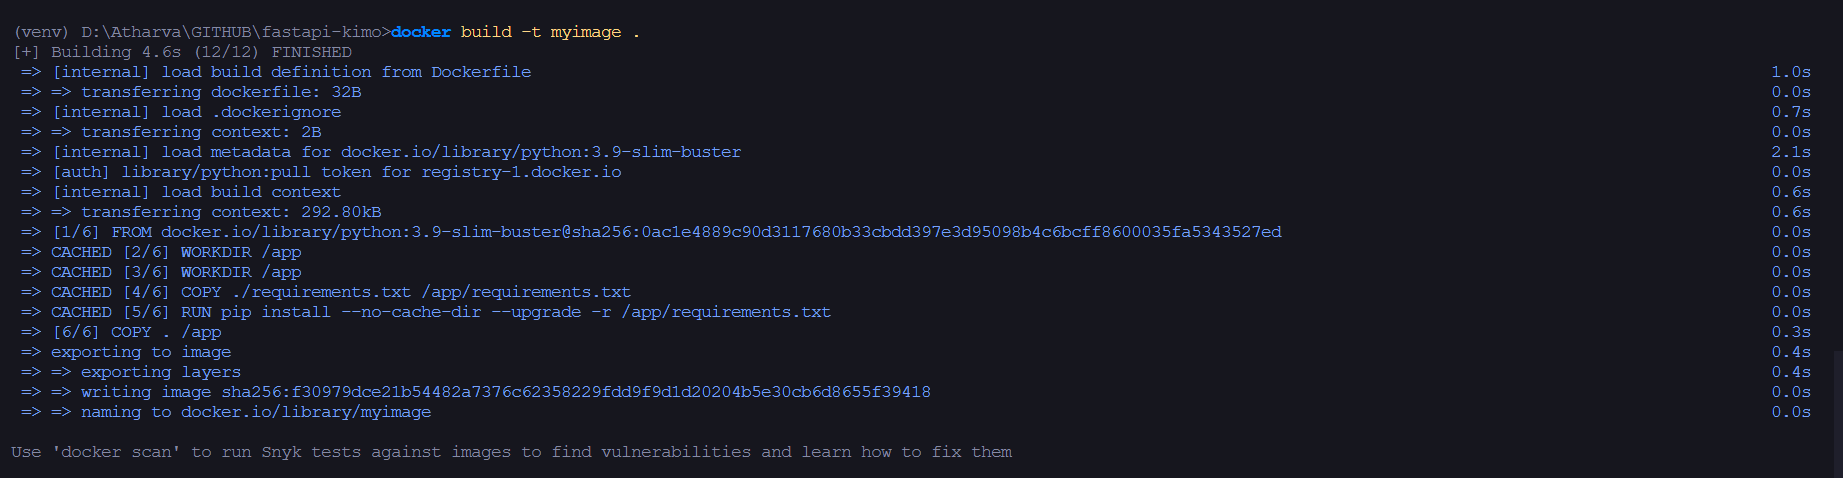
Containerizing the FastAPI app with Docker
Run the container in detached mode using the command **docker run -d -p 80:80 my_python_app**.
Once you do this, you can view the status of the containers and the image from Docker Desktop.
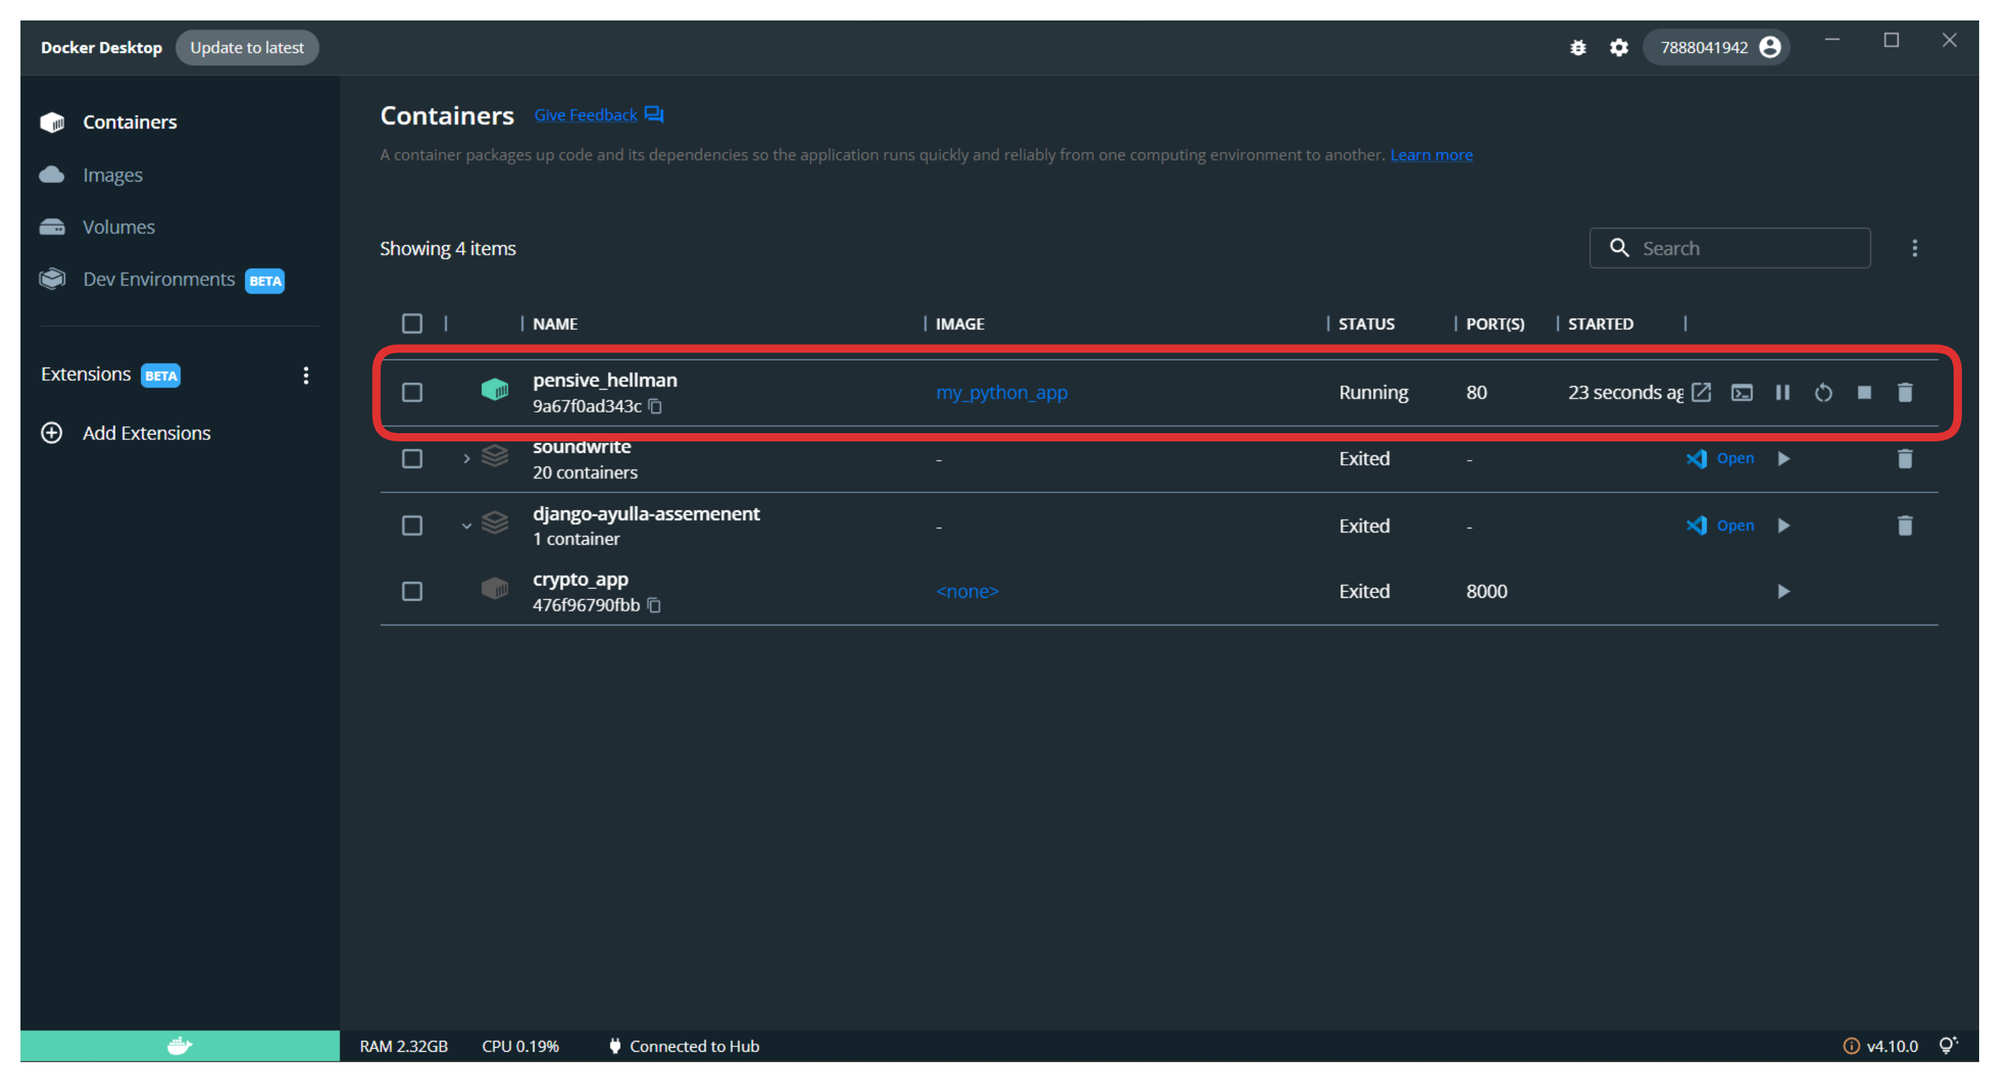
Docker Desktop shows that our container image is now in a running state on port 80
How to Terminate the Docker Container
Find the container ID or name with **docker ps**. Stop the container using its ID or name: **docker stop <container_id_or_name>**
This walkthrough has only addressed development, testing, and containerization. Just note that post deployment container security, if neglected, introduces risks like vulnerabilities, misconfigurations, and attacks. You should ideally take advantage of a CNAPP (Cloud Native Application Protection Platform) to scan images, stick to best practises, and monitor running containers for protection.
The takeaway is that Docker containerization allows bundling of Python scripts with dependencies, making them consistent and portable. The Dockerfile describes how the image should be created.
Running the container after it has been constructed is as simple as issuing a single command. It's just as simple to put a stop to it. Docker makes it simple to manage Python application distribution.
Conclusion
This tutorial was a quick start guide to help you leverage the power of FastAPI. We built a course administration API that efficiently handles queries related to courses.
We did this by importing course data from a JSON file into MongoDB and then creating multiple endpoints for users to access course lists, overviews, chapter information, and user scores. We also added a review aggregation feature to demonstrate using HTTP POST and HTTP GET methods so that you can grab data as well as post data to the server.
PyTest helped us handle automated testing, ensuring dependability and stability. We then containerized the application Docker, which simplifies deployment and maintenance.
My Github Repository contains the complete code covered in this quick start walkthrough. Subscribe to my technical blog for technical cheat sheets and resources.