Just as with other operating systems, multiple users can create user accounts and share the same machine running Linux OS.
But whenever different users share a system, problems of privacy can easily arise. The first user may not wish the next user to view, edit, or delete their files, for example.
The Linux Terminal possesses some superpowers when it comes to handling file permissions. You can grant or revoke permissions for every file and directory from your Linux Terminal.
What are File Permissions in Linux?
File permissions control which actions can be performed by which users. Read, Write, and Execute are the three actions possible for every file.
Users are classified under three broad categories: Normal users, Groups, and Others. Linux allows users to set permissions at a very granular level. You can secure your file or directory in every possible location of a file system.
This seems useful, right?
There are three important commands you'll use when managing file permissions:
chmod(Change mode)chown(Change ownership)chgrp(Change group)
Among these, chmod is one of the most important commands. We'll discuss the chmod command in this tutorial, and I'll get into the others in upcoming articles.
Let’s deep dive into the chmod command 🏊.
Actions you can perform on a file
Before we proceed further, I want to make sure you're clear about how the Read, Write, and Execute actions of a file work. Read and write are pretty are self-explanatory – they determine whether a user can read or write to a file.
But, what’s an executable file?
A file is said to be executable if it has a sequence of instructions to achieve something. A good example is scripting files (Shell Scripts).
What is the chmod Command?
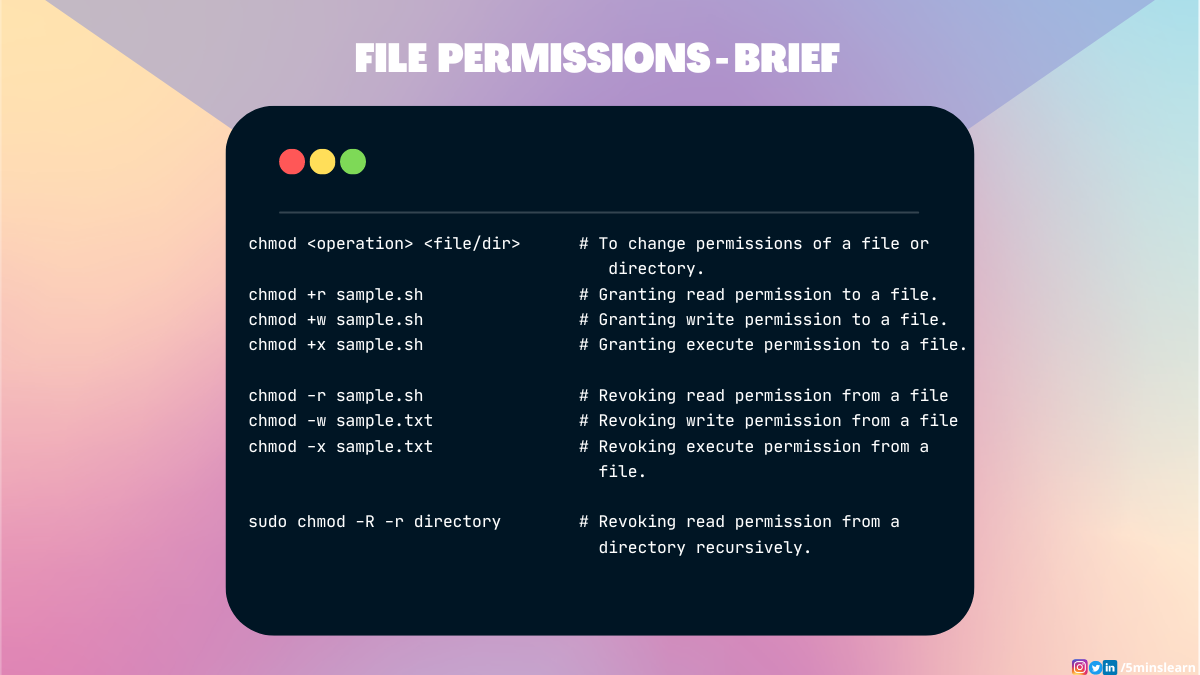
chmod is a command that lets you change the permissions of a file or directory to all types of users.
Here’s the syntax of the chmod command:
chmod <Operations> <File/Directory Name>You can grant or revoke the permission by replacing the Operations in the above command.
What are the operations you can perform?
The Operations in the above syntax are divided into 2 categories. Let's explore them below.
User Level permissions
These operations control permissions on the user level. Here's the commands you can use:
u– Grant permission to a userg– Grant permission to a group (A Group of users)o– Grant permission to others (who do not come under either of the above).
Note: If this option is left empty, permissions will be applied to the logged-in user. Most of the time it'll be left empty.
File Level permissions
These control permissions on the file level.
r– Grants read permissionw– Grant write permissionx– Grant execute permission
These operations need to be preceded with a '+' or '-' operator.
'+' indicates adding a new permission, and '-' indicates removing an existing permission.
Here's an example:
chmod +r sample.txtThe above command adds read permission for the sample.txt file.
Pretty straightforward, right? Let's continue.
How to Make a File Executable in Linux
I can explain this more clearly with an example from my experience.
Linux is the default operating system of my team. We recently hired an intern, who has zero knowledge of Linux but was curious to learn and explore. We started to train him initially by asking him to write some shell scripts, because most servers run Linux OS. He found the entire code on the internet and copied it (we gave such a task intentionally).
He saved the file but was not able to run the script. He didn't know the actual problem. He started removing a few blocks of code and tried to run it again and again.
He repeatedly got the error stating "Command not found".
Finally, he reached the 1st line. He replaced that line with a print statement (the "echo" command) and ran the file with the hope to see the output. But he still hadn't found that error.
With some frustration, he asked for help.
Let's see the issue now.
Basically, we can execute .sh files by just running them like this:
./install.shLet's see the code inside install.sh
echo "This is executable file 🎉"He ran the same command but it did not work. This is because the file was not in executable format. So I ran the magic command to make the file executable:
chmod +x install.shNow it is executable. He stared at me as if I was a hacker 😂. But really, it's a pretty simple and basic concept.
How to Remove Permissions from a File in Linux
I work with my colleague Divad on lots of projects, and he likes to try to fool me. We work together on many hobby projects and we often write shell scripts for quick deployment.
Whenever he writes shell scripts, he always removes all the permissions from the file and pushes the changes to the remote repo. So every time I have to grant permissions using the above commands for whatever action I have to do.
Let's have a quick look at the command he uses to remove file permissions.
Here we have a file named install.sh which has all permissions (Read, Write, Execute). Let's remove the execute permission for this script file.
chmod -x install.sh
You'll not be able to execute this file now. Trying so will give you an error as shown in the above screenshot.
Let's remove the read permission from the file.
chmod -r install.shAlright, with this command we've removed the read permission. Let's try to read that file using Nano (the file editor for the Linux terminal). You will be able to see the "Permission Denied" error at the bottom.
The same applies to removing write permission from the file:
chmod -w install.shYou can achieve all the above together using the below command:
chmod -rwx install.shThis is the core part of handling file permissions in Linux. Remember that we have barely scratched the surface of it, though. Try to understand it and play around with some sample files. Because who knows – in the future, you may get a colleague like Divad. :)
How to Add or Remove Permissions for Directories (Folders) in Linux
If you work with Linux, you might have come across various directories such as /etc, /var, /opt, and others. But you may not be aware of why these directories exist.
There's one thing in common for all these folders, though: that is, you'll not be able to create a file or folder inside them without root permission.
This setting will be pre-configured in your system when Linux OS is installed.
But, you might wonder, can I restrict my folder in a /home directory similar to the above directories? The answer is yes. You can achieve this by changing the permission of the directory using the chmod command.
Let's understand this with an example.
I created a directory named locked_directory and removed read permission from this directory. If I try to read the contents of the folder using the ls command, I'll end up seeing the "Permission Denied" error message.
chmod -r locked_directory/chmod command to remove read permission from a directoryBut, did you know that I can create another directory inside locked_directory named dir1 and read the files and folders in dir1?
Then what's the purpose of the command we just ran before? Removing the read permission on the parent should remove the same on child directories too, right?
Well. That's the exact thing I told you earlier. Linux manages a very granular level of file permissions.
If you want to apply the permissions to the parent directory and all its child directories, you need to pass an exclusive flag with the chmod command.
That flag is -R. It basically means applying the same permissions recursively to all sub-directories (child directories). So this permission will apply to the end child of a file/directory.
Here's the syntax for that:
sudo chmod -R <permission> <filename>Remember that running the command to do a recursive operation needs root permission. So you need to add sudo at the beginning of this command. Here's what it looks like:
sudo chmod -R -r locked_directoryFrom the above screenshot, you can see that trying to view the child directory files has failed after removing the read permission recursively from the parent directory.
Another Way to Handle File Permissions in Linux
Alternatively, you can use Octal representation to control the file permissions.
We can use numbers to represent file permissions (the method most commonly used to set permissions). When you change permissions using the Octal mode, you represent permissions for each triplet using a number (4, 2, 1, or combination of 4, 2, and 1).
Let's see the syntax for using octal mode:
chmod <user><group><others> install.shHere's an example of octal mode:
chmod 777 install.shHow can I remove permissions using Octal Mode?
We can use 0 to remove permissions from a file. Here's an example:
chmod 000 install.sh| Access | Symbolic Mode | Octal Mode |
| Read | r | 4 |
| Write | w | 2 |
| Execute | x | 1 |
The table shows the Octal code for each file permission:
| Access | Symbolic Mode Eg:u+rwx,g+rw,o+r | Octal Mode Eg:764 ( User, Group, Others ) |
| User | u | <first place> |
| Group | g | <middle place> |
| Others | o | <last place> |
You might be confused 😖. Read further to understand clearly.
Let's consider a scenario.
You want to grant read, write, and execute permissions to users and read-only permission for groups and others to the install.sh file.
Let's see how to do that using the above two methods.
How to manage permissions in Symbolic Mode
chmod u+rwx,go+r install.shLet's dismantle each part and try to understand them:
u+rwxrepresents adding read, write, and execute permissions for usersgo+rrepresents adding read permission for groups and others
How to manage permissions in Octal Mode
chmod 744 install.shLet's dismantle each of these numbers and try to understand them:
- The first number (7) represents permission for a user: 7 = ( 4 (
read) +2 (write) +1(execute) ) - The second number (4) represents permissions for a group: 4 (
read) - The third number (4) represents permissions for others: 4 (
read)
Which Mode is Best?
It turns out that symbolic mode is more powerful than octal mode.
The reason is, in the symbolic mode we can mask out the permission bits we want to change. But in octal mode, permission modes are absolute and can't be used to change individual bits.
How to Find Permissions of a File
We can find the existing permissions of a file using ls command.
I hope you all know about ls command. Adding the -l flag and file name with the ls command shows some more info about the file, including the permissions.
ls -l install.sh
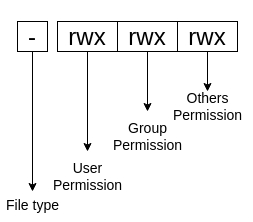
Look at the first part of the output (-rwxrwxrwx) from the above screenshot. Let's explore what it means:

The first character indicates the type of input.
- "-" indicates a file
- "d" indicates a directory
- "i" indicates a link (a symlink, which is a shortcut to a file/directory)
You group the next set of letters, at a maximum of 3 for each group. These groups represents corresponding permissions for user, group, and others.
Conclusion
In this article, you have learned about handling basic file and folder permissions.
I hope you enjoyed reading this tutorial. I have one request to all: give it a try on your own with some complicated scenarios like having permutations and combinations of permissions 😂. It'll definitely be helpful in your entire career.
Subscribe to my newsletter by visiting my site and also have a look at the consolidated list of all my blogs.
Cheers!

