

In this article, we will be learning about one of Firebase's build products called Cloud Firestore. It lets you store, sync, and retrieve data in a document-based database.
We'll learn how to set up our project for the web. Since this isn't a design-focused tutorial, we'll just use an HTML and JavaScript file to show how you can add (store), sync, and query data.
Cloud Firestore is useful because it serves as a backend database which is secure and very much scalable. When you use it, you don't have to worry about writing code to create and manage your own database.
It's also a great choice if you're a front-end developer, as it enables you build full stack applications. Let's get started.
What is Cloud Firestore?
According to the Firebase documentation,
"Cloud Firestore is a flexible, scalable database for mobile, web, and server development from Firebase and Google Cloud...".
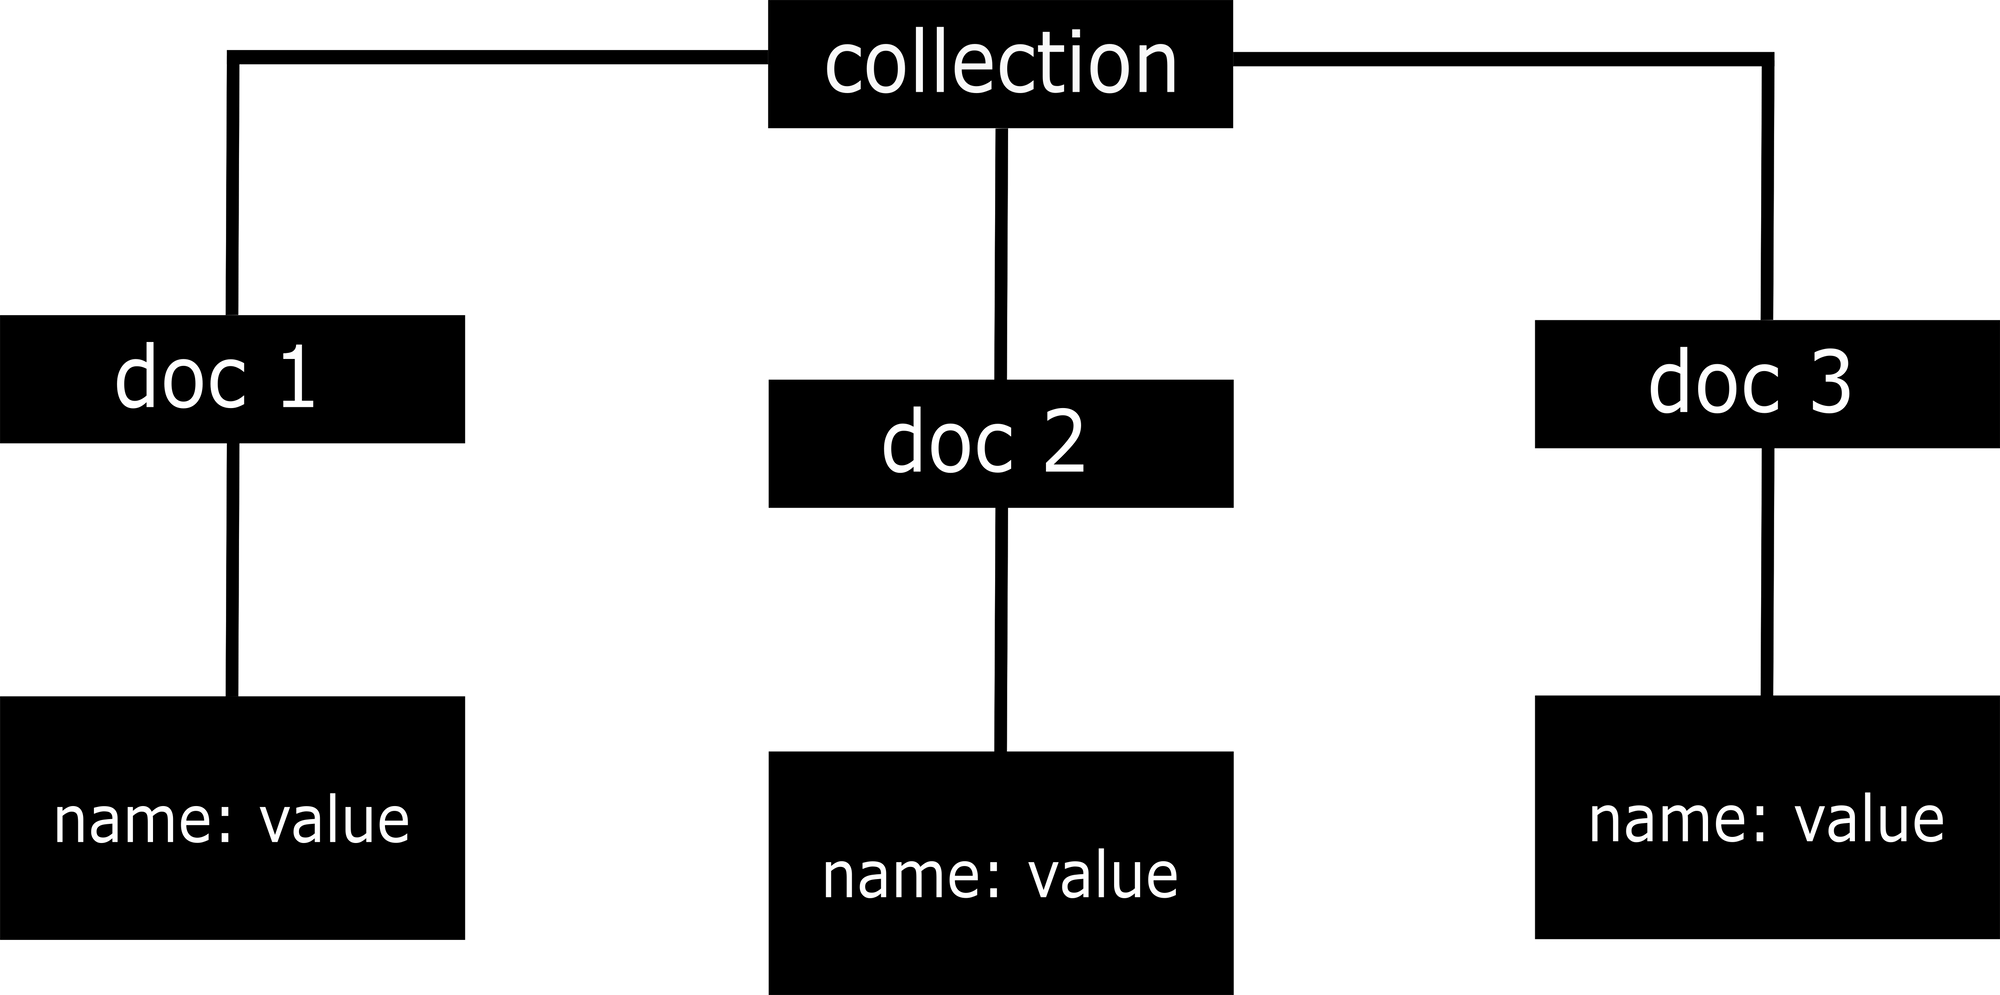
Firestore is a NoSQL database that doesn't store data in tables with rows and columns. Instead, it stores data in collections where each collection can have various documents under it where the data is stored.
We will be focusing on using Firestore to store and retrieve data for the web. You can find the code here. Each section has its own branch.
How to Create the Project Locally
We will working with the HTML and JS files only, so you can style your web page as you please. The main focus here will be on adding and interacting with the data stored in the database.
Here's the HTML file:
<!DOCTYPE html>
<html lang="en">
<head>
    <meta charset="UTF-8">
    <meta http-equiv="X-UA-Compatible" content="IE=edge">
    <meta name="viewport" content="width=device-width, initial-scale=1.0">
    <title>Firestore</title>
</head>
<body>

    <script src="app.js"></script>
</body>
</html>
Now you just need to create a JavaScript file. I've called mine app.js as you can see above above.
How to Set Up the Project in Firebase
To set up your project, go to the Firebase website and sign up if you don't already have an account (or sign in if you do).
Once you're signed in, click on "Go to console" (should be at the top right of the page) or "Get Started" as the case may be.
Next, click on "Add project" and give your project a name. The next steps are pretty straightforward – just keep clicking next and then wait for your project to be created.
How to Install and Initialize Firebase
Firstly, if you haven't already installed Firebase, then run the following command in your project terminal:
npm install firebase
After installing, go to the head section of your HTML page and include the following scripts:
<head>
    <meta charset="UTF-8" />
    <meta http-equiv="X-UA-Compatible" content="IE=edge" />
    <meta name="viewport" content="width=device-width, initial-scale=1.0" />
    <script src="https://www.gstatic.com/firebasejs/8.10.0/firebase-app.js"></script>
    <script src="https://www.gstatic.com/firebasejs/8.10.0/firebase-firestore.js"></script>
    <title>Firestore</title>
  </head>
The first script loads the Firebase app library while the second enables us to use the Firestore features.
Next, go to the Firebase console for your project and click on Firestore Database. Make sure to start in Test Mode so you can make requests without authentication since we are in development mode.
Make sure to change your security rules when the need arises so your project is accessible on the internet. After you have created the database, click on Project Overview on the navigation bar. You should see a page like the one shown below:

Click on the </> icon to initialize your project for the web. On the next page, copy the apiKey, authDomain, and projectId. We are going to initialize the project using the Firestore Web version 8 method as shown below:
<!DOCTYPE html>
<html lang="en">
  <head>
    <meta charset="UTF-8" />
    <meta http-equiv="X-UA-Compatible" content="IE=edge" />
    <meta name="viewport" content="width=device-width, initial-scale=1.0" />
    <script src="https://www.gstatic.com/firebasejs/8.10.0/firebase-app.js"></script>
    <script src="https://www.gstatic.com/firebasejs/8.10.0/firebase-firestore.js"></script>
    <title>Firestore</title>
  </head>
  <body>
    <script>
      firebase.initializeApp({
        apiKey: "### FIREBASE API KEY ###",
        authDomain: "### FIREBASE AUTH DOMAIN ###",
        projectId: "### CLOUD FIRESTORE PROJECT ID ###",
      });

      const db = firebase.firestore();
    </script>
    <script src="app.js"></script>
  </body>
</html>
Make sure to replace ### FIREBASE API KEY ###, ### FIREBASE AUTH DOMAIN ###, and ### CLOUD FIRESTORE PROJECT ID ### with the corresponding values you copied when initializing your project for the web.
How to Add Data to Firestore
You can manually add data to your database by going to the console and creating a new collection with documents which can have different data types. But here we will be taking a different approach – adding data to our database from the front end using input fields.
I have added a div to my code with an input field and a textarea:
<div class="content">
    <input type="text" id="username" placeholder="username">
    <textarea name="" id="about" placeholder="about"></textarea>
    <button id="btn">ADD</button>
</div>
That should be all for the markup for now. Let's get our hands dirty with some vanilla flavored JavaScript. We have to create variables that will get the values of our inputs:
const username = document.getElementById('username');
const about = document.getElementById('about');
const btn = document.getElementById('btn');
Next, we attach an event listener to the button and then write the code for adding data to the database:
btn.addEventListener('click', ()=>{
    db.collection('userInfo').add({
        username: username.value,
        bio: about.value
    });
    username.value = '';
    about.value = '';
})
db.collection('userInfo') looks for a collection called userInfo which does not exist at this point. It will be created automatically if it does not already exist. The id for the documents are also auto generated if not specified.
.add() takes the data in the curly brackets and adds them to the collection, which creates a new document under the userInfo collection. The data in the curly brackets come in name and value pairs.
I have added some data to my own database. You can play around with it and add as many as you want. After pressing the add button, go to your database console and refresh. Then you should see your data chilling in the database as shown below:

You can find the code for this in the addData branch.
How to Get Data
Now we are going to loop through the data we stored earlier and display them on the front end.
We start by creating a ul element in our HTML file that will act as a container.
<body>
    <div class="content">
      <ul id="lists">

      </ul>
    </div>
</body>
We'll create the rest dynamically using JavaScript:
const lists = document.getElementById("lists");

db.collection("userInfo")
  .get()
  .then((querySnapshot) => {
    querySnapshot.forEach((doc) => {
      let li = document.createElement("li");
      let username = document.createElement("h4");
      let bio = document.createElement("p");

      username.textContent = doc.data().username;
      bio.textContent = doc.data().bio;

      li.appendChild(username);
      li.appendChild(bio);

      lists.appendChild(li);
    });
  })
  .catch((error) => {
    console.log("Error getting documents: ", error);
  });
db.collection("userInfo").get() gets the userInfo collection. Since this returns a promise, we can attach a .then() method which has a callback function with a querySnapshot parameter. This parameter returns the current state of the database.
We then looped through the current state using the forEach() method. We created three new elements: li, h4, and p where the value of the h4 was the username stored in the database. We retrieved the username using data().username (same process for the bio).
We then appended the h4 and p elements to the li element, and appended the li element to the ul which already exists in the DOM.
The code for this section can be found in the getDAta branch.
How to Perform Queries on the Data
Queries let you filter the data you get from your database, and they return values based on given conditions. An example would be returning data only for a specific keyword. Here's an example:
db.collection("userInfo").where('username', '==', 'Ihechikara')
  .get()
  .then((querySnapshot) => {
    querySnapshot.forEach(doc =>{
        console.log(doc.data())
    })
  })
  .catch((error) => {
    console.log("Error getting documents: ", error);
  });
The request here is the same as in the previous section except for the where() method, which takes in three parameters: the username, an evaluation for the username, and the value we want to evaluate the username with.
So this is like saying, "Go to the userInfo collection, in the documents, return a user whose username is equal to 'Ihechikara'".
You can decide how you want to display your result on the front end. In the example above, we logged the result to the console.
Below are more comparison operators that you can use for the evaluation of queries:
- < less than
- <= less than or equal to
greater than
- => greater than or equal to
- != not equal to
- array-contains
- array-contains-any
- in
- not-in
You can see the code for this section in the queries branch
How to Order and Limit Data
Just like the heading says, you can order the arrangement of your data or limit the amount of data to be returned.
How to order data
db.collection("userInfo").orderBy('username')
  .get()
  .then((querySnapshot) => {
    querySnapshot.forEach(doc =>{
        console.log(doc.data())
    })
  })
  .catch((error) => {
    console.log("Error getting documents: ", error);
  });
This returns data from the database alphabetically based on usernames. You can also change the order to be descending by adding a 'desc' after the username. That is:
db.collection("userInfo").orderBy('username', 'desc')
  .get()
  .then((querySnapshot) => {
    querySnapshot.forEach(doc =>{
        console.log(doc.data())
    })
  })
  .catch((error) => {
    console.log("Error getting documents: ", error);
  });
You can also chain methods. You can combine the where() method with the orderBy() method to filter the data returned, like this:
db.collection("userInfo").where("bio", "==", "Web Developer")
  .orderBy('username')
  .get()
  .then((querySnapshot) => {
    querySnapshot.forEach(doc =>{
        console.log(doc.data())
    })
  })
  .catch((error) => {
    console.log("Error getting documents: ", error);
  });
If this throws an error saying the query needs an index, then click on the URL in the error message to create an index in your console.
How to limit data
db.collection("userInfo").limit(1)
  .get()
  .then((querySnapshot) => {
    querySnapshot.forEach((doc) => {
      console.log(doc.data());
    });
  })
  .catch((error) => {
    console.log("Error getting documents: ", error);
  });
The limit() method takes in one parameter which is the number of documents to return. In the example above, only one is returned.
You can see the code for this section in the order_and_limit branch.
Conclusion
And that's all for this article. If you followed up to this point then you should have enough knowledge to start making awesome web apps using Firestore.
This article does not cover all there is to know about Firestore, so go on and check the documentation to learn more.
Here's the link to the article's repository.
You can follow me on Twitter @ihechikara2. Thank you for your time.