
By Krissanawat
Chat applications have become one of the easiest ways to communicate over the internet. As such, many applications incorporate chat features in them so that users can interact and engage in social communications.
These applications have made the world smaller with their powerful end to end audio/video and text-based communication. On top of that, other features such as sharing stories, sending attachments, and more have made these apps even more engaging and useful.
Most apps also have a stories feature. It lets users share their experiences in brief and the story disappears after a certain amount of time. These features get users hooked to that app and make them want to share their thoughts, ideas, memories, and experiences.
Facebook Messenger is one of the most widely-used chat applications. It is just behind WhatsApp in overall usage across the world.
In this tutorial, we are going to replicate the Messenger UI using the Flutter mobile application development framework. We'll also explore widget-based UI development using Flutter coding. This will get us familiar with the Flutter ecosystem as well as best practices for writing Flutter code.
Here, we are going to implement the main conversation home screen of the messenger app which will contain a top app bar, a search bar, a stories section, and a conversation list section.
Through this process, we will see how Flutter makes the UI development easier and we'll get a messenger clone chat application out of it.
So, let's get started!
Create a new Flutter project
First, we need to create a new Flutter project. To do that, make sure that the Flutter SDK and other Flutter app development-related requirements are properly installed.
If everything is properly set up, then to create a project we can simply run the following command in the desired local directory:
flutter create messengerUI
After the project has been set up, we can navigate inside the project directory and execute the following command in the terminal to run the project in either an available emulator or an actual device:
flutter run
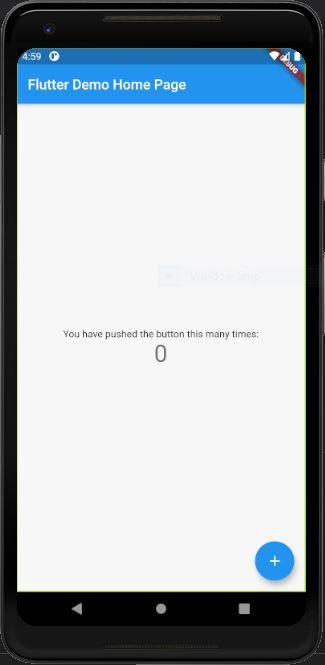
After a successful build, we will get the following result in the emulator screen:
Now, we need to replace the default template with our own project structure template.
First, we need to create a folder called ./screens inside the ./lib folder. Then, inside the ./lib/screens folder, we need to create a new file called conversations.dart.
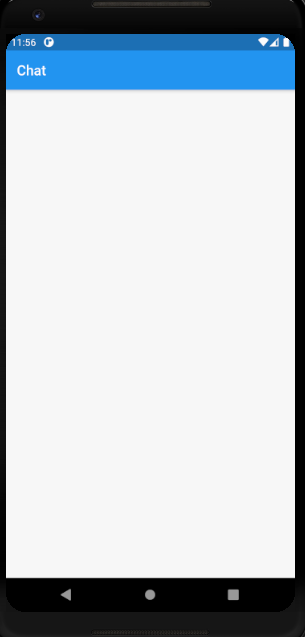
Inside conversation.dart, we are going to implement a simple Stateful widget class returning a Scaffold widget with a basic App bar and an empty Container body. The code for conversations.dart is shown in the code snippet below:
import 'package:flutter/material.dart';

class Conversations extends StatefulWidget {
  @override
  _ConversationsState createState() => _ConversationsState();
}

class _ConversationsState extends State<Conversations> {
  @override
  Widget build(BuildContext context) {
    return Scaffold(
      appBar: AppBar(
        title: Text("Chat"),
      ),
      body: Container(),
    );
  }
}
Now, we need to replace the default template in the main.dart file and call the Conversations screen in the home option of MaterialApp widget as shown in the code snippet below:
import 'package:flutter/material.dart';
import 'package:messangerUI/screens/conversations.dart';

void main() {
  runApp(MyApp());
}

class MyApp extends StatelessWidget {
  @override
  Widget build(BuildContext context) {
    return MaterialApp(
      title: 'Messenger Demo',
      debugShowCheckedModeBanner: false,
      theme: ThemeData(
        primarySwatch: Colors.blue,
        visualDensity: VisualDensity.adaptivePlatformDensity,
      ),
      home: Conversations(),
    );
  }
}
We get the result as shown in the image below:
How to Add the AppBar
Now, we are going to customize the App bar at the top. Since the app bar needs to be scrollable, we are not going to use the appBar option provided by Scaffold widget. We are simply going to use the ListView widget in the body option of Scaffold and keep all other widgets as children of the ListView widget.
The overall implementation of the custom app bar is provided in the code snippet below:
Widget build(BuildContext context) {
    return Scaffold(
      body: SafeArea(
          child: Container(
        padding: EdgeInsets.only(left: 20, right: 20, top: 15),
        child: ListView(
          children: [
            Row(
              mainAxisAlignment: MainAxisAlignment.spaceBetween,
              children: <Widget>[
                Container(
                  width: 40,
                  height: 40,
                  decoration: BoxDecoration(
                      shape: BoxShape.circle,
                      image: DecorationImage(
                          image: NetworkImage(
                              "<https://randomuser.me/api/portraits/men/11.jpg>"),
                          fit: BoxFit.cover)),
                ),
                Text(
                  "Chats",
                  style: TextStyle(fontSize: 22, fontWeight: FontWeight.bold),
                ),
                Icon(Icons.edit)
              ],
            ),
          ],
        ),
      )),
    );
  }
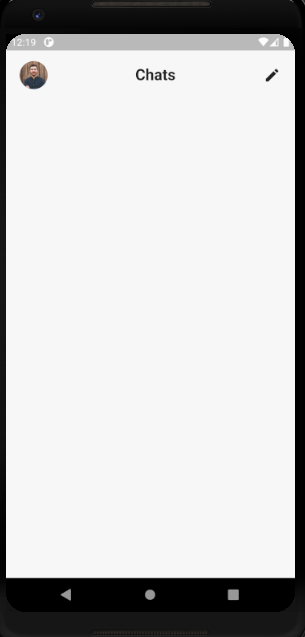
For the app bar UI, we have used a Row widget inside the ListView widget. Inside the Row widget, we have placed a Container widget with NetworkImage as a child, a Text widget, and an Icon widget.
Hence, we will get the result as shown in the image below:
How to Add the Search Bar
Now, we are going to add a search input field just below the app bar. It will contain an InputField widget decorated with styles and a search icon.
Since we need a text controller for the InputField widget we need to initialize it first as shown in the code snippet below:
TextEditingController _searchController = new TextEditingController();
Now, we are going to implement the UI for the search bar just below the Row widget which is inside the parent ListView widget. We'll use the SizedBox widget to give a tiny separation between the two sections.
The overall implementation of search bar using a TextField widget inside a Container widget with decoration is shown in the code snippet below:
body: SafeArea(
          child: Container(
        padding: EdgeInsets.only(left: 20, right: 20, top: 15),
        child: ListView(
          children: [
            Row(
              mainAxisAlignment: MainAxisAlignment.spaceBetween,
              children: <Widget>[
                Container(
                  width: 40,
                  height: 40,
                  decoration: BoxDecoration(
                      shape: BoxShape.circle,
                      image: DecorationImage(
                          image: NetworkImage(
                              "<https://randomuser.me/api/portraits/men/11.jpg>"),
                          fit: BoxFit.cover)),
                ),
                Text(
                  "Chats",
                  style: TextStyle(fontSize: 22, fontWeight: FontWeight.bold),
                ),
                Icon(Icons.edit)
              ],
            ),
            SizedBox(
              height: 15,
            ),
            Container(
              width: double.infinity,
              height: 40,
              decoration: BoxDecoration(
                  color: Color(0xFFe9eaec),
                  borderRadius: BorderRadius.circular(15)),
              child: TextField(
                cursorColor: Color(0xFF000000),
                controller: _searchController,
                decoration: InputDecoration(
                    prefixIcon: Icon(
                      Icons.search,
                      color: Color(0xFF000000).withOpacity(0.5),
                    ),
                    hintText: "Search",
                    border: InputBorder.none),
              ),
            ),
          ],
        ),
      )),
    );
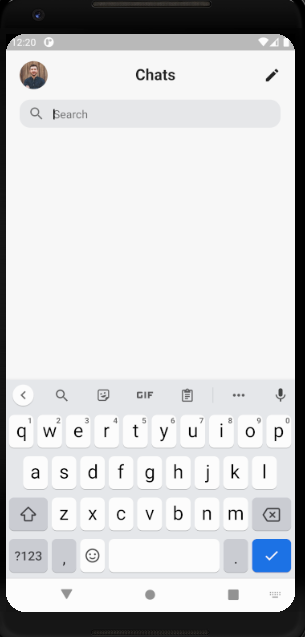
Hence, we will get the search bar as shown in the image below:
How to Implement the Stories Section
Now it is time to implement the stories section. Stories are popular feature in every social app these days. We are going to implement it just below the search bar.
This section will contain an image of the user with their name at the bottom. The users who have stories will have a blue circular ring around their image whereas others don't.
But first, we need to prepare a list of mock users to show them in the stories section.
For that, we are going to initialize a List called storyList. We'll keep some objects containing the user's information such as name, imageUrl, isOnline (to check if the user is online), and hasStory (to check it the user has a story).
The mock list data is provided in the code snippet below:
List storyList = [
    {
      "name": "Novac",
      "imageUrl": "<https://randomuser.me/api/portraits/men/31.jpg>",
      "isOnline": true,
      "hasStory": true,
    },
    {
      "name": "Derick",
      "imageUrl": "<https://randomuser.me/api/portraits/men/81.jpg>",
      "isOnline": false,
      "hasStory": false,
    },
    {
      "name": "Mevis",
      "imageUrl": "<https://randomuser.me/api/portraits/women/49.jpg>",
      "isOnline": true,
      "hasStory": false,
    },
    {
      "name": "Emannual",
      "imageUrl": "<https://randomuser.me/api/portraits/men/35.jpg>",
      "isOnline": true,
      "hasStory": true,
    },
    {
      "name": "Gracy",
      "imageUrl": "<https://randomuser.me/api/portraits/women/56.jpg>",
      "isOnline": false,
      "hasStory": false,
    },
    {
      "name": "Robert",
      "imageUrl": "<https://randomuser.me/api/portraits/men/36.jpg>",
      "isOnline": false,
      "hasStory": true,
    }
  ];
Now, we are going to implement a separate function that returns the overall UI for the Stories section. The implementation is provided in the code snippet below:
_stories() {
    return SingleChildScrollView(
      scrollDirection: Axis.horizontal,
      child: Row(
        children: <Widget>[
          Padding(
            padding: EdgeInsets.only(right: 20),
            child: Column(
              children: <Widget>[
                Container(
                  width: 60,
                  height: 60,
                  decoration: BoxDecoration(
                      shape: BoxShape.circle, color: Color(0xFFe9eaec)),
                  child: Center(
                    child: Icon(
                      Icons.add,
                      size: 33,
                    ),
                  ),
                ),
                SizedBox(
                  height: 10,
                ),
                SizedBox(
                  width: 75,
                  child: Align(
                      child: Text(
                    'Your Story',
                    overflow: TextOverflow.ellipsis,
                  )),
                )
              ],
            ),
          ),
          Row(
              children: List.generate(storyList.length, (index) {
            return Padding(
              padding: const EdgeInsets.only(right: 20),
              child: Column(
                children: <Widget>[
                  Container(
                    width: 60,
                    height: 60,
                    child: Stack(
                      children: <Widget>[
                        storyList[index]['hasStory']
                            ? Container(
                                decoration: BoxDecoration(
                                    shape: BoxShape.circle,
                                    border: Border.all(
                                        color: Colors.blueAccent, width: 3)),
                                child: Padding(
                                  padding: const EdgeInsets.all(3.0),
                                  child: Container(
                                    width: 75,
                                    height: 75,
                                    decoration: BoxDecoration(
                                        shape: BoxShape.circle,
                                        image: DecorationImage(
                                            image: NetworkImage(
                                                storyList[index]['imageUrl']),
                                            fit: BoxFit.cover)),
                                  ),
                                ),
                              )
                            : Container(
                                width: 70,
                                height: 70,
                                decoration: BoxDecoration(
                                    shape: BoxShape.circle,
                                    image: DecorationImage(
                                        image: NetworkImage(
                                            storyList[index]['imageUrl']),
                                        fit: BoxFit.cover)),
                              ),
                        storyList[index]['isOnline']
                            ? Positioned(
                                top: 38,
                                left: 42,
                                child: Container(
                                  width: 20,
                                  height: 20,
                                  decoration: BoxDecoration(
                                      color: Color(0xFF66BB6A),
                                      shape: BoxShape.circle,
                                      border: Border.all(
                                          color: Color(0xFFFFFFFF), width: 3)),
                                ),
                              )
                            : Container()
                      ],
                    ),
                  ),
                  SizedBox(
                    height: 10,
                  ),
                  SizedBox(
                    width: 75,
                    child: Align(
                        child: Text(
                      storyList[index]['name'],
                      overflow: TextOverflow.ellipsis,
                    )),
                  )
                ],
              ),
            );
          }))
        ],
      ),
    );
  }
Here, we returned a SingleChildScrollView as a parent widget with an option for horizontal scrolling.
Then, we used the List.generate widget inside the Row widget to iterate through our storyList array. For each item in the list, a template inside the List.generate is returned. The conditional rendering is used for online users and those users who have stories.
Now, we need to call the function inside the ListView children just below the InputField making a separation using the SizedBox widget as shown in the code snippet below:
body: SafeArea(
          child: Container(
        padding: EdgeInsets.only(left: 20, right: 20, top: 15),
        child: ListView(
          children: [
            Row(
              mainAxisAlignment: MainAxisAlignment.spaceBetween,
              children: <Widget>[
                Container(
                  width: 40,
                  height: 40,
                  decoration: BoxDecoration(
                      shape: BoxShape.circle,
                      image: DecorationImage(
                          image: NetworkImage(
                              "<https://randomuser.me/api/portraits/men/11.jpg>"),
                          fit: BoxFit.cover)),
                ),
                Text(
                  "Chats",
                  style: TextStyle(fontSize: 22, fontWeight: FontWeight.bold),
                ),
                Icon(Icons.edit)
              ],
            ),
            SizedBox(
              height: 15,
            ),
            Container(
              width: double.infinity,
              height: 40,
              decoration: BoxDecoration(
                  color: Color(0xFFe9eaec),
                  borderRadius: BorderRadius.circular(15)),
              child: TextField(
                cursorColor: Color(0xFF000000),
                controller: _searchController,
                decoration: InputDecoration(
                    prefixIcon: Icon(
                      Icons.search,
                      color: Color(0xFF000000).withOpacity(0.5),
                    ),
                    hintText: "Search",
                    border: InputBorder.none),
              ),
            ),
            SizedBox(
              height: 20,
            ),
            _stories(),
          ],
        ),
      )),
    );
We will get the result as shown in the demo below:
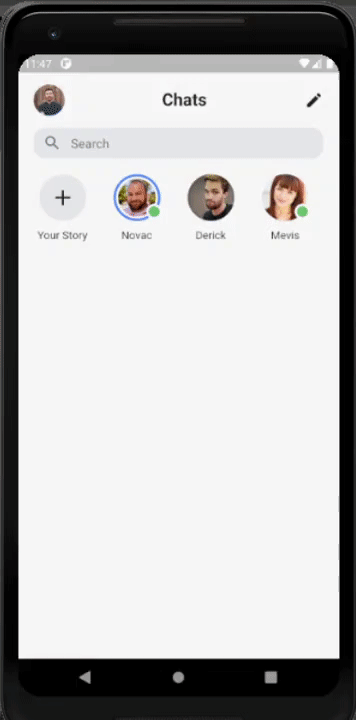
As you can see, the stories section is scrollable horizontally.
How to Create the Conversation List Section
Now, we are going to create a list of conversations just below the Stories section. It will contain an image of the user, their name, message, and time.
For the conversation list as well we are going to create some mock data. The list is similar to storiesList but has two extra pieces of information for message and time. The mock data list conversationList is shown in the code snippet below:
List conversationList = [
    {
      "name": "Novac",
      "imageUrl": "<https://randomuser.me/api/portraits/men/31.jpg>",
      "isOnline": true,
      "hasStory": true,
      "message": "Where are you?",
      "time": "5:00 pm"
    },
    {
      "name": "Derick",
      "imageUrl": "<https://randomuser.me/api/portraits/men/81.jpg>",
      "isOnline": false,
      "hasStory": false,
      "message": "It's good!!",
      "time": "7:00 am"
    },
    {
      "name": "Mevis",
      "imageUrl": "<https://randomuser.me/api/portraits/women/49.jpg>",
      "isOnline": true,
      "hasStory": false,
      "message": "I love You too!",
      "time": "6:50 am"
    },
    {
      "name": "Emannual",
      "imageUrl": "<https://randomuser.me/api/portraits/men/35.jpg>",
      "isOnline": true,
      "hasStory": true,
      "message": "Got to go!! Bye!!",
      "time": "yesterday"
    },
    {
      "name": "Gracy",
      "imageUrl": "<https://randomuser.me/api/portraits/women/56.jpg>",
      "isOnline": false,
      "hasStory": false,
      "message": "Sorry, I forgot!",
      "time": "2nd Feb"
    },
    {
      "name": "Robert",
      "imageUrl": "<https://randomuser.me/api/portraits/men/36.jpg>",
      "isOnline": false,
      "hasStory": true,
      "message": "No, I won't go!",
      "time": "28th Jan"
    },
    {
      "name": "Lucy",
      "imageUrl": "<https://randomuser.me/api/portraits/women/56.jpg>",
      "isOnline": false,
      "hasStory": false,
      "message": "Hahahahahaha",
      "time": "25th Jan"
    },
    {
      "name": "Emma",
      "imageUrl": "<https://randomuser.me/api/portraits/women/56.jpg>",
      "isOnline": false,
      "hasStory": false,
      "message": "Been a while!",
      "time": "15th Jan"
    }
  ];
Similar to the stories section, we are going to build the conversation list section as a separate function.
As a parent widget, we have returned the Column widget. The child of the Column widget contains the List.generate widget that iterates through the conversationList array and provides the UI for each item in the conversation list.
We use conditional rendering for online users and those users who have stories. The overall implementation of the function is provided in the code snippet below:
_conversations(BuildContext context) {
    return Column(
      children: List.generate(conversationList.length, (index) {
        return InkWell(
          child: Padding(
            padding: const EdgeInsets.only(bottom: 20),
            child: Row(
              children: <Widget>[
                Container(
                  width: 60,
                  height: 60,
                  child: Stack(
                    children: <Widget>[
                      conversationList[index]['hasStory'] ?
                      Container(
                        decoration: BoxDecoration(
                            shape: BoxShape.circle,
                            border:
                                Border.all(color: Colors.blueAccent, width: 3)),
                        child: Padding(
                          padding: const EdgeInsets.all(3.0),
                          child: Container(
                            width: 75,
                            height: 75,
                            decoration: BoxDecoration(
                                shape: BoxShape.circle,
                                image: DecorationImage(
                                    image: NetworkImage(
                                        conversationList[index]['imageUrl']),
                                    fit: BoxFit.cover)),
                          ),
                        ),
                      )
                      : Container(
                        width: 70,
                        height: 70,
                        decoration: BoxDecoration(
                            shape: BoxShape.circle,
                            image: DecorationImage(
                                image: NetworkImage(
                                    conversationList[index]['imageUrl']),
                                fit: BoxFit.cover)),
                      ),
                      conversationList[index]['isOnline']
                          ? Positioned(
                              top: 38,
                              left: 42,
                              child: Container(
                                width: 20,
                                height: 20,
                                decoration: BoxDecoration(
                                    color: Color(0xFF66BB6A),
                                    shape: BoxShape.circle,
                                    border: Border.all(color: Color(0xFFFFFFFF), width: 3)),
                              ),
                            )
                          : Container()
                    ],
                  ),
                ),
                SizedBox(
                  width: 20,
                ),
                Column(
                  crossAxisAlignment: CrossAxisAlignment.start,
                  children: <Widget>[
                    Text(
                      conversationList[index]['name'],
                      style:
                          TextStyle(fontSize: 17, fontWeight: FontWeight.w500),
                    ),
                    SizedBox(
                      height: 5,
                    ),
                    SizedBox(
                      width: MediaQuery.of(context).size.width - 135,
                      child: Text(
                        conversationList[index]['message'] +
                            " - " +
                            conversationList[index]['time'],
                        style: TextStyle(
                            fontSize: 15, color: Color(0xFF000000).withOpacity(0.7)),
                        overflow: TextOverflow.ellipsis,
                      ),
                    )
                  ],
                )
              ],
            ),
          ),
        );
      }),
    );
  }
Now we need to call the _converstions() function in the in ListView of Scaffold just below the Stories function as shown in the code snippet below:
body: SafeArea(
          child: Container(
        padding: EdgeInsets.only(left: 20, right: 20, top: 15),
        child: ListView(
          children: [
            Row(
              mainAxisAlignment: MainAxisAlignment.spaceBetween,
              children: <Widget>[
                Container(
                  width: 40,
                  height: 40,
                  decoration: BoxDecoration(
                      shape: BoxShape.circle,
                      image: DecorationImage(
                          image: NetworkImage(
                              "<https://randomuser.me/api/portraits/men/11.jpg>"),
                          fit: BoxFit.cover)),
                ),
                Text(
                  "Chats",
                  style: TextStyle(fontSize: 22, fontWeight: FontWeight.bold),
                ),
                Icon(Icons.edit)
              ],
            ),
            SizedBox(
              height: 15,
            ),
            Container(
              width: double.infinity,
              height: 40,
              decoration: BoxDecoration(
                  color: Color(0xFFe9eaec),
                  borderRadius: BorderRadius.circular(15)),
              child: TextField(
                cursorColor: Color(0xFF000000),
                controller: _searchController,
                decoration: InputDecoration(
                    prefixIcon: Icon(
                      Icons.search,
                      color: Color(0xFF000000).withOpacity(0.5),
                    ),
                    hintText: "Search",
                    border: InputBorder.none),
              ),
            ),
            SizedBox(
              height: 20,
            ),
            _stories(),
            SizedBox(
              height: 20,
            ),
            **_conversations(context)**
          ],
        ),
      )),
    );
  }
We will get the result as shown in the demo below:
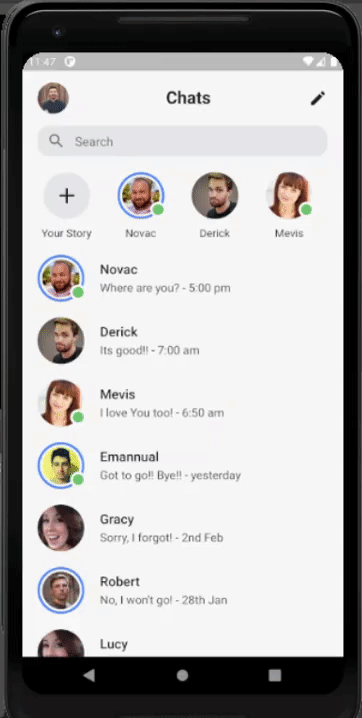
As you can see, the overall screen is scrollable vertically with Conversation List view and the Stories section is scrollable horizontally.
Finally, we have successfully created the home screen of a messenger app using Flutter.
Conclusion
The main objective of this tutorial was to show you how to build a UI like Facebook messenger using the Flutter ecosystem.
If you look closely at the code, you'll see that most of the implementation was pretty easy because of the flexibility and structured layout build that Flutter provides.
With only a few widgets, we can place every component in the UI in the correct position. Along with this beautiful UI creation, you can also learn basic coding patterns for Flutter development.
Separating large sections of code into separate functions helps simplify and clean up our code. This demonstrated a best coding practice for UI development in Flutter.
The tutorial also highlights how some widgets in Flutter make things easier for us, such as horizontal scrolling and placement icons and images with styles. You can definitely take this information and use it to build your own chat application in the future.
Moreover, you can also get inspiration from state of the art Flutter chat app templates out there that provide beautiful UIs as well as powerful features. And in case you want to check out chat application templates built using other mobile application development frameworks, you peruse these React Native Chat app templates as well.