

If you hopped on the Flutter bandwagon in it’s early days, most likely you have a project or two that were created prior to version 1.12 of Flutter. If that is the case, you may have seen this message whenever you run Pub get in one of your projects:
This app is using a deprecated version of the Android embedding.
To avoid unexpected runtime failures, or future build failures, try to migrate this app to the V2 embedding.Take a look at the docs for migrating an app: https://github.com/flutter/flutter/wiki/Upgrading-pre-1.12-Android-projects
Now, the document itself has the steps you need to follow to make this warning disappear, but it does not always clarify what to change and where.
This article will give you a step by step walkthrough on migrating your Flutter application to V2 Embedding so you can make that warning go away for good.
Automatic Migration – The Easy Way Out
It needs to be said that you can forego this process of migration if your application can be easily recreated. So what does that mean?
Well, if the code in your application is not complex, then you can just save the files in your lib folder and create a new project using flutter create. That way, you will have a project that is already migrated to V2 Embedding and will just need to copy paste the code you have in your lib folder.
But, if your project is more complex – let’s say it's a package that has platform specific code – you will probably be better off by migrating it manually.
Manual Migration – Follow These Steps
- Open the MainActivity.kt (or .java) file in your application
- You need to remove any content this file has and just leave it bare with a class declaration (unless you have specific logic there).
- Remove all of the imports and make sure to have one import that is this:
import io.flutter.embedding.android.FlutterActivity;
The end result should be as follows:
import io.flutter.embedding.android.FlutterActivity;
public class MainActivity extends FlutterActivity {
    // Nothing should be here
}
- Open the AndroidManifest.xml file and change the name attribute under the application tag to
${applicationName}– so it looks like this:
<application
    android:name="${applicationName}">
     ....
</application>
- You need to add the following meta data inside your application tags:
<meta-data
     android:name="flutterEmbedding"
     android:value="2" />
- If you want a specific Splash screen behavior, you will need to remove the Splash screen meta tag:
<meta-data android:name="io.flutter.app.android.SplashScreenUntilFirstFrame" android:value="true" />
- Then head to your styles.xml file and configure the LaunchTheme there with the drawable of your liking:
<?xml version="1.0" encoding="utf-8"?>
<resources>
     <style name="LaunchTheme" parent="@android:style/Theme.Black.NoTitleBar">        <item name="android:windowBackground">@drawable/launch_background
        </item>
    </style>
</resources>
Your AndroidManifest.xml will look something like this after all the changes above:
<manifest xmlns:android="http://schemas.android.com/apk/res/android"    package="PACKAGE_NAME">
<application
    android:name="${applicationName}"
    android:label="APPLICATION_LABEL"
    android:icon="@mipmap/ic_launcher">
        <activity
            android:name=".MainActivity"
            android:exported="true"
            android:launchMode="singleTop"     android:theme="@style/LaunchTheme"                android:configChanges="orientation|keyboardHidden|keyboard|screenSize|locale|layoutDirection|fontScale|screenLayout|density|uiMode"            android:hardwareAccelerated="true"            android:windowSoftInputMode="adjustResize">
                <intent-filter>
                    <action android:name="android.intent.action.MAIN"/>                                <category android:name="android.intent.category.LAUNCHER"/>
                    </intent-filter>
       </activity>
       <meta-data
               android:name="flutterEmbedding"
            android:value="2" />
 </application>
</manifest>
AndroidX Support
Your project might also be needed to be migrated to use AndroidX libraries instead of the older support libraries. You will be alerted for this when you build and run your application:
Your app isn’t using AndroidX. To avoid potential build failures, you can quickly migrate your app by following the steps on https://goo.gl/CP92wY.
Fixing this is rather simple, as Android Studio has built in support for migrating to AndroidX.
Start by opening the Android folder of your Flutter application as a standalone project
Click on Refactor → Migrate to AndroidX:
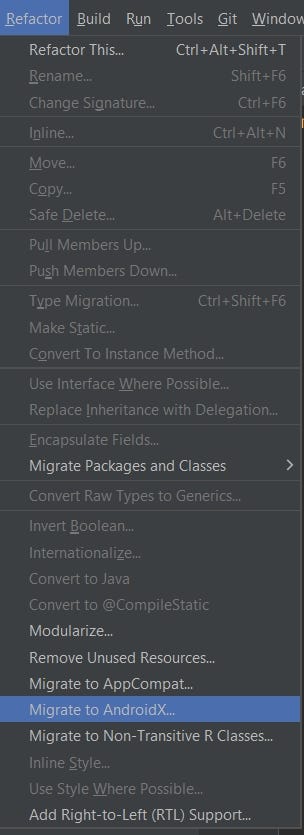 Dropdown menu to Migrate to AndroidX
You will then be prompted to save a copy of your project and past that, the migration process will take place.
Errors You Might See
During this migration process, you might encounter several errors when building your application. The most prominent ones are:
- Unable to get mutable Windows environment variable map
- cvc-complex-type.2.4.a: Invalid content was found starting with element ‘base-extension’. One of ‘{layoutlib}’ is expected
- Warning: This version only understands SDK XML versions up to 2 but an SDK XML file of version 3 was encountered. This can happen if you use versions of Android Studio and the command-line tools that were released at different times
The first two errors are related to each other and both stem from the same root cause. It is because your project was set up with an old Gradle version and it is needed to upgrade it.
To do so, follow these steps:
- Open the Android folder in your Flutter application as a standalone project
- Click on File → Project Structure:
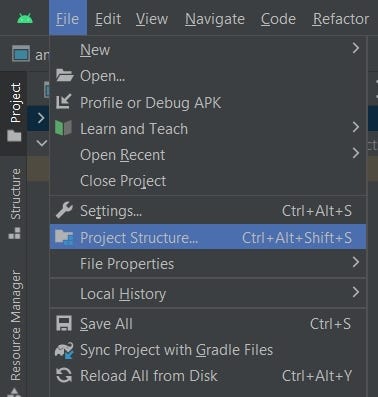 Dropdown menu to select Project Structure
- Change the Gradle version to something more recent and that matches the current Android Studio version you are using
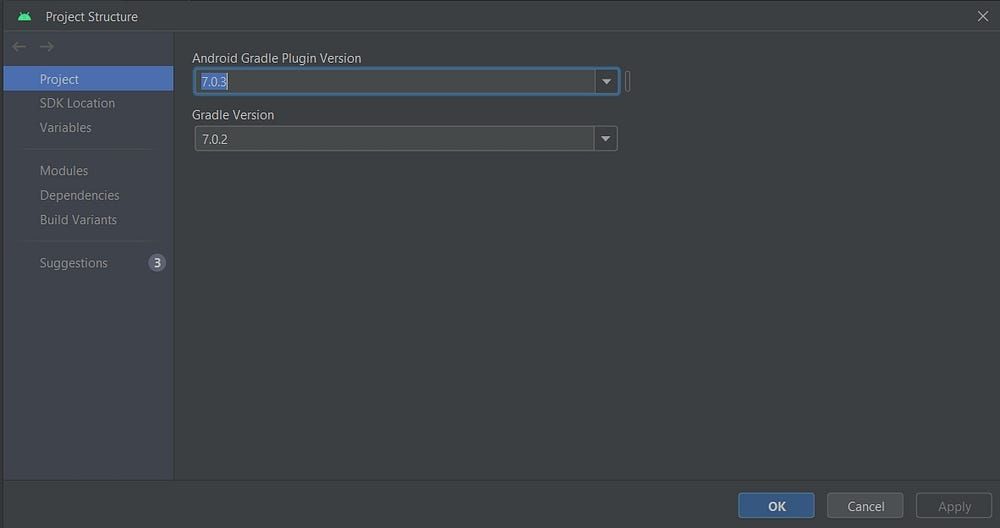 AGP and Gradle settings screen
You could also use the AGP Upgrade Assistant to do this as well by going to Tools →AGP Upgrade Assistant:
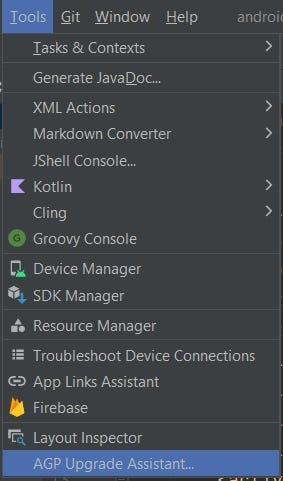 Dropdown menu to upgrade AGP using the AGP Upgrade Assistant
The third issue, which is a warning, might be caused by having an old version of the Android SDK Tools. To learn how to do that, you can go here.
Your project should be now fully migrated, compiling and running smoothly.
If you want to read other articles I have written, you can check them out here: