

Flutter is a UI toolkit for building cross-platform applications. You can build Flutter apps using various state management techniques like the Stacked architecture.
This article will explain what Stacked architecture is and will guide you through creating a simple Todo App in Flutter with Stacked.
Table of Contents
- Intro to App State and Flutter Widgets
- Why Do You Need State Management Architectures in Flutter?
- What is Stacked Architecture?
- About the Todo App We Will be Building
- How to Setup Flutter and the Todos Service
- How to build the Todo App's UI
- Note on Other Stacked Features
- Summary
Intro to App State and Flutter Widgets
State refers to any data you use in rendering your UI. It could be user-generated or from your servers or backend.
In Flutter, the app's User Interface (UI) is a function of State. In other words, your UI at any given point in time is a visual representation of your app's state.
Still, in Flutter, you use widgets to build different parts of the app's UI. A widget in Flutter is a piece or unit of the UI. Essentially, a Flutter application is a big tree of widgets. Examples of widgets are AppBar, Container, Icon, Image, Text, and so on.
Flutter has two types of widgets: StatelessWidgets and StatefulWidgets. You use StatefulWidgets in Flutter to build widgets that have State.
To tell Flutter that some state has changed in your application, you call the [setState](https://api.flutter.dev/flutter/widgets/State/setState.html) function (available only inside StatefulWidgets) and Flutter will rebuild the widget tree based on state data that has changed.
Widgets in Flutter don't change. They are immutable. Flutter paints UIs efficiently at about 60 frames per second.
At each frame paint, Flutter checks the widget tree. If any widgets have changed, Flutter gets rid of them and replaces them with new widgets that have the changed state.
Why Do You Need State Management Architectures in Flutter?
setState is good. It is an optimal way of handling UI and state because it encourages a declarative programming style (which is the best way to code UIs).
But then as your Flutter codebase grows, you will realize that you will always make calls to setState. Your Flutter app will have so many widgets that depend on huge and changing state data. This causes your code to be clogged up.
Using state management architectures across frameworks and libraries helps with Separation of concerns, clean code, and scaling. State management is also helpful when multiple developers are contributing to the same codebase. Architectures also help with code testability.
So to build robust apps, you should use state management where you need it. By default, setState is your go-to option for state management. But as you begin adopting architectures, you will use other available state management options in Flutter.
In Flutter, every widget has a build method that returns its tree of widgets. The build method takes a BuildContext with which it can access important data about the app or perform tasks like navigation or showing dialogs.
InheritedWidget is a built-in approach for accessing state from a widget higher in the widget tree. It accesses state from this higher widget with the help of the BuildContext.
[ChangeNotifier](https://api.flutter.dev/flutter/foundation/ChangeNotifier-class.html) is a Flutter class that does as its name says. It notifies listeners about changes in its values. You can extend this class and call its [notifyListeners();](https://api.flutter.dev/flutter/foundation/ChangeNotifier/notifyListeners.html) method which you can in turn use to update the UI where need be. Popular state management options in Flutter use ChangeNotifier. For example, Provider.
Some state management architectures find a way to navigate or show dialogs without the BuildContext in the build method. That way they can do these crucial parts of the app in files not containing widgets. And if they need to update the UI, they use notifyListeners(). Such is the case with Stacked architecture.
What is Stacked Architecture?
Stacked is a modern Flutter state management with top-notch separation of concerns and dependency injection.
Separation of concerns involves separating all UI code from logic code. Such separation is important for the maintainability of your Flutter project.
For example, with separation of concerns properly set up in your codebase, if there are updates to your backend API, you would only need to update the files that deal with the API logic. You won't necessarily need to update the UI code. This minimizes bugs that could happen while coding.
Dependency injection (or inversion of control) is a popular programming technique. For a given block of code, dependence injection is the fact that that block does not configure the things it needs to function (dependencies) by itself.
With dependency injection, you provide a class with the services (dependencies) it needs for proper functioning. In turn, these services abstract out and handle the app's business logic.
For example, a weather service can take care of fetching weather details and a weather display widget will use this service to display the data. This widget doesn't know how to set up the service. All it knows is that it will receive the weather data it needs to display from the weather service class in some way.
Stacked implements separation of concerns and dependency injection by building Flutter code around 3 entities: Views, ViewModels, and Services.
Views handle only UI code and are linked to ViewModels. ViewModels accompany views and handle UI logic. ViewModels use services. Views should never access services.
Stacked was founded by Dane Mackier and is now being maintained by the community. Dane Mackier is a GDE (Google Developer Expert) for Dart and Flutter. He used other popular state management architectures and combined their advantages in building Stacked.
Note that Stacked uses ChangeNotifier.
About the Todo App We Will Be Building
To keep things simple, we will build a one-screen dark-mode Todo App with Stacked architecture.
The app will display a message if there are no todos yet. However, if there are Todos, it will display all the todos one after the other.
Each Todo will have a "checkable circle" at its left to indicate whether it has been completed or not. At its right, a Todo will have a button (with a dash icon) to remove the Todo. The Todo's text content will fill the center or major part of the screen.
We will also have a floating action button (with a plus icon) to create new todos.
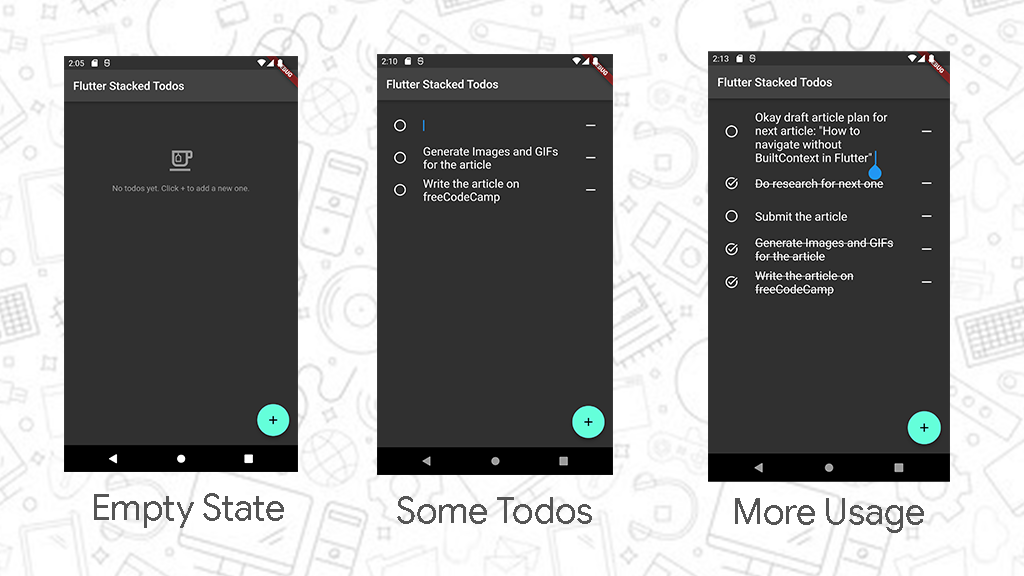
In addition to the above, we will store Todos to some browser or device storage with Hive. As a result, on closing and re-opening the Todo App, all previously created Todos will be restored.
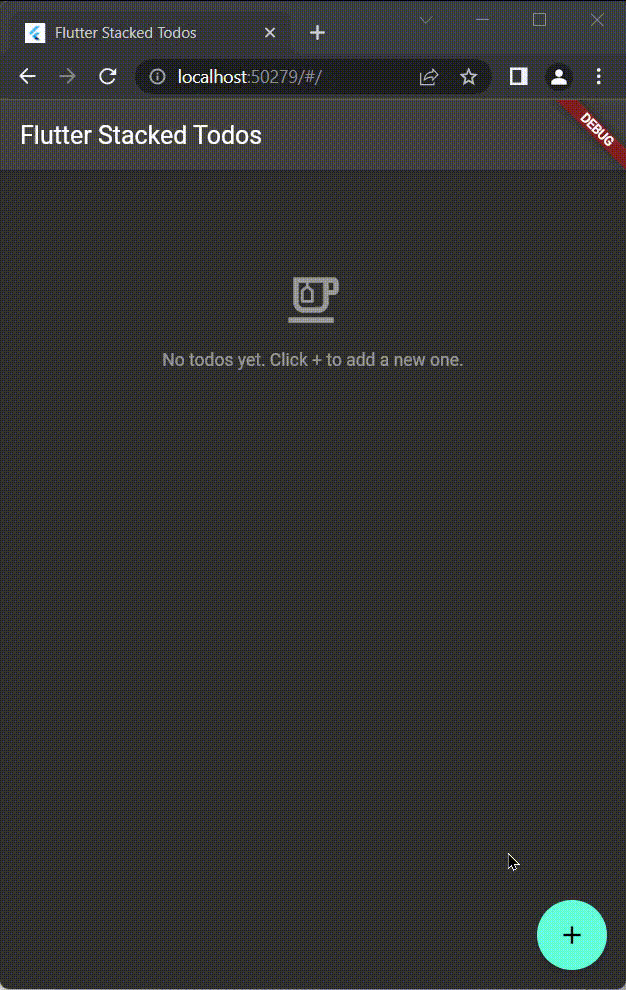 Todos been restored after browser reload
Because this is Stacked architecture, we will have a TodosService that will take care of managing Todos. We will also have a TodosScreen (for the UI). The TodosScreen will have a View and a ViewModel.
That said, let's start coding.
If you don't want to code along, the final code is here.
How to Setup Flutter and the Todos Service
1. Install Flutter
First, you'll need to have Flutter installed and working properly. If you do, you can get to step two. You can also get to step two if you don't want to follow along.
If you don't have Flutter installed, install it by following the steps for your operating system here.
Run the flutter doctor -v command in your terminal. If all the listed options have a good check or green color, then you are good to continue. If any of the results have errors, search the error online and you'll find solutions to the problem.
2. Create the Flutter Project
Run the following command to create a new Flutter project:
flutter create todo
This creates a new Flutter project with todo as the name of the app. If you want a different app name (aside from todo), use it instead of todo.
3. Add the Packages
We need to add the [stacked](https://pub.dev/packages/stacked) Flutter package to project. It will provide us with necessary classes (like ViewModels), given that we are building with the Stacked Architecture.
We also need to install another package to help with dependency injection or services. To keep things simple, we will use the [get_it](https://pub.dev/packages/get_it) package for "getting" services in this Todo App.
Because we want to persist todos across app closes with Hive, we will also need to add the [hive](https://pub.dev/packages/hive) and [hive_flutter](https://pub.dev/packages/hive_flutter) packages.
Change the terminal's focus directory to be inside the todo Flutter project you just created above. Run the following command in the same terminal:
cd todo
If you used a different app name, use it with the cd command instead of todo.
Run the following command in your terminal to add get_it, hive, hive_flutter, and stacked in the Flutter project.
flutter pub add get_it hive hive_flutter stacked
4. Create a Todo Model
We are building a Todo App meaning that we will be interacting with Todos. A Todo, in the context of the code, is an entity that we will be manipulating.
To keep things simple, a Todo will be a Dart class with just three properties:
id: Uniquely identifying string for each Todo.completed: Boolean value to indicate the status of the Todocontent: The actual text content of the Todo.
Open the Flutter project in your favorite editor.
Create a new folder with name models inside the lib folder. Inside this newly created models folder, create a new file with name todo.dart.
Paste the following into the newly created lib/models/todo.dart file:
class Todo {
  final String id;
  bool completed;
  String content;

  Todo({required this.id, this.completed = false, this.content = ''});
}
Notice that the id property is required for each todo. However, by default, a Todo is not completed and has empty content.
5. Create the TodoAdapter (for Hive)
Hive works well with primitive types (like bools, ints, strings, and so on). But to properly retrieve and save custom types (like our Todo model) from and to browser or device storage, Hive needs us to create adapters for our custom types.
Create a file named todo.adapter.dart in the lib/models folder. The todo.adapter.dart should accompany the todo.dart file.
Paste the following into the newly created lib/models/todo.adapter.dart file:
import 'package:hive_flutter/hive_flutter.dart';

import 'todo.dart';

class TodoAdapter extends TypeAdapter<Todo> {
  @override
  final int typeId = 1;

  @override
  Todo read(BinaryReader reader) {
    final numOfFields = reader.readByte();
    final fields = <int, dynamic>{
      for (int i = 0; i < numOfFields; i++) reader.readByte(): reader.read(),
    };
    return Todo(
      id: fields[0] as String,
      completed: fields[1] as bool,
      content: fields[2] as String,
    );
  }

  @override
  void write(BinaryWriter writer, Todo obj) {
    writer
      ..writeByte(3)
      ..writeByte(0)
      ..write(obj.id)
      ..writeByte(1)
      ..write(obj.completed)
      ..writeByte(2)
      ..write(obj.content);
  }
}
The above code basically provides read and write methods for Hive to retrieve and store a Todo.
6. Create the TodosService
Create a new folder with name services inside the lib folder. Inside this newly created services folder, create a new file with name todos.service.dart.
Paste the following into the newly created lib/services/todos.services.dart file:
import 'dart:math';

import 'package:hive_flutter/hive_flutter.dart';
import 'package:stacked/stacked.dart';

import '../models/todo.dart';

class TodosService with ReactiveServiceMixin {
  final _todos = ReactiveValue<List<Todo>>(
    Hive.box('todos').get('todos', defaultValue: []).cast<Todo>(),
  );
  final _random = Random();

  List<Todo> get todos => _todos.value;

  TodosService() {
    listenToReactiveValues([_todos]);
  }

  String _randomId() {
    return String.fromCharCodes(
      List.generate(10, (_) => _random.nextInt(33) + 80),
    );
  }

  void _saveToHive() => Hive.box('todos').put('todos', _todos.value);

  void newTodo() {
    _todos.value.insert(0, Todo(id: _randomId()));
    _saveToHive();
    notifyListeners();
  }

  bool removeTodo(String id) {
    final index = _todos.value.indexWhere((todo) => todo.id == id);
    if (index != -1) {
      _todos.value.removeAt(index);
      _saveToHive();
      notifyListeners();
      return true;
    } else {
      return false;
    }
  }

  bool toggleStatus(String id) {
    final index = _todos.value.indexWhere((todo) => todo.id == id);
    if (index != -1) {
      _todos.value[index].completed = !_todos.value[index].completed;
      _saveToHive();
      notifyListeners();
      return true;
    } else {
      return false;
    }
  }

  bool updateTodoContent(String id, String text) {
    final index = _todos.value.indexWhere((todo) => todo.id == id);
    if (index != -1) {
      _todos.value[index].content = text;
      _saveToHive();
      return true;
    } else {
      return false;
    }
  }
}
Understanding Reactive Services in Stacked
The TodosService class declaration comes with a ReactiveServiceMixin. This is where Stacked features start coming in.
With Stacked, services by default are not reactive. However, you need to make a service reactive if any other parts of the project code (other services or ViewModels) have to "react" to changes in the values of the service.
If a service is reactive, that is, has the ReactiveServiceMixin, it means that that service will have at least one ReactiveValue among its properties. It also means that the service has to call [listenToReactiveValues](https://pub.dev/documentation/stacked/latest/stacked/ReactiveServiceMixin/listenToReactiveValues.html) with a list of the reactive values in that service.
The idea behind reactivity is that when the reactive values change (either from user interaction or your backend server), the service can update listeners of that value that there are changes. In turn, these listeners can rebuild UIs just as if setState was called from within the widget.
About the TodosService class
In our case, the TodosService class has only one private reactive _todos field. _todos keeps a ReactiveValue of TodoList. This private reactive _todos is also given to the list of reactive values to listen to in the constructor (listenToReactiveValues).
This is where Hive comes in. With Hive, you store data as key-value pairs inside boxes. For our app, we are using a 'todos' box. Inside that box, we are using the 'todos' key to retrieve stored todos.
Hive.box('todos').get('todos', defaultValue: []).cast<Todo>(),
The empty list ([]) defaultValue is necessary. For the first time, the Todo App is run on a device that had never stored todos before, so the empty list will be returned instead.
Casting the retrieved value as a Todo object is also important (.cast<Todo>()). If you omit that step, Flutter will throw errors.
The TodosService class provides a todos getter for accessing the value of the private reactive TodoList (_todos.value).
List<Todo> get todos => _todos.value;
The TodosService class also provides methods for manipulating Todos and their properties (removeTodo, toggleStatus, and updateTodoContent). Each of these methods takes the Todo's id and uses the id to carry out the appropriate action.
Notice that all these methods call the private _saveToHive() method. The reason is whenever todos are updated, the updates are saved to our local storage with Hive. So that if the app is closed and re-opened, the latest state of todos will be loaded back.
Also notice that these methods call notifyListeners(). It is part of the idea behind having only a getter for todos (and no setter). So that whenever there are updates (from these methods), we can call notifyListeners() (if need be) and do appropriate logic (like _saveToHive).
notifyListeners() is the equivalent of setState() but this time not inside a StatefulWidget. It tells possible listeners (like the upcoming TodosScreenViewModel) that the todos getter has changed. In turn, the ViewModel will rebuild the UI of its view and render the new state of the todos.
It is worth pointing out that updateTodoContent doesn't call notifyListeners(). We will point out the reason why when we will build the UI of the TodosScreenView.
Notice the private _randomId() method that returns a random string of 10 characters. The newTodo() method uses _randomId() to set the id of a new Todo and inserts that new Todo at the beginning of the TodoList.
If you want new Todos to be added at the end of the list, use _todos.value.add(Todo(id: _randomId())); instead of _todos.value.insert(0, Todo(id: _randomId())); in the newTodo() method.
The entire above pattern of using a service introduces code structure and makes the code easier to read (compared to if everything was in a widget).
This service pattern becomes very useful if we were saving the todos to some external API and fetching them back on app load. But that will be beyond the scope of simply introducing Stacked Architecture.
6. Setup the Service Locator
Create a new folder with the name app inside the lib folder. Inside this newly created app folder, create a new file with the name locator.dart.
Paste the following into the newly created lib/app/locator.dart file:
import 'package:get_it/get_it.dart';

import '../services/todos.service.dart';

final locator = GetIt.instance;

setupLocator() {
  locator.registerLazySingleton(() => TodosService());
}
Here, out of convention, we named the GetIt instance locator. After all, that name reflects what it does. It locates services. Other developers might want to use getIt or some other descriptive name for this service locator. That's okay.
We have a setupLocator() function that registers our TodosService with the locator. If we had other services, we would register them here in a similar way.
We need to call the setupLocator() function before the entire Flutter app launches. This way the services are available to any widgets that the Flutter app will need.
Delete the entire contents of the lib/main.dart file and paste the following in there:
import 'package:flutter/material.dart';
import 'package:hive_flutter/hive_flutter.dart';

import 'app/locator.dart';
import 'models/todo.adapter.dart';
import 'ui/views/todos_screen_view.dart';

void main() async {
  WidgetsFlutterBinding.ensureInitialized();

  await Hive.initFlutter();
  Hive.registerAdapter(TodoAdapter());
  await Hive.openBox('todos');

  setupLocator();

  runApp(const MyApp());
}

class MyApp extends StatelessWidget {
  const MyApp({Key? key}) : super(key: key);

  @override
  Widget build(BuildContext context) {
    return MaterialApp(
      home: const TodosScreenView(),
      theme: ThemeData.dark(),
      title: 'Flutter Stacked Todos',
    );
  }
}
WidgetsFlutterBinding.ensureInitialized() is the first statement in the same main method.
In simple terms, we use this statement because Flutter asks us to always include it as the first thing in the main method anytime we want to do some other stuff (like Hive.initFlutter() or setupLocator()) before launching the Flutter app with runApp().
Notice that we are initializing Hive, registering the TodoAdapter, and opening the 'todos' box in the main method. This is the last part of setting up Hive.
Also notice that we are now calling the setupLocator() function inside the main method and before the final runApp call to launch the Flutter app.
We used a dark theme in our MaterialApp by setting the theme property to ThemeData.dark(). This dark theme is just for styling – you can remove it if you prefer the default light theme. You can also customize the app's theme as you wish.
Our lib/main.dart file currently has errors. The error is that the TodosScreenView widget does not exist and we set it as the home property of our MaterialApp.
If you are using a Flutter-enabled IDE, you'll notice that the above have been indicated as errors.
No worries, we will create those files now.
How to Build the Todo App's UI
The Different Types of ViewModels
In Stacked, think ViewModels first before their Views. This will help you gather the dependencies that the corresponding view needs before actually building the view.
Stacked comes with different ViewModel types. In Stacked, you have BaseViewModels, ReactiveViewModels, FutureViewModels, StreamViewModels, and MultipleFutureViewModels. Use each one based on your current need.
Use ReactiveViewModels if your View or its ViewModel will need to use reactive values from reactive services.
We will use the reactive ViewModel type for our TodosScreenViewModel. We are using a ReactiveViewModel because we will need the reactive todos getter in the TodosScreen.
1. Create the TodosScreenViewModel
Create a new folder with name ui inside the lib folder. Inside this newly created ui folder, create another folder named todos_screen. Then inside the new todos_screen folder, create a new file with name todos_screen_viewmodel.dart.
Paste the following into the newly created lib/ui/todos_screen/todos_screen_viewmodel.dart file:
import 'package:flutter/material.dart';
import 'package:stacked/stacked.dart';

import '../../app/locator.dart';
import '../../models/todo.dart';
import '../../services/todos.service.dart';

class TodosScreenViewModel extends ReactiveViewModel {
  final _firstTodoFocusNode = FocusNode();
  final _todosService = locator<TodosService>();
  late final toggleStatus = _todosService.toggleStatus;
  late final removeTodo = _todosService.removeTodo;
  late final updateTodoContent = _todosService.updateTodoContent;

  List<Todo> get todos => _todosService.todos;

  void newTodo() {
    _todosService.newTodo();
    _firstTodoFocusNode.requestFocus();
  }

  FocusNode? getFocusNode(String id) {
    final index = todos.indexWhere((todo) => todo.id == id);
    return index == 0 ? _firstTodoFocusNode : null;
  }

  @override
  List<ReactiveServiceMixin> get reactiveServices => [_todosService];
}
Notice how we have access to the _todosService with the help of locator. We override the reactiveServices getter on ReactiveViewModels and provide the _todosService to this list.
That way, whenever notifyListeners() is called inside TodosService, this TodosScreenViewModel will be notified and it will rebuild the UI as necessary.
From TodosScreenViewModel, we expose the removeTodo, toggleStatus, and updateTodoContent methods from the service to the TodosScreenView (which will come up later).
You might wonder why we need to do this. Why not just expose the service itself or rather access the service from the View or widget itself?
The point here is architectural rules and separation of concerns. Remember that the Stacked architecture states that Views should never access services.
Besides, we are doing this because we are keeping things simple. If the app grows bigger than this and we begin to add features to the views, you will realize that the TodosScreenViewModel will have to do other logic before or after making calls to the service's methods. In that case, we won't do such direct method exposure.
This is evident in the newTodo() method of TodosScreenViewModel. It calls the _todosService.newTodo() function to create a new empty Todo. Then it goes ahead and requests focus on the first or just-created Todo's node (_firstTodoFocusNode.requestFocus()).
That way, the cursor will automatically focus on the text input field of the newly created empty Todo after it is created. You will see this in action when we create the TodosScreenView.
The getFocusNode method returns this _firstTodoFocusNode if the Todo calling it is the first Todo. This call will be made from the UI in the TodosScreenView (coming up later on).
Note on the late keyword
The late keyword attached to the directly exposed service methods is necessary.
Dart is beautiful. late is a feature from Dart that says we are sure that these methods will be assigned later on (from the service) after the ViewModel has been instantiated.
If you remove the late keyword, Dart will complain with "The instance member '_todosService' can't be accessed in an initializer." This complaint is valid.
The complaint comes up because, when the TodosScreenViewModel has been instantiated, Dart is not sure if, at the time when it needs to instantiate those exposed methods (that had late in front of them), the '_todosService' has completed its initialization to be available for the methods.
Generally, instance members can't self initialize each other. The exception is either using the late keyword (as we did) or doing such initialization in the constructor.
Behind the scenes, the late keyword delays the initialization of the dependent instance members (in this case, the directly exposed methods) till the independent instance member (in this case, _todosService) has completed its initialization.
We didn't do these initializations in the constructor because it will make the code longer. And besides, it has the same effect as using late.
2. Create the TodosScreenView
Create a new file with name todos_screen_view.dart inside the lib/ui/todos_screen folder. In other words, the todos_screen_view.dart file should accompany its ViewModel file: todos_screen_viewmodel.dart.
Paste the following into the newly created lib/ui/todos_screen/todos_screen_view.dart file:
import 'package:flutter/material.dart';
import 'package:stacked/stacked.dart';

import 'todos_screen_viewmodel.dart';

class TodosScreenView extends StatelessWidget {
  const TodosScreenView({Key? key}) : super(key: key);

  @override
  Widget build(BuildContext context) {
    return ViewModelBuilder<TodosScreenViewModel>.reactive(
      viewModelBuilder: () => TodosScreenViewModel(),
      builder: (context, model, _) => Scaffold(
        appBar: AppBar(title: const Text('Flutter Stacked Todos')),
        body: ListView(
          padding: const EdgeInsets.symmetric(vertical: 16),
          children: [
            if (model.todos.isEmpty)
              Opacity(
                opacity: 0.5,
                child: Column(
                  children: const [
                    SizedBox(height: 64),
                    Icon(Icons.emoji_food_beverage_outlined, size: 48),
                    SizedBox(height: 16),
                    Text('No todos yet. Click + to add a new one.'),
                  ],
                ),
              ),
            ...model.todos.map((todo) {
              return ListTile(
                leading: IconButton(
                  icon: Icon(
                    todo.completed ? Icons.task_alt : Icons.circle_outlined,
                  ),
                  onPressed: () => model.toggleStatus(todo.id),
                ),
                title: TextField(
                  controller: TextEditingController(text: todo.content),
                  decoration: null,
                  focusNode: model.getFocusNode(todo.id),
                  maxLines: null,
                  onChanged: (text) => model.updateTodoContent(todo.id, text),
                  style: TextStyle(
                    fontSize: 20,
                    decoration:
                        todo.completed ? TextDecoration.lineThrough : null,
                  ),
                ),
                trailing: IconButton(
                  icon: const Icon(Icons.horizontal_rule),
                  onPressed: () => model.removeTodo(todo.id),
                ),
              );
            }),
          ],
        ),
        floatingActionButton: FloatingActionButton(
          onPressed: model.newTodo,
          child: const Icon(Icons.add),
        ),
      ),
    );
  }
}
About the TodosScreenView
The first line after the declaration of the build method is a return statement. This statement returns a ViewModelBuilder widget for the TodosScreenViewModel.
This is another aspect of Stacked architecture. It explains what we mean by Views being attached to ViewModels. In essence, we use ViewModelBuilders to render a View.
That way the View has access to the public properties and methods of its ViewModel. Also, calling notifyListeners() inside the ViewModel auto-updates the View's UI. Furthermore, most (if not all) UI logic that is not declarative should be moved to the ViewModel.
This explains why we shifted the logic of the first Todo's FocusNode to the TodosScreenViewModel.
The body of the TodosScreenView's Scaffold is a ListView for all the Todos gotten from model.todos.
However, the first member of the ListView is a conditional Opacity widget with 0.5 opacity. Its child is a Column for empty state with spacing, a teacup icon, and Text for children.
We used ListTile to display each Todo. It is a convenience widget that takes leading, title, and trailing widgets for the left, center, and right parts of the screen.
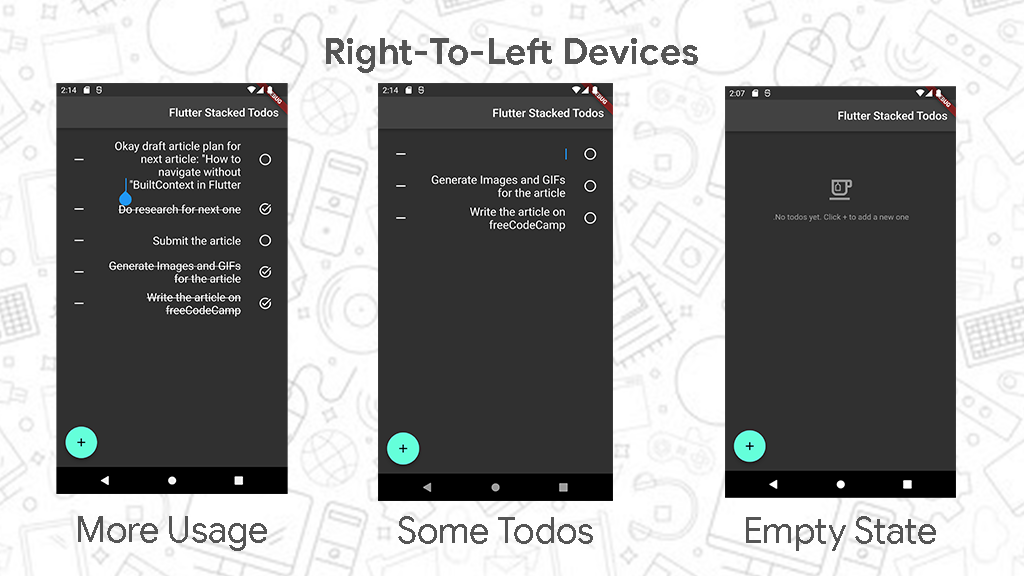
Note on Right-To-Left: ListTile is a good widget, and Flutter is a good framework. They both are internationalized. If this app was run on a device naturally set with a right-to-left locale (in Arabic for example), the app will be mirrored. So the leading, title, and trailing widgets of ListTiles will be right, center, and left parts of the screen instead.
The leading widget on the ListTile is an IconButton whose icon is either an empty or checked circle depending on if the Todo is completed or not. The onPressed callback on the IconButton toggles the status of the Todo.
The title (center) widget on the ListTile is a TextField with no decoration. No decoration here means it has no backgrounds, borders, or underlines. The aim is to give the user the feeling that they can just read their Todo content, while at the same time, the ability to edit the content is in the same place.
The [TextEditingController](https://api.flutter.dev/flutter/widgets/TextEditingController-class.html) given to the TextField is used to set the text content on the field from the content of the Todo. Setting maxLines to null on the TextField is telling Flutter that text in the TextField can span across multiple lines.
The onChanged callback updates the text content of the attached Todo. This callback is called for every keystroke or edit of text. We are doing this to keep all Todos always in sync with the UI.
We didn't call notifyListeners() in this callback (updateTodoContent) in the TodosService to prevent the cursor from jumping (given that we are making the call for each keystroke).
If notifyListeners() was called in this callback, the UI would be rebuilt each time, and the cursor would keep jumping back to the start of the TextField after each keystroke.

3. Run the Todo App
If you are using a Flutter-enabled IDE, you should be able to run the above app on a preconfigured device already.
If you are not, no problem – run the following command in the same terminal. Or rather, make sure that you are in the same project folder in the terminal, then run the command:
flutter run
It should run the Flutter app on an available device or ask you to choose a device and then run the application on it.
You should be able to create Todos, mark them as complete, and remove them.
If you've gotten this far, Congratulations on building a Todo App with the Stacked Architecture!
For a mini-recap, the files inside your lib folder now should be:
app/locator.dartmodels/todo.adapter.dartmodels/todo.dartservices/todos.service.dartui/todos_screen/todos_screen_view.dartui/todos_screen/todos_screen_viewmodel.dartmain.dart
You can get the final code on GitHub here.
Note on Other Stacked Features
There is more to using the Stacked architecture. The above Todo App was one-screen only and it did not need any navigation.
You will need to configure Navigation or Routing in most if not all applications you'll build with Flutter. Navigation is a necessity once you have more than one screen in the Flutter App.
Stacked lets you configure an @StackedApp decoration on an empty Dart class. This decoration can take routes and dependencies info as in the following snippet:
@StackedApp(
  routes: [MaterialRoute(page: TodosScreenView, initial: true)],
  dependencies: [LazySingleton(classType: TodosService)],
)
class App {
  // This class has no puporse besides housing the annotation that
  // generates the required functionality.
}
You'd then need to add build_runner and stacked_generator packages to the Flutter project. Then in development, you keep the following command running:
flutter pub run build_runner build --delete-conflicting-outputs
This command will generate the contents of the setupLocator() function for you. And it is the generated file (and function) that you would add to the main method in lib/main.dart.
Furthermore, the Stacked architecture also has a [stacked_services](https://pub.dev/packages/stacked_services) package. This package helps with configuring crucial services like bottom sheet, dialog, navigation, and snack bar, without the BuildContext, inside ViewModels.
All these introduce convenience and give you a better developer experience while using Stacked.
But these features would be overkill for the simple Todo App we just built. That's why we didn't include them.
The idea is to understand the fundamentals behind the Stacked architecture and be able to use the architecture in your large-scale Flutter projects.
The stress is on large-scale. In reality, if you are building anything simple, you won't need to use any state management architecture. Even a simple Todo App.
But in this article, I aimed to get you started with Stacked Architecture and I needed something simple (like this Todo App) to explain the concepts.
Of course, you can still use Stacked to build simple things. That's what we just did with a Todo App. But understand that you will enjoy the benefits of Stacked when you start adding more features like saving todos to some server, authentication, grouping todos into categories, and more in the Todo App.
Summary
State Management architectures are good ways to structure Flutter projects. They are optional but can become a necessity if you are building a complex application or if more than one person is contributing to the same codebase.
These architectures find a way to update the UI without the default calls to setState(). Stacked is one such architecture. It uses notifyListeners() to update the UI.
A key feature of Stacked is carrying out crucial services like navigation without the BuildContext. We didn't explore that feature in this Todo App. But have it in mind as you go further with using Stacked.
Your Stacked apps should have widgets inside View files. Views should be tied to ViewModels and UI logic should take place here. Services should be used for the app's business logic and APIs. They should be used by other services or ViewModels.
We've used this simple 3-entity structure to build a functional Todo App. You can use the same pattern to build bigger and better apps. Better still, you can refactor existing applications to follow this pattern and have cleaner code.
We also used Hive to save and retrieve Todos after closing and re-opening the Flutter application. Hive is a lightweight package and can serve similar purposes in your apps.
The freeCodeCamp mobile app is built with Flutter. It is open-source and was built using Stacked architecture. You can contribute to the freeCodeCamp app here.
Cheers!