
By Per Harald Borgen
In my previous startup, we used the Dropbox API heavily in our production process. Our products were children’s book apps for iPad, and each book was simply a collection of Dropbox folders containing all the visuals, music and voice-overs for the book. This had two big benefits: it provided everyone with an interface they already knew how to use, and it was cheaper than building a custom interface.
So when Dropbox asked Scrimba whether we’d be interested in creating a sponsored course on their API, there was no doubt in our minds, as we knew how useful their API can be.
Secondly, this sponsorship also allows us to create even more courses for our community throughout 2019. So we’re very thankful for Dropbox being interested in supporting Scrimba.
Now let’s have a look at the actual course.
Intro
The instructor of this course is Christian Jensen, a front-end developer based in Utah. Some of you might know him from the React Hooks tutorials he created on Scrimba last year, and which a lot of people enjoyed.

Christian starts off the course by giving you an overview of what you should know before you start, and what you can expect to learn throughout the course.
As prerequisites for the course, it would be good to know, but not necessary, some basic HTML and JavaScript. If you’re not really familiar with JS, you can still follow along with this course, as the API translates really well into other languages.
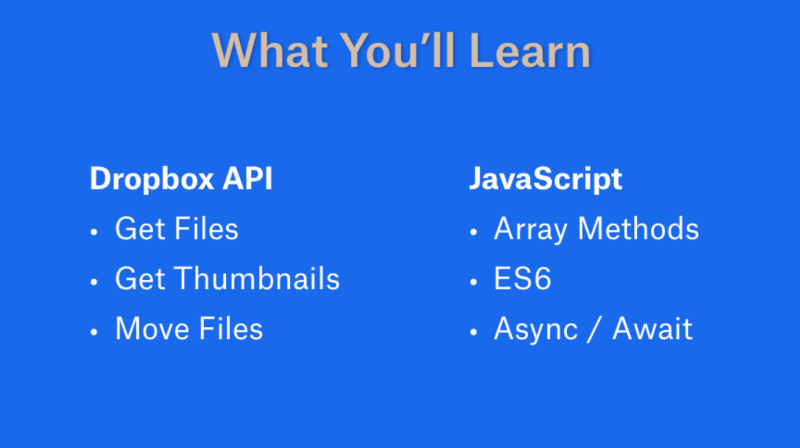
The end goal of the course is to make you capable of building an app on top of Dropbox folders, exemplified with the expense organizer app which Christian builds throughout the lessons.
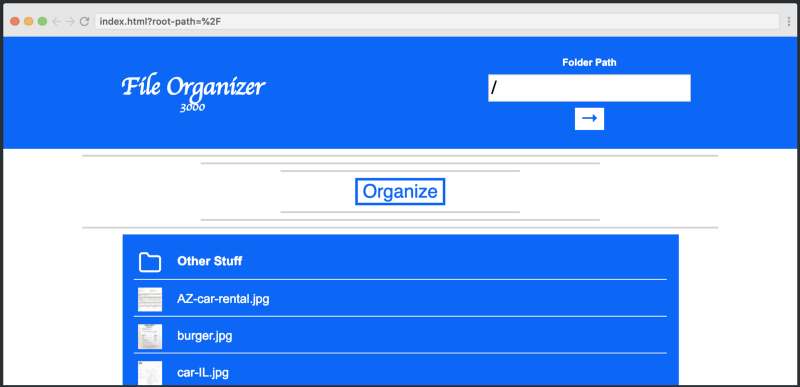
It’s a perfect example of something which is a lot of pain for many companies and freelancers, namely keeping track of receipts!
Set Up
Before we dive into the code, Christian gives us a brief, optional, overview of the setup for those who wish to run the app in this tutorial on their own.
The first thing you need to do is head to Dropbox. On the Dropbox website, go to My apps and choose Dropbox API:
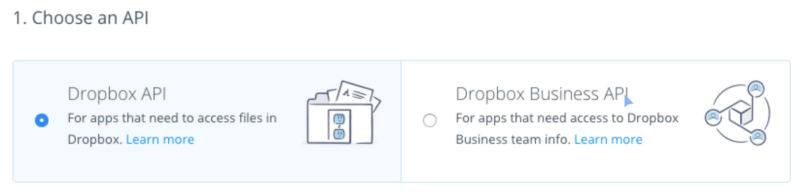
Next, we choose App folder access type, just to see how it works, and lastly, we will name our app.
After we hit the Create app button and after our app is generated, we see the settings screen.
In the settings, we really need only the OAuth 2 section and under Generated Access Token, click Generate button to get an access token we will use in the next part of our tutorial.
That’s all!
Import the SDK
In this cast, Christian shows us how to import the SDK and start using it.
A quick side note: even though in this course JavaScript SDK for Dropbox API is used, the SDK itself is basically the same across the programming languages.
Let’s begin with importing the JavaScript SDK.
// note that the import is named
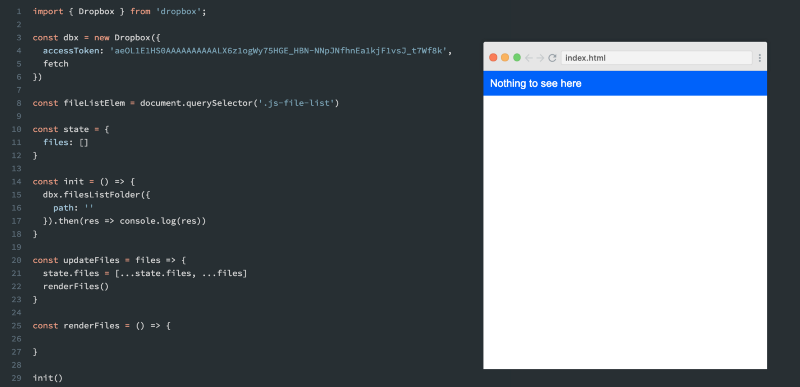
import { Dropbox } from 'dropbox';
The class is instantiated with a configuration object, that needs accessToken and a fetching library. We will be using plain fetch in the course and you can get your accessToken, if you wish, in your Dropbox Developer Account.
import { Dropbox } from 'dropbox';

const dbx = new Dropbox({
  accessToken: 'aeOL1E1HS0AAAAAAAAAALX6z1ogWy75HGE_HBN-NNpJNfhnEa1kjF1vsJ_t7Wf8k',
  fetch
})
Note: the accessToken above has been revoked, so it’s no point trying to use it in your own code.
Get Files
So far, Christian showed us how to instantiate a class.
A full list of methods on the class can be found at the official docs page.
In this cast, we will learn about the filesListFolder() method. It accepts a folder and _s_tarts returning the contents of the folder.
dbx.filesListFolder({
  path: ''
}).then(res => console.log(res))

// for a full console.log results, visit:
// [https://scrimba.com/p/pnyeEhr/cGvvanuy](https://scrimba.com/p/pnyeEhr/cGvvanuy)
There are a few things to keep in mind when we use filesListFolder():
- it returns a promise.
- to specify a root path we need to specify an empty string
''and not'/'
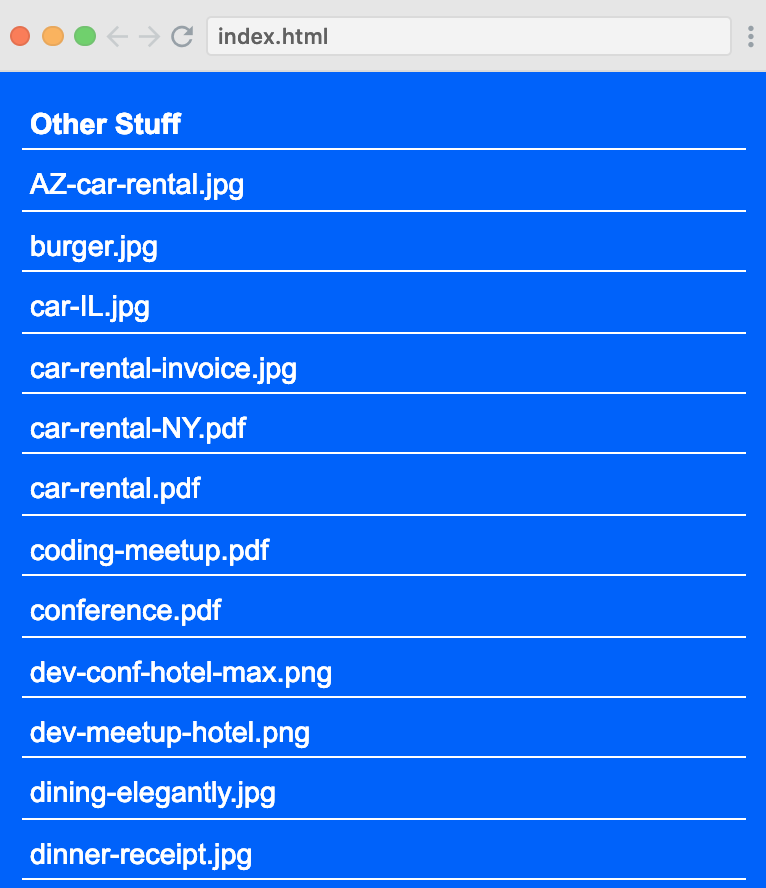
Render Files
In this lesson, Christian will show us how to render files that we get from filesListFolder() from the previous cast. He’ll provide us with some boilerplate vanilla JS code to get us started, so we can focus on the most interesting part of this lesson — rendering files.
Let’s write the renderFiles() function, together with Christian.
We need to add to fileListElem.innerHTML all the alphabetically sorted files, making sure that we put folders first. We then map every folder and file to a <li> and join using join('') to avoid rendering an array instead of a string.
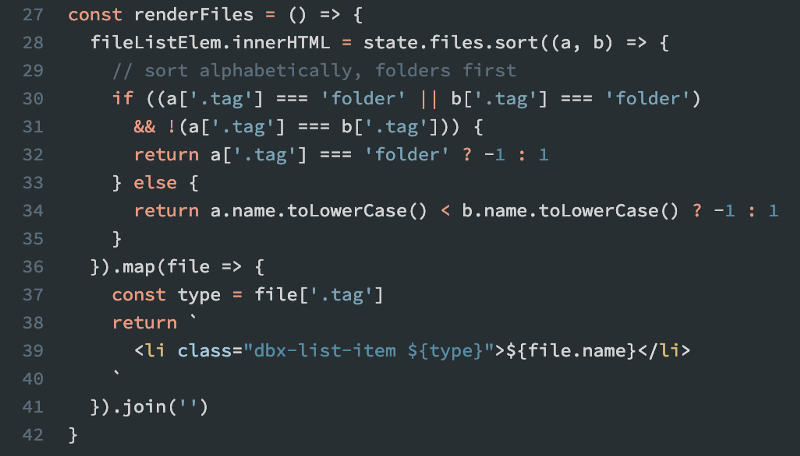
And there we go, our rendered files list!
Render Thumbnails
In this screencast, Cristian is going concentrate on rendering the thumbnails and we will look into getting actual thumbnails from Dropbox in the following lesson.
We’re going to modify our renderFiles() function. In the .map part, we can check if the thumbnail exists for a file and then use it, otherwise, use a default. Keep in mind that folders don’t have thumbnails.
The default images will be provided as base64 strings, and if you follow along with the course in your own editor, you can visit the cast to copy them.
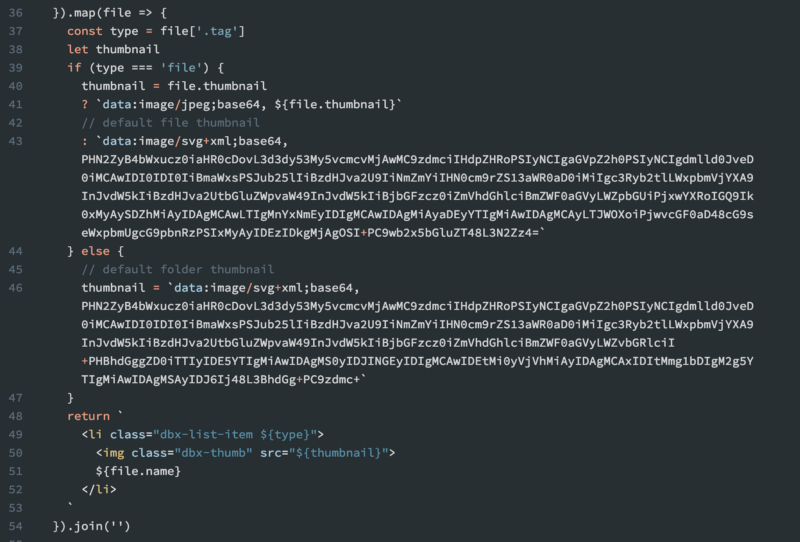
Great, now we have default thumbnails rendered and in the next cast Christian is going to show us how to render actual thumbnails that we can get from Dropbox API.

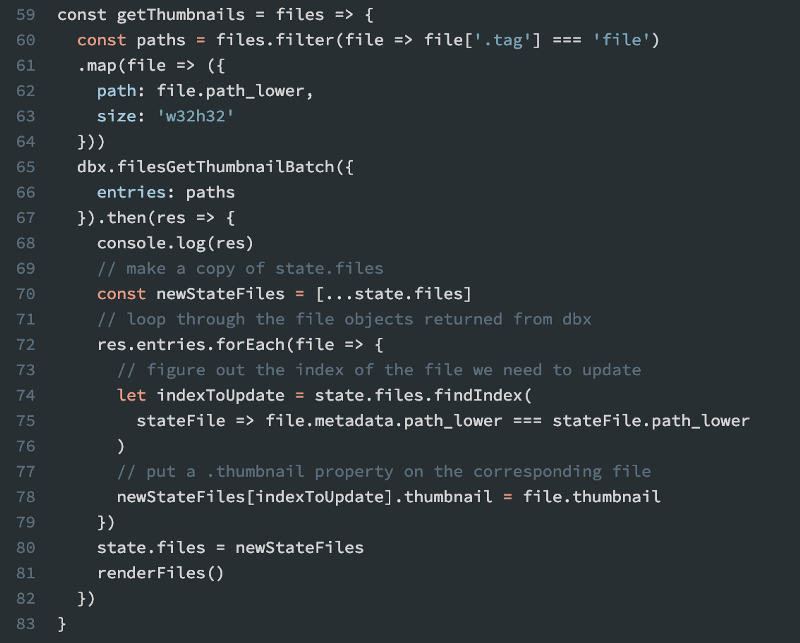
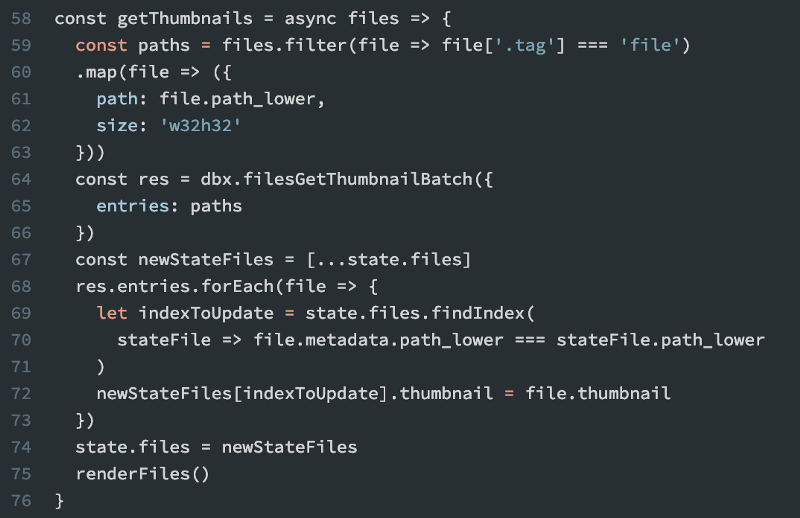
Get Thumbnails
As Christian promised in the last lesson, we’re now going to render actual thumbnails we can get from Dropbox API for the files that have them.
We’re going to add and then create getThumbnails() to our updateFiles()method.
const updateFiles = files => {
  state.files = [...state.files, ...files]
  renderFiles()
  getThumbnails(files)
}
To get thumbnails we can use an existing API endpoint:
// [http://dropbox.github.io/dropbox-sdk-js/Dropbox.html](http://dropbox.github.io/dropbox-sdk-js/Dropbox.html)

dbx.filesGetThumbnailBatch({
  entries: [{
    path: '',
    // preferred size for a thumbnail
    size: 'w32h32'
  }]
})
And this is the finished getThumbnails() function:
If you’re interested in a detailed walkthrough or wish to copy the code, feel free to jump into the actual cast.
Async / Await
So far we’ve used two API calls that return promises. We’ve been resolving them using .then() and in this screencast, Christian is going to show us how we can refactor them using async/await.
To use async/await we declare async in front of our function and await before our API call.
Let’s look at how we can refactor our init() function.
const init = async () => {
  const res = await dbx.filesListFolder({
    path: '',
    limit: 20
  })
  updateFiles(res.entries)
}
And now let’s refactor getThumbnail():
The Cursor
In this cast, we’re going to learn about Dropbox’s concept of the cursor.
In plain API terms, the cursor is an indication of where we are among our files.
For example, you have 100 files, and you requested the first 20. The cursor will move to the 21st file and will let you know that you have more files to download via has_more: true field. The more files you request, the further the cursor goes until it tells you that there are no more files left by has_more: false.
This is what it would look like in reality.

You can use the cursor string to let the API know where the cursor is, so you don’t receive the files that you already have.
In the next lesson, Christian will show us how we can apply this concept to our app and use the cursor to get more files.
Get More Files
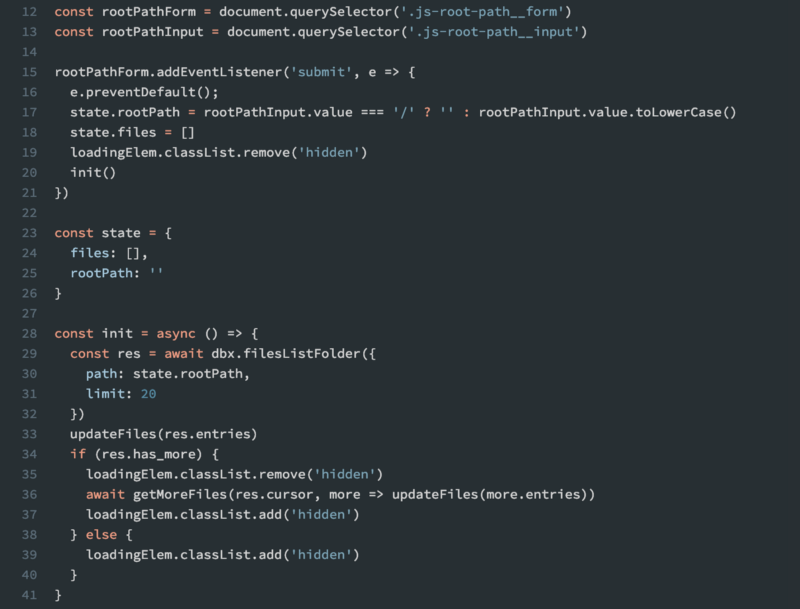
Let’s update init() method to load further files if there are any, by checking has_more property on our response.
const init = async () => {
  const res = await dbx.filesListFolder({
    path: '',
    limit: 20
  })
  updateFiles(res.entries)
  if (res.has_more) {
    getMoreFiles(res.cursor, more => updateFiles(more.entries))
  }
}
We can improve the user experience, but adding a loading message when more files need to be loaded.
const loadingElem = document.querySelector('.js-loading')

const init = async () => {
  const res = await dbx.filesListFolder({
    path: '',
    limit: 20
  })
  updateFiles(res.entries)
  if (res.has_more) {
    loadingElem.classList.remove('hidden')
    getMoreFiles(res.cursor, more => updateFiles(more.entries))
    loadingElem.classList.add('hidden')
  } else {
    loadingElem.classList.add('hidden')
  }
}
Now we can implement getMoreFiles() function.
const getMoreFiles = async (cursor, cb) => {
  const res = await dbx.filesListFolderContinue({ cursor })

// we check if the callback is provided and if so - call it
  if (cb) cb(res)

if (res.has_more) {
    // if there are more files, call getMoreFiles recursively,
    // providing the same callback.
    await getMoreFiles(res.cursor, cb)
  }
}
Change the File Path
Wow, we’ve written some really amazing code so far.
One thing that would be really cool is if we weren’t so restricted to just the root path all the time.
This is exactly we are going to learn in this cast.
To get us started, Christian made some changes to HTML and CSS in our app and the main change is Folder Path field. This is where the user could specify the folder that they would like to go to.
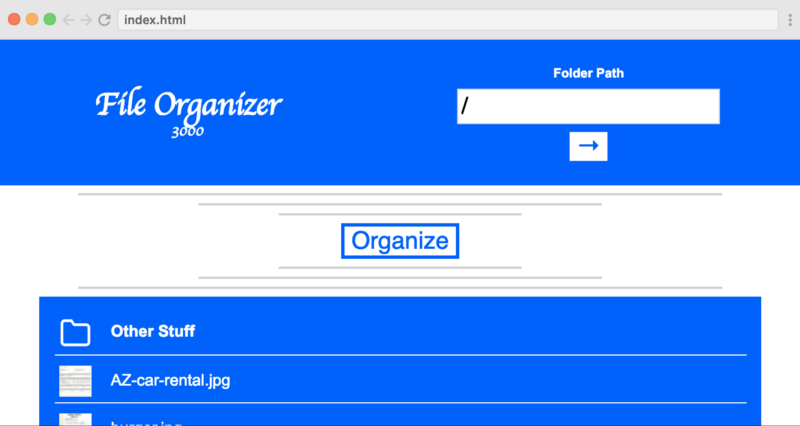
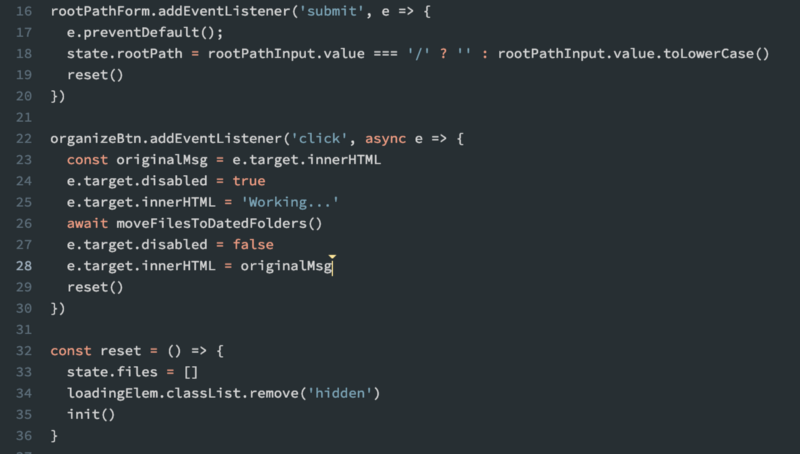
We can make this work by listening to the submit event on rootPathForm, when the user lets us know where they want to go. We then verify their input and prevent basic errors, like using the wrong casing for a name of a folder. We should also store the value of the rootPathInput in our state to be able to reuse it in the rest of our application.
Move Files
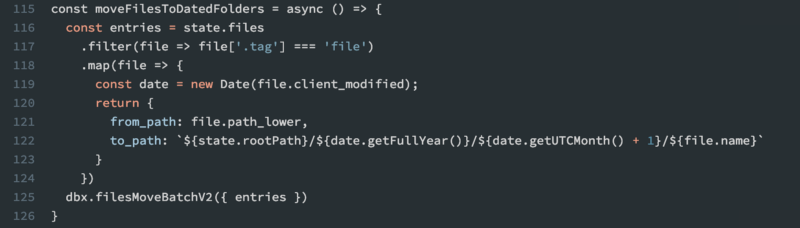
In this lesson, we’re going to implement the main function of our app — the ability to organize our files into folders, based on the date modified.
First, we need to add some organizational code, to make sure that our core functionality feels nice to our users before we implement moveFilesToDatedFolders().
const organizeBtn = document.querySelector('.js-organize-btn')

organizeBtn.addEventListener('click', async e => {
  const originalMsg = e.target.innerHTML
  e.target.disabled = true
  e.target.innerHTML = 'Working...'
  await moveFilesToDatedFolders()
  e.target.disabled = false
  e.target.innerHTML = originalMsg
})
Next, let’s implement moveFilesToDatedFolders() that will use Dropbox’s filesMoveBatchV2().
// Basic API implementation.
dbx.filesMoveBatchV2({
  entries: [{
    from_path: 'some_folder',
    to_path: 'some_other_folder'
  }]
})
Of course, we’re not going to use hardcoded values in our app and Christian will show us how to generate entries array, organized by date modified value, so the folder names are going to have names based on these dates.
Show Moved Files
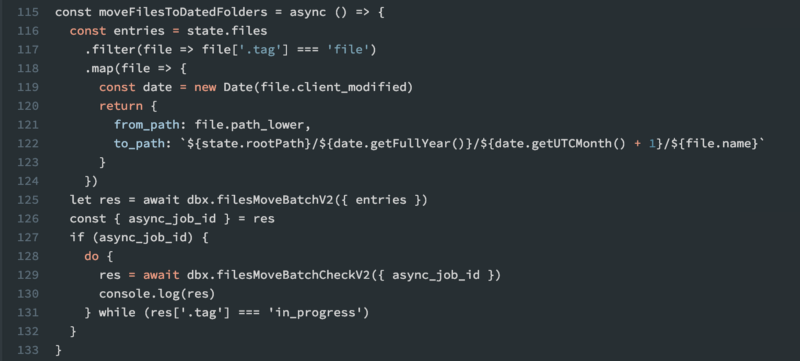
In the previous screencast, Christian showed us how to move files into their own folders based on modified date and in this cast we learn how to refine the existing functionality.
filesMoveBatchV2() returns one of two things: success if the call was immediately successful, and it might happen if we ask to move one or two files. However, most likely it’s going to return an object with a property async_job_id, and that means that your call is being executed.
In this case, we can use filesMoveBatchCheckV2() to check for completion of our job until it’s complete, or in other words, is not in_progress.
That’s where Christian helps us to rewrite the moveFilesToDatedFolders()using a neat do while loop, the key feature of which, is that it’s guaranteed to be executed at least once.
There is now one more thing we need to do — after the user moves the files, we want to show them what a new state looks like, without them having to refresh the page.
We essentially want to reuse this piece of functionality:
state.files = []
loadingElem.classList.remove('hidden')
init()
And let’s extract it into a new reset() method.
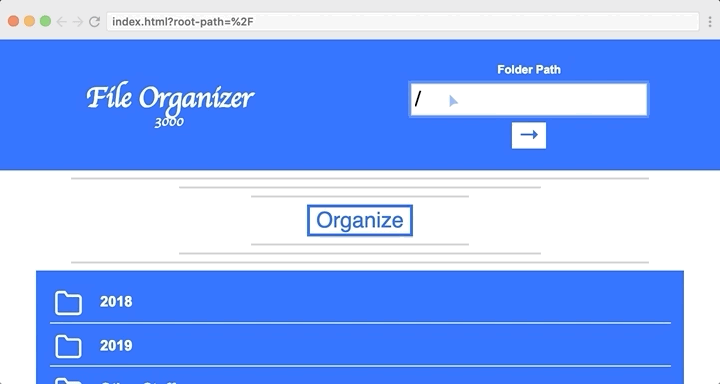
We can now see the functionality working. Hit ‘Organise’ and watch all of our files getting magically put into folders. Here’s a gif of how it works:
Conclusion
This is the end of the course, so congratulations on completing it! You should now be familiar with how to get files and thumbnails, and how to move files using the Dropbox API. Plus, you’ll have learned several ES6 concepts.
Finally, I want to thank Dropbox for sponsoring and paying for this post and the course itself. It helps Scrimba keep the lights on and it enables us to create more free content for our community throughout 2019.
Happy coding :)