
By Mohammad Iqbal
In this tutorial we're going to build out a full stack React blog along with a blog admin back end.
I will walk you through all the steps in detail.
By the end of this tutorial, you will have enough knowledge to build fairly complex full stack apps using modern tools: React, Express, and a PostgreSQL database.
To keeps things concise, I will do the bare minimum styling/layout and leave that up to the reader.
Completed Project:
https://github.com/iqbal125/react-hooks-complete-fullstack
Admin App:
https://github.com/iqbal125/react-hooks-admin-app-fullstack
Starter Project:
https://github.com/iqbal125/react-hooks-routing-auth-starter
How to build the starter Project:
https://www.freecodecamp.org/news/build-a-react-hooks-front-end-app-with-routing-and-authentication/
How to add a Fullstack search engine to this project:
https://www.freecodecamp.org/news/react-express-fullstack-search-engine-with-psql/
You can watch a video version of this tutorial here
https://www.youtube.com/playlist?list=PLMc67XEAt-yzxRboCFHza4SBOxNr7hDD5
Connect with me on Twitter for more updates on future tutorials: https://twitter.com/iqbal125sf
Section 1: Express Server and PSQL Database setup
- Project Structure
- Basic Express setup
- Connecting to Client side
axios vs react-router vs express router
why not use an ORM like Sequelize? - Setting up the database
PSQL foreign keys
PSQL shell - Setting up Express Routes and PSQL queries
Section 2: React front-end Setup
- Setting up global state with reducers, actions and context.
Saving User Profile Data to our Database
Actions and Reducers setup - Client side React app
addpost.js
editpost.js
posts.js
showpost.js
profile.js
showuser.js
Section 3: Admin App
- Admin App Authentication
- Global Edit and Delete Privileges
- Admin Dashboard
- Deleting Users along with their Posts and Comments
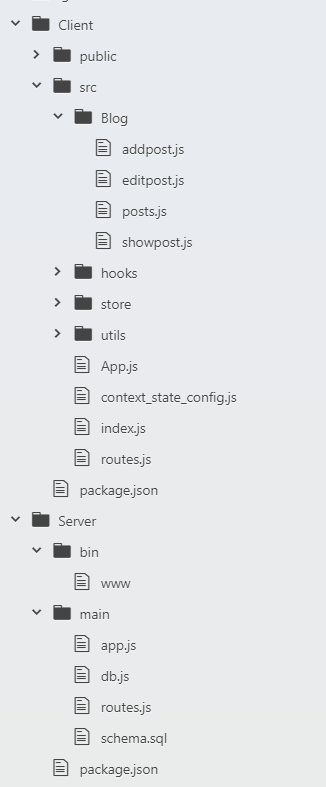
Project Structure
We will begin by discussing the directory structure. We will have 2 directories, the Client and Server directory. The Client Directory will hold the contents of the our React app we setup in the last tutorial and the Server will hold the contents of the of our express server and hold the logic for our API calls to our database. The Server directory will also hold our the schema to our SQL database.
The Final Directory structure will look like this.
Basic Express Setup
If you haven't already done so you can install the express-generator with the command:
npm install -g express-generator
This is a simple tool that will generate a basic express project with one simple command, similar to create-react-app. It will save us a little bit of time from having to set everything up from scratch.
We can begin by running the express command in the Server directory. This will give us a default express app, but we will not use the default configuration we will have to modify it.
First let's delete the routes folder, the views folder and the public folder. We will not need them. You should have only 3 files left. The www file in the bin directory, the app.js file and the package.json file. If you accidentally deleted any of these files, simply generate another express project. Since we deleted those folders we will have to modify the code a little bit as well. Refactor your app.js file as follows:
var createError = require('http-errors');
var express = require('express');
var path = require('path');
var cookieParser = require('cookie-parser');
var logger = require('morgan');


var app = express();

app.use(logger('dev'));
app.use(express.json());
app.use(express.urlencoded({ extended: false }));
app.use(cookieParser());
app.use(express.static(path.join(__dirname, 'public')));


module.exports = app;
We can also place app.js in a folder called main.
Next we need to change the default port in the www file to something other than port 3000 since this is the default port that our React front end app will be running on.
/**
 * Get port from environment and store in Express.
 */

var port = normalizePort(process.env.PORT || '5000');
app.set('port', port);
In addition to the dependencies we got by generating the express app, we will also be adding 3 more libraries to help us:
cors: this the library we will use to help communication between the React App and the Express server. We will do this through a proxy in the React app. Without this we would receive a Cross Origin Resource error in the browser.
helmet: A security library that updates http headers. This library will make our http requests more secure.
pg: This the main library we will use to communicate with our psql database. Without this library communication with the database will not be possible.
we can go ahead and install these libraries
npm install pg helmet cors
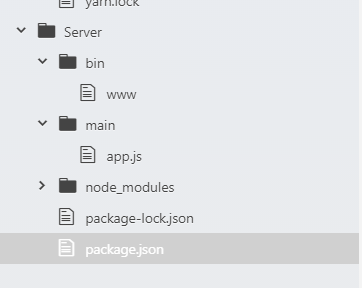
We are done setting up our minimal server and should have project structure that looks like this.
Now we can test to see if our server is working. You run the server without a Client side app. Express is a fully functioning app and will run independently of a Client side app. If done correctly you should see this in your terminal.
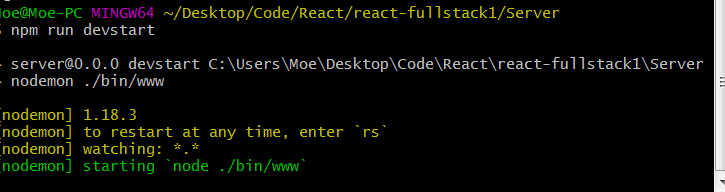
We can keep the server running because we will be using it shortly.
Connecting to the Client Side
Connecting our Client side app to our server is very easy and we need only one line of code. Go to your package.json file in your Client directory and enter the following:
“proxy”: “[http://localhost:5000](http://localhost:5000)"
And that’s it! Our client can now communicate with our server through a proxy.
**Note: Remember that if you set another port besides port:5000 in the www file use that port in the proxy instead.
Here is a diagram to break down and explain what is happening and how it works.
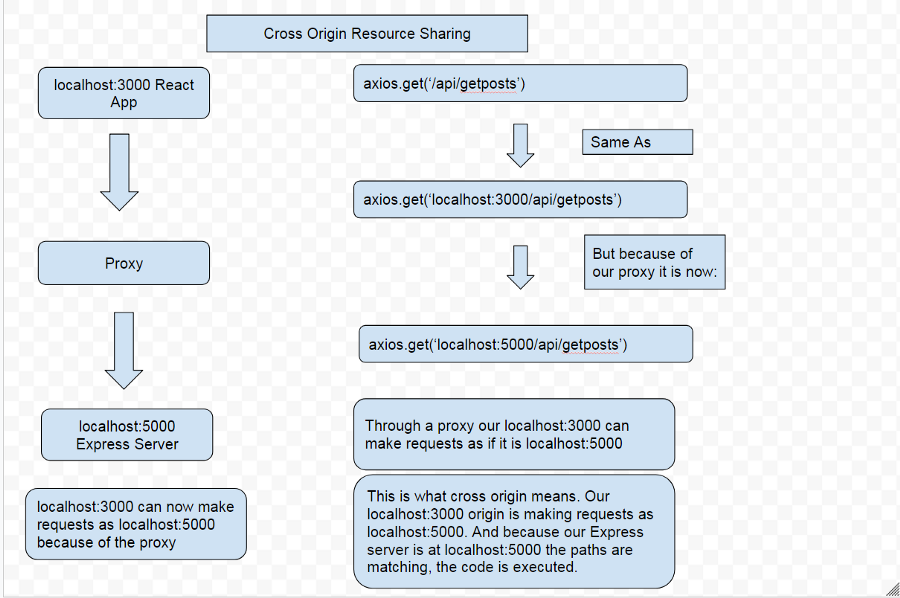
Our localhost:3000 is essentially making requests as if it were localhost:5000 through a proxy middleman which is what allows our Server to communicate with our Client.
Our Client side is now connected to our Server and we want to now test our app.
We now have to go back to the server side and set up the express routing. In your main folder in the Server directory create a new file called routes.js. This file will hold all of express routes. which allow us to send data to our Client side app. We can set a very simple route for now:
var express = require('express')
var router = express.Router()

router.get('/api/hello', (req, res) => {
    res.json('hello world')
})

module.exports = router
Essentially if an API call is made to the /hello route, our Express server will respond with a string of “hello world” in json format.
We also have to refactor our app.js file to use the express routes.
var createError = require('http-errors');
var express = require('express');
var path = require('path');
var cookieParser = require('cookie-parser');
var logger = require('morgan');

var indexRouter = require('./routes')

var app = express();

app.use(logger('dev'));
app.use(express.json());
app.use(express.urlencoded({ extended: false }));
app.use(cookieParser());
app.use(express.static(path.join(__dirname, 'public')));


app.use('/', indexRouter)

module.exports = app;
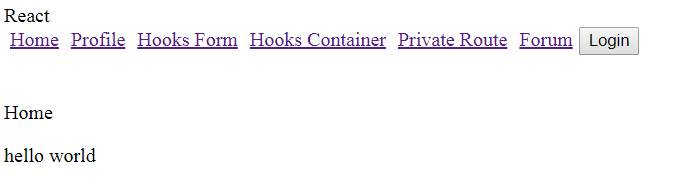
Now for our client side code in our home.js component:
import React, { useState, useEffect } from 'react'
import axios from 'axios';

const Home = props => {
    useEffect(() => {
      axios.get('/api/hello')
        .then(res => setState(res.data))
    }, [])

    const [state, setState] = useState('')

  return(
    <div>
      Home
      <p>{state}</p>
    </div>
 )
};

export default Home;
We are making a basic axios get request to our running express server, if it works we should be seeing "hello world" rendered to the screen.
And yes it is working, we have successfully setup a React Node Fullstack app!
Before continuing I’d like to address a couple of questions you might have which is what the difference is between axios, react router and express router and why Im not using an ORM like Sequelize.
Axios vs Express Router vs React Router
TLDR; We use react router to navigate within our app, we use axios to communicate with our express server and we use our express server to communicate with our database.
You may be wondering at this point how these 3 libraries work together. We use axios to communicate with our express server backend, we will signify a call to our express server by including “/api/” in the URI. axios can also be used to make direct http requests to any backend endpoint. However for security reasons it is not advised to make requests from the client to the database.
express router is mainly used to communicate with our database, since we can pass in SQL queries in the body of the express router function. express along with Node is used to run code outside of the browser which is what makes SQL queries possible. express is also a more secure way to make http requests rather than axios.
However, we need axios on the React client side to handle the asynchronous http requests, we obviously cant use express router on our React client side. axios is Promise based so it can automatically handle asynchronous actions as well.
We use react-router to navigate within our app, since React is a Single Page app the browser does not reload upon a page change. Our app has behind-the-scenes tech that will know automatically if we requesting a route through express or react-router.
Why Not use an ORM library like Sequelize?
TLDR; Preference for directly working with SQL which allows for more control than ORM. More learning resources for SQL than an ORM. ORM skills are not transferable, SQL skills are very transferable.
There are many tutorials that show how to implement a ORM library in use with a SQL database. Nothing wrong with this but I personally prefer to interact directly with the SQL. Working directly with the SQL gives you more fine grained control over the code and I believe this is worth the slight increase in difficulty when working directly with the SQL.
There are a lot more resources on SQL than there are on any given ORM library, so if you have a question or error it is much easier to find a solution.
Also, you are adding another dependency and level of abstraction with an ORM library that could cause errors down the road. If you use an ORM you will need to keep track of updates and breaking changes when the library is changed. SQL on the other hand is extremely mature and has been around for decades which means its not likely to have very many breaking changes. SQL also has had time to be refined and perfected, which usually isn’t the case for ORM libraries.
Lastly, an ORM library takes time to learn and the knowledge usually isn’t transferable to anything else. SQL is the most used database language by a very wide margin, (last I checked around 90% of commercial databases used SQL). Learning one SQL system such as PSQL will allow you to directly transfer those skills and knowledge to another SQL system such as MySQL.
Those are my reasons for not using an ORM library.
Setting up the Database
Let’s start by setting up the SQL schema by creating a file in the main folder of the Server directory called schema.sql.
This will hold the shape and structure of the database. To actually setup the database you will of course have to enter these commands in the PSQL shell. Simply having a SQL file here in our project does nothing, it is simply a way for us to reference what our database structure looks like and allow other engineers to have access to our SQL commands if they want to use our code.
But to actually have a functioning database we will enter in these very same commands into the PSQL terminal.
CREATE TABLE users (
  uid SERIAL PRIMARY KEY,
  username VARCHAR(255) UNIQUE,
  email VARCHAR(255),
  email_verified BOOLEAN,
  date_created DATE,
  last_login DATE
);


CREATE TABLE posts (
  pid SERIAL PRIMARY KEY,
  title VARCHAR(255),
  body VARCHAR,
  user_id INT REFERENCES users(uid),
  author VARCHAR REFERENCES users(username),
  date_created TIMESTAMP
  like_user_id INT[] DEFAULT ARRAY[]::INT[],
  likes INT DEFAULT 0
);

CREATE TABLE comments (
  cid SERIAL PRIMARY KEY,
  comment VARCHAR(255),
  author VARCHAR REFERENCES users(username),
  user_id INT REFERENCES users(uid),
  post_id INT REFERENCES posts(pid),
  date_created TIMESTAMP
);
So we have 3 tables here that will hold data for our users, posts and comments. In keeping with SQL convention all lowercase text is user defined column or table names, and all uppercase text is SQL commands.
PRIMARY KEY: Unique number generated by psql for a given column
VARCHAR(255): variable character, or text and numbers. 255 sets the length of the row.
BOOLEAN: True or false
REFERENCES: how to set the foreign key. The foreign key is a primary key in another table. I explain this more in detail below.
UNIQUE: Prevents duplicate entries in a column.
DEFAULT: set a default value
INT[] DEFAULT ARRAY[]::INT[]: this is fairly complex looking command but its fairly simple. We first have an array of integers, then we set that integer array to a default value of an empty array of type array of integers.
Users Table
We a have a very basic table for users, most of this data will be coming from auth0, which we will see more of in the authcheck section.
Posts Table
Next we have the posts table. We will get our title and body from React front-end and we also associate each post with a user_id and and username. We associate each post with a user with SQL’s foreign key.
We also have our array of like_user_id, this will contain all the user ids of people who have liked a post, preventing multiple likes from the same user.
Comments Table
Finally we have our comments table. We will get our comment from the react front-end and we will also associate each user with a comment so we use the user id and username field from our users table. And We also need the post id from our post table since a comment is made to a post, a comment does not exist in isolation. So each comment has to be associated with both a user and a post.
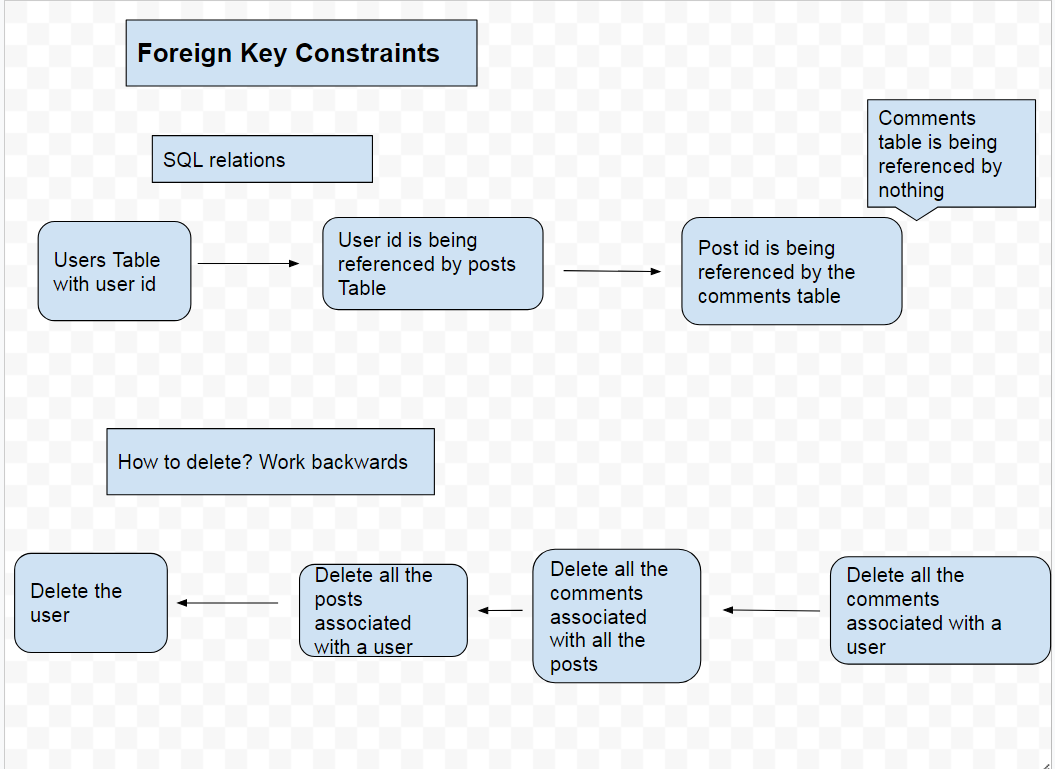
PSQL Foreign keys
A foreign key is essentially a field or column in another table that is being referenced by the original table. A foreign key usually references a primary key in another table but as you can see our posts table, it also has a foreign key link to the username which we need for obvious reasons. To ensure data integrity you can use the UNIQUE constraint on the username field which allows it to function as a foreign key.
Using a column in a table that references a column in a different table is what allows us to have relations between tables in our database hence why SQL databases are referred to as “relational databases”.
The syntax we use is:
column_name data_type REFERENCES other_table(column_name_in_other_table)
Hence a single row in the user_id column in our posts table will have to match a single row in the uid column of the users table. This will allow us to do things such as look up all the posts a certain user made or look up all the comments associated with a post.
Foreign Key Constraint
Also you will have to be mindful of PSQL's foreign key constraints. Which are restrictions that prevent you from deleting rows that are being referenced by another table.
A simple example is deleting posts without deleting the comments associated with that post. The post id from the post table is a foreign key in the comments table and is used to establish a relation between the tables.
You can't just delete the post without first deleting the comments because you will then have a bunch of comments sitting in your database with a non existent post id foreign key.
Here is an example showing how to delete a user and their posts and comments.
PSQL Shell
Let’s open up the PSQL shell and enter in these commands that we just created here in our schema.sql file. This PSQL shell should have been installed automatically when you installed PSQL. If not simply go to the PSQL website to download and install it again.
If you are first logging in to the PSQL shell you will be prompted to set the server, database name, port, username and password. Leave the port to the default 5432 and setup the rest of the credentials to anything you want.
So now you should just be seeing postgres# on the terminal or whatever you set the database name as. This means we are ready to start entering in SQL commands. Instead of using the default database let’s create a new one with the command CREATE DATABASE database1 and then connect to it with \c database1. If done correctly you should see the database#.
If you want a list of all the commands you can type help or \? in the PSQL shell. Always remember to end your SQL queries with a ; which is one of the most common errors when working with SQL.
From hear we can just copy and paste our commands from the schema.sql file.
To see a list of our tables we use the \dt command and you should be seeing this in the terminal.
And we have successfully set up the database!
Now we need to actually connect this database to our server. Doing this is extremely simple. We can do this by making use of the pg library. Install the pg library if you have not already done so and make sure you are in the Server directory we do not want to install this library in our React app.
Create a separate file called db.js in the main directory and set it up as follows:
const { Pool } = require('pg')

const pool = new Pool({
  user: 'postgres',
  host: 'localhost',
  database: 'postgres',
  password: '',
  post: 5432
})

module.exports = pool
These are going to be the same credentials you set when setting up the PSQL shell.
And that’s it we have setup our database with use with our server. We can now begin making queries to it from our express server.
Setting up Express Routes and PSQL queries
Here is the setup for the routes and queries. We need our basic CRUD operations for the posts and comments. All of these values will be coming from our React frontend which we will setup next.
var express = require('express')
var router = express.Router()
var pool = require('./db')


/*
    POSTS ROUTES SECTION
*/

router.get('/api/get/allposts', (req, res, next ) => {
  pool.query(`SELECT * FROM posts
              ORDER BY date_created DESC`,
            (q_err, q_res) => {
                  res.json(q_res.rows)
  })
})

router.get('/api/get/post', (req, res, next) => {
  const post_id = req.query.post_id

  pool.query(`SELECT * FROM posts
              WHERE pid=$1`,
            [ post_id ], (q_err, q_res) => {
                res.json(q_res.rows)
      })
} )


router.post('/api/post/posttodb', (req, res, next) => {
  const values = [ req.body.title,
                   req.body.body,
                   req.body.uid,
                   req.body.username]
  pool.query(`INSERT INTO posts(title, body, user_id, author, date_created)
              VALUES($1, $2, $3, $4, NOW() )`,
           values, (q_err, q_res) => {
          if(q_err) return next(q_err);
          res.json(q_res.rows)
    })
})

router.put('/api/put/post', (req, res, next) => {
  const values = [ req.body.title,
                   req.body.body,
                   req.body.uid,
                   req.body.pid,
                   req.body.username]
  pool.query(`UPDATE posts SET title= $1, body=$2, user_id=$3, author=$5, date_created=NOW()
              WHERE pid = $4`, values,
              (q_err, q_res) => {
                console.log(q_res)
                console.log(q_err)
        })
})

router.delete('/api/delete/postcomments', (req, res, next) => {
  const post_id = req.body.post_id
  pool.query(`DELETE FROM comments
              WHERE post_id = $1`, [post_id],
              (q_err, q_res) => {
                  res.json(q_res.rows)
                  console.log(q_err)
        })
})

router.delete('/api/delete/post', (req, res, next) => {
  const post_id = req.body.post_id
  pool.query(`DELETE FROM posts WHERE pid = $1`, [ post_id ],
              (q_err, q_res) => {
                res.json(q_res.rows)
                console.log(q_err)
       })
})

router.put('/api/put/likes', (req, res, next) => {
  const uid = [req.body.uid]
  const post_id = String(req.body.post_id)

  const values = [ uid, post_id ]
  console.log(values)
  pool.query(`UPDATE posts
              SET like_user_id = like_user_id || $1, likes = likes + 1
              WHERE NOT (like_user_id @> $1)
              AND pid = ($2)`,
     values, (q_err, q_res) => {
    if (q_err) return next(q_err);
    console.log(q_res)
    res.json(q_res.rows);
  });
});

/*
    COMMENTS ROUTES SECTION
*/


router.post('/api/post/commenttodb', (req, res, next) => {
  const values = [ req.body.comment,
    req.body.user_id,
    req.body.username,
    req.body.post_id]

  pool.query(`INSERT INTO comments(comment, user_id, author, post_id, date_created)
              VALUES($1, $2, $3, $4, NOW())`, values,
              (q_err, q_res ) => {
                  res.json(q_res.rows)
                  console.log(q_err)
      })
})

router.put('/api/put/commenttodb', (req, res, next) => {
  const values = [ req.body.comment,
                   req.body.user_id,
                   req.body.post_id,
                   req.body.username,
                   req.body.cid]

  pool.query(`UPDATE comments SET comment = $1, user_id = $2, post_id = $3, author = $4, date_created=NOW()
              WHERE cid=$5`, values,
              (q_err, q_res ) => {
                  res.json(q_res.rows)
                  console.log(q_err)
      })
})


router.delete('/api/delete/comment', (req, res, next) => {
  const cid = req.body.comment_id
  console.log(cid)
  pool.query(`DELETE FROM comments
              WHERE cid=$1`, [ cid ],
              (q_err, q_res ) => {
                  res.json(q_res)
                  console.log(q_err)
      })
})


router.get('/api/get/allpostcomments', (req, res, next) => {
  const post_id = String(req.query.post_id)
  pool.query(`SELECT * FROM comments
              WHERE post_id=$1`, [ post_id ],
              (q_err, q_res ) => {
                  res.json(q_res.rows)
      })
})

/*
  USER PROFILE SECTION
*/

router.post('/api/posts/userprofiletodb', (req, res, next) => {
  const values = [req.body.profile.nickname,
                  req.body.profile.email,
                  req.body.profile.email_verified]
  pool.query(`INSERT INTO users(username, email, email_verified, date_created)
              VALUES($1, $2, $3, NOW())
              ON CONFLICT DO NOTHING`, values,
              (q_err, q_res) => {
                res.json(q_res.rows)
      })
} )

router.get('/api/get/userprofilefromdb', (req, res, next) => {
  const email = req.query.email
  console.log(email)
  pool.query(`SELECT * FROM users
              WHERE email=$1`, [ email ],
              (q_err, q_res) => {
                res.json(q_res.rows)
      })
} )


router.get('/api/get/userposts', (req, res, next) => {
  const user_id = req.query.user_id
  console.log(user_id)
  pool.query(`SELECT * FROM posts
              WHERE user_id=$1`, [ user_id ],
              (q_err, q_res) => {
                res.json(q_res.rows)
      })
} )

// Retrieve another users profile from db based on username
router.get('/api/get/otheruserprofilefromdb', (req, res, next) => {
  // const email = [ "%" + req.query.email + "%"]
  const username = String(req.query.username)
  pool.query(`SELECT * FROM users
              WHERE username = $1`,
    [ username ], (q_err, q_res) => {
    res.json(q_res.rows)
  });
});

//Get another user's posts based on username
router.get('/api/get/otheruserposts', (req, res, next) => {
  const username = String(req.query.username)
  pool.query(`SELECT * FROM posts
              WHERE author = $1`,
    [ username ], (q_err, q_res) => {
    res.json(q_res.rows)
  });
});

module.exports = router
SQL commands
SELECT * FROM table: How we get data from the DB. return all the rows of a table.
INSERT INTO table(column1, column2): How we save data and add rows to the DB.
UPDATE table SET column1 =$1, column2 = $2: how to update or modify existing rows in a db. The WHERE clause specifies which rows to update.
DELETE FROM table: deletes rows based on conditions of the WHERE clause. CAUTION: not including a WHERE clause deletes the entire table.
WHERE clause: An optional conditional statement to add onto queries. This works similar to an if statement in javascript.
WHERE (array @> value): If the value is contained in the array.
Express Routes
To setup express routes we first use the router object we defined at the top with express.Router(). Then the http method we want which can be the standard methods such GET, POST, PUT etc.
Then in the parenthesis, we first pass in the string of the route we want and the second argument is a function to run when the route is called from the client, Express listens for these route calls from the client automatically. When the routes match, the function in the body is called which in our case happens to be PSQL queries.
We can also pass in parameters inside our function call. We use req, res and next.
req: is short for request and contains the request data from our client. This is essentially how we get data from our front-end to our server. The data from our React frontend is contained in this req object and we use it here in our routes extensively to access the values. The data will be supplied to axios as a parameter as a javascript object.
For GET requests with an optional parameter, the data will be available with req.query. For PUT, POST and DELETE requests the data will be available directly in the body of the request with req.body. The data will be a javascript object and each property can be accessed with regular dot notation.
res: is short for response and contains the express server response. We want to send the response we get from our database to the client so we pass in the database response to this res function which then sends it to our client.
next: is middleware that allows you to pass callbacks to the next function.
Notice inside of our express route we are doing pool.query and this pool object is the same one that contains our database login credentials that we setup previously and imported at the top. The query function allows us to make SQL queries to our database in string format. Also notice Im using `` not quotations which allows me to have my query on multiple lines.
Then we have a comma after our SQL query and the next parameter which is an arrow function to execute after running the query. we first pass in 2 parameters to our arrow function, q_err and q_res meaning the query error and the query response. To send data to the frontend we pass in q_res.rows to the res.json function. q_res.rows is the database response since this is SQL and the database will give us back matching rows based on our query. We then convert those rows to json format and send it to our frontend with the res parameter.
We can also pass in optional values to our SQL queries by passing in an array after the query separated by a comma. Then we can access the individual elements in that array in the SQL query with the syntax $1 where $1 is the first element in the array. $2 would access the second element in the array and so on. Note that is not a 0 based system like in javascript, there is no $0
Let’s break down each of these routes and give a brief description of each.
Posts Routes
- /api/get/allposts: retrieves all our posts from the database.
ORDER BY date_created DESCallows us to have the newest posts displayed first. - /api/post/posttodb: Saves a user post to the database. We save the 4 values we need: title, body, user id, username to an array of values.
- /api/put/post: Edits a existing post in the database. We use the SQL
UPDATEcommand and pass in all the values of the post again. We look up the post with the post id which we get from our front end. - /api/delete/postcomments: Deletes all the comments associated with a post. Because of PSQL’s foreign key constraint, we have to delete all the comments associated with the post before we can delete the actual post.
- /api/delete/post: Deletes a post with the post id.
- /api/put/likes: We make a put request to add the user id of the user who liked the post to the
like_user_idarray then we increase thelikescount by 1.
Comments Routes
- /api/post/commenttodb: Saves a comment to the database
- /api/put/commenttodb: edits an existing comment in the database
- /api/delete/comment: Deletes a single comment, this is different from deleting all the comments associated with a post.
- /api/get/allpostcomments: Retrieves all the comments associated with a single post
User Routes
- /api/posts/userprofiletodb: Saves a user profile data from auth0 to our own database. If the user already exists PostgreSQL does nothing.
- /api/get/userprofilefromdb: Retrieves a user by looking up their email
- /api/get/userposts: retrieves posts made by a user by looking up all posts that matches their user id.
- /api/get/otheruserprofilefromdb: get another users profile data from the database and view on their profile page.
- /api/get/otheruserposts: Get another users posts when you view their profile page
Setting up global state with Reducers, actions and context.
Saving User Profile Data to our Database
Before we can start setting up the global state we need a way to save our user profile data to our own database, currently we are just getting our data from auth0. We will do this in our authcheck.js component.
import React, { useEffect, useContext } from 'react';
import history from './history';
import Context from './context';

import axios from 'axios';

const AuthCheck = () => {
  const context = useContext(Context)

  useEffect(() => {
    if(context.authObj.isAuthenticated()) {
      const profile = context.authObj.userProfile
      context.handleUserLogin()
      context.handleUserAddProfile(profile)
       axios.post('/api/posts/userprofiletodb', profile )
        .then(axios.get('/api/get/userprofilefromdb',
                {params: {email: profile.profile.email}})
          .then(res => context.handleAddDBProfile(res.data)) )
        .then(history.replace('/') )
    }
    else {
      context.handleUserLogout()
      context.handleUserRemoveProfile()
      context.handleUserRemoveProfile()
      history.replace('/')
      }
    }, [context.authObj.userProfile, context])

    return(
        <div>
        </div>
)}

export default AuthCheck;
We setup most of this component in the last tutorial so I recommend seeing that tutorial for a detailed explanation but here we are doing an axios post request followed immediately by another axios get request to immediately get the user profile data we just saved to the db.
We do this because we need the unique primary key id that is generated by our database and this allows us to associate this user with their comments and posts. And we use the users email to look them up since we dont know what their unique id is when they first sign up. Finally we save that database user profile data to our global state.
*Note that this applies also to OAuth logins such as Google and Facebook logins.
Actions and Reducers
We can now begin setting up the actions and reducers along with context to setup the global state for this app.
To set the context up from scratch see my previous tutorial. Here we will only need state for the database profile and the all the posts.
First our action types
export const SET_DB_PROFILE = "SET_DB_PROFILE"

export const REMOVE_DB_PROFILE = "REMOVE_DB_PROFILE"

export const FETCH_DB_POSTS = "FETCH_DB_POSTS"

export const REMOVE_DB_POSTS = "REMOVE_DB_POSTS"
Now our actions
export const set_db_profile = (profile) => {
  return {
    type: ACTION_TYPES.SET_DB_PROFILE,
    payload: profile
  }
}

export const remove_db_profile = () => {
  return {
    type: ACTION_TYPES.REMOVE_DB_PROFILE
  }
}

export const set_db_posts = (posts) => {
  return {
    type: ACTION_TYPES.FETCH_DB_POSTS,
    payload: posts
  }
}

export const remove_db_posts = () => {
  return {
    type: ACTION_TYPES.REMOVE_DB_POSTS
  }
}
Finally our post reducer and auth reducer
import * as ACTION_TYPES from '../actions/action_types'

export const initialState = {
  posts: null,
}

export const PostsReducer = (state = initialState, action) => {
    switch(action.type) {
      case ACTION_TYPES.FETCH_DB_POSTS:
        return {
          ...state,
          posts: action.payload
        }
      case ACTION_TYPES.REMOVE_DB_POSTS:
        return {
          ...state,
          posts: []
        }

      default:
        return state
    }
}
import * as ACTION_TYPES from '../actions/action_types'

export const initialState = {
  is_authenticated: false,
  db_profile: null,
  profile: null,
}

export const AuthReducer = (state = initialState, action) => {
    switch(action.type) {
      case ACTION_TYPES.LOGIN_SUCCESS:
        return {
          ...state,
          is_authenticated: true
        }
      case ACTION_TYPES.LOGIN_FAILURE:
        return {
          ...state,
          is_authenticated: false
        }
        case ACTION_TYPES.ADD_PROFILE:
          return {
            ...state,
            profile: action.payload
          }
        case ACTION_TYPES.REMOVE_PROFILE:
          return {
            ...state,
            profile: null
          }
        case ACTION_TYPES.SET_DB_PROFILE:
          return {
            ...state,
            db_profile: action.payload
          }
        case ACTION_TYPES.REMOVE_DB_PROFILE:
          return {
            ...state,
            db_profile: null
          }
      default:
        return state
    }
}
Now we have to add these to the <Context.Provider />
...

    /*
      Posts Reducer
    */

    const [statePosts, dispatchPosts] =  useReducer(PostsReducer.PostsReducer,                                                         PostsReducer.initialState)


    const handleSetPosts = (posts) => {
      dispatchPosts(ACTIONS.set_db_posts(posts) )
    }

    const handleRemovePosts = () => {
      dispatchPosts(ACTIONS.remove_db_posts() )
    }
  ...


      /*
      Auth Reducer
    */
    const [stateAuth, dispatchAuth] = useReducer(AuthReducer.AuthReducer,
                                                               AuthReducer.initialState)


    const handleDBProfile = (profile) => {
      dispatchAuth(ACTIONS.set_db_profile(profile))
    }

    const handleRemoveDBProfile = () => {
      dispatchAuth(ACTIONS.remove_db_profile())
    }

  ...

  <Context.Provider
          value={{
              ...

            dbProfileState: stateAuthReducer.db_profile,

            handleAddDBProfile: (profile) => handleDBProfile(profile),
            handleRemoveDBProfile: () => handleRemoveDBProfile(),

            //Posts State
            postsState: statePostsReducer.posts,
            handleAddPosts: (posts) => handleSetPosts(posts),
            handleRemovePosts: () => handleRemovePosts(),

            ...
          }}>
   ...
This is it, we are now ready to use this global state in our components.
Client Side React App
Next we will setup the client side react blog. All the API calls in this section were setup in the previous express routes section.
It will be setup in 6 components as follows.
addpost.js: A component with a form to submit posts.
editpost.js: A component to edit posts with a form that has fields already populated.
posts.js: A component to render all posts, as in a typical forum.
showpost.js: A component to render an individual post after a user has clicked on a post.
profile.js: A component that renders posts associated with a user. The User Dashboard.
showuser.js: A component that shows another users profile data and posts.
Why Not use Redux Form?
TDLR; Redux Form is overkill for most use cases.
Redux Form is a popular library commonly used in React apps. So why not use it here? I tried Redux Form, but I simply could not find a use case for it here. We always have to keep in mind the final usage, and I couldn’t come up with a scenario for this app where we would need to save the form data in the global redux state.
In this app we simply take the data from a regular form and pass it to Axios which then passes it to the express server which finally saves it to the database. The other possible use case is for an editpost component, which I handle by passing in the post data to a property of the Link element.
Try Redux Form and see if you can come up with a clever usage for it, but we will not need it in this app. Also any functionality offered by Redux Form can be accomplished relatively easier without it.
Redux form is simply overkill for most use cases.
Same as with an ORM there is no reason to add another unnecessary layer of complexity to our app.
It’s simply easier to setup forms with regular React.
addpost.js
import React, { useContext} from 'react';
import axios from 'axios';

import history from '../utils/history';
import Context from '../utils/context';
import TextField from '@material-ui/core/TextField';


const AddPost = () => {
  const context = useContext(Context)

  const handleSubmit = (event) => {
    event.preventDefault()
    const user_id = context.dbProfileState[0].uid
    const username = context.dbProfileState[0].username
    const data = {title: event.target.title.value,
                  body: event.target.body.value,
                  username: username,
                  uid: user_id}

    axios.post('/api/post/posttodb', data)
      .then(response => console.log(response))
      .catch((err) => console.log(err))
      .then(setTimeout(() => history.replace('/'), 700) )
  }


    return(
      <div>
        <form onSubmit={handleSubmit}>
          <TextField
            id='title'
            label='Title'
            margin='normal'
            />
          <br />
          <TextField
            id='body'
            label='Body'
            multiline
            rowsMax='4'
            margin="normal"
            />
           <br />
           <button type='submit'> Submit </button>
           </form>
        <br />
        <button onClick={() => history.replace('/posts')}> Cancel </button>
      </div>
  )}


export default AddPost;
In the addpost component we have a simple 2 field form where a user can enter a title and body. The form is submitted using the handlesubmit() function we created. the handleSubmit() function takes an event parameter keyword which contains the user submitted form data.
We will use event.preventDefault() to stop the page from reloading since React is a single page app and that would be unnecessary.
The axios post method takes a parameter of “data” that will be used to hold the data that will be stored in the database. We get the username and user_id from the global state we discussed in the last section.
Actually posting the data to the database is handled in the express routes function with SQL queries that we saw before. Our axios API call is then passing the data to our express server which will save the information to the database.
editpost.js
Next we have our editpost.js component. This will be a basic component to edit users posts. It will only be accessible through the users profile page.
import React, { useContext, useState } from 'react';
import axios from 'axios';
import history from '../utils/history';
import Context from '../utils/context';

import TextField from '@material-ui/core/TextField';
import Button from "@material-ui/core/Button";


const EditPost = (props) => {
  const context = useContext(Context)

  const [stateLocal, setState] = useState({ title: props.location.state.post.post.title,
                                            body: props.location.state.post.post.body
                                          })


  const handleTitleChange = (event) => {
    setState({...stateLocal, title: event.target.value })
  }

  const handleBodyChange = (event) => {
    setState({...stateLocal, body: event.target.value })
  }

  const handleSubmit = (event) => {
    event.preventDefault()

    const user_id = context.dbProfileState[0].uid
    const username = context.dbProfileState[0].username
    const pid = props.location.state.post.post.pid
    const title = event.target.title.value
    const body = event.target.body.value

    const data = {title: title,
                  body: body,
                  pid: pid,
                  uid: user_id,
                  username: username
                 }
    axios.put("/api/put/post", data)
      .then(res => console.log(res))
      .catch(err => console.log(err))
      .then(setTimeout(() => history.replace('/profile'), 700 ))
  }


    return(
        <div>
          <form onSubmit={handleSubmit}>
            <TextField
              id='title'
              label='title'
              margin="normal"
              value={stateLocal.title}
              onChange={handleTitleChange}
            />
            <br />
            <TextField
              id='body'
              label='body'
              multiline
              rows="4"
              margin='normal'
              value={stateLocal.body}
              onChange={handleBodyChange}
              />
          <br />
          <button type="submit"> Submit </button>
          </form>
          <br />
          <Button onClick={() => history.goBack()}> Cancel </Button>
        </div>
    )}


export default EditPost;
props.location.state.posts.posts.title: is a functionality offered by react-router. When a user clicks on a post from their profile page the post data they clicked is save in a state property in the link element and that this is different from the local component state in React from the useState hook.
This approach offers us an easier way to save the data compared to context and also saves us an API request. We will see how this works in the in the profile.js component.
After this we have a basic controlled component form and we save the data on every keystroke to the React state.
In our handleSubmit() function we combine all our data before sending it to our server in an axios put request.
posts.js
import React, { useContext, useEffect, useState } from 'react';

import { Link } from 'react-router-dom';

import axios from 'axios';
import moment from 'moment';
import Context from '../utils/context';

import Button from '@material-ui/core/Button';
import TextField from '@material-ui/core/TextField';

import Card from "@material-ui/core/Card";
import CardContent from "@material-ui/core/CardContent";
import CardHeader from "@material-ui/core/CardHeader";

import '../App.css';
import '../styles/pagination.css';


const Posts = (props) => {
  const context = useContext(Context)


  const [stateLocal, setState] = useState({ posts: [],
                                            fetched: false,
                                            first_page_load: false,
                                            pages_slice: [1, 2, 3, 4, 5],
                                            max_page: null,
                                            items_per_page: 3,

                                            currentPage: 1,
                                            num_posts: null,
                                            posts_slice: null,
                                            posts_search: [],
                                            posts_per_page: 3
                                        })


    useEffect(() => {
     if(!context.postsState) {
        axios.get('/api/get/allposts')
          .then(res => context.handleAddPosts(res.data) )
          .catch((err) => console.log(err))
        }
      if (context.postsState && !stateLocal.fetched) {
        const indexOfLastPost = 1 * stateLocal.posts_per_page
        const indexOfFirstPost = indexOfLastPost - stateLocal.posts_per_page
        const last_page = Math.ceil(context.postsState.length/stateLocal.posts_per_page)

        setState({...stateLocal,
                  fetched: true,
                  posts: [...context.postsState],
                  num_posts: context.postsState.length,
                  max_page: last_page,
                  posts_slice: context.postsState.slice(indexOfFirstPost,
                                                        indexOfLastPost)
                  })
        }
      }, [context, stateLocal])


    useEffect(() => {
      let page = stateLocal.currentPage
      let indexOfLastPost = page * 3;
      let indexOfFirstPost = indexOfLastPost - 3;

      setState({...stateLocal,
                posts_slice: stateLocal.posts.slice(indexOfFirstPost,
                                                    indexOfLastPost) })
    }, [stateLocal.currentPage]) //eslint-disable-line


   const add_search_posts_to_state = (posts) => {
      setState({...stateLocal, posts_search: []});
      setState({...stateLocal, posts_search: [...posts]});
   }


  const handleSearch = (event) => {
     setState({...stateLocal, posts_search: []});
     const search_query = event.target.value
     axios.get('/api/get/searchpost', {params: {search_query: search_query} })
       .then(res => res.data.length !== 0
                      ? add_search_posts_to_state(res.data)
                      : null )
       .catch(function (error) {
         console.log(error);
         })
     }


  const RenderPosts = post => (
    <div >
    <Card >
      <CardHeader
        title={<Link to={{pathname:'/post/' + post.post.pid, state: {post}}}>
                  {post.post.title}
                </Link> }
        subheader={
            <div className="FlexColumn">
              <div className="FlexRow">
              {  moment(post.post.date_created).format('MMMM Do, YYYY | h:mm a') }
              </div>
              <div className="FlexRow">
                By:
                <Link style={{paddingLeft: '5px', textDecoration: 'none'}}
                      to={{pathname:"/user/" + post.post.author, state:{post} }}>
                 { post.post.author }
                 </Link>
               </div>
               <div className="FlexRow">
                <i className="material-icons">thumb_up</i>
                <div className="notification-num-allposts"> {post.post.likes} </div>
              </div>
            </div>
            }
          />
      <br />
      <CardContent>
        <span style={{overflow: 'hidden' }}> {post.post.body} </span>
      </CardContent>
    </Card>
    </div>
  )

  const page_change = (page) => {
    window.scrollTo({top:0, left: 0, behavior: 'smooth'})

    //variables for page change
    let next_page = page + 1
    let prev_page = page - 1

    //handles general page change
    //if(state.max_page < 5 return null)
    if(page > 2 && page < stateLocal.max_page - 1) {
      setState({...stateLocal,
                currentPage: page,
                pages_slice: [prev_page - 1,
                              prev_page,
                              page,
                              next_page,
                              next_page + 1],
              })
     }
     if(page === 2 ) {
       setState({...stateLocal,
                currentPage: page,
                 pages_slice: [prev_page,
                               page,
                               next_page,
                               next_page + 1,
                               next_page + 2],
               })
      }
     //handles use case for user to go back to first page from another page
     if(page === 1) {
       setState({...stateLocal,
                currentPage: page,
                 pages_slice: [page,
                               next_page,
                               next_page + 1,
                               next_page + 2,
                               next_page + 3],
            })
     }
     //handles last page change
     if(page === stateLocal.max_page) {
       setState({...stateLocal,
                 currentPage: page,
                 pages_slice: [prev_page - 3,
                               prev_page - 2,
                               prev_page - 1,
                               prev_page,
                               page],
               })
     }
     if(page === stateLocal.max_page - 1) {
       setState({...stateLocal,
                 currentPage: page,
                 pages_slice: [prev_page - 2,
                               prev_page - 1,
                               prev_page,
                               page,
                               next_page],
               })
     }
   }


  return(
      <div>
      <div style={{opacity: stateLocal.opacity, transition: 'opacity 2s ease'}}>
      <br />
      { context.authState
        ?  <Link to="/addpost">
              <Button variant="contained" color="primary">
                Add Post
              </Button>
            </Link>
        : <Link to="/signup">
              <Button variant="contained" color="primary">
                Sign Up to Add Post
              </Button>
            </Link>
          }
      </div>
      <br />
      <TextField
        id="search"
        label="Search"
        margin="normal"
        onChange={handleSearch}
      />
      <hr />

       <br />
       <div>
         {stateLocal.posts_search
           ? stateLocal.posts_search.map(post =>
             <RenderPosts key={post.pid + 1000} post={post} />
            )
            : null
          }
        </div>

      <h1>Posts</h1>
        <div>
          {stateLocal.posts_slice
            ? stateLocal.posts_slice.map(post =>
              <RenderPosts key={post.pid} post={post} />
             )
            : null
           }
        </div>
        <div>
            <div className="FlexRow">
                <button onClick={() => page_change(1) }> First </button>
                <button onClick={() => page_change(stateLocal.currentPage - 1) }> Prev </button>
                   {stateLocal.pages_slice.map((page) =>
                       <div
                         onClick={() => page_change(page)}
                         className={stateLocal.currentPage === page
                                       ? "pagination-active"
                                       : "pagination-item" }
                         key={page}>
                           {page}
                        </div>
                   )}
                 <button onClick={() => page_change(stateLocal.currentPage + 1)}> Next </button>
                 <button onClick={() => page_change(stateLocal.max_page)}> Last </button>
               </div>
         </div>
      </div>
  )}


export default Posts;
You will notice we have a fairly complex useEffect() call to get our posts from our database. This is because we are saving our posts from our database to the global state, so that the posts are still there even if a user navigates to another page.
Doing this avoids unnecessary API calls to our server. This is why we use a conditional to check if the posts are already saved to the context state.
If the posts are already saved to the global state we just set the posts in global state to our local state which allows us to initialize the pagination.
Pagination
We have a basic pagination implementation here in the page_change() function. We basically have our 5 pagination blocks setup as an array. When the page changes the array is updated with the new values. This is seen in the first if statement in the page_change() function the other 4 if statements are just to handle the first 2 and last 2 page changes.
We also have to a window.scrollTo() call to scroll to the top on every page change.
Challenge yourself to see if you can build a more complex pagination implementation but for our purposes this single function here for pagination is fine.
we need 4 state values for our pagination. We need:
num_posts: number of postsposts_slice: a slice of the total postscurrentPage: the current pageposts_per_page: The number of posts on each page.
We also need to pass the currentPage state value to the useEffect() hook this allows us to fire a function every time the page changes. We get the indexOfLastPost by multiplying 3 times the currentPage and get the indexOfFirstPost post we want to display by subtracting 3. We can then set this new sliced array as the new array in our local state.
Now for our JSX. We are using flexbox to structure and layout our pagination blocks instead of the usual horizontal lists that are traditionally used.
We have 4 buttons that allow you to go to the very first page or back a page and vice-versa. Then we use a map statement on our pages_slice array which gives us the values for our pagination blocks. A user can also click on a pagination block which will pass in the page as an argument to the page_change() function.
We also have CSS classes that allows us to set styling on our pagination as well.
.pagination-active: this is a regular CSS class instead of a pseudo selector you usually see with horizontal lists such as.item:active. We are toggling the active class in the React JSX by comparing thecurrentPagewith the page in thepages_slicearray..pagination-item: styling for all pagination blocks.pagination-item:hover: styling to apply when user hovers over a pagination block
          <div className="FlexRow">
                <button onClick={() => page_change(1) }> First </button>
                <button onClick={() => page_change(stateLocal.currentPage - 1)  }>
                    Prev
                </button>
                   {stateLocal.pages_slice.map((page) =>
                       <div
                         onClick={() => page_change(page)}
                         className={stateLocal.currentPage === page
                                       ? "pagination-active"
                                       : "pagination-item" }
                         key={page}>
                           {page}
                        </div>
                   )}
                 <button onClick={() => page_change(stateLocal.currentPage + 1)}> Next </button>
                 <button onClick={() => page_change(stateLocal.max_page)}> Last </button>
               </div>
.pagination-active {
  background-color: blue;
  cursor: pointer;
  color: white;
  padding: 10px 15px;
  border: 1px solid #ddd; /* Gray */
}

.pagination-item {
  cursor: pointer;
  border: 1px solid #ddd; /* Gray */
  padding: 10px 15px;
}

.pagination-item:hover {
  background-color: #ddd
}
RenderPosts<RenderPosts /> is the functional component we use to render each individual post. The title of the posts is a Link which when clicked on will take a user to each individual post with comments. Also you will notice we pass in the entire post to the state property of the Link element. This state property is different from our local state, this is actually a property of react-router and we will see this in more detail in the showpost.js component. We do the same with the author of the post as well.
You will also notice a few other things related to searching for posts which I will discuss in the later sections.
I will also discuss the "likes" functionality in the showpost.js component.
showpost.js
Now here we have by far the most complex component in this app. Dont worry, I will break it down completely step by step, it is not as intimidating as it looks.
import React, { useContext, useState, useEffect } from 'react';


import { Link } from 'react-router-dom';
import axios from 'axios';
import history from '../utils/history';
import Context from '../utils/context';

import TextField from '@material-ui/core/TextField';

import Button from '@material-ui/core/Button';


const ShowPost = (props) => {
  const context = useContext(Context)

  const [stateLocal, setState] = useState({ comment: '',
                                            fetched: false,
                                            cid: 0,
                                            delete_comment_id: 0,
                                            edit_comment_id: 0,
                                            edit_comment: '',
                                            comments_arr: null,
                                            cur_user_id: null,
                                            like_post: true,
                                            likes: 0,
                                            like_user_ids: [],
                                            post_title: null,
                                            post_body: null,
                                            post_author: null,
                                            post_id: null
                                           })


    useEffect(() => {
      if(props.location.state && !stateLocal.fetched) {

        setState({...stateLocal,
                  fetched: true,
                  likes: props.location.state.post.post.likes,
                  like_user_ids: props.location.state.post.post.like_user_id,
                  post_title: props.location.state.post.post.title,
                  post_body: props.location.state.post.post.body,
                  post_author: props.location.state.post.post.author,
                  post_id: props.location.state.post.post.pid})
        }
      }, [stateLocal,
          props.location])

  useEffect( () => {
    if(!props.location.state && !stateLocal.fetched) {

      const post_id = props.location.pathname.substring(6)

      axios.get('/api/get/post',
                  {params: {post_id: post_id}} )
        .then(res => res.data.length !== 0
                ?   setState({...stateLocal,
                        fetched: true,
                        likes: res.data[0].likes,
                        like_user_ids: res.data[0].like_user_id,
                        post_title: res.data[0].title,
                        post_body: res.data[0].body,
                        post_author: res.data[0].author,
                        post_id: res.data[0].pid
                      })
                 : null
              )
        .catch((err) => console.log(err) )
    }
  }, [stateLocal,
      props.location])

   useEffect(() => {
     if(!stateLocal.comments_arr) {
       if(props.location.state) {
         const post_id = props.location.pathname.substring(6)
         axios.get('/api/get/allpostcomments',
                     {params: {post_id: post_id}} )
           .then(res => res.data.length !== 0
                          ? setState({...stateLocal, comments_arr: [...res.data]})
                          : null )
           .catch((err) => console.log(err))
       }
     }
   }, [props.location, stateLocal])


    const handleCommentSubmit = (submitted_comment) => {
        if(stateLocal.comments_arr) {
            setState({...stateLocal, comments_arr: [submitted_comment,
                                                  ...stateLocal.comments_arr]})
         } else {
           setState({...stateLocal, comments_arr: [submitted_comment]})
         }
     };

     const handleCommentUpdate = (comment) => {
       const commentIndex = stateLocal.comments_arr.findIndex(com => com.cid === comment.cid)
       var newArr = [...stateLocal.comments_arr ]
       newArr[commentIndex] = comment

       setTimeout(() => setState({...stateLocal, comments_arr: [...newArr], edit_comment_id: 0 }), 100)
     };


     const handleCommentDelete = (cid) => {
       setState({...stateLocal, delete_comment_id: cid})
       const newArr = stateLocal.comments_arr.filter(com => com.cid !== cid)
       setState({...stateLocal, comments_arr: newArr})
     };

     const handleEditFormClose = () => {
       setState({...stateLocal, edit_comment_id: 0})
     }


    const RenderComments = (props) => {
      return(
      <div className={stateLocal.delete_comment_id === props.comment.cid
                        ? "FadeOutComment"
                        : "CommentStyles"}>
        <div>
        <p>{props.comment.comment} </p>
        <small>
          { props.comment.date_created === 'Just Now'
            ?  <div> {props.comment.isEdited
                  ? <span> Edited </span>
                  : <span> Just Now </span> }</div>
            :  props.comment.date_created
          }
        </small>
        <p> By: { props.comment.author} </p>
        </div>
        <div>
        {props.cur_user_id === props.comment.user_id
          ? !props.isEditing
            ?  <div>
                  <Button onClick={() => setState({...stateLocal,
                                                  edit_comment_id: props.comment.cid,
                                                  edit_comment: props.comment.comment
                                                  })
                                     }>
                     Edit
                   </Button>
                </div>
            :   <form onSubmit={(event, cid) => handleUpdate(event, props.comment.cid) }>
                  <input
                    autoFocus={true}
                    name="edit_comment"
                    id="editted_comment"
                    label="Comment"
                    value={stateLocal.edit_comment}
                    onChange={handleEditCommentChange}
                  />
                    <br />
                    <Button type='submit'>
                       Agree
                    </Button>
                    <Button type="button" onClick={handleEditFormClose}>
                     Cancel
                    </Button>
                    <button onClick={() => handleDeleteComment(props.comment.cid)}>
                      Delete
                    </button>
                  </form>
            : null }
          </div>
      </div>
    );
   }


    const handleEditCommentChange = (event) => (
      setState({...stateLocal,
                edit_comment: event.target.value})
    );


    const handleSubmit = (event) => {
      event.preventDefault()
      setState({...stateLocal, comment: ''})

      const comment = event.target.comment.value
      const user_id = context.dbProfileState[0].uid
      const username = context.dbProfileState[0].username
      const post_id = stateLocal.post_id
      const current_time = "Just Now"
      const temp_cid = Math.floor(Math.random() * 1000);

      const submitted_comment = {cid: temp_cid,
                                 comment: comment,
                                 user_id: user_id,
                                 author: username,
                                 date_created: current_time }

      const data = {comment: event.target.comment.value,
                    post_id: post_id,
                    user_id: user_id,
                    username: username}

      axios.post('/api/post/commenttodb', data)
        .then(res => console.log(res))
        .catch((err) => console.log(err))
      window.scroll({top: 0, left: 0, behavior: 'smooth'})
      handleCommentSubmit(submitted_comment)
    }

    const handleUpdate = (event, cid) => {
      event.preventDefault()
      console.log(event)
      console.log(cid)
      const comment = event.target.editted_comment.value
      const comment_id = cid
      const post_id = stateLocal.post_id
      const user_id = context.dbProfileState[0].uid
      const username = context.dbProfileState[0].username
      const isEdited = true
      const current_time = "Just Now"

      const edited_comment = {cid: comment_id,
                              comment: comment,
                              user_id: user_id,
                              author: username,
                              date_created: current_time,
                              isEdited: isEdited }

      const data = {cid: comment_id,
                    comment: comment,
                    post_id: post_id,
                    user_id: user_id,
                    username: username}

      axios.put('/api/put/commenttodb', data)
        .then(res => console.log(res))
        .catch((err) => console.log(err))
      handleCommentUpdate(edited_comment);
    }

    const handleDeleteComment = (cid) => {
      const comment_id = cid
      console.log(cid)
      axios.delete('/api/delete/comment', {data: {comment_id: comment_id}} )
        .then(res => console.log(res))
        .catch((err) => console.log(err))
      handleCommentDelete(cid)
    }

    const handleLikes = () => {
        const user_id = context.dbProfileState[0].uid
        const post_id = stateLocal.post_id

        const data = { uid: user_id, post_id: post_id }
        console.log(data)
        axios.put('/api/put/likes', data)
          .then( !stateLocal.like_user_ids.includes(user_id) && stateLocal.like_post
                    ? setState({...stateLocal,
                                likes: stateLocal.likes + 1,
                                like_post: false})
                    : null )
          .catch(err => console.log(err))
      };


    return(
        <div>
          <div>
            <h2>Post</h2>
            {stateLocal.comments_arr || props.location.state
              ? <div>
                  <p>{stateLocal.post_title}</p>
                  <p>{stateLocal.post_body}</p>
                  <p>{stateLocal.post_author}</p>
                </div>
            : null
           }

              <div style={{cursor: 'pointer'}} onClick={context.authState
                                                        ? () => handleLikes()
                                                        : () => history.replace('/signup')}>
                  <i className="material-icons">thumb_up</i>
                  <small className="notification-num-showpost">
                    {stateLocal.likes}
                  </small>
                </div>
          </div>
          <div>

            <h2> Comments:</h2>
            {stateLocal.comments_arr
              ? stateLocal.comments_arr.map((comment) =>
                 <RenderComments comment={comment}
                                 cur_user_id={context.dbProfileState
                                                ? context.dbProfileState[0].uid
                                                : null  }
                                 key={comment.cid}
                                 isEditing={comment.cid === stateLocal.edit_comment_id
                                              ? true
                                              : false }
                       />)
              : null
            }
          </div>
          <div>
            <form onSubmit={handleSubmit}>
              <TextField
                id="comment"
                label="Comment"
                margin="normal"
              />
              <br />

              {context.authState
                ? <Button variant="contained" color="primary" type="submit">
                    Submit
                  </Button>
                : <Link to="/signup">
                     <Button  variant="contained" color="primary">
                         Signup to Comment
                      </Button>
                   </Link>
               }
            </form>
          </div>
          <div>
          </div>
        </div>
    )}


export default ShowPost;
You will first notice a gigantic useState call. I will explain how each property works as we explore our component instead here all at once.
useEffect() and API requests
First thing we need to be aware of is that a user can access a post in 2 different ways. Accessing it from the forum or navigating to it using the direct URL.
useEffect(() => {
      if(props.location.state && !stateLocal.fetched) {
        setState({...stateLocal,
                  fetched: true,
                  likes: props.location.state.post.post.likes,
                  like_user_ids: props.location.state.post.post.like_user_id,
                  post_title: props.location.state.post.post.title,
                  post_body: props.location.state.post.post.body,
                  post_author: props.location.state.post.post.author,
                  post_id: props.location.state.post.post.pid})
        }
      }, [stateLocal,
          props.location])

  useEffect( () => {
    if(!props.location.state && !stateLocal.fetched) {

      const post_id = props.location.pathname.substring(6)

      axios.get('/api/get/post',
                  {params: {post_id: post_id}} )
        .then(res => res.data.length !== 0
                ?   setState({...stateLocal,
                        fetched: true,
                        likes: res.data[0].likes,
                        like_user_ids: res.data[0].like_user_id,
                        post_title: res.data[0].title,
                        post_body: res.data[0].body,
                        post_author: res.data[0].author,
                        post_id: res.data[0].pid
                      })
                 : null
              )
        .catch((err) => console.log(err) )
    }
  }, [stateLocal,
      props.location])

   useEffect(() => {
     if(!stateLocal.comments_arr) {
       if(props.location.state) {
         const post_id = props.location.pathname.substring(6)
         axios.get('/api/get/allpostcomments',
                     {params: {post_id: post_id}} )
           .then(res => res.data.length !== 0
                          ? setState({...stateLocal,
                                      comments_arr: [...res.data]})
                          : null )
           .catch((err) => console.log(err))
       }
     }
   }, [props.location, stateLocal])
If they access it from the forum we check for this in our useEffect() call and then set our local state to the post. Since we use react router's state property in the <Link /> element, we have access to the entire post data already available to us through props, which saves us an unnecessary API call.
If the user enters the direct URL for a post in the browser then we have no choice but to make an API request to get the post, since a user has to click on a post from the posts.js forum to save the post data to the react-router's state property.
We first extract the post id from the URL with react-router's pathname property, which we then use as a param in our axios request. After the API request we just save the response to our local state.
After that we need to get the comments with an API request as well. We can use the same post id URL extraction method to lookup comments associated with a post.
RenderComments and Animations
Here we have our <RenderComments /> functional component which we use to display an individual comment.
....

const RenderComments = (props) => {
      return(
      <div className={stateLocal.delete_comment_id === props.comment.cid
                        ? "FadeOutComment"
                        : "CommentStyles"}>
        <div>
        <p>{props.comment.comment} </p>
        <small>
          { props.comment.date_created === 'Just Now'
            ?  <div> {props.comment.isEdited
                  ? <span> Edited </span>
                  : <span> Just Now </span> }</div>
            :  props.comment.date_created
          }
        </small>
        <p> By: { props.comment.author} </p>
        </div>
        <div>
        {props.cur_user_id === props.comment.user_id
          ? !props.isEditing
            ?  <div>
                  <Button onClick={() => setState({...stateLocal,
                                                  edit_comment_id: props.comment.cid,
                                                  edit_comment: props.comment.comment
                                                  })
                                     }>
                     Edit
                   </Button>
                </div>
            :   <form onSubmit={(event, cid) => handleUpdate(event, props.comment.cid) }>
                  <input
                    autoFocus={true}
                    name="edit_comment"
                    id="editted_comment"
                    label="Comment"
                    value={stateLocal.edit_comment}
                    onChange={handleEditCommentChange}
                  />
                    <br />
                    <Button type='submit'>
                       Agree
                    </Button>
                    <Button type="button" onClick={handleEditFormClose}>
                     Cancel
                    </Button>
                    <button onClick={() => handleDeleteComment(props.comment.cid)}>
                      Delete
                    </button>
                  </form>
            : null }
          </div>
      </div>
    );
   }

 ....

   <h2> Comments:</h2>
   {stateLocal.comments_arr
     ? stateLocal.comments_arr.map((comment) =>
         <RenderComments comment={comment}
                         cur_user_id={context.dbProfileState
                                        ? context.dbProfileState[0].uid
                                        : null  }
                          key={comment.cid}
                          isEditing={comment.cid === stateLocal.edit_comment_id
                                         ? true
                                         : false }
                       />)
              : null
            }
          </div>

....
.CommentStyles {
  opacity: 1;
}

.FadeInComment {
  animation-name: fadeIn;
  animation-timing-function: ease;
  animation-duration: 2s
}


.FadeOutComment {
  animation-name: fadeOut;
  animation-timing-function: linear;
  animation-duration: 2s
}


@keyframes fadeIn {
  0% {
    opacity: 0;
  }
  100% {
    opacity: 1;
  }
}

@keyframes fadeOut {
  0% {
    opacity: 1;
  }
  100% {
    opacity: 0;
    width: 0;
    height: 0;
  }
}
We first start off by using a ternary expression inside the className prop of div to toggle style classes. If the delete_comment_id in our local state matches the current comment id then it is deleted and a fade out animation is applied to the comment.
We use @keyframe to do the animations. I find css @keyframe animations to be much simpler than javascript based approaches with libraries such as react-spring and react-transition-group.
Next we displayed the actual comment
Followed by a ternary expression that sets either the comment date created, "Edited" or "Just Now" based on the users actions.
Next we have a fairly complex nested ternary expression. We first compare the the cur_user_id (which we get from our context.dbProfileState state and set in our JSX) to the comment user id. If there is a match we show an edit button.
If the user clicks on the edit button we set the comment to the edit_comment state and set the edit_comment_id state to the comment id. And this also makes the isEditing prop to true which brings up the form and lets the user edit the comment. When the user hits Agree, the handleUpdate() function is called which we will see next.
Comments CRUD Operations
Here we have our functions for handling CRUD operations for comments. You will see that we have 2 sets of functions, one set to handle client side CRUD and another to handle API requests. I will explain why below.
....
//Handling CRUD operations client side

const handleCommentSubmit = (submitted_comment) => {
        if(stateLocal.comments_arr) {
            setState({...stateLocal,
                      comments_arr: [submitted_comment,                                                  ...stateLocal.comments_arr]})
         } else {
           setState({...stateLocal,
                     comments_arr: [submitted_comment]})
         }
     };

     const handleCommentUpdate = (comment) => {
       const commentIndex = stateLocal.comments_arr.findIndex(com => com.cid === comment.cid)
       var newArr = [...stateLocal.comments_arr ]
       newArr[commentIndex] = comment

       setTimeout(() => setState({...stateLocal,
                                  comments_arr: [...newArr],
                                  edit_comment_id: 0 }), 100)
     };


     const handleCommentDelete = (cid) => {
       setState({...stateLocal, delete_comment_id: cid})
       const newArr = stateLocal.comments_arr.filter(com => com.cid !== cid)
       setState({...stateLocal, comments_arr: newArr})
     };


....

//API requests

    const handleSubmit = (event) => {
      event.preventDefault()
      setState({...stateLocal, comment: ''})

      const comment = event.target.comment.value
      const user_id = context.dbProfileState[0].uid
      const username = context.dbProfileState[0].username
      const post_id = stateLocal.post_id
      const current_time = "Just Now"
      const temp_cid = Math.floor(Math.random() * 1000);

      const submitted_comment = {cid: temp_cid,
                                 comment: comment,
                                 user_id: user_id,
                                 author: username,
                                 date_created: current_time }

      const data = {comment: event.target.comment.value,
                    post_id: post_id,
                    user_id: user_id,
                    username: username}

      axios.post('/api/post/commenttodb', data)
        .then(res => console.log(res))
        .catch((err) => console.log(err))
      window.scroll({top: 0, left: 0, behavior: 'smooth'})
      handleCommentSubmit(submitted_comment)
    }

    const handleUpdate = (event, cid) => {
      event.preventDefault()
      console.log(event)
      console.log(cid)
      const comment = event.target.editted_comment.value
      const comment_id = cid
      const post_id = stateLocal.post_id
      const user_id = context.dbProfileState[0].uid
      const username = context.dbProfileState[0].username
      const isEdited = true
      const current_time = "Just Now"

      const edited_comment = {cid: comment_id,
                              comment: comment,
                              user_id: user_id,
                              author: username,
                              date_created: current_time,
                              isEdited: isEdited }

      const data = {cid: comment_id,
                    comment: comment,
                    post_id: post_id,
                    user_id: user_id,
                    username: username}

      axios.put('/api/put/commenttodb', data)
        .then(res => console.log(res))
        .catch((err) => console.log(err))
      handleCommentUpdate(edited_comment);
    }

    const handleDeleteComment = (cid) => {
      const comment_id = cid
      console.log(cid)
      axios.delete('/api/delete/comment', {data: {comment_id: comment_id}} )
        .then(res => console.log(res))
        .catch((err) => console.log(err))
      handleCommentDelete(cid)
    }
It is because if a user submits, edits or deletes a comment the UI will not be updated without reloading the page. You can solve this by making another API request or having a web socket setup that listens for changes to the database but a far simpler solution is just to handle it client side programmatically.
All the client side CRUD functions are called inside their respective API calls.
Client Side CRUD:
handleCommentSubmit(): update thecomments_arrby just adding the comment at the beginning of the array.handleCommentUpdate(): Find and replace the comment in the array with the index then update and set the new array to thecomments_arrhandleCommentDelete(): Find the comment in the array with the comment id then.filter()it out and save the new array tocomments_arr.
API requests:
handleSubmit(): we are getting our data from our form, then combining the different properties we need, and sending that data to our server. Thedataandsubmitted_commentvariables are different because our client side CRUD operations need slightly different values than our database.handleUpdate(): this function is nearly identical to ourhandleSubmit()function. the main difference being that we are doing a put request instead of a post.handleDeleteComment(): simple delete request using the comment id.
handling Likes
Now we can discuss how to handle when a user likes a post.
 ....

     const handleLikes = () => {
        const user_id = context.dbProfileState[0].uid
        const post_id = stateLocal.post_id

        const data = { uid: user_id, post_id: post_id }
        console.log(data)
        if(!stateLocal.like_user_ids.includes(user_id)) {
            axios.put('/api/put/likes', data)
                  .then( !stateLocal.like_user_ids.includes(user_id)
                              && stateLocal.like_post
                    ? setState({...stateLocal,
                                likes: stateLocal.likes + 1,
                                like_post: false})
                    : null )
                  .catch(err => console.log(err))
      };
     }

 ....

 <div style={{cursor: 'pointer'}}
       onClick={context.authState
                 ? () => handleLikes()
                 : () => history.replace('/signup')}>
   <i className="material-icons">thumb_up</i>
     <small className="notification-num-showpost">
        {stateLocal.likes}
     </small>
 ....
.notification-num-showpost {
  position:relative;
  padding:5px 9px;
  background-color: red;
  color: #941e1e;
  bottom: 23px;
  right: 5px;
  z-index: -1;
  border-radius: 50%;
}
in the handleLikes() function we first set the post id and user id. Then we use a conditional to check if the current user id is not in the like_user_id array which remember has all the user ids of the users who have already liked this post.
If not then we make a put request to our server and after we use another conditional and check if the user hasnt already liked this post client side with the like_post state property then update the likes.
In the JSX we use an onClick event in our div to either call the handleLikes() function or redirect to the sign up page. Then we use a material icon to show the thumb up icon and then style it with some CSS.
That's it! not too bad right.
profile.js
Now we have our profile.js component which will essentially be our user dashboard. It will contain the users profile data on one side and their posts on the other.
The profile data we display here is different than the dbProfile which is used for database operations. We use the other profile here we are getting from auth0 (or other oauth logins) because it contains data we dont have in our dbProfile. For example maybe their Facebook profile picture or nickname.
import React, { useContext, useState, useEffect } from 'react';
import Context from '../utils/context';

import { Link } from 'react-router-dom';
import history from '../utils/history';
import axios from 'axios';

import Card from '@material-ui/core/Card';
import CardContent from '@material-ui/core/CardContent';
import CardHeader from '@material-ui/core/CardHeader';
import Dialog from '@material-ui/core/Dialog';
import DialogActions from '@material-ui/core/DialogActions';
import DialogContent from '@material-ui/core/DialogContent';
import DialogContentText from '@material-ui/core/DialogContentText';
import DialogTitle from '@material-ui/core/DialogTitle';
import Button from '@material-ui/core/Button';


const Profile = () => {
  const context = useContext(Context)

  const [stateLocal, setState] = useState({ open: false,
                                            post_id: null,
                                            posts: []
                                          })

  useEffect(() => {
    const user_id = context.dbProfileState[0].uid
    axios.get('/api/get/userposts', {params: { user_id: user_id}})
      .then((res) => setState({...stateLocal, posts: [...res.data] }))
      .catch((err) => console.log(err))
  })

  const handleClickOpen = (pid) => {
    setState({open: true, post_id: pid })
  }

  const handleClickClose = () => {
    setState({open: false, post_id: null })
  }

  const DeletePost = () => {
    const post_id = stateLocal.post_id
    axios.delete('api/delete/postcomments', {data: { post_id: post_id }} )
      .then(() => axios.delete('/api/delete/post', {data: { post_id: post_id }} )
          .then(res => console.log(res) ) )
      .catch(err => console.log(err))
      .then(() => handleClickClose())
      .then(() => setTimeout(() => history.replace('/'), 700 ) )
  }

  const RenderProfile = (props) => {
    return(
      <div>
        <h1>{props.profile.profile.nickname}</h1>
        <br />
        <img src={props.profile.profile.picture} alt="" />
        <br />
        <h4> {props.profile.profile.email}</h4>
        <br />
        <h5> {props.profile.profile.name} </h5>
        <br />
        <h6> Email Verified: </h6>
        {props.profile.profile.email_verified ? <p>Yes</p> : <p>No</p> }
        <br />
      </div>

     )
   }

  const RenderPosts = post => (
    <Card style={{width: '500px', height: '200px', marginBottom: '10px', paddingBottom: '80px' }}>
      <CardHeader
        title={<Link to={{pathname:'/post/' + post.post.pid, state: {post}}}>
                  {post.post.title}
                </Link> }
        subheader={
            <div className="FlexColumn">
              <div className="FlexRow">
                {post.post.date_created}
              </div>
              <div className="FlexRow">
                <Link to={{pathname:'/editpost/' + post.post.pid, state:{post} }}>
                  <button>
                   Edit
                  </button>
                </Link>
                <button onClick={() => handleClickOpen(post.post.pid) }>
                 Delete
                </button>
              </div>
            </div>
            }
          />
      <br />
      <CardContent>
        <span style={{overflow: 'hidden' }}> {post.post.body} </span>
      </CardContent>

    </Card>
  );


      return(
          <div>
            <div>
            <RenderProfile profile={context.profileState} />
            </div>
            <div>
              {stateLocal.posts
                ? stateLocal.posts.map(post =>
                  <RenderPosts post={post} key={post.pid} /> )
                : null }
            </div>
            <Dialog
              open={stateLocal.open}
              onClose={handleClickClose}
              aria-labelledby="alert-dialog-title"
              aria-describedby="alert-dialog-description"
            >
              <DialogTitle id="alert-dialog-title"> Confirm Delete? </DialogTitle>
                <DialogContent>
                  <DialogContentText
                    id="alert-dialog-description"
                    >
                      Deleteing Post
                    </DialogContentText>
                    <DialogActions>
                      <Button onClick={() => DeletePost() }>
                        Agree
                      </Button>
                      <Button onClick={() => handleClickClose()}>
                        Cancel
                      </Button>
                  </DialogActions>
                </DialogContent>
            </Dialog>

          </div>
  )}


export default (Profile);
.FlexProfileDrawer {
  display: flex;
  flex-direction: row;
  margin-top: 20px;
  margin-left: -90px;
  margin-right: 25px;
}

.FlexColumnProfile > h1 {
  text-align: center;
}

FlexProfileDrawerRow {
  display: flex;
  flex-direction: row;
  margin: 10px;
  padding-left: 15px;
  padding-right: 15px;
}


.FlexColumn {
  display: flex;
  flex-direction: column;
}

.FlexRow {
  display: flex;
  flex-direction: row;
}
The vast majority of this functionality in this component we have seen before. We begin by making an API request in our useEffect() hook to get our posts from the database using the user id then save the posts to our local state.
Then we have our <RenderProfile /> functional component. We get the profile data during the authentication and save it to global state so we can just access it here without making an API request.
Then we have <RenderPosts /> which displays a post and allows a user to go to, edit or delete a post. They can go to the post page by clicking on the title. Clicking on the edit button will take them to the editpost.js component and clicking on the delete button will open the dialog box.
In the DeletePost() function we first delete all the comments associated with that post using the post id. Because if we just deleted the post without deleting the comments we would just have a bunch of comments sitting in our database without a post. After that we just delete the post.
showuser.js
Now we have our component that displays another users posts and comments when a user clicks on their name in the forum.
import React, { useState, useEffect } from 'react';

import { Link } from 'react-router-dom';

import axios from 'axios';
import moment from 'moment';
import Card from '@material-ui/core/Card';
import CardContent from '@material-ui/core/CardContent';
import CardHeader from '@material-ui/core/CardHeader';

import Button from '@material-ui/core/Button';


const ShowUser = (props) => {

  const [profile, setProfile ] = useState({})
  const [userPosts, setPosts ] = useState([])

  useEffect(() => {
    const username = props.location.state.post.post.author
    axios.get('/api/get/otheruserprofilefromdb',
              {params: {username: username}} )
      .then(res =>  setProfile({...res.data} ))
      .catch(function (error) {
          console.log(error);
        })
     axios.get('/api/get/otheruserposts',
               {params: {username: username}} )
       .then(res =>  setPosts([...res.data]))
       .catch(function (error) {
           console.log(error);
         })
      window.scrollTo({top: 0, left: 0})
    }, [props.location.state.post.post.author] )


  const RenderProfile = (props) => (
    <div>
      <div className="FlexRow">
         <h1>
            {props.profile.username}
         </h1>
         </div>
         <div className="FlexRow">
         <Link to={{pathname:"/sendmessage/",
                   state:{props} }}>
             <Button variant="contained" color="primary" type="submit">
                Send Message
             </Button>
          </Link>
        </div>
    </div>
    );


  const RenderPosts = (post) => (
    <div>
     <Card className="CardStyles">
        <CardHeader
          title={<Link to={{pathname:"/post/" + post.post.pid,
                              state: {post} }}>
                { post.post.title }
                </Link>}
          subheader={
                    <div>
                      <div >
                      {  moment(post.post.date_created).format('MMMM Do, YYYY | h:mm a') }
                      </div>
                      <div >{post.post.author}</div>
                    </div> }
        />
        <CardContent>
            <span style={{ overflow: 'hidden'}}>{ post.post.body } </span>
        </CardContent>
      </Card>
    </div>
  );


   return (
     <div>
     <div className="FlexRow">
        {profile
          ? <RenderProfile profile={profile} />
          : null
         }
     </div>

    <br />
    <hr className="style-two" />

     <h3> Latest Activity: </h3>
       <div className="FlexColumn">
       { userPosts ?
          userPosts.map(post =>
          <div key={ post.pid }>
             <RenderPosts  post={post} />
             <br />
          </div>
           )
       : null
       }
       </div>
     </div>
  )
}


export default (ShowUser);
We begin with 2 API requests in our useEffect() hook since we will need both the other user's profile data and their posts, and then save it to the local state.
We get the user id with react-routers state property that we saw in the showpost.js component.
We have our usual <RenderProfile /> and <RenderPosts /> functional components that display the Profile data and posts. And then we just display them in our JSX.
This is it for this component, there wasn't anything new or ambiguous here so I kept it brief.
Admin App
No full stack blog is complete without an admin app so this is what we will setup next.
Below is a diagram that will show essentially how an admin app will work. It is possible to just have your admin app on different routes within your regular app but having it completely separated in its own app makes both your apps much more compartmentalized and secure.
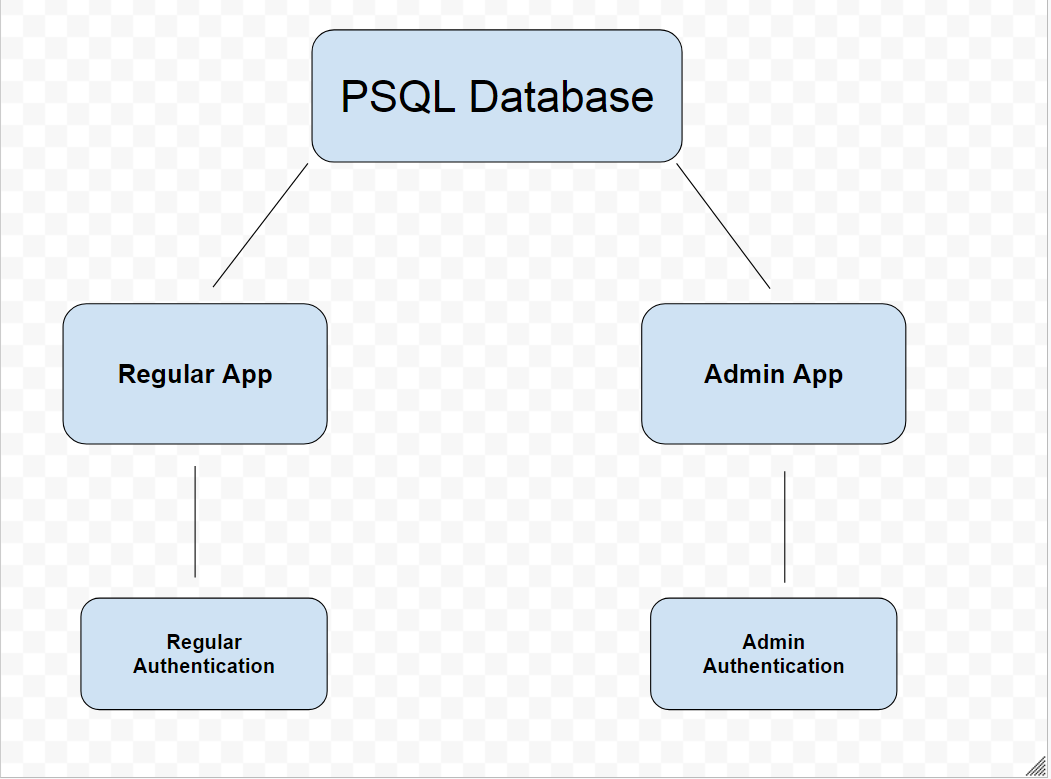
So the admin app will be its own app with its own authentication but connect to the same database as our regular app.
Admin App authentication
Authentication for the admin app will be a little bit different than our regular app. The main difference being that there will be no sign-up option on the admin app, admins will have to be added manually. Since we dont want random people signing up for our admin app.
Similar to the regular app, I will use Auth0 for authentication.
First we will start on the admin dashboard.

Next click on the create application button.

Next we will have to create a database connection. Go the connections section and click on create DB connection.
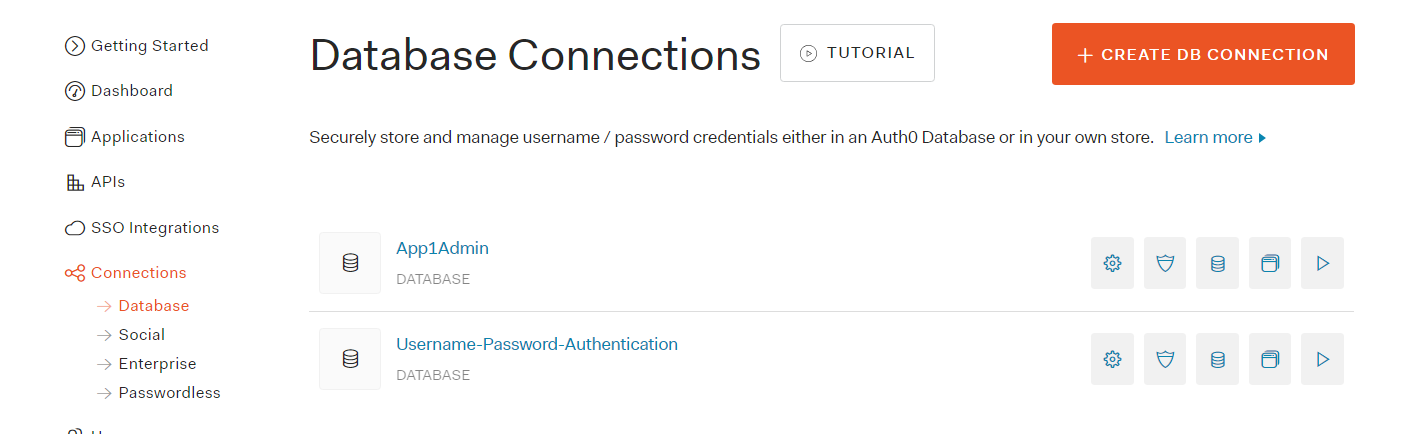
We will call our new connection “adminapp2db”.
**Important: Check the slider button that is labeled “Disable Sign Ups”. We do not want random people signing up for our admin app.

Click Create and go to the Applications tab. Click on the slider button for the adminapp2 that we created in the last step.
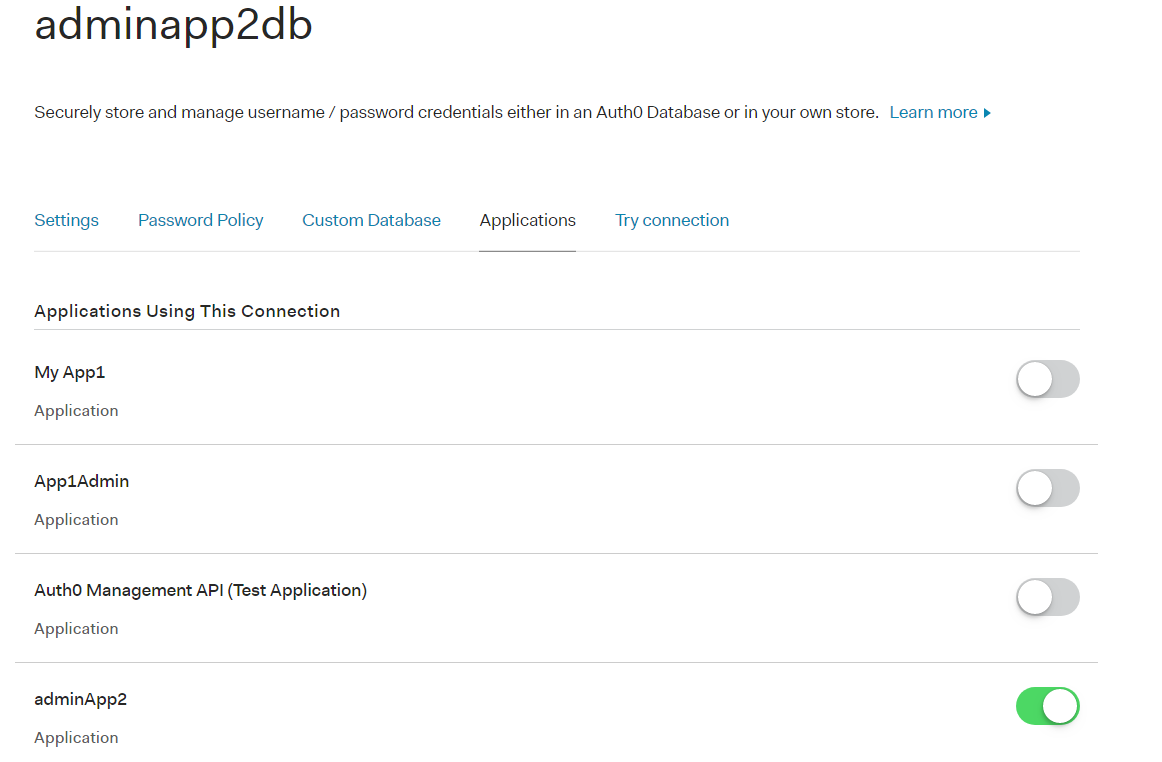
Next we want to manually add users to be able to log in to our admin app. Go to the users section and click Create User.
Fill out the email and password fields to your desired login info and set the connection to the adminapp2db connection we created in the last step. Then click save.

And that’s it. We can now test if our login is working. Go back to the connections section and click on the adminapp2db connection. Click on the try connection tab. Enter in your login details from the Create User step. You should also not see a tab for Sign Up.

If successful you should be seeing this:
Which means our authentication is setup and only admins we added manually can log in. Great!
Global Edit and Delete Privileges
One of the main functionalities of an admin app will be to have global edit delete privileges which will allow an admin or moderator to make edits to user's posts and comments or to delete spam. This is what we will build here.
The basic idea of how we will do this is to remove the authentication check to edit and delete posts and comments, but at the same time making sure the post and comment still belongs to its original author.
We dont have to start from scratch we can use the same app we have been building in the previous sections and add some admin specific code.
The very first thing we can do is get rid of the "sign up to add post/comments" buttons in our addpost.js and showpost.js component since an admin cant sign up for this app by themselves.
next in our editpost.js component in the handleSubmit() function we can access the user_id and username with the react-router props that we have seen before.
This will ensure that even though we edit the post as an admin, it still belongs to the original user.
const handleSubmit = (event) => {
    event.preventDefault()

    const user_id = props.location.state.post.post.user_id
    const username = props.location.state.post.post.author
    const pid = props.location.state.post.post.pid
    const title = event.target.title.value
    const body = event.target.body.value

    const data = {title: title,
                  body: body,
                  pid: pid,
                  uid: user_id,
                  username: username
                 }
    axios.put("/api/put/post", data)
      .then(res => console.log(res))
      .catch(err => console.log(err))
      .then(setTimeout(() => history.replace('/'), 700 ))
  }
The addpost.js component can be left as is, since an admin should be able to make posts as normal.
Back in our posts.js component we can add edit and delete buttons to our <RenderPosts /> function.
....

const RenderPosts = post => (
  <div >
  <Card >
 ...
    <button>
      <Link to={{pathname:"/editpost/" + post.post.pid, state:{post} }}>
        Edit
      </Link>
    </button>
    <button onClick={() => deletePost(post.post.pid)}>
      Delete
    </button>
  </Card>
  </div>
)

....
This functionality was only available on the user dashboard in our regular app, but we can implement directly in the main forum for our admin app, which gives us global edit and delete privileges on all the posts.
The rest of the posts.js component can be left as is.
Now in our showpost.js component the first thing we can do is remove the comparison of the current user id to the comment user id that allows for edits.
....
    // props.cur_user_id === props.comment.user_id
    const RenderComments = (props) => {
      return(
      <div className={stateLocal.delete_comment_id === props.comment.cid
                        ? "FadeOutComment"
                        : "CommentStyles"}>
        <div>
        {true
          ? !props.isEditing
            ?  <div>
  ....
Next in the handleUpdate() function we can set the user name and user id to the original author of the comment.
....

    const handleUpdate = (event, cid, commentprops) => {
      event.preventDefault()

       ....
      const user_id = commentprops.userid
      const username = commentprops.author

  ....
Our server and database can be left as is.
This is it! we have implemented global edit and delete functionality to our app.
Admin Dashboard
Another very common feature in admin apps is to have a calendar with appointments times and dates, which is what we will have to implement here.
We will start with the server and SQL.
CREATE TABLE appointments (
  aid SERIAL PRIMARY KEY,
  title VARCHAR(10),
  start_time TIMESTAMP WITH TIME ZONE UNIQUE,
  end_time TIMESTAMP WITH TIME ZONE UNIQUE
);
We have a simple setup here. We have the PRIMARY KEY. Then the title of the appointment. After that we have start_time and end_time. TIMESTAMP WITH TIME ZONE gives us the date and time, and we use the UNIQUE keyword to ensure that there cant be duplicate appointments.
/*
      DATE APPOINTMENTS
*/

router.post('/api/post/appointment', (req, res, next) => {
  const values = [req.body.title, req.body.start_time, req.body.end_time]
  pool.query('INSERT INTO appointments(title, start_time, end_time)
             VALUES($1, $2, $3 )',
        values, (q_err, q_res) => {
            if (q_err) return next(q_err);
            console.log(q_res)
            res.json(q_res.rows);
  });
});


router.get('/api/get/allappointments', (req, res, next) => {
  pool.query("SELECT * FROM appointments", (q_err, q_res) => {
    res.json(q_res.rows)
  });
});
Here we have our routes and queries for the appointments. For the sake of brevity I have omitted the edit and delete routes since we have seen those queries many times before. Challenge yourself to see if you can create those queries. These are basic INSERT and SELECT statements nothing out of the ordinary here.
We can now go to our client side.
At the time of this writing I couldn't find a good Calendar library that would work inside of a React Hooks component so I decided to just implement a class component with the react-big-calendar library.
It will still be easy to follow along, we wont be using Redux or any complex class functionality that isnt available to React hooks.
componentDidMount() is equivalent to useEffect(() => {}, [] ) . The rest of the syntax is basically the same expect you add the this keyword at the beginning when accessing property values.
I will replace the regular profile.js component with the admin dashboard here, and we can set it up like so.
//profile.js

import React, { Component } from 'react'

import { Calendar, momentLocalizer, Views } from 'react-big-calendar';
import moment from 'moment';
import 'react-big-calendar/lib/css/react-big-calendar.css';

import history from '../utils/history';

import Button from '@material-ui/core/Button';
import Paper from '@material-ui/core/Paper';
import Dialog from '@material-ui/core/Dialog';
import DialogActions from '@material-ui/core/DialogActions';
import DialogContent from '@material-ui/core/DialogContent';
import DialogContentText from '@material-ui/core/DialogContentText';
import DialogTitle from '@material-ui/core/DialogTitle';

import axios from 'axios';


const localizer = momentLocalizer(moment)

const bus_open_time = new Date('07/17/2018 9:00 am')
const bus_close_time = new Date('07/17/2018 5:00 pm')


let allViews = Object.keys(Views).map(k => Views[k])


class Profile extends Component {
  constructor(props) {
  super(props)
    this.state = {
      events: [],
      format_events: [],
      open: false,
      start_display: null,
      start_slot: null,
      end_slot: null
     }
  }

  componentDidMount() {
    axios.get('api/get/allappointments')
    .then((res) => this.setState({events: res.data}))
    .catch(err => console.log(err))
    .then(() => this.dateStringtoObject())
   }

   handleClickOpen = () => {
      this.setState({ open: true });
    };

    handleClose = () => {
      this.setState({ open: false });
    };


 dateStringtoObject = () => {
    this.state.events.map(appointment => {
      this.setState({
        format_events: [...this.state.format_events,
          { id: appointment.aid,
            title: appointment.title,
            start: new Date(appointment.start_time),
            end: new Date(appointment.end_time)
       }]})
     })
   }


   handleAppointmentConfirm = () => {
     const time_start = this.state.start_slot
     const time_end = this.state.end_slot
     const data = {title: 'booked', start_time: time_start, end_time: time_end }
     axios.post('api/post/appointment', data)
       .then(response => console.log(response))
       .catch(function (error) {
         console.log(error);
       })
       .then(setTimeout( function() { history.replace('/') }, 700))
       .then(alert('Booking Confirmed'))
    }

    showTodos = (props) => (
      <div className="FlexRow">
        <p> { props.appointment.start.toLocaleString() }</p>
      </div>
    )


   BigCalendar = () => (
     <div style={{height: '500px'}} >
       <Calendar
         selectable
         localizer={localizer}
         events={this.state.format_events}
         min={bus_open_time}
         max={bus_close_time}
         views={allViews}
         defaultDate={new Date('07/12/2018')}
         onSelectEvent={event => alert(event.start)}
         onSelectSlot={slotInfo =>
           {
             this.setState({start_slot: slotInfo.start,
                            end_slot: slotInfo.end,
                            start_display: slotInfo.start.toLocaleString()
              });
             this.handleClickOpen();
          }}
       />
     </div>
   )

 render() {
    return (
    <div className="FlexRow">
      <div className="FlexColumn">
        <div className="FlexRow">
         <h1> Admin Dashboard </h1>
        </div>


        <h4>Appointments: </h4>
          <div className="FlexRow">
           <Paper>
            <div className="FlexDashAppointCol">
            { this.state.format_events ?
              this.state.format_events.map(appointment =>
                <this.showTodos key={appointment.id} appointment={appointment} />)
             : null
            }
            </div>
         </Paper>
        </div>
        <br />
        <br />
        <div className="FlexRow">
        { this.state.format_events ?
          <this.BigCalendar />
         : null
        }
        </div>
        <hr />
      </div>

      <Dialog
          open={this.state.open}
          onClose={this.handleClose}
          aria-labelledby="alert-dialog-title"
          aria-describedby="alert-dialog-description"
        >
          <DialogTitle id="alert-dialog-title"> Confirm Appointment? </DialogTitle>
          <DialogContent>
            <DialogContentText id="alert-dialog-description">
              Confirm Appointment:  {this.state.start_display}
            </DialogContentText>
          </DialogContent>
          <DialogActions>
            <Button color="primary" onClick={() => this.handleAppointmentConfirm() }>
            Confirm
            </Button>
            <Button color="primary" onClick={() => this.handleClose() }>
              Cancel
            </Button>
          </DialogActions>
        </Dialog>
    </div>
    )}
}

export default (Profile);
We will start with our usual imports. Then we will initialize the calendar localizer with the moment.js library.
Next we will set the business open and close time which I have set at from 9:00 am to 5:00 pm in the bus_open_time and bus_close_time variables.
Then we set the allViews variable which will allow the calendar to have the months, weeks, and days views.
Next we have our local state variable in the constructor which is equivalent to the useState hook.
Its not necessary to understand constructors and the super() method for our purposes since those are fairly large topics.
Next we have our componentDidMount() method which we use to make an axios request to our server to get our appointments and save them to our events property of local state.
handleClickOpen() and handleClose() are helper functions that open and close our dialog box when a user is confirming an appointment.
next we have dateStringToObject() function which takes our raw data from our request and turns it into a usable format by our calendar. format_events is the state property to hold the formatted events.
after that we have the handleAppointmentConfirm() function. We will use this function to make our API request to our server. These values we will get from our <Calendar /> component which we will see in a second.
our <showTodos /> is how we display each appointment.
Next we have our actual calendar. Most of the props should be self explanatory, but 2 we can focus on are onSelectEvent and onSelectSlot.
onSelectEvent is a function that is called every time a user clicks on an existing event on the calendar, and we just alert them of the event start time.
onSelectSlot is a function that is called every time a user clicks an empty slot on the calendar, and this is how we get the time values from the calendar. When the user clicks on a slot we save the time values that are contained in the slotInfo parameter to our local state, then we open a dialog box to confirm the appointment.
Our render method is fairly standard. We display our events in a <Paper /> element and have the calendar below. We also have a standard dialog box that allows a user to confirm or cancel the request.
And thats it for the admin dashboard. You should have something that looks like this:
Deleting users along with their posts and comments
Now for the final part of this tutorial we can delete users and their associated comments and posts.
We will start off with our API requests. We have fairly simple DELETE statements here, I will explain more with the front end code.
/*
    Users Section
*/

router.get('/api/get/allusers', (req, res, next) => {
  pool.query("SELECT * FROM users", (q_err, q_res) => {
    res.json(q_res.rows)
  });
});


/*
 Delete Users and all Accompanying Posts and Comments
*/

router.delete('/api/delete/usercomments', (req, res, next) => {
  uid = req.body.uid

  pool.query('DELETE FROM comments
             WHERE user_id = $1', [ uid ], (q_err, q_res) => {
    res.json(q_res);
  });
});

router.get('/api/get/user_postids', (req, res, next) => {
  const user_id = req.query.uid

  pool.query("SELECT pid FROM posts
             WHERE user_id = $1", [ user_id ], (q_err, q_res) => {
    res.json(q_res.rows)
  });
});

router.delete('/api/delete/userpostcomments', (req, res, next) => {
  post_id = req.body.post_id

  pool.query('DELETE FROM comments
             WHERE post_id = $1', [ post_id ], (q_err, q_res) => {
    res.json(q_res);
  });
});

router.delete('/api/delete/userposts', (req, res, next) => {
  uid = req.body.uid
  pool.query('DELETE FROM posts
             WHERE user_id = $1', [ uid ], (q_err, q_res) => {
    res.json(q_res);
  });
});

router.delete('/api/delete/user', (req, res, next) => {
  uid = req.body.uid
  console.log(uid)
  pool.query('DELETE FROM users
             WHERE uid = $1', [ uid ], (q_err, q_res) => {
    res.json(q_res);
    console.log(q_err)
  });
});


module.exports = router
And now for our component, you will notice we are using all our API requests in the handleDeleteUser() function.
import React, { useState, useEffect } from 'react'

import axios from 'axios';
import history from '../utils/history';

import Button from '@material-ui/core/Button';
import Table from '@material-ui/core/Table';
import TableBody from '@material-ui/core/TableBody';
import TableCell from '@material-ui/core/TableCell';
import TableHead from '@material-ui/core/TableHead';
import TableRow from '@material-ui/core/TableRow';
import Paper from '@material-ui/core/Paper';

import Dialog from '@material-ui/core/Dialog';
import DialogActions from '@material-ui/core/DialogActions';
import DialogContent from '@material-ui/core/DialogContent';
import DialogContentText from '@material-ui/core/DialogContentText';
import DialogTitle from '@material-ui/core/DialogTitle';


const Users = () => {
  const [state, setState] = useState({ users: [],
                                       open: false,
                                       uid: null
                                     })

  useEffect(() => {
    axios.get('api/get/allusers')
      .then(res => setState({users: res.data}))
      .catch(err => console.log(err))
  }, [])


  const handleClickOpen = (user_id) => {
      setState({ open: true, uid: user_id });
    };

  const handleClose = () => {
      setState({ open: false });
    };

  const handleDeleteUser = () => {
      const user_id = state.uid
      axios.delete('api/delete/usercomments',
                          { data: { uid: user_id }})
        .then(() => axios.get('api/get/user_postids',
                            { params: { uid: user_id }})
          .then(res => res.data.map(post =>
                  axios.delete('/api/delete/userpostcomments',
                          { data: { post_id: post.pid }})) )
        )
        .then(() => axios.delete('api/delete/userposts',
                            { data: { uid: user_id }})
          .then(() => axios.delete('api/delete/user',
                                      { data: { uid: user_id }} )
      ))
        .catch(err => console.log(err) )
        .then(setTimeout(history.replace('/'), 700))
    }

  const RenderUsers = (user) => (
    <TableRow>
      <TableCell>
      <br/>
      <p> { user.user.username } </p>
      <p> { user.user.email } </p>
      <br />
      <button onClick={() => handleClickOpen(user.user.uid)}>
        Delete User
      </button>
      </TableCell>
    </TableRow>
  );


    return (
    <div>
      <h1>Users</h1>
      <div className="FlexRow">
      <Paper>
      <div className="FlexUsersTable">
      <Table>
        <TableHead>
          <TableRow>
            <TableCell> User</TableCell>
          </TableRow>
        </TableHead>
        <TableBody>
             {state.users ?
                state.users.map(user =>
                  <RenderUsers key={ user.uid } user={user} />)
             : null
             }
          </TableBody>
        </Table>
      </div>
    </Paper>
    </div>

    <Dialog
        open={state.open}
        onClose={handleClose}
        aria-labelledby="alert-dialog-title"
        aria-describedby="alert-dialog-description"
      >
        <DialogTitle id="alert-dialog-title"> Delete User </DialogTitle>
        <DialogContent>
          <DialogContentText id="alert-dialog-description">
          Deleteing User will delete all posts and comments made by user
          </DialogContentText>
        </DialogContent>
        <DialogActions>
          <Button onClick={() => {handleDeleteUser(); handleClose()} }>
            Delete
          </Button>
          <Button onClick={handleClose} color="primary">
            Cancel
          </Button>
        </DialogActions>
      </Dialog>
     </div>
    )
}

export default (Users);
handleDeleteUser()
I will start off with the handleDeleteUser() function. The first thing we do is define the user id of the user we want to delete which we get from local state. The user id is saved to local state when an admin clicks on a users name and the dialog box pops up.
The rational for this setup is because of PSQL's foreign key constraint, where we cant delete a row on a table that is being referenced by another table before we delete that other row first. See the PSQL foreign key constraint section for a refresher.
This is why we must work backwards and delete all the comments and posts associated with a user before we can delete the actual user.
The very first axios delete request is to delete all the comments where there is a matching user id which we just defined. We do this because we cant delete the comments associated with posts before deleting the posts themselves.
In our first .then() statement we look up all the posts this user made and retrieve those post ids. You will notice that our second .then() statement is actually inside our first .then() statement. This is because we want the response of the axios.get('api/get/user_postids') request as opposed to response of the first axios delete request.
In our second .then() statement we are getting an array of the post ids of the posts associated with the user we want to delete and then calling .map() on the array. We are then deleting all the comments associated with that post regardless by which user it was made. This would make axios.delete('/api/delete/userpostcomments') a triple nested axios request!
Our 3rd **.then()** statement is deleting the actual posts the user made.
Our 4th .then() statement is finally deleting the user from the database. Our 5th .then() is then redirecting the admin to the home page. Our 4th .then() statement is inside our 3rd .then() statement for the same reason as to why our 2nd .then() statement is inside our 1st.
Everything else is functionality we have seen several times before, which will conclude our tutorial!
Thanks for Reading!