
By Julia Gustafsson
In the world of software development, innovation often arrives in the form of powerful tools that transform the way we build applications - enter Quarkus, a development platform that's reshaping the Java landscape.
If you are new to the Quarkiverse, this tutorial is a great way to start exploring how it can radically improve your Java development experience. I’ll show you how to quickly assemble a REST application on the Quarkus platform, leveraging the power of JPAStreamer, a Hibernate extension to handle database interactions with the elegance of the Java Stream API.
By the end of this walkthrough, you'll possess the know-how to seamlessly streamline your forthcoming Java applications for cloud deployment. Moreover, I wouldn't be surprised if you discover that Java is far more enjoyable with live code reloads and continuous testing.
If you prefer a visual guide, there's a video version of this tutorial available on the freeCodeCamp.org YouTube channel (approximately 1 hour).
1. What We’ll Build
This tutorial serves as a comprehensive guide to building a robust Quarkus application. We'll cover every essential aspect, from setting up your development environment and establishing a database connection, to defining REST endpoints, mastering Java Streams with JPAStreamer for powerful queries, effortless continuous testing, and achieving native compilation. The final result is a lightweight REST application that serves information from a sample Film in a split second after a cold start, laying the groundwork for your future Quarkus projects.
On the surface, this looks like yet another guide on how to develop an application, but in practice, it is also a glimpse into what developing with Quarkus feels like.
During the development, you will become familiar with the following topics:
- Setting up a Quarkus project
- Connecting to a MySQL Docker instance
- Using the Quarkus development mode
- Expressing queries as Java Streams with JPAStreamer
- Performing continuous testing
- Compiling the application natively for rapid start-up times and minimal memory consumption
1.1 What Makes Quarkus Special?
Quarkus is often described as a cutting-edge, cloud-native framework designed for modern Java and Kotlin applications. Its mission is to tackle longstanding Java challenges, such as prolonged start-up times, high memory consumption, and a rather slow development experience.
It is able to achieve this objective with two clever design feats - an improved build process that performs much of the heavy lifting at build time instead of application start-up, and as an extension of that - a developer mode that allows you to spin up your application and incorporate any code updates on the fly.
Four years after its initial release, Quarkus boasts a wide range of extensions, ensuring seamless integration with all the major Java libraries like Hibernate, Spring, and JUnit.
1.2 What is JPAStreamer?
JPAStreamer is a lightweight library designed to simplify database access in Java applications that utilizes the Java Persistence API (JPA). Its power lies in its expressive and type-safe Stream queries that help enhance coding precision and productivity.
JPAStreamer optimizes performance by translating pipelines into Hibernate Query Language (HQL) queries. Unlike using getResultStream() in Hibernate, which materializes all entities, JPAStreamer ensures only relevant entities are fetched, akin to using SQL directly.
Imagine fetching 10 films from a database where each title starts with "A" and is at least 1 hour long. With JPAStreamer, the query is as simple as:
List<Film> films = jpaStreamer.stream(Film.class)
    .filter(Film$.title.startsWith("A")
        .and(Film$.length.greaterThan(60))
    .limit(10)
    .collect(Collectors.toList());
2. Prerequisites
Before we roll up our sleeves and start coding, it's important to ensure you have everything you need in place. Even though the walkthrough covers any details necessary to get a fully functional application, it is assumed that you are:
- Familiar with Basic Java
- Acquainted with the Java Stream API
- Comfortable with Database Interactions using JPA/Hibernate
If you're planning to follow along on your local machine, make sure your development environment meets the following requirements:
- Java 11 or later
- An IDE of your choice (the guide is using IntelliJ)
- Maven (or Gradle)
- Quarkus CLI
- Docker and Docker CLI (or your own database)
- Optional - GraalVM installation
3. Project Setup
Once you have checked off the list of prerequisites, it's time to create a new Quarkus project. There are multiple ways to do this, but for simplicity, I will use the Quarkus project configurator found at code.quarkus.io/. This tool empowers you to quickly assemble a complete build file with the necessary dependencies.
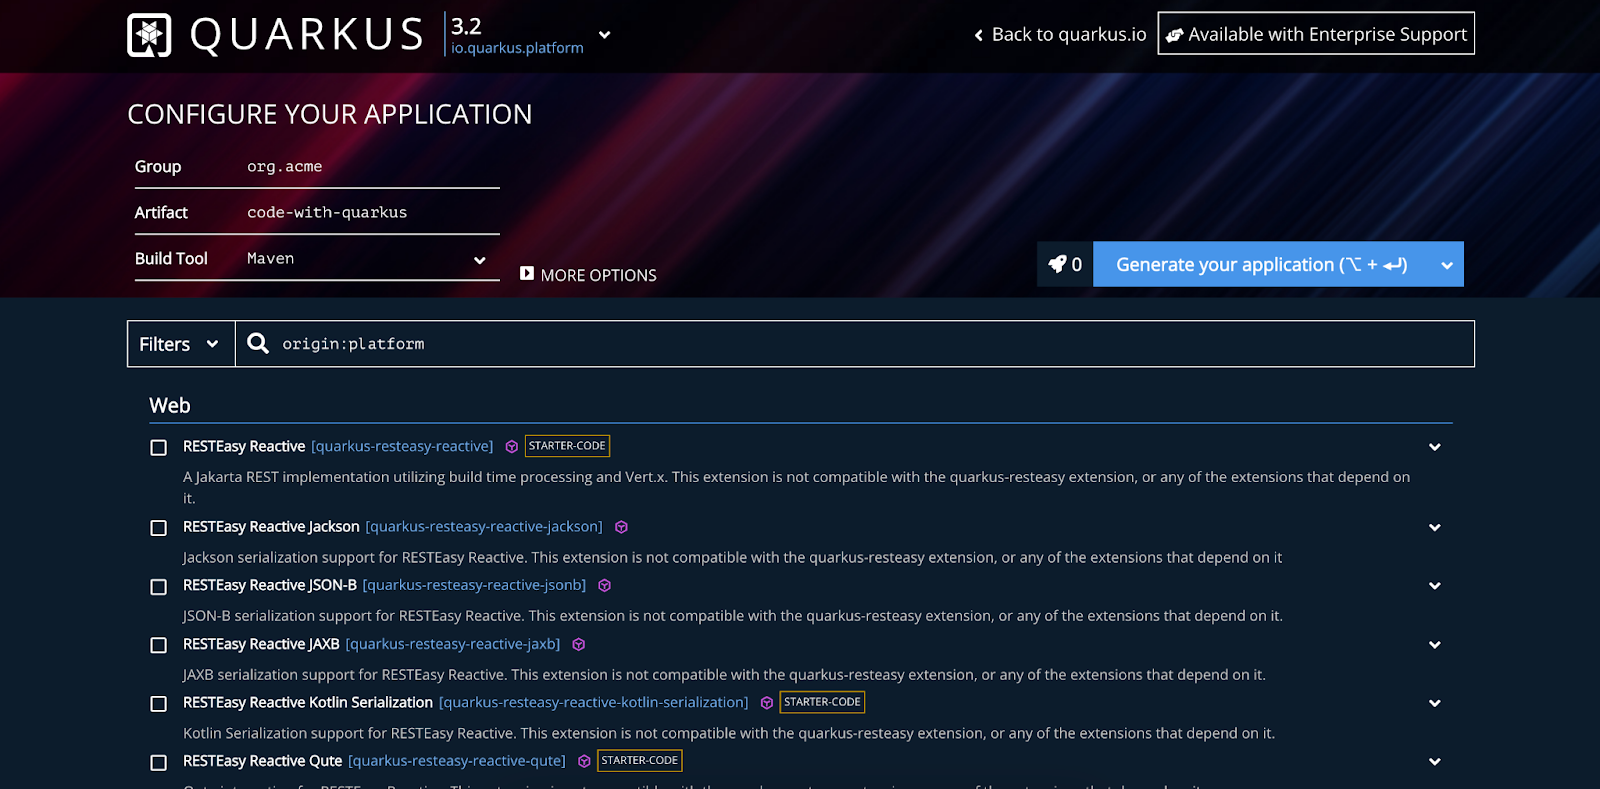
Start by selecting a Quarkus version at the top of the page. I recommend using the latest version or selecting a LTS release, e.g. 3.2 (the latest at the time of writing). After naming your project appropriately go ahead and select the following dependencies:
- Hibernate ORM with Panache: Handles database interactions
- JPAStreamer: Hibernate extension for intuitive and type-safe queries
- SmallRye OpenAPI: Enables Swagger UI for sending test requests
- RESTEasy Reactive Jackson: Facilitates easy setup REST endpoints
- JDBC Driver - MySQL: Our database driver
Then simply press “Generate your application” to download a project ZIP-file. You can download a Quarkus starter with my exact settings via this link.
From here, open up the project in your IDE of choice. Taking a quick look at the project structure, you'll notice that Quarkus has organized the project in a familiar Maven structure, with a pom.xml file for dependencies and project configuration.
quarkus-tutorial
     |- src
     |   |- main
     |   |   |- java
     |   |   |- resources
     |- src
If you peek into the pom.xml file you’ll find the selected dependencies. Also note that JUnit was automatically added for the continuous testing phase later.
4. Database Setup
As I dive into the realm of new technologies, I often include Oracle's sample database Sakila in my development playground as it is easily available as a Docker image. This project is no exception.
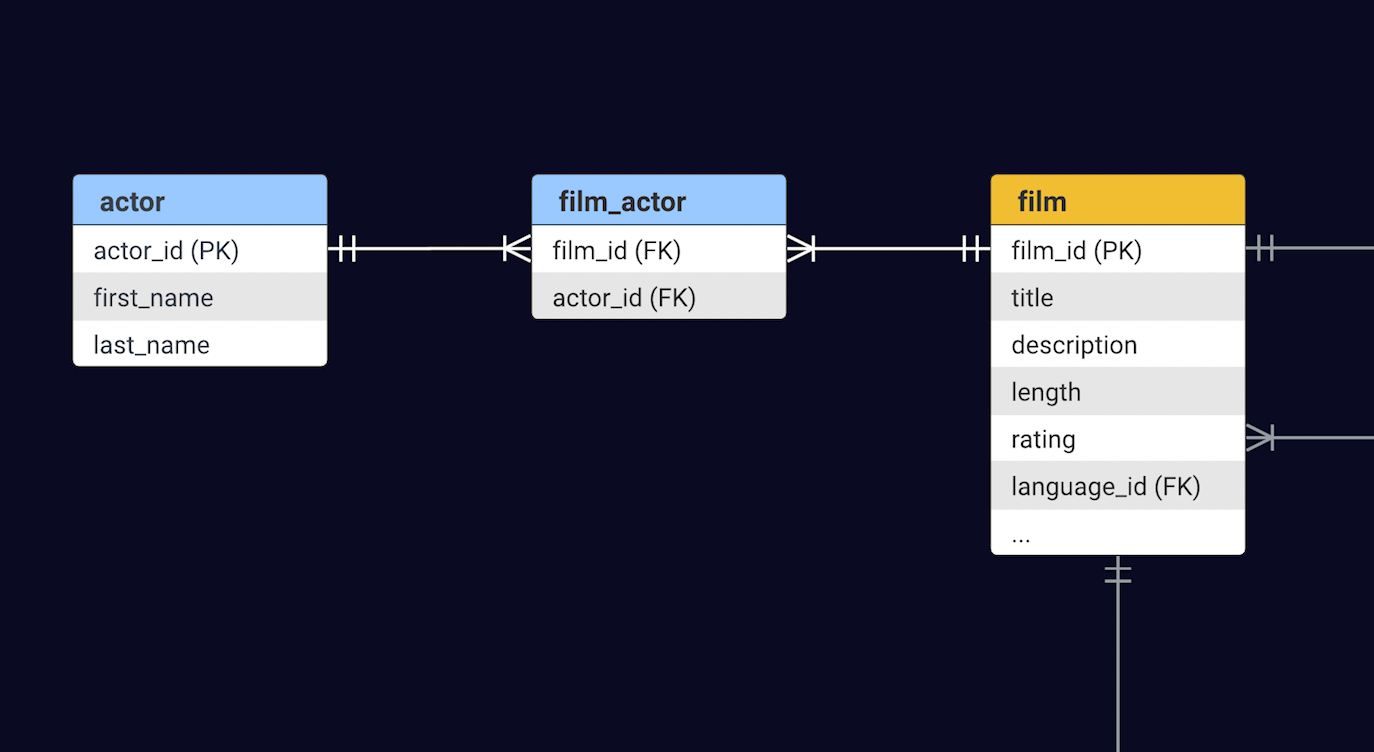
Sakila models an old-fashioned video rental store, the kind where you'd eagerly await a film on tape or DVD. Naturally, the core of this database centers around the Film table, complemented by various supporting tables – think Inventory, Customer, and Payment. For this demo, our focus will be on serving information about films and the actors starring in those films. The Film and Actor tables share a Many-to-Many relationship – a film can boast many actors, and conversely, an actor can star in numerous films.
To download and initiate the database on port 3306, use the Docker CLI.
docker run --platform linux/amd64 -d --publish 3306:3306 --name sakila restsql/mysql-sakila
The --platform flag instructs Docker to accept the Sakila Linux AMD64 image regardless of the local platform. In my experience, it runs fine on other platforms.
Upon running this command, you should observe the image being downloaded and launched.
5. Hibernate Setup
To facilitate database interactions via Hibernate, a bit of setup is required. While Hibernate in the Quarkus domain behaves much like standard Hibernate in any Java application, you will configure Hibernate in the application.configuration file. Secondly we will generate the JPA boilerplate with assistance from IntelliJ.
5.1 Configuring Hibernate
The application.configuration file is located in the /resources folder of the project template you initially downloaded. This file serves as a hub, catering to various potential Quarkus dependencies and extensions. This means our database configuration will not be Hibernate-specific; any framework needing database interaction can make use of this configuration.
Yet, the setup is similar to regular Hibernate database configuration. Assuming you are running the Sakila database as instructed, you need to define the MySQL JDBC driver, specify the JDBC URL for localhost on port 3306, and provide the username ‘root’ and password ‘sakila’.
quarkus.datasource.jdbc.driver=com.mysql.cj.jdbc.Driver
quarkus.datasource.jdbc.url=jdbc:mysql://localhost:3306/sakila
quarkus.datasource.username=root
quarkus.datasource.password=sakila
Additionally, I recommend setting hibernate-orm.log.sql to true, as this will ensure that all Hibernate queries are logged, simplifying the inspection of JPAStreamer queries later.
quarkus.hibernate-orm.log.sql=true
5.2 Creating the JPA Metamodel
To manipulate the data, you will need a JPA model with an Entity representing each table. As this is not an in-depth Hibernate guide, I will advise you to take a shortcut and generate some JPA boilerplate that only needs slight modifications to fit your needs. If you are using IntelliJ you can follow in my footsteps, otherwise, you will have to consult the documentation of your IDE.
Start by connecting to the database in IntelliJ by navigating to File > New > Data Source and selecting a MySQL instance. Then populate the fields of the dialog with the same connection URL, username, and password as in the previous section Configuring Hibernate.
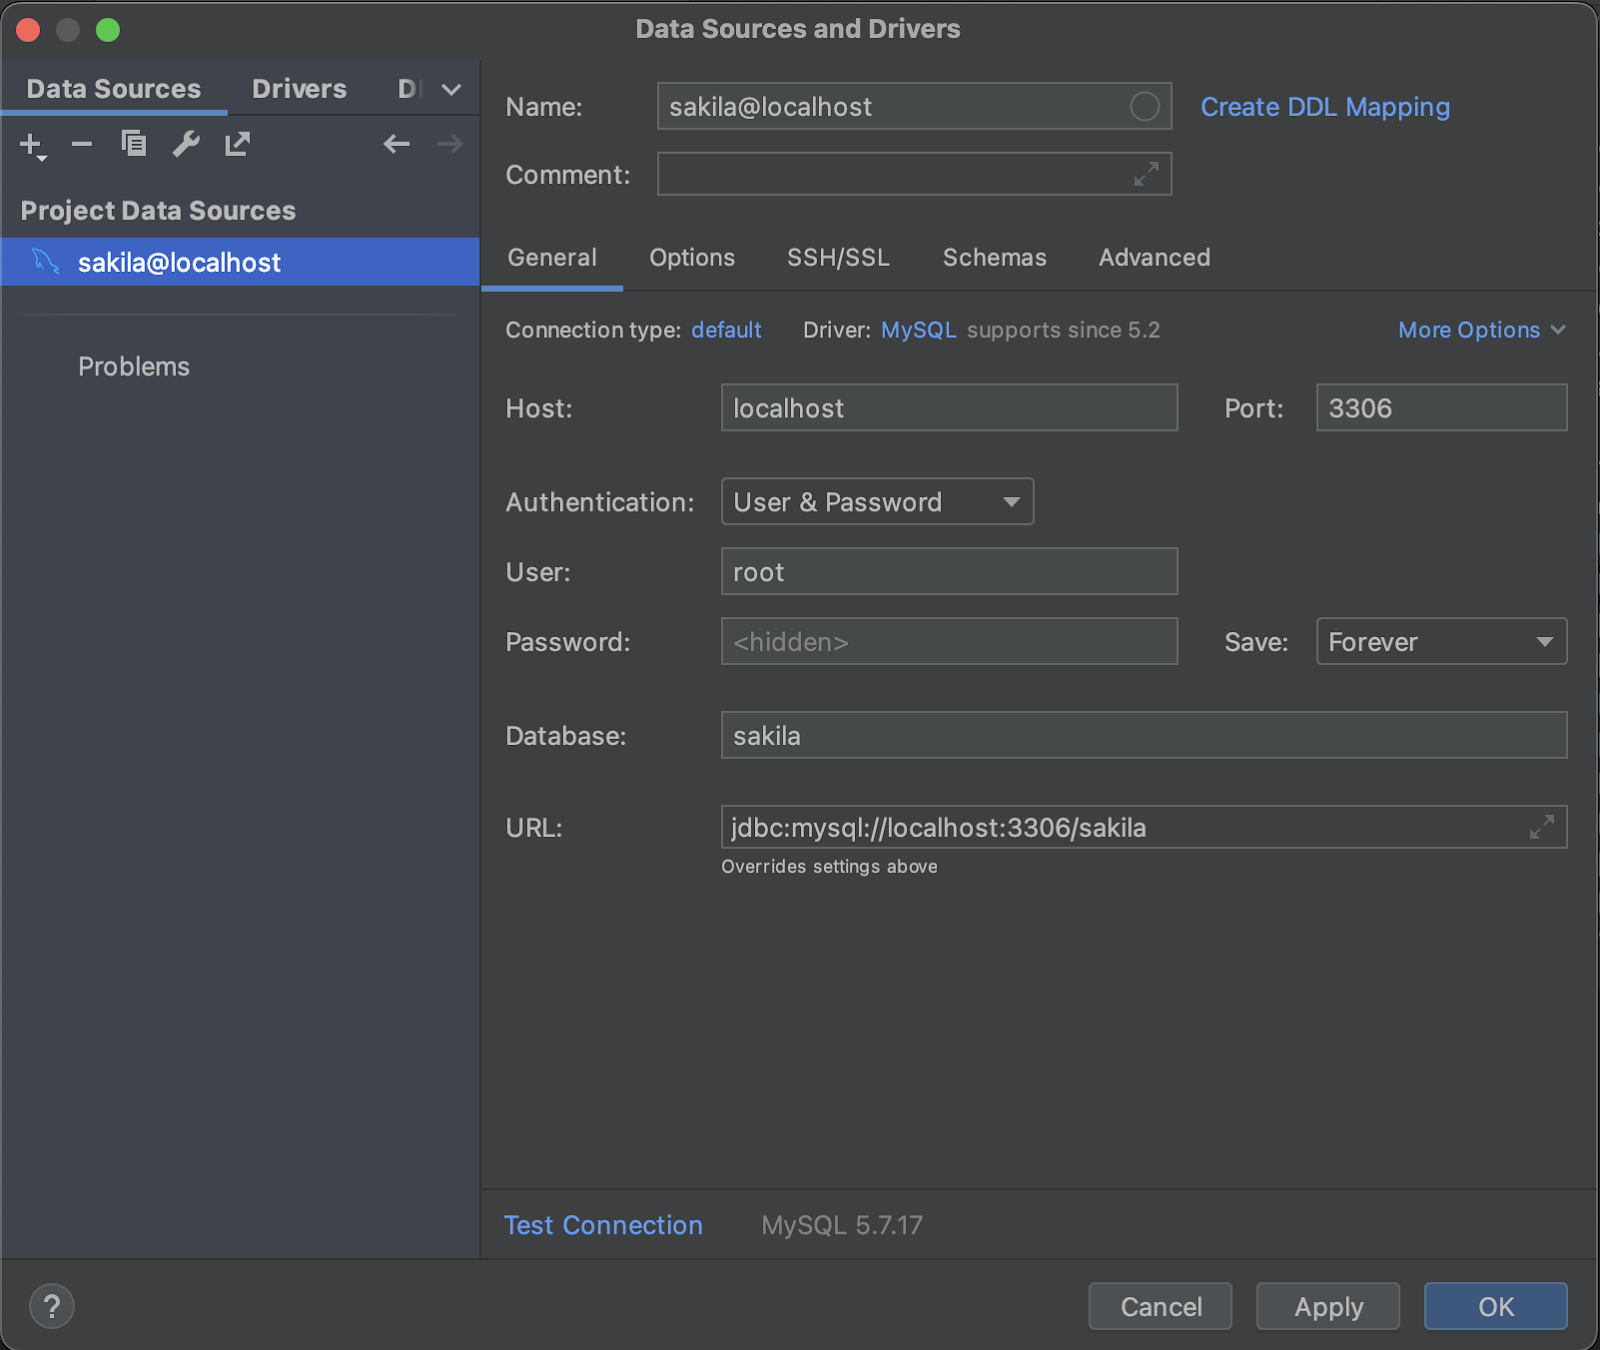
After pressing OK, you should be able to view the contents of the database to confirm that the connection was established correctly. If the database appears empty despite it connecting, trigger a database reload to ensure that the table data is fetched correctly.
Now that our database is linked to IntelliJ, generating entities is straightforward. A simple right-click on the connected database leads you to "Generate Persistence Mapping." Select where to place your generated entities (a package), and deselect all tables apart from Film and Actor as these are the only ones we will be working with. Click OK again, and the JPA entities for these tables are generated in a blink.
Next, you need to make a few modifications to the generated classes. JPA offers a myriad of annotations for fine-tuning these mappings, but I will only cover what is necessary for the purposes of this application.
Start by declaring which table and schema the two generated classes map to like this:
@Table(name = "film", schema = "sakila")
public class Film { … }
@Table(name = "actor", schema = "sakila")
public class Actor { … }
Then either remove the fields rating and _specialfeatures from the Film.class, or improve the mappings to impose some restraints on the values as follows:
@Basic
@Column(name = "rating", columnDefinition = "enum('G','PG','PG-13','R','NC-17')")
private String rating;
@Basic
@Column(name = "special_features", columnDefinition = "set('Trailers', 'Commentaries', 'Deleted Scenes', 'Behind the Scenes')")
private String specialFeatures;
You also need to manually define the Many-to-Many relationship between the Film and Actor table. This requires some updates to both classes.
First, the Film entity requires a field named "actors," intended to house references to the actors featured in a specific film. This linkage is established through the @ManyToMany mapping and @JoinTable annotation that describes the join. Recall the name of the join_table and the foreign keys from the schema in the database introduction above.
@ManyToMany(cascade = { CascadeType.PERSIST, CascadeType.MERGE })
@JoinTable(
    name = "film_actor",
    joinColumns = { @JoinColumn(name = "film_id") },
    inverseJoinColumns = { @JoinColumn(name = "actor_id") }
)
private List<Actor> actors = new ArrayList<>();
Likewise, the Actor class need a field films to house the set of films that the actor starred in. As you have already described the join in the Actor class, this field merely needs a reference to the above mapping as follows:
@ManyToMany(mappedBy = "actors")
private Set<Film> films = new HashSet<>();
As a final step, go ahead and generate getters and setters for all the fields in both the Film and Actor class. You chose if you do it manually or generate them with IntelliJ.
6. JPAStreamer Setup
JPAStreamer empowers you to craft complex Java Stream queries. To seamlessly convert these Streams into SQL queries upon execution, JPAStreamer utilizes its dedicated metamodel to create intelligible predicates. Although a standard lambda might serve for filtering, it lacks the details required for JPAStreamer to convert the Stream pipeline into a query.
In the prior example, you'll notice the use of an entity named Film$. This entity belongs to the JPAStreamer metamodel and allows you to articulate these straightforward predicates that JPAStreamer comprehends.
List<Film> films = jpaStreamer.stream(Film.class)
    .filter(Film$.title.startsWith("A")
        .and(Film$.length.greaterThan(60))
    .limit(10)
    .collect(Collectors.toList());
Thankfully, the JPAStreamer metamodel is created automatically for you once you have a JPA metamodel in place. Thus simply go ahead and rebuild your application.
The metamodel finds its place in the target directory, meaning it won’t be detected as source code by default. To remedy this, you need to designate the generated-sources folder as a "Generated Sources Root” by right-clicking it. If all went well, your generated-sources folder should contain a Film$.class and Actor$.class.
Beware that if you modify your JPA model at any point, you will need to rebuild the project to synchronize changes with the JPAStreamer metamodel. It's also worth mentioning that the name and location of the generated metamodel can be tailored using environment variable properties. You can see how that is done in the JPAStreamer docs.
7. Application Architecture
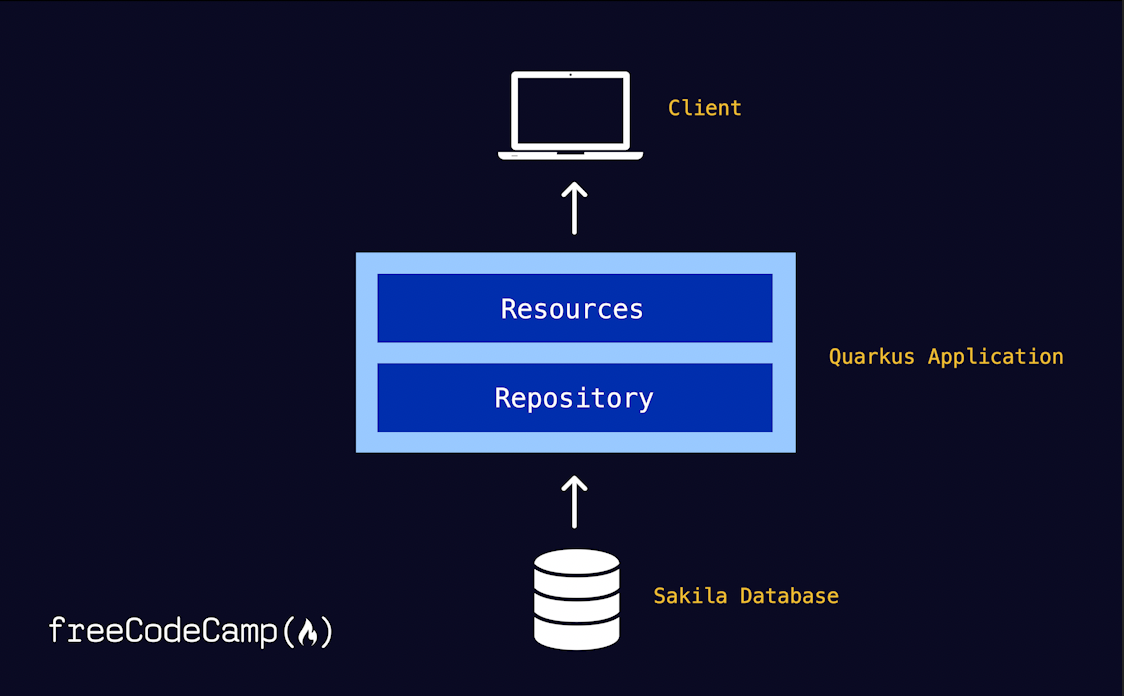
It is now time to look at the application architecture. The objective is to establish endpoints that serve film-related information to clients. For the sake of clarity and separation of concerns, I've chosen to adopt a straightforward Repository Pattern.
Below is a snapshot of how the architectural pieces will fit together when you are done. The Resources class takes on the responsibility of delivering database-derived content to clients. However, this class refrains from conducting the actual database interactions; instead, this task is entrusted to the Repository. This architectural approach neatly segregates the data layer from the other facets of our application.
This translates to the following file hierarchy in your project folder once you are done:
quarkus-tutorial
    |- src
    |   |- main
    |   |   |- java
    |   |   |       |- com.freecodecamp.app
    |   |   |       |   |- FilmResource.java
    |   |   |       |   |- model
    |   |   |       |      |- Film.java
    |   |   |       |      |- Actor.java
    |   |   |       |   |- repository
    |   |   |       |       |- FilmRepository.java
    |   |   |- resources
    |   |   |       |   |- application.properties
|- src
7. Hello World!
To grasp the rhythm of development with Quarkus, let's begin with crafting a classic "Hello World" endpoint.
Start by establishing the FilmResource class, positioned a tier above your data model package:
@Path("/")
public class FilmResource {

    @GET
    @Path("/hello")
    @Produces(MediaType.TEXT_PLAIN)
    public String helloWorld() {
        return "Hello world!";
    }
}
The @Path annotation ensures that your Resteasy servlet is kick-started as the application launches and open the endpoint /hello for requests.
8. Running in Quarkus Dev Mode
With a simple endpoint in place, I suggest you start the application to validate the functionality and enjoy the experience of the Quarkus dev mode. Use the following command to fire up the app in your terminal:
quarkus dev
When your application starts you should be greeted by the Quarkus prompt, indicating that your app is running on the default port 8080 and that live coding has been activated.
Listening for transport dt_socket at address: 5005
__  ____  __  _____   ___  __ ____  ______
 --/ __ \/ / / / _ | / _ \/ //_/ / / / __/
 -/ /_/ / /_/ / __ |/ , _/ ,< / /_/ /\ \
--\___\_\____/_/ |_/_/|_/_/|_|\____/___/
2023-08-14 14:14:01,731 INFO  [io.quarkus] (Quarkus Main Thread) quarkus-tutorial 1.0.0-SNAPSHOT on JVM (powered by Quarkus 3.1.3.Final) started in 2.210s. Listening on: http://localhost:8080
2023-08-14 14:14:01,733 INFO  [io.quarkus] (Quarkus Main Thread) Profile dev activated. Live Coding activated.
You can now visit http://localhost:8080/hello to confirm that you are greeted by the expected response “Hello world!”.
If this is your first time using the Quarkus dev mode seize the opportunity and make a duplicate of your first endpoint. A minor tweak, even as small as a single character, will suffice to set it apart from the original. Next, tap the [s] key in your terminal to swiftly restart the application. The restart takes place in the blink of an eye, granting you access to your new endpoint moments later in the browser.
This dynamic approach prevents the dreaded scenario of accumulating changes only to realize that the application is non-operational upon compiling. You also no longer need to endure lengthy compilation times when iterating over small tweaks to algorithms or code snippets. It's a really swift and agile method for interactive development.
Before we move on, here are a few basic commands that are good to know:
[s] - Force restart
[h] - Display help
[q] - Quit
9. Fetching Films with Java Streams and JPAStreamer
So far our application has not touched the database, but that is our next move. We start simple and gradually build up Stream queries that are more powerful.
Initiate this process by establishing a dedicated repository package adjacent to the existing model package. Inside this repository section, create a class named FilmRepository. As the name implies, this class will serve as the hub for our database queries. This class needs to be annotated with @ApplicationScoped for it to be injected into your FilmResource later.
Then, to start harnessing JPAStreamer, integrate it into the repository by injecting a JPAStreamer instance. This instance is your access point to the Stream query API. Here is what your class should look like at this point:
@ApplicationScoped
FilmRepository() {

    @Inject
    JPAStreamer jpaStreamer;
    …
}
9.1 Fetching an Entity by Id
The first endpoint will fetch the title of a film, given an id. This will be your first opportunity to leverage JPAStreamer to perform queries. You can think of a Stream query as a virtual pipeline that is trafficked by all the Films in the database. The operations appended to the pipeline will decide what entities are allowed through, and in what shape. For example, a filter operation is the equivalent of a WHERE statement as it puts a logical constraint on the resulting entities.
To initiate a Stream query, you simply call the method JPAStreamer.stream() and provide it with a source of your choice. In this case, our source is the Film table, represented by the entity Film.class. The return value of this operation is a standard Stream<Film>. This means you can, in practice, apply any Stream operation available in the Stream API to manipulate the Film entities.
But not so fast - your choice of Stream operations significantly influences performance, particularly with large datasets! If you're familiar with the Stream API, you've likely encountered numerous lambda-based examples for predicates and mappings such as this:
.filter(f -> f.getFilmId().equals(filmId))
However, this predicate cannot be optimized by JPAStreamer as the anonymous lambda holds too little metadata to make a correct SQL translation. Therefore, make it a habit to express predicates using the JPAStreamer metamodel. Guided by IntelliSense in your IDE, this is simple:
.filter(Film$.id.equal(filmId))
Upon execution, this operation will in fact be translated to a SQL WHERE operation to ensure that the filtering is performed in the database, not in the JVM, for efficiency.
With this knowledge, you can go ahead and create a method that fetches films based on their id as follows:
public Optional<Film> film(int filmId) {
    return jpaStreamer.stream(Film.class)
        .filter(Film$.filmId.equal(filmId))
        .findFirst();
}
As before, use the [s] key to reload your application in the terminal and browse to:
Assuming all is well, you'll be greeted by the film's title:
ANACONDA CONFESSIONS
A quick look in the application log reveals the Hibernate query that was issued by JPAStreamer, confirming the presence of a WHERE operation.
Hibernate:
    select
        f1_0.film_id,
        f1_0.description,
        f1_0.language_id,
        f1_0.last_update,
        f1_0.length,
        f1_0.original_language_id,
        f1_0.rating,
        f1_0.rental_duration,
        f1_0.rental_rate,
        f1_0.replacement_cost,
        f1_0.special_features,
        f1_0.title
    from
        film f1_0
    where
        f1_0.film_id=? limit ?
9.2 Paged Queries
When grappling with a substantial dataset, shipping users the entire results might prove unpractical or even unfeasible. That's where paging enters the scene, limiting the result set. Leveraging Java Stream queries, paging becomes an effortless endeavor. You can easily navigate through pages by skipping preceding data with the skip()-operator and constraining the results to a predefined page size with limit().
Assuming a page size of 20, you can facilitate client access to films that match or exceed a specified length while maintaining an orderly sequence based on length. Here's how:
private static final int PAGE_SIZE = 20;

...

public Stream<Film> paged(long page, int minLength) {
    return jpaStreamer.stream(Film.class)
        .filter(Film$.length.greaterThan(minLength))
        .sorted(Film$.length)
        .skip(page * PAGE_SIZE)
        .limit(PAGE_SIZE);
}
To accommodate this paged content, your FilmResource needs a new endpoint:
@GET
@Path("/paged/{page}/{minLength}")
@Produces(MediaType.TEXT_PLAIN)
public String paged(long page, int minLength) {
    return filmRepository.paged(page, minLength)
        .map(f -> String.format("%s (%d min)", f.getTitle(), f.getLength()))
        .collect(Collectors.joining("\n"));
}
A simple call to http://localhost:8080/paged/3/120 fetches the movies on the third page, each lasting a minimum of 2 hours, yielding an anticipated response:
AMERICAN CIRCUS (129 min)
UNFORGIVEN ZOOLANDER (129 min)
...
CHOCOLATE DUCK (132 min)
STREAK RIDGEMONT (132 min)
A quick look in the Quarkus dev terminal reveals that all Stream operators where embedded in the query as WHERE-, ORDER BY- and LIMIT-operator with a lower and upper value:
Hibernate:
    select
        f1_0.film_id,
        f1_0.description,
        f1_0.language_id,
        f1_0.last_update,
        f1_0.length,
        f1_0.original_language_id,
        f1_0.rating,
        f1_0.rental_duration,
        f1_0.rental_rate,
        f1_0.replacement_cost,
        f1_0.special_features,
        f1_0.title
    from
        film f1_0
    where
        f1_0.length>?
    order by
        f1_0.length limit ?,
        ?
9.3 Projections
You've probably noticed that you're retrieving the entire array of Film table columns, although you only include the title and length in your response. You can save application resources by using a projection as the Stream source instead of the full table. The filmId is required as it is the primary key.
public Stream<Film> paged(long page, int minLength) {
    return jpaStreamer.stream(Projection.select(Film$.filmId, Film$.title, Film$.length))
        .filter(Film$.length.greaterThan(minLength))
        .sorted(Film$.length)
        .skip(page * PAGE_SIZE)
        .limit(PAGE_SIZE);
}
This change also require that you enhance the Film entity with a matching constructor.
public Film(short filmId, String title, int length) {
    this.filmId = filmId;
    this.title = title;
    this.length = length;
}
Now go ahead and make a second request to the paged endpoint and observe how the query is limited to three columns.
http://localhost:8080/paged/3/120
Hibernate:
    select
        f1_0.film_id,
        f1_0.title,
        f1_0.length
    from
        film f1_0
    where
        f1_0.length>?
    order by
        3 limit ?,
        ?
9.3 Joins
Now onto something a little more interesting - performing a Stream join. A join is a combination of several tables, translated to Stream queries, which means you need to update the Stream source to include entities from an additional table.
In section 5.2 you defined a mapping between the Film and Actor-table via the field List<Actor> actors. With JPAStreamer, you can achieve a join of the Film and Actor table by creating a StreamConfiguration<Film> that references this field as follows:
StreamConfiguration<Film> sc = StreamConfiguration.of(Film.class).joining(Film$.actors);
The stream configuration now replaces Film.class as the stream source. While where at it we might as well add another filter and flip the sorting order. Notice how multiple predicates can by combined with the and/or-operators.
public Stream<Film> actors(String startsWith, int minLength) {

    final StreamConfiguration<Film> sc = StreamConfiguration
        .of(Film.class).joining(Film$.actors);
    return jpaStreamer.stream(sc)
        .filter(Film$.title.startsWith(startsWith)
            .and(Film$.length.greaterThan(minLength)))
        .sorted(Film$.length.reversed());
}
As a response to the clients, it seems suitable to present the title of the films, the films’ length (to confirm that the sorting order is correct), and a list of the starring actors:
@GET
@Path("/actors/{startsWith}/{minLength}")
@Produces(MediaType.TEXT_PLAIN)
public String actors(String startsWith, short minLength) {
    return filmRepository.actors(startsWith, minLength)
        .map(f -> String.format("%s (%d min): %s",
            f.getTitle(),
            f.getLength(),
            f.getActors().stream()
                .map(a -> String.format("%s %s", a.getFirstName(), a.getLastName()))
                .collect(Collectors.joining(", "))))
        .collect(Collectors.joining("\n"));
}
Now try calling the new endpoint with a start character A and a minimum length of 2 hours: http://localhost:8080/actors/A/120. You should expect the following results:
ANALYZE HOOSIERS (181 min): TOM MCKELLEN, TOM MIRANDA, JESSICA BAILEY, GRETA MALDEN, ED GUINESS
ALLEY EVOLUTION (180 min): KARL BERRY, JUDE CRUISE, ALBERT JOHANSSON, GREGORY GOODING, JOHN SUVARI
...
ALAMO VIDEOTAPE (126 min): JOHNNY CAGE, SCARLETT DAMON, SEAN GUINESS, MICHAEL BENING
ARIZONA BANG (121 min): KARL BERRY, RAY JOHANSSON, RUSSELL BACALL, GRETA KEITEL
Below is the resulting query, confirming that the join was applied.
Hibernate:
    select
        f1_0.film_id,
        a1_0.film_id,
        ...
    from
        film f1_0
    left join
        (film_actor a1_0
    join
        actor a1_1
            on a1_1.actor_id=a1_0.actor_id)
                on f1_0.film_id=a1_0.film_id
        where
            f1_0.title like replace(?,'\\','\\\\')
            and f1_0.length>?
        order by
            f1_0.length desc
9.4 Updating Films
While JPAStreamer’s strength lies in reading data, you can use it to update your database as well. Let’s say the imagined video rental store has a price model based on the length of the films. In that case, you want to be able to adjust the rental rate based on length. That’s easily achieved by filtering out the relevant films and applying the operator forEach() to set a new price. By annotating the method with @Transactional, you ensure that Hibernate persists the changes to your Film entities.
@Transactional
public void updateRentalRate(int minLength, int maxLength, BigDecimal rentalRate) {
    jpaStreamer.stream(Film.class)
        .filter(Film$.length.between(minLength, maxLength))
        .forEach(f -> {
            f.setRentalRate(rentalRate);
    });
}
I’ll leave it to you to create an endpoint that facilitates clients to initiate rental rate updates.
10. Continuous Testing
You can configure Quarkus to automatically trigger the execution of your JUnit test suite every time you run your application. Or alternatively, trigger the execution manually by pressing [r] in the Quarkus dev terminal. Before, I understood the value of test-driven-development (TDD) but I have always felt it got in the way of focusing on the business logic as I would only run them occasionally. This does not mean Quarkus writes the tests for you, but they are easy to execute and the dev mode constantly reminds you that they are there.
Both integration tests and unit tests.
Even though I initially laid out the requirements for this tutorial, there are some specifics to be aware of when it comes to continuous testing. If you used the Quarkus project configurator as described in this tutorial, you should already be set up. Otherwise, make sure that you:
- Depend on the Quarkus JUnit 5 module
- Define a Maven Surefire Plugin version (e.g. 3.0.0) as the default version does not have support for JUnit 5
- (Optional) Rest-assured for simple REST endpoint tests
To meet the above requirements, check that you have the following dependencies and plugin configurations in your pom.xml:
<dependencies>
    <dependency>
        <groupId>io.quarkus</groupId>
        <artifactId>quarkus-junit5</artifactId>
        <scope>test</scope>
    </dependency>
    <dependency>
        <groupId>io.rest-assured</groupId>
        <artifactId>rest-assured</artifactId>
        <scope>test</scope>
    </dependency>
…

</dependencies>
…

<build>
    <plugins>
        <plugin>
            <artifactId>maven-surefire-plugin</artifactId>
            <version>3.0.0</version>
            <configuration>
                <systemPropertyVariables>
                    <java.util.logging.manager>
                        org.jboss.logmanager.LogManager
                    </java.util.logging.manager>
                    <maven.home>${maven.home}</maven.home>
                </systemPropertyVariables>
            </configuration>
        </plugin>
        ….

    </plugins>
</build>
Quarkus tests are placed as your regular JUnit tests in the standard test folder, i.e. /src/test/java if your build tool is Maven. The only real difference is that you need to annotate your test classes with @QuarkusTest for the tests to be recognized by Quarkus. The following sections contains examples on how to craft unit and integration tests.
10.1 Unit Tests
There’s nothing special about creating unit tests with Quarkus apart from the fact that they can be swiftly executed in the development mode. To test the FilmRepository, you can simply inject it into your test class as you did in the FilmResource and call your CRUD methods.
Here is an example of a test that ensures that your getFilm()-method retrieves a film with the title “AFRICAN EGG”.
@QuarkusTest
public class FilmRepositoryTest {

    @Inject
    FilmRepository filmRepository;

    @Test
    public void test() {
        final Optional<Film> film = filmRepository.getFilm(5);
        assertTrue(film.isPresent());
        assertEquals("AFRICAN EGG", film.get().getTitle());
    }
}
10.2 REST Integration Tests
Quarkus also facilitates effortless integration testing of your REST endpoints. By leveraging the rest-assured library, which was mentioned in the previous section, you gain access to a rich API tailored for REST testing.
The next example is reminiscent of the prior unit test, however in the form of an integration test. Upon execution, Quarkus will automatically issue a GET request to your film endpoint, targeting a film with an ID of 5. The test anticipates a successful response (HTTP status code 200) and verifies that the response body contains the film's title, "AFRICAN EGG."
@QuarkusTest
public class FilmResourceTest {
    @Test
    public void test() {
        given()
            .when().get("/film/5")
            .then()
            .statusCode(200)
            .body(containsString("AFRICAN EGG"));
    }
}
10.3 Running the Tests
Assuming you are still running in the Quarkus dev mode, you can use one of these commands to control the test phase:
[r] - Re-run all tests
[f] - Re-run failed tests
[v] - Print failures from the last test run
The tests results will be recorded in the Quarkus logs:
All 1 tests are passing (0 skipped), 1 tests were run in 336ms. Tests completed at 17:34:25 due to changes to FilmRepository.class.
If you want the tests to be executed each time an application change is detected, you can set quarkus.test.continuous-testing=enabled in application.properties.
You also have the option of executing your tests whenever you are not running in dev mode using the command:
mvn quarkus:test
11. Running the Debugger with Quarkus Dev Mode
Frequently, a test may fail without any apparent cause, leaving us perplexed (or perhaps not so much). Ironically, I sometimes find myself attributing my own simple errors to underlying bugs in external libraries. Thankfully, the debugger comes to our rescue, shedding light on where things took a wrong turn and often humbling me by revealing my own mistakes.
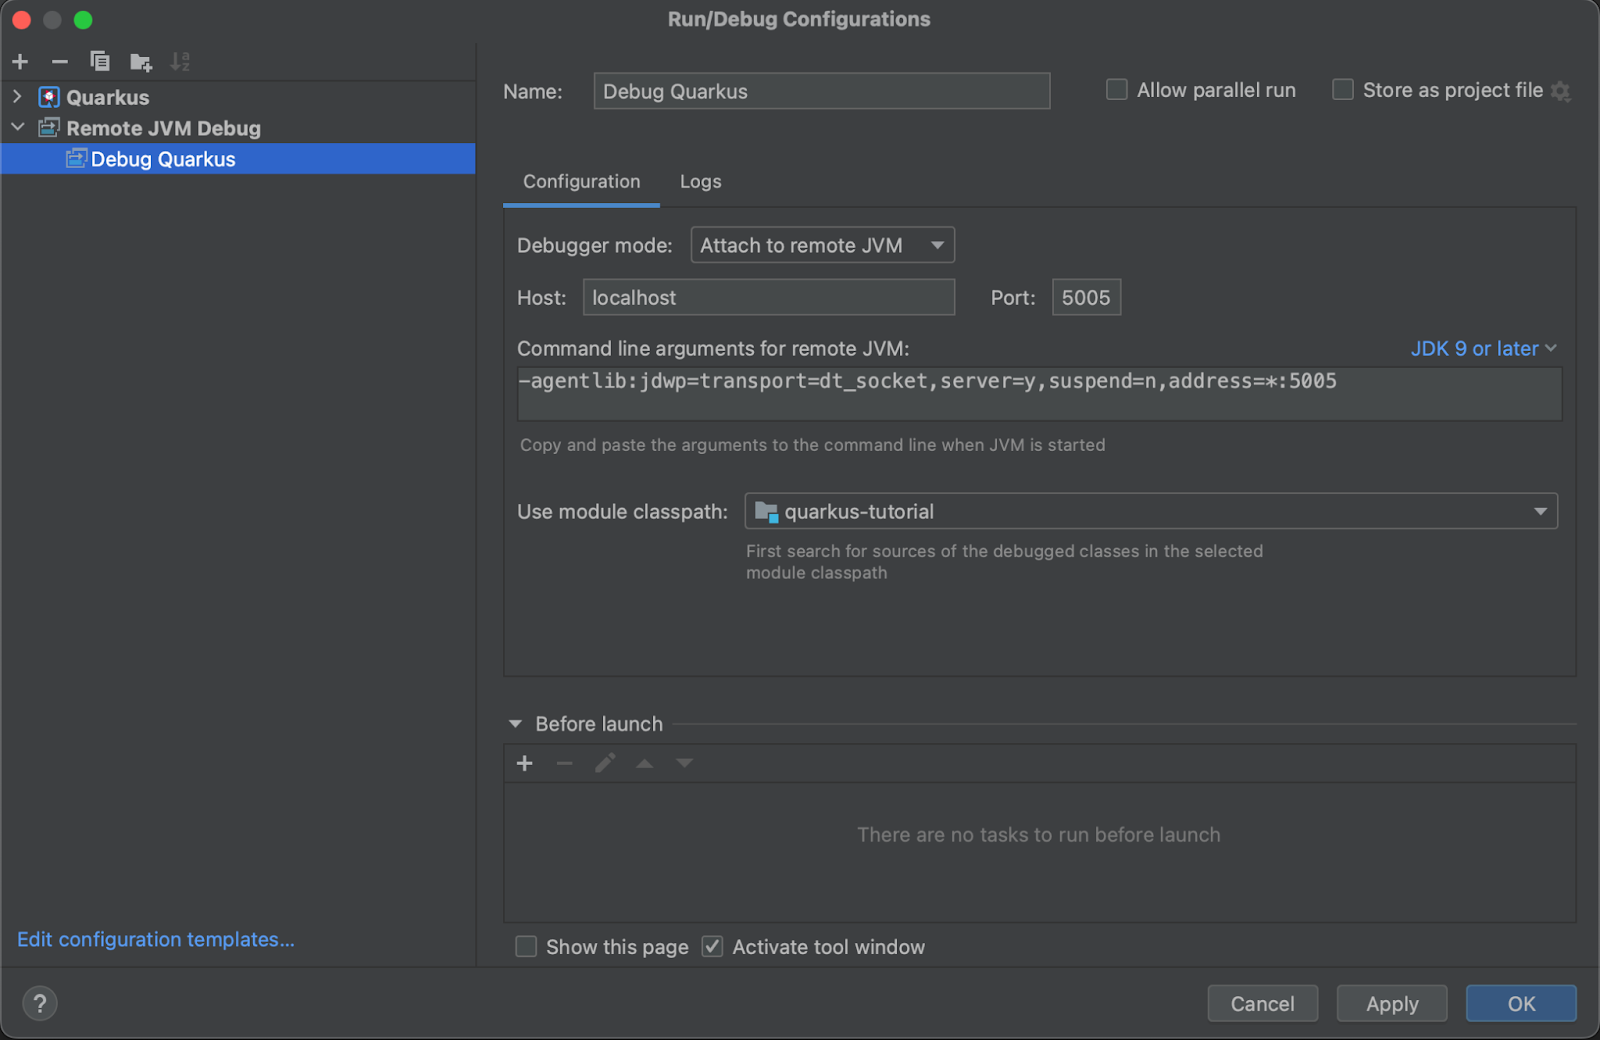
If you wish to use IntelliJ’s debugger in conjunction with the Quarkus dev mode, you need to attach the debugger manually. This process is straightforward but entails creating a personalized run configuration. Head to Run > Edit Configurations and generate a new Remote JVM Debug configuration. Opt for a clear label like "Debug Quarkus" to easily distinguish it from other configurations. As Quarkus designates port 5005 for debug sessions, you simply need to specify that you want to link to a remote JVM at localhost:5005, as illustrated in the image below.
Once this configuration is in place, restart Quarkus in the debug dev mode as follows:
./mvnw compile quarkus:dev -Ddebug
Then run your new Debug Quarkus configuration in IntelliJ to connect to the Quarkus process and proceed to use the debugger as normal.
12. Building Your Application
Although our application's feature set might be modest at this stage, it's fully functional and primed to potentially offer users access to film-related information. With this in mind, it's a fitting moment to prepare for deployment.
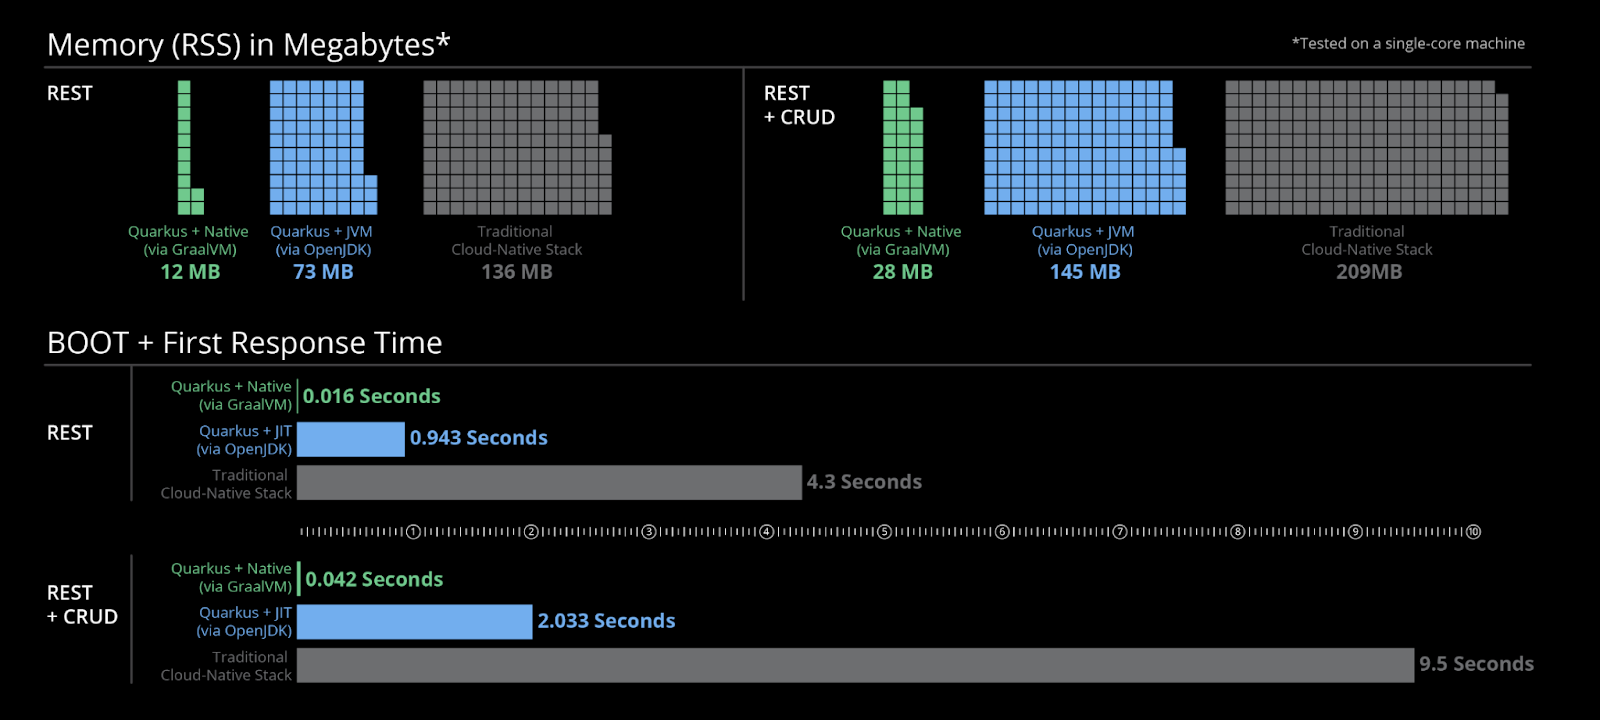
Quarkus provides two distinct build options: the Quarkus JIT HotSpot compiler and the Quarkus native build powered by Graal VM. The former enhances the standard Java JIT compiler for optimal performance, while the latter capitalizes on ahead-of-time compilation (AOT), maximizing build-time efficiency over runtime execution. While the image below is a Quarkus-provided marketing asset, my own experiments affirm the tangible performance gains it highlights.
12.1 Quarkus JIT Build via OpenJDK
Since you've already developed your project using the Quarkus platform, you have immediate access to the JIT compiler without any additional steps required. The illustration above provides a glimpse into the significant enhancements Quarkus has made to the standard compiler, potentially fulfilling your optimization requirements.
To initiate the standard Quarkus build process, simply execute the command:
quarkus build
The resulting build is stored in /target/quarkus-app. However, it's important to note that the generated JAR isn't an über-jar and therefore lacks standalone functionality. For successful deployment, ensure that the entire quarkus-app folder is included, to guarantee the availability of all necessary resources.
When you're ready to run your application, employ the following command:
java -jar /target/quarkus-run.jar
Pay attention to the Quarkus prompt indicating how long it took to start your application. For reference, it took me around 1.7s to start the JIT compiled version of this application.
12.2 Quarkus Native Build via GraalVM
Now, let's delve into the more interesting aspect of Quarkus—the native build process. Although compiling natively doesn't demand additional effort on your part as a developer, it does require a bit of patience. Performing ahead-of-time compilation (AOT) takes considerably longer than the standard JVM HotSpot build. Native compilation acts as a potent compressor, best reserved for when you're preparing to deploy a fresh iteration of your software.
As Quarkus have introduced the option to build nativelty using a containerized variant of GraalVM, I won't delve into GraalVM installation instructions. To execute a native build using the GraalVM Docker container, issue the following command:
./mvnw package -Pnative -Dquarkus.native.container-build=true
Alternatively, if you possess GraalVM locally, you can proceed with the local version:
./mvnw package -Pnative
The executable file created by the native build operates not as a JVM-based application, but as a platform-specific native application. To run it, simply execute the runner script located in the root of the target folder (The filename corresponds to your application's name):
./target/quarkus-tutorial-1.0.0-SNAPSHOT-runner
Again, observe the Quarkus prompt to observe how long it took to start the native version. In my case I was down to about a tenth of a second!
13. Resources
- Quarkus Project Configurator
- Quarkus Documentation
- JPAStreamer Documentation
- Complete Project Source Code