
By Daniel Simmons
WebAssembly is a brand new web technology with massive potential. It will have a significant impact on how web applications are developed in the future.
But, sometimes, I feel like it just doesn’t want to be understood… almost in a strangely passive-aggressive kind of way.
When I look at the documentation and the handful of tutorials that are already out there, I can’t help but feel like a farmer who prayed for rain, only to drown in a flood. I technically got what I wanted… just not in the way that I’d hoped. “You want rain?! Oh, I’ll give you rain!”
This is because WebAssembly makes so many new things possible and can be implemented in so many different ways. But, it has changed so much along the way to its official MVP release in February, that when you first get started learning about it, it’s easy to drown in a sea of details.
Continuing the rain metaphor, this article is my attempt to provide a light shower of an introduction to WebAssembly. Not the concepts or the nuts and bolts, but the actual implementation.
I’ll walk you through the steps to create and implement an extremely simple project, removing complexity wherever possible. After you’ve implemented it once, however simply, a lot of those higher level ideas are a lot easier to make sense of.
Let’s break it down
Everything will be much clearer if we step back and look at a list of the steps involved in implementing WebAssembly in a project.
When you’re first getting started, it’s easy to look at WebAssembly and just see a big wad of options and processes. Breaking it down into discrete steps will help us get a clear picture of what’s going on:
- Write: Write something (or use an existing project) in C, C++, or Rust
- Compile: Compile it into WebAssembly (giving you a binary .wasm file)
- Include: Get that .wasm file into a project
- Instantiate: Write a bunch of asynchronous JavaScript that will compile the .wasm binary and instantiate it into something that JS can play nicely with.
And that’s pretty much it. Granted, there are different permutations of this process, but that’s the gist of it.
Broadly speaking, it’s not all that complicated. However, it can get extremely complicated, because most of these steps allow for widely varying degrees of complexity. In each case, I’m going to err on the side of bare-bones simplicity.
For our project, we’ll be writing a simple function in C++ (don’t worry if you’re not familiar with C++, it’ll be extremely simple). The function will return the square of a given number.
Then, we’ll compile it into .wasm using an online tool (you won’t need to download or use any command line utilities). Next, we’ll instantiate it with 14 lines of JS.
When we’re done, you’ll be able to call a function written in C++ as if it were a JS function, and you’ll be amazed!
The sheer number of possibilities that this opens up are absolutely mind blowing.
Write
Let’s start with our C++ code. Remember, we won’t be using a local dev environment to write or compile this.
Instead, we’ll be using an online tool called WebAssembly Explorer. It’s kind of like CodePen for WebAssembly, and it allows you to compile your C or C++ code right in the browser and download a .wasm file all in one place.
Once you’ve opened up WebAssembly Explorer, type this C++ code into the leftmost window:
int squarer(int num) { return num * num;}
Like I said, we’re using a really simple example here. Even if you’ve never looked at C or C++ before, it’s probably not too difficult to tell what’s going on.
Compile
Next, click the button that says “compile” in the red bar above your C++ code. Here’s what you’ll see:
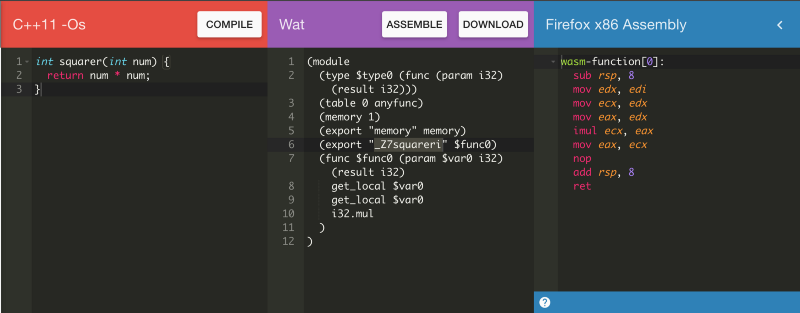
The middle column shows you a human-readable version of the .wasm binary that you’ve just created. This is called “WAT” or WebAssembly Text Format.
On the right is the resultant assembly code. Pretty cool.
I won’t go into much detail about either of these, but you do need to know at least a little bit about the WAT file in order to follow the next steps.
WAT exists because we humans generally have a hard time making sense of straight binary. It’s essentially a layer of abstraction that helps you understand and interact with your WebAssembly code.
In our case, what we want to understand is how our WebAssembly refers to the function that we just created. This because we’ll need to use that exact same name in our JS file later on to refer to it.
Any functions that you write in your C++ code will be available in WebAssembly as something called an “export.” We’ll talk a bit more about this later, but for now, all you need to know is that the exports are the things that you’ll be able to interact with and use.
Take a look at the WAT file and look for the word “export.” You’ll see it twice: once alongside the word memory and again alongside the word _Z7squareri. We don’t need to know about memory for now, but we’re definitely interested in _Z7squareri.
We used the function name squarer in our C++, but now that has somehow become _z7squareri. This can definitely be confusing the first time you see it.
As far as I can tell, the “_Z7” prefix and “i” suffix are debug markers introduced by the C++ compiler. This isn’t really important to understand in depth, though. You just need to be aware that this will happen, because you need to use this exact name in your JS file in order to call your C++ function.
Include
Now just click the “download” button at the top of the purple WAT section. You’ll get the .wasm binary file. Rename it squarer.wasm. Then create a new directory and put your squarer.wasm file in there, along with two other files:
index.html(boilerplate)scripts.js(empty for now)
Instantiate
Now for the tricky part. Or, at least, the part that caused me a lot of confusion when I first started sifting through the documentation.
Although you’ll eventually be able to include .wasm modules like a regular old ES6 module (using <script type='module'> ), for the time being you need to “manually” set it up. This is done by making a bunch of asynchronous calls to the WebAssembly API. There are three steps:
- Get your .wasm binary file into an array buffer*
- Compile the bytes into a WebAssembly module*
- Instantiate* the WebAssembly module
If all of this makes sense to you, then you can skip to the next section. But if you found yourself scratching your head a bit and want a more detailed explanation, then continue reading.
*Array Buffer
A buffer is a temporary storage place for data while it’s being moved around. Generally, this is useful when data is being received and processed at different rates.
For example, when a video is buffering, the data is being received at a rate slower than the video player can play it. One of the things that our array buffer is doing is queueing up our binary data so that it can be compiled more easily.
But there’s something else very important going on here. In JavaScript, an array buffer is a typed array, which is something that’s used specifically for storing binary data.
The fact that it is explicitly typed means that the JS engine can interpret an array buffer much faster than it can a regular array, because it already knows the data type and doesn’t have to go through the process of figuring it out.
*WebAssembly module
Once you’ve got all your binary data into an array buffer, you can compile it into a module. The WebAssembly module is, in itself, inert. It’s just the compiled binary, waiting for something to be done with it.
You can almost think of the module like a cake recipe. The recipe is just a format for storing information about how to make a cake. If you actually want a cake, you need to create an instance of the cake described in the recipe (instantiate the cake).
You do this by following the instructions laid out in the recipe. Alternatively, you could send the recipe to someone else (a “service worker”), or you could save it and use it later (“cache” it). Both of these are much more convenient to do with a recipe, than with an actual cake.
*Instantiate
The last thing you need to do is create an instance of your WebAssembly module, which “brings it to life” and makes it actually usable.
The instance gives you access to the module’s exports (remember this from our WAT file?). This is an object that contains:
- Memory (not relevant to us, but you can read more about it here)
- Any functions that were present in your C++ code. This is how you will use the C++ function that you’ve written.
Finish up and run it!
Here’s the code that accomplishes all of the steps we just went over (this goes into your scripts.js file):
The loadWebAssembly() function fetches your .wasm file and then performs the operations mentioned above. Then it returns a new instance of your WebAssembly module.
Our C++ function (remember it’s referred to by the funky name that we mentioned before: _z7squareri ) lives in the exports property of our instance. You can see it being assigned to the global variable squarer on line 12. Now we can use squarer() as a regular JavaScript function!
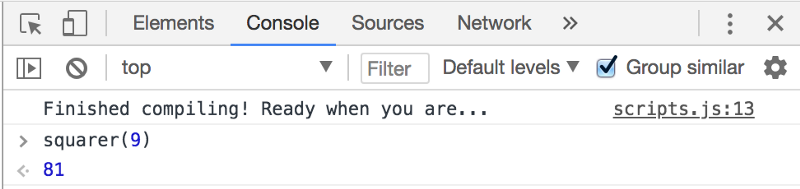
Once you put this into your scripts.js file and hit save, you can pull it up on localhost and you should see the “Finished compiling…” message in the console.
Now, just call your function and pass in an argument from the console. Try something like squarer(9) . Hit return and you’ll see 81 . It works! You’re calling a function written in C++!
This is fantastic
You can just imagine all of the things that this makes possible.
For one, JavaScript is no longer your only option for “doing things” in the browser. That is absolutely huge.
Then there’s the performance improvements, since WebAssembly, unlike JS, runs at near-native speed.
And then there’s all the legacy code that’s now at your disposal. C and C++ have been around for a long time, and in that time, a lot of brilliant people have created some amazing open-source projects with it. Projects that can now be integrated into websites or apps.
From here, you can write more complex C, C++, or Rust code, or even adapt an existing project, and “wasm-it” into a web project.
One caveat, however, is that if you want to create functions that accept arguments or return values that are not numbers, then things start to get a bit more complicated. That’s when you’ll need to learn a bit more about the memory attribute of the .wasm instance’s exports.
This project is available on GitHub if you’d just like to clone a working copy in addition to following along with the article.