
The first time I learned about open source was through a tweet that promoted Hacktoberfest in 2019. And my first-ever accepted pull request was to add a book title in emojis to a list.
You might think, "You can't count that as an open source contribution. That's a joke!"
I had the same thought myself — until recently. Getting my feet wet in open source was daunting, yet I got through it. And looking back, I learned a ton from that first contribution.
As a newbie who didn't know anything about open source, I learned how to communicate with the maintainers, how to work with Git and GitHub, and how to create a pull request. It was a big learning curve!
That is one of the reasons why I wrote this guide: to make your journey in contributing to open-source projects smoother and less daunting.
In this guide, I'll walk you through the basic Git and GitHub workflow when contributing to open-source projects. I'll also explain how to synchronize your forked and local repositories with the original repository and how to resolve merge conflicts when you encounter one.
Without further ado, let's get started!
Table of Contents
- Prerequisites
- Are all GitHub Projects Open Source?
- How to Fork a Repository
- How to Clone a Repository
- How to Create a New Branch
- How to Add Changes to the Staging Area
- How to Commit Changes
- How to Synchronize Changes
- How to Resolve Merge Conflicts
- How to Push Changes
- How to Create a Pull Request
- Final Words
Prerequisites
To follow along with this tutorial, you'll need the following:
Are all GitHub Projects Open Source?
When you're interested in making contributions, you should make sure that the project you're interested in is open source. You can't assume that all projects on GitHub are open source.
In this section, I will share what you should check to know if a project is open source.
The License
The license is the first thing you want to check. A project on GitHub is not an open source unless it has a license.
In most jurisdictions, a project without a license is automatically licensed as "All Rights Reserved" by its owner. It means that no one may use, modify, or redistribute anything in the project without the permission of the owner. If you ignore it, they can legally sue you.
You can find the license in a file called LICENSE. You'd usually see in the "About" section of the repository.
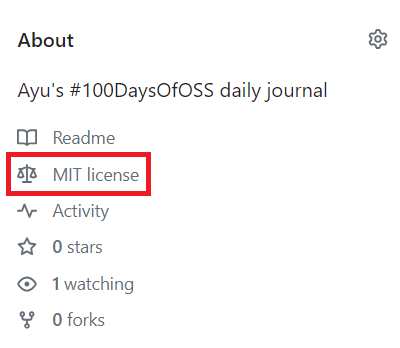 An MIT license in the "About" section on the right sidebar of a repository on GitHub
The Contribution Guide
Most open-source projects are ready to receive contributions when it has a contribution guide. This guide contains everything you should know about how to contribute to the project, from opening an issue to creating a pull request. From the code of conduct to the expected communication style.
The procedures and requirements for contributing to open-source projects may differ from one to another. You always want to read and follow the guide when contributing to a project.
Usually, you'll find a section about the contributing guide on the README. But if you can't find it there, look for a file called CONTRIBUTING.md or anything similar.
Hacktoberfest Topic
Hacktoberfest is a yearly event in October sponsored by DigitalOcean to support open source.
To participate in this event and get your pull requests reviewed and counted, you should check whether a project is involved in Hacktoberfest before contributing.
A project participating in the event should have a hacktoberfest topic that you can find tagged in the "About" section of the repository's main page.
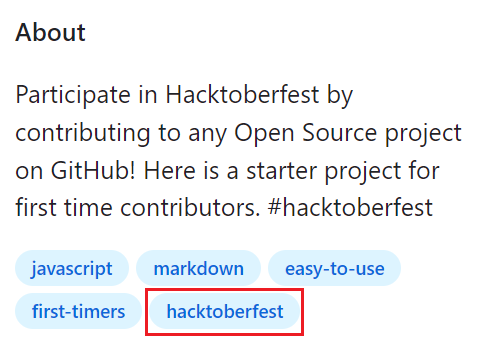 The "About" section on the right sidebar of a repository with
 hacktoberfest as one of the topics — Credit: AliceWonderland/hacktoberfest
How to Fork a Repository
So, you're ready to contribute to a repository of your choice. The first thing that you should do is to fork the repository.
Fork means creating a copy of a repository in your GitHub account.
You always want to fork a repository because most open-source project owners don't authorize contributors to push changes directly to their repositories.
By convention, your forked repository is called the origin repository, while the original repository is the upstream repository. I will use these aliases from now on to differentiate them.
At the repository's main page on GitHub, click the Fork button at the top right:

Fork button on GitHub
It will redirect you to the "Create a new fork" form. You can leave the inputs as it is. Then, click the green "Create fork" button at the bottom.
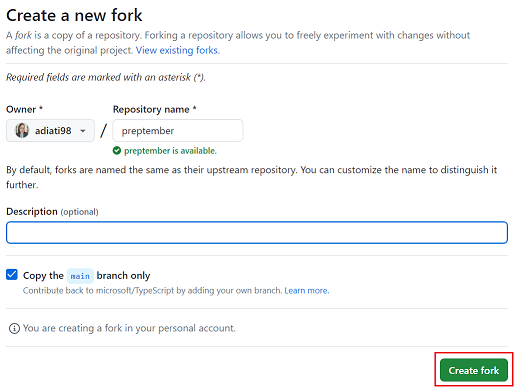 A
A Create a new fork form with a green Create fork button on GitHub
This will create a copy of the repository in your GitHub account.
How to Clone a Repository
After forking the repository, the next thing to do is to clone it.
Cloning a repo means creating a copy of a repository in your local environment. You should clone your forked repository when contributing to an open-source project.
Here are the steps to follow:
Step #1 - Navigate to the forked repo
Navigate to your forked repository with these steps:
- Click your avatar on the top right.
- Click
Your repositorieson the dropdown menu. - Click the repository that you want to clone to open it.
Then click on the green <> Code button. Copy the HTTPS URL by clicking the copy icon.
To ensure that you are cloning the forked repository, you should see your GitHub username in the link. For example:
https://github.com/<github-username>/<repository-name>.git
That is:
![]() User's avatar on GitHub
User's avatar on GitHub
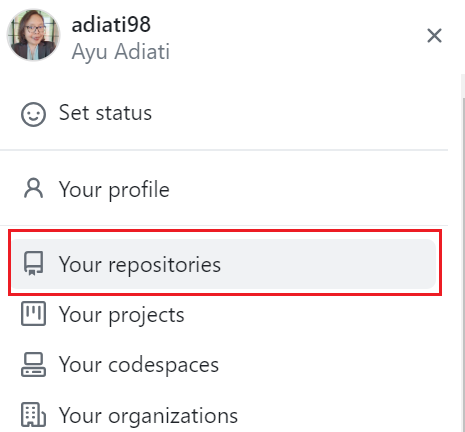 Dropdown menu on GitHub that highlights
 Your repositories
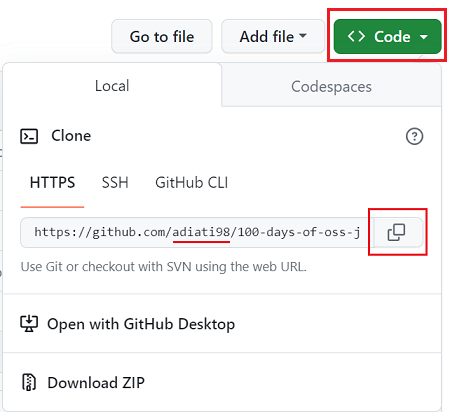 A green
 <> Code button and a HTTPS URL of a repository followed by a copy icon on GitHub
Step #2 - Clone the Project Locally
In your terminal, run the git clone command along with the URL that you copied:
git clone <copied-url>
You can navigate to the project's directory with this command:
cd <project-name>
How to Create a New Branch
The best practice in open source is to create a new branch whenever you are going to work on an issue. A new branch isolates your changes and keeps the main branch clean.
Run this command to create a new branch and navigate to it:
git checkout -b <branch-name>
Although you can give a branch any name, you should follow conventions related to naming a branch. A branch name usually refers to the change that you make. For example, feature/add-dark-mode or bugfix/broken-link-to-about-page.
Now you can start to make changes in your new branch.
How to Add Changes to the Staging Area
Let's say you've finished working on changes. Before committing, you must first add them to the staging area.
This step allows you to keep your changes while you can still modify them before committing. It also lets you choose which change(s) you're ready to commit.
Adding changes to the staging area is often seen as a less critical step. But that's not true. This step allows you to change your mind before committing. Because once you commit your changes, you add a piece of story to the project's history.
How to Add Single or Multiple Files to the Staging Area
When you want to add one or multiple files — but not all — to the staging area, run this command:
git add <file-name-1> <file-name-2>
For example:
git add README.md CONTRIBUTING.md
The command above adds the README.md and CONTRIBUTING.md files to the staging area.
When you add nested files(s) to the staging area, you want to add the path(s) to the file(s). If you can't figure out the exact path, running git status will help give you the status of the files that contain your changes.
Here is how to do it:
Run git status in your terminal. You will see something like this:

git status showing paths to three modified files on the VSCode terminal
Copy the path and run the git add command along with the path(s) to the file(s):
git add <path-to-file-1> <path-to-file-2>
Here is an example of adding paths to two files based on the screenshot above:
git add app/routes/__frontend/resources/index.mdx app/routes/__frontend/resources/developer-resources/open-source/index.mdx
How to Add All Files
When you want to add all files to the staging area, run this command:
git add .
This adds all the files with changes to the staging area.
How to Commit Changes
To commit means to record your changes. That is why a commit requires a message as the record. Over time, commits will tell the story of the project's history. So, a clear and descriptive commit message is essential.
What you should know when committing your changes:
- Add and commit your changes often. The best time to add and commit your changes is every time you finish making a meaningful change, even if it's a small change. Committing your work once completed also prevents your changes from being carried over to other branches.
- Use a clear and descriptive message. "Change the background color from black to dark blue" is more descriptive and easy to understand by everyone than "Fix style".
To make a commit, run this command in your terminal:
git commit -m "Your message"
Here is an example of a single line commit:
git commit -m "Fix the link to the About page"
And here's a commit with multiple lines:
git commit -m "Fix the link to the About page
Fix the typos in the About page"
How to Synchronize Changes
When you are working on changes, there is a possibility that the main branch on the upstream repository has already merged in some pull requests. So, the state of the origin and your local repositories at this time will no longer be the same as the upstream.
For this reason, you should always update your local working branch so you'll push the same state as the upstream repository.
How to Update the origin Repository
First, go to the origin repository on GitHub to check if it's up to date with the upstream.
You can push your changes when no change exists in the upstream repository.
To know if the origin repository is up to date, you'll see a message that says, "This branch is up to date with " on the main page of the repository, as shown in the screenshot below:
 An up-to-date branch in the
 origin repository on GitHub
But when there are changes, you will see a message that says, "This branch is X commit(s) behind ".
 A message indicating a branch in the
 origin repository is eight commits behind the upstream repository on GitHub
To update the origin repository:
- Click the
Sync forkdropdown button. - Click the green
Update branchbutton.
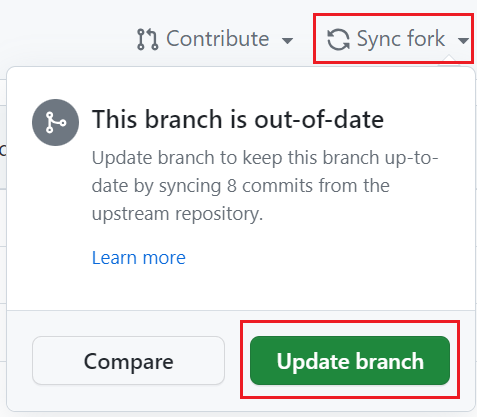 The
The Sync fork and Update branch buttons on GitHub
After it's updated, you will see a "Successfully fetched and fast-forwarded from upstream " notification at the top.
 A notification "Successfully fetched and fast-forwarded from upstream" on GitHub
How to Pull Changes
Now that your origin is up to date with the upstream repository, it's time to pull the changes and update your local one.
Pull is a way of getting new changes from the remote to the local repository.
To pull the changes, ensure that you are on your working branch. You can do so by running git status:

git status showing a branch name
Run the git pull command to pull the changes from the main branch in the origin repository:
git pull origin main
You can now push your changes if you don't need to resolve conflicts.
How to Resolve Merge Conflicts
After updating your local repository, you might encounter conflicts that you must fix before you can push your changes.
It's common to encounter these conflicts in open source projects. Merge conflicts usually occur when there are changes in the same line(s) and file(s) from two different branches.
When a conflict arises, you will see options for accepting changes on top of your workspace in VSCode. You will also see another change(s) different from yours — the incoming change.
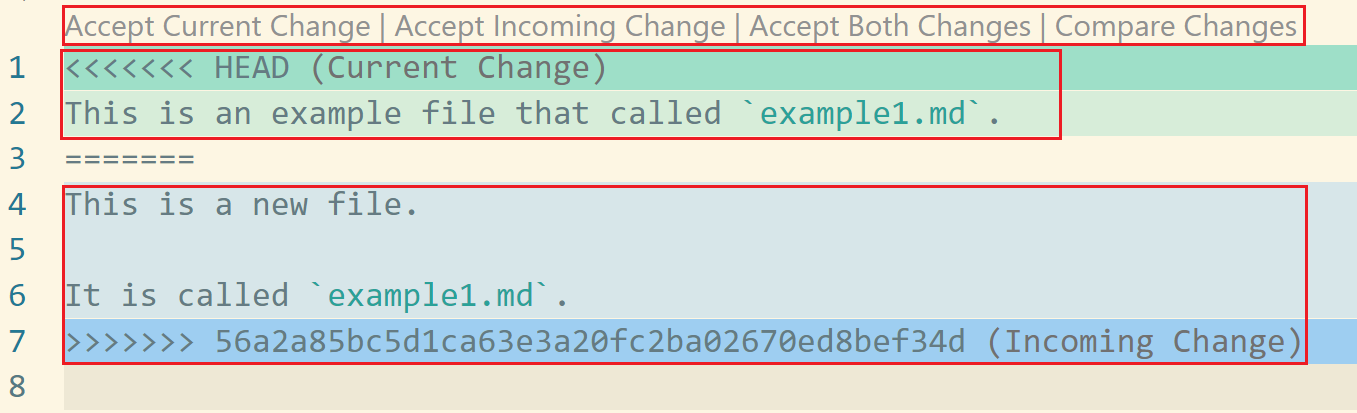 Options to accept change, the current change, and the incoming change on VSCode
How to Fix Merge Conflicts
You can choose from different options when you want to resolve a conflict:
- Accept Current Change: When you wish to keep your changes only.
- Accept Incoming Change: When you want to accept only the incoming changes that aren't yours.
- Accept Both Changes: When you want to accept your changes and the incoming changes.
You can still fix things if necessary after choosing the desirable action.
After resolving the conflicts, you can then add your changes to the staging area and commit them.
Since you'll add and commit changes in an existing file, you can run this command to do both actions at the same time:
git commit -am "Your message"
How to Push Changes
Now, it's time to push your changes. This means moving changes from the local to the remote repository.
You always want to push your changes to the origin repository. To do that, run this command in your terminal:
git push origin <branch-name>
There's a possibility that you may get this error message:
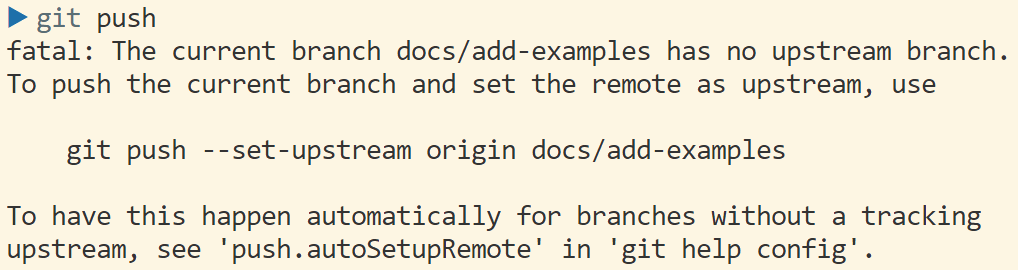
git push message "fatal: The current branch <branch-name> has no upstream branch."
You can copy, paste, and run the command in the error message in your terminal:
git push --set-upstream origin <branch-name>
Alternatively, you can run this command:
git push -u origin <branch-name>
How to Create Pull Request
A pull request — commonly called a PR — is a way to notify others that a branch with changes has been pushed to a remote repository.
After a pull request is opened, maintainers can review and discuss your changes. They can ask you to make more changes before they can merge your pull request or merge them immediately into the main branch.
How to Create a Pull Request
First, go to the upstream or origin repository on GitHub.
Then click the green Compare & pull request button to redirect to the Open a pull request form:
 The green
 Compare & pull request button on GitHub
Then fill out the pull request form. If there's a pull request template, complete all required areas to help maintainers review your changes.
If there is no pull request template, you can write the pull request in a structured manner. Consider this when writing your pull request:
- A short, clear, and informative title.
- A clear description of the changes.
- The link to the related issue. For example, "Closes #456".
- Screenshots or screen recordings when necessary.
Lastly, click the green Create pull request button at the bottom to create a PR.
 The green
 Create pull request on GitHub
Final Words
Contributing to open-source projects can be daunting and make you feel intimidated at the beginning. But like other skills, with continuous practice, you will become better.
Besides understanding Git and GitHub, there are non-technical aspects of open source that you should know too.
And once you get the grip, open source can be so much fun!
If you liked and enjoyed this article, please share it with others. You can find other works of mine on my blog, and let's connect on X (formerly Twitter) or LinkedIn!