By Deborah Kurata
Knowing the right Git command for the task at hand can often be challenging. Especially when you're adding complexity to your task, like with Git branching.
Git is a powerful version control system that enables you to track changes to your codebase. One of the key features of Git is its ability to manage branches.
Branches allow developers to work on different features, issues, or bug fixes without affecting the project's main codebase.
This tutorial walks you through a set of Git commands for creating, committing, merging, and deleting branches.
The tutorial assumes you have a basic conceptual understanding of Git branching as I covered in my previous article.
You can also watch the associated video here which includes demonstrations of branching using VS Code's Git integration.
This tutorial is set up for you to try the commands as we go. So we'll start at the beginning by creating our local repository.
How to Create a Local Repository
We want to build a recipes website, or maybe an app for collecting and managing recipes. And we want to create a repository so we can easily track our changes to the project files.
To create a local repository, follow these steps:
First, open your terminal or command prompt and navigate to the directory where you want to create your project.
Then initialize a new Git repository using the following command.
git init recipes
This command creates a new folder for the project called recipes and initializes a new Git repository in that folder.
The initialization process creates a .git folder within the project folder that stores the files and data for the repository.
This file may be hidden by default. In Mac's Finder, use Command + Shift + . (period) to make hidden files appear. On Windows, use the File Explorer View tab and check Hidden items to display hidden files.
When a new repository is initialized, Git automatically creates a new primary branch. Depending on your Git settings, that primary branch is created with the name "main", "master", or something similar.
Navigate down to the project folder:
cd recipes
The project folder is our working folder. All of the files for our project should be created, updated, and modified from this folder or subfolders of this folder.
This working folder is the folder that Git watches to track our changes.
Optionally, verify the status of the Git repository:
git status
The result of the above steps is shown below:
 Figure 1. Creating a local repository
The init command tells us that it initialized an empty Git repository named .git in the folder we told it to use.
The status command provides the status of our repository. At this point in time, we are on the main branch, we have no commits, and we have nothing to commit.
We now have a local repository! Let's add some files to the repository so we have something to work with.
How to Create Files
The primary purpose of a repository is to store a snapshot of the files from our working folder at a particular point in time. We don't currently have any files in our working folder.
Let's add two simple text files. But note that the process of branching covered in this article is the same with any type of code files.
Use a text editor to create the two files: file1.txt and file2.txt. Add one line of content to each file identifying the file.
If you'd prefer to create the two files using the console, type these commands, one at a time:
echo file1 > file1.txt
echo file2 > file2.txt
Each of these commands "echoes", or "writes" the text on the left into the file on the right. If the file doesn't exist, it creates the file.
Use a single greater than > with echo to replace the contents of the file with the specified text. Use a double greater than >> to append the text to the end of the file. We'll see the double greater than later in this tutorial.
Now that we have a local repository and two changed files, let's commit those files to the repository.
How to Commit Files to the Local Repository
Committing files to a local repository requires the following steps:
First, add the files to the Git staging area.
git add .
Before committing files to the local repository, we tell Git which files we want to include in that commit by adding them to a staging area. Basically, staging allows us to selectively choose which changes to include in a commit.
Using the . (period) adds all of the files in the working folder (and its subfolders) to the staging area. If you only want to add specific files, you can list them instead.
Think of staging like a shopping cart. You can put items into your shopping cart or take items out of your shopping cart without committing to buying them. When you are ready, you commit to buying the items that are in your cart.
Now you're ready to commit the staged files to the local repository.
git commit -m "Initial commit"
Here we commit the files in the Git staging area to the local repository.
The -m option is for a commit message. Follow the -m with the message, in quotes. Be sure to define a clear message describing the changes you are committing. More about commit messages in the next section below.
Then you can optionally verify the commit using the log command:
git log
The log command outputs the commit history for the repository with the most recent commit first. Use it whenever you want to see what's happened within that repository.
NOTE: If your terminal window is too small to display the entire log, this command automatically opens a pager screen to page through the display. Use the PgUp, PgDn or arrow keys to page through the output. Press the Q key to exit the pager.
There are an extensive set of options available for the log command to filter or limit the log to specific commits. There are also options to make the log prettier. See the documentation for more information.
The terminal after these steps is shown below:
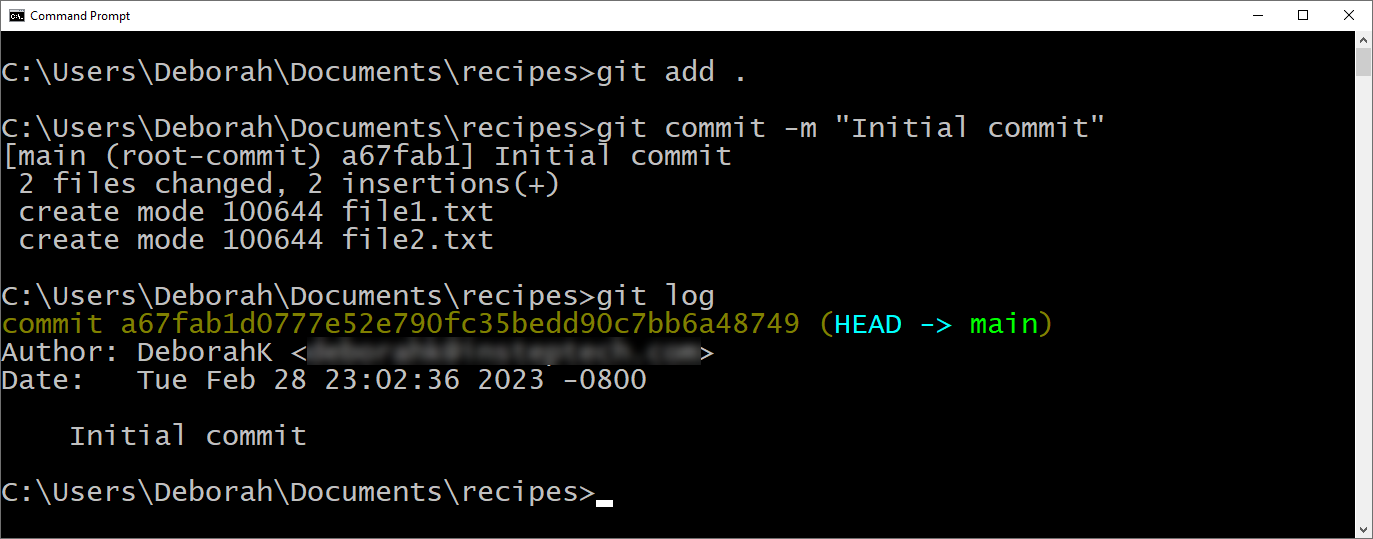 Figure 2. Committing files to the local repository
The add command doesn't output a message.
The commit command displays the branch we are on (main), the first few characters of the commit's id (more on that in a moment), and the commit message. It then lists the changed files. In this example, there were 2 files changed and both were insertions (new files).
The number after create mode indicates the file type and permissions. 100644 means that these are regular files, not folders, with owner read and write permissions.
The log command provides the commit history of the current branch. It includes a long string of numbers and letters called a Secure Hash Algorithm or SHA. The SHA is an id assigned to each commit. Technically, it's a checksum based on the files in the commit plus the log message, author information, and date. The log also displays the person that made the commit (name and email), the commit date, and the commit message.
We now have our main branch with a single commit. We are ready to start working on our project.
Before we move on, let's cover a bit more about commit messages.
How to Create Useful Commit Messages
A commit message details what you've done and why. This is especially important when working on a team as it tells the other team members what's in the commit. But it's also useful when working alone as it reminds you what you'd done.
Defining good commit messages can make it easier to find and compare prior commits. And understanding the purpose of a commit helps us feel confident when merging that commit.
Commit messages could also be used for release notes when working on changes to a production application.
Here are some tips for creating good commit messages:
- Describe the change concisely. Try to keep it to no more than 50 characters. If you can't describe the commit in 50 characters, it may mean you are including too much in a commit. And if you find yourself adding an "and", that's a good indicator that you have multiple changes in one commit.
- Describe what, not how. For example, instead of "Modify 5 files", use "Add copyright notice to footer".
- Use sentence case with only the first letter capitalized.
- Don't end with a period.
- Use the imperative mood. That is to say write the message in the form of a command in the present tense.
This last one is a bit challenging for me because my first thought is to use past tense, describing what I did. But it should be what the commit will do.
To help me remember, I think of completing the sentence "This commit will: " For example: "This commit will improve color contrast". Not "improved" or "improving".
For more information on commit messages, see this video:
To better demonstrate branching, let's jump ahead in time and assume we now have a beta release of our project out to several users. And we have a list of feature tasks to finish and bugs/issues to fix.
How to Create a Branch
Create a branch for every task or issue you work on. This ensures that your work on the task or issue is isolated from your existing codebase. That makes it easier to work on multiple parts of the project simultaneously, or try out ideas without adversely affecting your main codebase.
Following along with our example, we begin with a task to update the style of the recipes to make the ingredients list more clear and recipe steps easier to follow.
We create a branch for the task following these steps.
First, switch to the main project branch:
git checkout main
For our particular example, we only have our main branch at this point, so this command isn't necessary. But in general, it's important to ensure you are on the main branch before creating a new branch.
Then create a branch from the current branch:
git branch style_change
This branch command creates a branch with the specified name from the current branch. In this case, the branch is named style_change.
But this command does not switch our working folder to the new branch.
Then switch to the new branch:
git checkout style_change
The checkout command checks out the branch so you can work with it. Think of it like checking a book out from the library so you can read it. Or selecting a movie from a streaming service so you can watch it.
As part of the checkout process, Git copies the files from the most recent commit on the specified branch into the working folder so we can work on them. When we insert, edit, or delete files in our working folder, we impact the checked out branch.
Alternatively, you can use a single command to create and switch to the new branch.
git checkout -b style_change
The -b option creates a new branch with the provided name and checks out that branch.
Optionally, view the list of all branches to confirm the creation of the branch:
git branch
The branch command lists all existing branches in the repository.
Following these steps using the single command to create and switch to the new branch, the terminal appears as shown below:
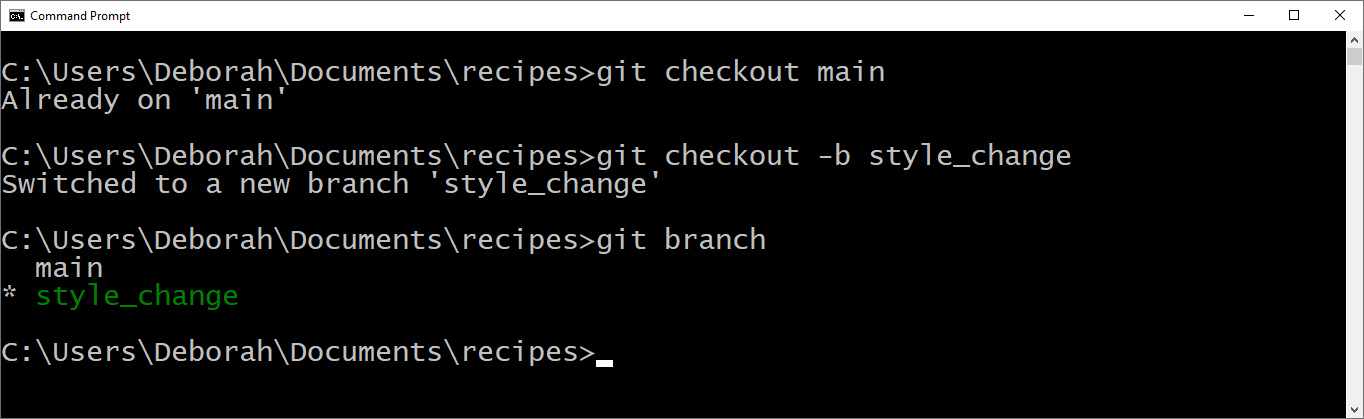 Figure 3. Creating a branch
The first checkout command tells us we are already on the main branch.
The second checkout command creates a new branch called style_change and switches to that branch.
As part of the checkout process, the files in the working folder are changed to the files from latest style_change branch commit. Since this is a new branch created from the main branch, the latest commit on the new branch points to the latest commit on the branch it was created from, which is main. So the files in the working folder are the files from the latest commit to the main branch.
The branch command lists the two branches. The current branch is indicated with an asterisk (*).
Now that we have the new branch checked out, we can make changes to our working folder and those changes only impact that branch. Our main codebase remains unchanged.
To simulate a change to our branch, let's add a line of text to one of our files:
echo Style changes >> file1.txt
Confirm the change by typing out the content of the file:
type file1.txt        // On windows
OR
cat file1.txt        // On a mac
The result of these two commands looks like this:
 Figure 4. Modifying a file
At this point, we have two files in our working folder, one of which we've changed. After we make a set of changes, we want to commit those changes to the branch.
How to Commit Changes to a Branch
As we work on a task or issue, such as our style changes task, we commit our changes. The commit stores a snapshot of our working folder along with any staged changes. Committing basically stores our progress on the branch for that task or issue.
Here are the steps:
First, stage the changes to include in the commit:
git add .
We've used this command before. It tells Git which files we want to include in the commit by adding them to a staging area.
The . (period) adds all of the files in the working folder (and its subfolders) to the staging area.
Then commit the files that are in staging:
git commit -m "Restyle recipe ingredients"
This commit command creates a new commit. As we used previously, the -m option signifies that we are providing a commit message. Follow the -m with the message, in quotes.
Or, if you've only modified or deleted files, not created any new files, you can stage and commit changes to the branch using a single command:
git commit -a -m "Restyle recipe ingredients"
The -a option stages all modified and deleted files in the working folder, but does not include any new files. This commit command then creates a new snapshot of our working folder (except for any new files) and commits them.
Optionally verify the commit using the log command:
git log
We've used this command previously to output the commit history for the repository.
The result is shown below:
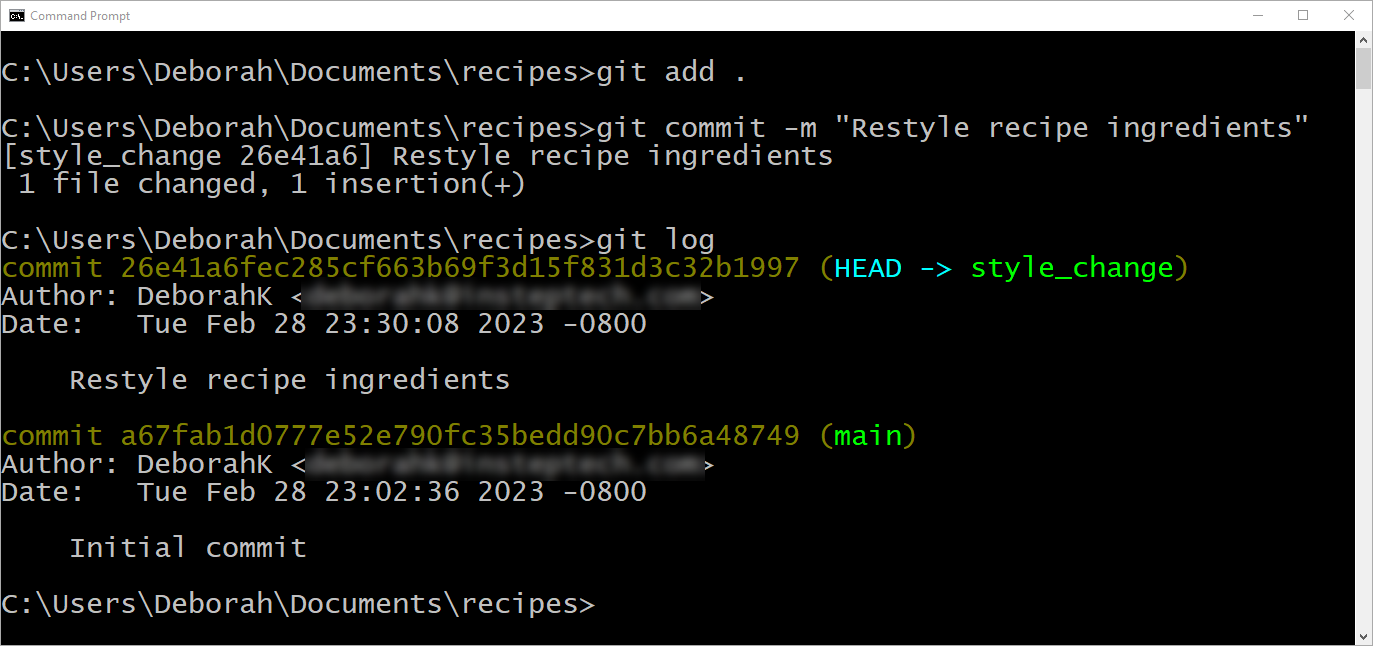 Figure 5. Committing changes to a branch
The log command lists both of our commits with the most recent first.
Continue to make changes to the branch, committing those changes as needed. Consider committing whenever you've completed a logical portion of the task or when you need to put the task aside for other work or when leaving for the day.
How to Create and Commit on Another Branch
As developers, we are often taken away from our current task to work on another task or issue.
For our example, let's say we are still working on the style changes task, and receive an urgent issue from our users that our login page no longer works. We commit our current changes to the style_changes branch as shown above so we can begin work on the login issue.
We want a new branch for the login issue so we can keep our work on that issue separate from our main codebase and our in-progress work on the style changes task.
We create the new login issue branch from our main branch that contains our currently deployed codebase. That way we can deploy the fix without including any code from our in-progress tasks.
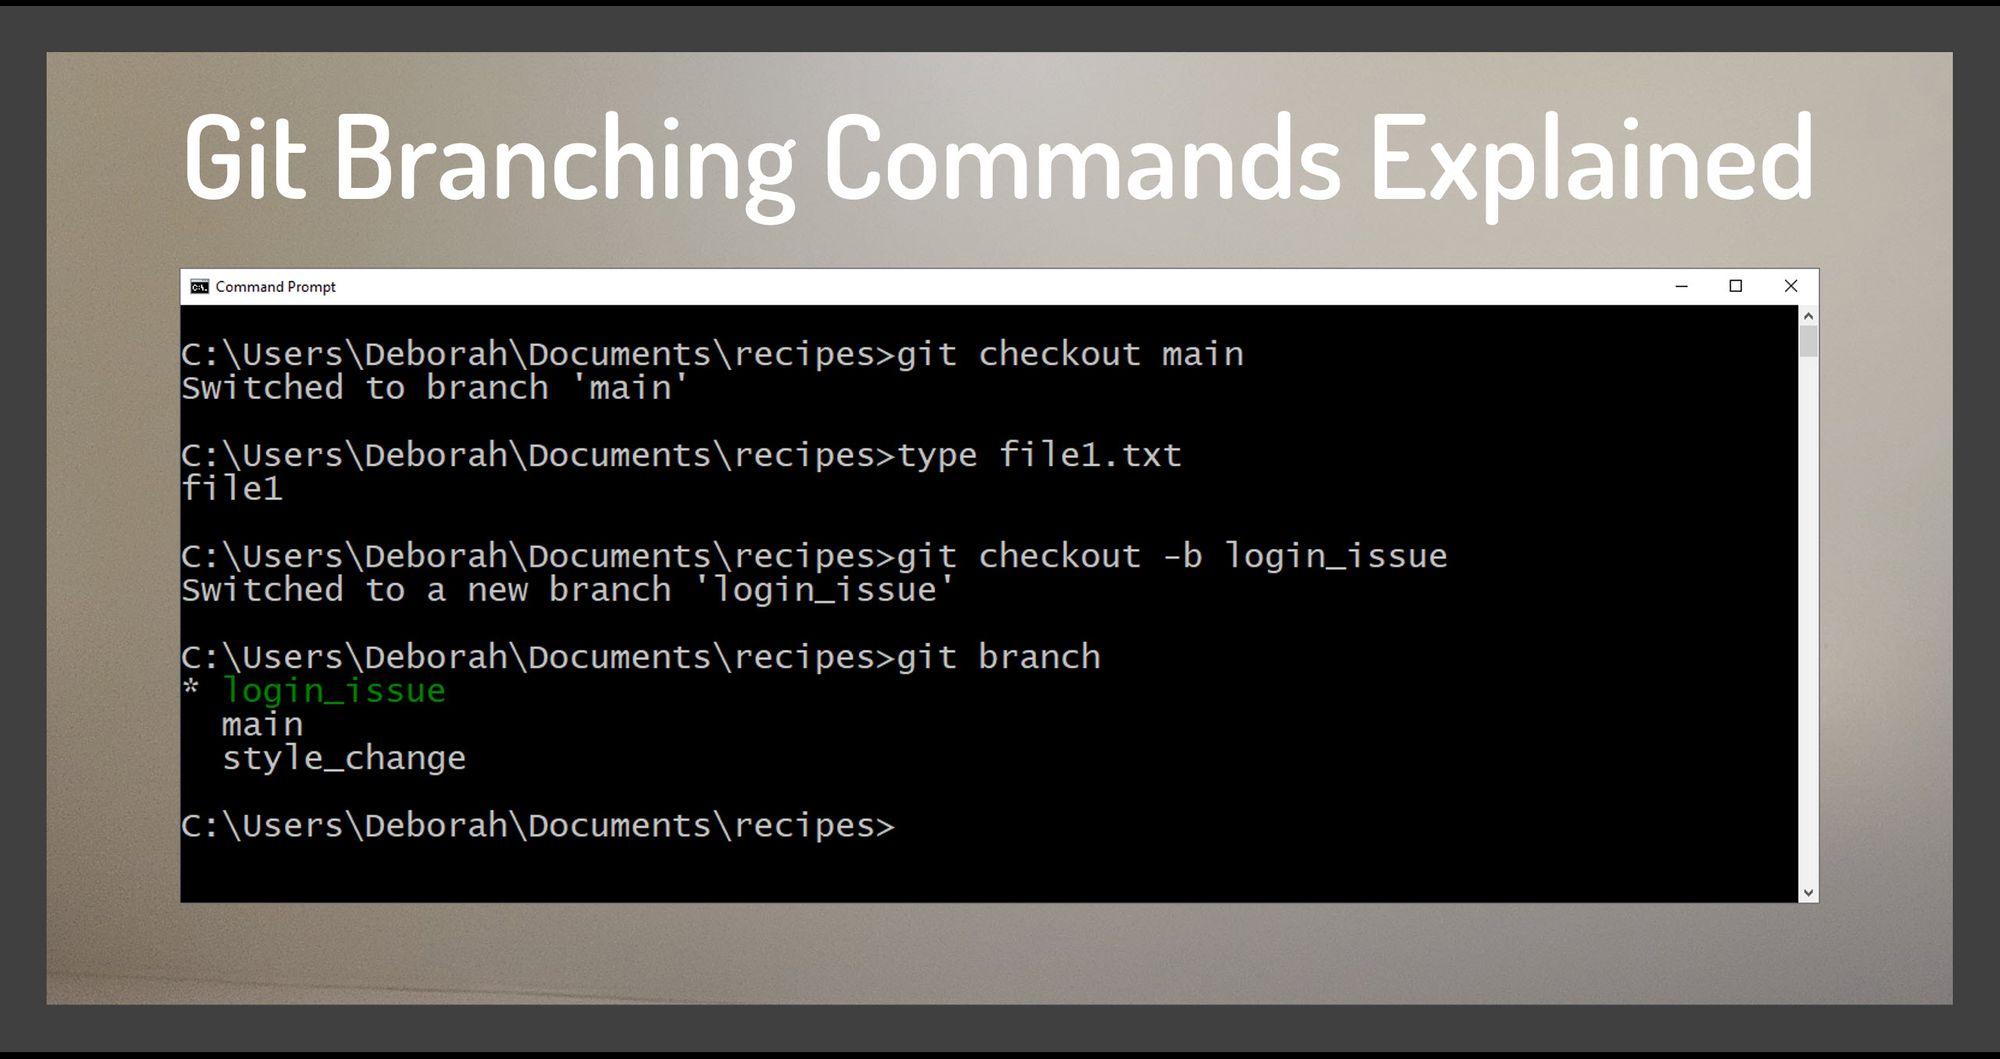
Start by switching to the main branch.
git checkout main
This checks out the main branch, replacing the code in our working folder with the code from the latest commit on our main branch.
Optionally, confirm the code in the working folder:
type file1.txt        // On windows
OR
cat file1.txt        // On a mac
Typing out our file1.txt file, we see that we don't have our style change. Our working folder now contains the original code from our main branch.
Next, create and switch to a new login_issue branch:
git checkout -b login_issue
The -b option signifies that we are creating a new branch with the provided name and checking out that branch.
Optionally confirm the new branch:
git branch
The result of these commands is shown below:
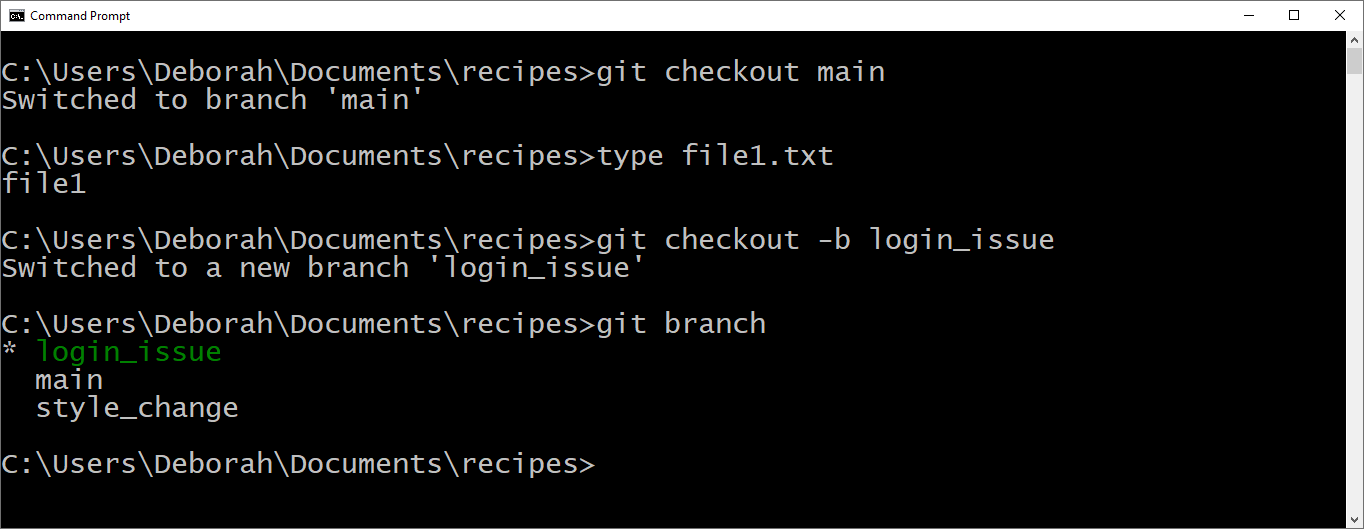 Figure 6. Creating another branch
The branch command lists our three branches. The asterisk (*) indicates that we have the login_issue branch checked out.
As part of the checkout process, the files in the working folder are changed to the files from latest commit on the login_issue branch.
Since this is a new branch again created from the main branch, the latest commit on the new branch points to the latest commit on the branch it was created from, which is main. So the files in the working folder are the files from the latest commit to the main branch.
Next we make our changes to fix the login issue. We'll simulate the change by adding a line of text to our other file:
echo Login changes >> file2.txt
Confirm the change by typing out the content of the file:
type file2.txt        // On windows
OR
cat file2.txt        // On a mac
The file contents are shown below:
 Figure 7. Changing a file
As with our style_change branch, as we finish our changes, we commit those changes.
Stage the changes for the commit:
git add .
As we've seen previously, this command tells Git which files we want to include in the commit by adding them to a staging area.
Then commit the files from staging to the checked out branch:
git commit -m "Fix login issue"
This creates a new commit from our staging area.
Optionally verify the commit using the log command:
git log
Here is the result of these commands.
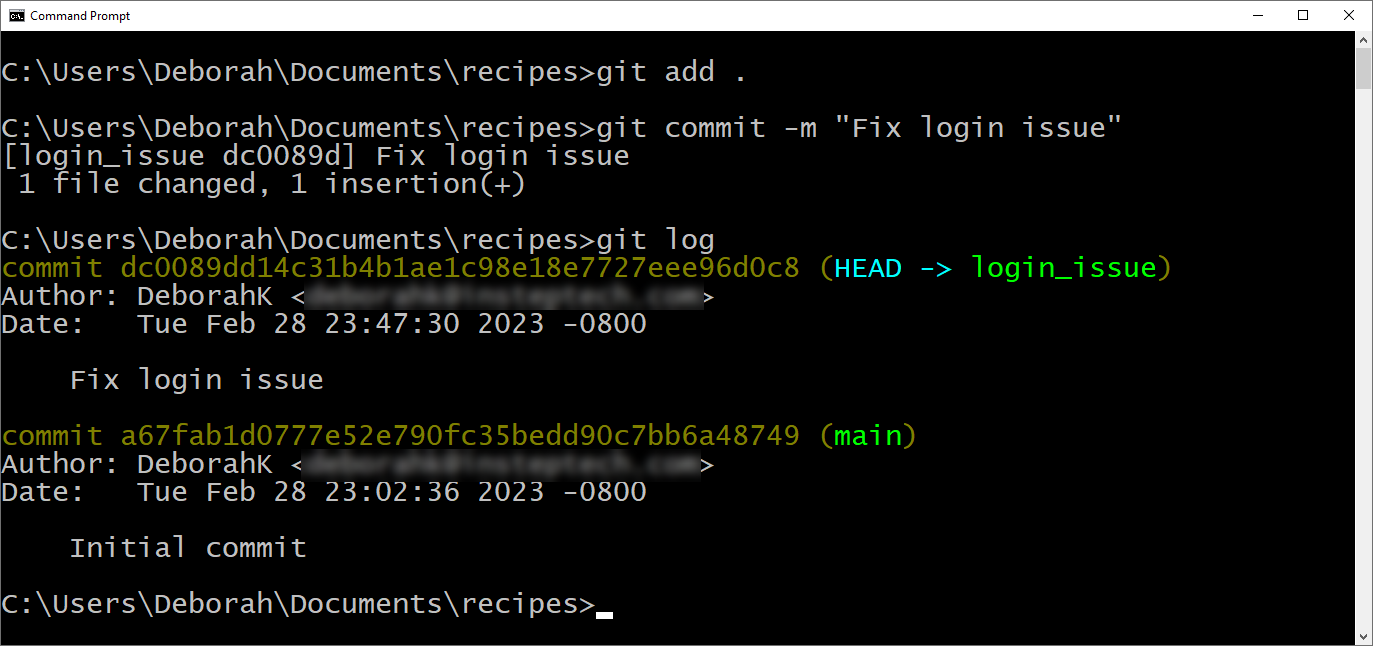 Figure 8. Committing changes
Notice in the logging above that we don't see the style change commit. That's because it's in the style_change branch and not in this login_issue branch.
We continue to make changes until the login issue is complete.
While working on the login issue, if you need to go back to the style change task:
- Check in all current changes to the login issue.
- Use the
checkoutcommand to switch to thestyle_changebranch. - Work on the task, checking in all changes.
- When you are ready, switch back to the
login_issuebranch.
Use the branch command at any time to view your list of branches and confirm which branch you have checked out.
How to Merge a Branch
When we are finished with the task or issue, we want to merge the code for that task or issue into our main codebase. We can then optionally deploy the change to the users.
Let's first confirm the content of our files by typing the two commands, one at a time:
type file1.txt        // On windows
type file2.txt
OR
cat file1.txt        // On a mac
cat file2.txt
The result is shown below:
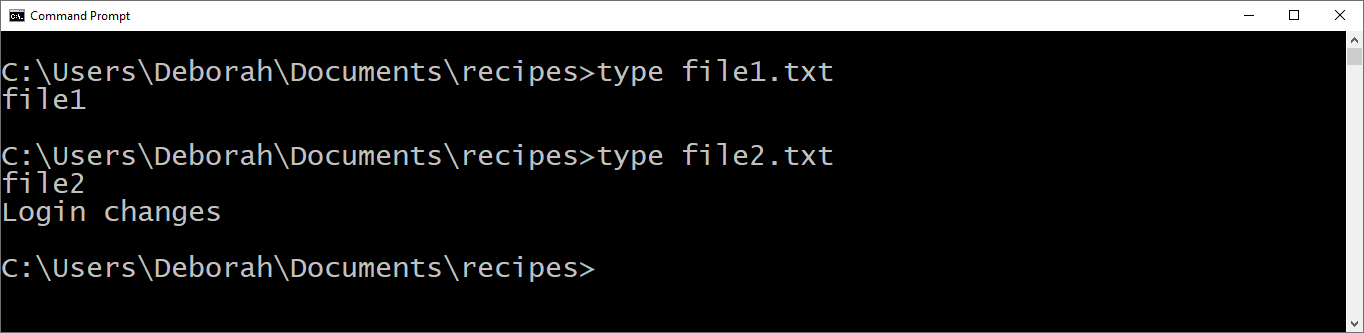 _Figure 9. Current content of the loginissue branch
Our file1.txt has our original text, not our style changes. Our file2.txt has our new login text.
Now we are ready to merge our login_issue branch into our main branch.
First, switch to the main branch:
git checkout main
To be clear what's happening, let's again verify the content of our files:
type file1.txt        // On windows
type file2.txt
OR
cat file1.txt        // On a mac
cat file2.txt
Here is the result:
 Figure 10. Content of the main branch before the merge
Notice that both files contain only our original text. When switching to the main branch, our working folder content was changed to the files from the last commit to the main branch. It doesn't include any of the changes we made in our other branches.
Then merge the task or issue branch into the main branch.
git merge login_issue
This merges the changes from the specified branch into the current branch. If there are any conflicts, Git prompts you to resolve them before the merge can be completed.
We'll again verify the content of our files:
type file1.txt        // On windows
type file2.txt
OR
cat file1.txt        // On a mac
cat file2.txt
Here is the result of these commands:
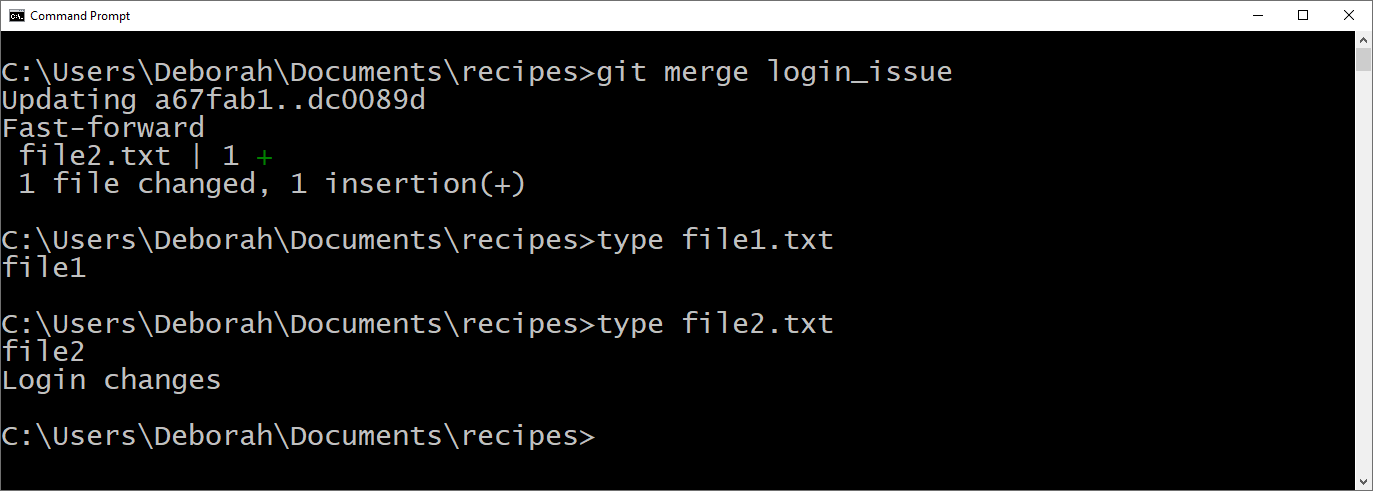 Figure 11. Content of the main branch after the merge
The merge command displays information on the type of merge along with the files that were merged.
In this case, Git used a fast-forward type of merge. This is a simple merge that Git can use when there are no new changes on the current branch since the merged branch was created.
The commits from the merged branch are effectively incorporated into the current branch. No need for a new merge commit and there is no possibility of a merge conflict.
For our example, we didn't make any changes on the current branch ( main) since the point we created the login_issue branch. So the commits on the login_issue branch could be incorporated directly into the main branch.
We can see from the content of file2.txt that our main branch now contains the changes from our login_issue branch! We successfully merge the branch into main.
Once a branch has been merged into the main codebase, it is safe to delete it.
How to Delete a Branch
Delete any branch that you no longer need to keep your repository clean and easier to manage.
Let's start by confirming our current list of branches:
git branch
If you aren't on the main branch, switch to the main branch:
git checkout main
You cannot delete the branch you are on. By switching to the main branch you can delete any of the other branches.
Delete the desired task or issue branch:
git branch -d login_issue
The -d option deletes the specified branch from the local repository.
Optionally confirm the resulting list of branches:
git branch
The result of these commands is shown below:
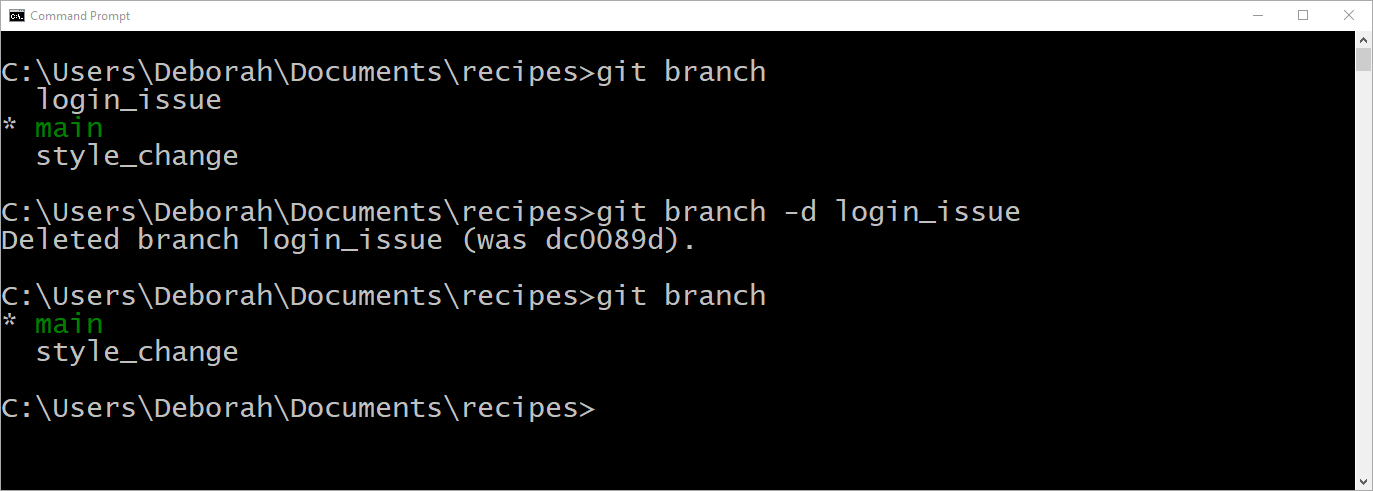 Figure 12. Deleting a branch
The first branch command lists all three branches.
The branch -d command deletes the defined branch and logs the action.
The last branch command lists our two remaining branches. Our issue branch was successfully deleted!
Now, what about our original branch? Our main branch has our login issue changes merged in, but our original style_change branch does not.
How to Merge "main" Back to Branches
To minimize more extensive merging conflicts later, it's often a good idea to keep all task and issue branches up to date with main. That means after changes from a branch are merged into the main branch, we want to merge those changes from the main branch back to all remaining task or issue branches.
First, switch to one of the task or issue branches:
git checkout style_change
Here we switch to the style_change branch as it's our only other branch.
Optionally, view the commits for that branch:
git log
This is the result of these commands:
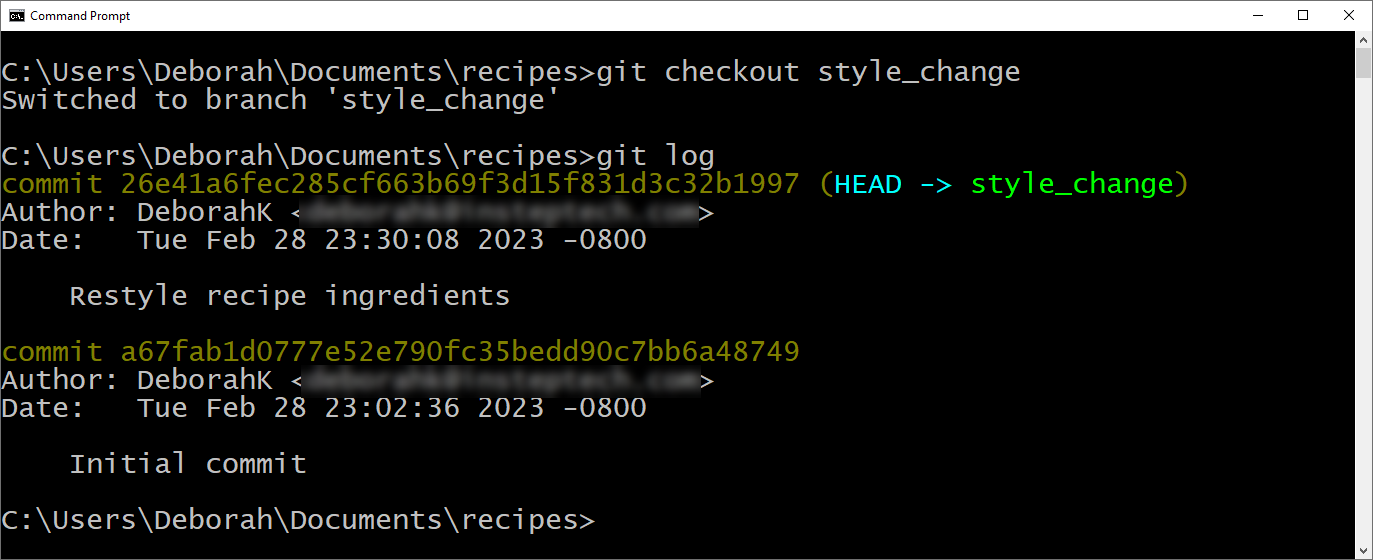 _Figure 13. Logging the stylechange branch before merging main
Notice that the log command lists the initial commit and the styling change. It does not have our login fix.
Now merge the main branch into the current branch:
git merge main
This merge command merges the change history from the main branch into the current branch, which in this case is the style_change branch.
Optionally, again view the commits for the branch:
git log
The result is shown below:
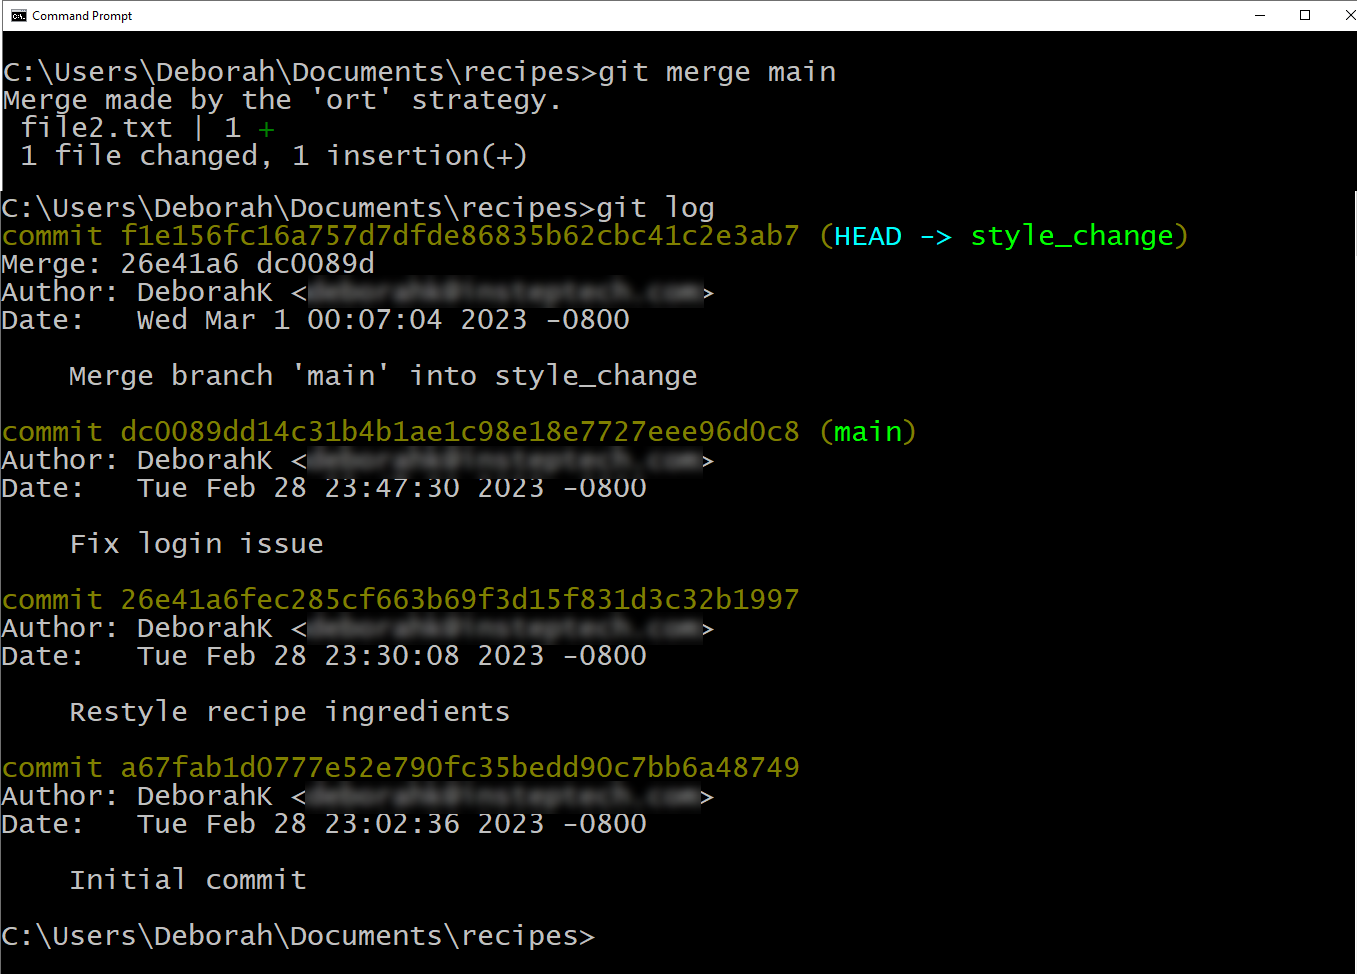 _Figure 14. Logging the stylechange branch after merging main
Notice that in this case, Git couldn't use the fast-forward type of merge. That's because the style_change and main branches have diverged, meaning that they have both changed since the time we created the style_change branch.
Git instead used an ort strategy for merging the changes. See the documentation for more information on this merge strategy.
Because Git couldn't use the fast-forward type of merge, the merge process created a new commit, called a merge commit. A merge commit represents a combination of the changes made on the separate branches.
The log command in Figure 14 includes our style commits and the merged commits from main. Starting at the top:
- The merge commit created by the merge process.
- The commit of our login issue fix merged from
main. - The commit of our first style change.
- Our initial commit to
mainbefore we created the branch.
At this point, we can continue working on our styling task. Or use the steps we've covered to add branches for other tasks or issues.
How to Finish Our Project
Let's finish up our project, making one more change to our branch and then merging our changes to main. These steps have minimal explanation since we covered them in detail earlier in this tutorial.
Switch to the style_change branch:
git checkout style_change
If you were already on this branch, it will display a message.
Then make any final changes. We'll simulate the changes by adding another line to the file2.txt file:
echo More style changes >> file2.txt
Add the files to staging:
git add .
And commit the changes:
git commit -m "Restyle recipe steps"
The result of these steps are below:
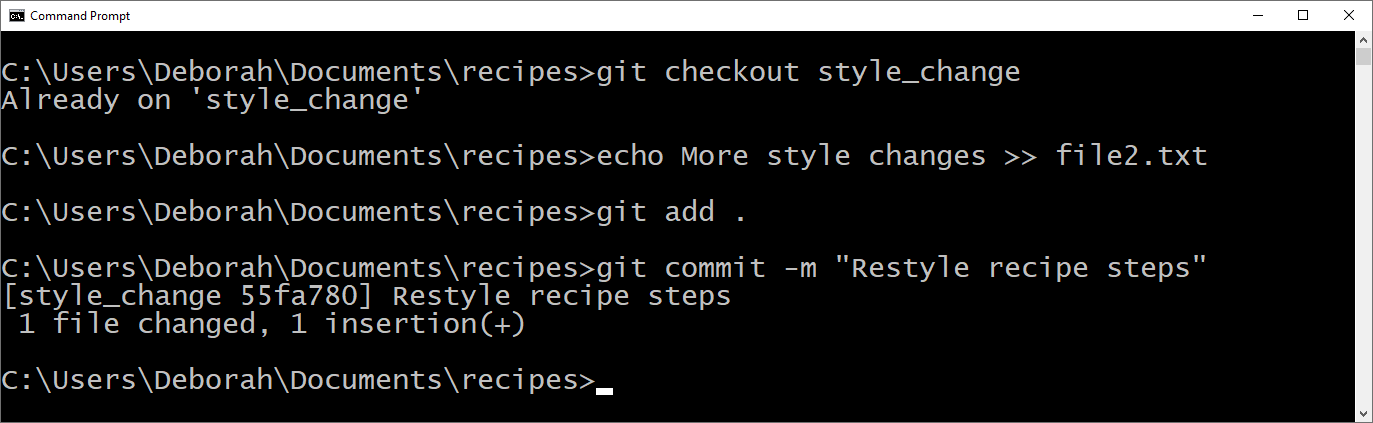 Figure 15. Making one more change
Now we are done with the task and ready to merge it into the main branch.
Switch to the main branch:
git checkout main
Merge the style_change branch into main:
git merge style_change
Delete the style_change branch:
git branch -d style_change
Optionally, confirm that the branch was removed:
git branch
This results in the output shown below:
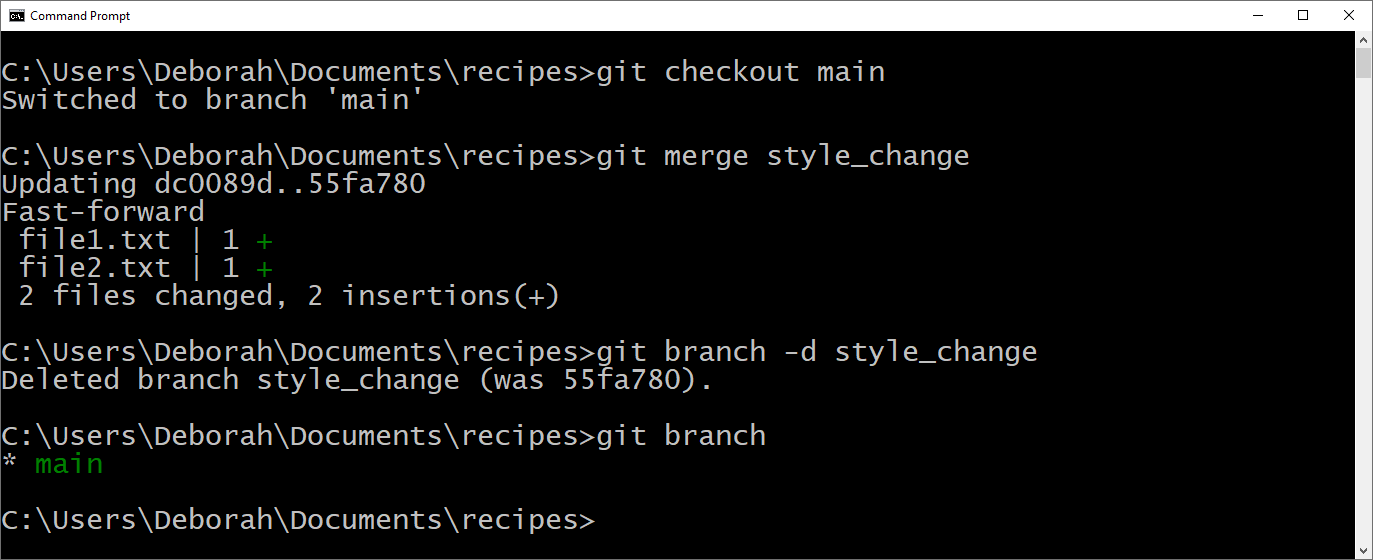 Figure 16. Merging to main
Notice that the merge was able to use the fast-forward strategy.
At this point, we now only have our main branch.
Optionally, confirm the status of the main branch:
git log
Here is the result:
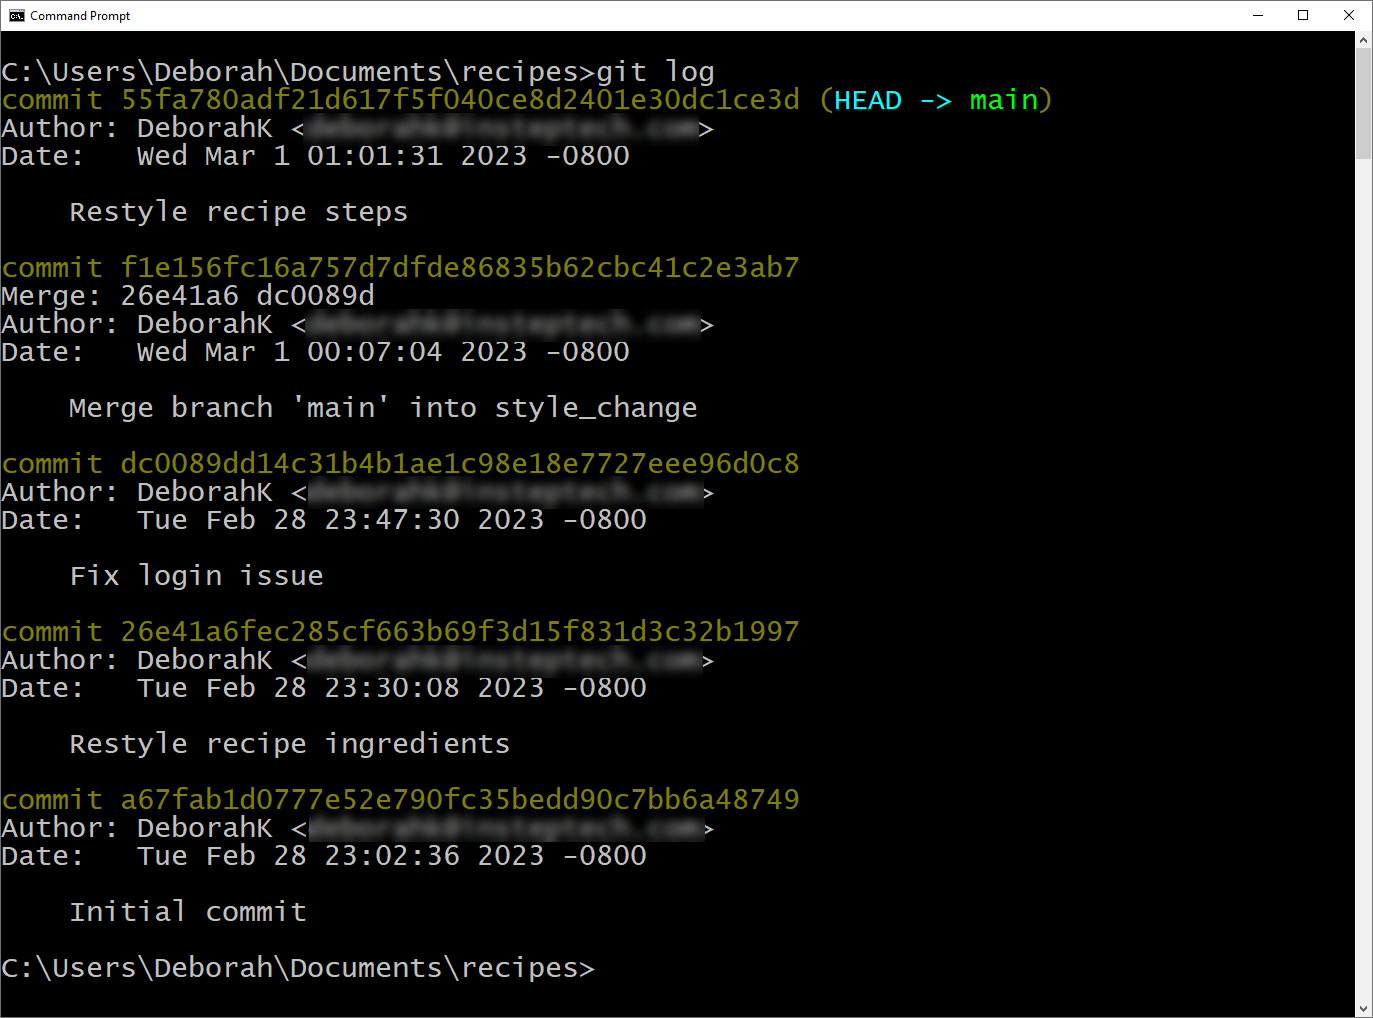 Figure 17. Final commit history
The log command displays:
- The last style change merged from the
style_changebranch. - The merge commit created by the prior merge process.
- The commit of our login issue fix merged from
main. - The commit of our first style change.
- Our initial commit to
main.
We now have our main codebase up to date!
If you want to completely remove all of the work you've done, delete the recipes folder. This deletes the files and the Git repository.
Wrapping Up
The basic steps for working with branches are:
- Switch to the
mainbranch. - Create the new task or issue branch from the
mainbranch and check it out. - Make changes to the files in the working folder.
- Stage and commit changes to the task or issue branch.
- When the task or issue is complete, switch to the
mainbranch and merge the changes from the task or issue branch tomain. - Delete the task or issue branch.
Note that these steps are a bit more complex when working with a remote repository. In that case check with your team or open source community on the appropriate additional steps for using branches with a remote repository.
Managing branches is an essential part of working with Git. By following the commands outlined in this article, you can create, commit, merge, and delete branches with ease.
With these skills, you can work on multiple features or bug fixes at the same time without affecting the main codebase, and merge your changes back in when they are complete.