By Deborah Kurata
One of the things we fell in love with when we saw our future backyard was the tree. The valley oak is the largest North American oak. It can grow to be 600 years old and 100 feet tall. It's known for its irregular, spreading branches.
Speaking of branches...a key feature of Git is branching. Think of the trunk of a tree as your main project. We create branches to separate our work for each task. It helps us isolate and work on one part of the project without directly impacting the main project until we are ready to merge it back in.
Let's explore the concepts and learn how to work with Git branching. You can apply that knowledge whether you use the command line or a tool such as GitHub Desktop or VS Code's Git integration.
A separate tutorial walks through the commands for working with branches. You can also watch the associated video here which includes demonstrations using VS Code.
Why Use Branching?
By default, when we initialize a Git repository, Git creates a branch often called "main", though you may see it with other names. We'll refer to the primary branch as "main" throughout this article.
We create a separate branch for every issue or feature we work on. So as a feature is in progress, we commit our code to the branch for that feature.
Say, for example, we expect to spend a week working on an "Add feedback" feature that allows users to comment on a recipe. As we work, we commit our edits to the "Add feedback" branch.
Someone else on the team is working on updating the copyright notice on all of our site's pages. They commit their edits to the "Add copyright" branch.
Suddenly, we receive notification from our users that the login isn't working. We create a new branch to fix that issue without impacting any partially complete work.
When the code for the "login issue" branch is complete, we merge the branch back into the main branch. And optionally, we can delete the merged branch.
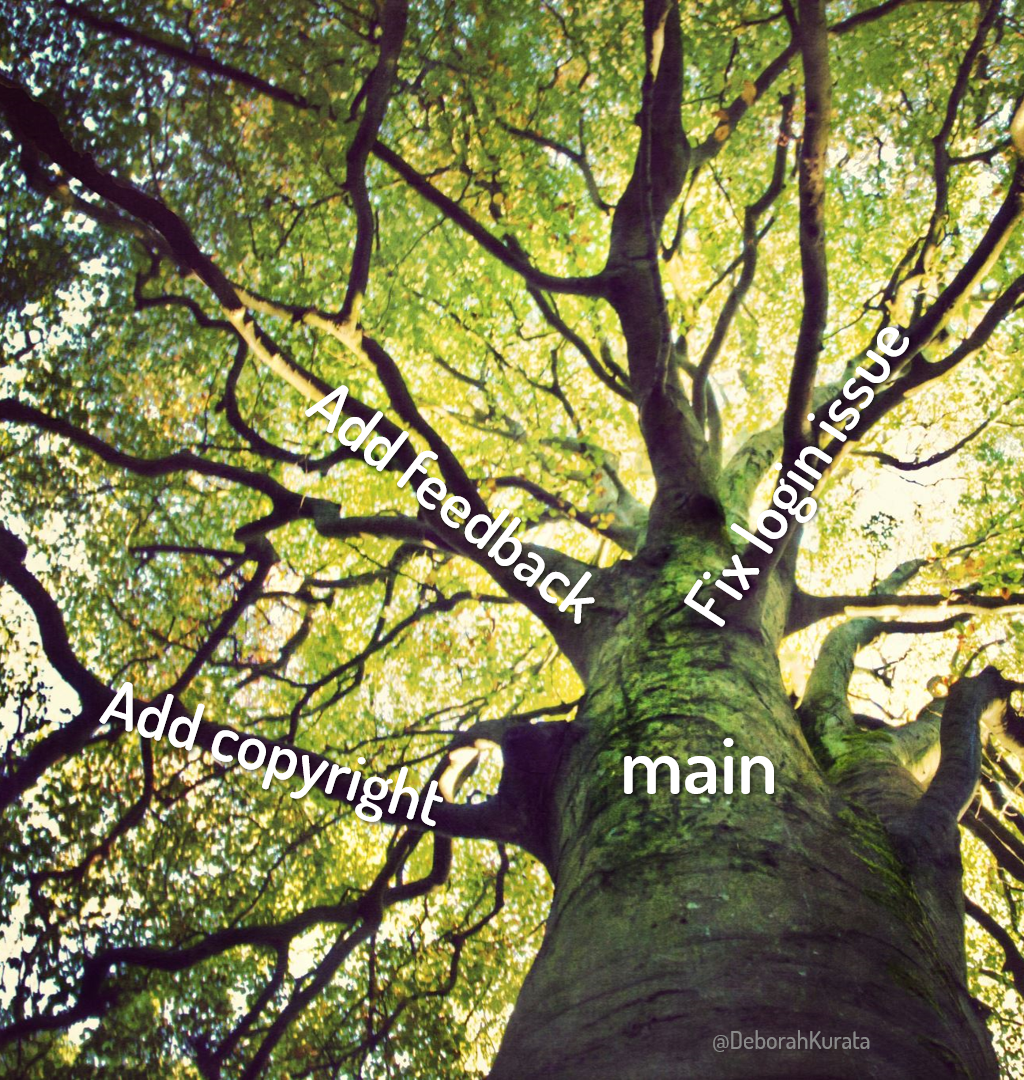 Figure 1. Working version in the main branch, work in progress in feature or issue branches
We use branching to keep a working version of our code in the main branch, and partially completed code in feature or issue branches. That way our main branch will always have a working version of the code.
But Git doesn't enforce this – rather, it's up to you and your team to define if and how you'll use branching.
How to Create and Switch Branches in Git
Our team is building a website for collecting and managing recipes. We create a repository for the project with Git. By default, it creates the primary project branch, often called "main".
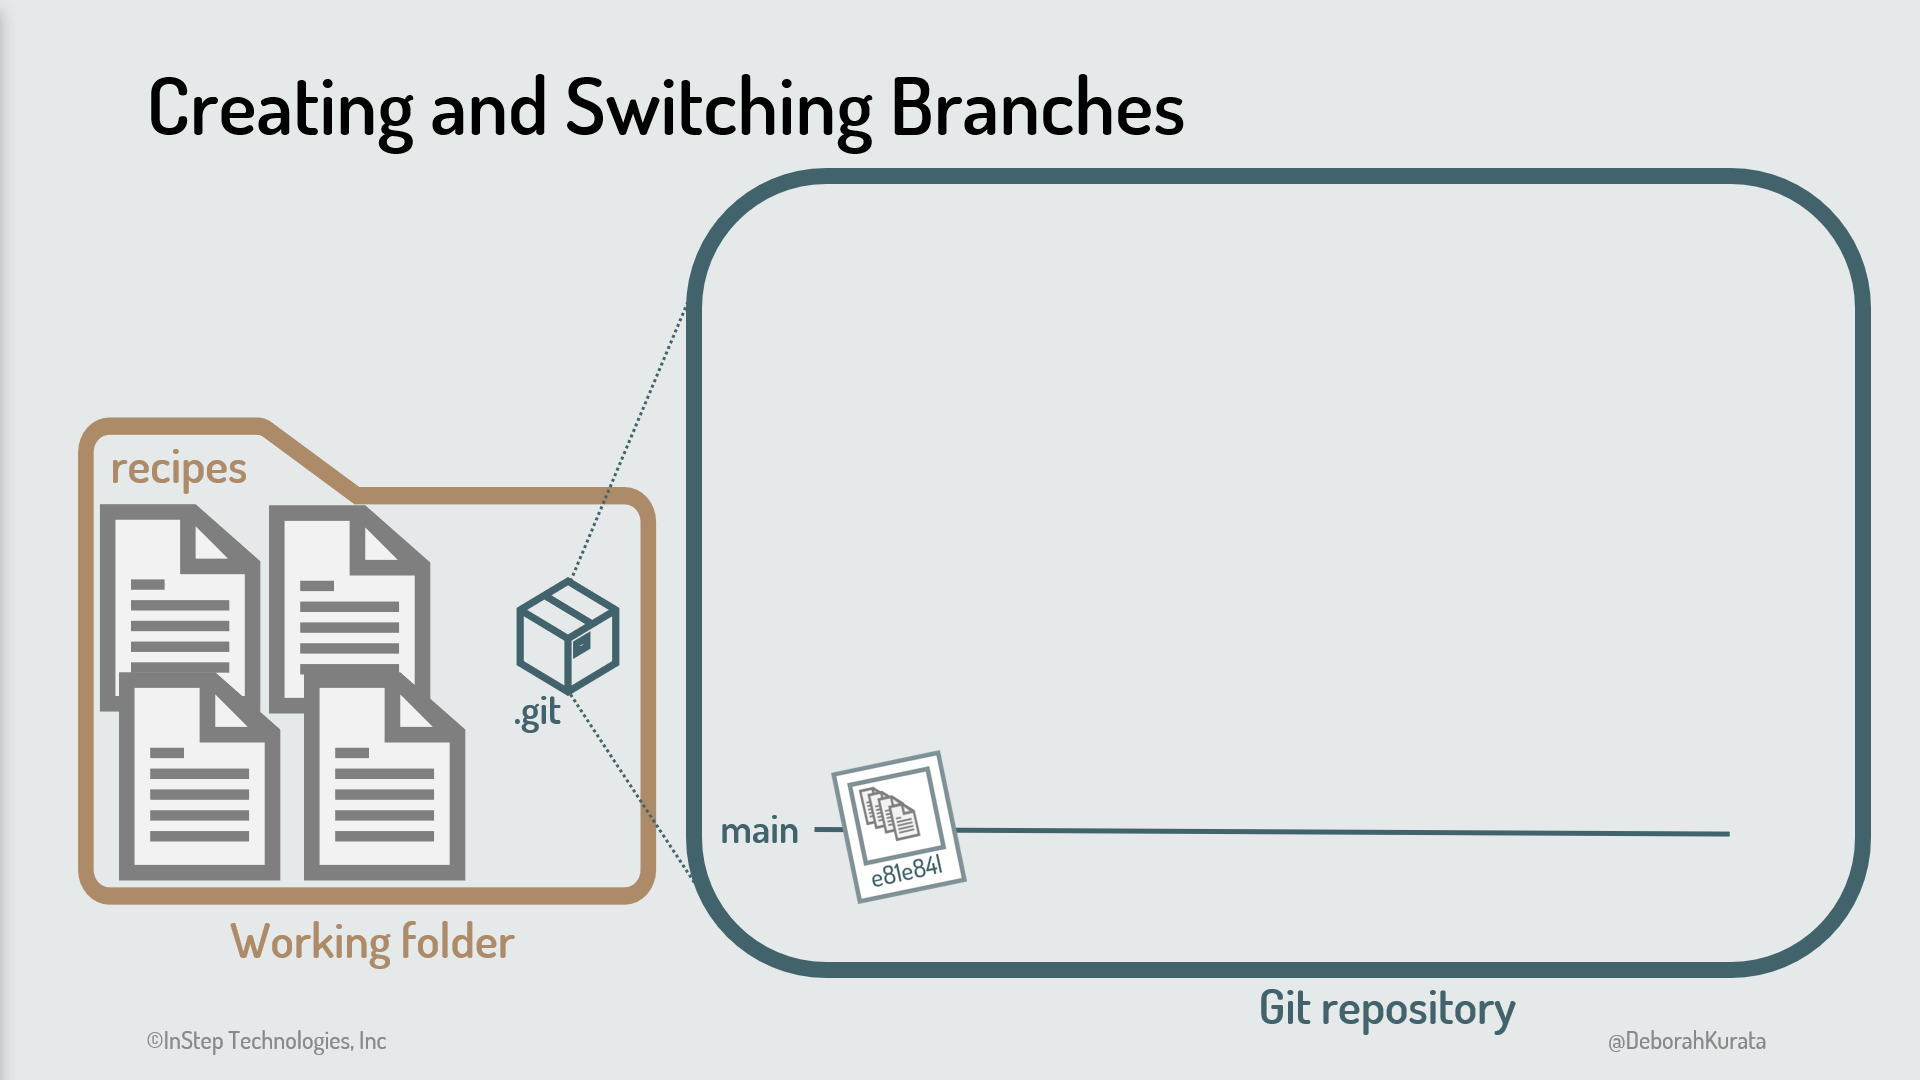 Figure 2. Main branch with a commit.
On the left in Figure 2 is our working folder with our Git repository shown as a box. That box is expanded to the right so we can peek inside. And there we have our main branch with a single commit. The code in our working folder currently matches the files in that most recent commit.
We start on a project to update the style of the website. We want to ensure our work on this task is isolated from our existing code, so we create a branch from the main branch.
Before we start work on the branch, we switch to that branch. Then we make changes for our task. We modify one file, then stage and commit to the branch. The result is shown in Figure 3.
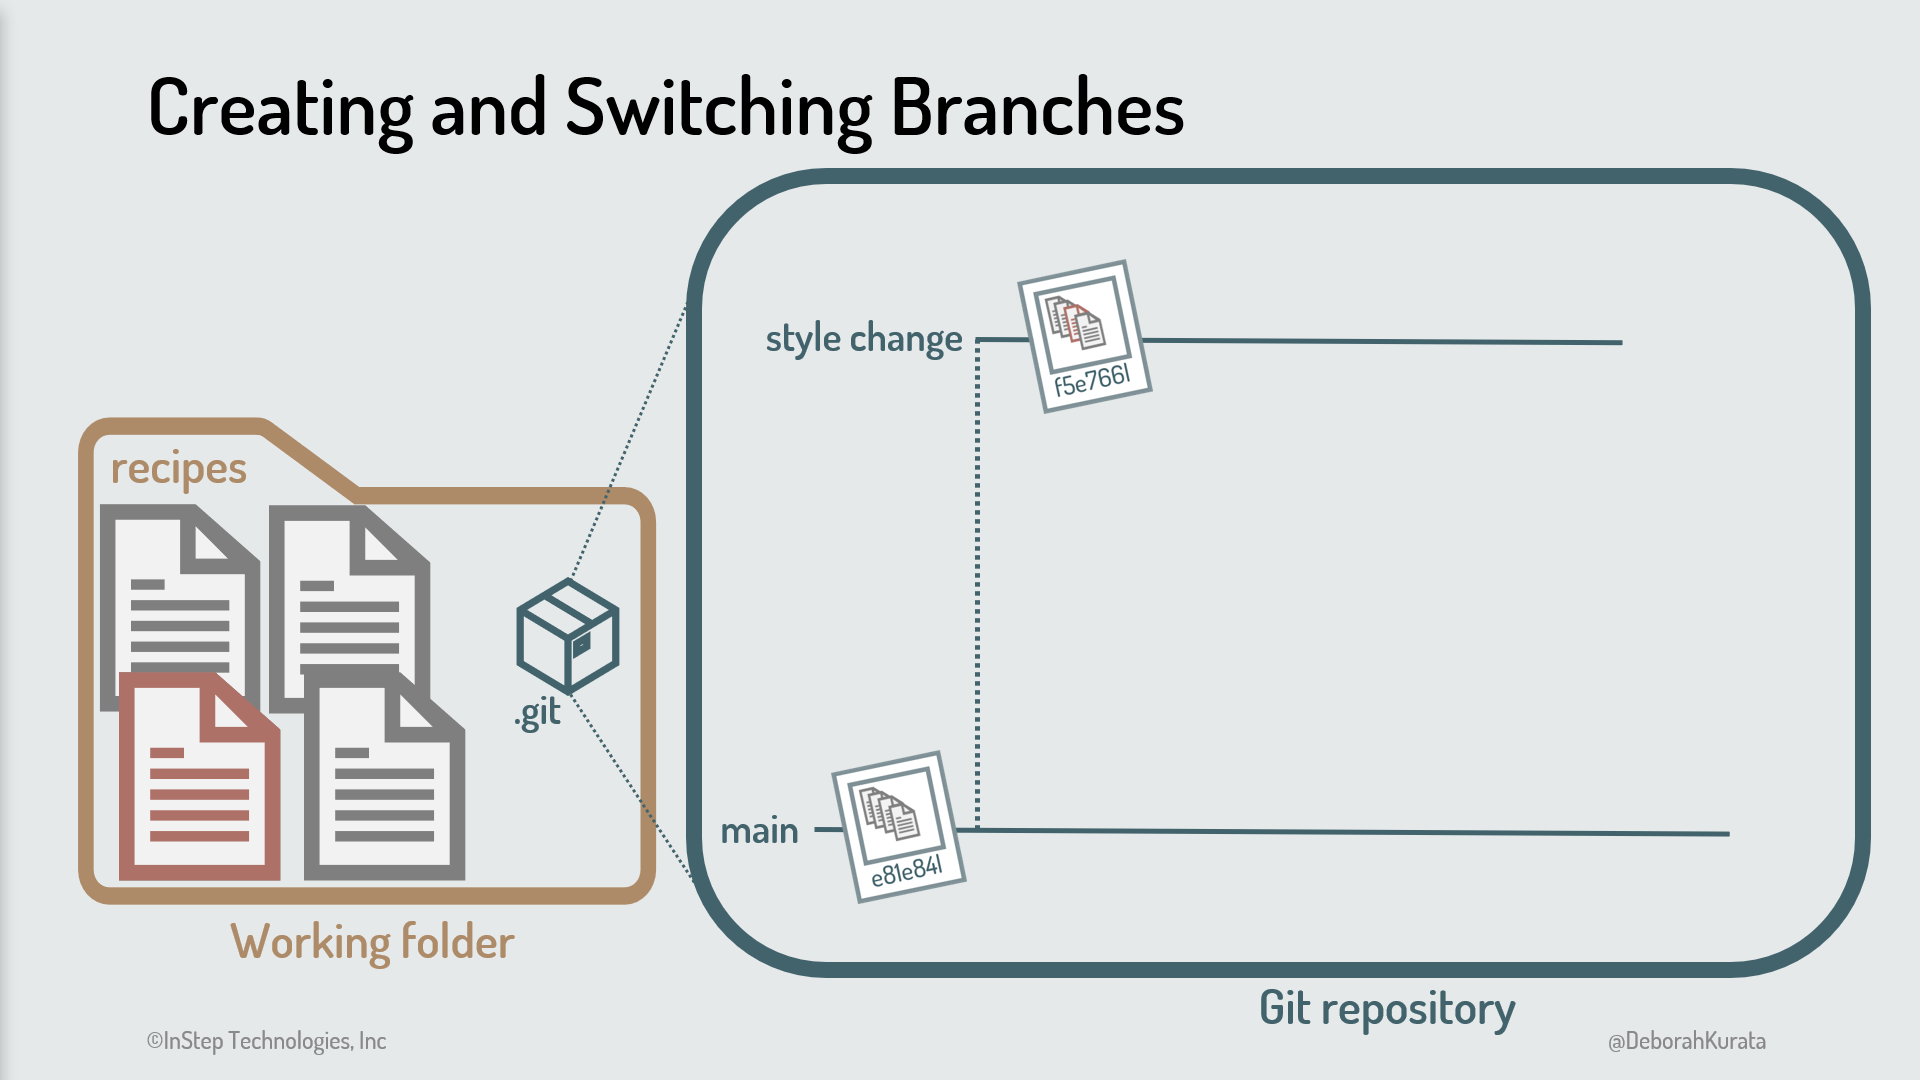 Figure 3. "Style change" branch with its first commit.
Any time you want to work on a branch, switch to that branch. Switching to a branch checks out that branch. And the code in our working folder is automatically changed to the code from the latest commit on that branch. All commits then occur on that checked out branch.
At this point, one of our users reports a login issue. We have our style change partially complete, so we don't want to make our fix in that branch.
We instead create another branch from the main branch. Since we created it from the main branch, the initial code for this new branch is a copy of the main branch code. It has none of our style changes.
When we switch to that branch, our working folder reflects the code from that branch. We've basically reset our working folder to the code for the new branch.
 Figure 4. Switching to the "login issue" branch resets the working folder
We then fix the login issue in this new branch, modifying one file and staging and committing the change as shown in Figure 5.
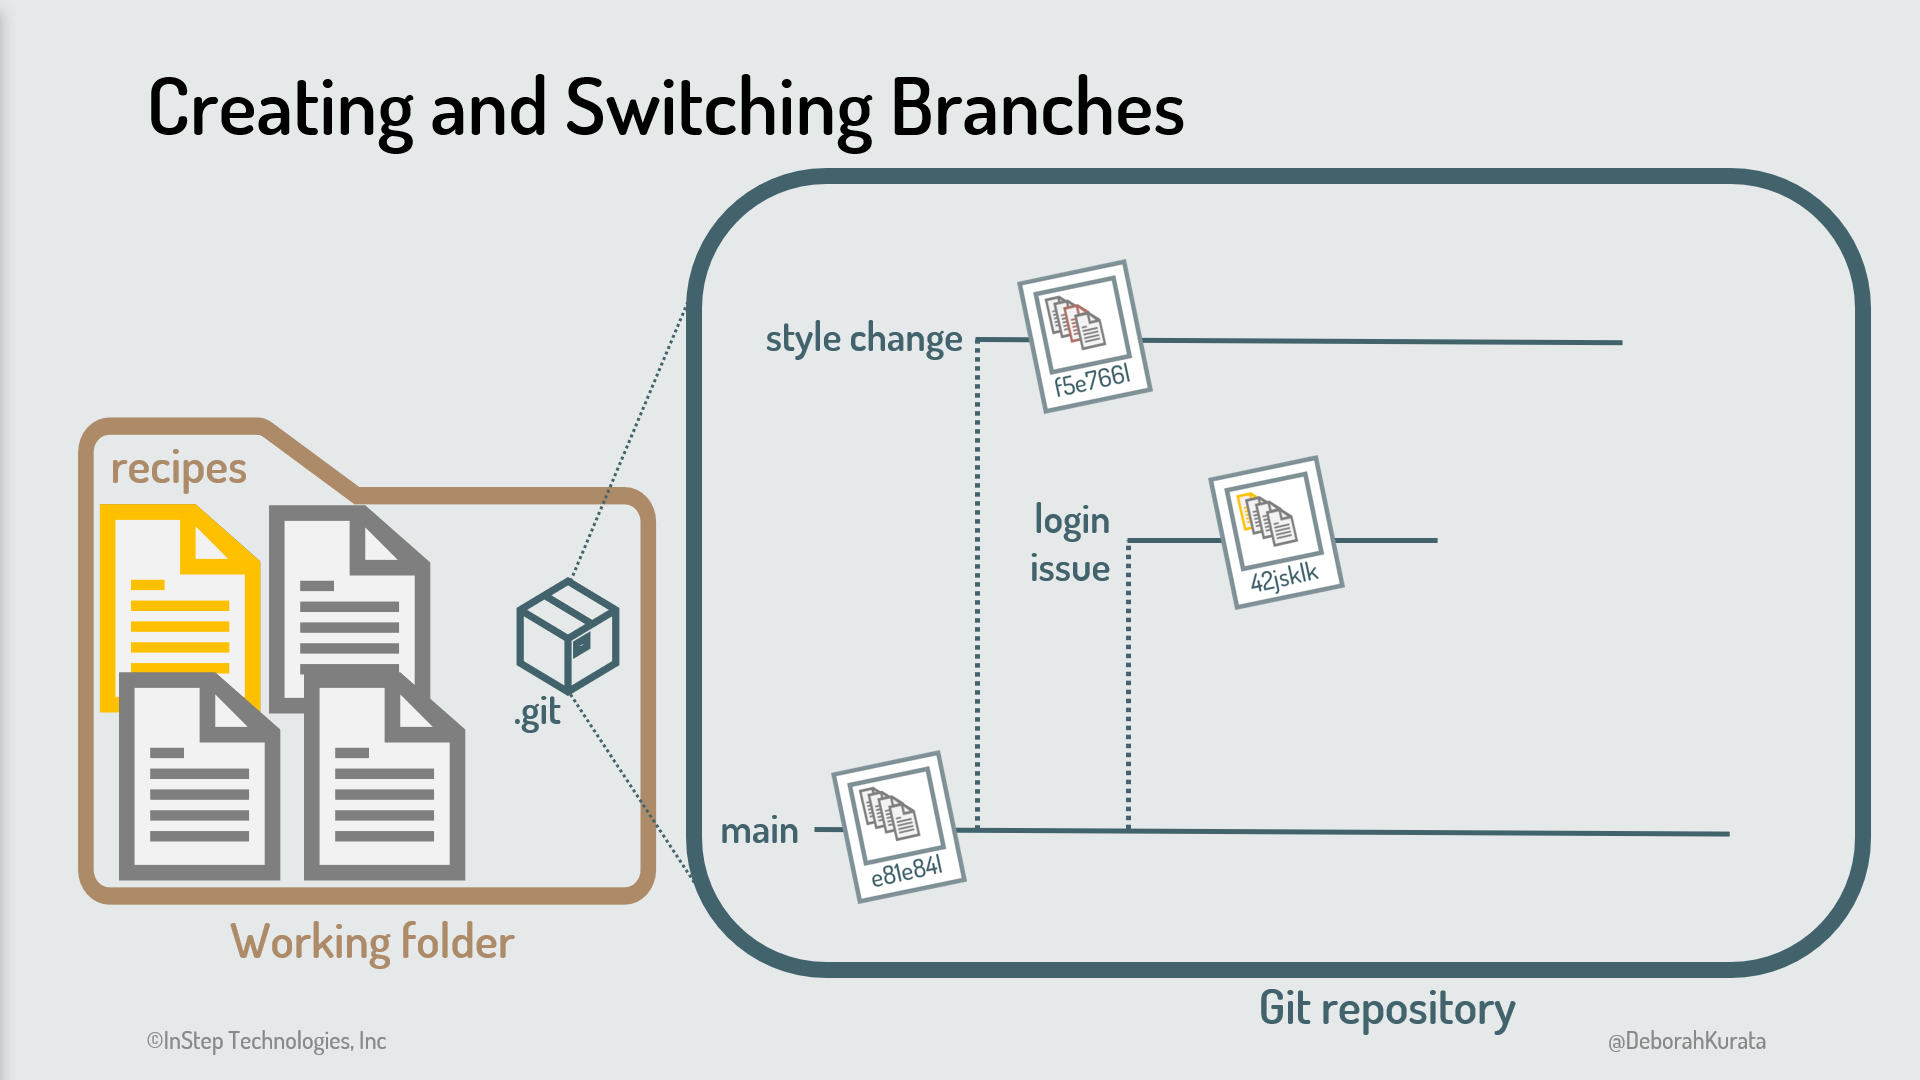 Figure 5. "Login issue" branch with its first commit.
Is this process clear at this point? Because we've used branches, we can work on other issues as they come up without impacting the tasks that are in progress.
How to Merge Branches in Git
When our login fix is complete, we merge the "login issue" branch back into the main branch. The fix then becomes part of our main code as shown in Figure 6. Once the branch is merged, we can delete it.
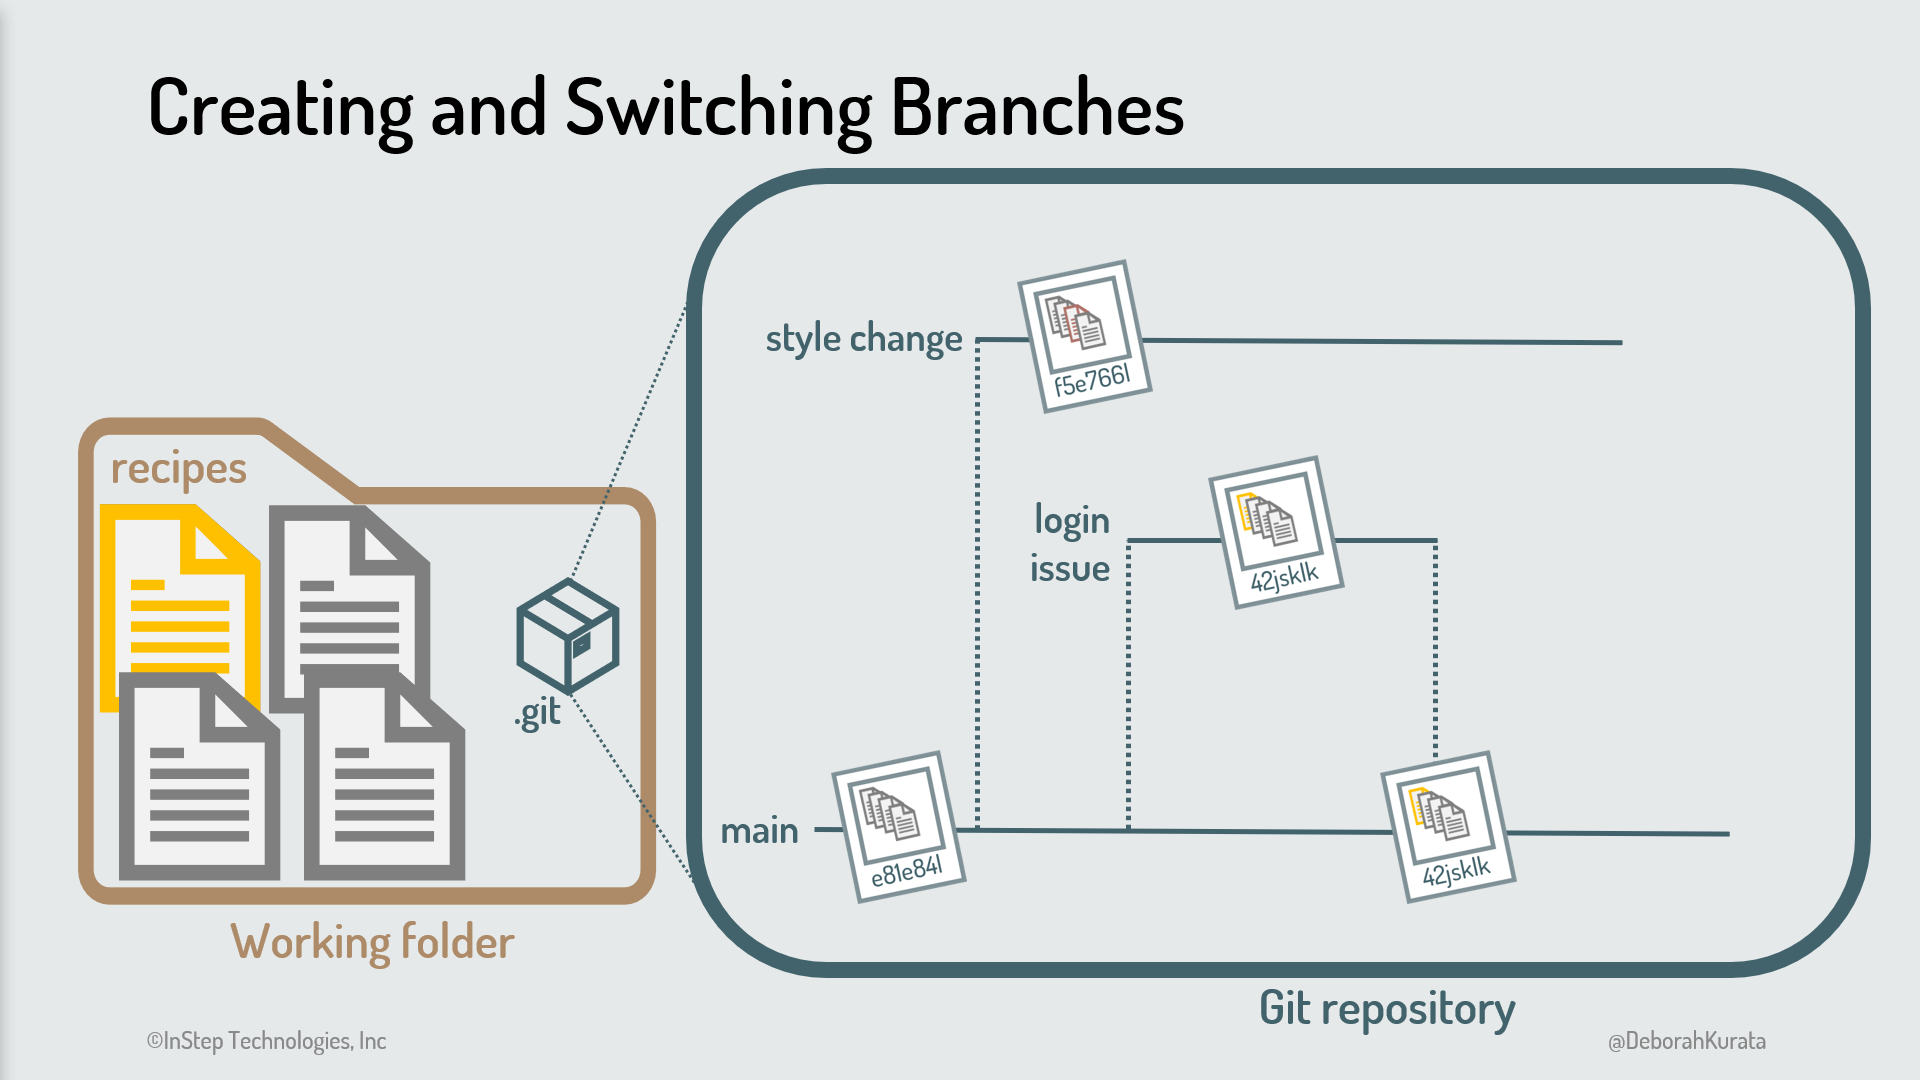 Figure 6. Merging the "login issue" branch to main
Now we switch back to the "style change" branch to finish our modifications. The code in our working folder is automatically switched to the code from the last commit in that style change branch.
We make more style changes and stage and commit those changes to the "style change" branch. The result is Figure 7.
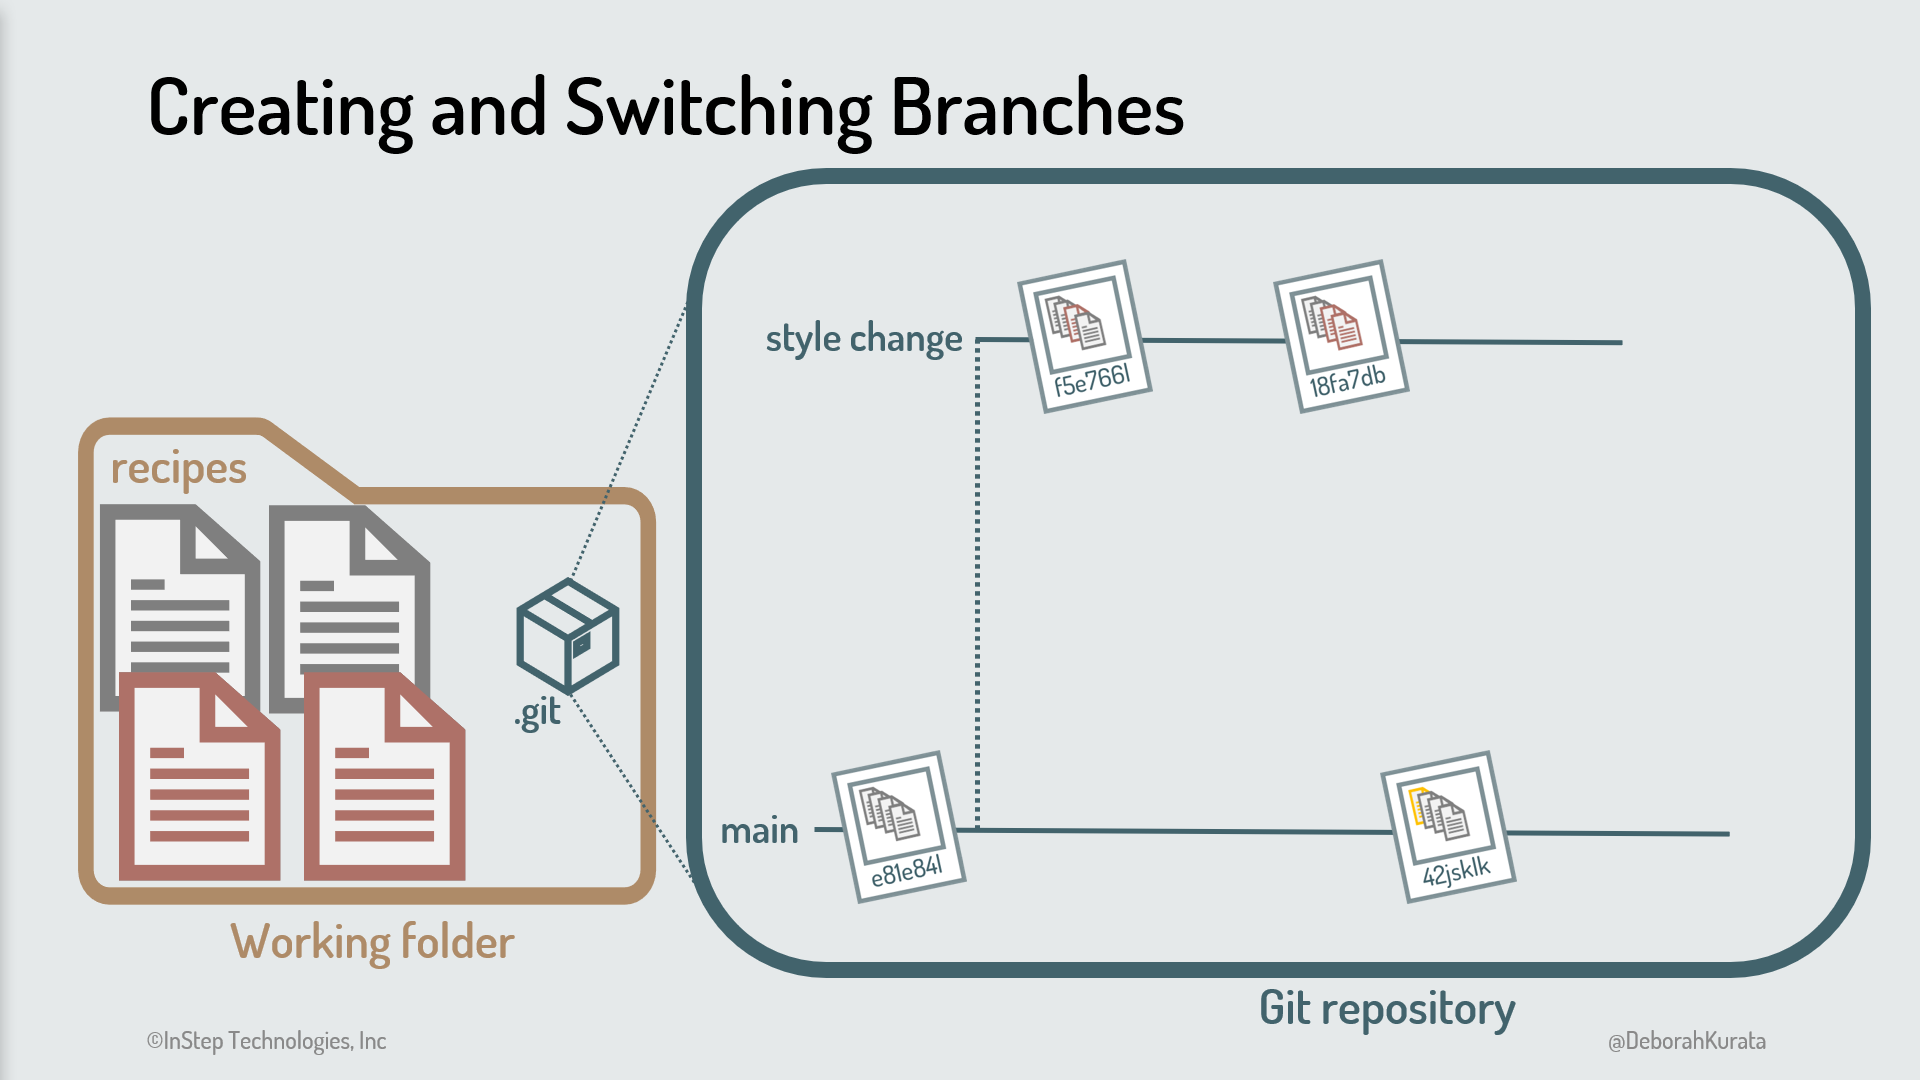 Figure 7. "Style change" branch with multiple commits
But wait...our main code branch now has our login fix, but our "style change" branch does not.
At some point, before the "style change" branch is merged into main, we need to pull in the login change from main.
We merge the latest changes from our main branch into the "style change" branch, resolving any merge conflicts. This creates another commit as shown in Figure 8. Notice that our working folder now reflects both sets of changes.
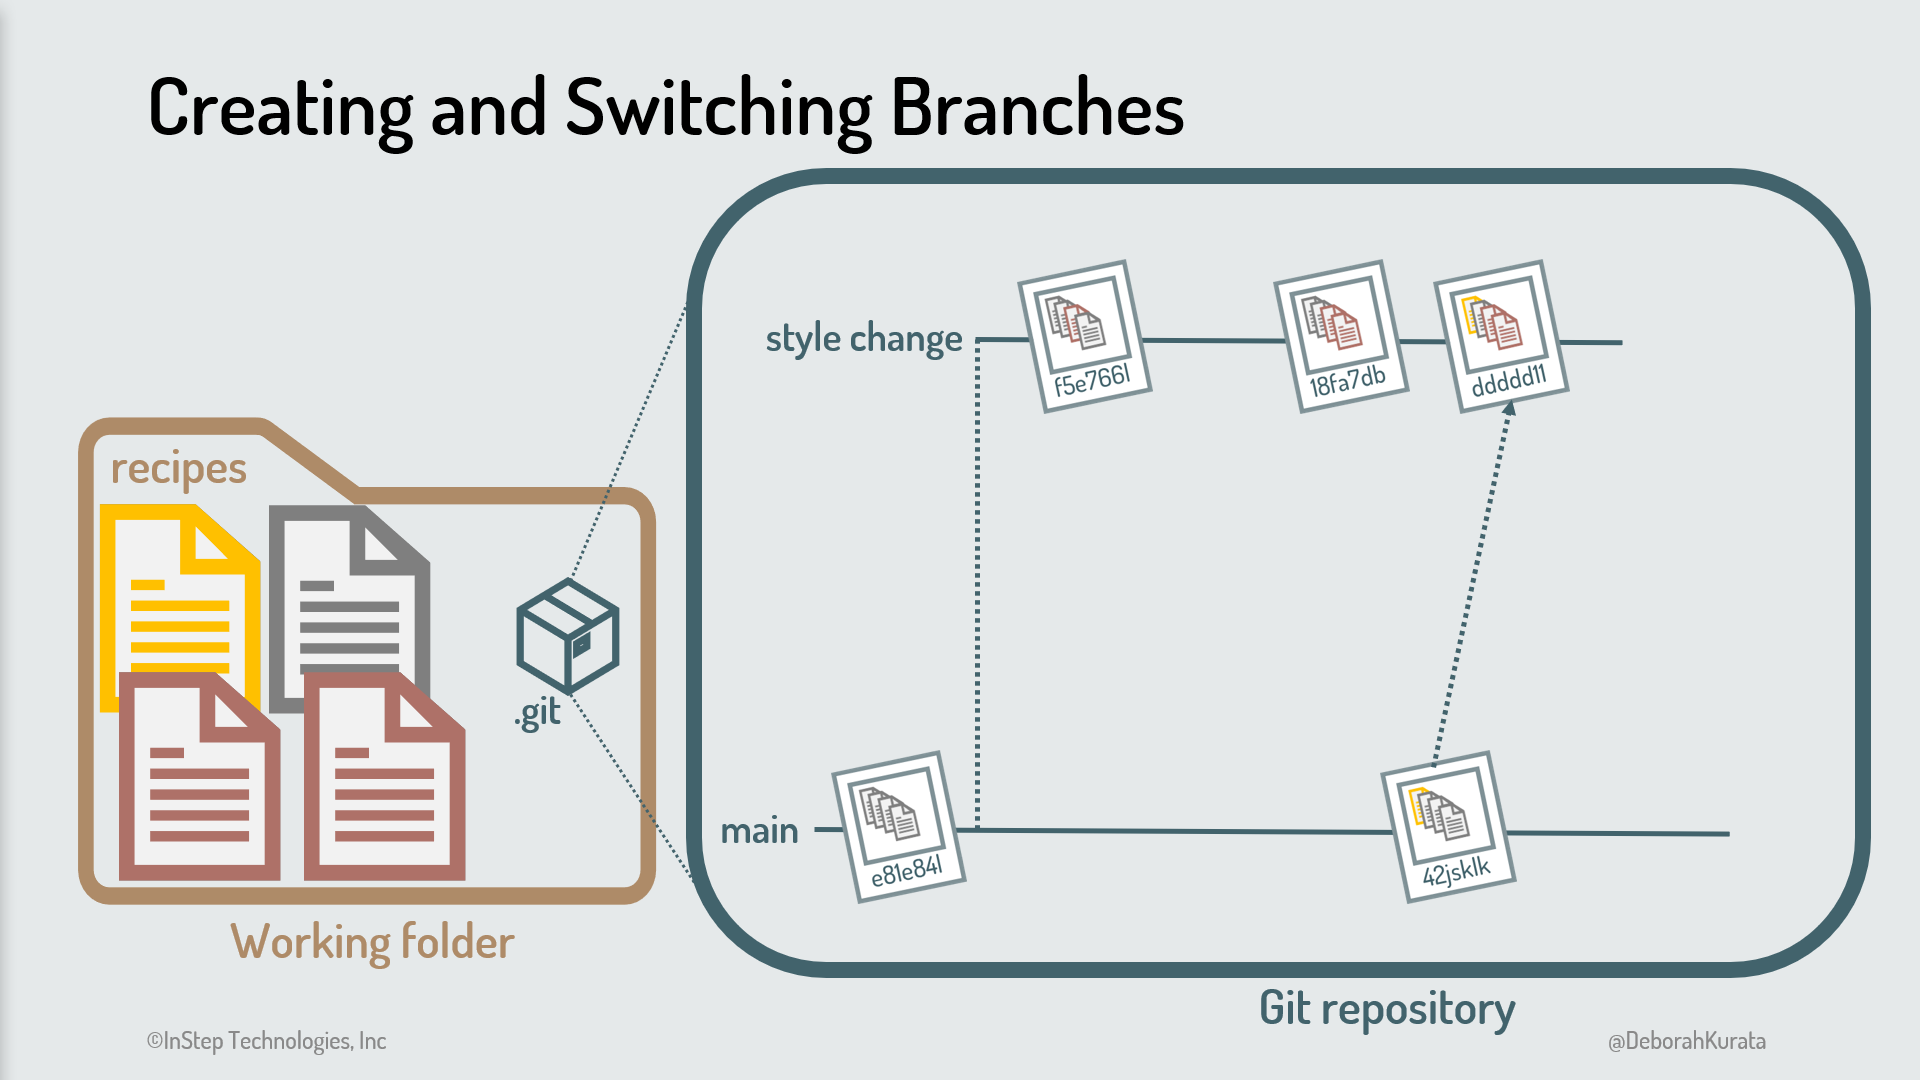 Figure 8. Merging the changes from main to the "style change" branch
When the style change is complete, we merge the "style change" branch back into the main branch.
Now our main branch has all of our changes, depicted in Figure 9. And we can delete our "style change" branch.
 Figure 9. Merging the "style change" branch to main
Note that most projects have their own specific process, requirements, and preferences for using branches, defining commits, and merging changes. Be sure to check the project documentation or with your collaborators before creating branches.
Wrapping Up
We use a branch to isolate the work on a task, such as a feature, change, or issue. This keeps our main branch clear of partially complete or untested code.
We can have any number of feature branches defined at any point in time. Be sure to switch to the appropriate branch before staging and committing. And merge in any changes from the main branch as needed.
When the task is complete, merge the branch for that task into main. Branches are meant to be short lived and are often deleted after merging
For more information on Git and GitHub, check out my course: "Gentle Introduction to GitHub for Beginners". And for information on web development, including Angular, subscribe to my YouTube channel.
Now, how about a nice nap under those spreading branches?