
Almost every software developer uses git. Many use it continually throughout the day. While you may already know the very basics of git, your productivity will be increased if you learn some advanced git concepts.
We just released a git course on the freeCodeCamp.org YouTube channel that will help you take your git skills to the next level.
Tobias Günther created this course. He has many years of experience using git and even co-founded Tower, a company that creates a GUI client for git.
In this course, you will learn some advanced git techniques related to the following topics:
- The perfect commit
- Branching strategies
- Pull requests
- Merge conflicts
- Merge vs. rebase
Watch the full course below or on the freeCodeCamp.org YouTube channel (1-hour watch).
Transcript
(autogenerated)
This is an intermediate Git course taught by Tobias Günther.
He'll help you move beyond Git basics and improve your Git workflow.
Hello, Free Code Camp friends, my name is Tobias.
And I'm going to improve your Git knowledge today.
There are a lot of beginner tutorials out there about version control with Git.
But I will help you understand the concepts behind many things in git, how to craft the perfect commit, how to choose a branching strategy, or how merge conflicts really work.
So my goal is to give you more confidence when you work with git, and to get you a little bit closer to becoming an advanced Git user.
Before we start a huge shout out to the Free Code Camp team, thank you so much for being on this mission of teaching people how to code.
And thanks for letting me contribute a little bit.
A couple of words about my own background, I'm part of the team behind tower, and tower is a git desktop GUI.
for Mac and Windows, we've been around for more than 10 years now, and helped over 100,000 developers and designers well work more easily with git, become more productive with git, and make fewer mistakes.
For today's session, you don't need to have tower installed, you can follow along on the command line, no problem.
Alright, let's get started.
So let's talk a bit about how to create the perfect commit.
So the first part is to add the right changes, right.
And the second part is to compose a good commit message.
So let's start by, let's start by adding changes to the commit.
So our goal here is to create a commit that makes sense one that only includes changes from a single topic.
And in contrast to the easy way when we sometimes just cram all of our current local changes into the next commit.
So this is the bad thing we should not do.
But being selective and carefully deciding what should go into the next commit is really important.
This is a better way of how a better commit could look like because it separates different topics.
On the other hand, the bigger a commit gets.
And the more topics that are mixed into the commit, the harder it gets to understand both for your colleagues and for yourself in the future.
So Git staging area concept is really helpful in this context, it allows you to select specific files, or even parts of those files for the next commit.
So this is what the staging area can do for you, you can really select individual files for one, commit, and even parts of files for one commit and leave others for future commit.
So let's take a look at a practical example.
And over the last few hours, or maybe even days, we've created a bunch of changes, let's say git status here.
But let's say that not all of those are about the same topic.
So let's stick to that golden rule of version control to only combine changes from the same topic in a single commit.
And you probably already know that to include a specific file, we can simply type, git add and the name of the file.
So let's add that CSS file here.
And voila, and let's take a closer look at another file index HTML and see what changes it currently contains.
So we can use git diff for that.
And we can see that there are two parts or chunks of changes at the moment.
And let's say that the first one belongs to the next commits topic, but not the second one.
So let's just add the first part to the staging area, we can do that.
Let me just exit the output here.
We can do that with the git add git add dash p flag.
P brings us down to the patch level, we want to decide on the patch level what to include and what not.
And we want to do that with index HTML.
So now Git steps through every every single chunk of changes with us.
And it asks us a simple question.
Do we want to add this chunk or hunk to the staging area or not? Don't worry about all the other possible answers you can give in that situation.
I don't know them.
And I want to sleep at night for us.
A simple why for Yes, or n for no is sufficient.
So let's say this one is actually the topic that we want to commit.
So let's say yes, we want to include that.
And, and for the second one, this is not the same topic.
So let's leave that out of the staging area for the moment.
So if we now take another look at git status, we can see that parts of index HTML will be included in the next commit changes to be committed, and other parts will be left for a future commit.
Again, so index HTML is listed twice, awesome.
crafting a commit like this in a very granular way, will help you create a very valuable commit history, one that is easy to read and to understand.
And this is crucial if you want to stay on top of things.
Now let's talk about the second part of creating that perfect commit.
And that is providing great commit message.
We'll start with the subject line.
So of course, conventions are different between teams.
But generally, the advice is to write something very concise, less than 80 characters if possible.
And the subject should be a very brief summary of what happened.
And here's a little hint, if you have trouble writing something short and concise, then this might be an indication that you've put too many different topics into that commit, right.
So let's go to the command line.
And if I now type, so I have a couple of changes against stage for the next commit.
If I type git commit, I will get an editor window where I can enter a commit message.
And we'll write something simple ad capture for email signup.
If we add an empty line after the subject, get knows we are writing the body of the message and has room for a much more detailed explanation.
So here are a couple of questions you might want to answer with your commit message body this year, what's now different than before, what's the reason for the change? And is there anything to watch out for or anything particularly remarkable about that commit.
So I'll write my version of that in the text editor here.
And voila, so let's save and close this.
And the commit is done.
Let's take a quick look at git log, and we can see Okay, so this is the last commit we just did.
This is the subject, and this is the body of the message.
So by answering these questions you're doing your colleagues and your future self a huge favor, because it helps to understand what exactly happened in this revision, and what to watch out for.
Let's talk a bit about branching strategies.
This is an important topic because Git leaves it completely up to you how you want to work with branches.
It only provides the tool, but you and your team are responsible for using it in the optimal way.
And this brings us to our first topic conventions.
If you work in a team, you need to come up with a clear convention on how to how you want to work with branches.
And you need to write this down somewhere where it's accessible to everyone.
Why your team needs a written convention you ask because Git allows you to create branches, but it doesn't tell you how to use, you need a written best practice of how to work or how work is ideally structured in your team to avoid mistakes and collisions.
And this highly depends on your team and team size on your project, and how you handle releases of your software.
last not least it helps to onboard new team members.
When new people join your team, you can point them to your documented will convention and will quickly understand how branches are handled in your team.
When you think about how you want to work with branches, you automatically think about how you integrate changes and structure releases.
These topics are tightly connected.
To help you better understand your options.
Let's simplify a little bit.
I'll show you how to extreme versions of how you could design your branching workflows.
And the motto of the first one is always be integrating mainline development.
Always integrate your own work with the work of the team.
That's the motto here.
And this is how it could look.
In this example we only have a single branch where everyone contributes their commits.
So this is a really simple For example, I doubt that any team in the real world would have such simple branching structure.
But for illustration, this extreme simplified example helps us understand the advantages and disadvantages of this model.
So in an always be integrating model, you have very few branches.
And this makes it easier to keep track of things in your project.
Of course, also commits in this model must be relatively small.
This is a natural requirement because you cannot risk big bloated commits in such an environment where things are constantly integrated into production code.
And this also means that you must have a high quality testing environment setup.
Again, the premise in this model is that code is integrated very quickly into your main line your production code.
And this means that testing and QA standards in your team must be top notch.
If you don't have this, this model will not work for you.
The other end of the spectrum is when multiple different types of branches enter the stage.
So here branches are used to fill to fulfill different jobs.
New features and experiments are kept in their own branches.
releases can be planned and managed it managed in their own branches.
And even different states in your development flow, like production develop, can be represented by branches.
Remember that this all depends on the needs and requirements of your team and project, it's hard to say that one approach is better than the other.
And although a model like this one seems complicated, it's mostly a matter of practice and getting used to it.
And as I already said, in reality, most teams are working somewhere in between these extremes.
Now let's look closer at two main types of branches and how they are used.
These two types of branches are long running and short lived branches.
So the distinction between a long running and a short lived branch is one of the broadest you can make and a very helpful one.
So let's start about talking about the long running branches first.
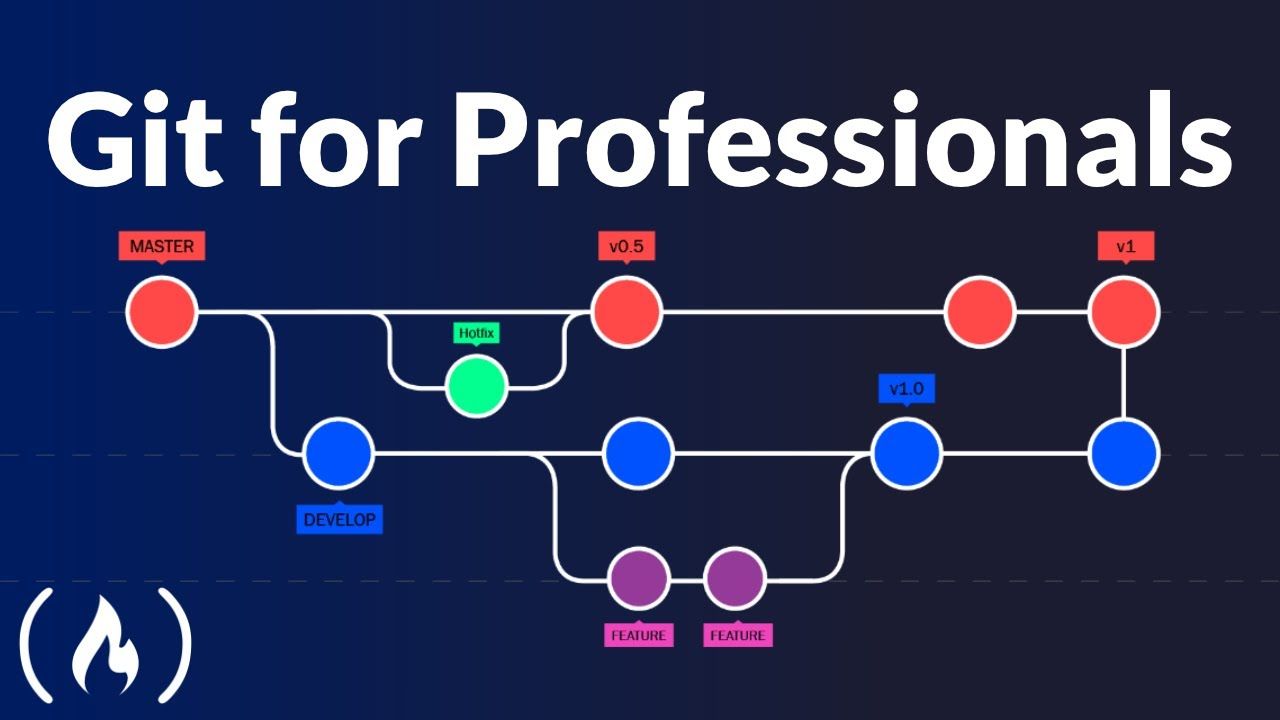
Every Git repository contains at least one long running branch typically something called main or master.
But there might be also other long running branches in your project something like develop or production or staging.
For example, these branches all have something in common they exist throughout the complete lifecycle of the project.
I've already mentioned one typical example of such a long running branch.
Every project has a mainline branch like master or main.
And another type of long running branches are so called integration branches, often named develop or staging.
Typically, these branches represent states in a project release or deployment process.
If your code moves through different states, for example, from development to staging to production, it makes a lot of sense to mirror the structure in your branches to.
And finally, many teams have a convention connected to long running branches.
Typically commits are never directly added to these branches.
commits should only make it to the long running branch through integration.
In other words, through a merge or rebase.
There are a couple of reasons for such a rule.
One has to do with quality.
You don't want to add untested and reviewed code to your production environment as an example.
And that's why code should go through different states tests and reviews before finally arrives on production.
Another reason might be release bundling and scheduling, you might want to release new code in batches maybe even thoroughly scheduled.
And without such a rule.
When code is directly committed to long running branches like main, keeping an eye on what's released becomes pretty difficult.
Now the other type of branches are short lived branches.
And in contrast to long running branches, they are created for certain purposes, and then deleted after they have been integrated.
There are many different reasons to create short live branches.
For example, when you start working on a new feature, a bug fix or refactor refactoring or an experiment.
And typically a short lived branch will be based on a long running branch.
For example, when you start a new feature, you might base that new feature on your long running main branch for example, and after making some commits and finishing your work, you probably want to re integrate it back into main.
And after you've safely merged or rebased it your feature branch can be deleted.
And I've already said that branching strategies will be different for each team and project.
It highly depends on your preferences or team size or type of project.
But I'd like to give you a glimpse into two pretty popular branching strategies, and take both of them as inspiration for your own individual branching strategy.
Let's start with GitHub flow.
GitHub advocates a workflow that's extremely lean and simple.
It only has a single long running branch, the default main branch, and anything you're actively working on is done in a separate branch, a short left branch, no matter if that's a feature a bug fix, or a factoring.
So this is a very simple, very lean setup.
Another very popular model is called Git flow.
And this offers a bit more structure but also more rules to follow.
So the main branch is a reflection of the current production state.
The other long running branch is typically typically called develop in any feature branches start from this one, and will be merged back into it.
Develop is also the starting point for any new releases, you would open a new release branch, do your testing commit any bug fixes to that release branch.
And once you're confident that it's ready for production, you merge it back into main, you would then add a tag for that release, commit on Main, and close the release branch.
As you can see, good flow defines quite a couple of tasks and steps in the process.
In tower, the good desktop GUI that we make, we support users by offering these tasks as shortcuts in the app.
And that way I can show you here, so you have all of the most important actions that Git flow brings to you.
So you don't have to remember all of the bits and pieces and what you have to do and what comes next, that makeup, these different steps.
So if you ask different teams, how they are using branches, you will get many different answers.
There is no perfect branching model that everyone should adopt.
It's more about understanding your project, your release workflow and your team, and then modeling a branching workflow that supports you in the best way possible.
Let's talk about pull requests.
First of all, you need to understand that pull requests are not a core good feature.
There are provided by your Git hosting platform, which means they work and look a little bit differently on GitHub, git lab, Bitbucket, Azure DevOps, or whatever you're using.
But the basic principles and ideas are always the same.
Let's start by talking about why you would want to use pull requests at all.
In essence, they are a way to communicate about code and review it.
The Perfect example is when you've finished working on a feature, without a pull request, you'd simply merge your code into main master or some other branch.
And in some cases, this might be totally fine.
But especially when your changes are a bit more complex or a bit more important, you might want to have a second pair of eyes look over your code.
And this is exactly what pull requests were made for.
With pull requests, you can invite other people to review your work and give you feedback.
And after some conversation about the code, your reviewer might approve the pull request and merge it into another branch.
Apart from this, there's another important use case for pull requests.
It's a way to contribute to code to repositories, which you don't have right access to think of a popular open source repository, you might have an idea for improving something, but you're not one of the main contributors and you're not allowed to push commits to their repository.
This is another use case for pull requests.
And we also have to talk about forks in this connection of fork is your personal copy of a git repository.
And going back to our open source example, you can fork the original repository.
make changes in your forked version and open a pull request to include those changes into the original repository.
And one of the main contributors can then review your changes and decide to include them or not.
I already mentioned it.
Every good platform has its own design and understanding of how pull requests should work.
And they look a little bit different on GitHub, git lab Bitbucket or Azure DevOps, or whatever you're using.
So here is an example we'll use the GitHub interface.
For this test case, let's use the Ruby on Rails open source repository and Let's see.
Alright, so here we are on GitHub on the Ruby on Rails main repository.
And in the top right, I can fork this repository, so I can create my own personal version of the repository.
And it's code base.
And again, a reminder about why we're doing this, I don't have access to push code into Ruby on Rails, into the Ruby on Rails repository.
And for good reasons, of course, because I'm not a Ruby on Rails Pro.
But in my own fork repository, I can make changes, I can make whatever changes I want.
So I just did that I forked the repository.
And I can now simply clone that I'll get the clone URL, and then on the command line, git clone and remote URL.
And we will, in a second, when this has finished cloning, we will create a branch and make some changes.
So this is also important to understand pull requests are always based on branches, not on individual commits.
So we're creating a new branch which we later request to be included.
And let's ogburn let's go into rails, and open this in my editor.
And I'll just create a brief branch git branch test and git checkout test.
Alright, so I now am on a new branch and can make a silly little change, let's change something in the readme file.
This is a, an awesome web application framework, close this.
Alright, let's take a look at our changes.
git add README and git commit dash m silly little change.
So we now have made some small changes on a separate branch, and we can push that branch to our own remote repository, our fork, so git push set upstream origin tests test.
And once this is available, okay, so this has worked.
So we have now created the changes that we can request to be included.
Once I've pushed them to my remote repository on GitHub, I can take another look at the repository in the browser and see what happened.
And voila, GitHub has noticed that I just pushed something here.
And since it's a fork of forked repository, GitHub detected my changes, and automatically asks me if I want to create a pull request with those changes.
Because in a forked environment, this is mostly what you want to do.
And if I do, I can propose which branch they should be integrated in.
So I'll start the pull request process here.
So at the moment, I'm proposing to integrate my changes from my little branch here in the fork back into the main branch in Rails, and let's say that is okay.
And I can add some comment.
And I could then create the pull request and the maintainer of the original repository would then be notified, and they can review my changes, and possibly integrate them.
Merge conflicts, nobody likes them, but they are a fact of life when you're working with Git.
And in most cases, they are not as tragic as we often think.
Oh, we'll talk about when they happen, what they actually are and how to solve them.
Alright, so the name already says it.
Merge.
Conflicts can occur when you integrate when your merge changes from a different source.
But keep in mind that integration is not limited to only merging branches.
Conflicts can also happen when rebasing interactive rebasing when performing a cherry pick or a pull, or even when reapplying a stash, and all of these actions performed some kind of integration and that's when merge, conflicts can happen.
Of course, these actions don't result in a merge conflict every time Thank God.
But when exactly do conflicts occur, actually gets merging capabilities are one of its greatest features and advantages.
Merging branches works effortlessly most of the time, because Git is usually able to figure things out on its own.
But there are situations where contradictory changes were made.
And that's when technology simply cannot decide what's right or wrong.
These situations require a decision from a human.
The true classic is when the exact same line of code was changed into commits on two different branches.
Git has no way of knowing which change you prefer.
There are some other similar situations that are a little bit less common, for example, when a file was modified in one branch and deleted in another.
But the same, but the problem is always the same changes contradict when you're working with a desktop GUI, like tower forget, that can make things easier, especially because it's just more visual, I can select things here.
And this helps me understand what actually happens, I can see these two changes conflict and I can select one or both or just this year and solve the conflict pretty easily.
How do you know when a conflict has occurred? Don't worry about that get will tell you very clearly, when a conflict has happened.
First, it will let you know immediately in the situation, for example, when a merge or rebase fails with a conflict.
So let's try this out.
Actually, we have something here, let's provoke a merge conflict.
And I'll just try to merge in developer to my main branch.
And voila, automatically I can see something is wrong here.
Conflict conflict conflict, automatic merge failed.
So you can see that when I tried to perform the merge, I ran into conflict and get tells me instantaneously about the problem.
But even while even if I had overlooked these warning messages, I would find out about the conflict the next time I run git status.
So let's do that.
And pretty quickly, you have this unmerged path category in the status here.
So in other words, don't worry about not noticing, merge conflicts get makes sure you can't overlook them.
All right, um, though you can't ignore a merge conflict, you really have to deal with it before you can continue your work.
Dealing with a merge conflict doesn't necessarily mean you have to resolve it, you can also undo it.
And this is sometimes very helpful.
So keep this in mind always, you can always undo a merge conflict and return to the state before.
And this is true even when you've already started resolving some of the conflicted files and you notice Oh god, I'm, I'm on the wrong track here.
Even then, when you find yourself in a dead end, you can still undo the merge.
And some commands come with an abort option that lets you do exactly that.
So the most prominent examples are Git merge, Uber abort, and Git rebase abort.
So in our example, here, when I find why I don't have the time to deal with this right now, or I've resolved something the wrong way, I can always type Git merge dash dash abort here, and get status shows me I'm back to normal again.
So this should give you the confidence that you really cannot mess up, you can always aboard, return to clean state and try again start over.
So let's see what a conflict really looks like under the hood, we will demystify those little buggers.
And, at the same time, help you lose respect for them and gain a little bit of confidence.
So as an example, let's look at the contents of one of the conflict files.
I'll provoke that merge conflict once again, and I can see that in my index HTML file, I have a conflict.
So let's take a look at that.
And Nope, not this one.
But this one.
So get was kind enough to mark the problematic areas in the file.
So they're surrounded by these symbols here.
This is the start and this is the end of the problem area.
So the content that came that comes after the first marker, originally originates from our current working branch, then aligned with some equal lines equal signs, separates the two conflicting changes.
And finally, this year came from the other branch that's displayed as well.
So in this case, it's pretty simple.
In the develop branch where I made some changes, I deleted this list item, these list items, and in my head branch, I changed them.
So Git is unsure, did you want to change them? Like Like this? Or did you want to delete them? Like here? And I have to tell git, what's correct and what's not.
Okay, so how can you solve a conflict, solving the conflict is actually pretty simple, we need to clean up these lines.
And after we finish, the file should look exactly as we want it to look.
So it might be necessary to talk to the teammate who wrote the other changes and decide which code is actually correct, maybe it's ours, maybe it's theirs, maybe it's a mixture between the two.
And this process of cleaning up the file, making sure it contains the what we actually want.
This doesn't have to involve any magic, you can do this simply by opening your text editor or ID and make some changes.
Sometimes, though, you'll find that this is not the most efficient way, that's when dedicated tools can save you a little bit time and effort.
So on the one hand, there are good desktop gooeys.
Some of the graphical user interfaces for good can be helpful when solving conflicts, you've already seen one.
So this is tower where you could where you can see what happened in the conflict.
And this visualizes the problem.
And on the other hand, there are dedicated merge tools.
For more complicated conflicts can be great to have a dedicated different merge tool at hand, you can configure a tool of choice using the Git config command.
And then in case of a conflict, you can simply type Git merge tool and have it open the conflict, I have a kaleidoscope app installed on my Mac.
So let's just try this Git merge tool.
I configured that.
So the first one, as you can see is a pretty easy one or the second one here, error HTML was deleted.
So I don't need to see that I just need to decide, do I want to keep it or do I want to delete it.
So I'll stick with the deletion.
And for the second one, there's really content in the file, where it makes sense to open that merge tool that I configured, I can see, well, this is the the change that I made.
And this is the change that came from another person or from a different branch.
And what do I want to look like and what I wanted to look like I can choose these changes, or these year or I can make my own changes here.
So after cleaning up the file, either manually or in a desktop, do your GUI or merge tool, we have to commit this like any other change.
So I can save it here and say this is resolved.
And if I type git status, I can see these changes would be committed, I've made some changes here in index HTML, this here is just a safety copy, you can configure that also to happen.
So you can always return to the to the original file.
But I would actually just commit this here.
And simply by committing the resolved files, I signal to get that conflict is completed.
And I can go on with my work.
Most developers understand that it's important to use branches in git, because having separate containers for your work is incredibly helpful.
Let's talk a bit about integrating branches about getting your new code back into an existing branch.
There are different ways to do this, and the two most common ones are merge and rebase.
Let's start by talking about merge and how it actually works.
When Git performs a merge, it looks for three commits.
First the common ancestor commit.
If you follow the history of two branches in a project, they always have at least one commit in common.
At this point, both branches had the same content.
And after that they evolve differently.
The other interesting commits are the end points of each branch.
Remember that the goal of an integration is to combine the current states of two branches.
So the latest revisions are of course important.
Combining these three commits, will perform the integration that we're aiming for.
I've chosen a very simple example case here because one of the two branches are a branch a here, it didn't receive any new commits after the branching happened.
So its latest commit is also the common ancestor.
In this case, the integration is dead simple good can just add all the new commits from branch B on top of the common ancestor commit.
And and get the simplest form of integration is called a fast forward merge.
Both branches then share the exact same history.
In most most cases, however, both branches move forward differently, of course.
And to make an integration, good, we'll have to create a new commit that contains the differences between them.
And this is what we call a merge commit.
Normally, a commit is carefully created by a human being at some meaningful unit that wraps only related changes in the commit message provides context and notes.
Now, a merge commit is a bit different.
It's not created by a developer, it gets created automatically by Git.
And it also does not wrap a set of related changes.
Its purpose is to connect two branches just like a knot.
If you want to understand a merge operation after the fact, you need to take a look at the history of both branches and their commit history.
Now let's talk about rebase.
But before we start, let me emphasize something rebase is not better or worse than merge.
Most importantly, it's different.
You can live a happy, good life just using merge.
But rebase has its pros and cons.
So knowing what it does, and when it could be helpful is nice.
Alright, remember that we just talked about the automatic merge commit, some people would prefer to go without these, they want the project history to look like a straight line, without any science that it had been split into multiple branches at some point, even after branches have been integrated.
And this is what happens with rebase.
Let's walk through a rebase operations step by step.
The scenario is the same as in the previous example, we want to integrate changes from branch B into branch a.
But now by using rebase.
The actual Git command to start this is really simple.
It's just Git rebase and the branch.
Similar to Git merge, we just tell git, which branch we want to integrate.
But let's take a look behind the scenes.
First, git will remove all commits on branch a that happened after the common ancestor commit.
But don't worry, will not throw them away, you can think of those commits as being parked as saved somewhere temporarily.
Then get applies to new commits from branch B.
And at this point temporarily, both branches look exactly the same.
But in the final step, those parked commits need to be included, the new commits from branch a, they're positioned on top of the integrated commits from branch B, they are rebased, as you can see, and the result looks like development had happened in a straight line, there is no merge commit that contains all the combined changes, we preserve the original commit structure.
There's one more thing an important thing to understand about rebase it rewrites commit history.
So take a close look at this last diagram here.
Commit c three has an asterisk symbol, it has the same contents as C three, but it's effectively a different commit.
Because it now has a new parent before the rebase.
See, one was its parent.
And after the rebase, it's C for which it was rebased onto a commit has only a handful of important properties like the author date change set and who its parent commit is.
and changing anything any of this information, if effectively creates a completely new commit and with a new commit hash.
So we writing history, like that is not a problem for commits that haven't been published or pushed yet.
But if you're rewriting commits that have already been pushed to a remote repository, you might be in trouble.
Because another developer might have based their work on the original c three commit, which is not here anymore.
So let's close this topic with a simple rule.
Do not rewrite commits, that you've already pushed to a shared repository.
tools like rebase, you should only use them for cleaning up your local commit history.
For example, for a feature branch that you've been working on for some time, and before you integrate that back into a team branch, then you're using re Based on that, that's what these tools like in rebase were made for.
Alright, so much for today.
Be sure to check out my little advanced Git kit.
It's completely free of charge.
It's a little collection of short videos about a lot of advanced Git topics from things like interactive rebase, all the way to branching strategies, merge conflicts, sub modules, what have you.
It's really helpful if you want to become more productive with Git and version control.
And again, it's free.
More right? Have fun and see you soon here on the Free Code Camp YouTube channel.