
By Chris Williams
In 2024, knowing how to use Git and GitHub effectively is an indispensable skill set, and is vital for nearly every role.
Whether you’re a developer, DevOps engineer, project manager, data scientist, or even an architect, a solid understanding of Git and GitHub is no longer a nice-to-have, but a must-have.
These tools form the backbone of collaborative software development, enabling efficient version control, code sharing, and project tracking.
The GitHub Foundations certification serves as a benchmark that can help you validate your skills in using this widely-used and adopted platform.
This handbook will prepare you to sit and pass the certification exam. The objective domains listed below are taken from the GitHub Foundations Certification Study Guide.
My goal here is to equip professionals across the tech spectrum with the knowledge and insights necessary to master these crucial tools and, in turn, bolster their competence and versatility in a tech-driven world.
Objective Domains
- Domain 1: Introduction to Git and GitHub
- Domain 2: Working with GitHub Repositories
- Domain 3: Collaboration Features
- Domain 4: Modern Development
- Domain 5: Project Management
- Domain 6: Privacy, Security, and Administration
- Domain 7: Benefits of the GitHub Community
- Next Steps and Conclusion
Domain 1: Introduction to Git and GitHub
Git and GitHub Basics
Describe version control:
A version control system (VCS) is a program or set of programs that tracks changes to a collection of files.
One goal of a VCS is to easily recall earlier versions of individual files or of the entire project. Another goal is to allow several team members to work on a project, even on the same files, at the same time without affecting each other's work.
Define distributed version control
Git is distributed, which means that a project's complete history is stored both on the client and on the server.
You can edit files without a network connection, check them in locally, and sync with the server when a connection becomes available. If a server goes down, you still have a local copy of the project. Technically, you don't even have to have a server.
Describe Git
![]()
Git is a distributed version control system that enables developers to track and manage changes to code or documents. Its core functionality revolves around creating a series of snapshots, called commits, which record the state of a repository at a given point in time.
Unlike centralized version control systems, Git's distributed nature allows each developer to have a complete history of changes, letting them work offline and create multiple branches for separate features or versions.
Git supports collaboration through features like branching, merging, and remote repositories, making it easier for teams to manage changes and contributions from multiple sources.
Its efficiency, flexibility, and robust branching capabilities make Git a staple tool in modern software development, particularly in open-source projects.
Describe GitHub
![]()
GitHub is a web-based platform widely used for version control and software development. It employs Git, a distributed version control system, to enable multiple developers to work collaboratively on projects without interfering with each other's work.
GitHub facilitates the management of code changes, supports branching and merging of code, and provides a platform for issue tracking and code review.
Also, GitHub integrates Continuous Integration/Continuous Deployment (CI/CD) through GitHub Actions, enabling automation of software workflows.
GitHub's social networking aspect allows users to follow each other's work, contribute to open source projects, and gain insights into various development methodologies.
GitHub's extensive features, combined with its ease of use and strong community support, have made it an indispensable tool for modern software development, be it for individual programmers or large-scale enterprise projects.
Explain the difference between Git and GitHub:
Git is a distributed version control system (DVCS) that multiple developers and other contributors can use to work on a project. It provides a way to work with one or more local branches and then push them to a remote repository.
GitHub is a cloud platform that uses Git as its core technology. GitHub simplifies the process of collaborating on projects and provides a website, more command-line tools, and overall flow that developers and users can use to work together. GitHub acts as the remote repository.
Key features provided by GitHub include: Issues, Discussions, Pull Requests, Notifications, Labels, Actions, Forks, & Projects
Describe a GitHub repository
A repository is a fundamental element in the GitHub ecosystem, acting as a storage space for software development projects. It contains all the project files (including documentation), and stores each file's revision history.
Repositories can be public, making them accessible to everyone, or private, restricted to specific collaborators. They serve as a focal point for collaborative development, allowing developers to track changes, revert to previous states, and work on different branches of a project without affecting the main codebase.
GitHub repositories also support features like issues and pull requests, facilitating discussion, feedback, and contributions to the project.
Also, GitHub provides integration with various tools and services, enabling automated workflows, continuous integration, and deployment. This makes a GitHub repository not just a storage space, but a comprehensive platform for managing the entire lifecycle of a software project.
Describe a commit
In Git, a commit is a fundamental operation that captures the current state of a project's files. It serves as a snapshot, recording the modifications made to the files in a repository since the last commit.
Each commit contains a unique ID, author information, a timestamp, and a message that describes the changes. This process allows for tracking the history of changes, enabling developers to revert to previous versions if needed and understand the evolution of the project over time.
Commits are essential for collaborative work, as they provide a way to merge changes from different contributors smoothly and maintain a coherent project history.
Describe branching
Branching is a method of diverging from the main line of development and continuing to work independently without affecting that main line.
Each branch represents an independent line of development, allowing multiple tasks such as feature work, bug fixes, or experiments to proceed in parallel.
The default branch in Git is typically called main, but branches can be named anything.
Branching is a core concept in Git, as it enables developers to work in an isolated environment without impacting the rest of the project.
It's particularly useful in collaborative environments, where it allows teams to work concurrently on different features or versions of a product. Changes made in a branch do not affect other branches until they are merged back into the main branch, facilitating controlled and organized development.
Define a remote in Git terminology
In Git terminology, a "remote" refers to a remote version of your repository. It's a common repository that all team members use to exchange their changes.
In most cases, the remote repository is stored on a server, often a web-based hosting service like GitHub, GitLab, or Bitbucket. The primary purposes of a remote repository are backup, collaboration, and synchronization:
- Backup: It serves as a reliable backup of your local repository.
- Collaboration: A remote repository is typically the central place where team members can push their local changes and pull updates from others, facilitating collaborative work.
- Synchronization: It helps in keeping the local repositories in sync with other team members’ work.
In Git, the term origin is a default name given to the remote repository from which your local repository was initially cloned, but you can work with several remotes and name them differently.
Managing remotes involves commands like git remote add to add a new remote, git fetch to retrieve updates from a remote, git push to send local updates to a remote, and git pull to get remote updates into your local repository.
Describe the GitHub flow
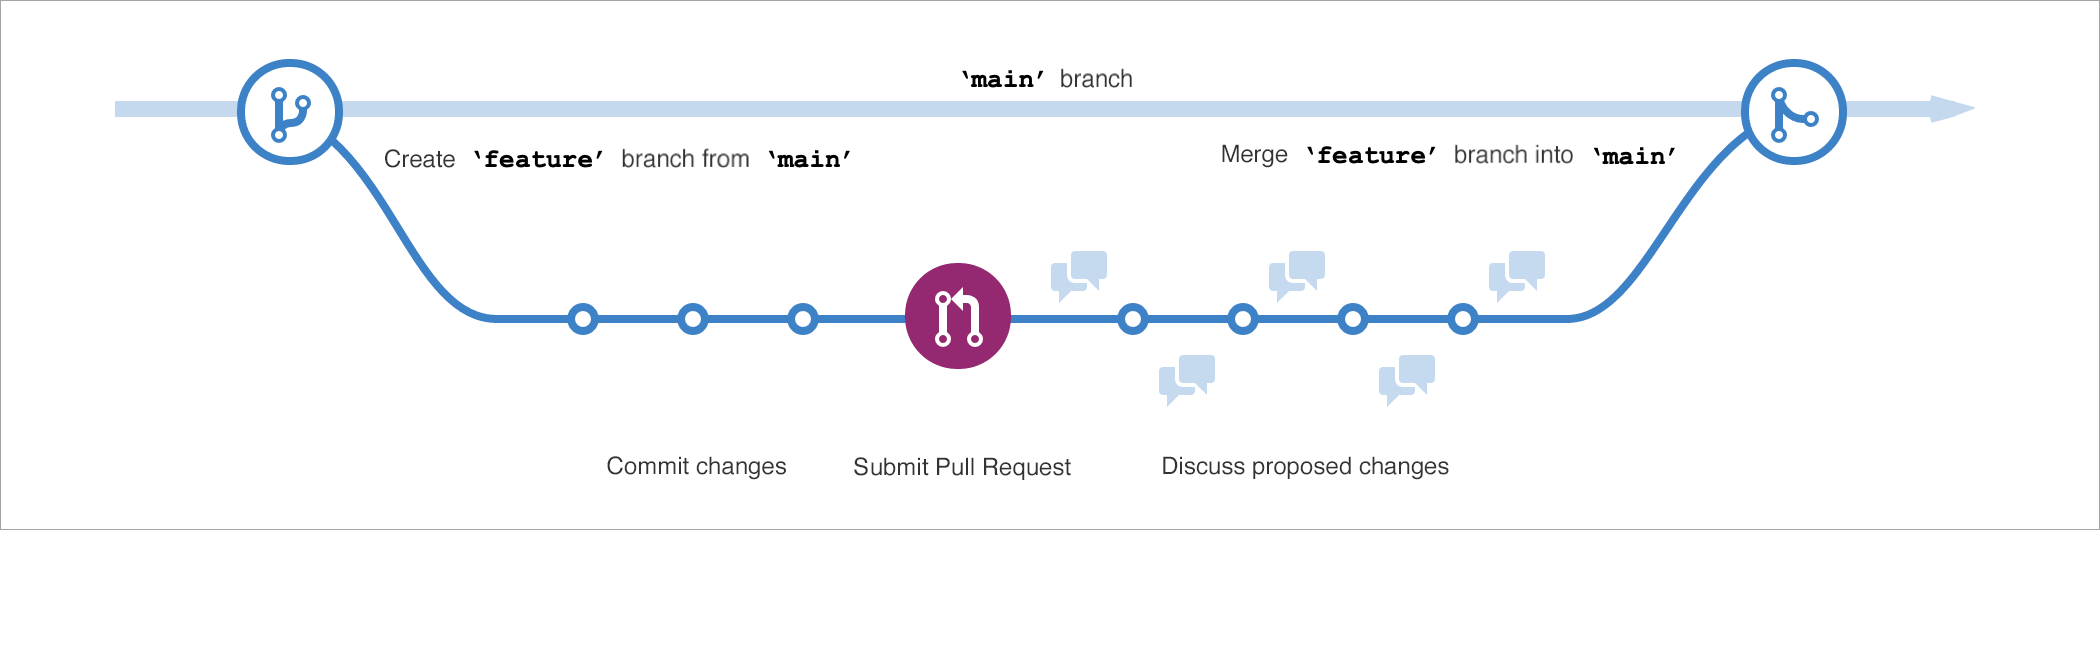
- The first step of the GitHub flow is creating a branch so that the changes, features, and fixes you create don't affect the main branch.
- The second step is to make your changes. I recommend deploying changes to your feature branch before merging into the main branch. Doing so ensures the changes are valid in a production environment.
- The third step is to create a pull request to ask collaborators for feedback. Pull request review is so valuable that some repositories require an approving review before pull requests can be merged.
- Next comes reviewing and implementing your feedback from your collaborators.
- Once you’re feeling great about your changes, now it's time to get your pull request approved and merge it into the main branch.
- The final step is to delete your branch. Deleting your branch signals your work on the branch is completed and prevents you or others from accidentally using old branches.
GitHub Entities
Describe the different GitHub accounts (personal, organization, enterprise)
Personal Account: Every person who uses GitHub.com signs into a personal account. Your personal/user account is your identity on GitHub.com and has a username and profile.
Your personal/user account can own resources such as repositories, packages, and projects as well as manage your permissions. Whenever you take an action on GitHub.com, such as creating an issue or reviewing a pull request, the action is attributed to your personal account.
Each personal account uses either GitHub Free or GitHub Pro. All personal accounts can own an unlimited number of public and private repositories, with an unlimited number of collaborators on those repositories. If you use GitHub Free, private repositories owned by your personal account have a limited feature set.
Organization accounts: these are shared accounts where an unlimited number of people can collaborate across many projects at once. Unlike personal/user accounts, permissions with organization accounts are done at a tiered approach.
Similar to personal accounts, organizations can own resources such as repositories, packages, and projects. But you can't sign into an organization. Instead, each person signs into their own personal account, and any actions the person takes on organization resources are attributed to their personal account. Each personal account can be a member of multiple organizations.
The personal accounts within an organization can be given different roles in the organization to grant different levels of access to the organization and its data. All members can collaborate with each other in repositories and projects. But only organization owners and security managers can manage the settings for the organization and control access to the organization's data with security and admin features.
Enterprise accounts: these accounts allow admins to centrally manage policies and billing for multiple organizations and enable inner sourcing between their orgs. An enterprise account must have a handle, like an organization or user account on GitHub.
Organizations are shared accounts for enterprise members to collaborate across many projects at once. In the enterprise settings, enterprise owners can invite existing organizations to join your enterprise account, transfer organizations between enterprise accounts, or create new organizations.
Enterprise accounts allows you to manage and enforce policies for all the organizations owned by the enterprise. Each enterprise policy controls the options available for a policy at the org level.
Describe GitHub’s products for personal accounts (free, pro)
GitHub Free for personal accounts includes:
- GitHub Community Support
- Dependabot alerts
- Two-factor authentication enforcement
- 500 MB GitHub Packages storage
- 120 GitHub Codespaces core hours per month
- 15 GB GitHub Codespaces storage per month
- GitHub Actions:
- 2,000 minutes per month
- Deployment protection rules for public repositories
GitHub Pro for personal accounts includes GitHub Free features plus:
- GitHub Support via email
- 3,000 GitHub Actions minutes per month
- 2 GB GitHub Packages storage
- 180 GitHub Codespaces core hours per month
- 20 GB GitHub Codespaces storage per month
- Advanced tools and insights in private repositories:
- Required pull request reviewers
- Multiple pull request reviewers
- Protected branches
- Code owners
- Autolinked references
- GitHub Pages
- Wikis
- Repository insight graphs for pulse, contributors, traffic, commits, code frequency, network, and forks
Describe GitHub’s products for organization accounts (free for organizations, teams)
GitHub Free for orgs includes GitHub Free for personal accounts plus:
- Team access controls for managing groups
GitHub Team is "GitHub Pro for Organizations" & includes:
- GitHub Support via email
- 3,000 GitHub Actions minutes per month
- 2 GB GitHub Packages storage
- Advanced tools and insights in private repositories:
- Required pull request reviewers
- Multiple pull request reviewers
- Draft pull requests
- Team pull request reviewers
- Protected branches
- Code owners
- Scheduled reminders
- GitHub Pages
- Wikis
- Repository insight graphs for pulse, contributors, traffic, commits, code frequency, network, and forks
- The option to enable or disable GitHub Codespaces
Describe the different deployment options for GitHub Enterprise
There are two GitHub Enterprise options: GitHub Enterprise Server (GHES) and GitHub Enterprise Cloud.
The significant difference between them is that GHES is a self-hosted solution that allows organizations to have control of their infrastructure.
The other difference between them is that GitHub Enterprise Cloud includes increases in GitHub Actions minutes and GitHub Packages storage:
- 50,000 GitHub Actions minutes per month
- 50 GB GitHub Packages storage
- An SLA for 99.9% monthly uptime
- Option to centrally manage policy and billing for multiple GitHub.com organizations with an enterprise account
- Option to provision and manage the user accounts for your developers, by using Enterprise Managed Users
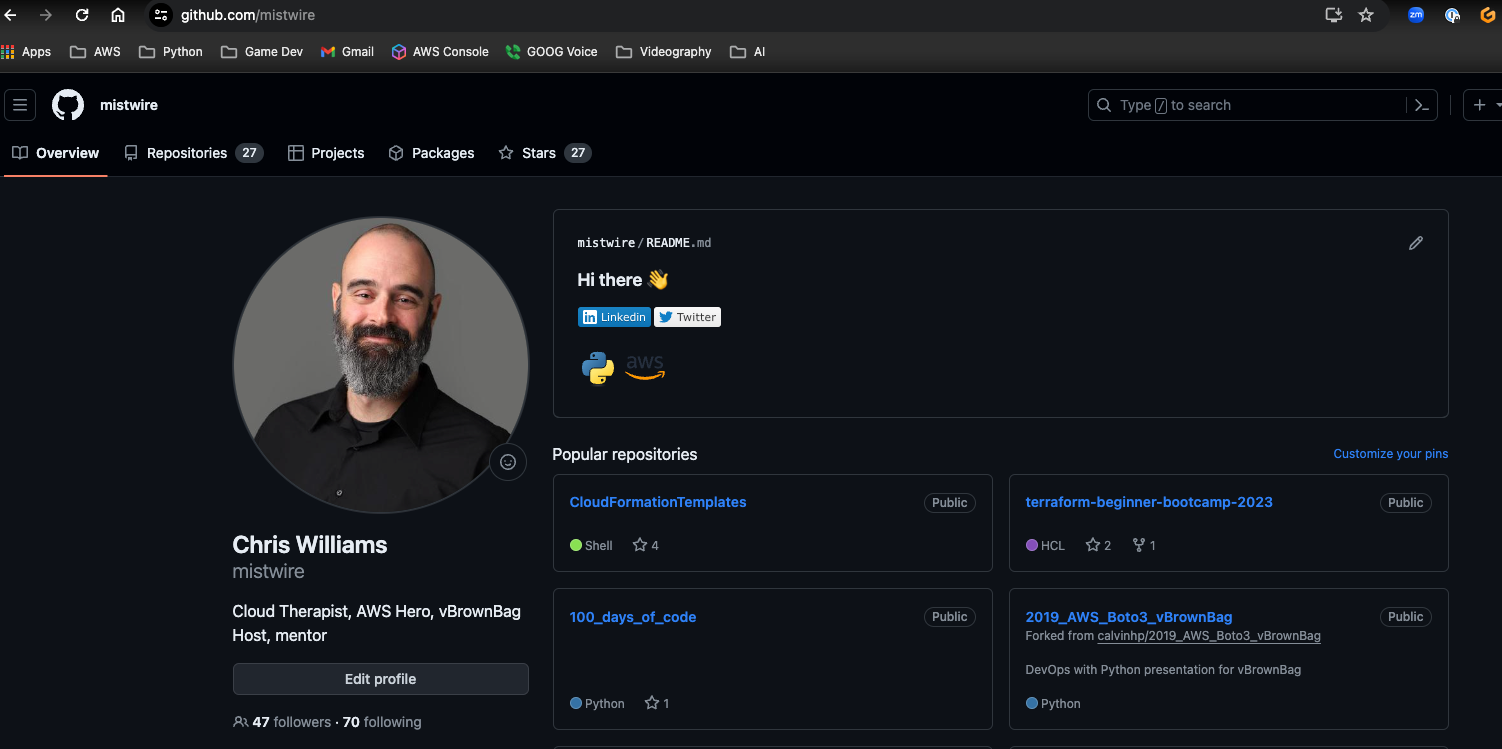
Describe the features in the user profile (metadata, achievements, profile readme, repositories, pinned repositories, stars, and so on)
People who visit a profile see a timeline of the users contribution activity, like issues and pull requests opened, commits made, and pull requests reviewed.
You can choose to display only public contributions or to also include private, anonymized contributions.
People who visit a users profile can also see the following information:
- Repositories and gists owned or contributed to. Work can be showcased by pinning repositories and gists to the profile.
- Repositories can be starred and organized into lists.
- An overview of activity in organizations, repositories, and teams active in.
- Badges and Achievements that highlight activity and show if a user uses GitHub Pro or participate in programs like the Arctic Code Vault, GitHub Sponsors, or the GitHub Developer Program.
- Pronouns if set.
- Mutual connections shared with someone who is viewing your profile. The person viewing your profile can see which of the people they follow are also followed by you.
You can also set a status on your profile to provide information about your availability.
GitHub Markdown
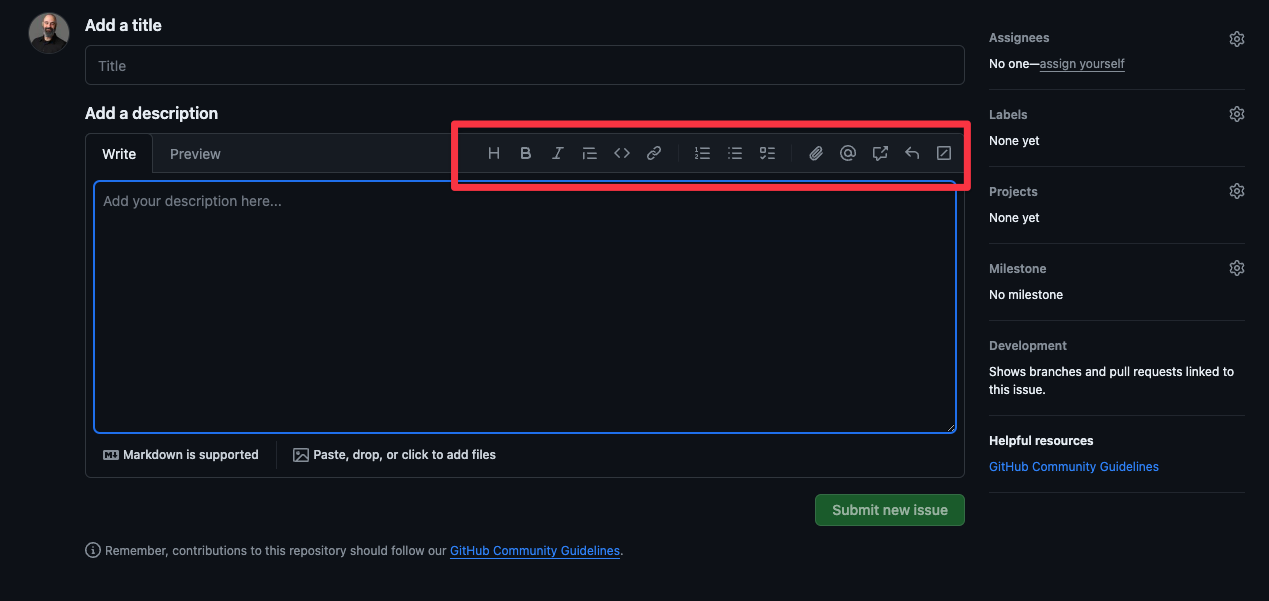
Identify the text formatting toolbar on issue and pull request comments
Every comment field on GitHub contains a text formatting toolbar, which allows you to format your text without learning Markdown syntax. In addition to Markdown formatting like bold and italic styles and creating headers, links, and lists, the toolbar includes GitHub-specific features such as @-mentions, task lists, and links to issues and pull requests:
Describe Markdown
Markdown is a lightweight markup language with plain-text formatting syntax that is often used for writing documentation, particularly in online contexts. It allows users to write using an easy-to-read, easy-to-write plain text format, which then converts to structurally valid HTML (or XHTML) for viewing in a web browser or other platforms.
The key features of Markdown include simplicity and ease of use. It supports various formatting features like headers, lists, emphasis, links, blockquotes, inline code, images, and tables.
Initially created by John Gruber and Aaron Swartz, Markdown has gained immense popularity, particularly on platforms like GitHub, because it allows for effective and efficient documentation without the overhead of directly coding HTML.
Identify the basic formatting syntax (headings, links, task lists, comments, and so on)
GitHub Flavored Markdown (GFM) supports various shortcode formats to make it easy to link to issues and pull requests. The easiest way to do this is to use the format #ID
| Reference type | Raw reference | Short link |
| Issue or pull request URL | https://github.com/desktop/desktop/pull/3602 | #3602 |
| # and issue or pull request number | #3602 | #3602 |
| GH- and issue or pull request number | GH-3602 | GH-3602 |
| Username/Repository# and issue or pull request number | desktop/desktop#3602 | desktop/desktop#3602 |
Explain where to find and use slash commands
Slash commands can save you time by reducing the typing required to create complex Markdown.
You can use slash commands in any description or comment field in issues, pull requests, or discussions where that slash command is supported. Command|Raw reference -|- /code|Inserts a Markdown code block. You choose the language. /details|Inserts a collapsible detail area. You choose the title and content. /saved-replies|Inserts a saved reply. You choose from the saved replies for your user account. If you add %cursor% to your saved reply, the slash command places the cursor in that location. /table|Inserts a Markdown table. You choose the number of columns and rows. /tasklist|Inserts a tasklist. This slash command only works in an issue description. /template|Shows all of the templates in the repository. You choose the template to insert. This slash command works for issue templates and a pull request template.
GitHub Desktop
Explain the difference between GitHub Desktop and github.com
GitHub Desktop is a standalone application that allows users to interact with GitHub repositories through a graphical user interface. It supports common Git and GitHub operations without the need for a browser or command line, and it's compatible with macOS, Windows, and Linux.
You can use GitHub Desktop for managing a local copy of a repository. You can't do GitHub website based features like fork, star, watch, collaborate, create issues/PRs, or integrate with online CI/CD tools.
Describe the available features with GitHub Desktop
- Add and clone repositories.
- Add changes to your commit interactively.
- Quickly add co-authors to your commit.
- Check out branches with pull requests and view CI statuses.
- Compare changed images.
GitHub Mobile
Describe the available features with GitHub Mobile
- Manage, triage, and clear notifications from github.com.
- Read, review, and collaborate on issues and pull requests.
- Edit files in pull requests.
- Search for, browse, and interact with users, repositories, and organizations.
- Receive a push notification when someone mentions your username.
- Schedule push notifications for specific custom hours.
- Secure your GitHub.com account with two-factor authentication.
- Verify your sign in attempts on unrecognized devices.
Explain how to manage notifications through the GitHub Mobile app
Set Push Notifications for:
- DMs
- Review Requests
- Assigned
- Deployment Review
- Pull Request Review
- Workflow Runs
Set working hours to only get them during certain times.
Domain 2: Working with GitHub Repositories
Understanding GitHub Repositories
Repository Terminology Term|Definition -|- Branch|A parallel version of your code that is contained within the repository, but does not affect the primary or main branch. Clone|To download a full copy of a repository's data from GitHub.com, including all versions of every file and folder. Fork|A new repository that shares code and visibility settings with the original "upstream" repository. Merge|To take the changes from one branch and apply them to another. Pull request (PR)|A request to merge changes from one branch into another. Remote|A repository stored on GitHub, not on your computer. Upstream|The branch on an original repository that has been forked or cloned. The corresponding branch on the cloned or forked branch is called the "downstream."
Describe the components of a good README and the recommended repository files (LICENSE, CONTRIBUTING, CODEOWNERS)
You can add a README file to a repository to communicate important information about your project. A README, along with a repository license, citation file, contribution guidelines, and a code of conduct, communicates expectations for your project and helps you manage contributions.
A README is often the first item a visitor will see when visiting your repository.
README files typically include information on:
- What the project does
- Why the project is useful
- How users can get started with the project
- Where users can get help with your project
- Who maintains and contributes to the project
If you put your README file in your repository's hidden .github, root, or docs directory, GitHub will recognize and automatically surface your README to repository visitors.
If a repository contains more than one README file, then the file shown is chosen from locations in the following order:
- the
.githubdirectory - the repository's
rootdirectory - the
docsdirectory
If you add a README file to the root of a public repository with the same name as your username, that README will automatically appear on your profile page.
You can edit your profile README with GitHub Flavored Markdown (GFM) to create a personalized section on your profile.
Github created https://choosealicense.com, to help you understand how to license your code. A software license tells others what they can and can't do with your source code, so it's important to make an informed decision.
License text should live in a file named LICENSE.txt (or LICENSE.md or LICENSE.rst) in the root of the repository.
You can use a CODEOWNERS file to define individuals or teams that are responsible for code in a repository.
Explain basic repository navigation
Read Create & Manage repositories 🥰
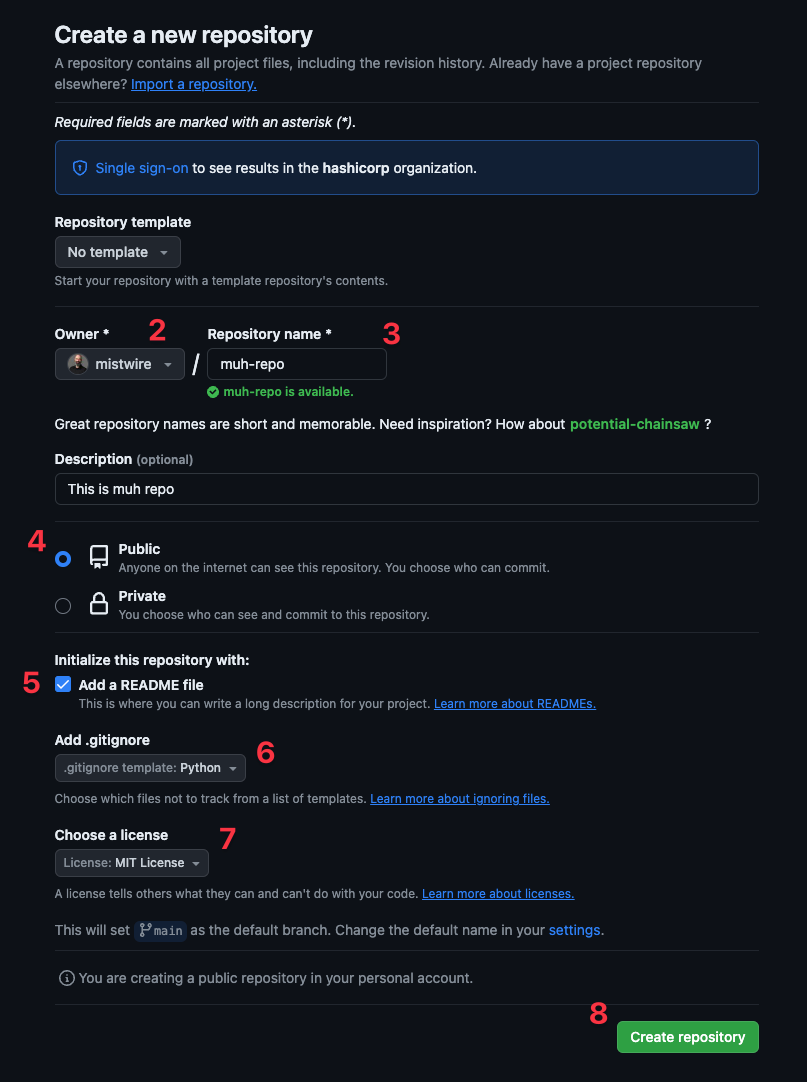
Explain how to create a new repository
- In the upper-right corner of any page, select the dropdown
 , then click New repository:
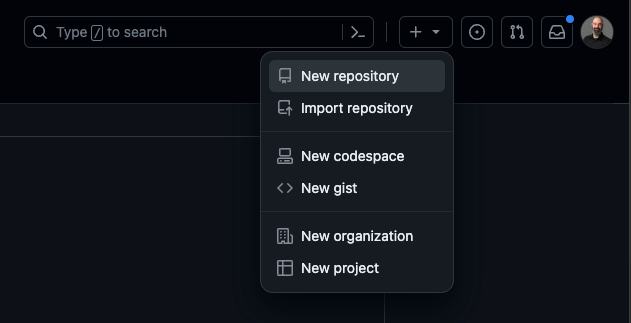
- Use the Owner dropdown menu to select the account you want to own the repository.
- Type a name for your repository, and an optional description.
- Choose a repository visibility. For more information, see "About repositories."
- You can create a README, which is a document describing your project.
- You can create a .gitignore file, which is a set of ignore rules.
- You can choose to add a software license for your project.
- Click Create repository:
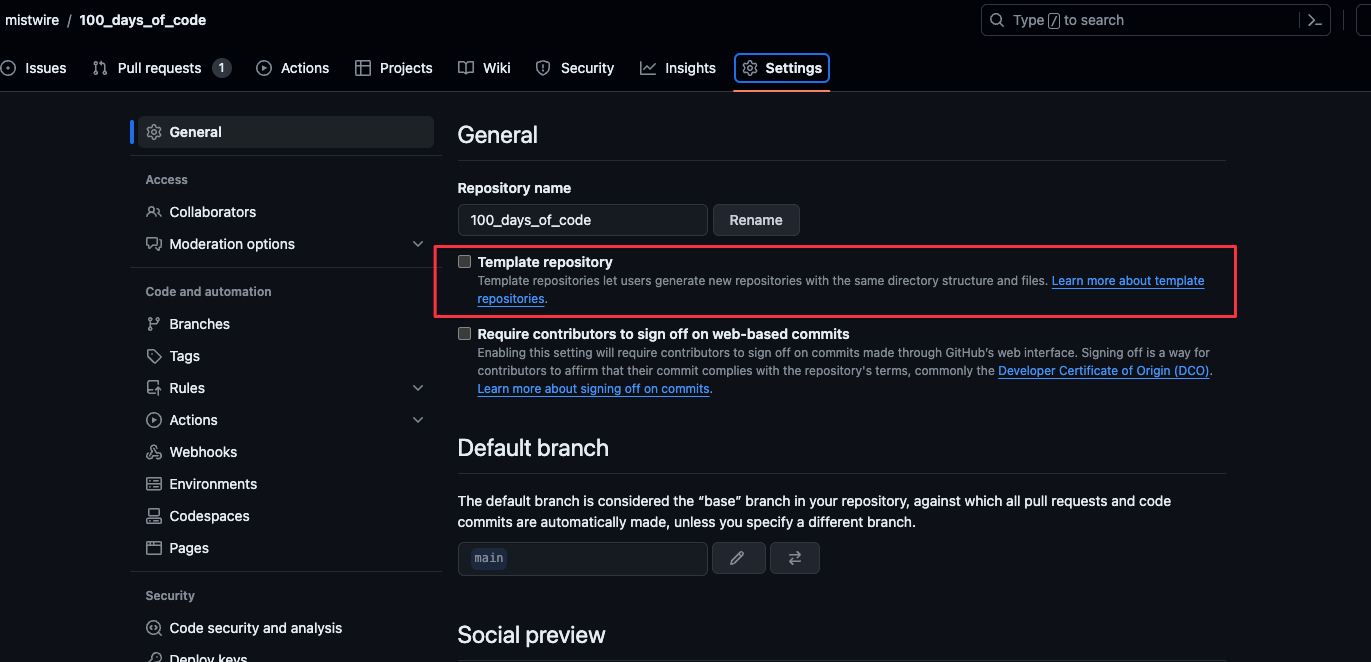
Describe repository templates
To create a template repository, you must create a repository, then make the repository a template.
After you make your repository a template, anyone with access to the repository can generate a new repository with the same directory structure and files as your default branch. They can also choose to include all the other branches in your repository.
Branches created from a template have unrelated histories, so you cannot create pull requests or merge between the branches.
Here are the steps to follow to do this:
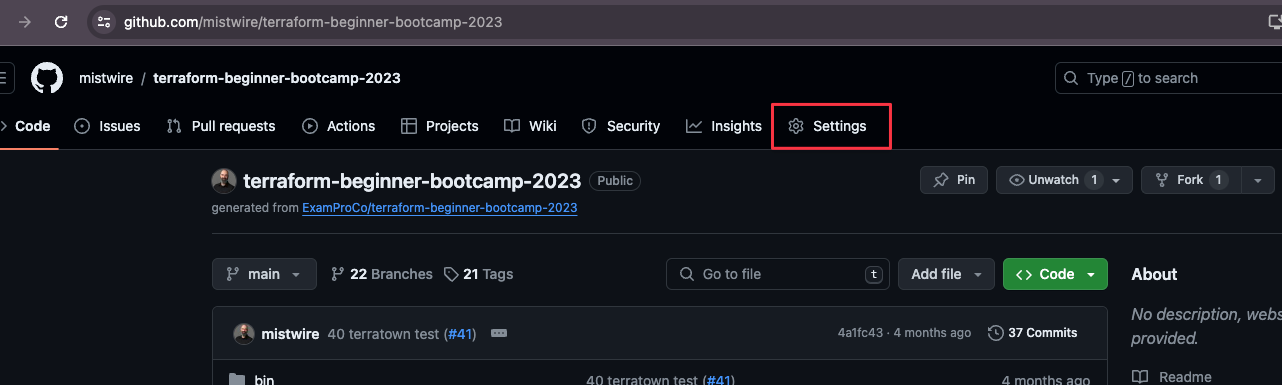
- On GitHub.com, navigate to the main page of the repository.
- Under your repository name, click Settings:
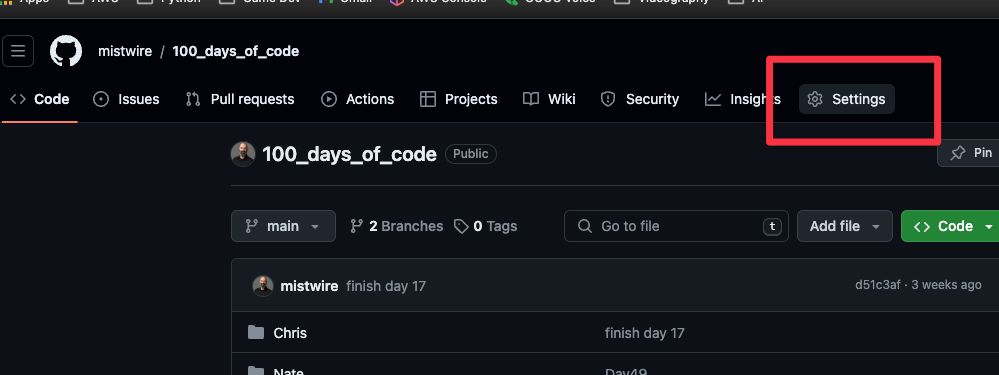
- Select Template repository:

Describe how to clone a repository
Cloning a repository pulls down a full copy of all the repository data that GitHub.com has at that point in time, including all versions of every file and folder for the project.
To clone a repo, follow these steps:
- On GitHub.com, navigate to the main page of the repository.
- Above the list of files, click Code.
- Copy the URL for the repository:
CleanShot-2024-03-09-at-11.48.38
- Open Terminal
- Change the current working directory to the location where you want the cloned directory.
- Type
git clone, and then paste the URL you copied earlier:

Describe how to create a new branch
You can create a new branch several ways, both in the web interface and from the terminal.
- On GitHub.com, navigate to the main page of the repository.
- From the file tree view on the left, select the branch dropdown menu, then click View all branches.
- Click New branch:
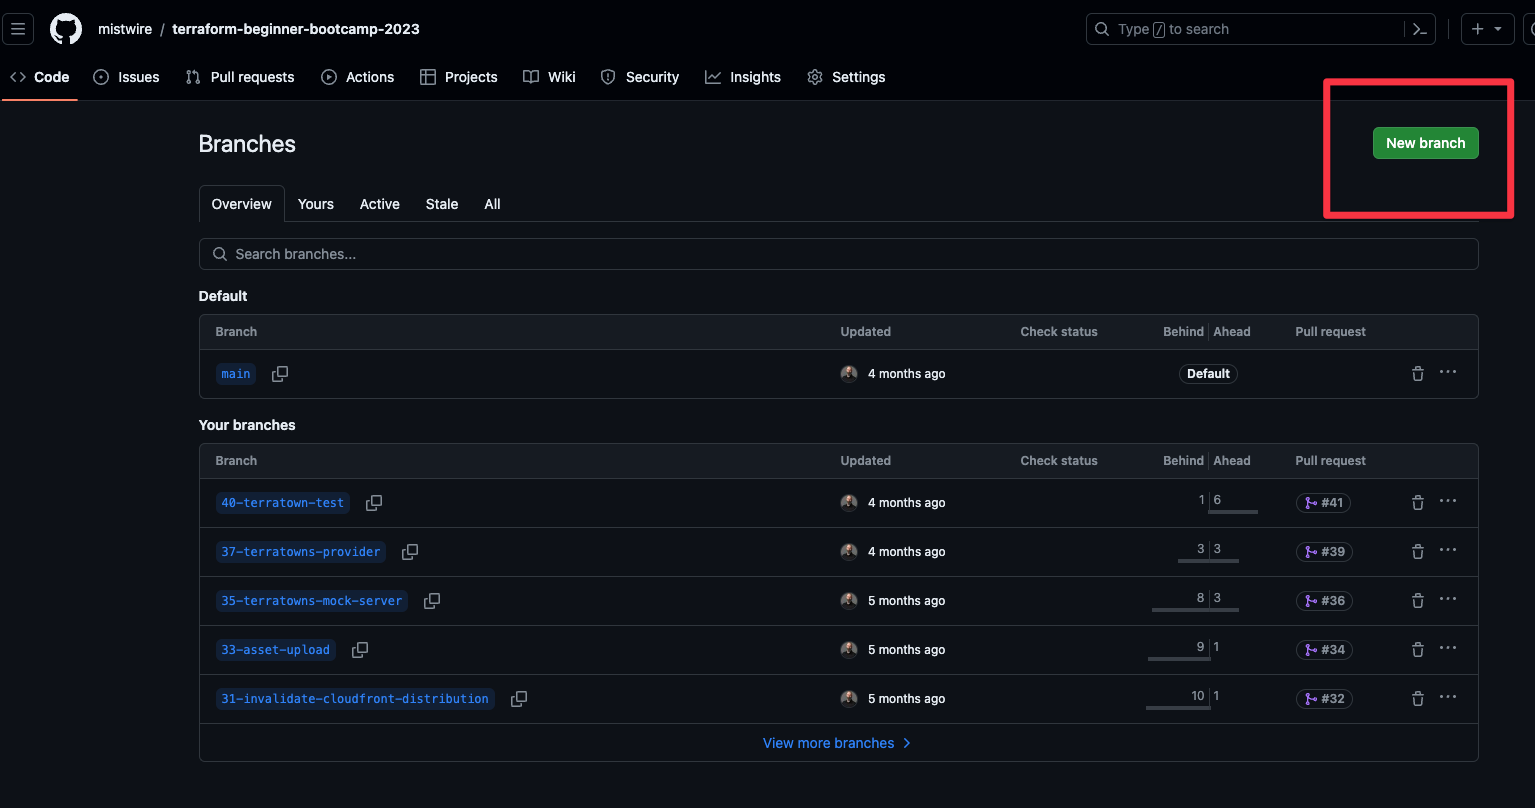
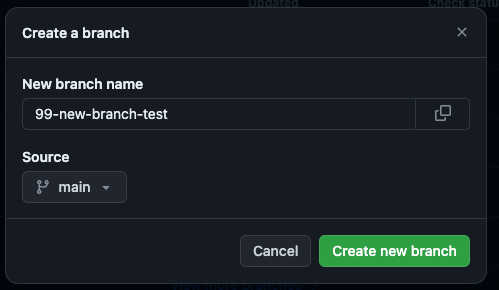
- Under "Branch name", type a name for the branch.
- Under "Branch source", choose a source for your branch.
- Select the branch dropdown menu and click a branch.
- Click Create branch:
Explain how to add files to a repository
You can add up to 25 MB files to a repository via a browser. You can add up to 100 MB (each) files via the CLI. You can't add/upload files to protected branches.
- On GitHub.com, navigate to the main page of the repository.
- Above the list of files, select the Add file dropdown menu and click Upload files. You can also drag and drop files into your browser:
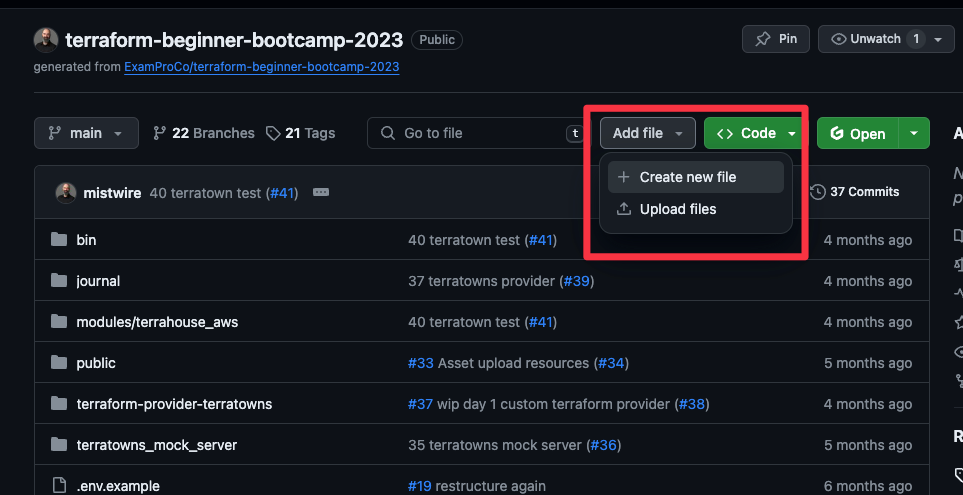
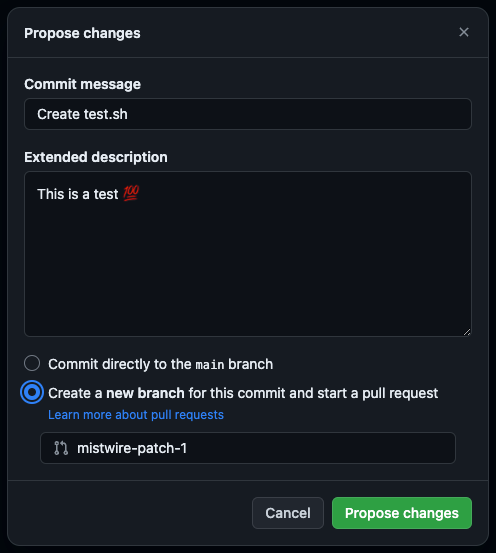
- In the "Commit message" field, type a short, meaningful commit message that describes the change you made to the file. If there are multiple authors, you can attribute the commit them here.
- Below the commit message fields, decide whether to add your commit to the current branch or to a new branch (best practice is to NOT commit to main, but rather do a PR and merge).
- Click Propose changes:
Identify how to view repository insights
You can view stats for your repo from the insights tab:
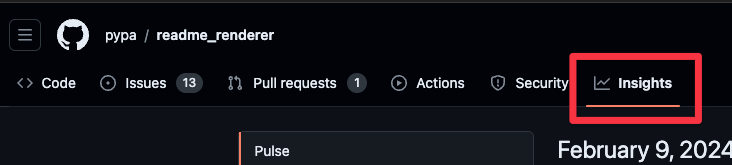
- Pulse - Recent activity (PRs, issues, and so on).
- Contributors - who's contributing and their stats.
- Community Standards - Checks for contributing guidelines files that repository maintainers can set to help collaborators make useful contributions to a project.
- Commits - Graph of commits over time.
- Code frequency - Additions/deletions over the history of the repo.
- Dependency Graph - A list of dependencies and dependants of the repo.
- Network - Timeline of the most recent commits to this repository and its network ordered by most recently pushed to.
- Forks - List of forks of the repo.
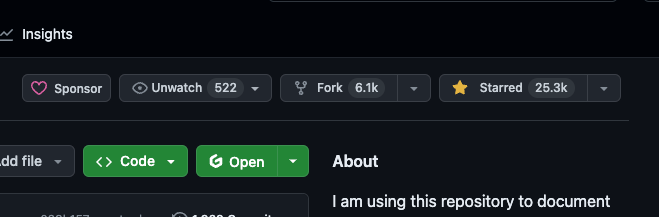
Explain how to save a repository with stars
You can star repositories and topics to keep track of projects you find interesting and discover related content in your news feed:
Explain feature previews
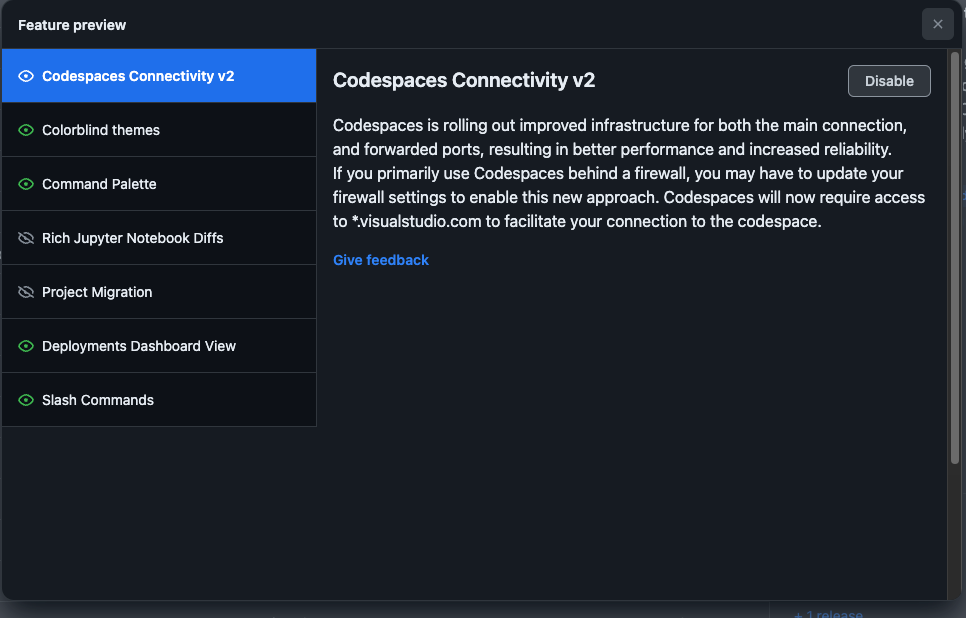
You can see a list of features that are available in beta and a brief description for each feature. Each feature includes a link to give feedback.
- In the upper-right corner, click your profile photo, then click Feature preview:
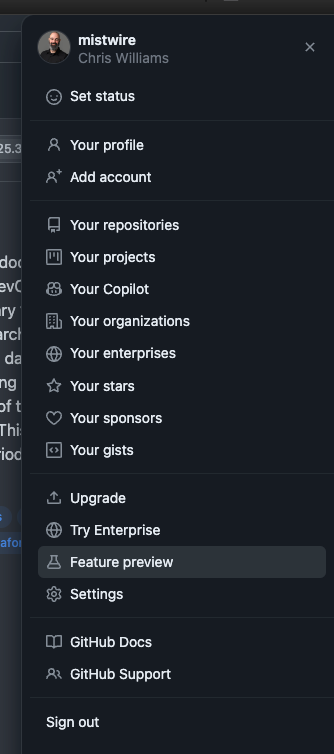
- To view details for a feature, in the left sidebar, click the feature's name (where you can also enable/disble that feature):
Domain 3: Collaboration Features
Issues
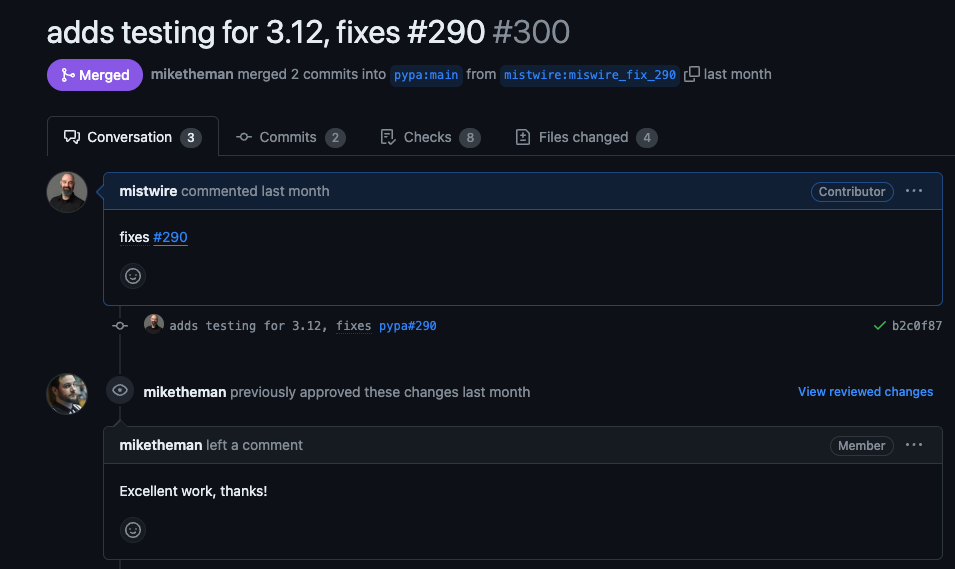
Describe how to link a PR to an issue
You can link a pull request to an issue by using a supported keyword in the pull request's description or in a commit message. The pull request must be on the default branch. Keywords are: close closes closed fix fixes fixed resolve resolves and resolved.
The syntax for closing keywords depends on whether the issue is in the same repository as the pull request.
| Linked issue | Syntax | Example |
| Issue in the same repository | KEYWORD #ISSUE-NUMBER | Closes #10 |
| Issue in a different repository | KEYWORD OWNER/REPOSITORY#ISSUE-NUMBER | Fixes octo-org/octo-repo#100 |
| Multiple issues | Use full syntax for each issue | Resolves #10, resolves #123, resolves octo-org/octo-repo#100 |
Describe how to create an issue
There are several ways to create an issue
- From a repository:

- With GitHub CLI
- From a comment:
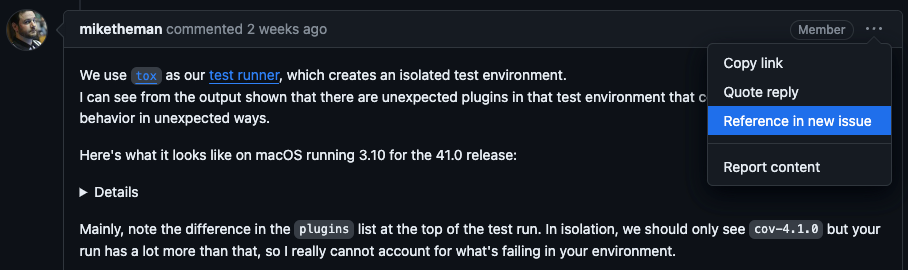
- From code
- From discussion
- From a project
- From a task item list
- From a URL query
- From a code scanning alert
Describe the difference between an issue, discussion, and pull request
An issue on GitHub is a way to track enhancements, tasks, or bugs for work on GitHub. It's a primary tool for collaborative problem solving within a repository.
When someone identifies a bug in your code or wants to request a new feature, they can open an issue. It's a way of having a conversation about the code without directly changing it. Issues can be assigned, labeled, and referenced in pull requests.
GitHub Discussions is a feature that provides a space for community members to engage in conversations and share ideas, questions, or feedback. It's more about having an open-ended conversation rather than tracking tasks or reporting problems like issues.
Discussions are more suitable for Q&A, sharing updates, brainstorming, or general conversations about a project.
A pull request is a way to propose changes to the codebase. When you open a pull request, you're suggesting that your changes should be merged into the main code.
PRs are used for code review, where others can review, discuss, and request additional changes before merging the proposed changes.
A pull request includes the code changes, a comparison with the existing code, and a discussion thread.
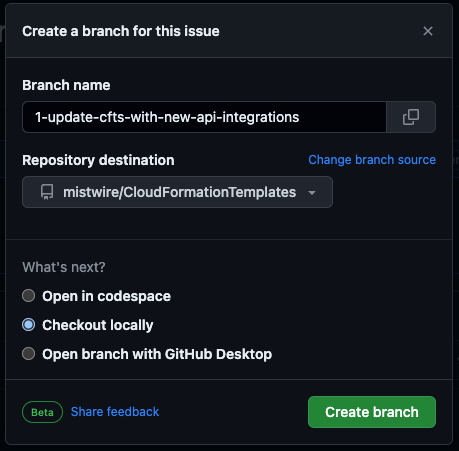
Explain how to create a branch from an issue
From an issue you can create an associated branch:
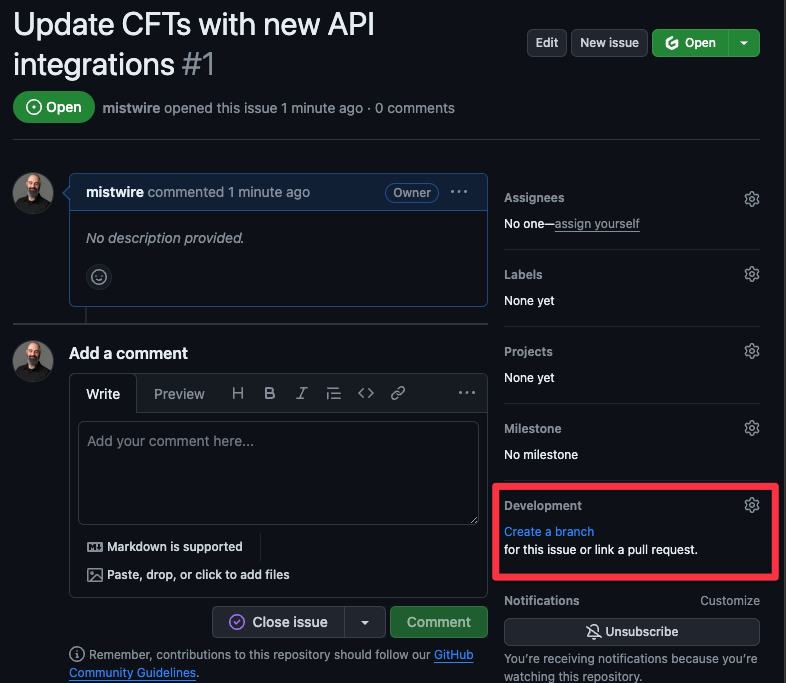
This creates a branch that is numbered with the same number as the issue, allowing for easier issue tracking:
Identify how to assign issues
- Navigate to the Issue: Go to your repository on GitHub and find the issue you want to assign. You can do this by clicking on the 'Issues' tab in your repository.
- Open the Issue: Click on the title of the issue to open it.
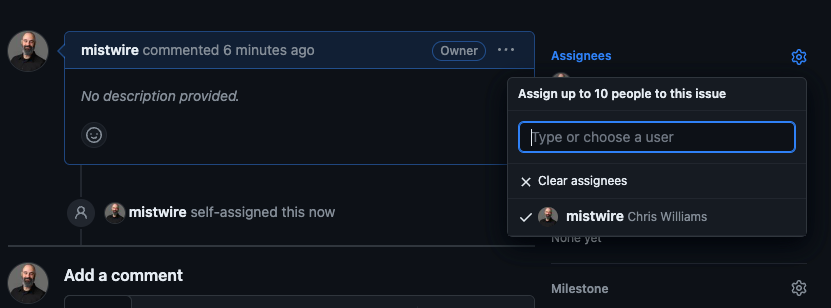
- Assign the Issue: On the right-hand side of the issue, you'll see a section titled 'Assignees'. Click on the gear icon next to 'Assignees'.
- Select a User: A dropdown menu will appear with a list of users. These are the people you can assign the issue to. These usually include contributors and collaborators on your repository. Select the user or users you want to assign the issue to.
- Confirm Assignment: The selected users will now be listed under 'Assignees' for the issue. GitHub automatically saves your changes, so there is no need for a confirm button:
Describe how to search and filter issues
You can filter issues and pull requests to find:
- All open issues and pull requests
- Issues and pull requests that you've created
- Issues and pull requests that are assigned to you
- Issues and pull requests where you're @mentioned
Here's how you can search/filter issues:
- Access the Issues Section: Go to the GitHub repository where you want to search or filter issues. Click on the 'Issues' or 'Pull Requests' tabs.
- Use the Search Bar: At the top of the issues list, there's a search bar. You can type keywords related to the issue you are looking for. This can include specific terms mentioned in the issue's title or body.
- Filter by Labels: GitHub allows you to add labels to issues for categorization. You can filter issues based on these labels. Click on 'Labels' and select the one you want to filter by.
- Filter by Assignee: To see issues assigned to a specific person, click on the 'Assignee' dropdown and select a user.
- Filter by Author: If you want to see issues created by a specific user, use the 'Author' filter.
- Filter by Milestones: If your project uses milestones, you can filter issues based on the milestone they are associated with.
- Advanced Filters: GitHub also supports more advanced filters like filtering by open/closed status, specific mentions, comments, or even specific time frames. These can usually be accessed by clicking on a dropdown or entering specific filter commands in the search bar.
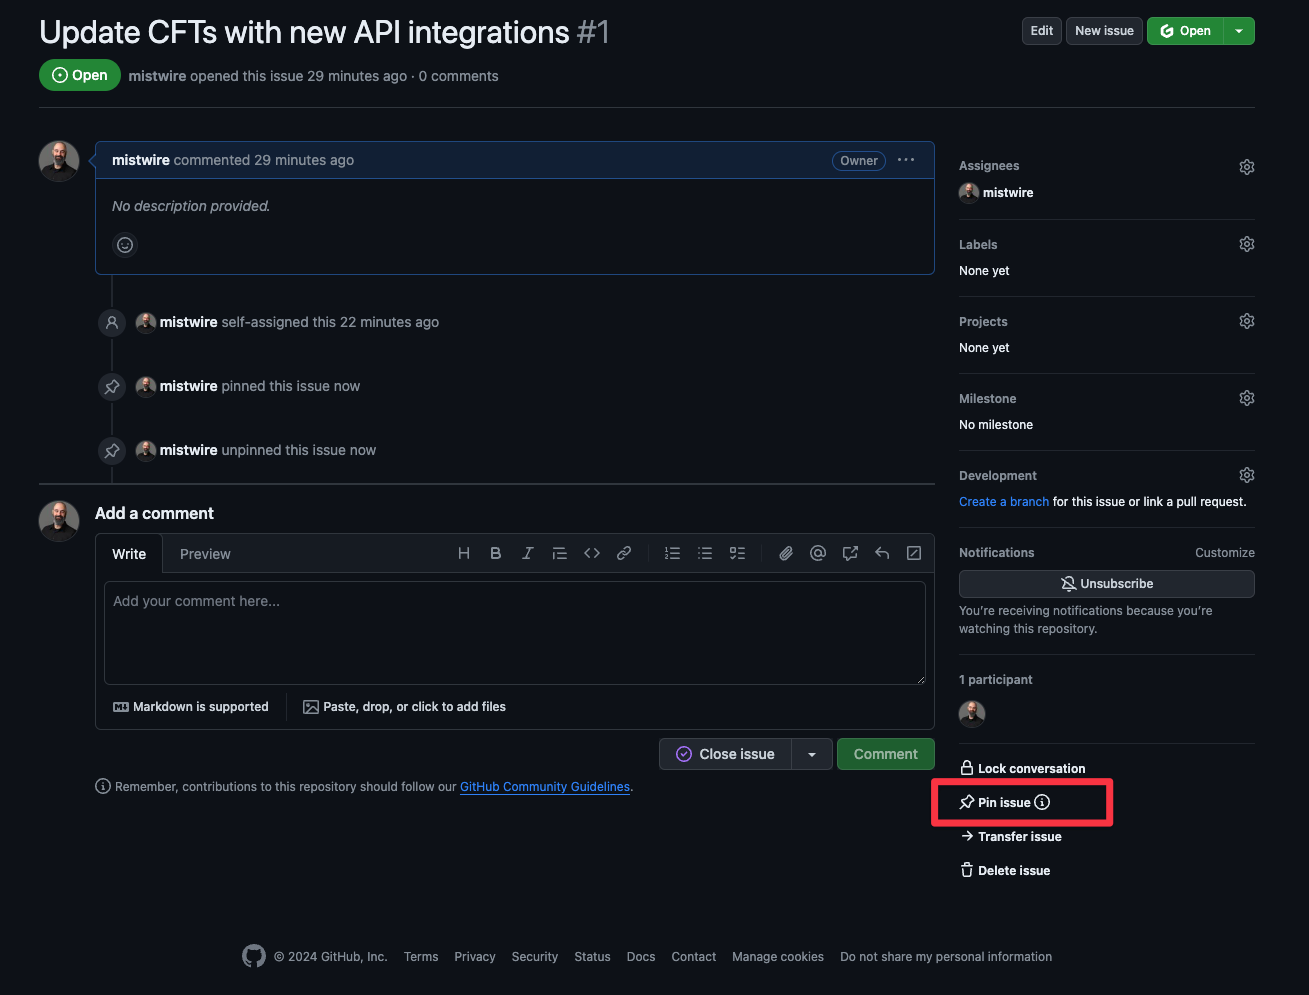
Describe how to pin an issue
You can pin up to three important issues in the issues list of a repo.
On the issues tab, click the issue to pin, then on the right sidebar click 'Pin Issue':
Explain basic issue management
Creating Issues: Issues can be created by any user with access to the repository. They are typically used to report bugs, request features, or discuss other tasks.
To create an issue, click on the 'Issues' tab in the repository and then on 'New issue'. You can then fill out the title and description, add labels, and assign the issue to a user.
Labeling Issues: Labels are a useful way to categorize issues. Common labels include 'bug', 'feature request', and 'help wanted'. They can be customized to fit the needs of the project. Labels help in organizing and prioritizing issues.
Assigning Issues: Issues can be assigned to specific users. This is typically done to indicate who is responsible for working on the issue. It helps in distributing tasks among team members.
Milestones: Milestones can be used to group issues together, often for a specific release or project phase. This helps in tracking the progress towards a particular goal.
Issue Comments: Team members can comment on issues to discuss them in more detail. This is a key part of collaborative problem-solving and can include suggestions, questions, or updates on progress.
Closing Issues: Once an issue has been resolved, it should be closed. This helps in keeping the issue tracker clean and focused on outstanding issues.
Searching and Filtering Issues: GitHub provides tools to search and filter issues. This can be done using keywords, labels, assignees, or other criteria. It helps in finding specific issues quickly.
Linking Pull Requests to Issues: Often, pull requests are linked to issues. This indicates that the code changes in the pull request address the issue. GitHub provides an automatic link in the pull request to the corresponding issue when mentioned.
Explain the difference between issue templates and issue forms
Issue Templates are markdown files that create a predefined structure for users to fill out when they open a new issue. The template can include headings, checklists, and text areas with instructions like "Describe the bug" or "Steps to reproduce." They help in guiding the user to provide necessary details.
Issue templates are flexible and can be edited as plain text. If you want contributors to provide specific, structured information when they open issues, issue forms help ensure that you receive your desired information.
Issue Forms, on the other hand, were introduced as a more structured alternative to issue templates. They allow repository maintainers to build more interactive and user-friendly forms using YAML configuration files.
Issue forms can include required fields, dropdowns, checkboxes, validations, default assignees, default labels, and more, ensuring that users provide all the essential information when submitting an issue. This reduces the chances of getting incomplete or vague reports.
Explain how to use keywords in issues
Keywords are used in pull requests and commit messages to link the pull request or commit to an issue, and optionally to close the issue when the pull request is merged.
To link a pull request or commit to an issue without closing it, you can use keywords like "refers to", "addresses", or "re:", followed by the issue number. For example, "Refers to #123".
To close an issue automatically when a pull request is merged, use keywords such as "close", "closes", "closed", "fix", "fixes", "fixed", "resolve", "resolves", or "resolved", followed by the issue number. For instance, "Fixes #123" in the pull request description or a commit message will close issue 123 upon merging the pull request.
When creating a pull request or making a commit, include the chosen keyword followed by the issue number in the pull request description or the commit message. For example: "This commit fixes #123 by adding new validation rules".
If your pull request or commit addresses several issues, you can use multiple keywords. For example: "This commit closes #123, resolves #124, and refers to #125".
Pull requests
Describe a pull request
A pull request (commonly referred to as a PR) is way to propose changes to a codebase in a collaborative environment. It allows for code review, discussion, and modifications before integrating the changes into the main project.
A PR is a cornerstone of collaborative software development and a great way to ensure quality and share knowledge within the team.
Explain how to create a new pull request
- Step 1: Branch – You start with a branch, which is like your personal workspace in a project's repository.
- Step 2: Make Changes – You do your magic here (write code, fix bugs, add features, and so on).
- Step 3: Commit – Once you're happy with your work, you commit it to your branch.
- Step 4: Create the Pull Request – Now, you create a pull request to the main branch.
- Step 5: Review & Discussion – A repo maintainer checks out your work. They might suggest changes or ask questions.
- Step 6: Merge – If everything looks good, your changes are merged into the main branch.
Describe the base and compare branches in a pull request
The compare branch is the developers branch where the new work is being done.
The base branch is the the where you want to merge the changes into. This is often called main or (in the old days) master.
Explain the relationship of commits on a pull request
When you create a new branch to do work on, you will commit your changes to that branch. Once you've completed your commmits to that branch you will then be prompted by GitHub to 'Compare & pull request' into main.
Describe draft pull requests
Draft Pull Requests in GitHub are a feature that allows developers to create incomplete or work-in-progress (WIP) pull requests.
This feature is especially useful when you want feedback on code that is not yet ready to be merged into the main codebase.
A draft PR can't be merged and repo owners aren't automatically notified to review them.
When creating a pull request, you have the option to mark it as a draft. You can do this by selecting the "Create as draft" checkbox in the pull request creation interface.
Once marked as a draft, the pull request is clearly labeled as such, indicating to other team members that it’s not ready for a final review or merge.

Describe the purpose of the pull request tabs (conversation, commits, checks, files changed)
Conversation: This is the social hub of the PR. It's where the team discusses the proposed changes. You'll find overall comments about the PR, feedback, suggestions, and often a bit of friendly banter. It's also where automated messages, like those from continuous integration (CI) tools, show up. Think of it as the meeting room where everyone chats about the PR.
Commits: This tab is like a diary of all the changes made. Each entry (commit) in this diary has a message explaining what was changed, and by whom. Browsing through this, you can see the evolution of the PR, with each commit representing a step in the development process.
Checks: This is the quality control center. It shows the status of automated checks that have been run on the code. These can include tests, linting (code style checks), security scans, and other automated reviews. Green check marks mean all is well, while red Xs are like stop signs indicating something needs attention.
Files Changed: The magnifying glass of the PR, this tab shows you exactly what was altered in each file. It's where you can do a line-by-line review of the changes, make suggestions, or request further alterations. It's a crucial tool for ensuring that only the best, most polished code makes it into the project.
Identify how to link activity within a pull request
Linking activity within a pull request is like creating a network of breadcrumbs that connect different parts of your project's story. This helps everyone understand how your pull request fits into the bigger picture.
Here’s how you can weave this web of connections:
Referencing Issues: If your pull request addresses a specific issue, you can link to it. Simply include phrases like fixes #issue_number, closes #issue_number, or resolves #issue_number in your PR description or in a commit message. This not only creates a link but also helps in automatically closing the referenced issue when the PR is merged.
Mentioning Other Pull Requests or Discussions: You can reference other PRs or discussions by using the # followed by the PR/discussion number (like
#123). This is handy when your work is related to or dependent on someone else's work.Linking to Commits: To reference a specific commit in your discussion, use its SHA (the unique identifier of the commit). This is like saying, "Hey, check out this specific moment in our project history!"
Mentioning Team Members: Need specific feedback from a teammate? Use @username to grab their attention. It's like a friendly nudge to have them look at something specific.
Using Markdown for Additional Context: GitHub supports Markdown, which lets you add links to external resources, images, or documents that might be relevant to your PR. This is useful for providing additional context or evidence for the changes you're proposing.
Checklist to Track Progress: In the PR description, you can include a task list using - [ ]. This helps in tracking the progress of different components of your PR, especially in large updates.
Explain the different pull request statuses
- Draft pull request - When you create a pull request, you can choose to either create a pull request that’s ready for review or a draft pull request. A pull request with a draft status can’t be merged, and code owners aren’t automatically requested to review draft pull requests.
- Open pull request - An open status means the pull request is active and not yet merged to the base branch. You can still make commits and discuss and review potential changes with collaborators.
- Closed pull request - You can choose to close a pull request without merging it into the base/main branch. This option can be handy if the changes proposed in the branch are no longer needed, or if another solution is proposed in another branch.
- Merged pull request - The merged pull request status means that the updates and commits from the compare branch were combined with the base branch. Anyone with push access to the repository can complete the merge.
Recognize how to comment on a posted link to a line or lines of code from a file
Hover over the line of code where you'd like to add a comment, and click the blue comment icon.
To add a comment on multiple lines, click and drag to select the range of lines, then click the blue comment icon.
Describe code review with a codeowners file
Code review in GitHub with a CODEOWNERS file is an integral part of the GitHub workflow. It's aimed at improving the quality and security of code.
The CODEOWNERS file can be placed in the root, docs/, or .github/ directory of a repository. It specifies individuals or teams responsible for code in certain parts of the repository.
Here’s a brief overview:
- Defining Code Owners: In the CODEOWNERS file, you can specify owners for specific files and directories using GitHub usernames or team names, along with the file path patterns. See example CODEOWNERS file here
- Automatic Review Requests: When a pull request (PR) changes any code in areas covered by the CODEOWNERS file, GitHub automatically requests a review from the specified owners. This ensures that the right people review changes to code they’re familiar with.
- Mandatory Reviews for Protected Branches: For repositories with branch protection rules, you can enforce that changed code is reviewed by its owners before it’s merged. This is particularly useful in critical repositories where quality and security are paramount.
- Flexibility and Documentation: The CODEOWNERS file can be updated as teams and codebases evolve. It also serves as a clear documentation of responsibilities, helping new team members understand who maintains which part of the code.
- Integration with GitHub Actions: You can further integrate CODEOWNERS with GitHub Actions to automate various aspects of your development workflow, enhancing the overall efficiency of the process.
Explain the different options for providing a code review on a pull request (comment, approve, request changes, suggested changes)
- Comment: This is used when you want to leave a remark or observation about a specific part of the code but don't necessarily want to formally approve or request changes.
- Approve: This option is used when you have reviewed the PR and believe it is ready to be merged without any further changes.
- Request Changes: This is used when you identify issues that must be addressed before the PR can be merged.
- Suggested Changes: This feature allows you to propose specific code changes.
- Draft Pull Requests: create a pull request but mark it as a draft. This indicates that the PR is a work-in-progress and not yet ready for review. Once it’s ready, you can mark it as “Ready for review.”
Discussions
Describe the difference between discussions and issues
Issues:
- Primarily used for tracking tasks, bugs, enhancements, and other actionable items.
- Issues are more formal and focused.
- They can be labeled, assigned to individuals, and are often linked directly to code changes (pull requests).
- Used for tracking the progress of work, discussing potential changes, or reporting bugs.
- Can be closed when resolved, and they are integral to project management and software development workflows.
Use Case: If a user finds a bug or has a feature request, they would open an issue to discuss and track the progress of this specific item.
Discussions:
- Aimed at broader conversations and community engagement, discussions are more about ideas, Q&As, and general conversations.
- More informal and open-ended compared to issues.
- A place for questions, feature ideas, or general conversations that don’t need an immediate resolution.
- Support a threaded format, making extended conversations easier to follow. They can be categorized (for example, Q&A, Ideas, General, and so on) for better organization.
- Great for building a community around the project, where users and contributors can engage without the formality of an issue.
Use Case: If someone has a question about using the project, or if there's a desire to have a conversation about best practices, future directions, or community-related topics, they would start or participate in a discussion.
Explain the options available with discussions (announcements, ideas, polls, Q&A, show and tell)
Announcements:
- Purpose: Used to share updates, important news, or information about the project. Only maintainers or designated community members can post announcements.
- Use Case: Sharing release updates, policy changes, or any critical information that the community needs to be aware of.
Ideas:
- Purpose: For proposing new features, enhancements, or improvements to the project.
- Use Case: If a member has an idea for a new feature or an enhancement to existing functionality, they can post it under this category. The community can then discuss and iterate on these ideas.
Polls:
- Purpose: Allows maintainers to create polls for community feedback.
- Use Case: When a project maintainer wants to gather opinions or make decisions based on community preferences, polls can be a useful tool. This could be for new features, UI changes, or any other aspect where community input is valuable.
Q&A:
- Purpose: A place for asking and answering questions related to the project.
- Use Case: If someone needs help with a particular aspect of the project, or if they have questions about how to use a feature, they can ask under the Q&A category. Others, including maintainers and community members, can provide answers.
Show and Tell:
- Purpose: For users to showcase their work related to the project.
- Use Case: If a community member wants to share something they've built using the project, like a new integration, a tool, or any creative use case, they can do so under Show and Tell. This encourages sharing of ideas and innovation within the community.
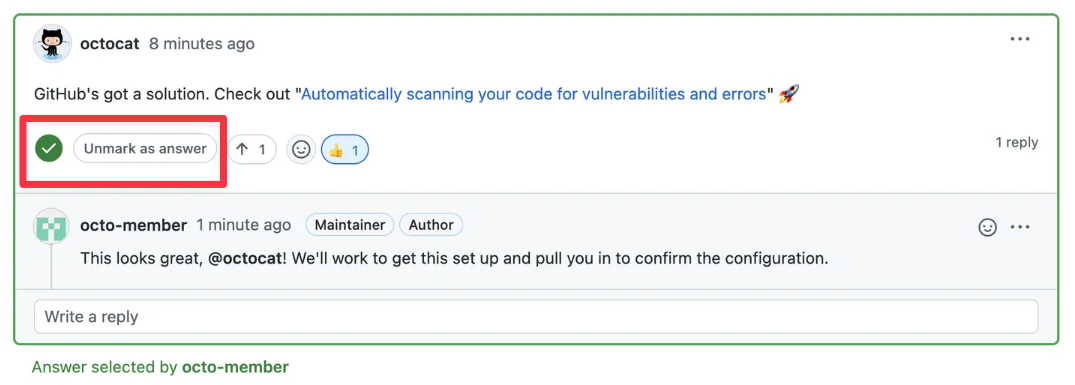
Identify how to mark a comment as an answer to a discussion
As a repository maintainer, contributor, or the original author of the question, you will see an option to mark a comment as the answer:
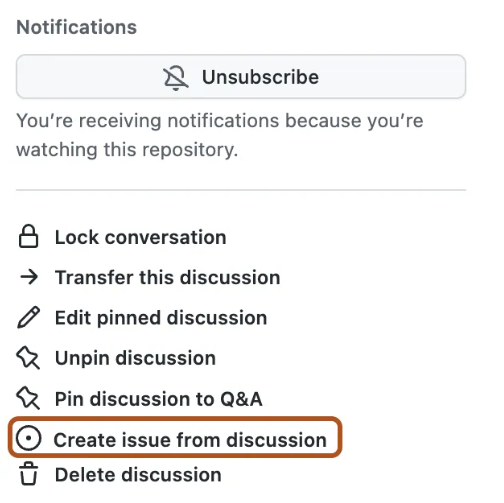
Explain how to convert a discussion to an issue
In the discussion you want to convert, in the right sidebar you have the option to Create issue from discussion:
Recognize how to pin a discussion
In the discussion you want to pin, in the right sidebar you have the option to Pin:
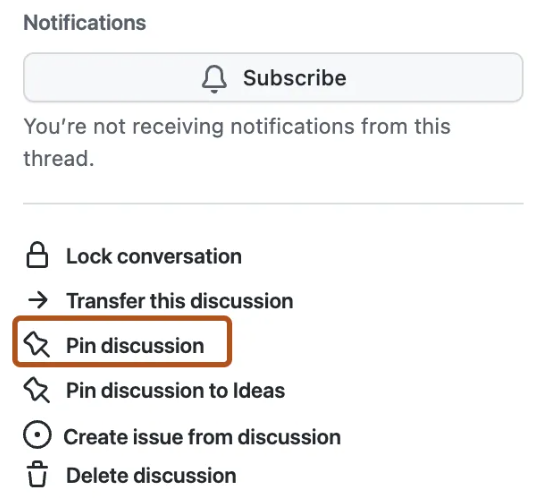 discussion**
Notifications
Describe how to manage notification subscriptions
You can specify how to receive notifications, the repositories you are interested in, and the types of activity you want to hear about.
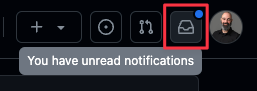
On the left sidebar at the bottom, you can manage your notifications
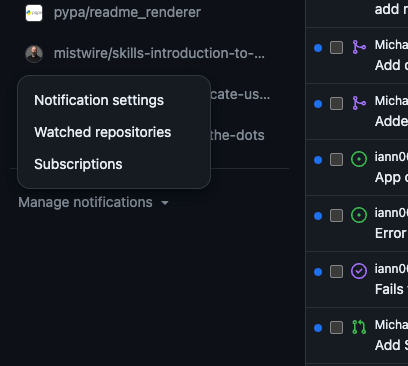
Explain how to subscribe to notification threads
GitHub's notification system is flexible, allowing you to be as involved as you want in the repositories and discussions:
- Navigate to the Repository or Issue Page
- Watch the Repository
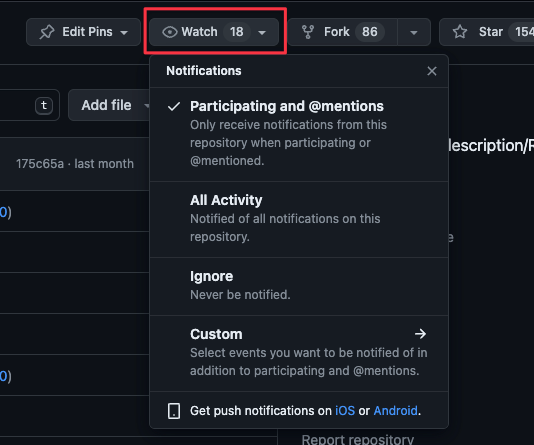
Clicking this button will give you several options:
- "Watching": You’ll receive notifications for all conversations.
- "Not watching": You’ll no longer receive notifications, but you’ll be notified when you participate in a conversation or someone mentions you.
- "Ignore": You won’t receive any notifications at all from the repository.
- Subscribe to an Issue or Pull Request: For specific issues or pull requests, navigate to the one you're interested in. On the right-hand side, you'll find a "Notifications" sidebar. Here you can click on the "Subscribe" button to get updates for that particular issue or pull request.
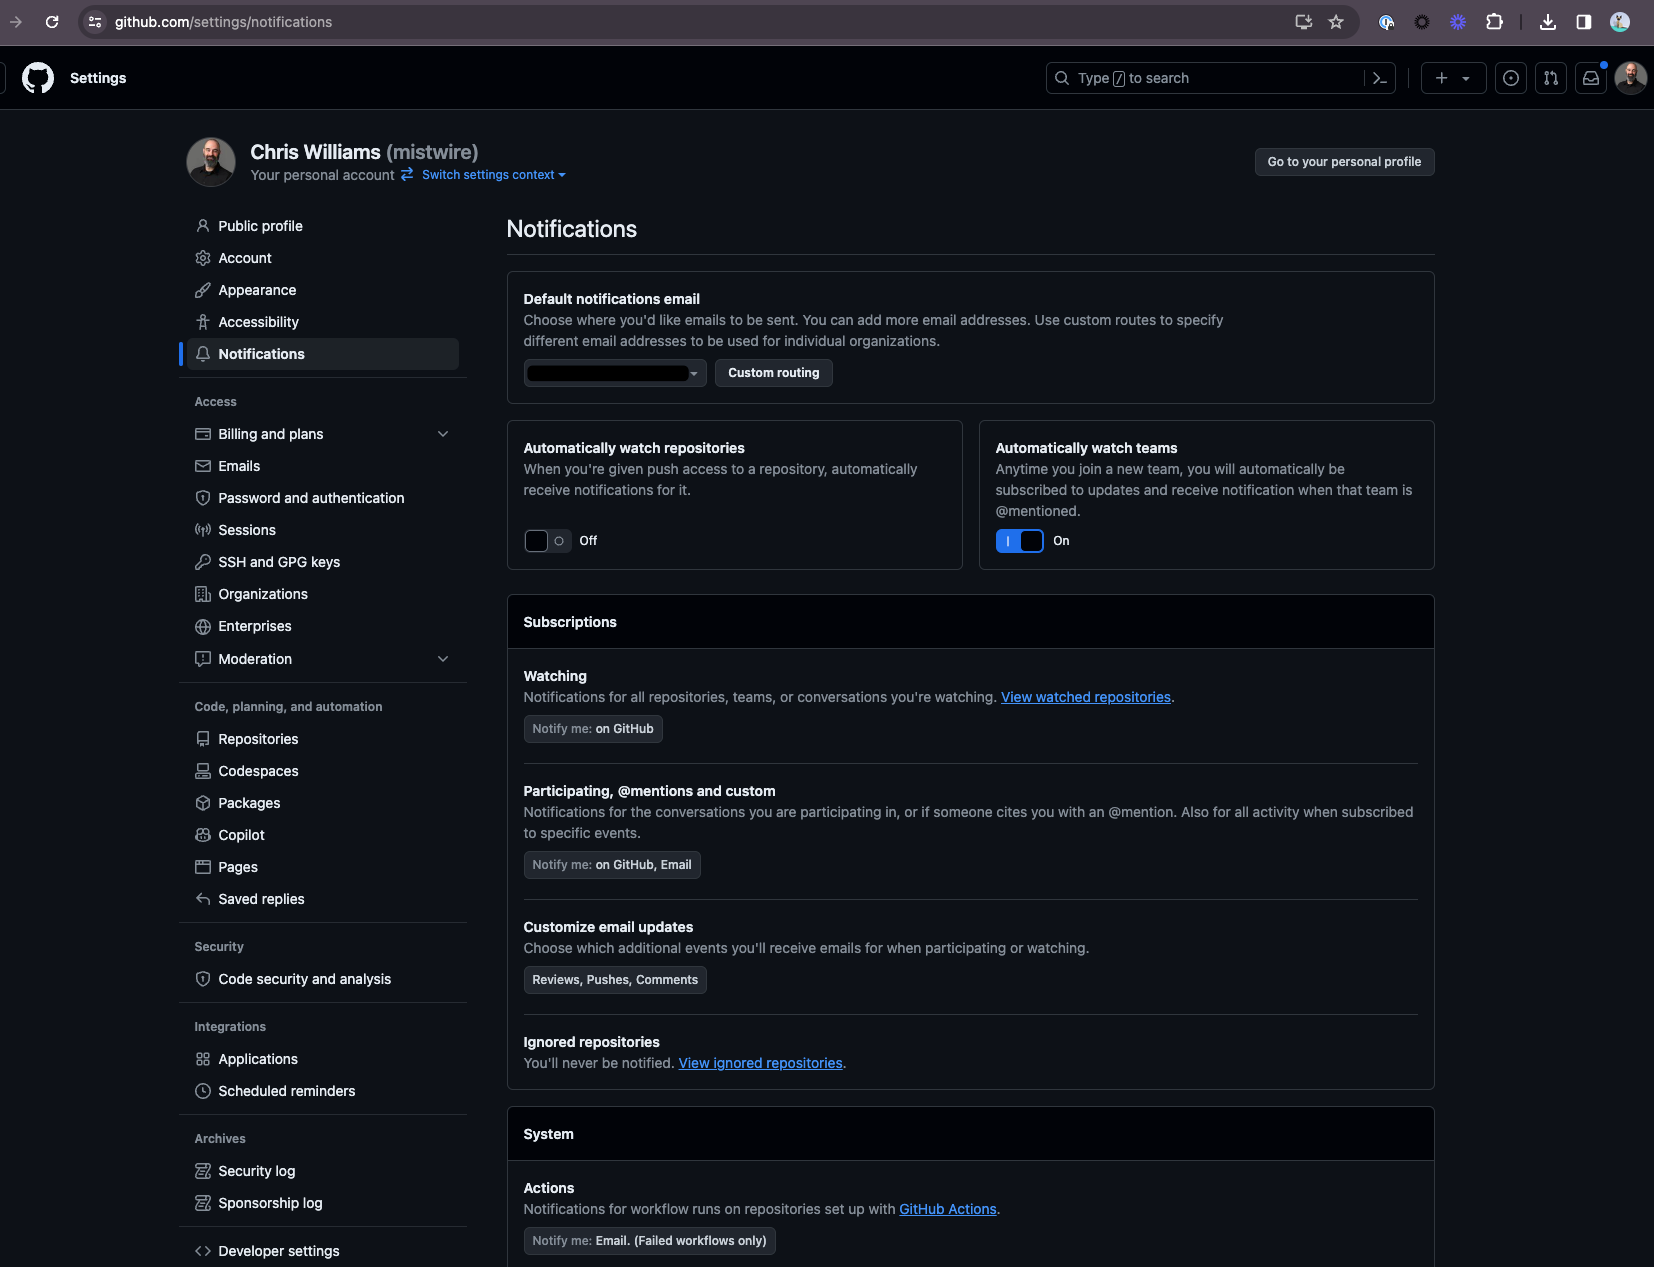
- Configure Your Notification Settings: You can fine-tune your notification preferences in your GitHub account settings. Go to your profile, select "Settings," then "Notifications." Here, you can configure how you receive notifications (for example, via email or web) and for what types of activities
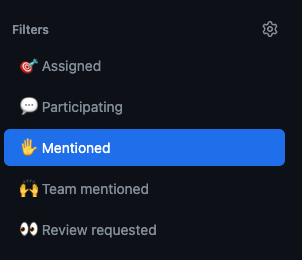
Describe how to find threads where you are at-mentioned
On the notifications page you can filter using the 'Mentioned' option:
Identify the notification filtering options
All vs Participating:
- All: This option shows all the notifications from the repositories you’re watching.
- Participating: This filter shows notifications from threads in which you’ve participated, such as through comments or if you’re @mentioned.
Reason for Notification: You can filter notifications based on why you received them, like being directly mentioned, having authored the thread, or being part of a team that’s mentioned.
Repository: You can filter notifications based on specific repositories. This is particularly useful if you follow multiple repositories and want to focus on updates from just one or a few of them.
Type of Activity: This option allows you to filter notifications based on the type of activity, such as Issues, Pull Requests, or Discussions.
Unread: This filter allows you to view only those notifications that you haven't read yet, helping you to focus on new updates.
Custom Filters: GitHub also allows the creation of custom filters based on various criteria, which can be a combination of the above or more specific criteria. You can save these filters for quick access in the future.
Notifications from a Specific Time Range: You can filter notifications based on when they were created, like within the last day, week, or a custom time range.
Keywords: You can also use keywords in the search bar within the notifications page to find specific notifications.
Explain the different notification configuration options
I feel like I've beaten notification configuration to death at this point 🤣 I recommend you go through https://github.com/settings/notifications and click on anything left that you might have a question on.
Gists, Wikis, and GitHub Pages
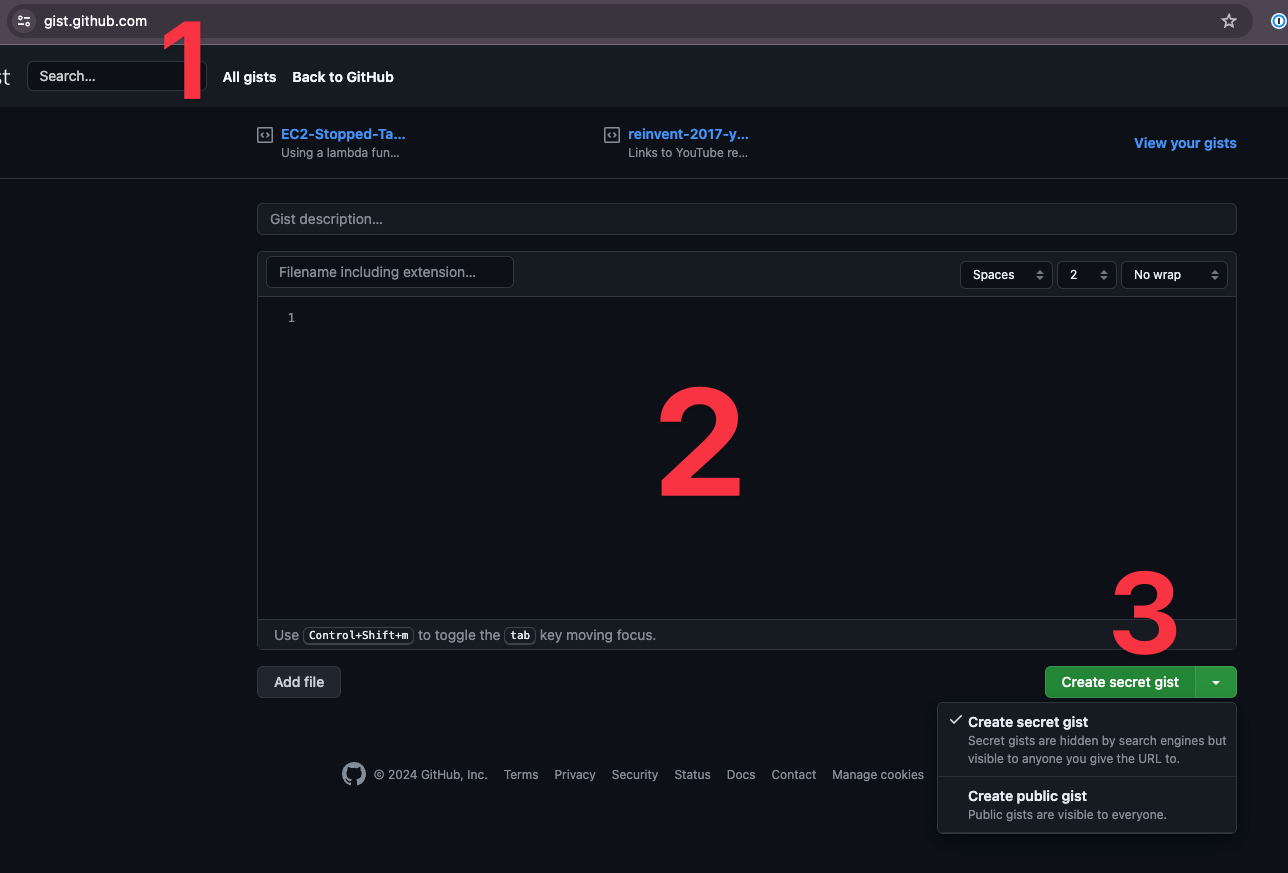
Explain how to create a GitHub gist
Gists are Git repositories, so they can be forked and cloned just like any other Git repository. This makes them a versatile tool for collaboration and version control of small pieces of code or text.
Here's how to create a gist:
- Go to https://gist.github.com/
- Add code
- Choose public or secret gist (note: anyone with the link can view a secret gist!)
Describe how to fork and clone a gist
Forking a Gist
- Find the Gist to Fork
- Fork the Gist: At the top-right of the gist page, you’ll see a “Fork” button. Click this button to create a copy of the gist under your GitHub account.
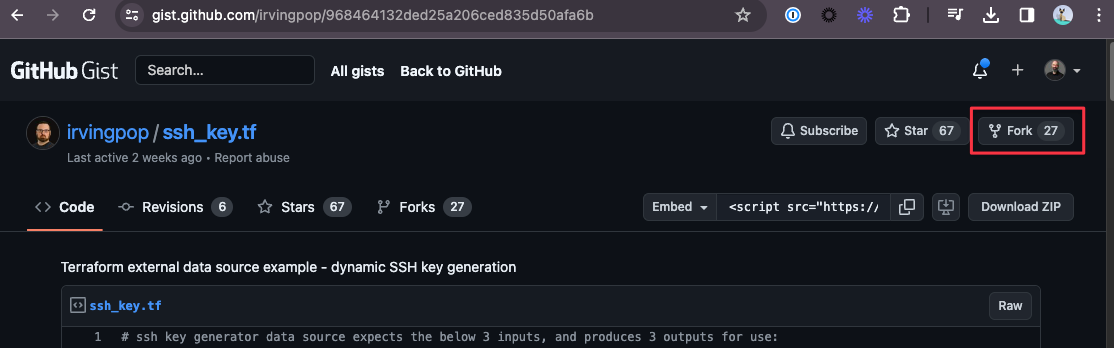
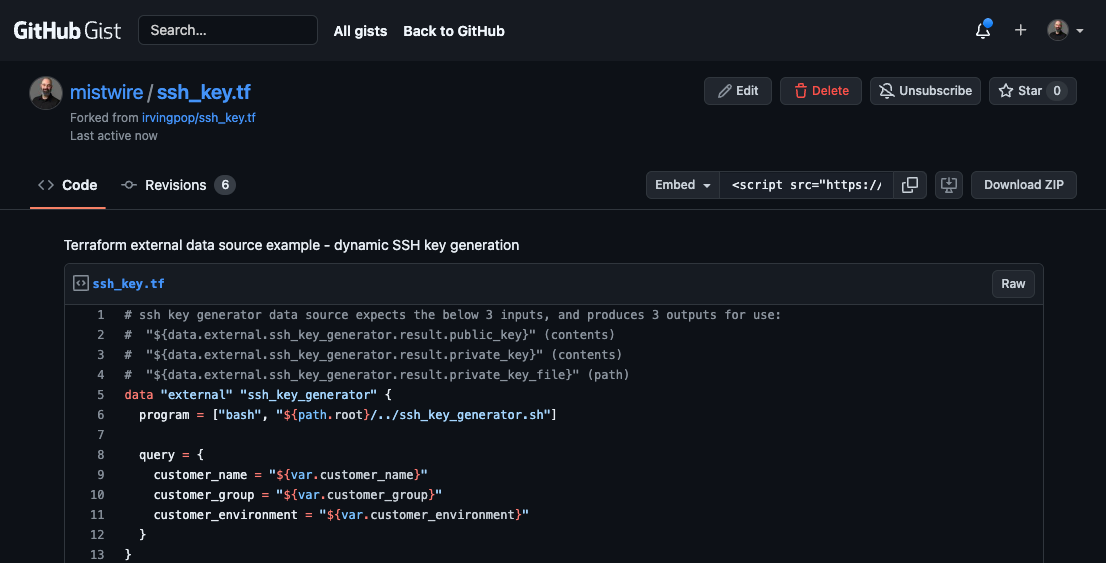
- After clicking “Fork”, you’ll be taken to your own copy of the gist, which you can now modify. The gist will show that it’s forked from the original user’s gist.
Cloning a Gist
- Get the Clone URL:On the gist’s page, look for the “Embed” button on the top right. Click it to see the clone URL. Ensure that you copy the URL (you can choose between SSH or HTTPS).
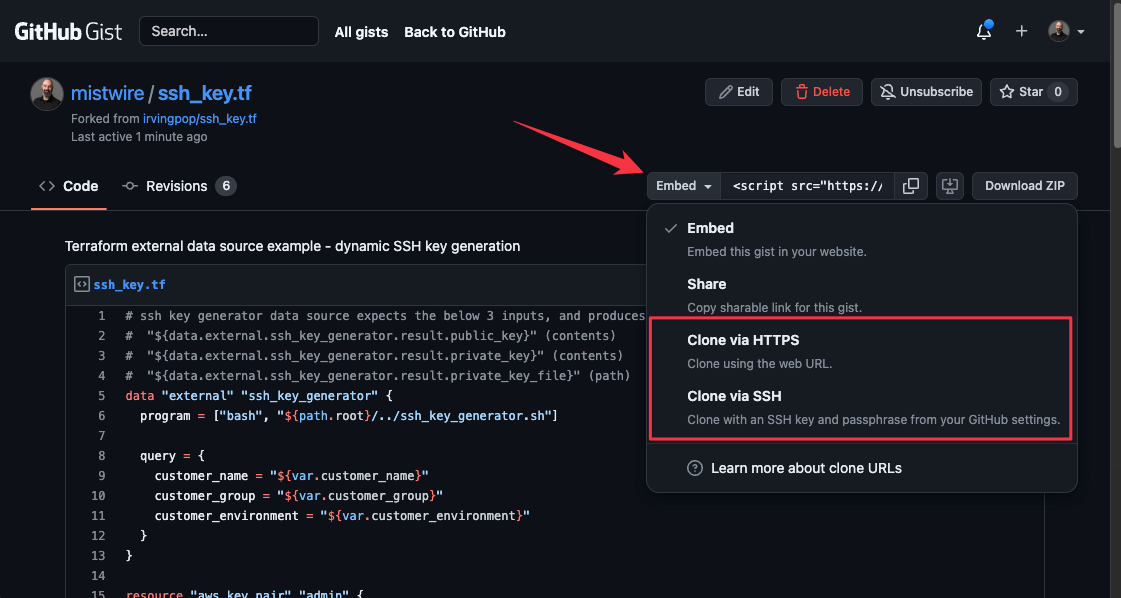
- Open Terminal or Command Prompt and clone as per the usual process.
Explain GitHub Wiki pages
Wiki pages provide a space associated with a GitHub repository to create and share detailed documentation about the project. They're useful for things like extended project descriptions, user manuals, design documentation, examples, or anything else you want to share about your project.
Describe how to create, edit, and delete wiki pages
Create a wiki page
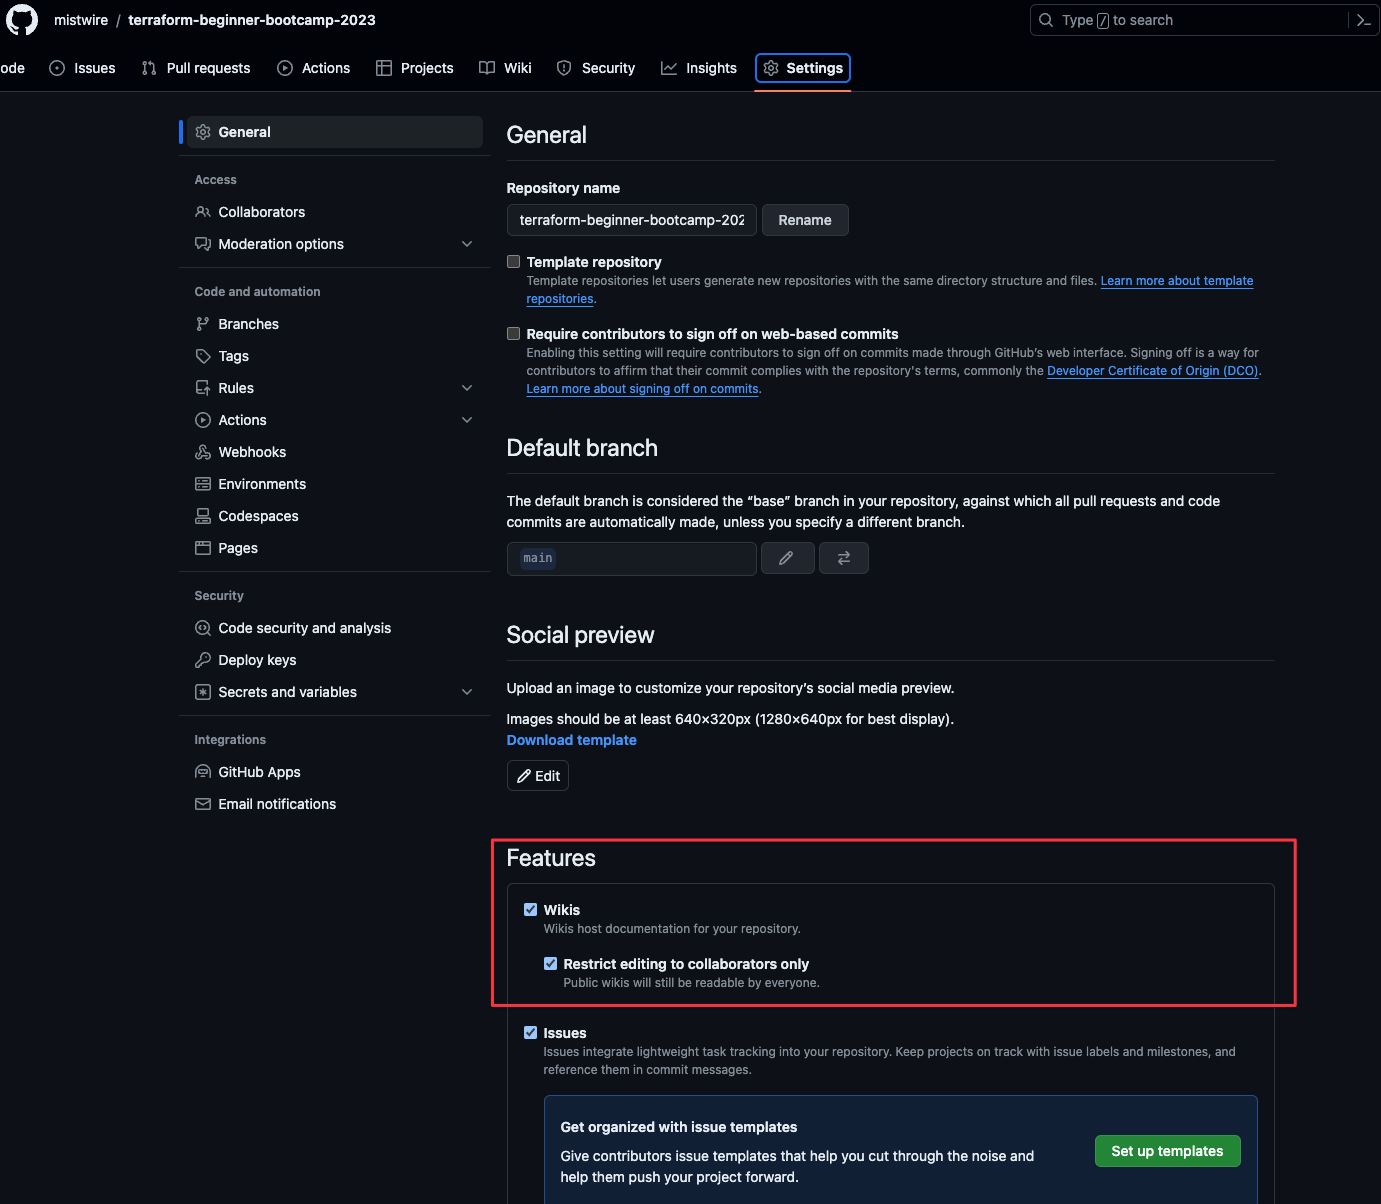
First, you'll need to enable the Wiki: click on "Settings" and then check the "Wiki" box under "Features."
Once it's enabled, a new "Wiki" tab appears on the repository's homepage. Click on it to access the Wiki section.
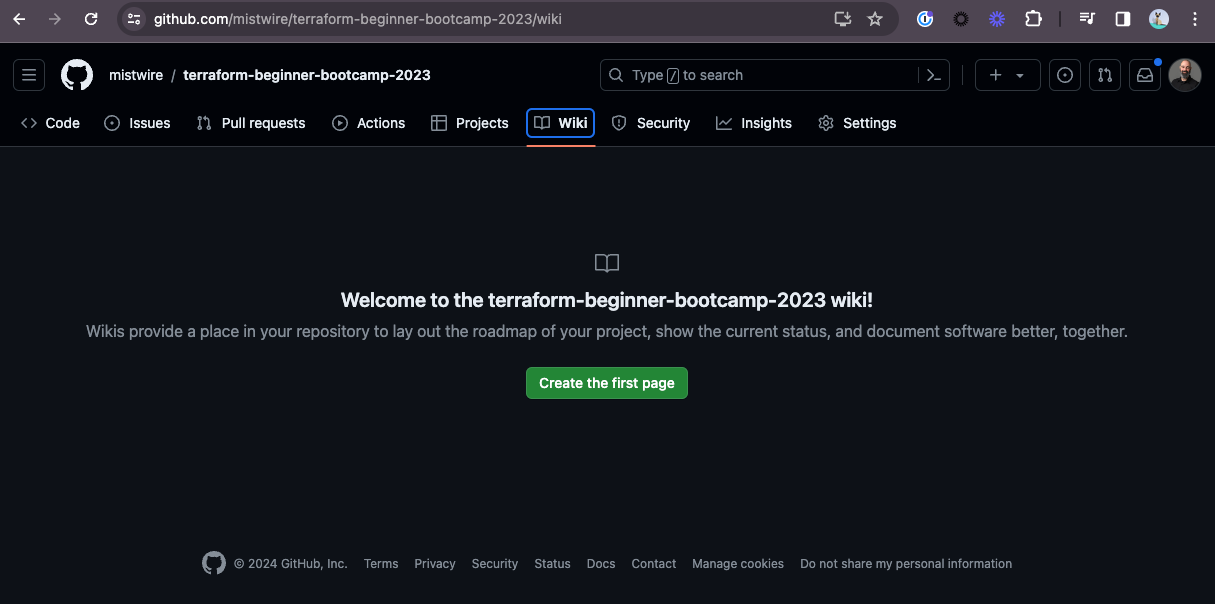
You can create a new Wiki page by clicking the “New Page” button. You'll be prompted to give it a title and then you can start adding content.
Delete a wiki
Click the Edit button on the page you wish to delete then click the Delete page button:

Explain the visibility of wiki pages
If the repository is public, the Wiki is also publicly visible. This means anyone on the internet can view the Wiki pages, regardless of whether they have a GitHub account.
For private repositories, the Wiki is only visible to users who have access to the repository. This includes collaborators with appropriate permissions.
By default, anyone who has push access to the repository can edit the Wiki.
Wikis can be cloned just like any other Git repository. The visibility of the clone follows the same rules - public for public repositories, and restricted for private repositories.
If you change the visibility of a repository from public to private (or vice versa), the Wiki's visibility will also change accordingly.
Unlike other aspects of GitHub repositories, Wikis do not support forking or pull requests. This means collaboration and contributions are managed through direct edits and are dependent on the access permissions set by the repository owner.
Describe GitHub Pages
GitHub Pages is a web hosting service offered by GitHub that allows users to host their static website directly from a GitHub repository. It's particularly popular among developers for hosting project documentation, personal blogs, and portfolio sites.
You can reach GitHub Pages from the domain username.github.com
Domain 4: Modern Development
GitHub Actions
Describe GitHub Actions (basic understanding)
GitHub Actions is a continuous integration and continuous delivery (CI/CD) platform that is integrated directly with your GitHub repositories. It allows you to automate your build, test, and deployment pipeline.
You can create workflows that build and test every pull request to your repository, or deploy merged pull requests to production.
Actions are defined as YAML files located in the .github/workflow folder. You can have multiple workflows in a repo that a triggered by different events.
Explain where you can use GitHub Actions within GitHub (general event types)
- Push Events: Trigger actions on any push event to a repository, such as when code is pushed to a branch or a new tag is created. This is commonly used for Continuous Integration (CI) processes.
- Pull Request Events: Actions can be triggered by different stages of pull requests, like opened, reopened, synchronize, or closed. This allows for automated testing, linting, or even deploying preview environments for a pull request.
- Issue Events: Automate workflows in response to issue activities like created, edited, labeled, or closed. This can be used for automated issue triaging or notification systems.
- Release Events: Trigger workflows when a new release is published or a draft release is created. This is often used for automating deployment processes.
- Schedule Events: Run workflows on a schedule using cron syntax. This can be useful for nightly builds, routine tasks, or data synchronization jobs.
- Manual Events: With workflow_dispatch, you can manually trigger a workflow from GitHub's UI. This is useful for workflows that need to be run occasionally and shouldn't be tied to code changes.
- Registry Events: Actions can respond to events from package registries, like the GitHub Package Registry, when packages are published or updated.
- Forking and Starring Repositories: Triggers when a repository is forked or starred, which can be useful for gathering metrics or automated messaging.
- Gollum Events: Triggered by changes to a repository's wiki, which is useful for documentation update workflows.
- Webhook Events: If none of the predefined events fit your needs, GitHub Actions can also be triggered by external events using repository webhooks.
Explain where you can find existing GitHub Actions
The GitHub Marketplace is one of the primary places to find existing GitHub Actions. You can browse or search for actions created by the GitHub community and third-party vendors: GitHub Marketplace - Actions.
GitHub maintains an official set of actions for common CI/CD tasks, such as setting up different programming environments, caching dependencies, or deploying code. GitHub Actions
And many open-source projects and companies share their custom GitHub Actions on public repositories. You can search for these repositories directly on GitHub. Use keywords like “GitHub Actions” along with specific tasks or tools you’re interested in (for example, “Docker GitHub Actions”).
GitHub Copilot
Describe GitHub Copilot
Copilot is a service that provides you with an AI pair programmer that works with all of the popular programming languages and accelerates overall developer productivity.
Developed in collaboration with OpenAI, GitHub Copilot is powered by OpenAI Codex, an AI system created by OpenAI. OpenAI Codex has broad knowledge of how people use code, in part because it was trained on a data set that includes a larger concentration of public source code.
GitHub Copilot is available as an extension for Visual Studio Code, Visual Studio, Vim/Neovim, and the JetBrains suite of integrated development environments (IDEs).
Features include:
- AI powered auto-complete
- ChatGPT-like experience in your editor with GitHub Copilot Chat
- Copilot for Pull Requests
- AI-generated answers about documentation (GitHub Copilot for Docs)
- Copilot for the command line interface (CLI)
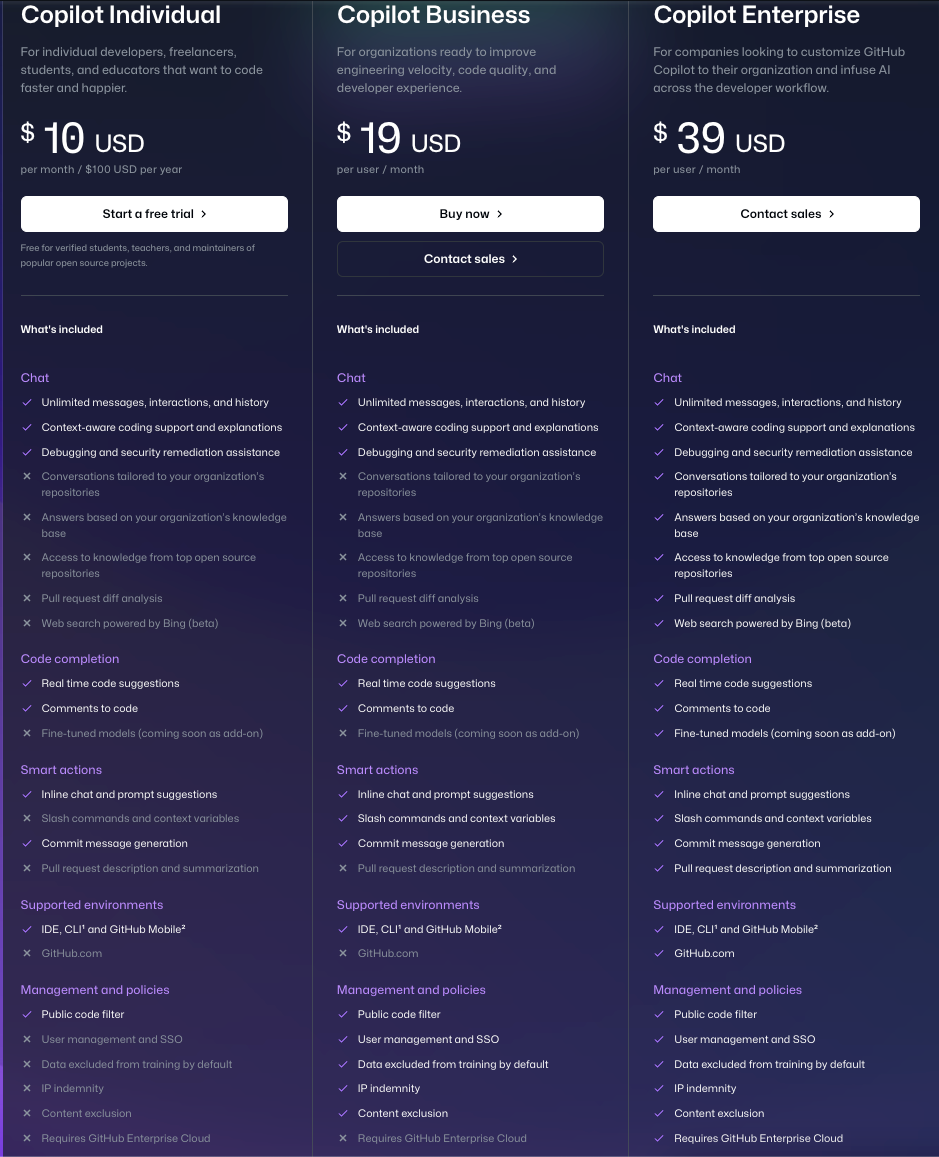
Describe the difference between GitHub Copilot for Individuals and GitHub Copilot for Business
GitHub Copilot is available through GitHub personal accounts with GitHub Copilot Individual, or through organization or enterprise accounts with GitHub Copilot Business and GitHub Copilot Enterprise.
Copilot Business allows you to control who can use GitHub Copilot in your company. Once you give access to an organization, its admins can then give access to individuals and teams.
With Copilot Business, GitHub Copilot is open to every developer, team and organization, and enterprise.
GitHub Copilot Business features: code completions, chat in IDE and mobile, security vulnerabilities filter, code referencing, public code filter, IP indemnity, and enterprise-grade security, safety, and privacy
Note: GitHub Copilot Enterprise has an extra layer of personalization, allowing orgs to use their own codebase to train the AI*.
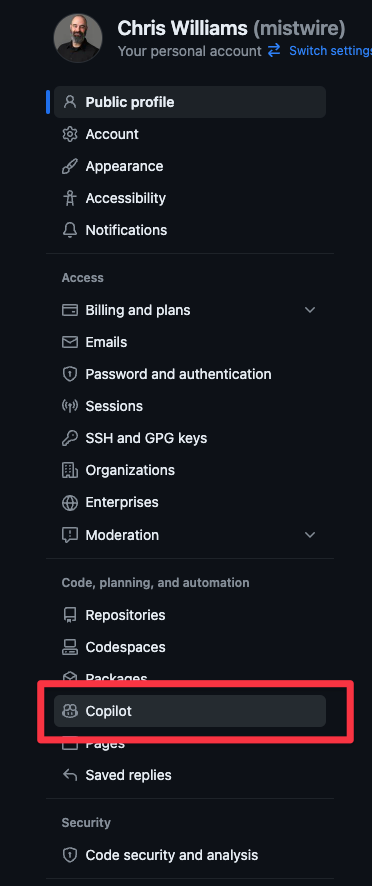
Explain how to get started using GitHub Copilot
- Sign up for free trial or subscription (profile photo -> Settings -> Copilot is on the left-hand menu under Code, planning, and automation):
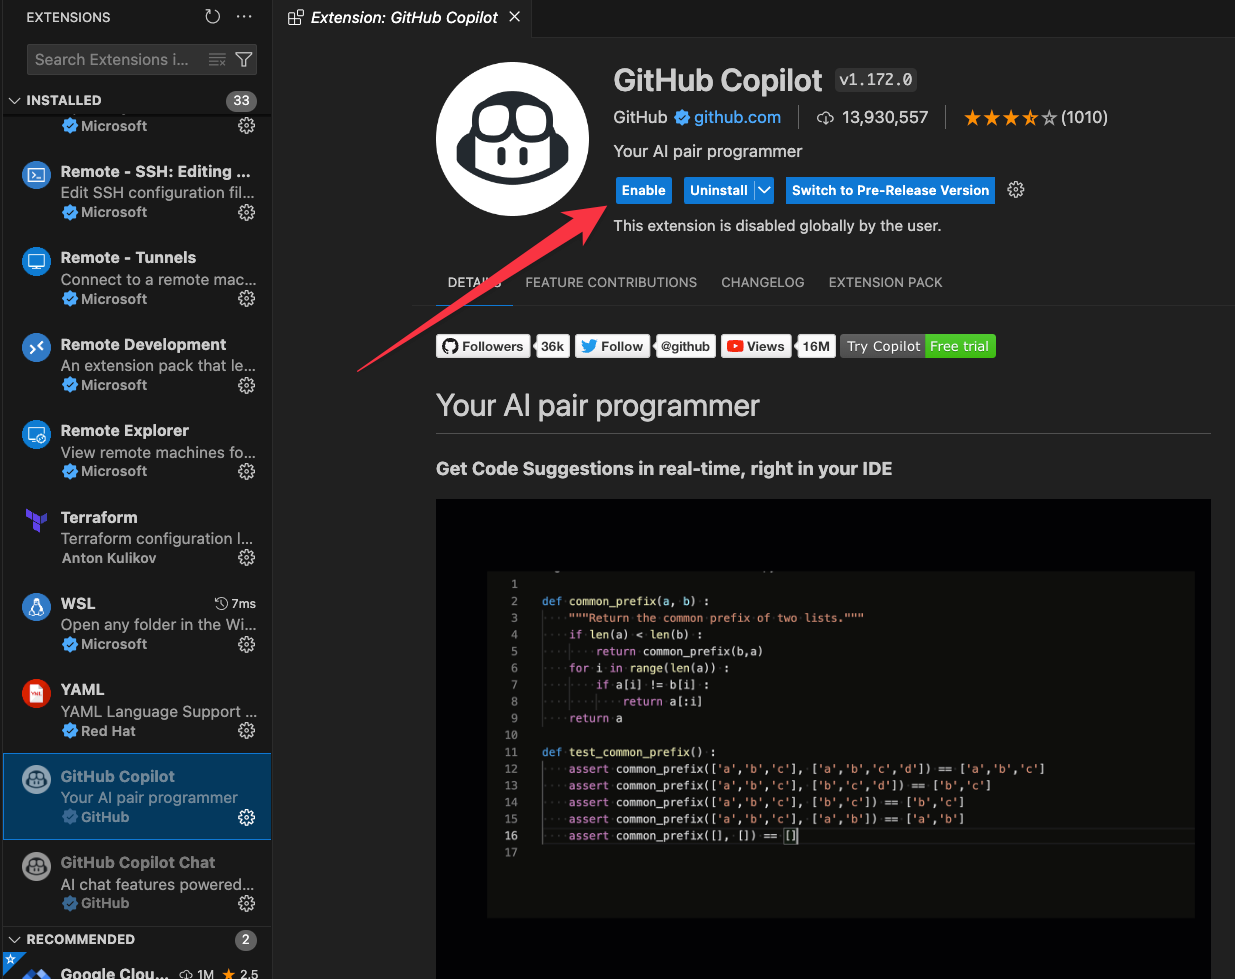
- Install an extension for your preferred IDE (see supported IDEs above)
- Enable (or disable) GitHub Copilot extension in your IDE:
GitHub Codespaces
Describe GitHub Codespaces
GitHub Codespaces is a cloud-based development environment integrated directly into GitHub. It allows you to code directly within your browser, providing a fully-featured, customizable, and containerized development environment that you can configure to match your local setup. This means you can write, run, and debug your code without needing to set up anything on your own computer.
Key features include:
- Instant-on Environment: Codespaces spin up quickly, giving you a development environment in seconds, preloaded with your code and dependencies.
- Fully Featured: Offers support for Visual Studio Code (VS Code) extensions and features, including a full suite of development tools and terminal access.
- Customizable and Configurable: You can define configurations in your repository to ensure the environment meets your project's requirements, such as specific dependencies, extensions, and settings.
- Remote Development: Since it's cloud-based, it's accessible from any device, making it easy to switch between machines or collaborate with others.
- Integration with GitHub: Directly integrated with GitHub repositories, making it easy to make pull requests, view diffs, and perform Git operations right from the development environment.
Identify how do to start a GitHub codespace
You can create a Codespace on GitHub.com, in Visual Studio Code, or by GitHub CLI.
There are four ways to create a Codespace:
- From a GitHub template or any template repository on GitHub.com to start a new project.
- From a branch in your repository for new feature work.
- From an open pull request to explore work-in-progress.
- From a commit in a repository's history to investigate a bug at a specific point in time.
Describe the codespace lifecycle
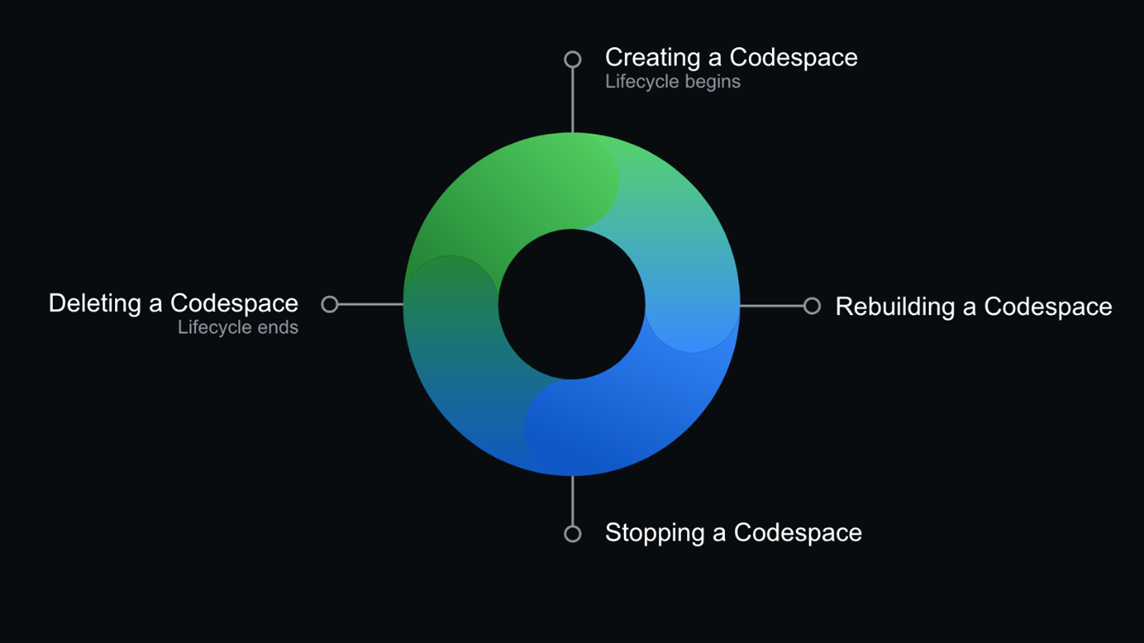
You can create a new Codespace each time you develop in GitHub Codespaces or keep a long-running Codespace for a feature.
When creating a new Codespace each time you work on a project, you should regularly push your changes to ensure that any new commits are on GitHub. After you create a Codespace, the clone is placed in the /workspace directory.
You can create an unlimited number of Codespaces per repo or branch, depending upon available space. When you reach an upper amount of resources, a message displays that an existing Codespace needs to removed/deleted before a new Codespace can be created.
When creating a GitHub Codespace, four processes occur:
- VM and storage are assigned to your Codespace.
- A container is created.
- A connection to the Codespace is made.
- A post-creation setup is made.
Saving changes: autosave is enabled automatically through the web, but if you are going through VS Code you must manually enable it. Your work saves up to a virtual machine. You can close and stop a Codespace and return to the saved work.
If you have unsaved changes, you receive a prompt to save them before exiting. If you don't save and your Codespace is deleted, your work is lost. To save your work, you must commit and push changes to your remote repo.
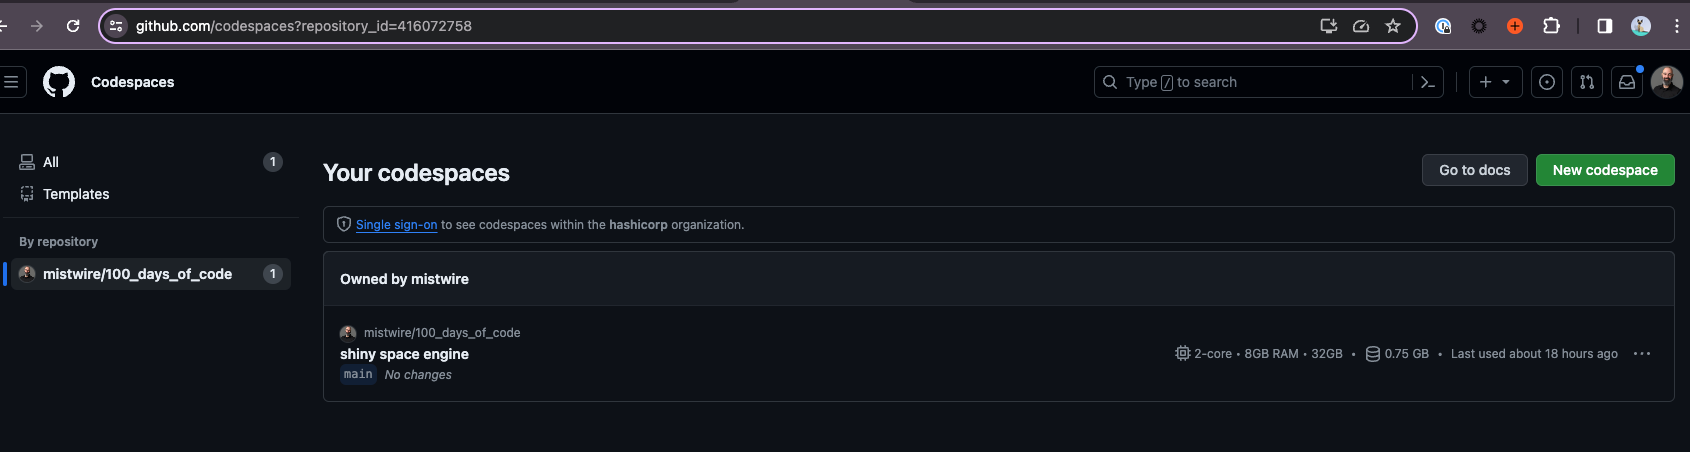
Opening existing Codespace: Go to the repo where the codespace exists and press , on keyboard -> select resume or open https://github.com/codespaces, select the repo, & select existing codespace:
Describe the different customizations you can personalize with GitHub Codespaces
- Settings Sync: You can sync VS Code settings between the app and the web client.
- Dotfiles: You can use a dotfiles repo to specify scripts, shell preferences, and other configs.
- Rename a Codespace: When you create a Codespace, it's assigned a name. If you have multiple Codespaces, the display name helps you to differentiate between Codespaces and you can rename them.
- Change your shell: Open a new terminal window with a shell of your choice, change your default shell, or install a new shell. You can use dotfiles to configure your shell.
- Change the machine type.
- Set the default editor:
- Visual Studio Code - desktop app
- Visual Studio Code - web client
- JetBrains Gateway - for opening Codespaces in a JetBrains IDE
- JupyterLab - the web interface for Project Jupyter
- Set the default region.
- Set the timeout: By default this period is 30 minutes, but you can specify a longer or shorter default timeout period in your personal settings on GitHub.
- Configure automatic deletion: Choose how long your stopped Codespaces are retained, up to a max of 30 days.
Recognize how to add and configure dev containers
You can configure the dev container for a repo so that any codespace created for that repository will give you a tailored development env, complete with all the tools and runtimes you need to work on a specific project.
What are development containers? They are Docker containers that are specifically configured to provide a fully featured development environment. Whenever you work in a codespace, you are using a dev container on a virtual machine.
A dev container file is a JSON file that lets you customize the default image that runs your codespace, VS code settings, run custom code, forward ports and much more!
The devcontainer.json file is expected in the root of your project repo.
Identify how to share a deep link to a GitHub codespace
You can use these URLs to link to the codespace creation page for your repository (replace the text in uppercase letters):
- Create a codespace for the default branch of the repository:
https://codespaces.new/OWNER/REPO-NAME - Create a codespace for a specific branch of the repository:
https://codespaces.new/OWNER/REPO-NAME/tree/BRANCH-NAME - Create a codespace for the topic branch of a pull request:
https://codespaces.new/OWNER/REPO-NAME/pull/PR-SHA
Explain how to use the github.dev editor and explain the differences between the github.dev editor and a GitHub Codespace
| ' | GitHub.dev | GitHub Codespaces |
| Cost | Free | Free monthly quota of usage for personal accounts |
| Availability | Available to everyone on GitHub.com | Available to everyone on GitHub.com |
| Startup | GitHub.dev opens instantly with a key-press and you can start using it right away without having to wait for configuration or installation | When you create or resume a Codespace, it's assigned a VM, and the container is configured based on the contents of a devcontainer.json file. This setup takes a few minutes to create the env. |
| Compute | Can't build and run your code or use the integrated terminal. | A dedicated VM to run and debug your application. |
| Terminal access | None | Provides a common set of tools by default, meaning that you can use the Terminal as you would in your local env. |
| Extensions | The subset of extensions that can run on the web appear in the extensions view and can be installed | You can use most extensions from the Visual Studio Code Marketplace. |
Domain 5: Project Management
Manage your work with GitHub Projects
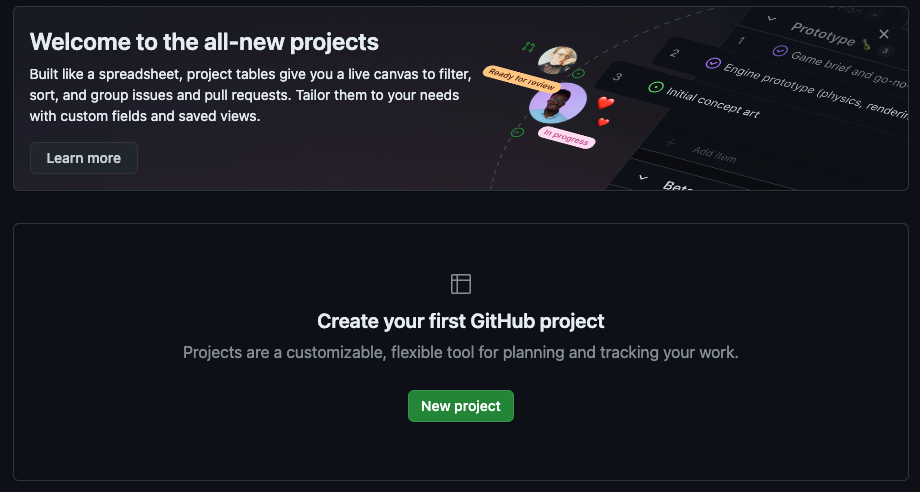
Describe GitHub Projects
GitHub Projects is a project management tool integrated within GitHub. It enables users and teams to organize and prioritize work directly in GitHub.
Here are its key features:
- Kanban and Scrum Boards: Similar to Trello or Jira, GitHub Projects allows users to create boards for managing tasks and workflows. Tasks are represented as cards, which can be moved across various columns representing stages of progress (like To Do, In Progress, Done).
- Integration with GitHub Repositories: Cards in a project can be linked to GitHub issues and pull requests. This tight integration allows easy tracking of code-related tasks directly from the project board.
- Customization: Users can customize columns to match their workflow. For example, a software development project might have columns for Backlog, In Progress, Code Review, Testing, and Done.
- Automation: GitHub Projects can automate workflows. For example, when a pull request is merged, the associated task card can automatically move to the Done column.
- Collaboration Tools: Multiple team members can work on a project, with changes reflected in real-time. This collaboration extends to issue and pull request tracking, making it ideal for software development teams.
- Milestones and Progress Tracking: Projects can be linked to specific milestones, and progress can be tracked via the board. This helps in visualizing the overall progress of a project.
- Filtering and Searching: Users can filter cards on the board by labels, assignees, or milestones, making it easy to find specific tasks or issues.

Explain the layout options for projects
- Board View (Kanban-style): This is the most common layout in GitHub Projects. It presents tasks as cards arranged in columns. Each column represents a stage of the workflow, like "To Do," "In Progress," "In Review," "Done," and so on. Cards can be easily dragged and dropped from one column to another, reflecting the progress of tasks. Ideal for visualizing task flow and workload at a glance.
- List View: Displays tasks in a simple list format. Each task or issue is a line item, which can be checked off or updated. Suitable for those who prefer a straightforward, linear approach to task management. Offers a simple and direct way to view tasks without the spatial orientation of a board.
- Table View: This layout represents tasks in a table or spreadsheet format. Allows for a more detailed view, showing various attributes (like assignee, status, labels) as separate columns. Useful for projects that require a more granular view of tasks and their associated metadata. Offers powerful sorting and filtering capabilities.
- Calendar View: This layout aligns tasks with specific dates, showing them in a calendar format. Ideal for managing tasks with deadlines or for planning purposes. Helps in visualizing how tasks are spread over time, making it easier to manage schedules and deadlines.
- Custom Layouts: GitHub Projects often allows customization of these views to fit specific team needs. Teams can create a mix of different views or adapt existing ones to match their workflow.
Describe the configuration options for projects
- Workflow Customization: You can define custom columns in Kanban or Scrum boards, such as "To Do," "In Progress," "Review," and "Done." Gives you the ability to create, rename, and reorder these columns to match your team's workflow.
- Automation Rules: Automate repetitive tasks like moving cards between columns when certain triggers occur (for example, an issue is closed or a pull request is merged). Setting up rules for automated assignment of issues or requests to specific team members.
- Access and Permissions: Configuring who can view, edit, or manage the project. Options for public visibility or restricting access to certain team members.
- Integration with Repository Elements: Linking project cards to issues, pull requests, and milestones from the repository. Utilizing labels, assignees, and other GitHub features directly within the project.
- Card Configuration: Customizing what information appears on project cards (like issue labels, assignees, progress status). Options to add notes, checklists, or additional details to cards.
- Milestone Tracking: Associating parts of the project with specific milestones for better progress tracking. Setting deadlines and timelines for project phases or individual tasks.
- Views and Filters: Creating different views such as List, Board, or Table views, to accommodate different management styles. Filtering options to view tasks by assignee, label, milestone, and so on for more efficient navigation.
- Notifications and Updates: Configuring notification settings for project updates. Subscribing to specific parts of a project to receive relevant updates.
- Reporting and Analytics: Depending on the tool, you might have options for reporting on project progress, like burndown charts or progress reports. Viewing analytics related to issue resolution times, pull request merges, etc.
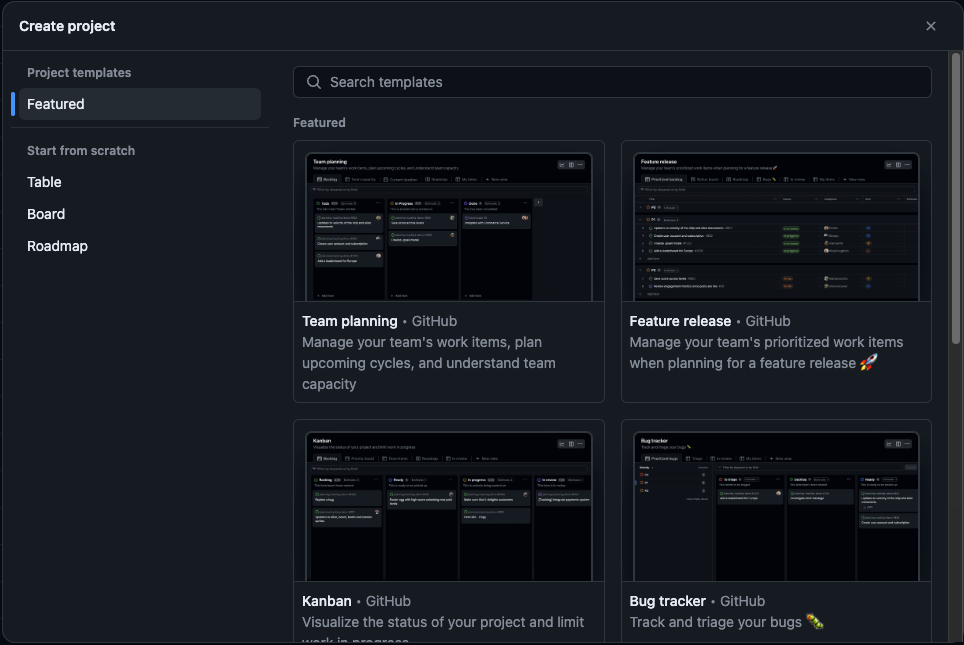
- Template Usage: Some tools offer project templates for common workflows which can be used as a starting point.
- External Integrations: Integrating with third-party tools for enhanced project management capabilities, like time tracking, enhanced analytics, etc.
Explain the difference between projects and projects classic
GitHub has two versions of its project management tool: "GitHub Projects" (often referred to as the new GitHub Projects) and "GitHub Projects Classic."
GitHub Projects is a more advanced and feature-rich tool, catering to complex project management needs and offering greater customization and automation.
In contrast, GitHub Projects Classic is more straightforward and is suited for teams that require basic task tracking and project management without the need for extensive customization.
Explain the use of labels
You can manage work by using labels to categorize issues, pull requests, and discussions. Once a label exists, you can use the label on any issue, pull request, or discussion within that repository.
GitHub provides the following default labels in every new repository:
| Label | Description |
bug | Indicates an unexpected problem or unintended behavior |
documentation | Indicates a need for improvements or additions to documentation |
duplicate | Indicates similar issues, pull requests, or discussions |
enhancement | Indicates new feature requests |
good first issue | Indicates a good issue for first-time contributors |
help wanted | Indicates that a maintainer wants help on an issue or pull request |
invalid | Indicates that an issue, pull request, or discussion is no longer relevant |
question |Indicates that an issue, pull request, or discussion needs more information|
wontfix |Indicates that work won't continue on an issue, pull request, or discussion|
Explain the use of milestones
You use milestones to track progress on a group of PRs or issues in a repository. Upon making the milestone you associate it to the relevant issues and PRs. Use milestones to track progress, set deadlines, and prioritize work.
Describe how to use and create template repos
Creating a GitHub Template Repository:
- Create or Choose a Repository: Start with an existing repository that you want to use as a template, or create a new repository to serve this purpose.
- Configure as Template Repository:
- Go to the repository, click on "Settings".
- In the "General" section, find the "Template repository" section.
- Check the box labeled "Template repository".
Using a GitHub Template Repository:
- Create a New Repository from the Template:
- Navigate to the template repository on GitHub.
- Click the "Use this template" button, located near the top of the repository.
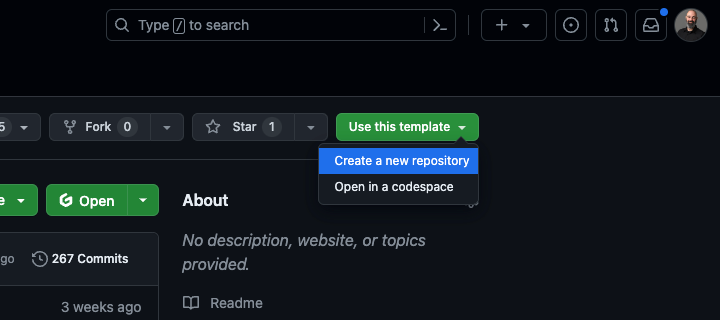
You'll be prompted to create a new repository. Specify the owner, name, description, and visibility for the new repository.
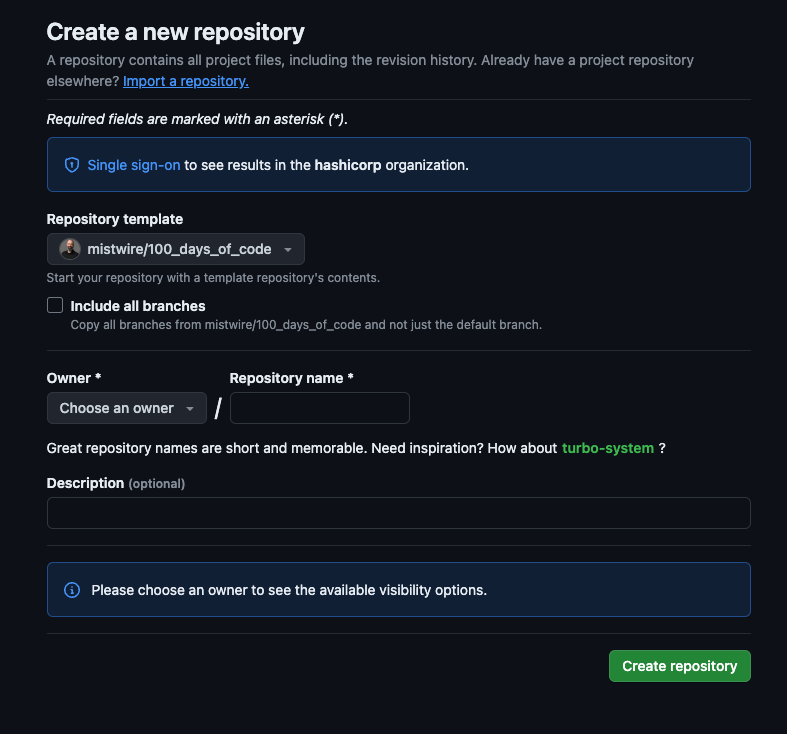
- Customize the New Repository:
- Modify, add or remove files as needed to suit the specific requirements of the new project. Update the README.md and other documentation to reflect the nature of the new project.
Explain how to create, edit, and delete saved replies
Saved replies are pre-formatted responses that you can use to quickly respond to issues, pull requests, and discussions. They are useful for common replies that you find yourself typing frequently.
Create a Saved Reply:
- Click on your profile picture in the top right corner of GitHub.
- Select "Settings" from the dropdown menu.
- On the settings page, find the "Saved replies" section in the sidebar.
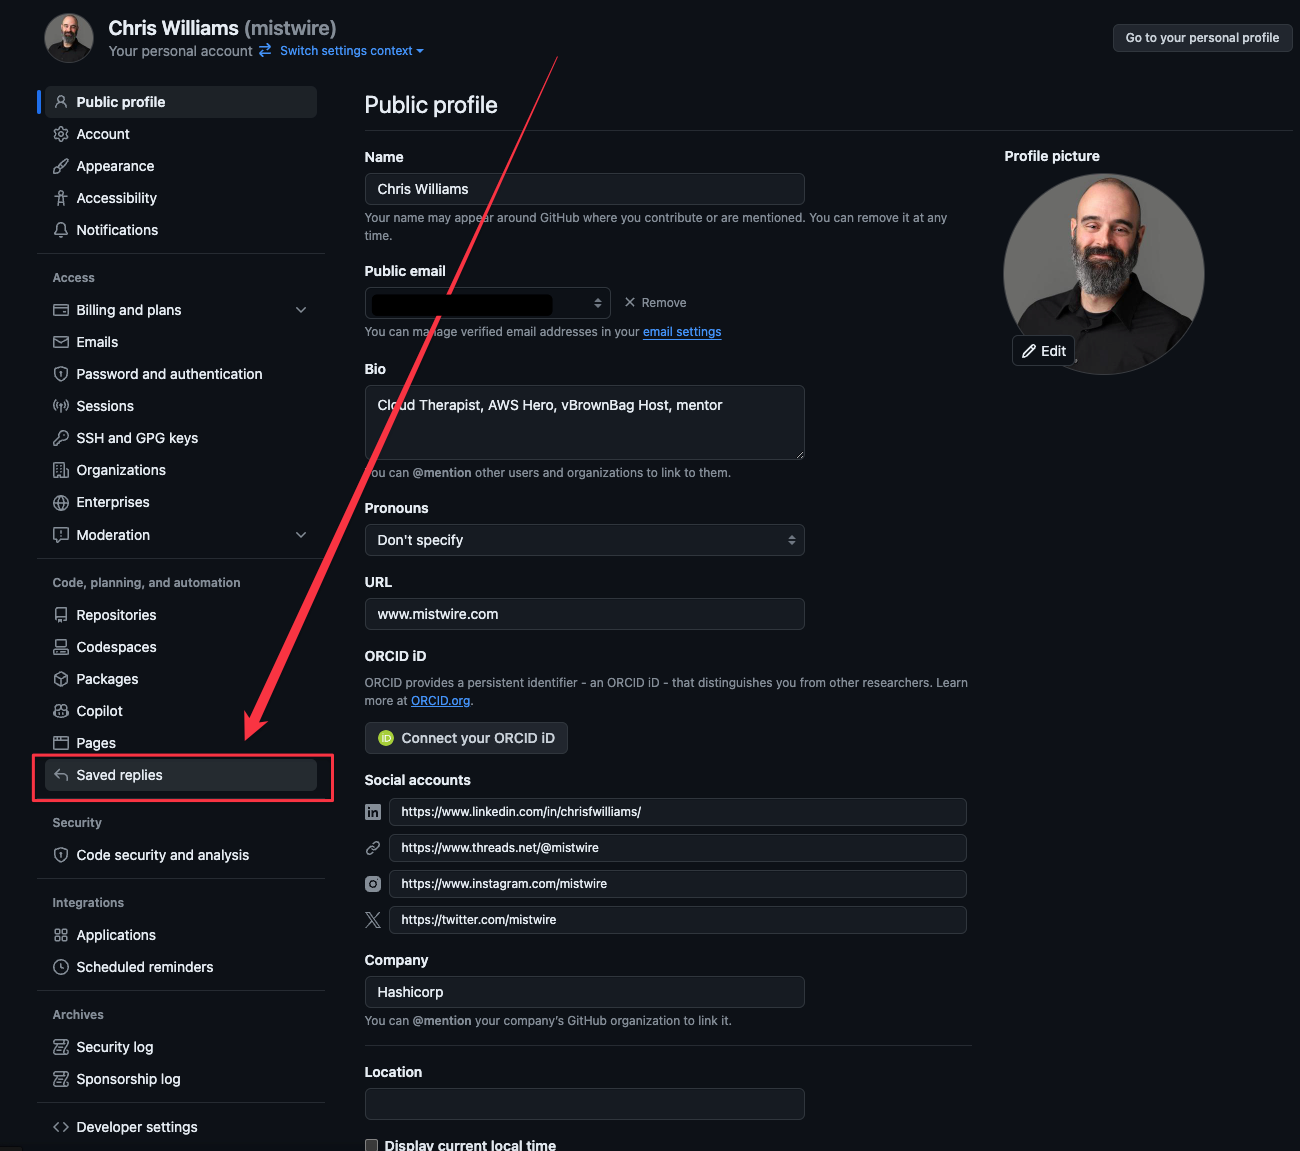
- In the form that appears, enter a title for your saved reply in the "Reply title" field. Enter the response you want to save in the "Reply body" field. Click the "Add saved reply" button to save it.
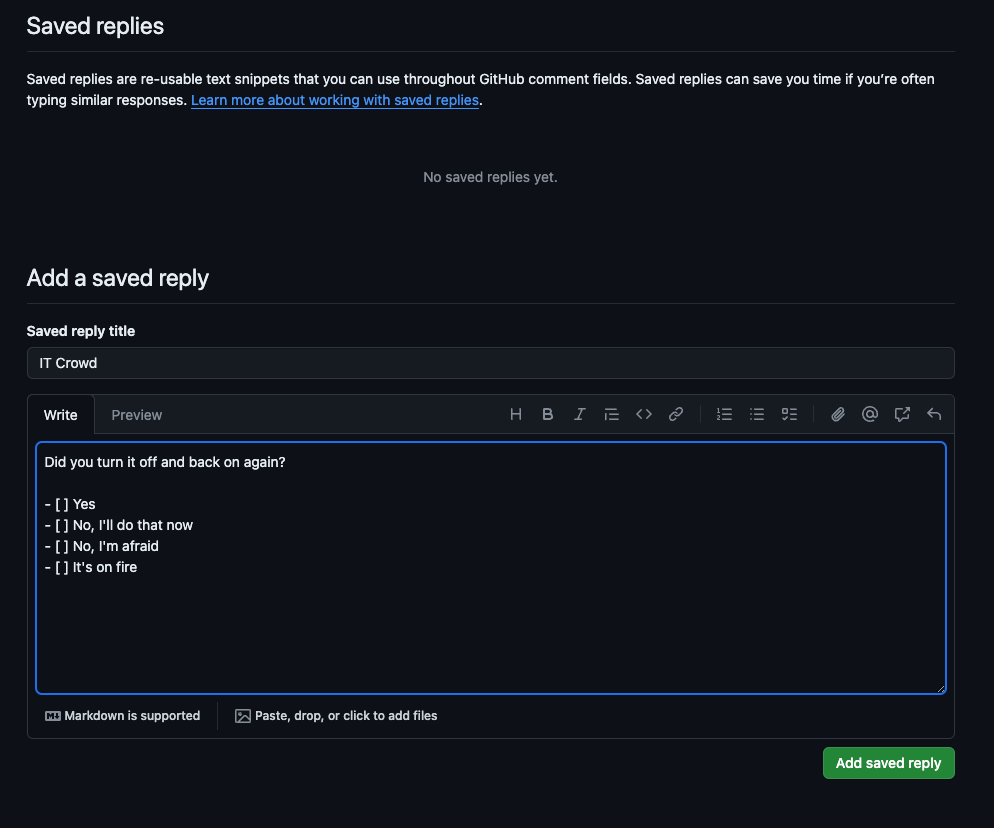
Edit and Delete a Reply:
- Locate the saved reply you wish to edit or delete.
- Click the pencil icon (Edit) to modify, or the 'X' icon (Delete) next to it. (Warning: you will NOT be prompted to delete)
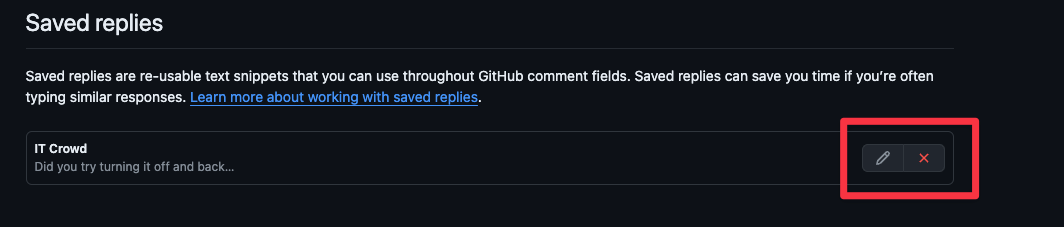
Describe the benefits of using a saved reply
Saved replies allow you to create a reusable response to issues and pull requests. You can save time by creating a saved reply for the responses you use most frequently.
Once you've added a saved reply, you can use it in issues, pull requests, and discussions. Saved replies are tied to your personal account. Once they're created, you'll be able to use them across repositories and organizations.
You can create a maximum of 100 saved replies. If you've reached the maximum limit, you can delete saved replies that you no longer use or edit existing saved replies.
You can also use the GitHub-provided "Duplicate issue" saved reply to mark an issue as a duplicate and track it with a similar issue.
Recognize how to add assignees to issues and pull requests
You can assign multiple people to each issue or pull request, including yourself, anyone who has commented on the issue or pull request, anyone with write permissions to the repository, and organization members with read permissions to the repository.
Issues and pull requests in public repositories (and in private repositories for a paid account), can have up to 10 people assigned.
- In the repository, click either Issues or Pull Requests.
- Open the Issue or PR.
- In the right side menu, click Assignees and start typing the name of the user you want to have it.
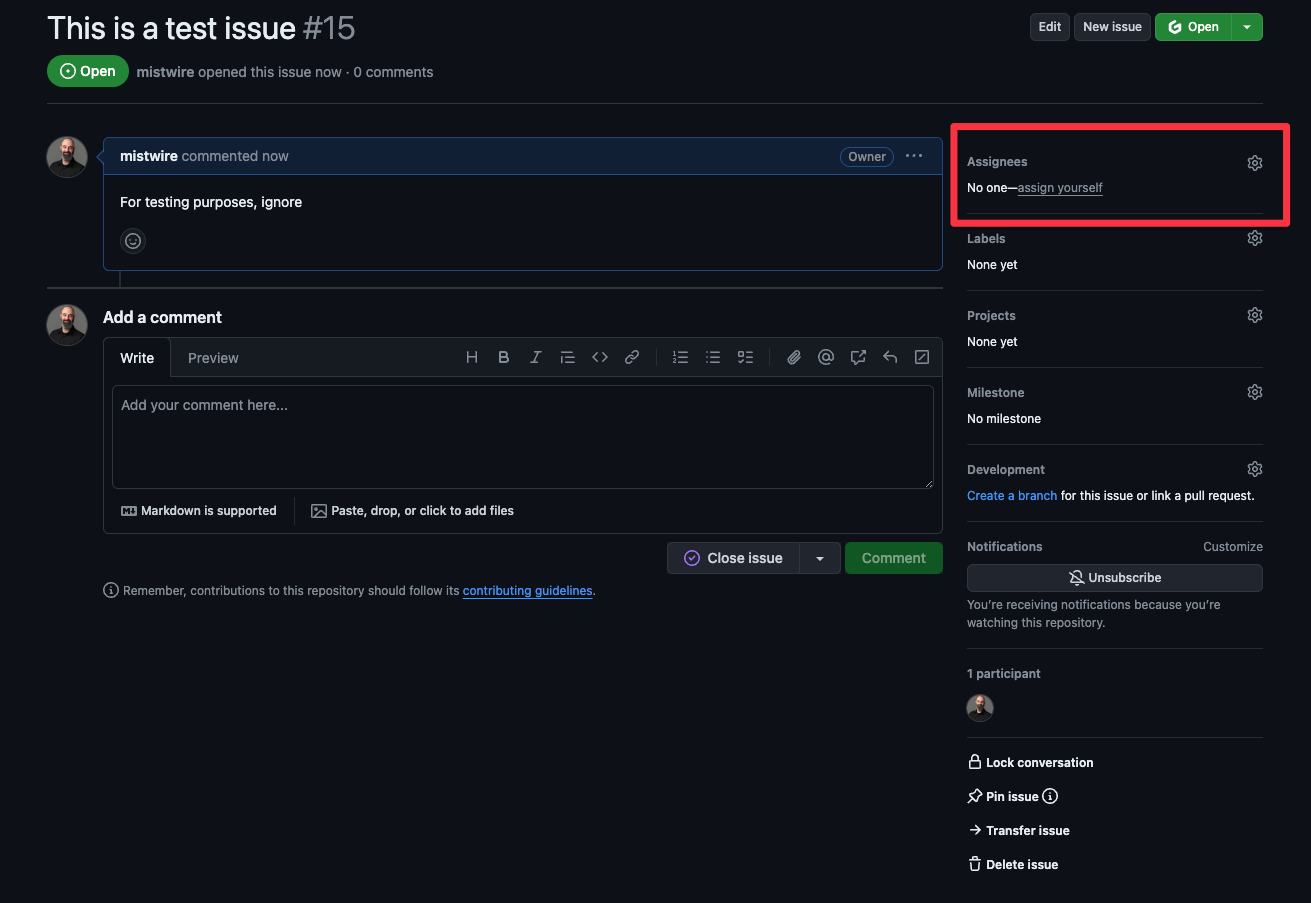
Explain how to use project workflows
With built-in workflows, your project can take newly created issues or pull requests and automatically put them into your Project with a Todo status.
To enable automation, first go to the top-right corner of your Project and click on the three dots to open the menu.
Next, in the menu, click Workflows.
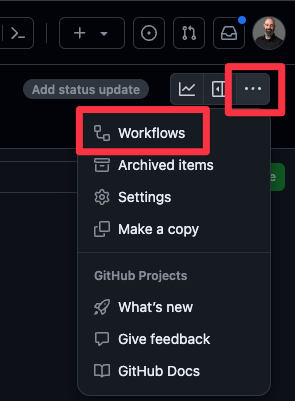
In the left column, under Default workflows, select Item added to project.
Now in the center of the page, where it says "When an item is added to the project", ensure that both issues and pull requests are selected.
Below, click on "Set value" and click Status:Todo.
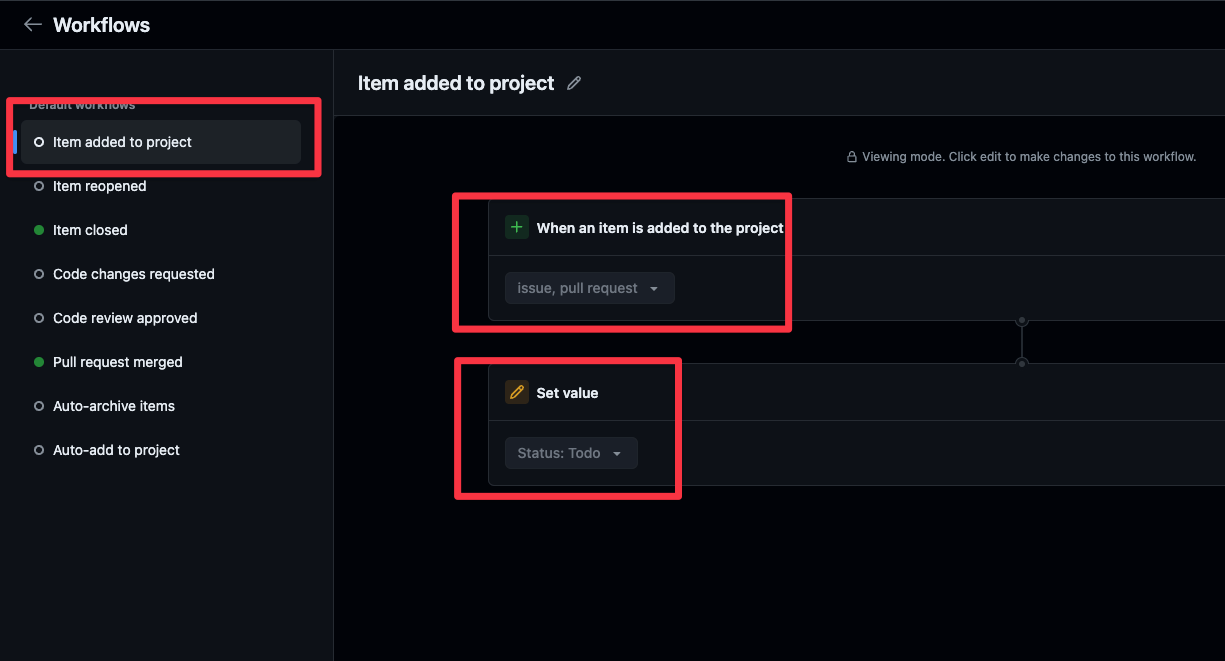
Finally in the right corner of the page, click 'edit' and "save and turn on workflow".
Describe project insights
Insights with Projects enables you to view, create and customize charts that use items added to your Project as source data. When you create a chart, you set the filters, chart type, the information displayed, and the chart is available to anyone that can view the Project.
There are 2 types of charts: Current and Historical.
You can create current charts to visualize your Project items. For example, you can create charts to show how many items are assigned to each individual, or how many issues are assigned to each upcoming iteration.
You can also use filters to manipulate the data used to build your chart. For example, you can create a chart showing how much upcoming work you have, but limit those results to particular labels or assignees.
Historical charts are currently available as a feature preview for organizations using GitHub Team and are generally available for organizations using GitHub Enterprise Cloud.
Historical charts are time-based charts that allow you to view your Project's trends and progress. You can view the number of items, grouped by status and other fields, over time. The default "Burn up" chart shows item status over time, allowing you to visualize progress and spot patterns over time.
Domain 6: Privacy, Security, and Administration
Authentication and Security
Explain how to secure your account with 2FA
There are two recommended authentication methods you can implement when authenticating users on GitHub: SAML SSO and multifactor authentication, also known as 2FA.
Securing your GitHub account with Two-Factor Authentication (2FA) adds an extra layer of security to protect your account from unauthorized access.
To enable 2FA:
- Sign in to your GitHub account. Click on your profile photo in the top-right corner. In the "Access" section, click on "Password and Authentication":

- In the "Two-factor authentication" section of the page, click Enable two-factor authentication.
- From here you can add several options to reduce your chances of account lockout (and get your recovery codes which you should print out).
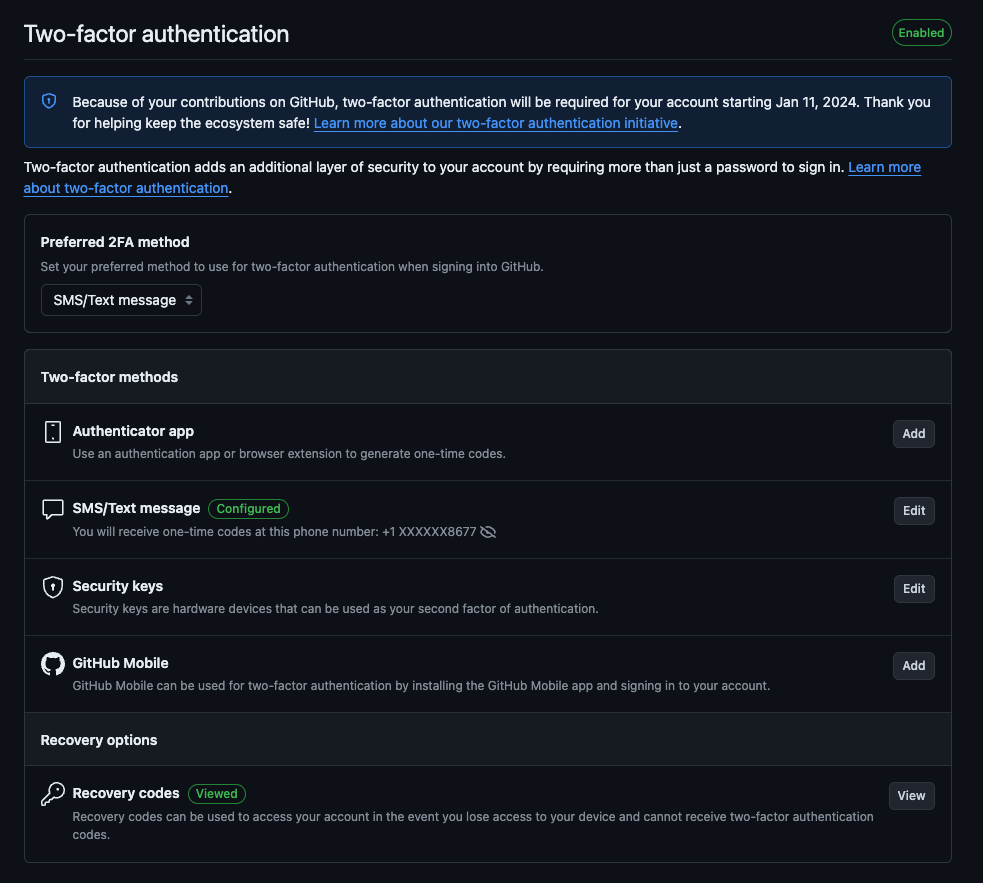
SAML SSO authentication is a process used to verify user identity and credentials against a known identity provider.
If you are in an enterprise environment, your company is probably already using this. If so, you can link your existing IdP to GitHub for user sign-in management.
This is an overview of the process:
- Before enabling SAML SSO with your GitHub Enterprise, an Administrator needs to connect the GitHub organization to a supported IdP. GitHub supports SAML SSO with IdPs that use the SAML 2.0 standard: AD FS, Microsoft Entra ID, Okta, OneLogin, PingOne, and Shibboleth.
- Next, when a member accesses resources within an organization that uses SAML SSO, GitHub redirects the member to the IdP to authenticate.
- After successful authentication, the IdP redirects the member back to GitHub, where resources are accessed. Even after configuring SAML SSO, members of the GitHub organization will continue to be prompted to log into their user GitHub accounts.
Describe the different access permissions
Repository Permissions:
- Read: Allows users to clone the repository and pull updates. They can view issues, pull requests, wikis, and the project's settings. Ideal for users who need to view or discuss the project but don’t contribute code.
- Write: Includes all Read permissions. Additionally, users can push changes to the repository, merge pull requests, and manage issues and pull requests. Suitable for contributors who actively develop the project.
- Maintain: Includes Read and Write permissions. Users can manage the repository without access to sensitive or destructive actions. Capabilities include managing releases and managing repository settings like collaborators and webhooks.
- Admin: Full control over the repository. Can change repository settings, add collaborators, access sensitive settings like repository visibility changes, and destructive actions such as deleting the repository or changing its visibility. Intended for the project owners or team leads.
Organization Permissions:
In addition to repository-specific permissions, GitHub organizations have their own permission levels:
Owner: Full control over the organization and its repositories and teams. Can add/remove members, create teams, add repositories to teams, and handle billing settings.
Member: Basic permissions within an organization, including creating new repositories and teams (depending on the organization's settings).
Teams Permissions in Organizations:
- Read, Write, Maintain, Admin: Similar to the repository permissions but applied at the team level within the organization. Control what members of a team can do within the repositories assigned to that team.
Collaborator Permissions:
- For individual repositories, a user who is not an organization member can be added as a collaborator and be can given Read, Write, or Admin access to a specific repository.
Explain EMUs (Enterprise Managed Users)
EMUs are used to manage the lifecycle and authentication of users on GitHub.com from an external identity management system (IdP). You can provide access to GitHub Enterprise Cloud to people who have existing identities and group membership on your IdP.
- Joining teams: Making a change to one of the IdP groups consisting of EMUs may cause your EMUs to automatically join a new team in GitHub.
- Removal from teams: Removing an IdP group from a team in the organization can affect GitHub team membership. Also, if those EMUs are not a member of any other team in your organization, the process will automatically remove them from the organization.
- Managing repository access: You cannot manage repository access for the teams in your enterprise.
- Previously manually added EMUs: Users added to your GitHub groups and teams manually before you began using Enterprise Managed Users will have to be deleted and re-added.
GitHub Administration
Explain how to enable and disable features
In the repositories settings you can enable and disable the following features: Wikis, Issues, Sponsorships, Discussions, Projects, and the ability to Preserve this repository via the GitHub Archive Program
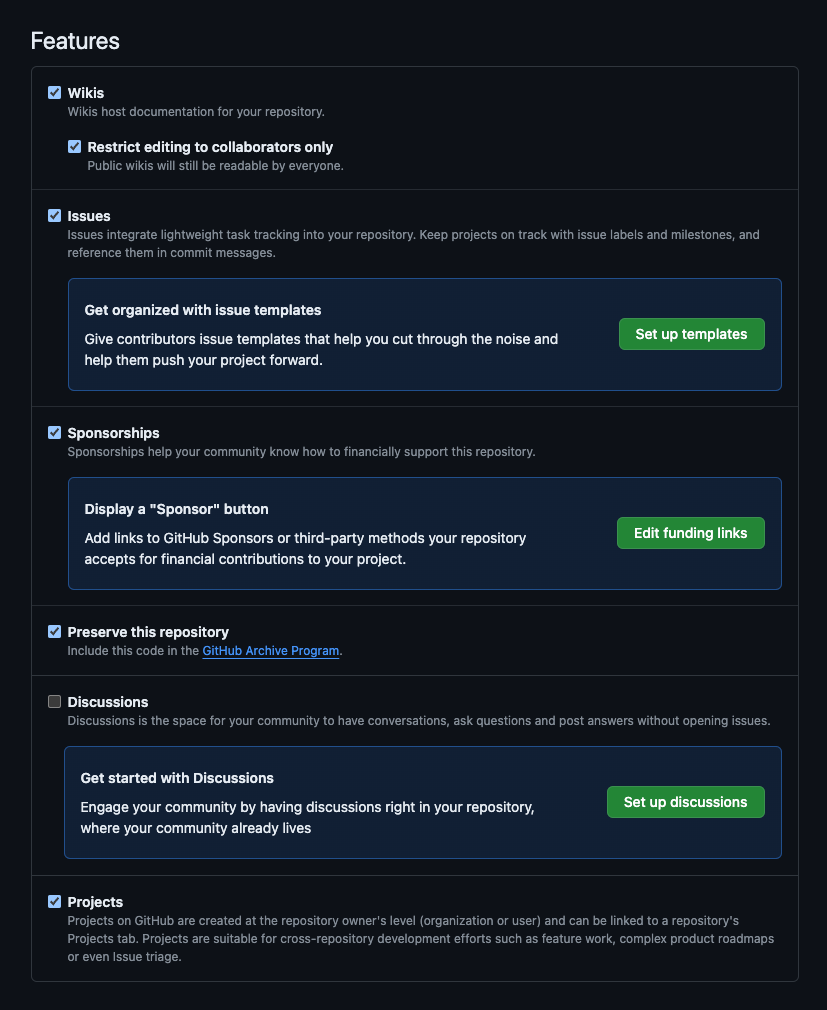
Recognize repository permission levels
- Read: Allows users to clone the repository and pull updates. They can view issues, pull requests, wikis, and the project's settings. Ideal for users who need to view or discuss the project but don’t contribute code.
- Triage: Recommended for contributors who need to proactively manage issues and pull requests without write access. This level could be good for some project managers who manage tracking issues but don't make any changes.
- Write: Includes all Read permissions. Additionally, users can push changes to the repository, merge pull requests, and manage issues and pull requests. Suitable for contributors who actively develop the project.
- Maintain: Includes Write permissions. Users can manage the repository without access to sensitive or destructive actions. Capabilities include managing releases and managing repository settings like collaborators and webhooks.
- Admin: Full control over the repository. Can change repository settings, add collaborators, access sensitive settings like repository visibility changes, and destructive actions such as deleting the repository or changing its visibility. Intended for the project owners or team leads.
Identify the options for repository visibility
Public Repositories: Accessible to everyone. Anyone can view, clone, and contribute to a public repository. Used for open-source projects where collaboration and transparency are important.
Private Repositories: Restricted to specific individuals or teams.
Internal Repositories: Accessible to all members within an organization but not to outsiders. Internal repositories are the default setting for all new repositories created in an organization owned by an enterprise account.
By default, enterprise members can fork an internal repository into any organization where the user can create repositories.
They are useful for projects that are not open source but are meant for collaboration within a larger entity, like a company. This is ridiculously trying to be coined "innersource".
Explain repository privacy setting options (branch protections, codeowners, required reviewers)
- Branch Protections: Used to protect important branches. Defines whether collaborators can delete or force push to the branch and set requirements for any pushes to the branch:
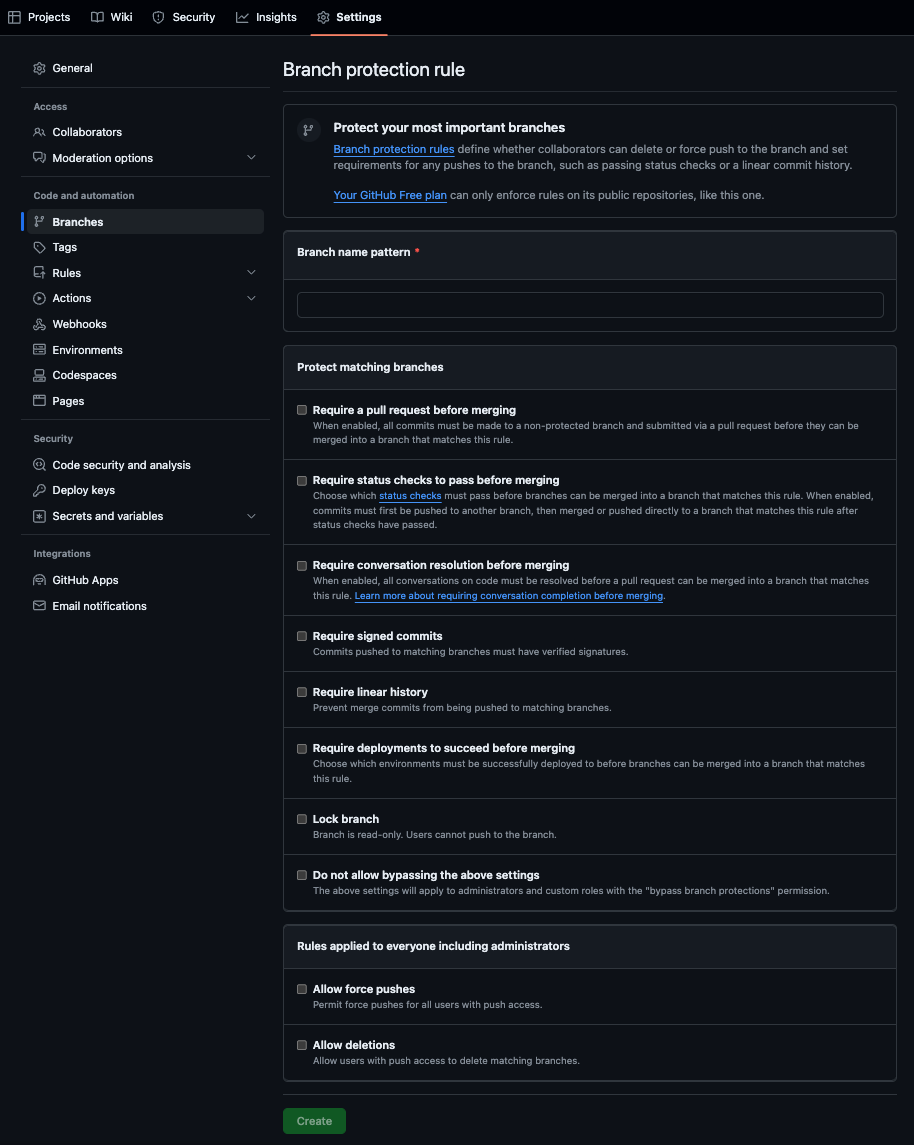
Describe the main features and options in the Security tab
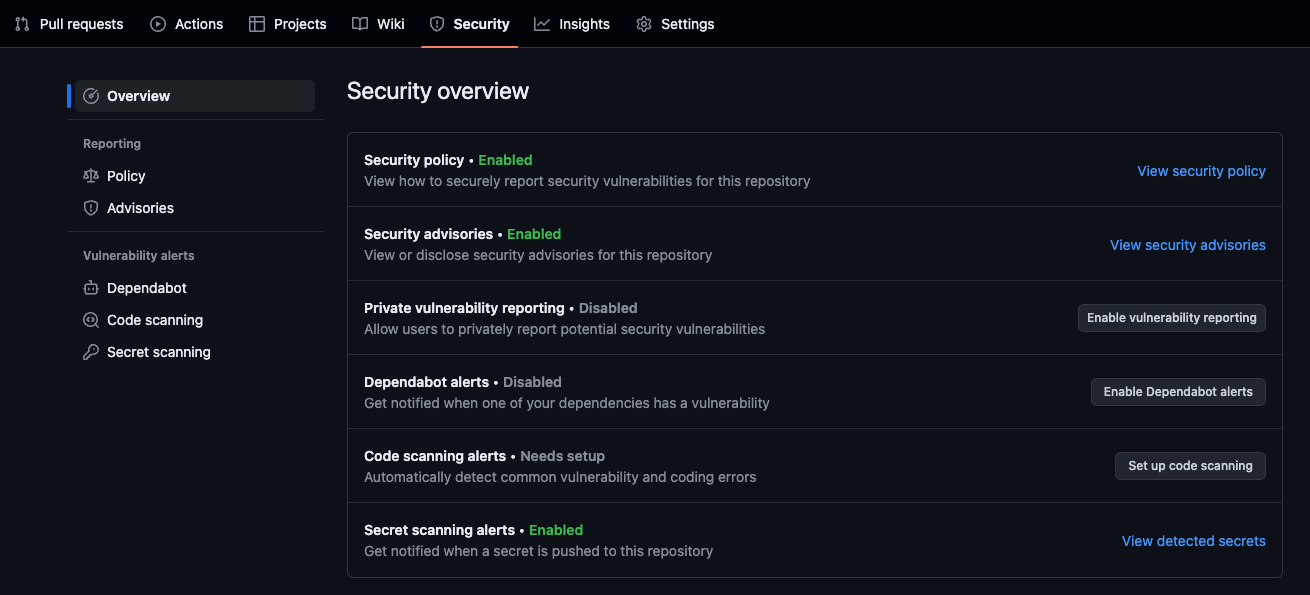
In the security tab, you'll find security policies that allow you to specify how to report a security vulnerability in your project by adding a SECURITY.md file to your repository.
There are aslo security advisories that you can use to privately discuss, fix, and publish information about security vulnerabilities in your repository.
Dependabot alerts notify you when GitHub detects that your repository is using a vulnerable dependency or malware.
And there's also code scanning that helps you find, triage, and fix vulnerabilities and errors in your code.
Define repository insights
GitHub repository insights provide a range of analytical data and visualizations about the activity and health of a repository. These insights are valuable for repository maintainers and contributors, as they help track the progress, participation, and overall state of the project.
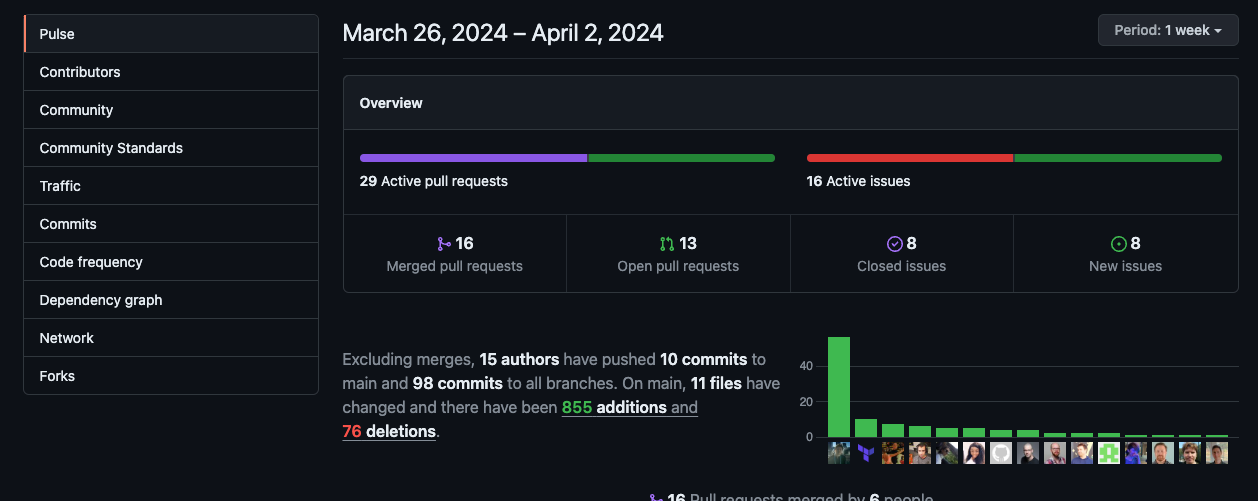
- Pulse: Provides a summary of the activity in the repository over a specific period (daily, weekly, monthly). It includes information about opened and closed issues, merged pull requests, and contributors who have been active during that period.
- Contributors: Shows the number of contributions (commits) from each contributor over time.
- Community: Shows contribution activitity to Discussions, Issues, and PRs.
- Community Standards: Compares the repository to the recommended community standards.
- Traffic: Shows number of clones and visitors over time. Also shows referring sites and popular content in the repo.
- Commits: Visualizes commit activity over time.
- Code frequency: Displays the frequency of additions and deletions to the codebase over time.
- Dependency Graph: Shows the repository’s dependencies and the projects that depend on it.
- Network: Timeline of the most recent commits to this repository and its network ordered by most recently pushed to. The repository network shows the 100 most recently pushed forks.
- Forks: Who has forked the repo, either in tree or list form.
Explain how to manage collaborators
To Add Collaborators: Click on the "Settings" tab near the top of the repository page. Click on "Collaborators". Click on the "Add people" button.
- Enter Username or Email: Enter the GitHub username or email address of the person you want to add as a collaborator.
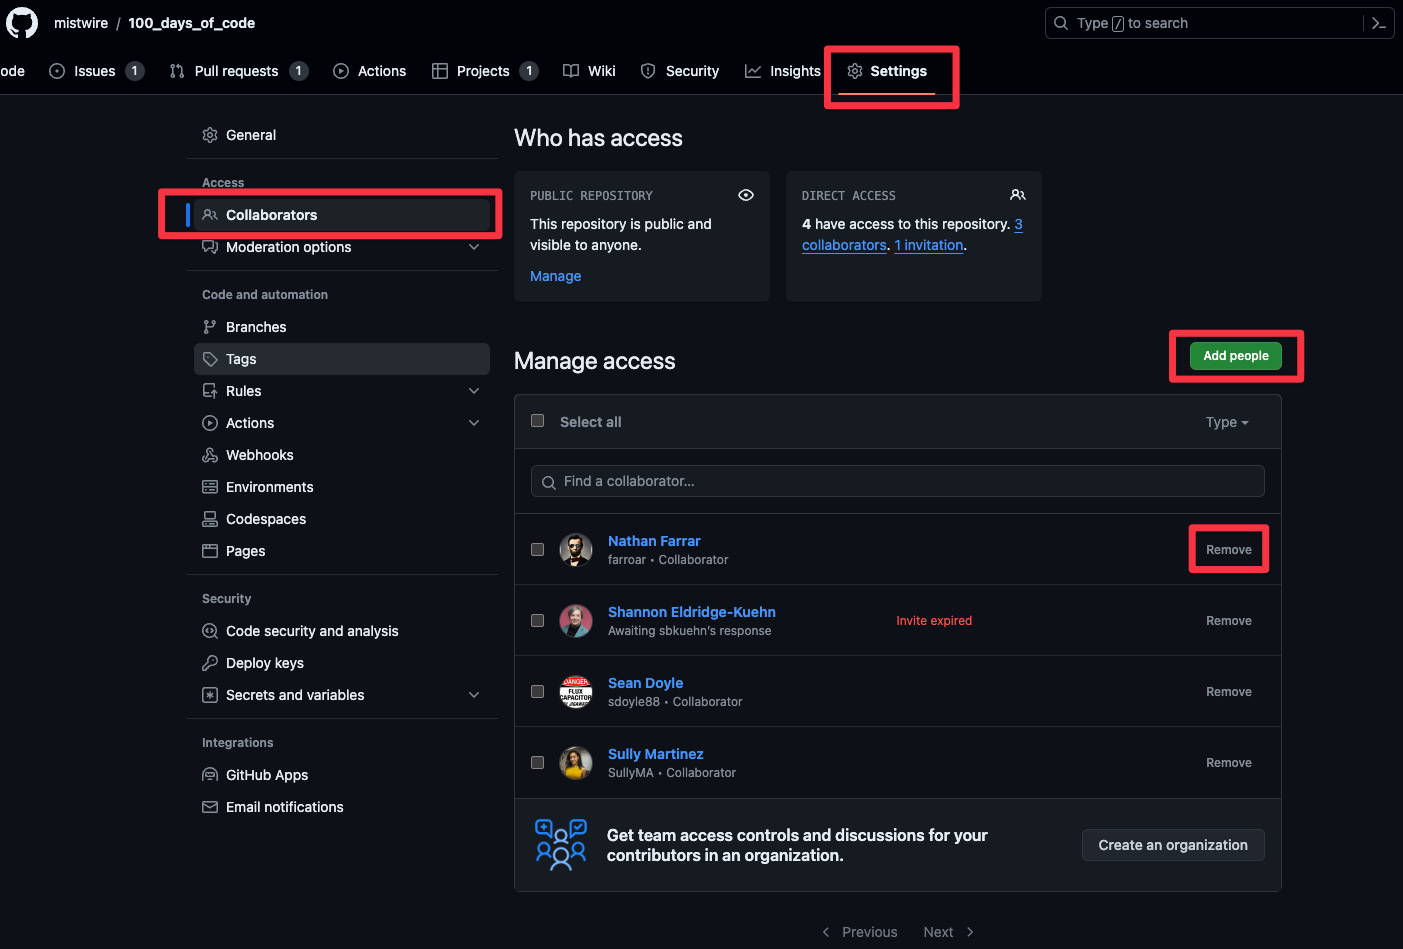
- Set Permissions: Choose the appropriate permission level (read, write, or admin).
- Send Invitation: Click on "Add" or "Send invitation." The user will then receive an invitation to join the repository as a collaborator.
Permission Levels
- Read: Can clone and view the repository, cannot push changes or manage settings.
- Write: Can clone, push changes, and manage a limited set of repository settings.
- Admin: Full access to the repository, including settings and deletion.
Managing and Reviewing Collaborators
- Review Current Collaborators: Within the "Manage access" section, you can see a list of current collaborators and their permission levels.
- Change Permissions: To change a collaborator's permissions, click on their name and select a different permission level.
- Remove Collaborator: To remove a collaborator, click on the “Remove” button next to their name.
Collaborator Requests
- Approving Requests: If someone requests access to your repository, you will receive a notification. You can approve or deny these requests in the "Manage access" section.
Best Practices
- Limit Admin Access: Admin access should be limited to a small group to maintain security.
- Regularly Review Access: Periodically review who has access to ensure that only current contributors have the necessary permissions.
- Use Teams for Organizations: For GitHub organizations, prefer managing access using teams rather than individual collaborators for easier and more organized access control.
Explain how to manage organization settings
To manage organization settings, click on your profile:
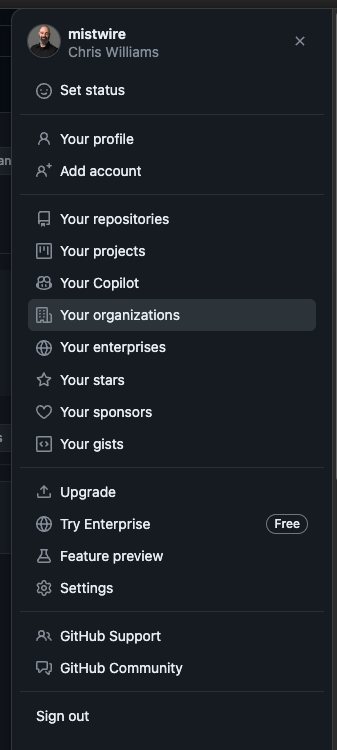
Go into Organizations and choose which (if you have more than one) organization you want to manage the settings for:
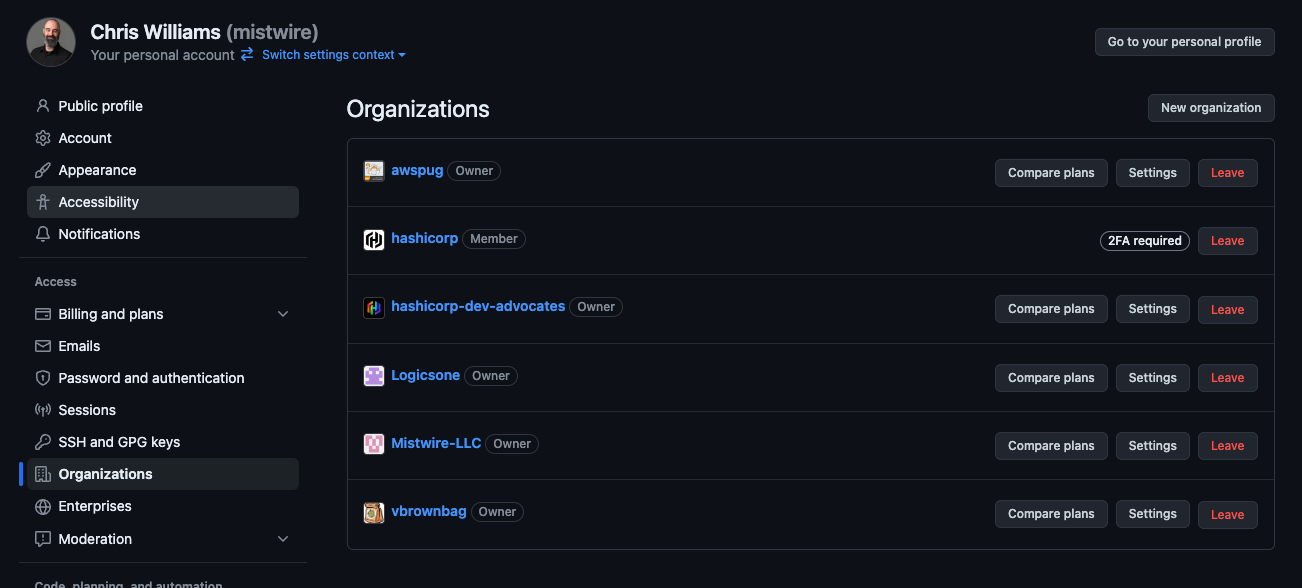
From there you can manage these key areas (and more):
- Edit profile details like organization name, email, location, and bio. You can also upload an organization avatar.
- Set base permissions for all members (read, write, admin, none). Manage invitation privileges (who can invite users to the organization). Set repository creation permissions (who can create repositories).
- Billing and Plans: View current GitHub plan and usage (number of collaborators, private repositories, and so on). Upgrade or downgrade your GitHub subscription. Update billing information and view payment history.
- Security: Enable or disable two-factor authentication requirements for the organization. Manage security settings like SSH certificate authorities.
- Repositories: Manage settings for organization repositories. Implement repository management policies like repository visibility and project board settings.
- Third-party access: Control which third-party applications can access the organization's data. Set policies for OAuth App access.
- Manage settings for GitHub Actions like allowed actions, environments, and runner groups.

Describe members, teams, and roles in a GitHub organization
Members are individual GitHub users who have been added to an org. Members can be collaborators on one or more repositories within the organization and can be granted varying levels of access and permissions based on their role within the organization.
Types of Members:
- Owners: Have full administrative access to the organization, including the ability to manage team and member settings, billing information, and can delete the organization.
- Members: Generally have read access to the organization's repositories but may have more specific permissions based on team membership or repository-specific settings.
Teams are groups within a GitHub organization, created to organize members who work on similar projects or who require similar permissions. Teams help in structuring the organization members, often reflecting the company’s actual structure or project teams.
Teams can be assigned specific access permissions to repositories, making it easier to manage large groups of users. Teams can be mentioned using @team-name in discussions, pull requests, and issues, which notifies all members of the team.
GitHub allows the creation of sub-teams within a team, enabling a hierarchy that can mirror an organization’s internal structure.
Roles define what actions a member or a team can perform within an organization and its repositories.
- Member: Regular members of the organization, typically with read access to repositories and specific permissions based on team membership or individual settings.
- Moderators: Members who, in addition to their permissions as members, are allowed to block and unblock non-member contributors, set interaction limits, and hide comments in public repositories owned by the organization.
- Owner: Can manage all aspects of the organization, including adding/removing members, creating teams, managing billing settings, and deleting the organization.
- Billing managers: Users who can manage the billing settings for your organization, such as payment information.
- Security managers: An organization-level role that owners can assign to any team in the org. It gives every member of the team permissions to view security alerts and manage settings for code security across your organization, as well as read permissions for all repositories in the organization.
Domain 7: Benefits of the GitHub Community
Describe open source
Open source is a term used to describe software for which the original source code is made freely accessible and may be redistributed and modified by anyone.
It's based on the principle of collaborative development, where developers from around the world contribute to the software's improvement and advancement. This model promotes transparency, as the code is available for public scrutiny, leading to enhanced reliability and security.
Open source software is typically released under licenses that permit modification and redistribution, such as the GNU General Public License or the MIT License.
This approach not only fosters innovation and creative problem-solving but also forms a community of developers and users who support and evolve the software over time.
Open source has become fundamental in the tech world, with notable examples including the Linux operating system, the Apache web server, and the Mozilla Firefox browser.
Describe the benefits of the open source community
There are many benefits to being part of the open source community and contributing to open source projects. Here are a few of them:
Collaboration: Open source fosters a collaborative environment where developers from around the world contribute their expertise.
Transparency and Security: Open source projects often produce high-quality software. The transparency of the source code allows for continuous peer review, leading to more robust, secure, and error-free software.
Decentralization: Since the community develops the code—and since no one person or company owns that code—open source is an inherently decentralized form of software development that comes with fewer silos, bottlenecks, and barriers to entry.
Flexibility and customization: Users have the freedom to customize open source software to meet their specific needs. This flexibility can be a significant advantage over proprietary software, which may impose limitations on use.
Cost savings: OSS source code is free, resulting in a lower total cost of ownership compared to proprietary or closed source solutions.
Learning and Skill Development: Open source projects provide an excellent opportunity for developers to learn from source code, contribute to real-world projects, and build a portfolio. This can be especially beneficial for new developers seeking to enhance their skills.
Community Support: Many open source projects often have active communities. These communities offer support through forums, mailing lists, or chat channels, which can be invaluable for problem-solving and learning.
Avoid Vendor Lock-in: Using open source software helps avoid vendor lock-in, where users are dependent on a vendor for updates and support. Open source offers more control and independence.
Describe GitHub Sponsors
GitHub Sponsors allows the developer community to financially support the people and organizations who design, build, and maintain the open source projects they depend on, directly on GitHub.
GitHub Sponsors does not charge any fees for sponsorships from personal accounts, so 100% of these sponsorships go to the sponsored developer or organization.
As you consider where to find open source contributors to sponsor, consider starting here.
Describe how GitHub advances open source projects
The GitHub platform itself has many features and benefits that help advance the causes of open source projects:
- Community Engagement: GitHub promotes community building around projects. Users can star and fork repositories, showing support and creating their own versions of a project. Discussions and wikis within repositories provide spaces for community interaction, knowledge sharing, and extensive documentation.
- Discoverability: Search functionality and trending projects section make it easy for developers to discover open source projects. This visibility helps in attracting new contributors and users, thereby expanding the project's community.
- Open Source Guides and Education: GitHub offers guides and educational resources to help new contributors understand open source philosophy and how to contribute effectively, fostering the growth of the open source community.
- GitHub Marketplace: The marketplace offers a plethora of tools and apps that enhance and simplify project development. Many of these tools are tailored to support open source development workflows.
- Funding and Sponsorship: GitHub Sponsors allow the community to financially support maintainers of open source projects.
Identify how to follow people (receive notifications, discover projects in their community)
- Simply go to their GitHub page & click "Follow": 😂
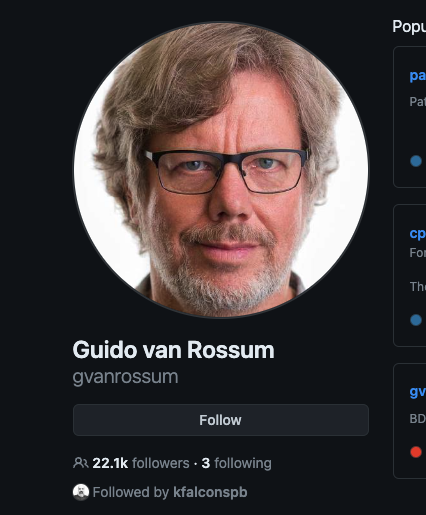
Explain how to follow organizations (receive notifications about their activity)
- Simply go to their GitHub page & click "Follow":
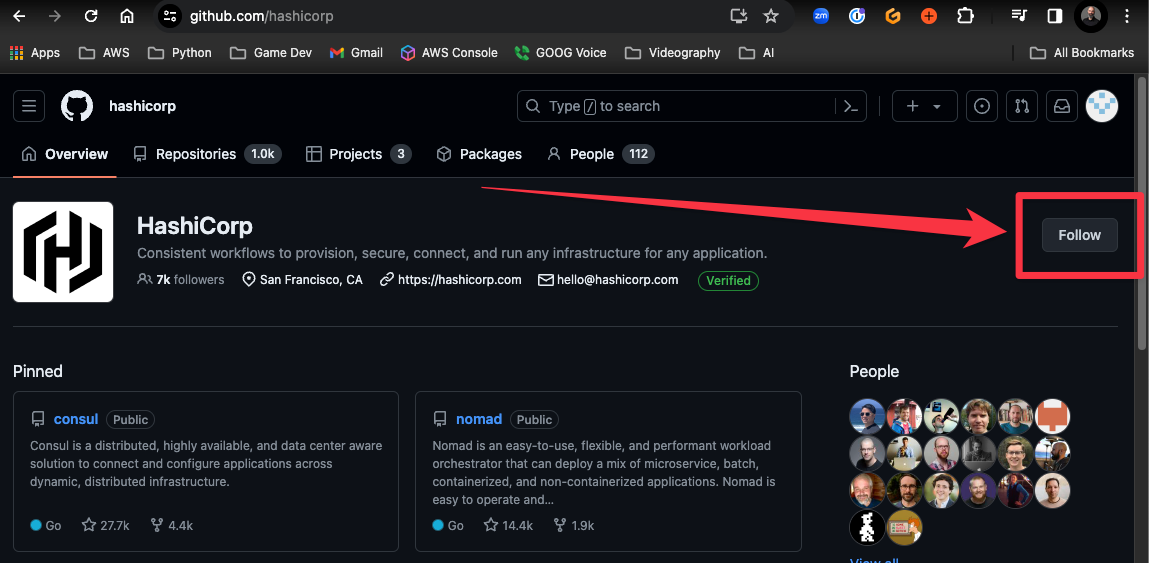
Describe the GitHub Marketplace and its purpose
Marketplace is a platform within GitHub designed to provide a comprehensive suite of tools that extend and enhance the functionality of GitHub's development and DevOps workflows.
You can list free and paid tools for developers to use in GitHub Marketplace.
It offers developers two types of tools: GitHub Actions and Apps, and each tool requires different steps for adding it to GitHub Marketplace.
Describe how to apply the benefits of open source
Describe InnerSource
InnerSource is a concept that takes the principles and practices of open source software development and applies them within the confines of an organization.
It's an approach to collaboration and software development that encourages openness and sharing across internal team boundaries.
Identify the differences between InnerSource and open source
InnerSource and open source are similar in philosophy but differ primarily in their scope and implementation.
Think of InnerSource as an open source effort constrained by an organization. The org will allow internal employees (and external collaborators) to view/fork/watch other teams repos, but they are not available outside of the company.
Describe forking
Forking is the action of creating a personal copy of someone else's project.
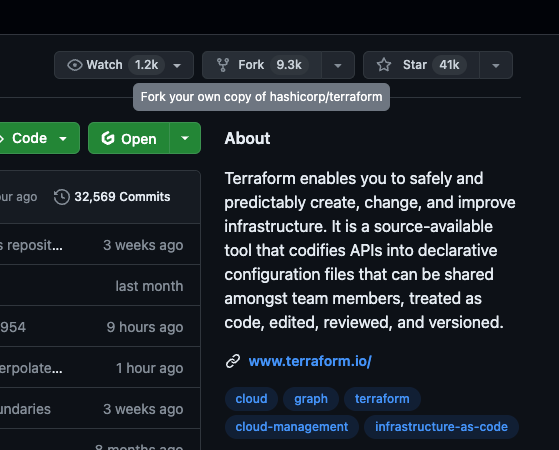
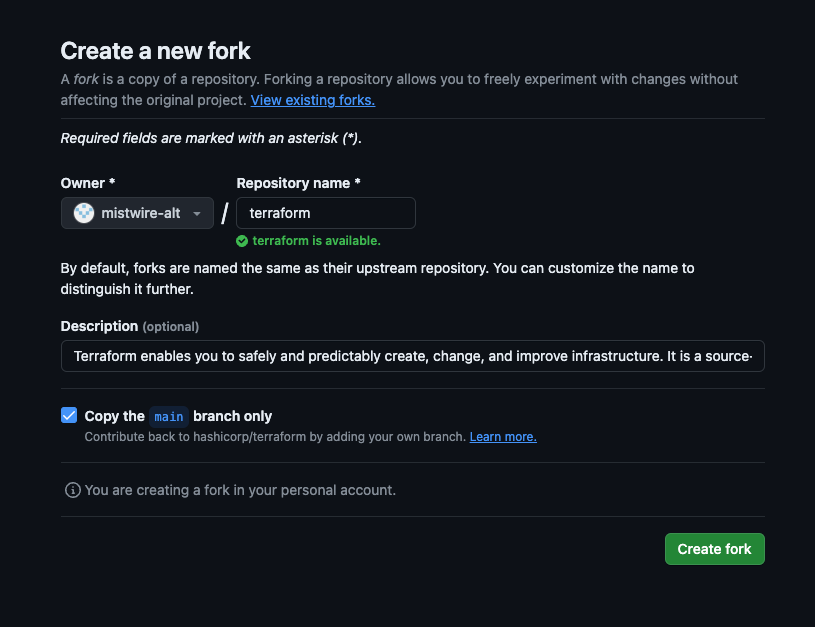
Describe the components of a discoverable repository
To make your respository discoverable, there are various things you'll want to consider.
First of all, a well-crafted README is crucial. It should provide an overview of the project and its purpose. It should also guide users on how to install, configure, and use the software.
You should also add topics to your repository related to your project's intended purpose, subject area, affinity groups, or other important qualities. To browse the most used topics, go to topics.
You should also have a License File. Including an open-source license is vital. It informs users about what they can and cannot do with your code. Common licenses include MIT, GPL, and Apache. Github created this guide to help you decide which license to go with.
Then you should have a CONTRIBUTING file, which should detail how others can contribute to your project. It might include information on the types of contributions you’re looking for, the process for submitting changes, and any coding standards or tests contributors should follow.
Issue Templates and Pull Requests Templates are also very useful. Templates guide contributors when they open issues or pull requests.
You should also use helpful GitHub features like milestones, labels, and projects to organize issues and pull requests. This helps in managing the project but also shows potential contributors that the project is actively maintained.
Describe when to use issue templates
Templates are helpful when you want to provide guidance for opening issues while allowing contributors to specify the content of their issues. If you want contributors to provide specific, structured information when they open issues, issue forms help ensure that you receive your desired information.
Describe when to use pull request templates
When you add a pull request template to your repository, project contributors will automatically see the template's contents in the pull request body.
You must create templates on the repository's default branch. Templates created in other branches are not available for collaborators to use.
You can store your pull request template in the repository's visible root directory, the docs folder, or the hidden .github directory.
Pull request template filenames are not case sensitive, and can have an extension such as .md or .txt.
Next Steps and Conclusion
Alright! If you've made it this far then you should be ready to sit the exam! 🥰
If you want to sign up straight away, here's where you can do that
If you want to pratice a little bit more, check out GitHub Skills which will give you a lot more hands-on experience with the various processes.

If you skimmed this article (how could you) and want a resource directly from Microsoft, the GitHub Foundations Learning Path is great, but it's missing some of the domain sections.
In conclusion, embracing modern GitHub practices is essential for working in today's IT landscape. These practices foster a more organized and productive environment for open-source and private projects alike.
Whether for individual developers or large teams, leveraging GitHub paves the way for more innovative, collaborative, and successful software development endeavors.